Premium ENZO User manual

EN: DECORATIVE COOKER HOOD INSTRUCTIONS FOR USE
FR : NOTICE D’UTILISATION DE LA HOTTE DÉCORATIVE
MODEL: ENZO-ALESSA-OLIVERA-JOYS-REMO

COOKER HOOD INSTRUCTIONS FOR USE
CONTENTS
1. Safety Warnings
2. Definition, Dimensions and Technical Specifications of the Cooker Hood
3. Mounting of the Cooker Hood
3.1. Location of the Cooker Hood
3.2. Mounting of Hanger Screws on the Wall
3.3. Mounting of Connection Sheets of the Interior Chimney
3.4. Mounting of Cooker Hood on the Wall
3.5. Mounting of Plastic Chimney Adaptor and Air Escape Pipe
3.6. Mounting of Exterior Chimney
3.7. Mounting of Interior Chimney
4. Use of the Cooker Hood
4.1. Control Panel
4.1.1. Touch Control Panel
4.1.2. Touch Control Panel 3 Speed
4.2 Usage of the Cooker Hood
4.2.1. Use With Chimney
4.2.2. Use Without Chimney
4.3. Use of Aluminum Filter
5. Replacement of Lamps
5.1. Replacement of Led Lamp
6. Maintenance and Cleaning
7. Recommendations
8. Things to be Done If the Cooker Hood is not Working
9. Guarantee
9.1. Terms of Guarantee
9.2. Situations Outside the Scope of Guarantee
1.SAFETY WARNINGS
Please read this manual throughly of and follow the instructions!
This manual is a part of your device and has to be kept for future use.
As this manual applies to more than one model, it may include some equipment and features that are not
available in your device.
This device is produced as household type for personal use. It should not be used for commercial purposes
or for the wrong purposes.
The width of your device has to be at least as wide as the width of your cooker.
Once you have unpacked your device, make visual check to see whether there is any damage. If there is
damage caused by shipping, do not mount the device.
Keep packing materials away from children as they may be dangerous (drowning, swallowing, etc.).
Mounting process and electrical connection should be performed by authorized persons. In the mounting
process, attention should be paid to current applicable building regulations, regulations of local electricity and
gas enterprises and regulations on air discharge systems.
The producing company will not accept responsibility for accidents, damages, fires and/or injuries that may
occur due to the mounting and/or usage of the product in a manner not in accordance with the instructions
specified in the manual.
There is a risk of injury during mounting due to sharp edges that may be in your device. Therefore, protective
gloves should be worn during the mounting of your device.

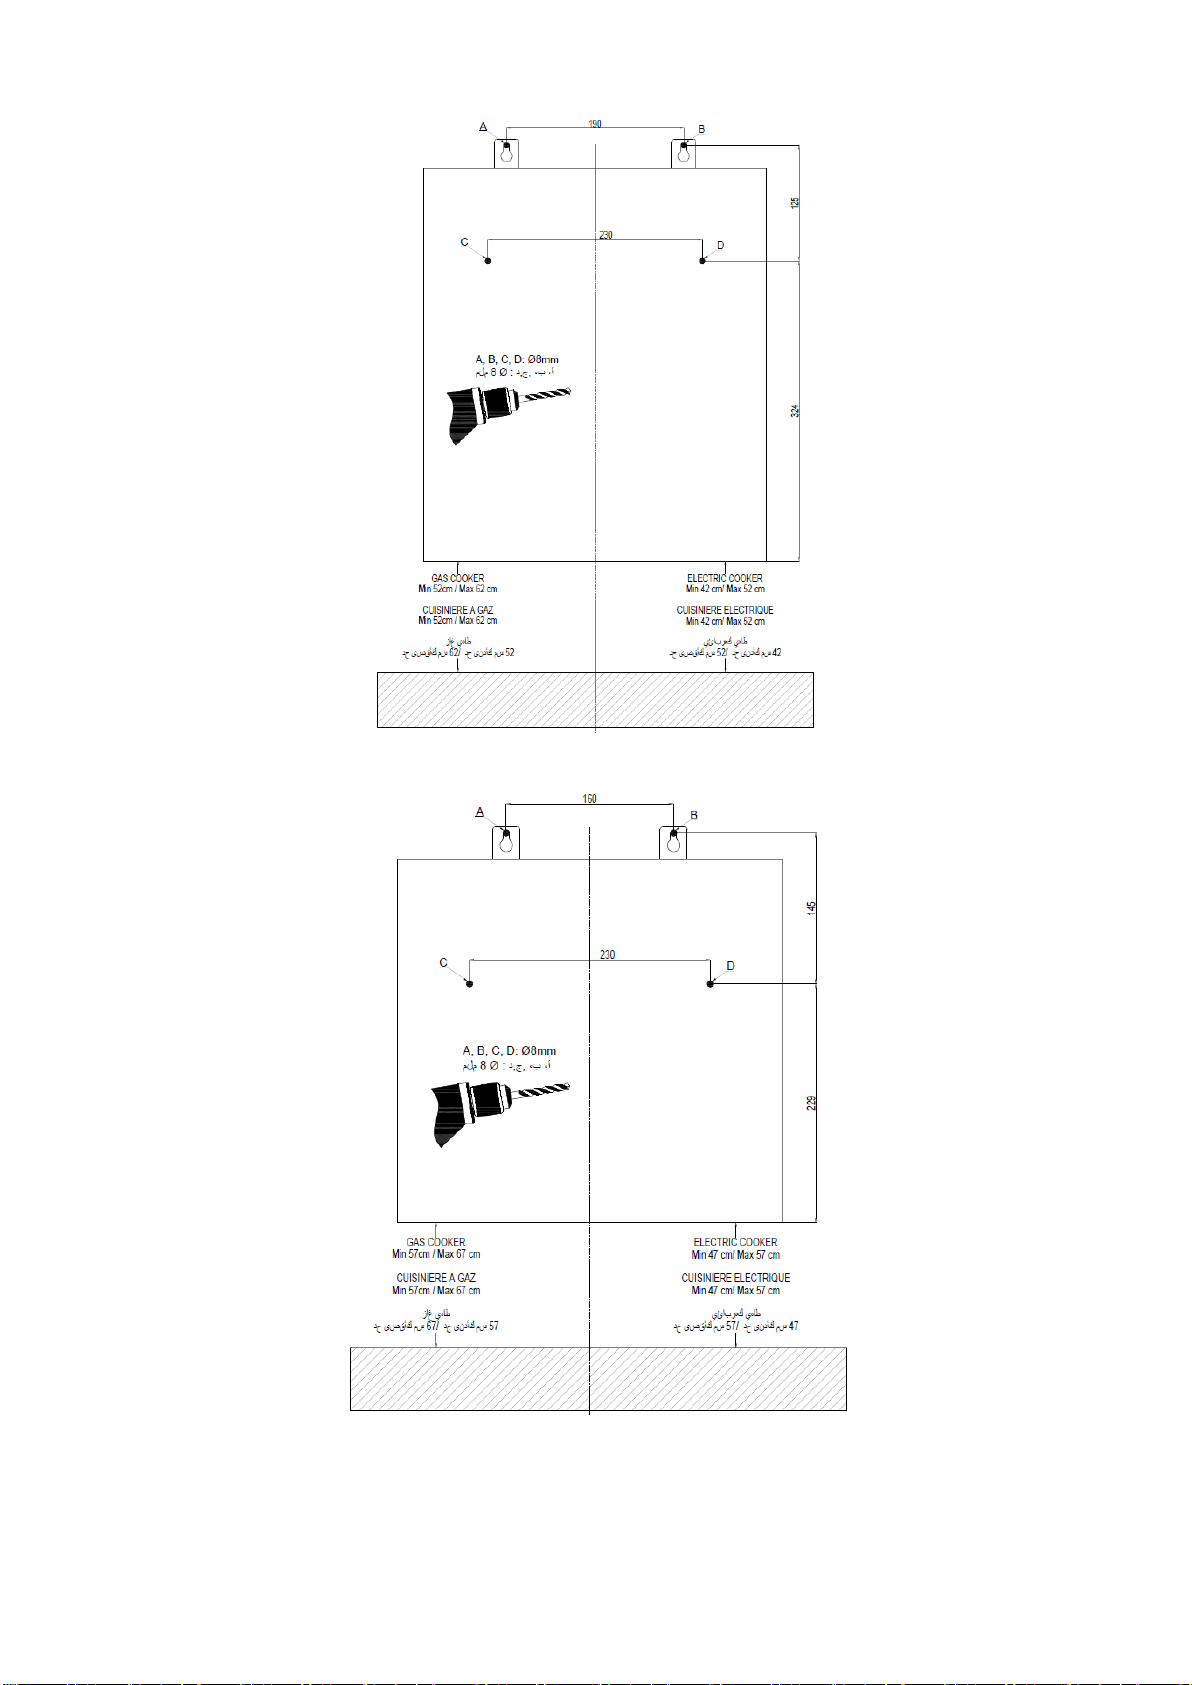
Mounting of your device should be performed with mounting accessories inside the product package. All
fittings available in the mounting accessories should be used in order to complete the safe mounting of your
device. Unlike, materials such as adhesives, screws, nails etc. should not be used.
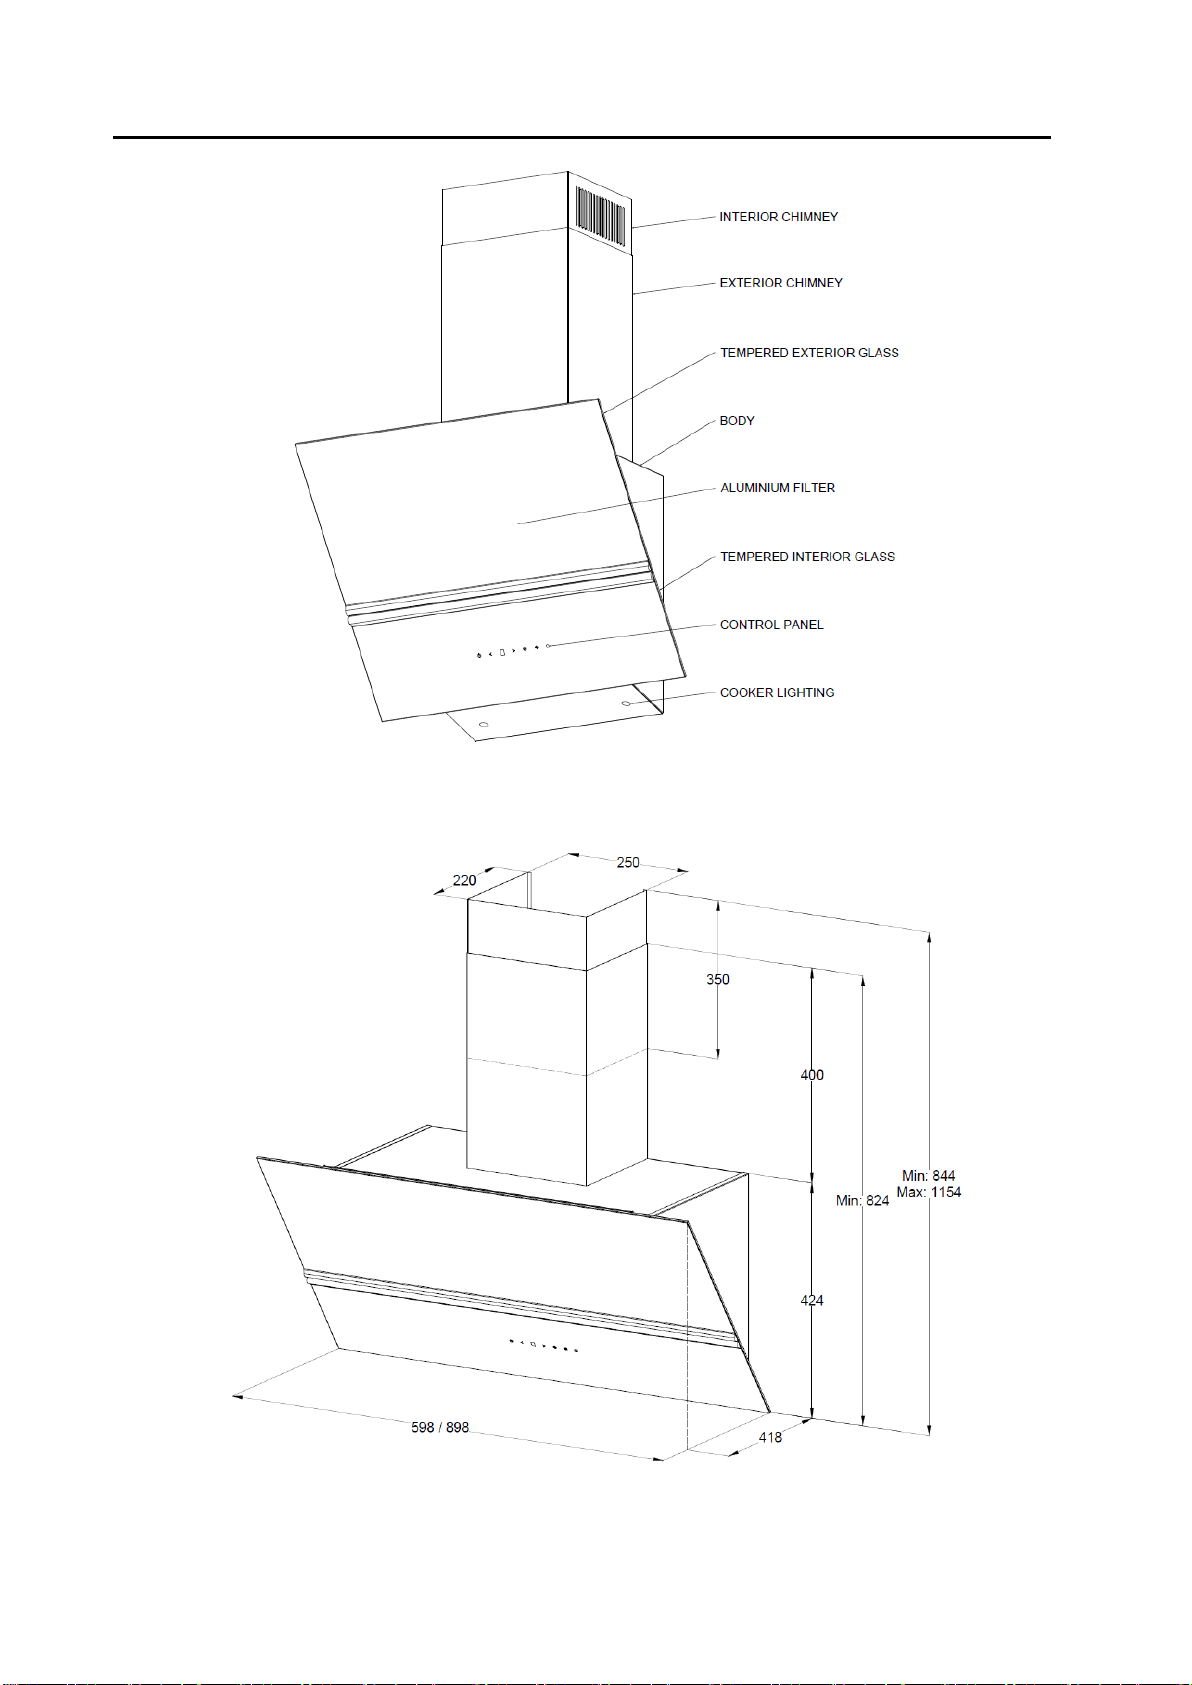
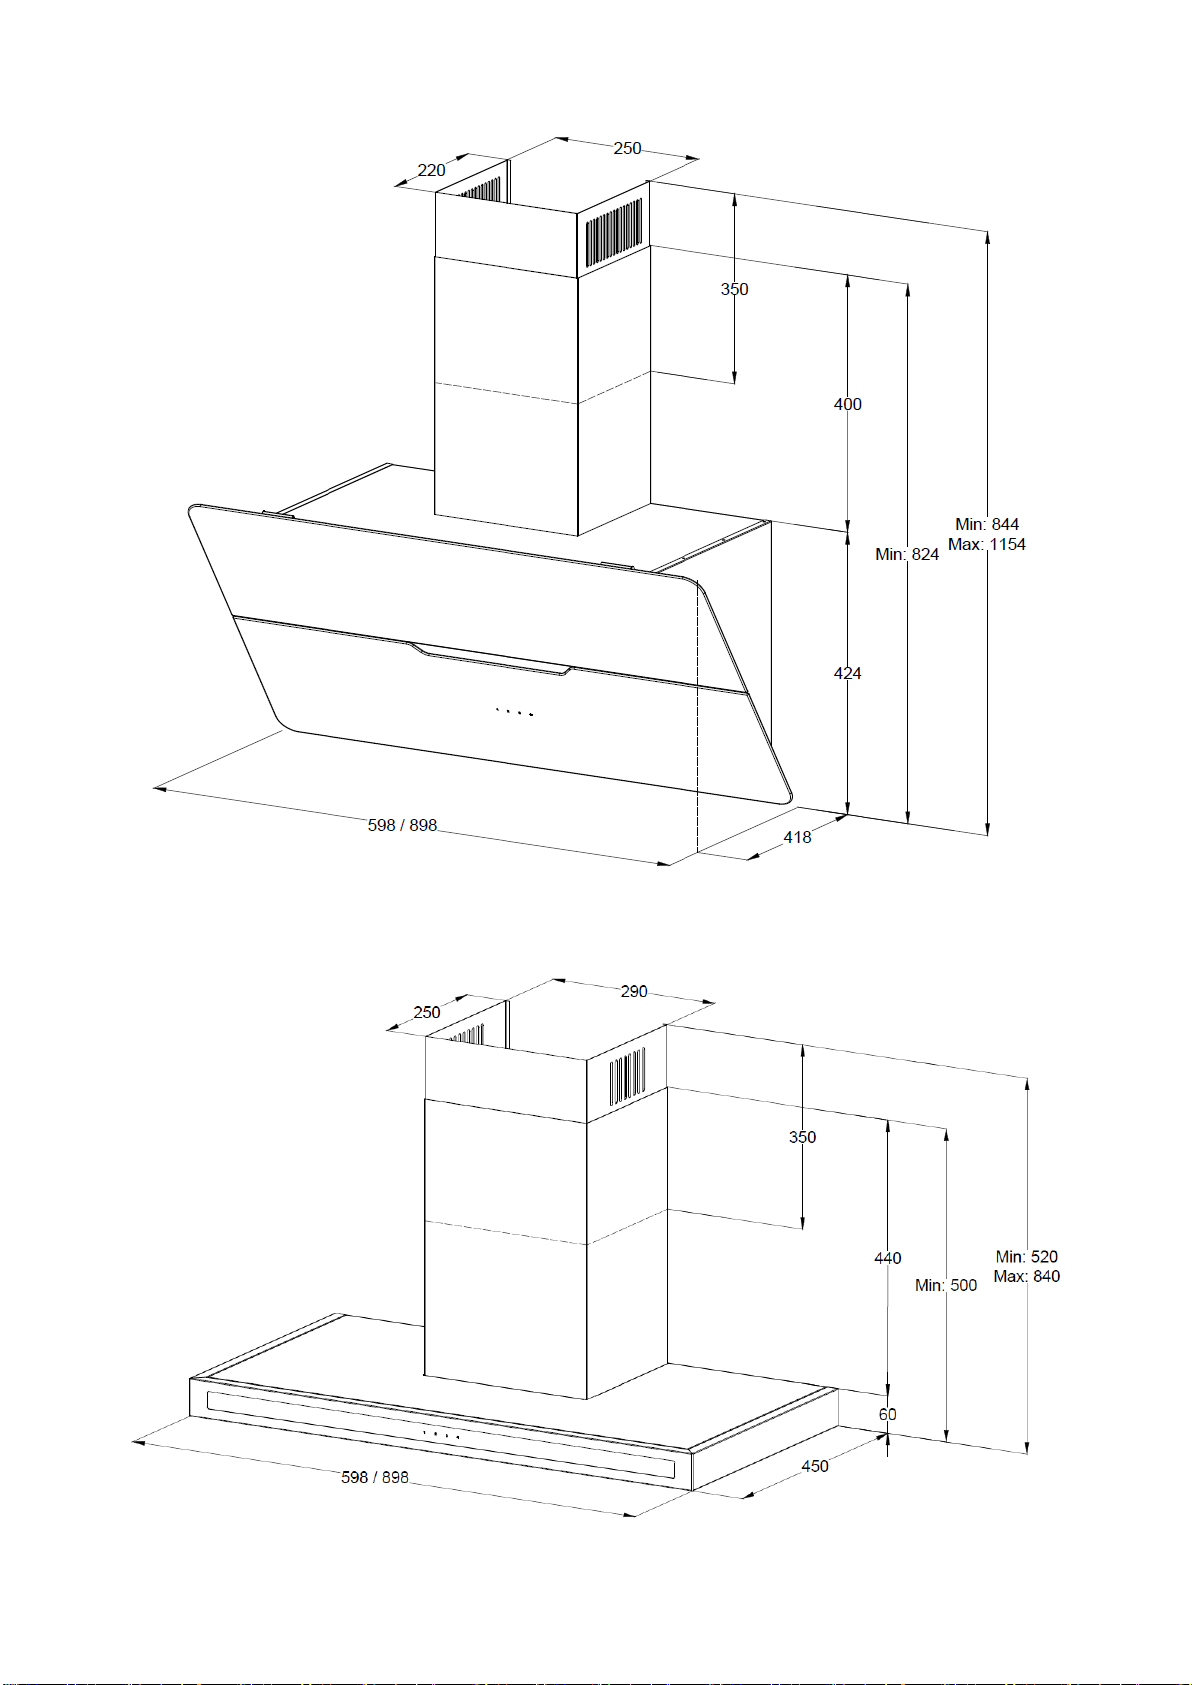
When mounting your device, the mounting template inside the mounting accessories should be used. The
minimum height of your device from the cooker surface should be 75cm in gas cookers and 65cm in electric
cookers. If gas cookers and electric cookers are used together, the minimum distance should be 75cm.
The device should be mounted on the wall on a flat surface.
Air escape pipe should not be connected to the chimneys containing waste gas such as gas heater,
thermosiphon, combi boiler, heating stove and fireplace and a minimum Ø120mm air escape pipe should be
used. Also, if it is not a specially designed opening, the outlet air should not be given to the wall opening.
This warning does not apply to devices used without a chimney (carbon filter).
The air escape pipe should be as short as possible and have few elbows. This warning does not apply to
devices used without a chimney (carbon filter).
If adequate ventilation is not provided when your device is in operating state, vacuum will be generated as
your device will draw the ambient air. In this case, the gases of other products used as chimney and
containing waste gas (gas heater, thermosiphon, combi boiler, heating stove, fireplace, etc.) may enter the
ambient again and cause poisonings. The negative pressure in the room should be at most 4 Pa (0.04
mbar). This warning does not apply to devices used without a chimney (carbon filter).
The flaps at the outlet of the chimney on your device should be in the open position when the motor is
running and in the off position when the motor is not running. The negativities that prevent this situation
should be removed. This warning does not apply to devices used without a chimney (carbon filter).
The electrical connection should not be made before the mounting of your device is completed.
If the power supply cable is damaged, the mounting of the device should not be performed and a new one
should be supplied from the authorized service and be replaced.
The operating voltage of your device is 220-240V and should be connected to a grounded power network.
If there is a supply cord and plug in your device, the device should be mounted so that the plug can be easily
reached.
If your device is to be connected directly to the electric network, it is necessary to place a switch between the
device and the network, of which minimum clearance between the contacts is 3 mm and dimensions are in
accordance with the load and the law in force.
During the mounting, the supply cable should not be exposed to heat, jamming or crushing.
For your safety, the "MAX 6A" fuse should be used in the device connection wiring.
After the mounting of your device is completed, the white and/or transparent protective foil on the inox
(stainless) surfaces should be removed without damaging the product.
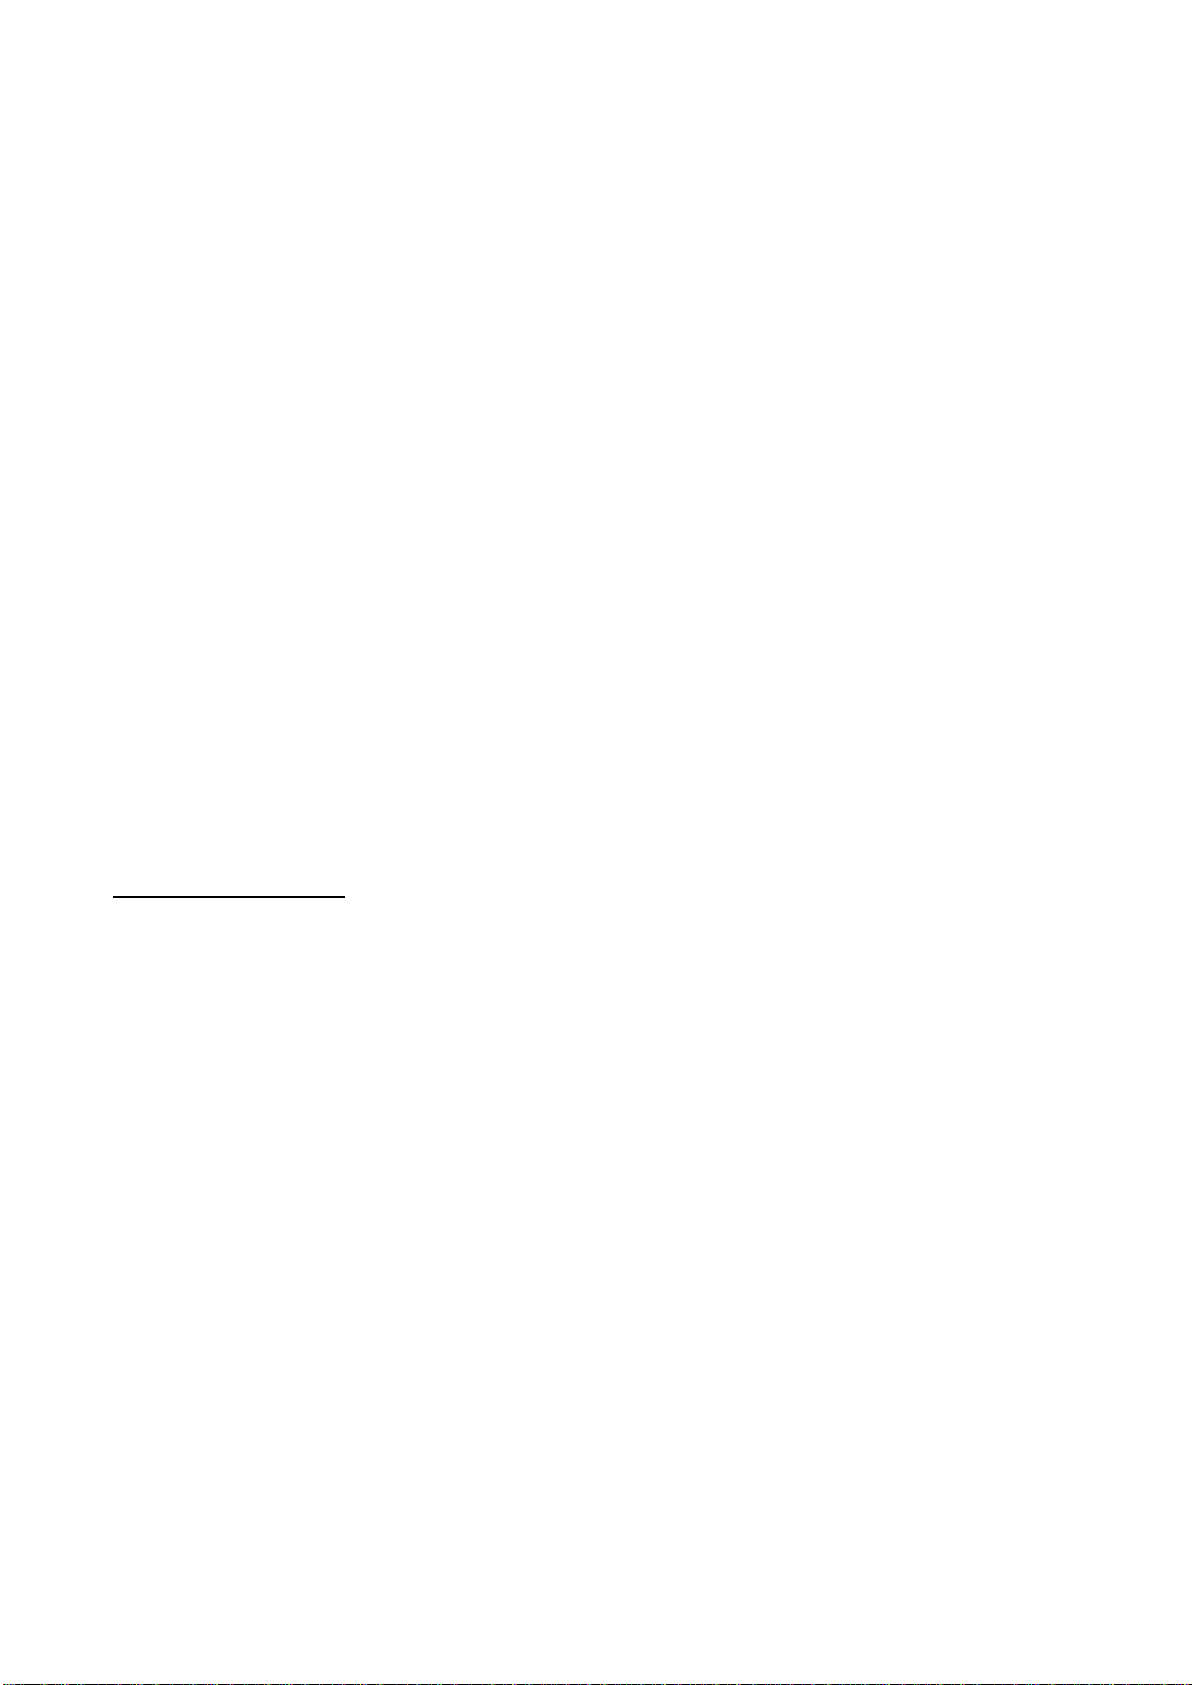
The device should not be operated without a filter. The filters should not be removed from their places when
the device is in the operating state.
The filters in your device sould be replaced and/or washed in the specified periods. Filters that are not
replaced and/or washed on time are have the risk of fire due to oil deposits on them. In addition, these oil
deposits will reduce the performance of your device.
Before cleaning or maintaining, it should be waited for the cooling of the device. The fuse should be switched
off or the electric outlet should be unpluged.
When cleaning the interior of the cooker hood, it should be very careful and gloves should be worn.
Non-flame-resistant filtering materials should not be used instead of filter. The original filters of the producer
company should be used.

The cooking tool (pot, pan, etc.) should be placed on the cooker before flaming the gas burner in your
cooker, and the gas burner should be flamed after bringing your cooker hood to operating state.
The flame in your cooker should be adjusted so that it will not overflow from the cooking tool (pot, pan, etc.).
The cooker should be turned off before the cooking tool (pot, pan, etc.) over the cooker is taken.
The cooker hood should be operated for 15 minutes more to ventilate the environment, to remove the food
smells, and to dry the humidity in the carbon filter present in the cooker hoods used without a chimney.
The use of naked flame in your cooker under your device poses s filters and other
components, which can cause a fire. For this reason, flaming cookings should be avoided and it should be
exposed to high naked flames.
Do not ever run the two gas burners on your cooker at the same time longer than 15 minutes in the largest
flame setting. A big burner with power more than 5kW (vok) equals the power of two gas burners.
When cooking foods such as frying, these types of cookings should be constantly monitored, as the oils may
burst into flames.
In case of any possible flamimg, the gas burner of the cooker should be extinguished, the electrical
connections of the cooker hood and the cooker should be disconnected. Fire should always be extinguished
using a damp cloth, fire-fighting blanket, suitable cover or dish, but never with water.
Persons who have mental, physical, or sensory restrains, who do not have experienceand knowledge in
using the device, and the children should not use this device.
Ensure that your child does not play with this product.
Broken bulbs should be replaced immediately to avoid overloading in other bulbs. The bulbs of your device
will heat up when they work for a long time. In this case, the bulbs should not be touched.
The bulbs in your device are designed for cooker lighting. It should not be used as ambient lighting.
Otherwise, the life of your bulbs will shorten.
In case of failure, the nearest authorized service should be called.
Never place any objects on the device.
In order to ensure that your device is long-lasting and not corroded, the cooker hood should also be operated
while the cooker is in use.
LED lamps should not be viewed for more than 3 seconds.

2. DEFINITION, DIMENSIONS AND TECHNICAL SPECIFICATIONS OF THE COOKER HOOD
JOYS

ALESSA
ENZO

OLIVERA
REMO

3.MOUNTING OF THE COOKER HOOD
3.1. LOCATION OF THE COOKER HOOD
The mounting height of JOYS-OLIVERA models devices should be minimum 52cm, maximum 62cm from the
surface of the cooker in gas cookers, and 42cm minimum, 52cm maximum from the surface of the cooker in
electric cookers (illustration 1). The mounting height of ALESSA-ENZO models device should be minimum
57cm, maximum 67cm from the surface of the cooker in gas cookers, and minimum 47cm, maximum 57cm
from the surface of the cooker in electric cookers (illustration2). The mounting height of REMO model device
should be minimum 65cm, maximum 75cm from the surface of the cooker in gas cookers, and minimum
55cm, maximum 65cm from the surface of the cooker in electric cookers (illustration3).
Illustration 1

Illustration 2
Illustration 3
3.2. MOUNTING OF HANGER SCREWS ON THE WALL
Attach the mounting template, which comes out of the mounting accessories, to the surface where the
cooker hood will be hanged, according to the appropriate height that should be from the surface of the
cooker. For JOYS-OLIVERA (Illustration 4.a), ALESSA (Illustration 4.b), ENZO (Illustration 4.c) and REMO
(Illustration 4.d) models drill with an auger of Ø8mm from the places indicated by A, B, C, D marks. Bang the
dowels of 8mm, which came out of mounting accessories, to these holes with the help of a hammer, without
damaging the dowels, and tighten these dowels with 2 hanger screws of 4x40 YHB, which again came out of
mounting accessories, in a way that the head of the screw will be left out about 6-8mm (Illustration 6).

Illustration 4.a
Illustration 4.b

Illustration 4.c
Illustration 4.d

Illustration 5
Illustration 6
3.3. MOUNTING OF CONNECTION SHEET OF THE INTERIOR CHIMNEY ON THE WALL
Your device has a maximum and minimum height gauge. This height can be calculated by moving the
interior chimney up and down after the distance of your device from the cooker surface is determined. After
the desired height of the interior chimney has been determined, mark the locations to be drilled using the
interior chimney connection sheet in order to fix the interior chimney connection sheet on the wall, and drill
with an auger of Ø6 mm. Bang 2 dowels of 6mm, which came out of mounting accessories, to these holes
with the help of a hammer, without damaging the dowels. Fix the interior chimney connection sheet to these
dowels, again with 2 screws of 3,5x30 which again came out of mounting accessories (Illustration 7). At the
end of the mounting of the cooker hood, the interior chimney will be mounted on this connection sheet.
The height of the connection sheet of interior chimney should be within the maximum and minimum values of
your device. The connection sheet of interior chimney should be located in the middle of your cooker as an
axis, and the distances of the right and left spaces should be equal to each other.

Illustration 7
3.4. MOUNTING OF COOKER HOOD ON THE WALL
By lifting the cooker hood holding from its body, hang the hanger sheets on the body to thehanger screwa on
the wall. When the cooker hood is lifted, it should not be held from the glasses. Tighten the hanger
screws on the wall (Illustration 8). Enable the parallelism of the cooker hood to the floor with the screws used
in fixing the hanger sheets to the body (Illustration 9). Use a long-end screwdriver to tighten the screws at
the points indicated by C and D for ENZO, ALESSA, OLIVERA and JOYS models (Illustration 10).
Illustration 8

Illustration 9
Illustration 10
3.5 MOUNTING OF PLASTIC CHIMNEY ADAPTOR and AIR ESCAPE PIPE
Mount the plastic chimney adaptor to the motor located on the body. Mount the air escape pipe to the plastic
chimney adaptor (Illustration 11). Fix the pipe with a clamp. Mount the other end of the air escape pipe to the
chimney hole in the room. A minimum of Ø120 mm air escape pipe should be used.
The air escape pipe should be as short as possible and have few elbows. This warning does not apply to
devices without a chimney (carbon filter).

Illustration 11
3.6. MOUNTING OF EXTERIOR CHIMNEY
Place the exterior chimney on the body with the interior chimney inside it and fix it with 2 screws of 3.5x9.5
mm (Illustration 12).
Illustration 12

3.7. MOUNTING OF INTERIOR CHIMNEY
Pull the interior chimney upward through the exterior chimney and extend it up to the connection sheet of the
exterior chimney. Fix the interior chimney with 2 screws of 3.5x9.5 mm (Illustration 13).
Illustration 13
4. USE OF THE COOKER HOOD
4.1. CONTROL PANEL
4.1.1. TOUCH CONTROL PANEL
1 2 3 4 5 6 7
1. Motor on / off. It is used to start and stop the motor of the cooker hood.
2. Reducing the speed. Used to reduce motor speed while the cooker hood is in operating state.
3. Display. Information on the operating status of the cooker hood is read. The aluminum filter should be
cleaned when the C mark appears. To clear the C warning, the speed reduction button numbered 2 should
be pressed for 5 seconds while the device is off.
4. Increasing the speed. Used to increase the motor speed while the cooker hood is in operating state.
5. Timer. It is used for automatic turn-off of the cooker hood after 15 minutes. Ventilation mode is activated
when it is pressed for 3 seconds. The screen will be rotating and the cooker hood will operate to ventilate the
ambient in the 1st speed for 10 minutes on hourly for 24 hours. To deactivate, it should be pressed on the
same button for 3 seconds or the cooker hood is turned of by pressing the motor turn on/off buton numbered
1.
6. Turn on / off the lamp. It is used to turn on and off the cooker lightings.
7. Remote control sensor.
Note: In order to operate the JOYS model cooker hood, the glass has to be opened by pressing the bottom
of the upper glass. The cooker hood will start to operate automatically when the glass is opened. All of the
above functions can be actively used when the glass is open. The cooker hood will automatically turn off
when the upper glass is closed by pressing the bottom of it.
4.1.2. TOUCH CONTROL PANEL 3 SPEED
1 2 3 4
1. Turning on/off the motor in speed 1. It is used to start and stop the motor of the cooker hood in speed 1.
2. Turning on/off the motor in speed 2. It is used to start and stop the motor of the cooker hood in speed 2.
3. Turning on/off the motor in speed 3. It is used to start and stop the motor of the cooker hood in speed 3.
4. Lamp on/off. It is used to turn on and off the cooker lightings.
Timer: It is used for automatic turn-off of the cooker hood after 15 minutes. Timer mode is activated when
the desired speed is pressed for 3 seconds. The button light will flash.

4.2. USAGE OF THE COOKER HOOD
Your device has been manufactured in a suitable way for use with chimney and without chimney.
4.2.1. USE WITH CHIMNEY
Your device should be connected to a chimney in the room so that it will be able to discharge the indoor air to
outer environment.
The minimum Ø120mm air escape pipe should be used. For your device to operate more efficiently, an air
escape pipe that is as short possible and having few elbows should be used.
If your device is fitted with a carbon filter, it has to be removed.
4.2.2. USE WITHOUT CHIMNEY
Carbon Filter is used in environments where there is no chimney or chimney connection is not possible. The
ambient air is filtered through a carbon filter and sent back to ambient.
To mount the carbon filters in their places, first the aluminum filters should be demounted. After mounting the
carbon filters in the snail block by turning them, the aluminum filters should be mounted again (Illustration
14).
Aluminum filters should also never be used when using carbon filters.
Filters can be supplied from the authorized services.
Illustration 14
4.3. USE OF ALUMINUM FILTER
Aluminum filters retain the humidity and oil existing in the environment and ensure that your device lasts
long. To remove the filter from its place, you you should press on its latch (Illustration 15). Pay attention that
the filter does not fall.
Never use your cooker hood without the aluminum filter.
Illustration 15

5. REPLACEMENT OF LAMPS
5.1. REPLACEMENT OF LED LAMPS
The lamp of the same type should be used for lamp replacement.
To change the lamp, first disconnect the electrical connection of your device. Remove the aluminum filters
from their places. Disconnect the socket cable connection of the led lamp (Illustration 16). Disjoint the LED
lamp by pressing the connection indicated by the arrows (Illustration 17). Mount the LED lamp that can be
supplied from authorized services by applying the opposite of the same processes. Check that the lamps
work. Do not damage your device during the replacement.
Illustration 16
Illustration 17
6. MAINTENANCE and CLEANING
Cut off the electric connection of the cooker hood before starting maintenance and cleaning.
Wait for the cooker hood to cool before starting maintenance and cleaning.
Cleaning and maintenance should be carried out at regular intervals (at most in every 2 months) for the
performance and service life of your device.
The oils accumulated inside of your device and in the chimney increases the risk of fire.
Soften the dried dirts with a damp cloth, do not scrape off.
The performance of your device will decrease due to the oil and dirt accumulation of the aluminum filters.
Aluminum filters should be washed with a soapy hot water or at 60ºC in a dishwasher per month. The
surface of the filter can change color. This does not affect the performance, replacement is not necessary.
When washing in the dishwasher, place the filters in the dishwasher without tightening them. Aluminum
surfaces may become deformed in tightened conditions.
After washing the aluminum filters, do not mount to their places without drying them.
Carbon filters should never be washed. Carbon filters should be replaced on average every 6 months.
There is a risk of damage due to moisture penetration to the electronic. Never clean the control elements
with damp cloth.

Improper cleaning may result in surface damage. Inox (stainless) surfaces, should be cleaned only in the
direction of brushing.
The exterior surfaces of the aspirator should be wiped with soapy water or with a damp cloth moisturized
with alcohol.
For Inox products, using an inox (stainless) surface cleaner will ensure that your product lasts longer.
The surface your device and the control panel is susceptible to scratching. The scrubbing, hard or chisel
cleaning materials may damage the surfaces. Do not use such cleaning materials.
Dry your cooker hood with a lint-free cloth.
7. RECOMMENDATIONS
In order to use your device more efficiently;
Use an escape pipe of Ø120mm minimum, for a more efficient use, use an escape pipe of Ø150mm.
Make the connection of the escape pipe in a way there will be minimum elbow.
Pay attention to cleaning times of metal filters, and replacement times of carbon filters.
Do not wash very dirty aluminum filters together with other dishes in the dishwasher.
Run your device at low speeds when intensive suction is not required.
Run your cooker hood before flaming up the cooker burner.
When you finish cooking, run your cooker for 15 minutes more in order to ventilate the environment
completely.
When transportation is required, transport it in its original packaging. Keep packing materials out of the reach
of children.
8. THINGS TO BE DONE IF THE COOKER HOOD IS NOT WORKING
Before contacting the service;
If your device is not working, make sure that the plug is plugged in and that the electrical fuse in the
installation is intact.
Check the edges of the bottons. Clean the dirt that will prevent the buttons from functioning.
If the lightnings are not working, check the solidity and tightness of the bulbs.
If polluted air is entering the environment from the chimney of your device, check that the flaps at the
chimney outlet of your device are working.
Do not perform any process that could damage the product.
Service and Spare Parts;
Have the mounting of your product free of charge from our authorized services.
You can supply spare parts of your product from your dealer or your authorized service.
There is an authorized service list in the package along with the product.
When you contact your service or dealer, please inform the name of the product model which you can find on
the product label in order to request spare parts. You can see the product label when you remove the
aluminum filter from its place.
Check your cooker hood according to the table below before contacting the service. If the problem is
continuing, contact your dealer or authorized service.
Check the electrical
connection (mains voltage
should be 220-240 V. Cooker
hood should be connected to
grounding plug.)
Check the motor switch. (The
motor has to be in the on
position)
Check the lamp switch. (The
lamp has to be in the on
position)
Check the aluminum filter.
(Aluminum cassette filter
should be washed once a
month under normal
conditions)
Check the bulbs. (Bulbs have
to be intact)
Check the air outket chinney
(Air outlet chimney should
be open.)
Check the carbon filter. (In the
cooker foods working with
carbon fitler, the carbon filter
should be changed every 3
months under normal
conditions)
Cooker Hood is not Working
X
X
Lightning lamp is not glowing
X
X
X
Davlumbaz hava çekişi zayıf
X
X
X
Air suction of the cooker hood is
weak
X
X
The operating (keeping the spare parts available, which are required for the device to fulfill its necessary

functions) time of your device is 10 years.
9. GUARANTEE
9.1. TERMS OF GUARANTEE
1. Guantee period begins at the date of delivery of the device and is 2 (two) years.
2. All of the device, including all the parts, is under guarantee of the producing company.
3. If the device malfunctions within the guarantee period, the time elapsed in repair is added to the guarantee
period.
4. Repair time of the device is maximum 20 (twenty) working days. This period begins on the date on which
the malfunction of the device is notified to the authorized service unit or, in the absence of service, to the
dealer, representative, vendor, importer or manufacturer of the device.
5. In case the malfunction of the device can not be repaired within 10 (ten) working days, the producer,
manufacturer or importer company has to allocate another device
of similar characteristics to the use of the customer until the repair of the device is completed.
6. If the device malfunctions due to material and workmanship and / or mounting errors within the warranty
period, the malfunction of the device will be repaired without charging a fee under the name of labor, spare
parts or anything else.
5. Despite the consumer uses its right to repair;
a. From the date of delivery of the device to the consumer, provided that it is within the specified guarantee
period, in addition to the facts that the same malfunction repeats more than two or different malfunctions
occur more than four or the sum of different malfunctions is more than six within the specified guatantee
period, if these malfunctions make unbenefitting from the device permanent,
b. If the maximum period required for reparation is exceeded,
c. If it is determined by a report prepared by the service station, in the absence of service station, by one of
the dealer, vendor agency, representative, importer, manufacturer or producer of the device, respectively,
that the reparation of the device is not possible, the consumer may request the replacement of device free of
charge, may request refund or price reduction at the rate of defect.
6. Defects arising from use of device contrary to the points included in the instructions for use, are outside
the scope of guarantee.
7. For problems that may arise in relation to the certificate of guarantee, it can be applied to Ministry of
Industry and Trade, the General Directorate of Protection of Consumer and Competition.
9.2. SITUATIONS OUTSIDE THE SCOPE OF GUARANTEE
1. Faults and / or errors caused by improper mounting and / or misuse of the device.
2. Faults and / or errors caused by interference of one or more persons in the device other than authorized
persons or attempt to repair the device.
3. Faults and / or errors due to mounting of any part other than the parts supplied by the manufacturer on the
device.
4. Faults and / or errors resulting from non-domestic use or from unusual or abnormal use of the device.
5. Faults and / or errors arising from incorrect voltage.
6. Faults and / or errors caused by improper processing of the device.
7. Faults and / or errors that may occur during transportation after delivery of the device.
8. Faults and / or errors due to natural events (earthquake, flood, deluge, thundebolt, fire, etc..).
This manual suits for next models
4
Table of contents
Languages:
Other Premium Ventilation Hood manuals
Popular Ventilation Hood manuals by other brands

VentAHood
VentAHood EUROLINE installation instructions

Air King
Air King ARA36GL Use and handling instructions

Range Master
Range Master RM51000 Series User instructions

Range Master
Range Master RM60000 SERIES Installation instructions and user manual

Wesco
Wesco WH QUADRO 5 Use and maintenance instructions

VentAHood
VentAHood XLH12 Installation instruction