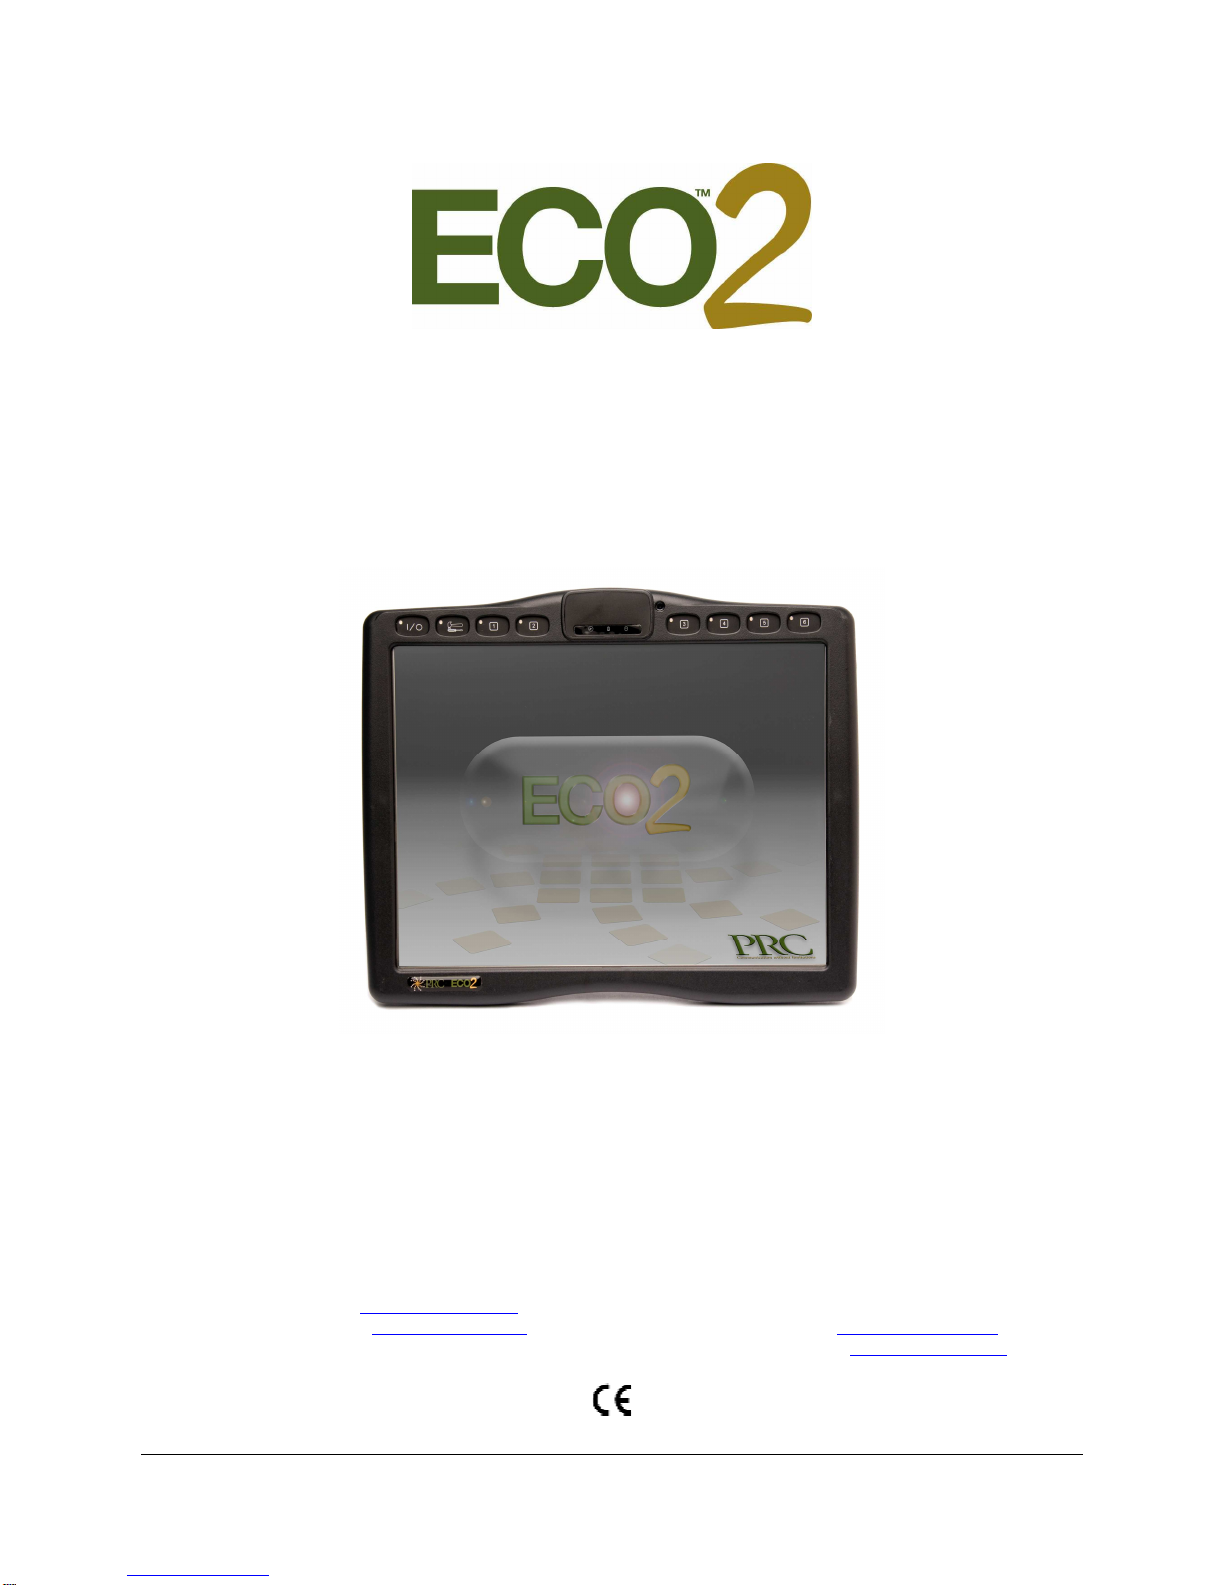
Prentke Romich Company ECO2 User manual

ECO Manual
14957v1.03
Operator's Manual
PRC HEADQUARTERS PRC INTERNATIONAL
1022 Heyl Rd • Wooster, OH 44691 Liberator Ltd
Telephone: (330 262-1984 • (800) 262-1984 Minerva Business Park
Fax: (330) 263-4829 Lynch Wood, Peterborough, Cambridgeshire
PE2 6FT UK
Web Site Address: www.prentrom.com E-mail Address: info@liberator.co.uk
Web Site Address: www.liberator.co.uk

ECO Manual
END USER LICENSING AGREEMENT
Microsoft, Inc.
You have acquired a PRC ECO
™
which includes software licensed by PRC from Microsoft Licensing Inc. or its
affiliates ("MS"). Those installed software products of MS origin, as well as` associated media, printed materials and
"online" or electronic documentation (software) are protected by international intellectual property laws and treaties.
IF YOU DO NOT AGREE TO THIS END USER LICENSE AGREEMENT (EULA), DO NOT USE THE DEVICE OR COPY THE
SOFTWARE. INSTEAD, PROMPTLY CONTACT PRENTKE ROMICH COMPANY FOR INSTRUCTIONS ON RETURN OF THE
UNUSED DEVICE(S) FOR A REFUND. ANY USE OF THE SOFTWARE, INCLUDING BUT NOT LIMITED TO USE ON THE
DEVICE, WILL CONSTITUTE YOUR AGREEMENT TO THIS EULA (OR RATIFICATION OF ANY PREVIOUS CONSENT).
GRANT OF SOFTWARE LICENSE.
This EULA grants you the following license:
•You may use the SOFTWARE only on the ECO.
•NOT FAULT TOLERANT. THE SOFTWARE IS NOT FAULT TOLERANT. PRC HAS INDEPENDENTLY DETERMINED
HOW TO USE THE SOFTWARE AND MS HAS RELIED UPON PRC TO CONDUCT SUFFICIENT TESTING TO DETERMINE
THAT THE SOFTWARE IS SUITABLE FOR SUCH USE.
•NO WARRANTIES FOR THE SOFTWARE. THE SOFTWARE is provided "AS IS" and with all faults. THE ENTIRE RISK
AS TO SATISFACTORY QUALITY, PERFORMANCE, ACCURACY, AND EFFORT (INCLUDING LACK OF
NEGLIGENCE) IS WITH YOU. ALSO THERE IS NO WARRANTY AGAINST INTERFERENCE WITH YOUR
ENJOYMENT OF THE SOFTWARE OR AGAINST INFRINGEMENT. IF YOU HAVE RECEIVED ANY WARRANTIES
REGARDING THE DEVICE OR SOFTWARE, THOSE WARRANTIES DO NOT ORIGINATE FROM, AND ARE NOT
BINDING ON, MS.
•Note on Java Support. The SOFTWARE may contain support for programs written in Java. Java
technology is not fault tolerant and is not designed, manufactured, or intended for use or resale as online
control equipment in hazardous environments requiring fail-safe performance, such as in the operation of
nuclear facilities, aircraft navigation or communication systems, air traffic control, direct life support
machines, or weapons systems, in which the failure of Java technology could lead directly to death,
personal injury or severe physical or environmental damage. Sun Microsystems, Inc. has contractually
obligated MS to make this disclaimer.
•No Liability for Certain damages. EXCEPT AS PROHIBITED BY LAW, MS SHALL HAVE NO LIABILITY FOR
ANY INDIRECT, SPECIAL CONSEQUENTIAL OR INCIDENTAL DAMAGES ARISING FROM OR IN CONNECTION
WITH THE USE OR PERFORMANCE OF THE SOFTWARE. THIS LIMITATION SHALL APPLY EVEN IF ANY
REMEDY FAILS OF ITS ESSENTIAL PURPOSE. IN NO EVENT SHALL MS BE LIABLE FOR ANY AMOUNT IN
EXCESS OF U.S. TWO HUNDRED FIFTY DOLLARS (U.S. $250.00).
•Limitations on Reverse Engineering, Decompilation and Disassembly. You may not reverse engineer,
decompile, or disassemble the SOFTWARE, except and only to the extent that such activity is expressly
permitted by applicable law notwithstanding this limitation.
•SOFTWARE TRANSFER ALLOWED BUT WITH RESTRICTIONS. You may permanently transfer
rights under this EULA only as part of a permanent sale or transfer of the Device, and only if the recipient
agrees to this EULA. If the SOFTWARE is an upgrade, any transfer must also include all prior versions of
SOFTWARE.
•EXPORT RESTRICTIONS. You acknowledge that SOFTWARE is subject to U.S. export jurisdiction.
You agree to comply with all applicable international and national laws that apply to the SOFTWARE,
including U.S. Export Administration Regulations, as well as end-user, end-use and destination restrictions
issued by U.S. and other governments. For additional information see
http://www.microsoft.com/exporting/.

ECO MANUAL
iii
Data can be uploaded from this unit to a personal computer for storage on a hard disk, CD, or other storage medium. Be sure to make multiple
copies of all important data to protect against accidental loss.
ECO2, ECO, ECOpoint, WordCore, Language Activity Monitor (LAM), Memory Transfer Interface (MTI) and PRC Infrared Receiver (IRR) are
trademarks of Prentke Romich Company. ECOpoint is a product developed by PRC in collaboration with Tobii Technology(AB)
Minspeak and Unity are registered trademarks of Semantic Compaction Systems, Inc. in the United States and in other countries.
Pixon is a trademark of Semantic Compaction Systems, Inc.
MinTalk is a trademark of Semantic Compaction Systems, Inc.
Semantic Compaction is a trademark of Semantic Compaction Systems, Inc.
PCS Symbols are a product of Mayer-Johnson.
Clarity Symbols are a product of Liberator, Ltd.
Fonix-DECtalk Text-to-Speech software is a copyright of Fonix Corporation; all rights reserved.
RealSpeak Text-to-Speech is a trademark of Nuance Communications, Inc.
AT&T Natural Voices is a trademark of AT&T Corporation.
Acapela speech technologies licensed from the Acapella Group.
Non-English text-to-speech supplied by the Acapela Group and RealSpeak Text-to-Speech, a trademarked product of Nuance Communications, Inc.
Windows, Windows Explorer, Windows Media Player, Microsoft Outlook, Microsoft Word, Windows WordPad and Microsoft PowerPoint are registered
trademarks of Microsoft, Inc.
IBM is a registered trademark of International Business Machines.
Tracker is a trademark of Madentec, Inc.
Headpointing technology by Madentec
IntelliTools is a registered trademark of IntelliTools, Inc.
HeadMouse is a trademark of Origin Instruments, Inc.
Bluetooth Wireless Technology is a registered trademark. The Bluetooth word mark and logos are owned by the Bluetooth SIG, Inc. and any use of
such marks by PRC is under license. Other trademarks and trade names are those of their respective owners.
WordQ is a trademark of Bloorview MacMillan Children's Centre
Paint Shop Pro software is copyrighted by JASC Software, Inc.Inmage Viewer/32 is shareware from SB Software.
Digital photos of the devices courtesy of Doug Miller
ELECTRONIC INTERFERENCE INFORMATION
This device complies with Part 15 of the FCC Rules. Operation is subject to two conditions: (1) this device may not cause harmful interference, and (2)
this device must accept any interference received, including interference that may cause undesired operation.
Warning! Changes or modifications to this product which are not authorized by Prentke Romich Company could exceed FCC limits and negate your
authority to use this product.
This equipment has been tested and found to comply with the limits for a Class B digital device, pursuant to Part 15 of the FCC Rules. These limits are
designed to provide reasonable protection against harmful interference in a residential installation. This equipment generates, uses and can radiate
radio frequency energy and, if not installed and used in accordance with the instructions, may cause harmful interference to radio communications.
However, there is no guarantee that interference will not occur in a particular installation. You can determine whether this product is causing
interference in your radio or television by turning this product off. If the interference stops, it was probably caused by this product or one of its
accessories. You can attempt to correct the interference by using one or more of the following measures:
•Turn the television or radio antenna until the interference stops.
•Move this product to one side or the other of the television or radio.
•Move this product farther away form the television or radio.
•Plug this product into an outlet that is on a different circuit from the television or radio; that is, this product should be controlled by different circuit
breakers/fuses from the television or radio.
•If necessary, contact a Prentke Romich Company service technician for assistance.
Bluetooth Adapter, ECOpoint
These devices comply with Part 15 of the FCC Rules. Operation is subject to the following two conditions: (1) these devices may not cause
harmful interference, and (2) these devices must accept any interference received, including interference that may cause undesired
operation. The Bluetooth device contains FCC-ID POOWML-C40. Bluetooth QD ID B013848
This Class B digital apparatus meets all requirements of the Canadian Interference-Causing Equipment Regulations. Cet appareil numérique de la
classe B respect toutes les exigences du Règlement sur le matériel brouiller du Canada.
CE ENVIRONMENTAL INFORMATION: Use: 0o - 45oC; Storage: (-20o) - 50oC; 95% maximum relative humidity @ ambient temperatures less than
40oC.
CLASS 1 LED PRODUCT –The Tracker Headpointing option falls within the limits of a Class 1 LED product as specified by CENELEC EN 60825-1,
Amendments 1 and 2.
Attention! Consult accompanying documents.
This device not intended to be an emergency call device or sole communication aid.
Warnings!
•When operating this device in a medical environment, do not use with any product that is not medically approved. Follow all rules
for appropriate cell phone and, if necessary, wireless device use.
•Any mounts used should be fitted by a qualified person. Failure to install the mounting system according to the manufacturer's
instructions may result in an injury to the user.
©Prentke Romich Company 2009-2010. All rights reserved. Under copyright laws this manual may not be copied, in whole or in part, without the
written consent of the Prentke Romich Company.

Prentke Romich Company • 1022 Heyl Rd. • Wooster, Ohio 44691 • (800) 262-1984
ECO MANUAL
iv
Remove your device from
Shipping Mode
To conserve the batteries,
your device was put in Shipping Mode at the factory
before it was sent to you.
To use it you must take it out of Shipping Mode:
Plug in your battery charger and then press the key
on the front of the case.
It will take a few moments for the device to boot up.

ECO MANUAL
v
About the RESTORE Disk
In the event that your device's hard drive or the Windows system quits working,
you will have to use the RESTORE disk that came in a separate mailer.
Unless you are very familiar with computers and understand when and how to use
a RESTORE disk,
call the PRC Service Department first and tell them what is wrong with your
device before you attempt to use the RESTORE disk.
Warning!
Never remove the battery in this device to
perform a re-set.

TABLE OF CONTENTS
ECO Manual
vi
Table of Contents
GETTING ACQUAINTED WITH YOUR ECO....................................................................................................10
The Front Panel ...........................................................................................................................................................11
The Top of the ECO ....................................................................................................................................................13
The Back of the ECO...................................................................................................................................................14
The Right Side Panel...................................................................................................................................................15
Battery Door and Batteries ..........................................................................................................................................16
Left Side Panel ............................................................................................................................................................17
The Display Areas.......................................................................................................................................................18
Different Ways to Turn your Device Off.....................................................................................................................21
About the Batteries in your ECO.................................................................................................................................23
The Touch Screen and the Exploration Wizard...........................................................................................................27
The Unity
®
60 Sequenced Overlay..............................................................................................................................29
About Minspeak
®
........................................................................................................................................................31
Icon Prediction Shows Where You Have Messages Stored.........................................................................................32
About the Color-Coded Toolbox.................................................................................................................................34
Change the Speaker Volume .......................................................................................................................................35
About the CALL Tool in the Toolbox.........................................................................................................................36
SETTING UP YOUR COMMUNICATION DEVICE ..........................................................................................38
About Setting Up your Device ....................................................................................................................................40
Select a User Area .......................................................................................................................................................41
Access Methods...........................................................................................................................................................47
The ACCESS METHOD MENU................................................................................................................................49
Touch Options .............................................................................................................................................................51
1 Switch Scanning Methods ........................................................................................................................................52
1 Switch Scanning Options..........................................................................................................................................54
2 Switch Scanning Methods ........................................................................................................................................56
2 Switch Scanning Options..........................................................................................................................................57
Headpointing/Joystick Methods ..................................................................................................................................60
Joystick Options ..........................................................................................................................................................60
Tracker Headpointing Options ....................................................................................................................................62
Mouse/Trackball/USB Joystick Options .....................................................................................................................65
ECOpoint.....................................................................................................................................................................67
The FEEDBACK MENU............................................................................................................................................68
FEEDBACK MENU Options......................................................................................................................................69
SPEECH MENU Options............................................................................................................................................72
The AUDITORY PROMPT MENU............................................................................................................................75
The OUTPUT MENU .................................................................................................................................................78
Save Your Set-Up Settings..........................................................................................................................................80
Store the "Use Settings" Keys on your Overlay ..........................................................................................................81
WORD PREDICTION..............................................................................................................................................82
About Minspeak
®
and Word Prediction ......................................................................................................................83
Spell and Select Words................................................................................................................................................84
Word Prediction Options.............................................................................................................................................87
USING THE CORE VOCABULARY OVERLAY ................................................................................................94
About Core Vocabulary and Activity Row Vocabulary..............................................................................................95
Recorded and Computer Speech..................................................................................................................................96

TABLE OF CONTENTS
ECO Manual
vii
Before You Begin to Store, Plan What You Want to Say ...........................................................................................96
Record a Vocabulary Message ....................................................................................................................................97
Erase a Recorded Message ........................................................................................................................................104
Store a Computer Speech Message............................................................................................................................105
Edit a Computer Speech Message .............................................................................................................................109
Completely Erase the Contents of a Key...................................................................................................................110
Link an Icon Sequence to an already Created Page...................................................................................................110
Hide Vocabulary Keys...............................................................................................................................................112
Swap Core Vocabulary Keys on Your Overlay.........................................................................................................114
PAGES......................................................................................................................................................................116
About Custom Pages .................................................................................................................................................117
Set Page Template.....................................................................................................................................................118
Create a Custom Page................................................................................................................................................120
Go to Your Custom Page...........................................................................................................................................123
Modify a Custom Page ..............................................................................................................................................124
Scene Pages ...............................................................................................................................................................131
Add Links to other Pages on your Scene Page ..........................................................................................................139
Link your Scene Page to the MY SCENES page. .....................................................................................................140
Copy Pages/Activities from your Current User Area to Another User Area.............................................................142
Copy Activities or Pages from One Device to Another.............................................................................................144
Expand a User Area or Page......................................................................................................................................145
ACTIVITIES............................................................................................................................................................150
Activities....................................................................................................................................................................151
Set Activity Template................................................................................................................................................152
Create a New Activity—An Example .......................................................................................................................154
Dynamic Activities....................................................................................................................................................156
Erase a Dynamic Activity Link; Review All Dynamic Activities.............................................................................157
About the Picture Prediction Option..........................................................................................................................159
Modify an Already Existing Activity ........................................................................................................................162
Link an Activity to a Page or to another Activity......................................................................................................164
Copy Pages/Activities from your Current User Area to Another User Area.............................................................166
Copy Activities or Pages from One Device to Another.............................................................................................168
STORE/ASSIGN TOOLS AND MACROS IN CORE, ACTIVITIES AND PAGES........................................170
To Store a Tool Use the INSERT TOOL Key on the Spelling Keyboard .................................................................171
Store a Tool Under an Icon Sequence .......................................................................................................................171
Assign a Tool to a Core Key......................................................................................................................................172
Erase the Tool and Restore the Original Icon............................................................................................................173
Assign a Tool to an Activity Row Key......................................................................................................................174
About Macros............................................................................................................................................................175
Store a Macro Under an Icon Sequence.....................................................................................................................176
Assign a Macro to a Core Key...................................................................................................................................178
Erase Macros.............................................................................................................................................................179
Change All Occurrences of an Icon...........................................................................................................................180
Copy or Erase all Sequences Beginning with Selected Icon(s) .................................................................................181
REVIEW VOCABULARY.....................................................................................................................................182
Using the REVIEW VOCABULARY MENU..........................................................................................................183
Using the "Review to File" Option............................................................................................................................184
Icon Tutor Options.....................................................................................................................................................184
NOTEBOOKS..........................................................................................................................................................186
Creating and Using Notebooks..................................................................................................................................187
The Notebook Workspace .........................................................................................................................................187
New Notebooks .........................................................................................................................................................188
Close a Notebook; Save a Notebook .......................................................................................................................189

TABLE OF CONTENTS
ECO Manual
viii
Open or Delete a Notebook .......................................................................................................................................189
Rename a Notebook; Transfer a Notebook to a Computer File.................................................................................190
Print a Notebook........................................................................................................................................................191
Speak a Notebook; Lock a Notebook .......................................................................................................................192
Copy a Notebook from One Area to Another............................................................................................................193
Store a Notebook under an Icon Sequence................................................................................................................193
Save/Load a Notebook...............................................................................................................................................194
Editing Tools.............................................................................................................................................................195
THE SPEECH DICTIONARY...............................................................................................................................198
The Speech DICTIONARY MENU..........................................................................................................................199
Add Words to the Dictionary.....................................................................................................................................200
Delete Words from the Dictionary.............................................................................................................................200
Review Words in the Dictionary ...............................................................................................................................201
CALCULATOR.......................................................................................................................................................202
Using the Calculator..................................................................................................................................................203
THE MAINTENANCE MENU..............................................................................................................................206
The MAINTENANCE MENU..................................................................................................................................207
TRANSFER MEMORY MENU.............................................................................................................................214
About Memory Transfers ..........................................................................................................................................215
Memory Transfer using a USB Flash Drive or Secure Digital Card .........................................................................216
Importing Icons/Photos (graphics).............................................................................................................................217
Load Icons from an MTI File ....................................................................................................................................218
Save Pages and Activities/Load Pages and Activities...............................................................................................219
Load an IR Device/Save an IR Device......................................................................................................................220
Import Scenes............................................................................................................................................................221
Using the FILE ORGANIZER ..................................................................................................................................222
USING THE BLUETOOTH CELL PHONE........................................................................................................224
Bluetooth Phone ........................................................................................................................................................225
Phone Tools...............................................................................................................................................................226
Pair and Configure your Bluetooth Cell Phone .........................................................................................................227
Using the Dial Pad.....................................................................................................................................................230
Using the Phone Directory.........................................................................................................................................232
Adjusting Caller and Listener Volume......................................................................................................................234
Send a Text Message.................................................................................................................................................235
Reading a Text Message............................................................................................................................................236
Using the Internal Microphone to Speak...................................................................................................................237
USING THE MP3 PLAYER MENU .....................................................................................................................238
Listening to Music with your Communication Aid (MP3, WAV and WMA files)...................................................239
About the Options in the MP3 PLAYER MENU......................................................................................................240
Creating and Using Playlists......................................................................................................................................243
Music Tools...............................................................................................................................................................244
About Importing Sound Files to Store on your Overlay............................................................................................245
Store a Sound File under an Icon or Icon Sequence on your Overlay .......................................................................246
Using the FILE ORGANIZER ..................................................................................................................................247
USING A REMOTE CONTROL...........................................................................................................................250
Using your Communication Aid as a Remote Control..............................................................................................251
About Teaching Remote Control Signals to your Device..........................................................................................252
Teach Remote Control Signals to your Device..........................................................................................................253
Add a New Device to the IR SETUP MENU............................................................................................................256
Create a New REMOTE Page using "Copy from Existing Page" .............................................................................257
Place the TV BDRM Page in your REMOTES Activity...........................................................................................258
How to Store the IR Functions under an Icon Sequence ...........................................................................................259

TABLE OF CONTENTS
ECO Manual
ix
Delete a Device..........................................................................................................................................................260
Rename a Device.......................................................................................................................................................260
Add a New Function to an Existing Device...............................................................................................................261
Rename a Function....................................................................................................................................................262
Delete a Function.......................................................................................................................................................262
Re-Learn Signals .......................................................................................................................................................263
The IR REMOTE Page..............................................................................................................................................264
ON-OFF Control of Non-Remote Appliances: Using the X-10 ...............................................................................265
USING THE ECO'S INTERNAL COMPUTER..................................................................................................266
The Optional Internal Computer................................................................................................................................267
To Begin Computer Access.......................................................................................................................................268
Keys in the Computer Access Activity Row .............................................................................................................271
The Computer Programs Page...................................................................................................................................272
Internet Access Information ......................................................................................................................................275
Using Word Pad
™
......................................................................................................................................................276
The Magnification Option .........................................................................................................................................278
Using the <RUN PROGRAM> Tool.........................................................................................................................283
Sending Mouse Commands to Windows...................................................................................................................284
Pages and ECO Keyboard Mode...............................................................................................................................286
Minimize ECO...........................................................................................................................................................288
Using an External Computer with a USB Cable........................................................................................................288
Using an External Computer with the PRC Bluetooth Wireless Adapter..................................................................289
Using an External Computer and an Infrared Receiver (IRR)...................................................................................290
APPENDICES..........................................................................................................................................................292
Appendix A: Recalibrate the Touch Screen..............................................................................................................293
Appendix B: Next-Mouse-Right-Click Tool in PASS and ECO..............................................................................294
Appendix C: Serial Macro Tool ...............................................................................................................................296
Appendix D: Modify Scan Pattern ...........................................................................................................................297
Appendix E: Pagelets................................................................................................................................................309
Appendix F: Vocabulary Builder..............................................................................................................................313
Appendix G: Mid-Sequence Category......................................................................................................................326
Appendix H: Using the LAM (Language Activity Monitoring)...............................................................................328
Appendix I: All Tools List........................................................................................................................................331
Appendix J : IBM and Macintosh Computer Keyboard Names; Mouse Commands ................................................343
Appendix K: Troubleshooting..................................................................................................................................352
Appendix L: The Joystick Adapter...........................................................................................................................359
Appendix M: RealSpeak
™
Speech Tips....................................................................................................................360
Appendix N: Helpful DECtalk Speech Tips.............................................................................................................375
Appendix O: Setting Up the ECO for Wi-Fi .............................................................................................................383
INDEX......................................................................................................................................................................388
Index..........................................................................................................................................................................390

GETTING ACQUAINTED WITH YOUR ECO
ECO Manual
10
Getting Acquainted with your ECO
Graphics in this manual were taken using the Classic skin with, for the most
part, Enhanced Icons turned OFF. These options can be found in the
FEEDBACK MENU in the Toolbox.

GETTING ACQUAINTED WITH YOUR ECO
ECO Manual
11
The Front Panel
KEY FUNCTION
ON/OFF
Turns the device ON or OFF. If you turn the ECO off with this button, you
must use it to turn the device back on.
TOOLBOX
Takes you to the Toolbox where you can use the system menus.
USER
DEFINED
KEYS
Keys 1-6 are User Defined keys. They have been pre-programmed for you
to perform some often-used functions. You can re-program them to do
whatever you wish. See the Store/Assign Tools chapter beginning on page
170.
CHOOSE
ACTIVITY
Press this to toggle through your Activity Row.
SET-UP
This key allows you to customize vocabulary in Pages and Activities.
ECO KYBD
This allows you to see both the Windows desktop and the ECO screens at the
same time. This means you can use your overlay to interact with the
Windows programs. Your ECO keyboard goes to half-screen so you see half
your overlay and half of the Windows environment.

GETTING ACQUAINTED WITH YOUR ECO
ECO Manual
12
SCROLL
Use with the internal computer.
Select this key to scroll through your overlay when you are in
Keyboard Mode, so you can access all your overlay keys.
MOUSE-RIGHT-
CLICK
Use this with the internal computer.
Select this key then select a key on your overlay. A small context-
sensitive menu will pop up next to the overlay key you selected that
will allow you to perform various functions such as Cut, Copy, Paste
or use the Setup key.
MINIMIZE ECO
Use this with the internal computer.
This maximizes and minimizes your communication overlay when
you are in Keyboard Mode so you can see all of the Windows
application you are using. ECO goes into the Windows task bar.
RECORDING
MICROPHONE
This is the small round hole near the top right of the case. When you
record messages, speak toward this area.
HEADPOINTING
INFRARED
WINDOW (IR)
The IR window receives IR information from the Tracker or other IR
headpointer.
This window is not used with ECOpoint.
3 LEDs AT BOTTOM
OF IR WINDOW
The LED on the left flashes when the battery charger is plugged in.
A rapid flash means the battery is recharging. A slow flash means the
battery is full and is just trickle-charging.
The LED in the middle indicates a low battery. If you see this LED
flashing, plug in the battery charger.
The LED on the far right flashes when the hard drive in the ECO
system is working, just as the hard drive LED in your computer does.
HP IR Window
Microphone

GETTING ACQUAINTED WITH YOUR ECO
ECO Manual
13
The Top of the ECO
DVD/CD Player
The DVD/CD player is at the top of the case above the rounded area. Use this to play movie
DVDs, Audio DVDs and CDs. If you purchased the optional internal computer, you can also
install software and burn CDs using the DVD player.
To Use
: If your device is On, simply slide a disk into the CD/DVD Player. The device will
accept it. If your device is Off, slide a disk about half-way into the player, then turn your device
On. The ECO will accept the disk. Press the small button on the Player door to eject a disk.
Learning Infrared Area
Sending Infrared Area
The rounded area below the DVD player is the learning and sending infrared area. You point a
remote control at this area to teach remote control signals to your ECO. When the ECO is
sending remote control signals to control things like a TV or DVD player, this window must be
facing in the general direction of the object you want to control.
DVD Player
Learning IR
Area Sending IR
Area
Eject
button

GETTING ACQUAINTED WITH YOUR ECO
ECO Manual
14
The Back of the ECO
Back
Wire Table Stand
Pull the stand out from the case and set your device on a flat surface. If you want your device to
sit at a lower or higher angle, remove the table stand from the holes that hold it in place and
place it in the second set of holes. The bottom holes are lower; the top holes are higher.
Wheelchair Mounting Plate
Slide the optional QRM2 onto the wheelchair mounting plate until the Release Knob pin drops
into its hole on the plate. This secures the QRM2 to the mounting plate so you can mount the
ECO onto a wheelchair mount.
USB Port
If you are using an ECOpoint eyegaze unit, it plugs into this USB port. If you are not using
ECOpoint, this is a third USB port for your use.
Reset Button
This is a "final try" reset button. Try a reset with the button on the left side panel before using
this one. This button causes a power reset which is the equivalent of pulling the batteries.
Unbend a paper clip and poke it into the hole to press the re-set button. Read Appendix L:
Troubleshooting: The Internal Computer on page 352 before using this button.
USB port
Table Stand
Wheelchair
Mounting Plate "Final-try"
Reset button

GETTING ACQUAINTED WITH YOUR ECO
ECO Manual
15
The Right Side Panel
The Connectors from Left to Right
Mini-USB Connector
Use this to connect to an external computer with a USB cable.
2 Rectangular USB Connectors
Use these for USB flash drives, a USB mouse and keyboard, etc. You can use USB flash drives
for MTI files and importing graphics, among other things.
Ethernet Connector
Plug an Ethernet cable in here for wired internet access.
2 USB Ports
Ethernet Port
Mini USB port
to Computer
Battery Door

GETTING ACQUAINTED WITH YOUR ECO
ECO Manual
16
Battery Door and Batteries
The Battery door is on the right side of your ECO case. This door protects the removable battery.
There is a small window in the Battery Door that allows you to check the amount of charge left
in the removable battery. The ECO also has an internal battery but you cannot see or remove the
internal battery.
To remove the Battery Door, press down on door with both thumbs and slide the door off the end
of the case. When the door is off you see the removable battery.
Replace the battery door by lining it up on the case. Then place your thumb on the end of the
door nearest the edge of the case and push the door into its slots. You may need to use the edge
of the case for leverage. The door should fit tightly.
When you Remove the Battery Door
A yellow message box will appear on your display screen telling you that you that the battery
door is off the case. The Battery Graph in the Status Display Area will show all red lines.
The removable battery will not work if the Battery Door is off.
Your device will be powered solely by the internal battery which will give you much less battery
life than when both batteries are working.
If the Battery Door remains off the case, the yellow message box will appear at intervals on your
display screen. Eventually you will hear the low battery warning.
Press down and slide
door to right, off the
case.
Battery Status
window

GETTING ACQUAINTED WITH YOUR ECO
ECO Manual
17
Left Side Panel
Connectors from Left to Right
Battery Charger
Plug in the battery charger that came with your device.
Switch A and Switch B Connectors: plug single and dual switches into Switch A and Switch B
ports. A joystick will need an adapter that fits these ports.
Monitor Connector
Plug a computer monitor into this connector.
Secure Digital Card Slot
Insert a Secure Digital card in this slot. You can use a Secure Digital card to store MP3 songs for
your device to play as well as many other things.
If you remove this small door by unscrewing the two screws, there is a slot for an Express Card.
Reset Button:Unbend a paper clip and poke it into the hole to press the re-set button. Read
Appendix L: Troubleshooting: The Internal Computer on page 352 before using this button.
External Microphone Jack
Plug an external microphone in here. (Note: you can also use a USB microphone)
External Headphones Jack
Plug external stereo headphones or speakers in here.
Re-set Button

GETTING ACQUAINTED WITH YOUR ECO
ECO Manual
18
The Display Areas
Text Display Area
This is where you will see any text that appears, either from messages that you have retrieved by
selecting icon sequences or from typing in text. Touch this area and your device will speak any
text on the display.
Icon Display Area/Word Prediction List Area
This is where you will see the icons that you activate on your communication overlay or, if you
are using your spelling overlay and Word Prediction is On, you will see a list of predicted words.
Text Display Area
Icon or Word
Prediction Display
Area
Status Display
Area

GETTING ACQUAINTED WITH YOUR ECO
ECO Manual
19
Status Display Area
Date and Time
Set this in the CLOCK MENU in the Toolbox to display the current date and time.
Battery Bar Graph
This shows the status of the batteries. A FULL battery shows mostly green lines, with only a
few red and yellow lines. A LOW battery shows only red and yellow lines. Plug in the charger.
You cannot store when the battery is low.
An ALMOST DEAD battery shows only red lines. You will hear a warning beep that the ECO
is going to shut down. Plug in the charger.
Speaker Bar Graph
Headphones Bar Graph
These indicate speaker and headphone volume. When the lines fill up the bar graph, the volume
is at its loudest.
Caps Lock
When this is lit, you have turned Caps lock on in your spelling overlay. All letters you type will
be in CAPITAL letters.
Note: Do not use Caps Lock when storing messages for RealSpeak voices.
Ctrl
When this is lit, you are sending a CONTROL command.
Output
When this is lit, your Output option is On in the OUTPUT MENU. Anything you type, or any
messages you retrieve will appear on the Text Display Area of your overlay and will also be sent
to the internal computer or external computer if you are connected to one.
Speech
When this is lit, your device will speak anything that appears in the Text Display Area.
Drop-Down Menu
This mini-menu to the right of the Status Display Area gives you quick access to some of the
menus in the Toolbox. You can open this menu by touching it with your finger or a stylus or by
plugging in and using a USB mouse.
Battery Status
Speaker
Volume
Headphone Volume Date and Time Toolbox Drop-
Down Menu

GETTING ACQUAINTED WITH YOUR ECO
ECO Manual
20
Status Display Area—Modern Skin
The Modern Skin Status Display Area looks quite different from the Classic one, but you have
the same information.
From Left to Right
Headphone and Speaker Volume Icons: In the graphic above, the headphone volume is Low
and the speaker volume is set at Medium.
Battery Indicator: In the graphic above, the battery charger is plugged in so the graph lines
are blue and you see the plug beneath the graph.
If the charger is not plugged in, the graph lines will be red and yellow. Red and yellow lines
near the bottom of the icon mean that your battery is very low and you should plug in the
charger.
If the Battery Door is Off (on the right side of the ECO) the battery graph will have all red lines
and you will get periodic warnings that the door is off.
Date and Time: You can set the date and time in the CLOCK MENU in the Toolbox.
CORE Overlay: Under the date and time is the name of the CORE overlay you are using. You
should also see the number for the Area you are using (1-6) although that is not visible in this
picture.
Small letter "a": This indicates that Shift is Off.
If Shift is On, a capital "A" will flash until the capital letter you want is selected. Then you will
see a small "a" again.
If CAPS LOCK is On, you will see a steady capital "A".
If you select Shift while CAPS LOCK is On, the small "a" will flash until you select a letter.
If you are sending a CONTROL character, you will see tow letter "c"s on a diagonal
Keyboard and Mouse: If you see the keyboard and mouse, your Output is ON and you are using
the ECO's internal computer.
If you see an ARROW above the Keyboard, you are connected to an external computer with
Output turned On. If the Arrow is blue, you are using a Bluetooth adapter to connect to an
external computer.
If you see the Speech Bubble, Speech is turned On.
Other manuals for ECO2
2
Table of contents