PreSens pH-10 mini User manual

PreSens
Precision Sensing GmbH
Instruction Manual
pH-10 mini
10-Channel Minisensor pH-Meter

PreSens
Precision Sensing GmbH
Instruction Manual
pH-10 mini
10-Channel Minisensor pH-Meter
Manual version 3
PC software version pH10-10_v6
PreSens
Precision Sensing GmbH
Josef-Engert-Strasse 11
D-93053 Regensburg
Germany
Phone +49 941 942 72 0
Fax +49 941 942 72 27
Internet www.PreSens.de

Content
1Preface............................................................................................................................3
1.1 Safety Guidelines ...................................................................................................4
2Description of the pH-10 mini Device...........................................................................6
2.1 Instrument...............................................................................................................6
2.2 Front Panel of the pH-10 mini Device...................................................................6
2.3 Rear Panel of the pH-10 mini Device....................................................................7
2.4 Required Basic Equipment....................................................................................8
3pH-Sensitive Minisensors .............................................................................................9
3.1 General Description ...............................................................................................9
3.2 Dynamic range........................................................................................................9
3.3 Characteristics of a typical pH sensor...............................................................10
3.4 Cross sensitivities................................................................................................10
3.5 Sensor drift...........................................................................................................11
3.6 Temperature dependency....................................................................................11
3.7 Limitations of optical pH sensors.......................................................................12
3.8 Response time......................................................................................................12
3.9 Housings of pH-Sensitive Minisensors..............................................................12
3.9.1 Planar Analyte-Sensitive Foils........................................................................13
3.9.2 Flow-Through Cell - pH Minisensor................................................................14
4Software........................................................................................................................16
4.1 Software Installation............................................................................................16
4.2 Starting pH-10 mini and its Software..................................................................18
4.3 Function and Description of the pH-10 mini Software......................................19
4.3.1 Menu Bar:.......................................................................................................19
4.3.2 Status Bar.......................................................................................................20
4.3.3 Control section ...............................................................................................20
4.3.4 Channel selection...........................................................................................23
4.3.5 Data Handling.................................................................................................24
5Mounting sensors........................................................................................................24
5.1 Mounting planar sensor spots............................................................................24
5.2 Mounting flow through cells ...............................................................................24
5.3 Measurement of a pH Minisensors.....................................................................25
6Calibration ....................................................................................................................26
6.1 Calibration.............................................................................................................26
6.2 Re calibration........................................................................................................26
6.2.1 Determination of calibration constants...........................................................27

Content
7Some Advice for Correct Measurement.....................................................................29
7.1 Signal drift due to photo-decomposition...........................................................29
7.2 Performance proof...............................................................................................29
8General Instructions:...................................................................................................30
8.1 Warm-Up Time......................................................................................................30
8.2 Maintenance..........................................................................................................30
8.3 Service...................................................................................................................30
9Technical Data General Data.......................................................................................31
9.1 Technical Notes....................................................................................................33
9.2 Operation Notes ...................................................................................................33
10 Appendix.......................................................................................................................34
10.1 Dual Lifetime Referenced (DLR) Optical Sensors.............................................34

Preface
3
1 Preface
Congratulations!
You have chosen a new, innovative technology for measuring pH!
The pH-10 mini is a compact, easy to transport and completely PC-controlled fiber optic pH meter.
The data evaluation is PC supported as well.
The pH-10 mini was specially developed for small fiber optic pH sensors, flow-through cells and
integrated sensor systems. It is based on a novel technology, which creates very stable, internally
referenced measured values. This allows a more flexible use of pH sensors in many different fields of
interest.
Optical pH sensors (also called optodes) have some important features:
•They are small
•Their signal does not depend on the flow rate of the sample
•They can be physically divided from the measuring system which means a contactless
measurement
•They are offered steril
•They can be used in disposables.
Therefore, they are ideally suited for the examination of small sample volumes, for highly parallelized
measurements in disposables, and for biotechnological applications.
A set of different pH minisensors, flow-through cells and integrated sensor systems is available to
make sure you have the sensor which is ideally suited for your application.
Please feel free to contact our service team to find the best solution for your application.
Your PreSens Team.

Safety Guidelines
4
1.1 Safety Guidelines
PLEASE READ THESE INSTRUCTIONS CAREFULLY BEFORE WORKING WITH THIS
INSTRUMENT!
This device has left our works after careful testing of all functions and safety requirements.
The perfect functioning and operational safety of the instrument can only be ensured if the user
observes the usual safety precautions as well as the specific safety guidelines stated in these
operating guidelines.
- Before connecting the device to the electrical supply network, please ensure that the operating
voltage stated on the power supply corresponds to the mains voltage
- The perfect functioning and operational safety of the instrument can only be maintained under
the climatic conditions specified in Chapter 8 "Technical Data" in this operating manual.
- If the instrument is moved from cold to warm surroundings, condensate may form and interfere
with the functioning of the instrument. In this event, wait until the temperature of the instrument
reaches room temperature before putting the instrument back into operation.
- Balancing, maintenance and repair work should exclusively be carried out by a suitable,
qualified technician, trained by us.
- Especially in the case of any damage to current-carrying parts, such as the power supply
cable or the power supply itself, the device must be taken out of operation and protected
against being put back into operation.
- If there is any reason to assume that the instrument can no longer be employed without a risk,
it must be set aside and appropriately marked to prevent further use.
- The safety of the user may be endangered, e. g., if the instrument
•is visibly damaged
•no longer operates as specified
•has been stored under adverse conditions for a lengthy period of time
•has been damaged in transport.
- If you are in doubt, the instrument should be sent back to the manufacturer PreSens for repair
and maintenance.
- The operator of this measuring instrument must ensure that the following laws and guidelines
are observed when using dangerous substances:
•EEC directives for protective labor legislation
•National protective labor legislation
•Safety regulations for accident prevention
•Safety data-sheets of the chemical manufacturer.
The pH-10 mini is not protected against water spray;
The pH-10 mini is not water proof;
The pH-10 mini must not be used under environmental conditions which cause water-condensation in
the housing;
The pH-10 mini must not be opened;

Safety Guidelines
5
We explicitly draw your attention to the fact that any damage of the manufactural seal will render all
guarantee warranties invalid.
Any internal operations on the unit must be carried out by personnel explicitly authorized by PreSens,
and under antistatic conditions.
The pH-10 mini may only be operated by qualified personnel.
This measuring instrument was developed for use in the laboratory. Thus, we must assume that, as a
result of their professional training and experience, the operators will know the necessary safety
precautions to take when handling chemicals.
Keep the pH-10 mini, power supply and optical sensors out of the reach of children!
As the manufacturer of the pH-10 mini, we only consider ourselves responsible for safety and
performance of the device if
•the device is strictly used according to the instruction manual and the safety guidelines
•the electrical installation of the respective room corresponds to the DIN IEC/VDE standards.
The pH-10 mini and the sensors must not be used in vivo examinations on humans!
The pH-10 mini and the sensors must not be used for human-diagnostic or therapeutical purposes!

Description of the pH-10 mini Device
6
2 Description of the pH-10 mini Device
2.1 Instrument
The pH-10 mini is a precision pH meter,
designed for fiber-optic pH minisensors.
For operation, a PC/Notebook with RS-
232 interface is required. The pH-10 mini
is controlled using a comfortable
software, which also saves and
visualizes the measured values
2.2 Front Panel of the pH-10 mini Device
Description of the pH-10 mini Device
7
ELEMENT DESCRIPTION FUNCTION
CH1 – CH10 SMA fiber connector
Connect the fiber optic pH minisensor here
Line Blue Control
LED on: instrument on
off: instrument off
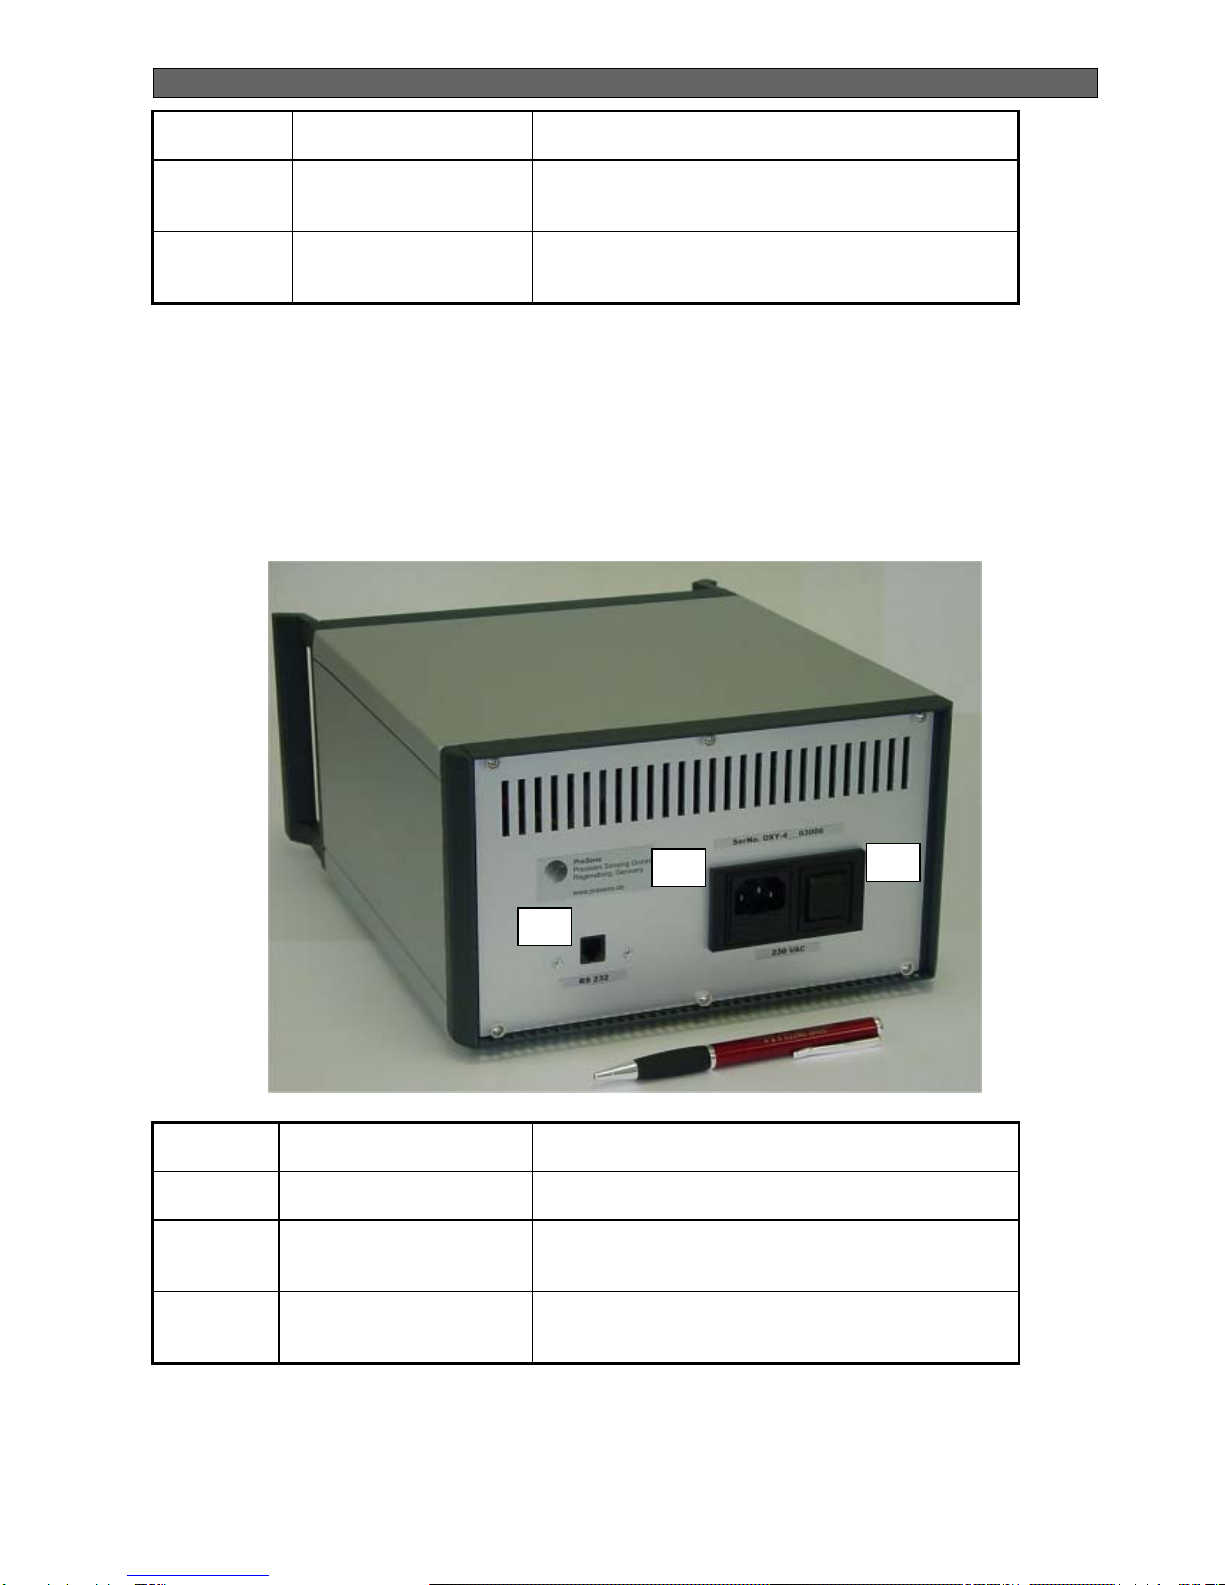
2.3 Rear Panel of the pH-10 mini Device
The electrical specifications of all rear panel connectors are given in the technical specification sheet.
Please read also the technical notes to avoid mistakes.
ELEMENT DESCRIPTION FUNCTION
S1 ON/OFF switch Switches the device ON and OFF
C1 Line adapter for power
supply Connector for 230 V AC power supply
C2 RS-232 interface
(male) Connect the device with a RS-232 data cable to
your PC/Notebook here
C1
C2
S1

Required Basic Equipment
8
2.4 Required Basic Equipment
•pH meter pH-10 mini*
•Software for pH-10 mini*
•PC / Notebook
(System requirements:
Windows XP; Pentium processor, at least 166 MHz, 64 MB RAM,
A RS 232 port or a USB port and a USB-serial adapter is needed)
•RS 232 Cable *
•Line adapter (110 - 220 V AC, 12 V DC) *
•pH-sensitive minisensors
The minisensors are mounted into different types of housings
* scope of supply

pH-Sensitive Minisensors
9
3 pH-Sensitive Minisensors
3.1 General Description
Optical pH Sensors designed for pH-10 mini device are based on the new Dual Luminophor
Reference method (see also appendix). They consist of an inert long decay time reference
dye and a short decay time indicator dye, which changes its fluorescence intensity due to the
pH-value. The measured value, the average decay time, represents the ratio of the two
fluorescence intensities. Therefore, the signal is internal referenced and insensitive to
fluctuations of the light source.
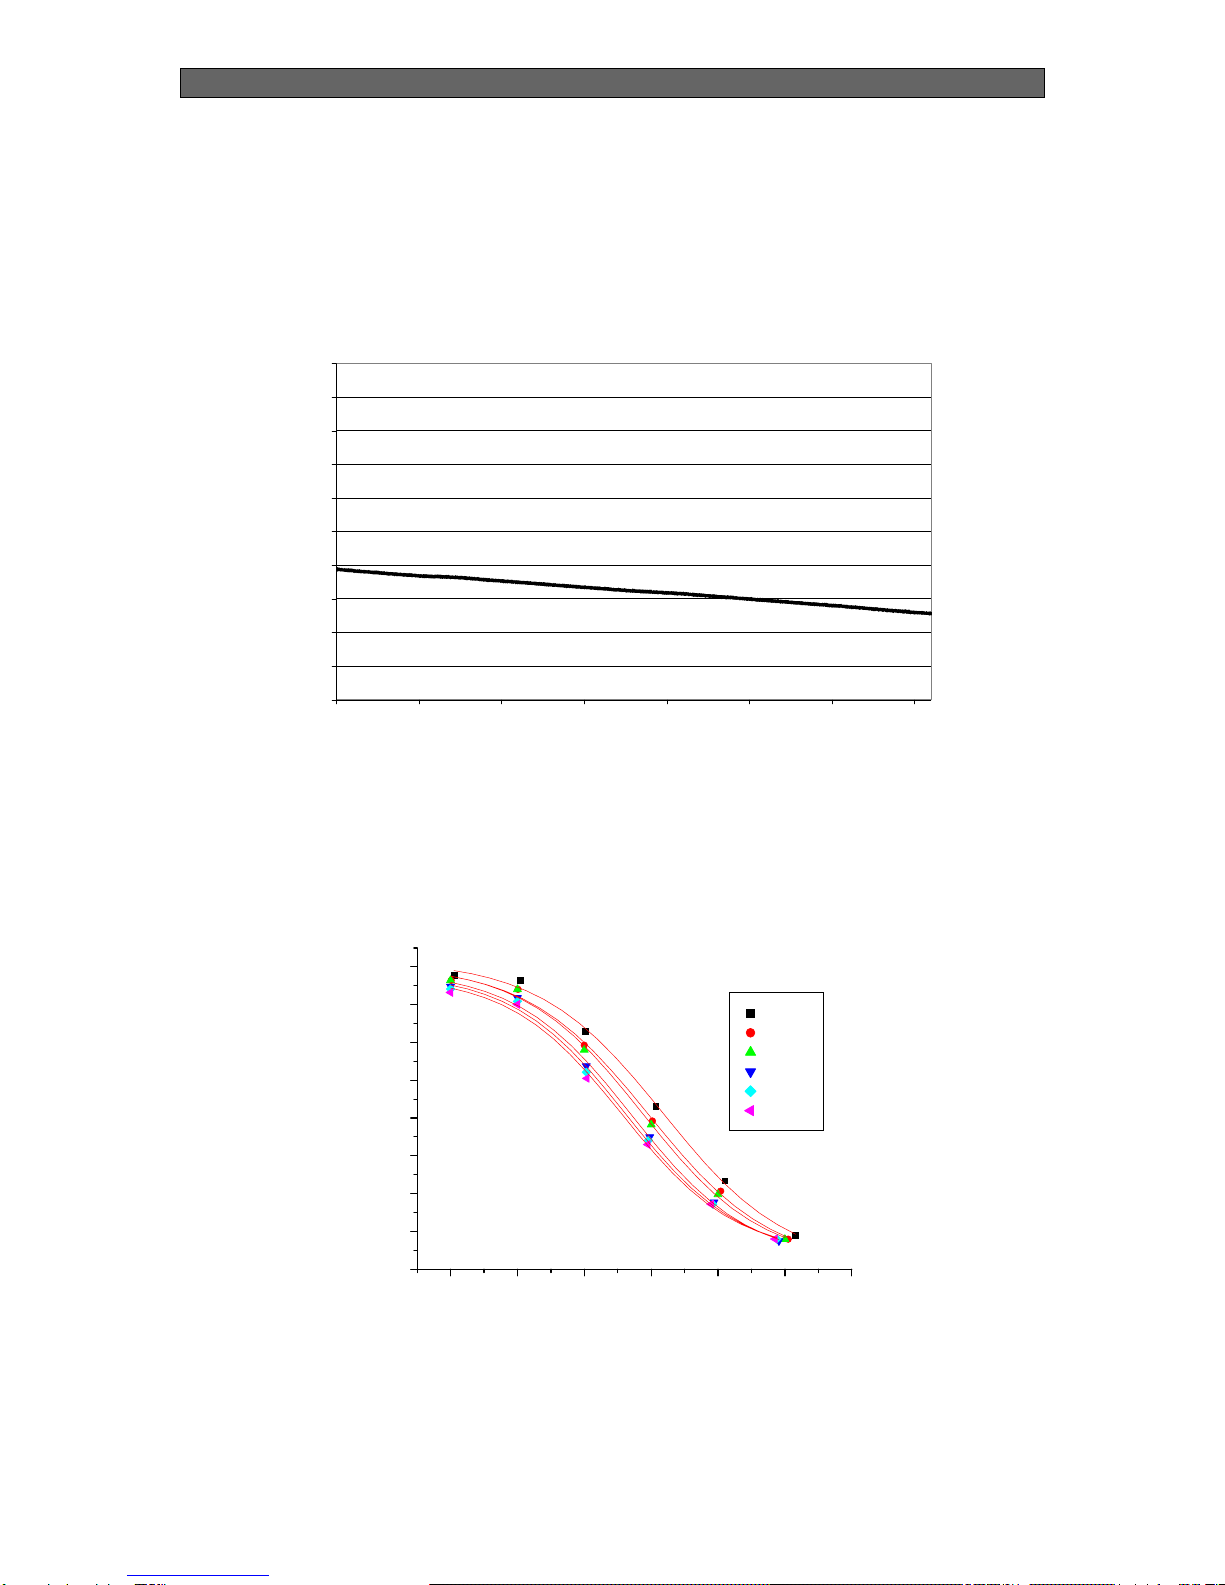
3.2 Dynamic range
Optical pH sensors respond according to the mass acting law, hence, they do not show a
linear behaviour like potentiometric pH electrodes. This limits their use to a dynamic range of
approximately 3 to 4 pH units. On the other hand, the resolution can be very high in the
optimal range. A typical response curve of a pH sensor is shown below. Increasing the pH
decreases the phase angle Φ. The phase angle Φcan be related to the pH as shown below.
The theoretical aspects are explained more detailed in the appendix.
Response of pH minisensor. Typical calibration curve of a pH minisensor
22° C, PBS-Buffer, ionic strength 120 mM
5
5.5
6
6.5
7
7.5
8
8.5
9
91113151719
time, min
pH
0
10
20
30
40
50
24681012
pH
Phase
Calibration values
Calibration curve

pH-Sensitive Minisensors
10
3.3 Characteristics of a typical pH sensor
The characteristic of a typical sensor are listed below:
Dynamic range: pH 5.5 to 9
Resolution: 0.01 pH
Drift due to bleaching: 0.003 pH per 1000 measuring points
Response time: less then 30 sec
Please note that the given values may differ from your special device and sensoric
application.
3.4 Cross sensitivities
The optical pH measurement is interfered by ionic strength of the sample. This can be
overcome by a calibration with buffers of ionic strength similar to the sample.
456789
15
20
25
30
35
40
45
50
55
phase
pH
is50
is100
is200
Cross-sensitivity to ionic strength.
A lower ionic strength than used in the calibration will pretend a lower pH and vice versa.
Also small fluorescent molecules like fluorescein can influence the measurement. They will
pretend a higher pH.
We recommend to calibrate the sensor in pH-adjusted media in these cases.
pH-Sensitive Minisensors
11
3.5 Sensor drift
Like all optical chemo sensors, optical pH-sensors are subject to photobleaching. Due to this
process the measured intensity (amplitude) is decreasing while the phase of the sensor is
increasing. This process is quite slow and depends on the light intensity used and the
duration of illumination. If you are in doubt whether a measured increase in phase is due to
photobleaching or decreasing pH of the sample, please lower the light intensity. If the drift is
not getting smaller, your signal drift is due to pH changes in your sample.
Drift due to bleaching: 0.003 pH per 1000 measuring points
3.6 Temperature dependency
pH Minisensors display, as any other pH sensors, a distinct temperature sensitivity. Some
typical calibration curves at different temperatures are shown below:
45678910
15
20
25
30
35
40
45
50
55
Phase
pH
5 °C
15 °C
20 °C
30 °C
35 °C
40 °C
To obtain most reliable results we recommend calibrating at the same temperature as used
for measurement. Higher temperature pretends lower pH. At pH 7 a deviation of about 0.08
pH / 5° C occurs.
6.5
6.6
6.7
6.8
6.9
7
7.1
7.2
7.3
7.4
7.5
0 10203040506070
Measurement each 30 sec.
time, h
pH

pH-Sensitive Minisensors
12
3.7 Limitations of optical pH sensors
The pH sensors offered for pH-10 mini were specially designed for physiological samples
and media. Samples with extremely low ionic strength and low buffer content may be not
measured. To test whether the sample can be measured accurately, try to perform the
calibration procedure with a buffer system which is as similar to the sample as possible. If the
calibration procedure does not result in a sigmoidal shaped calibration plot, the system is not
suited for the sensor.
The measurement can also be influenced by small, highly fluorescent molecules like
fluorescein or rhodamin in the sample.
The sensors can not be autoclaved, but γ-sterilized. They do not stand pH above 9 and
organic solvents.
3.8 Response time
The response time (t90) of the pH sensor is dependent from the diffusion rate of protons
through the sensor layer. Hence, the response time is dependent from the thickness of the
sensor layer and the stirring rate. The typical response (t90) time of a pH-sensitive foil is
below 1 minute.
3.9 Housings of pH-Sensitive minisensors
PreSens minisensors are based on 2 mm polymer optical fibers (POF). Depending on the
respective application, PreSens offers a set of different standard designs.
Sensor spots pH Flow-Through Cell
Of course, it is possible to build customer-specific designs. Please feel free to contact our
service team to find the best solution for your application.
pH-Sensitive Minisensors
13
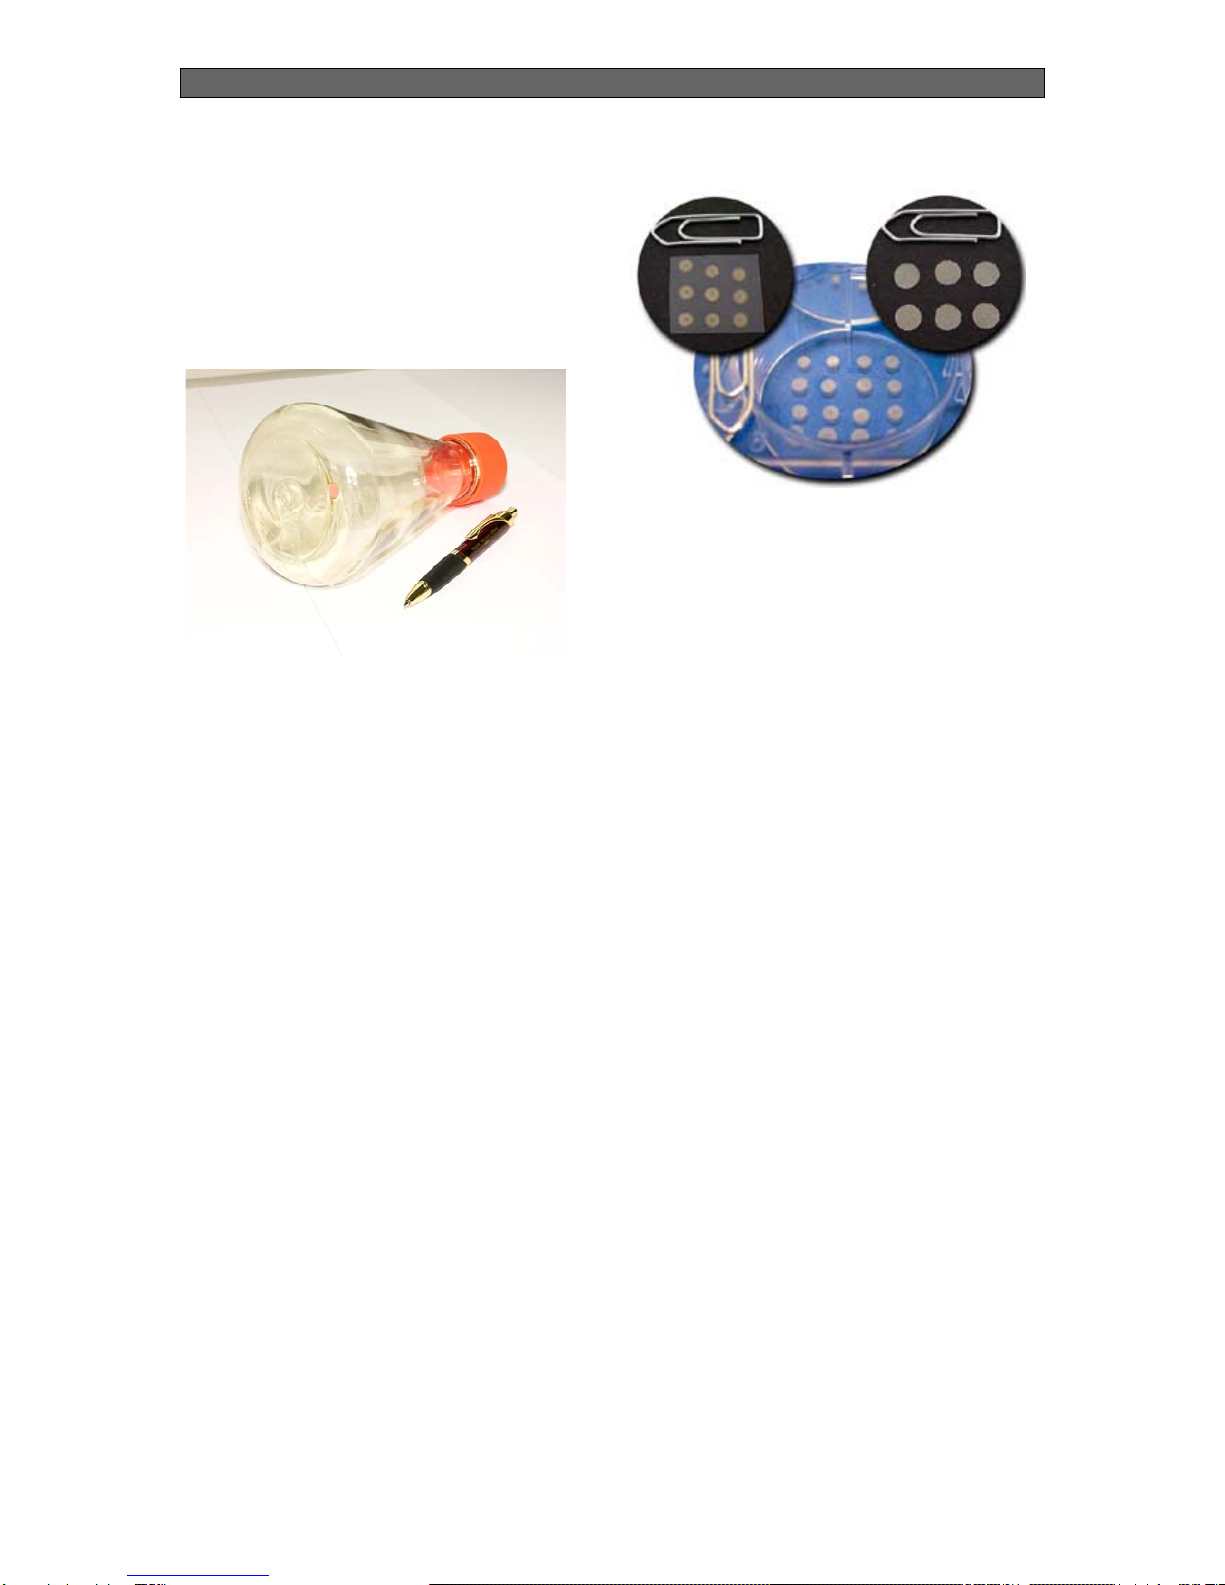
Planar pH sensor spots
Planar pH sensors can be glued, for example,
inside disposables (e.g. cell culture flask) and
the pH can be measured non-invasively and
non-destructively from outside through the
wall of the flask.
Only prerequisite: The wall of the flask has to
be transparent and non-fluorescent.
•non-invasive and non-destructive measurement from outside through the wall of the
flask
•applicable in disposables
•No reference electrode needed
•pH measurement in the physiological range of pH 5.5 - 9
•Resolution up to 0.005
•Robust sensor with an excellent long-term stability (0.1 pH within a week in 2 min
mode)
•Sterilizable by gamma irradiation
•Insensible towards electrical interference and magnetic fields
•Many disposables with integrated pH Sensors are available
Planar pH sensor spots can be used in combination with the pH meter pH-1 mini, pH-4 mini
and pH-10 mini
pH-Sensitive Minisensors
14
Order codes for planar pH Sensor spots
The Planar pH sensor spots are offered with options to be specified in the purchase order
form. The order code key shown above defines the parameters. Please, choose the
parameters that meet your requirements best. With this code you will order a planar pH
sensor (HP5) with a diameter of 5 mm
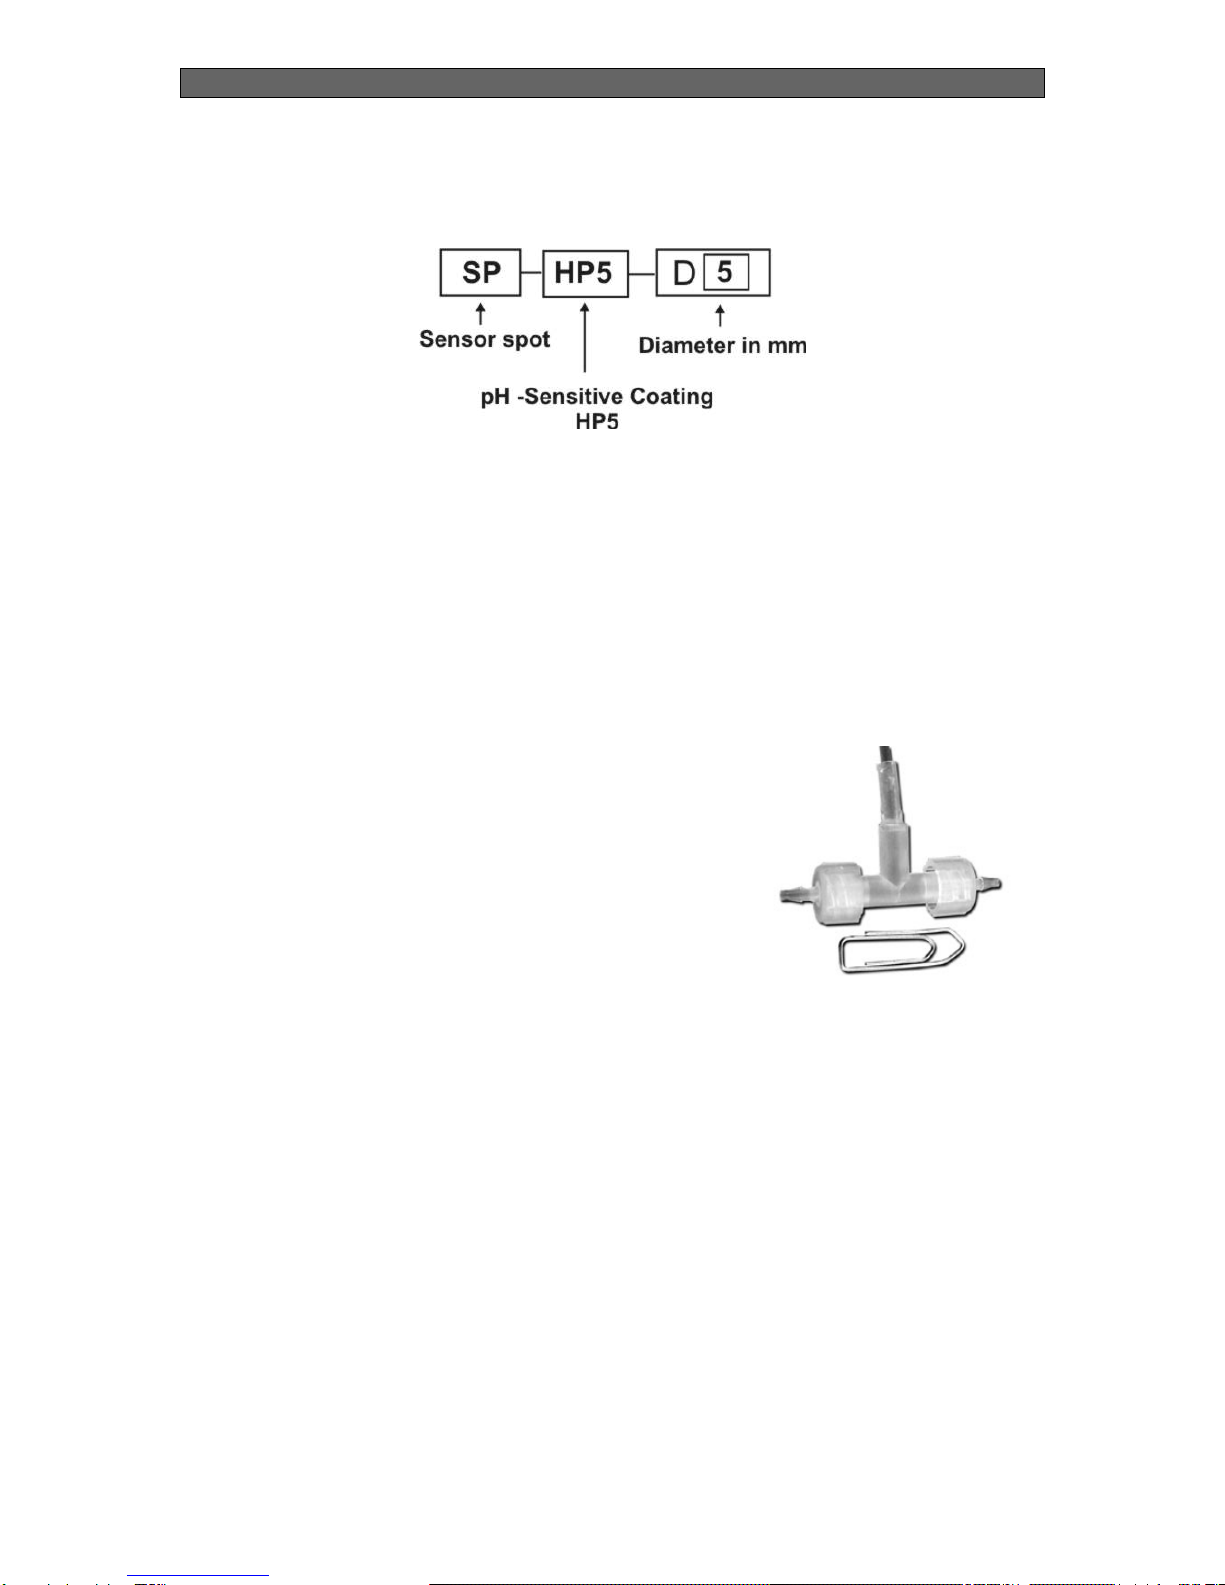
3.9.1 Flow-Through Cell - pH minisensor
Flow-through cell pH minisensor (FTC-HP8) is a
miniaturized fiber optic pH sensor integrated in a T-
shape flow-through cell.
The FTC is connected to the PreSens pH meter pH-
10 mini, pH-4 mini or pH-1 mini by a polymer optical
fiber (POF) with 2 mm diameter as a light guide. The
volume for liquid inside the FTC is about 300
microliters.
The standard T-shape FTC can be easily connected
via Luer-Lock adapters to external tubings. Liquids
(like water, blood, etc.) can be pumped through the
cell.

pH-Sensitive Minisensors
15
Schematic drawing of the Flow-Through Cell minisensor
Cell volume 300 µl
•Online monitoring
•No reference electrode needed
•pH measurement in the physiological range of pH 5.5 - 9
•Resulution: up to 0.005
•Robust sensor with a good long-term stability (0.1 pH within a week in 2 min mode)
•Sterilizable by gamma irradiation
•Easy to handle
•Signal independent to flow velocity
•Insensible towards electrical interferences and magnetic fields
•This Flow-Through Cell minisensor can be used in combination with the pH meter pH-1
mini, pH-4 mini and pH-10 mini.
Order code for pH Flow-Trough cells
The order code key of the Flow-Through cell is shown below.
General Instructions
16
4 Software
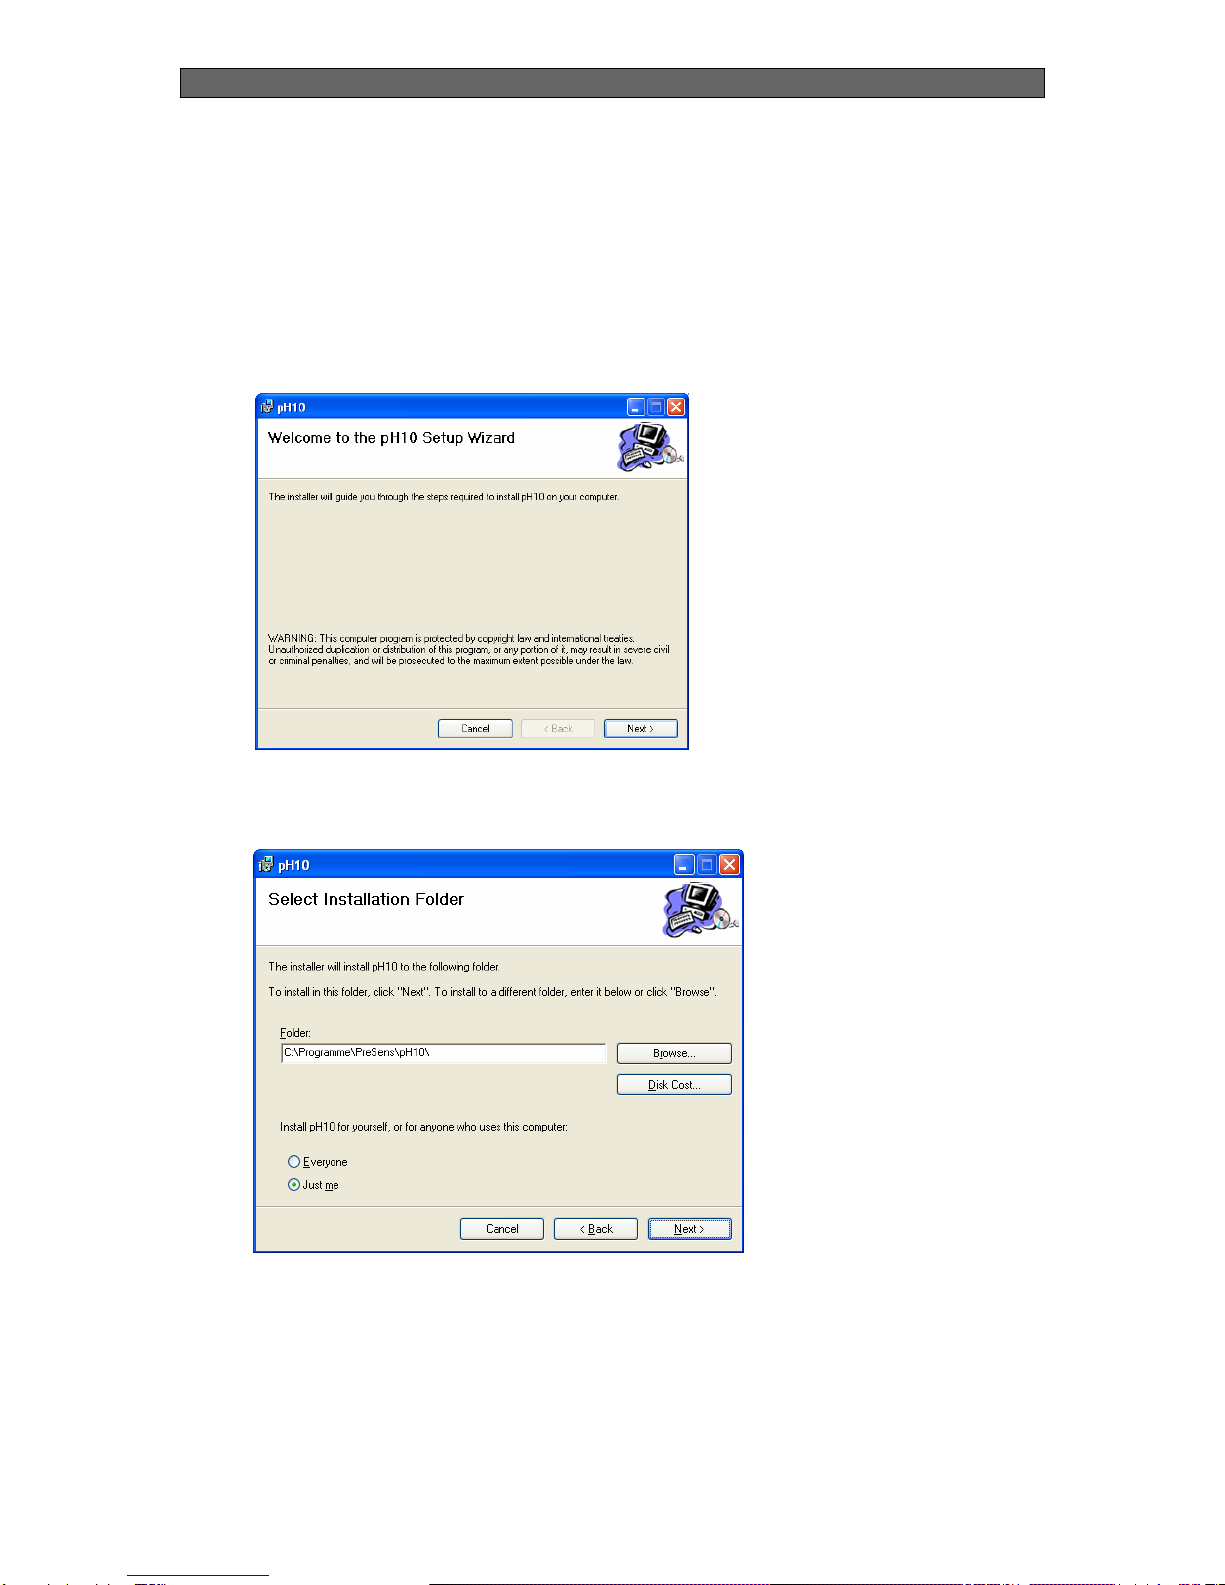
4.1 Software Installation
This software is compatible with Windows XP.
1. Insert the supplied disc/CD into the respective drive. Start the file setup.exe
2. Follow the instructions of the installation wizard
3. Choose the folder for installing the software
General Instructions
17
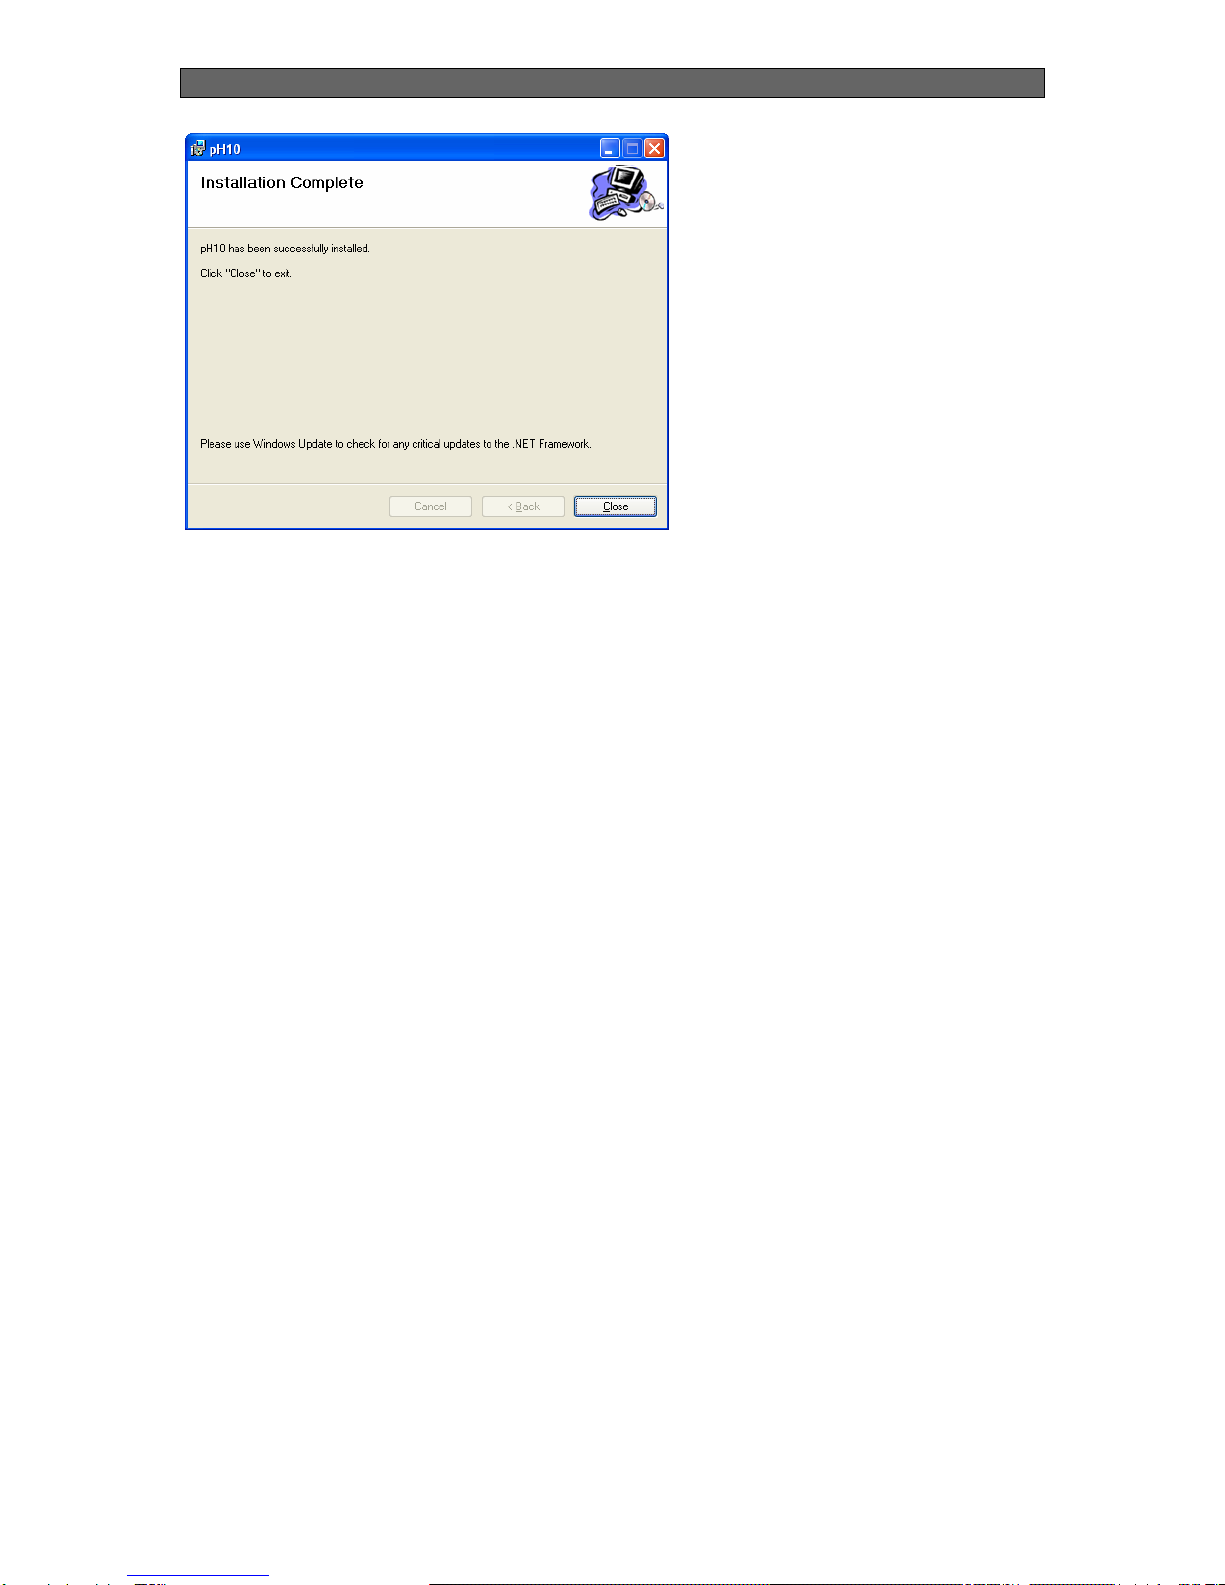
Now the Software is properly installed and you will find a link in your Start menu.
General Instructions
18
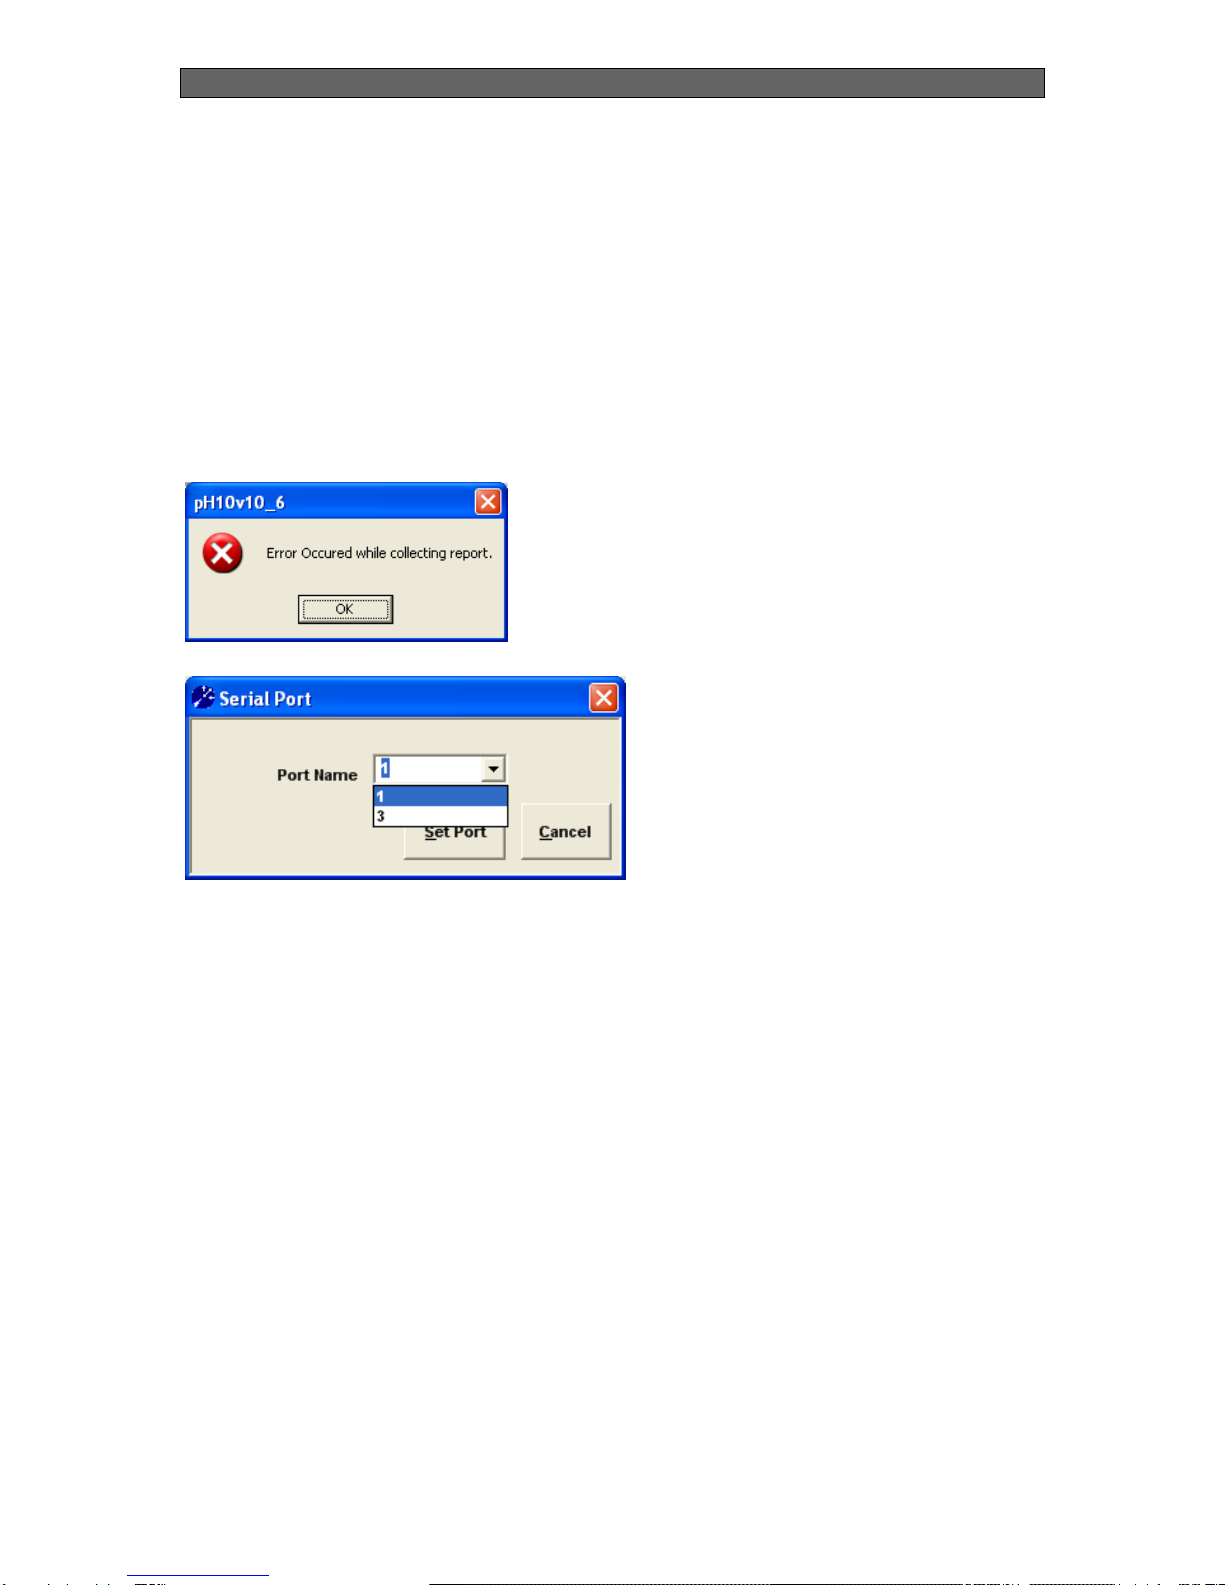
4.2 Starting pH-10 mini and its Software
1. Connect the pH-10 mini via the supplied RS-232 serial cable to a serial port of your
computer. Tighten the cable with the screws to your computer.
2. Connect the power supply.
3. Please close all other applications as they may interfere with the software. Start the
program pH10v10_6.
4. The software is connecting to the instrument and uploading system information. This
may take a few minutes.
If the instrument is not switched on or not connected to the right com port an error message
will occur:
Press OK and choose the right com port:
Table of contents
Other PreSens Measuring Instrument manuals


