PRESONUS Eris HD10BT User manual
Eris HD10BT
Professional Headphones with Active Noise
Canceling and Bluetooth
®wireless technology
Owner’s Manual
www.presonus.com
®
English

Table of Contents
1 Overview — 1
1.1 Introduction — 1
1.2. What is in the box — 1
1.3. Companion PreSonus Products — 2
2. Hookup — 3
2.1. Right Earpiece Connections and Controls — 3
2.1.1. Bluetooth Pairing and Powering — 3
2.1.2. Track Navigation
and Bluetooth volume — 3
2.1.3. Phone Call Controls — 4
2.1.4. Hardwiring — 5
2.2. Left Earpiece Connections and Controls — 5
2.2.1. Active Noise Canceling (ANC) — 5
2.2.2. Charging — 5
1
1 Overview
1.1 Introduction
Eris HD10BT
Owner’s Manual
1Overview
1.1 Introduction
Thank you for purchasing the PreSonus® Eris™ HD10BT professional headphones
with Active Noise Canceling and Bluetooth wireless technology. PreSonus®
Eris HD10BT headphones provide studio-quality audio performance with the
mobility and freedom of Bluetooth connectivity. Active Noise Canceling (ANC)
reduces ambient sounds by up to 18 dB – so whether you’re walking down a
busy street, or sitting in the middle seat on an airplane, you can listen to your
favorite music, podcasts, or binge-worthy TV series in vivid sonic fidelity.
PreSonus Audio Electronics is committed to constant product improvement,
and we highly value our customers and their creative endeavors. We
appreciate the support you have shown us by purchasing your Eris HD10BT
headphones and are confident that you will enjoy it for years to come!
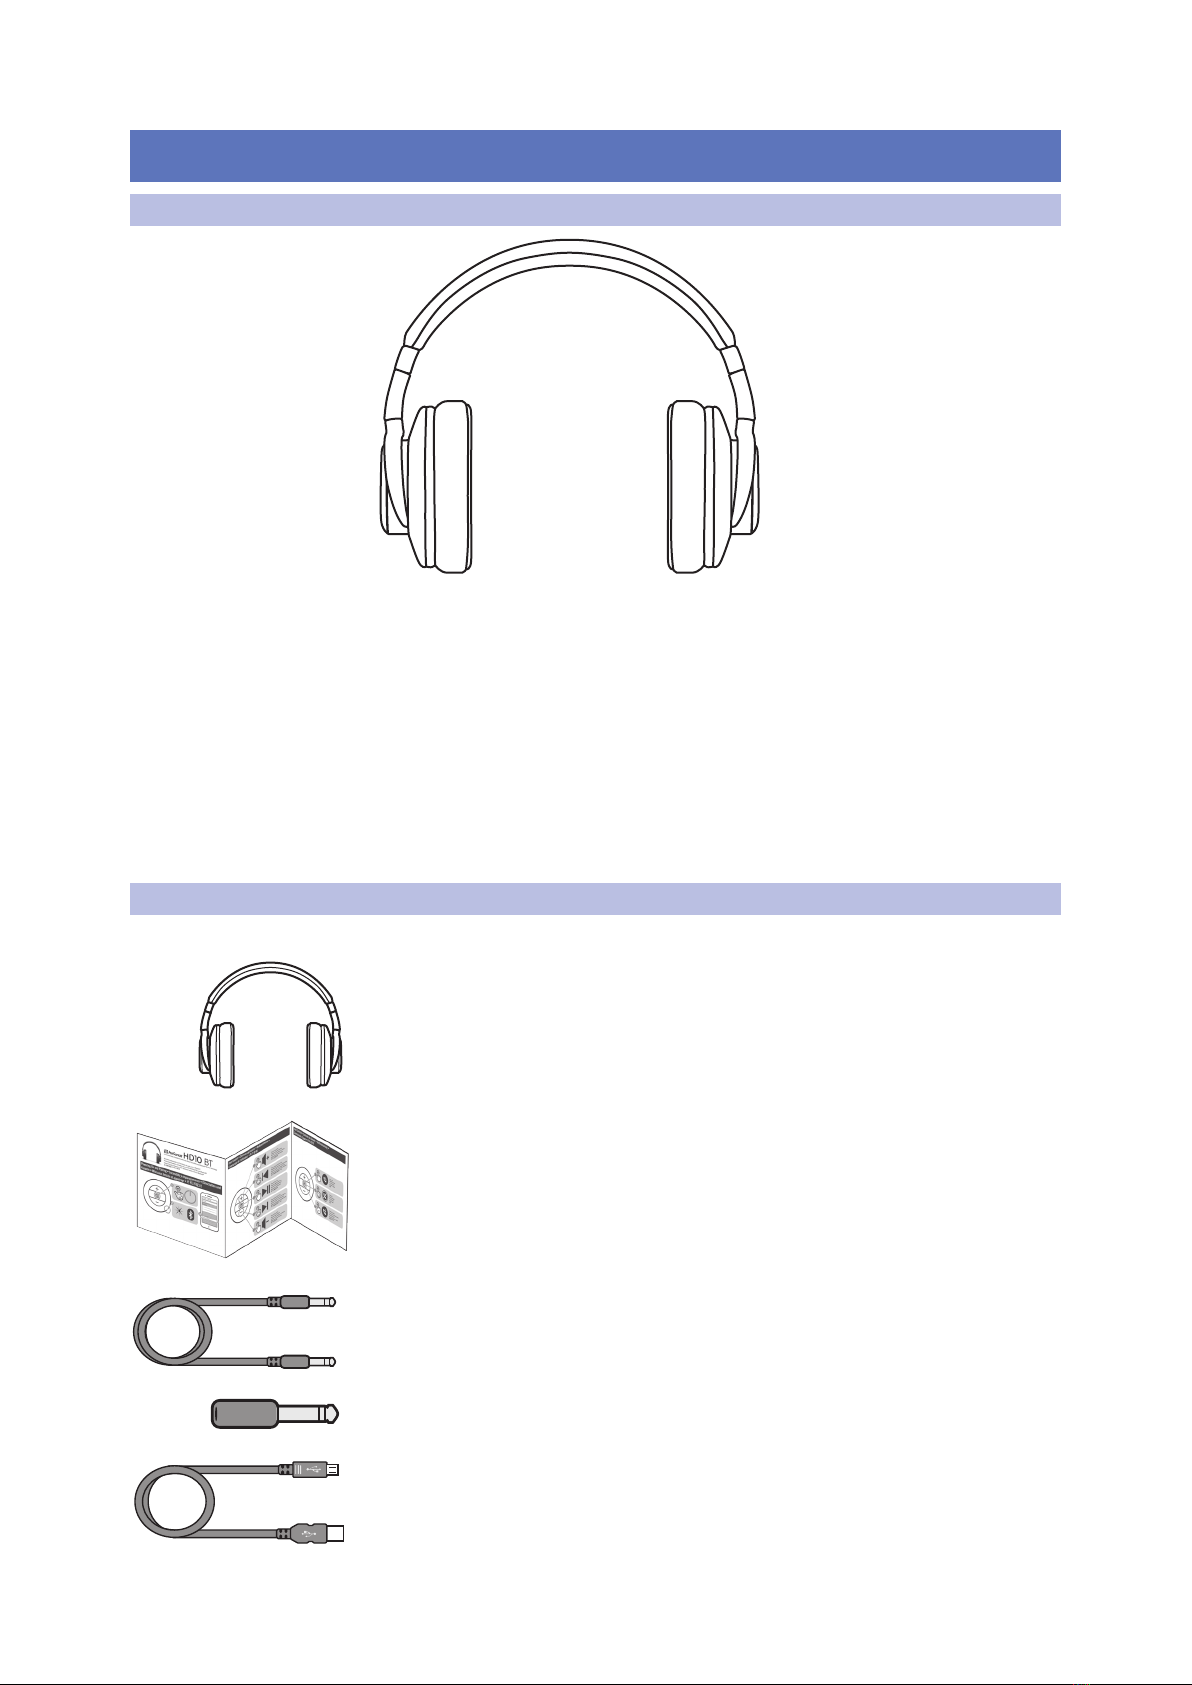
1.2. What is in the box
Your Eris HD10BT package contains the following:
PreSonus Eris HD10BT professional headphones
Quick Start Guide
1M 1/8”(3.5mm) TRS-TRS cable
1/8”(3.5mm) TRS-to-1/4” (6.35mm) TRS adapter
1M USB charging cable

2
1 Overview
1.3. Companion PreSonus Products
Eris HD10BT
Owner’s Manual
Hardshell carrying case
PreSonus Health, Safety, and Compliance Guide for Headphones
1.3. Companion PreSonus Products
Thanks for choosing PreSonus! As a solutions company, we believe the best way to
take care of our customers (that’s you) is to ensure that you have the best possible
experience from the beginning of your signal chain to the end. To achieve this goal,
we’ve prioritized seamless integration throughout every design phase of these
products from day one. The result is systems that communicate with each other
as intended – straight from the box – without excessive configuration hassles.
We’re here for you. Find out more at www.presonus.com
PreSonusSafety Warnings and Instructions
Electricalinformationand warning symbols for PreSonus products are located on the rear electrical panel of the unit
adjacenttothe electrical plug or on the bottom of the unit along with other product compliance information.
Thislightningflash with arrowhead symbol within an equilateral triangle is intended to alert the user to the presence of non-
insulated“dangerousvoltage”withinthe product ’senclosure that may be of sufficient magnitude to constitute a risk of electric shock.
WARNING:TOREDUCE THE RISK OF ELECTRIC SHOCK, DO NOT REMOVE COVER (OR BACK) AS THERE
ARENOUSER-SERVICEABLE PARTS INSIDE. REFER SERVICING TO QUALIFIED PERSONNEL.
Theexclamation point within an equilateral triangle is intended to alert the user to the presence of
importantoperatingand maintenance instructions in the literature accompanying the appliance.
CAUTION:Toreduce the risk of electric shock, do not expose this appliance to rainand moisture. Do not expose this device
todrippingor splashing liquids and no object filled with liquids, such as vases, should be placed on the device.
CAUTION:Theseservice instructions are for use by qualified service personnel only. Toreduce the risk of electric shock,
donotper form anyser vicing other than that contained in the operationinstruc tions.Qualified ser vice personnel must
performrepairs.
1. Read these instructions.
2. Keepthese instruc tions.
3. Heed all warnings.
4. Followall instructions.
5. Do not use this device near water.
6. Clean only with a dry cloth.
7. Do not install near any heatsources, such as radiators, heat registers, stoves,
orotherdevice (including amplifiers) that produce heat.
8. Protectthe power cord from being walked on or pinched, particularly at plugs,
conveniencereceptacles,and the point where they exit from the device.
9. Useonly attachments/accessories specified by PreSonus.
10. Unplug this device during lightning storms or when unused for long periods.
11. Servicing is required when the device has been damaged in any way,such as if a power-supply cord or plug is
damaged;orliquid is spilled, or objects have fallen into the device; or if the device has been exposed to rain
ormoisture,does not operate normally, or has been dropped. All PreSonus products in the USA should be
servicedatthe PreSonus factor y in Baton Rouge,Louisiana. If your PreSonus product requires a repair, contact
contacttheirlocal distributor. Yourdistributor’s contact information is available at www.presonus.com.
12. Protective grounding(earthing) terminal.The apparatus should be connected to a
mainssocketoutlet with a protective grounding(earthing) connection.
13. Where the Mains plug or an appliance coupleris used as the disconnec t device,
thedisconnectdevice shall remain readily operable.
14. The use of apparatus is in moderateclimates.
15. Please allow 5cm around the apparatusfor sufficient ventilation; the ventilation should not be impeded
bycoveringthe ventilation openings with items, such as newspapers, table-cloths, curtains, etc.
SPLWarning:
Exposuretoextremely high noise levels may cause permanent hearing loss. Individuals vary considerably in susceptibility to
noise-inducedhearingloss but nearly everyone will lose some hearing if exposed to sufficiently intense noise for a period of
time.TheU.S. Government’sOccupational Safety and Health Administration (OSHA) has specified the permissible noise level
exposuresshownin the following chart:
Duration(hours) per day SPL(dBA) TypicalExample
890 Duoin a small club
692
495 Subway
397
2100 Veryloudclassical music
1.5 102
1105
0.5 110
0.25or less 115 Rockconcert
WARNING:
Cancerandreproductive harm - www.p65warnings.ca.gov
PreSonusCompliance Information
EuropeanUnion (EU)
TheCEmark on this product indicates that the device is compliant with the
EUCouncilDirectives
2014/35/EULowVoltage Directive
2014/30/EUEMCDirective
WEEEThissymbol on this product or its packaging indicates that this product must not be disposed of with other
waste.Instead,it is your responsibility to dispose of your waste equipment by handing it over toa designated
collectionpointfor the recycling of waste electrical and electronic equipment. The separate collection and recycling
ofyourwaste equipment at the time of disposal will help conserve natural resources and ensure that it is recycled
inamanner that protects human health and the environment. For more information about where you can drop
offyourwaste equipment for recycling, please contact your local city recycling office or the dealer from whom you
purchasedtheproduct.
Radioand Television Interference
Ifthesesymbols are marked on the product, the device complies as follows:
AnyChangesor modifications not expressly approved by the party responsible for compliance could void the user’sauthority to operate
theequipment.
USA:Thisequipment has been tested and found to comply with the limits for a Class B digital device, pursuant to
Part15of the FCC Rules. Operation is subject to the following two conditions: (1) This device may not cause harmful
interference,and(2) this device must accept any interference received, including interference that may cause
undesiredoperation.These limits are designed to provide reasonable protectionagainst harmful inter ferencein a
residentialinstallation.This equipment generates, uses, and can radiateradio frequency energy, and, if not installed
inaccordancewith the instructions, may cause harmful interference to radio communications. However,there is no guarantee that
interferencewillnot occur in a particular installation. If this equipment does cause harmful interference to radio or television reception,
whichcanbe determined by turning the equipment off and on, the user is encouraged to try to correct the interference by one or more of
thefollowingmeasures:
•Reorientorrelocate the receiving antenna.
•Increasetheseparation between the equipment and the receiver.
• Connecttheequipment into an outlet on a circuit different from that to which the receiver is connected.
• Consultthedealer or an experienced radio/TV technician for help.
FCCRadiationExposure Statement:
Thisequipmentcomplies with FCC radiation exposure limits set forth for an uncontrolled environment.This equipment should be installed
andoperatedwith minimum distance 20cm between the radiator& your body.
Thistransmittermust not be co-located or operating in conjunction with any other antenna or transmitter.
CAUTION:Changesor modifications to this device not expressly approved by PreSonus Audio Electronics could void the user’sauthority to
operatetheequipment under FCC rules.
AustralianCompliance:This equipment complies with Radio communication Devices Notice 2003; or Radio communication
Labeling(ElectromagneticCompatibility) Notice 2008; or Radio communication (Compliance Labeling Electromagnetic
Radiation)LabelingNotice 2003.
ICWARNING
ICRSSwarning: This device complies with Industry Canada licence-exempt RSS standard (s). Operation is subject to the following two
conditions:(1)this device may not cause interference, and (2) this device must accept any interference,including interference that may
causeundesiredoperation of the device. Under Industry Canada regulations, this radio transmitter may only operate using an antenna of a
typeandmaximum (or lesser) gain approved for the transmitter by Industry Canada. To reducepotential radio interference to other users,
theantennatype and its gain should be so chosen that, the equivalent isotropically radiated power (e.i.r.p.)is not more than that necessary
forsuccessfulcommunication.
Thisradiotransmitter (identify the device by certifcation number, or model number if Category II) has been approved byIndustr y Canada
tooperatewith the antenna types listed below with the maximum permissible gain and required antenna impedance for each antenna
typeindicated.Antenna types not included in this list, having a gain greater than the maximum gain indicated for that type, are strictly
prohibitedforuse with this device.
ICRadiationExposure Statement:
Thisequipmentcomplies with IC RF radiation exposure limits set forth for an uncontrolled environment.This transmitter must not be
co-locatedoroperating in conjunction with any other antenna or transmitter.
ICES003:ThisCAN ICES3 (B)/NMB3(B) digital apparatus complies with Canadian ICES003.
PreSonus Health, Safety, and ComplianceGuide Headphones
PreSonus Health, Safety, and ComplianceGuide Headphones
®
PreSonusHealth, Safety, and Compliance Guide. Part# 70-50000015-A
©2019 PreSonus Audio Electronics, Inc. All Rights Reserved.
18011Grand Bay Ct. • Baton Rouge, Louisiana70809 USA • 1-225-216-7887
www.presonus.com
3
2. Hookup
2.1. Right Earpiece Connections and Controls
Eris HD10BT
Owner’s Manual
2. Hookup
2.1. Right Earpiece Connections and Controls
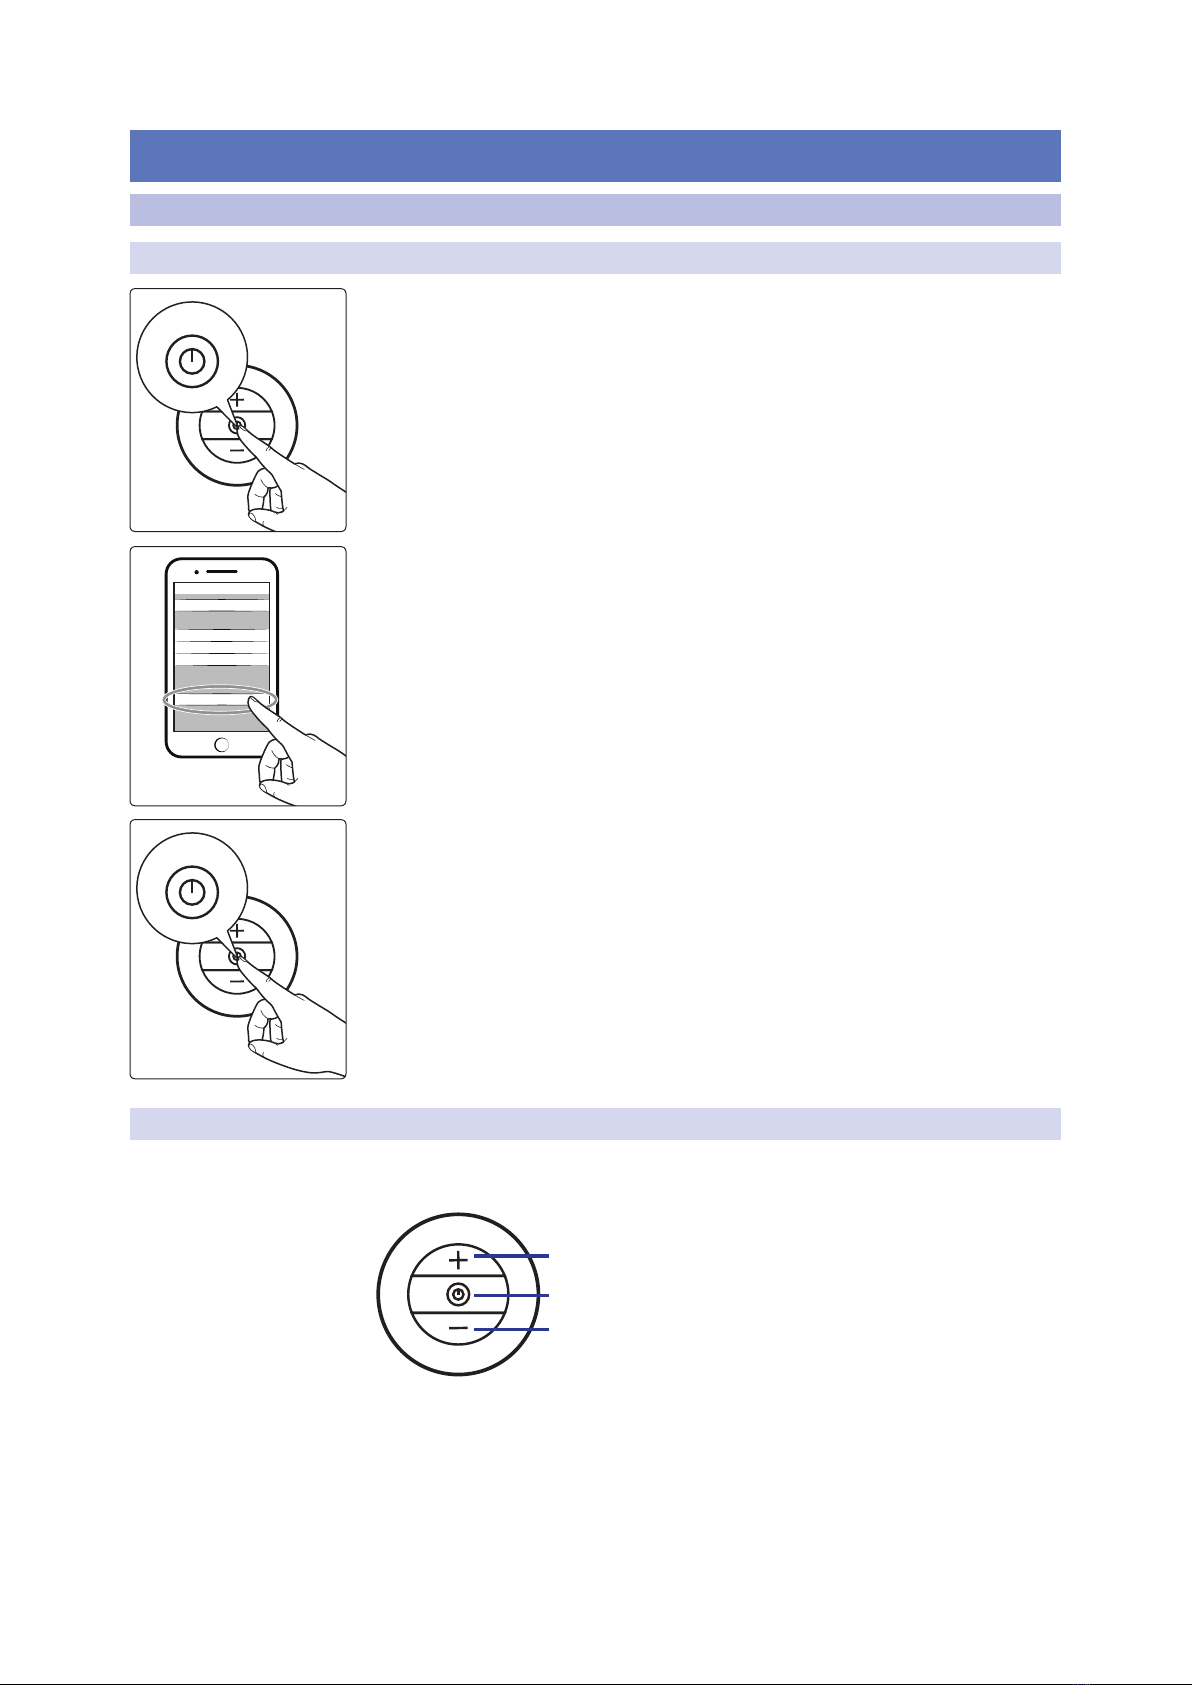
2.1.1. Bluetooth Pairing and Powering
To power on your Eris HD10BT headphones, press and hold the center button for 3
seconds, if no Bluetooth device is paired or the previously paired Bluetooth device is
not available, your Eris HD10BT headphones will enter pairing mode.
While in pairing mode, the LED on the lower right of the earpiece will flash blue and red.
On your Bluetooth device, select “PreSonus HD10BT” from the pairing menu.
To power down your Eris HD10BT headphones, press and hold the center button for
5 seconds.
2.1.2. Track Navigation and Bluetooth volume
The following controls are available for use with your
favorite Bluetooth device while listening to audio:
1
2
3
1. Volume Up / Prev Track. Press once to increase the Bluetooth
playback volume. Press and hold to navigate to the previous track.
2. Play/Pause. Press this button to remotely start and
stop playback on your Bluetooth device.
3. Volume Down / Next Track. Press once to lower the Bluetooth
playback volume. Press and hold to advance to the next track.
Hold for 3 sec
Bluetooth< Settings
Bluetooth
PreSonus HD10BT
My Devices
Other Devices
Now discoverable as “My Phone”
Hold for 5 sec
4
2. Hookup
2.1. Right Earpiece Connections and Controls
Eris HD10BT
Owner’s Manual
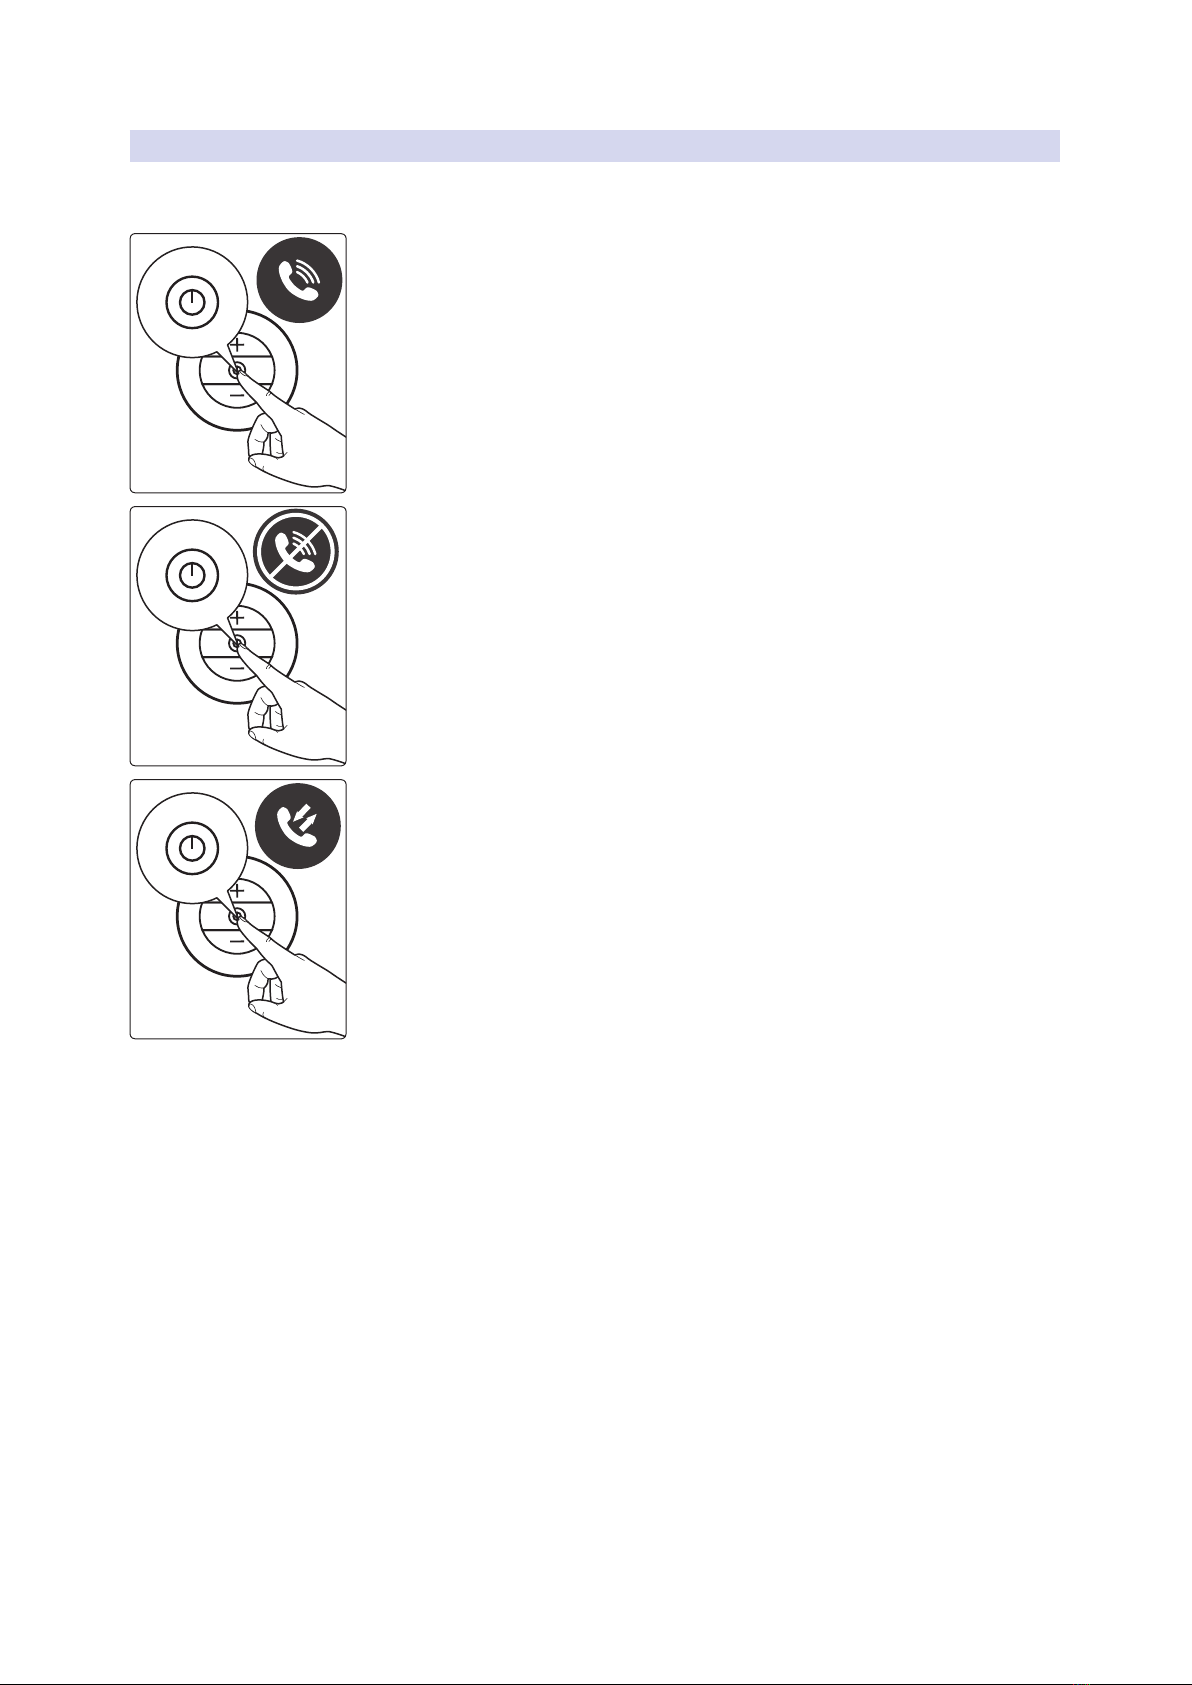
2.1.3. Phone Call Controls
The center button can also be used to remotely answer or reject calls when
your phone is paired via Bluetooth to your Eris HD10BT headphones:
Press once to answer a call.
Press and hold for 1 second to reject a call.
Press twice to redial the last number.
Hold for 1 sec
Press 2x
5
2. Hookup
2.2. Left Earpiece Connections and Controls
Eris HD10BT
Owner’s Manual
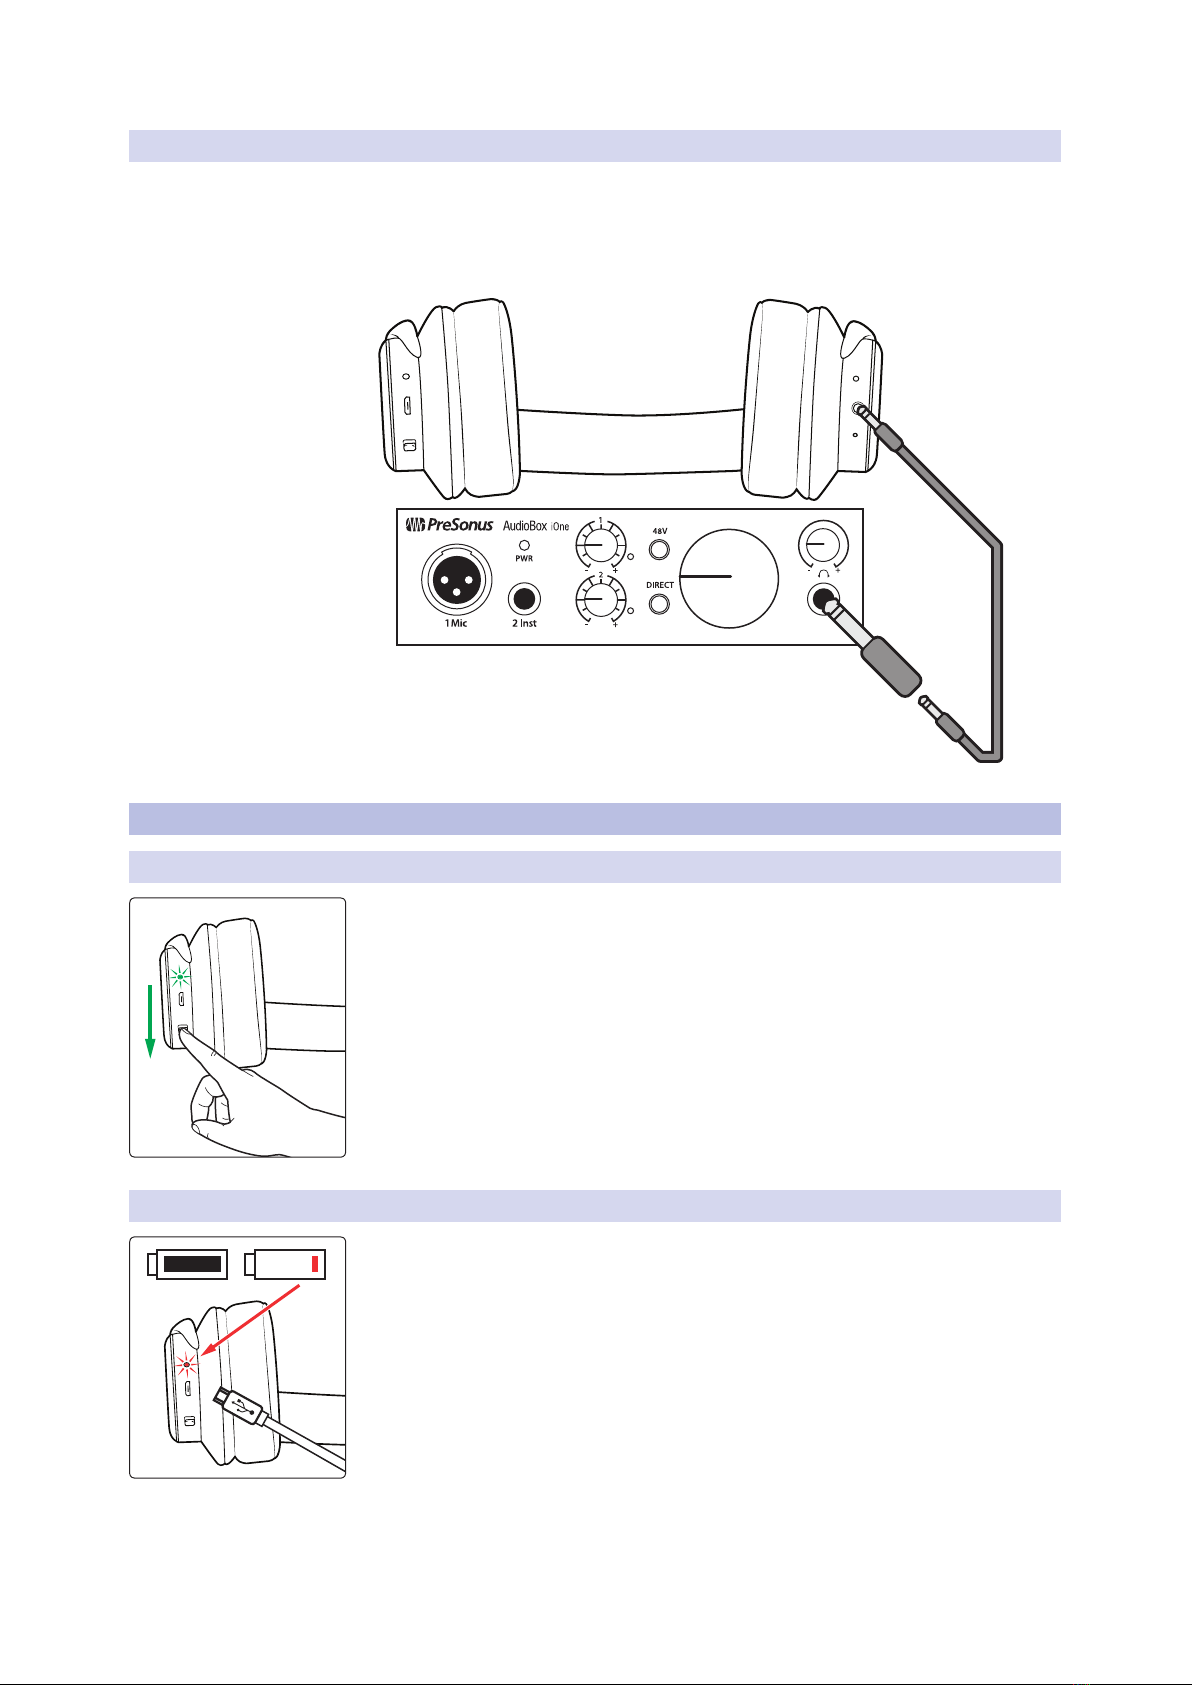
2.1.4. Hardwiring
Your Eris HD10BT headphones can be used wired when the battery is
low, or if you would like to connect them a device that does not offer
Bluetooth. The 1/8”TRS jack is located on the bottom of the Right
Earpiece. Use the included cable or any standard 1/8”TRS cable.
2.2. Left Earpiece Connections and Controls
2.2.1. Active Noise Canceling (ANC)
On the bottom of the Left earpiece, you will find Active Noise Canceling (ANC)
switch. Active Noise Canceling can be used independently from Bluetooth listening.
However, ANC does require that your Eris HD10BT headphones be powered on.
Note: Using ANC will reduce your battery charge at a faster rate than simply using
Bluetooth wireless.
When ANC is active, the adjacent LED will illuminate green.
2.2.2. Charging
Connect the included USB cable to the charging port to charge your Eris HD10BT
headphones using either a standard USB outlet charger or a computer. The ANC LED
will illuminate red while charging. When the battery is fully charged, the LED will turn
off. Once charged, the Eris HD10BT headphones provide up to 8 hours of Bluetooth
playtime with ANC active, and up to 16 hours ANC off.
Do not use Bluetooth while charging.

© 2019 PreSonus Audio Electronics, Inc. All Rights Reserved. AudioBox, Eris, and PreSonus are trademarks or registered trademarks of PreSonus Audio Electronics, Inc. Bluetooth
is a registered trademark of Bluetooth SIG. Other product names mentioned herein may be trademarks of their respective companies. All specifications subject to change without
notice...except the recipe, which is a classic.
Dinner is Served
Added bonus: PreSonus’previously Top Secret recipe for…
Chicken and Andouille Gumbo
Ingredients:
•1 C All-Purpose flour
•¾ C Vegetable Oil
•1 large onion (diced)
•1 small onion (quartered)
•6 celery stalks (diced)
•1 large green bell pepper (diced)
•3 cloves garlic (2 minced, 1 whole)
•1 lb link Andouille sausage
•4 Chicken leg quarters
•4 qt water
•4 bay leaves
•1 tsp thyme
•1 tsp Old Bay seasoning
•1-2 C frozen okra, sliced
•¼ C fresh parsley, minced
•6-8 eggs (optional)
Cooking Instructions:
1. In a large pot, combine whole chicken leg quarters, water, quartered onion, Old Bay, 2 bay leaves and 1 whole clove garlic.
Cover and bring to a low boil. Simmer stock until chicken is falling off the bone. Remove the chicken and set aside. Discard
the onion, bay leaves, and garlic, reserving the liquid.
2. In a heavy saucepan, heat 1 Tbsp of the oil on medium high heat and brown the andouille until it is cooked through. Set
aside sausage for later.
3. In the same saucepan, add and heat remaining oil. Slowly add flour 1-2 Tbsp at a time, stirring continuously. Continue
cooking and stirring the roux until it is a dark brown (it should look like melted dark chocolate). Be careful to not to get the
oil too hot or the flour will burn and you’ll have to start over.
4. Once roux has reached the correct color, add diced onion, celery, green pepper, and minced garlic. Cook until vegetables
are very tender. Do not cover.
5. Slowly add 1 quart of chicken broth and bring to a low boil, stirring constantly.
6. Transfer roux mixture to a soup pot and bring to low boil. Do not cover, the roux will settle on the bottom of the pot and burn.
7. Add remaining chicken broth, bay leaves, and thyme. Simmer for 30 minutes.
8. While gumbo is simmering, debone and shred chicken and slice the andouille.
9. Add chicken and andouille to gumbo and return to a simmer. Simmer for 30-45 minutes.
10. Stir in frozen okra and parsley and bring to a rolling boil.
11. Optional: Crack one egg into a teacup and quickly pour into the boiling gumbo. Repeat with the other eggs being careful
not to cluster them too closely. After all the eggs have risen back to the surface, reduce heat and simmer.
12. Correct seasoning with salt and pepper (red, white and/or black) if necessary.
13. Serve over rice with potato salad.
Serves 12

18011 Grand Bay Ct. • Baton Rouge,
Louisiana 70809 USA• 1-225-216-7887
www.presonus.com Part# 70-52000141-A
®
Eris HD10BT
Professional Headphones with Active Noise
Canceling and Bluetooth
®wireless technology
Owner’s Manual
Other manuals for Eris HD10BT
2
Table of contents


