PRESTIGE Fietsen BAFANG MAX User manual

1
MANUAL
BAFANG MAX
ENG

2
PREFACE
My brand new electric beauty
You are the proud owner of a Prestige electric bicycle.
The bicycle is provided with electronic pedal assistance which guarantees a completely new
way of cycling.The pedal assistance makes cycling lighter and more comfortable than ever.
Whether you use the bike for commuting, heavy shopping or just to get around, it is as if you
always have the wind in your sails.Thanks to the reliable, durable and easy to operate electro-
nic pedal assistance, exertion is now relaxation!
Chances are you have not owned a bicycle with electric pedal assistance before. So please
read our manual rst to learn more about your electric bike, how to use the LCD display,
and to get even more facts and tips. For more information or the latest news, please visit our
website:
www.prestigeetsen.be

3
Exploring the display 4
Explore the control panel 5
Operating the display 5
Bike range and battery capacity 7
Disconnecting and removing the battery 7
Battery charging and more info 7
Pedal assistance 8
Tire pressure 10
Shifting gears 10
Checking your bike and tips 10
Cleaning and treatment 11
Service and inspection 11
Warnings 12
content

4
1. EXPLORING THE DISPLAY
The display only works when the battery is in the bike and the battery is on.
Het scherm Het bedieningspaneel
A - When it is necessary to carry out a service
the SERVICE symbol will appear on the
screen. Please make an appointment with Prestige for main
tenance.
B - Menu
C - Speed display in km/h or mile/h
D - Speed mode : average speed (AVG km/h)
maximum speed (MAXS km/h)
E - Error display: when an error occurs, the symbol of the
symbol of a wrench will appear.
F - Distance display (distance travelled)
G - Speed modes from 1 to 5 (1: minimum support - 5: maxi-
mum support) 5: maximum assistance)
H - Walk assist: While walking and pushing the bike, ‘WALK
I - Lighting: This symbol appears when your front and rear lights
are on. back light are on.
J - Distance mode / TRIP: the distance of the ride.
TOTAL: the total distance you have already covered.
K - Battery indication
Insert the battery from the back between the opening and push it gently forward
until you hear a click. Remember to securely lock your battery before you start driving.

5
2. Explore the control panel
3. Operating the display
Turning On/Off
Press the power button for 2 seconds to start the display. Press the power button for 2 seconds
to turn off the display.When the pedelec is not used for 5 minutes the display will turn itself off.
Gear Mode
In the manual gear mode you can use the + and - buttons to get the desired support. In level 0
the bicycle will not provide any support. In level 1 the bicycle will give the minimum support and
in level 5 the maximum support.
Switching between speed menu and distance menu
Press the “i” or menu button brie y to switch between the speed menu and the distance menu.
TRIP (km): the distance of the driven trip. (now)
TOTAL (km): the total ride distance of the bicycle (over the entire period)
MAXS (km/h) maximum ridden speed
AVG (km/h): average of the ridden speed
A - more assistance / up
B - less assistance / down
C - lighting
D - switch on / off
E - mode / menu
6
Front light and display light
Press the button for 2seconds:
The display light, front light and rear light will turn on.
Press the button for 2 seconds: to turn the lights off again.
(When the display is in a dark environment, it will automatically turn on the front light,
(When the display is in dark surroundings, it will automatically turn on the front light, back light,
and display. If the lights are turned off manually (by pressing the button), they will have to be
turned on again manually and will not turn on automatically. ) There are 5 settings for the
backlight to adjust the brightness of the screen.
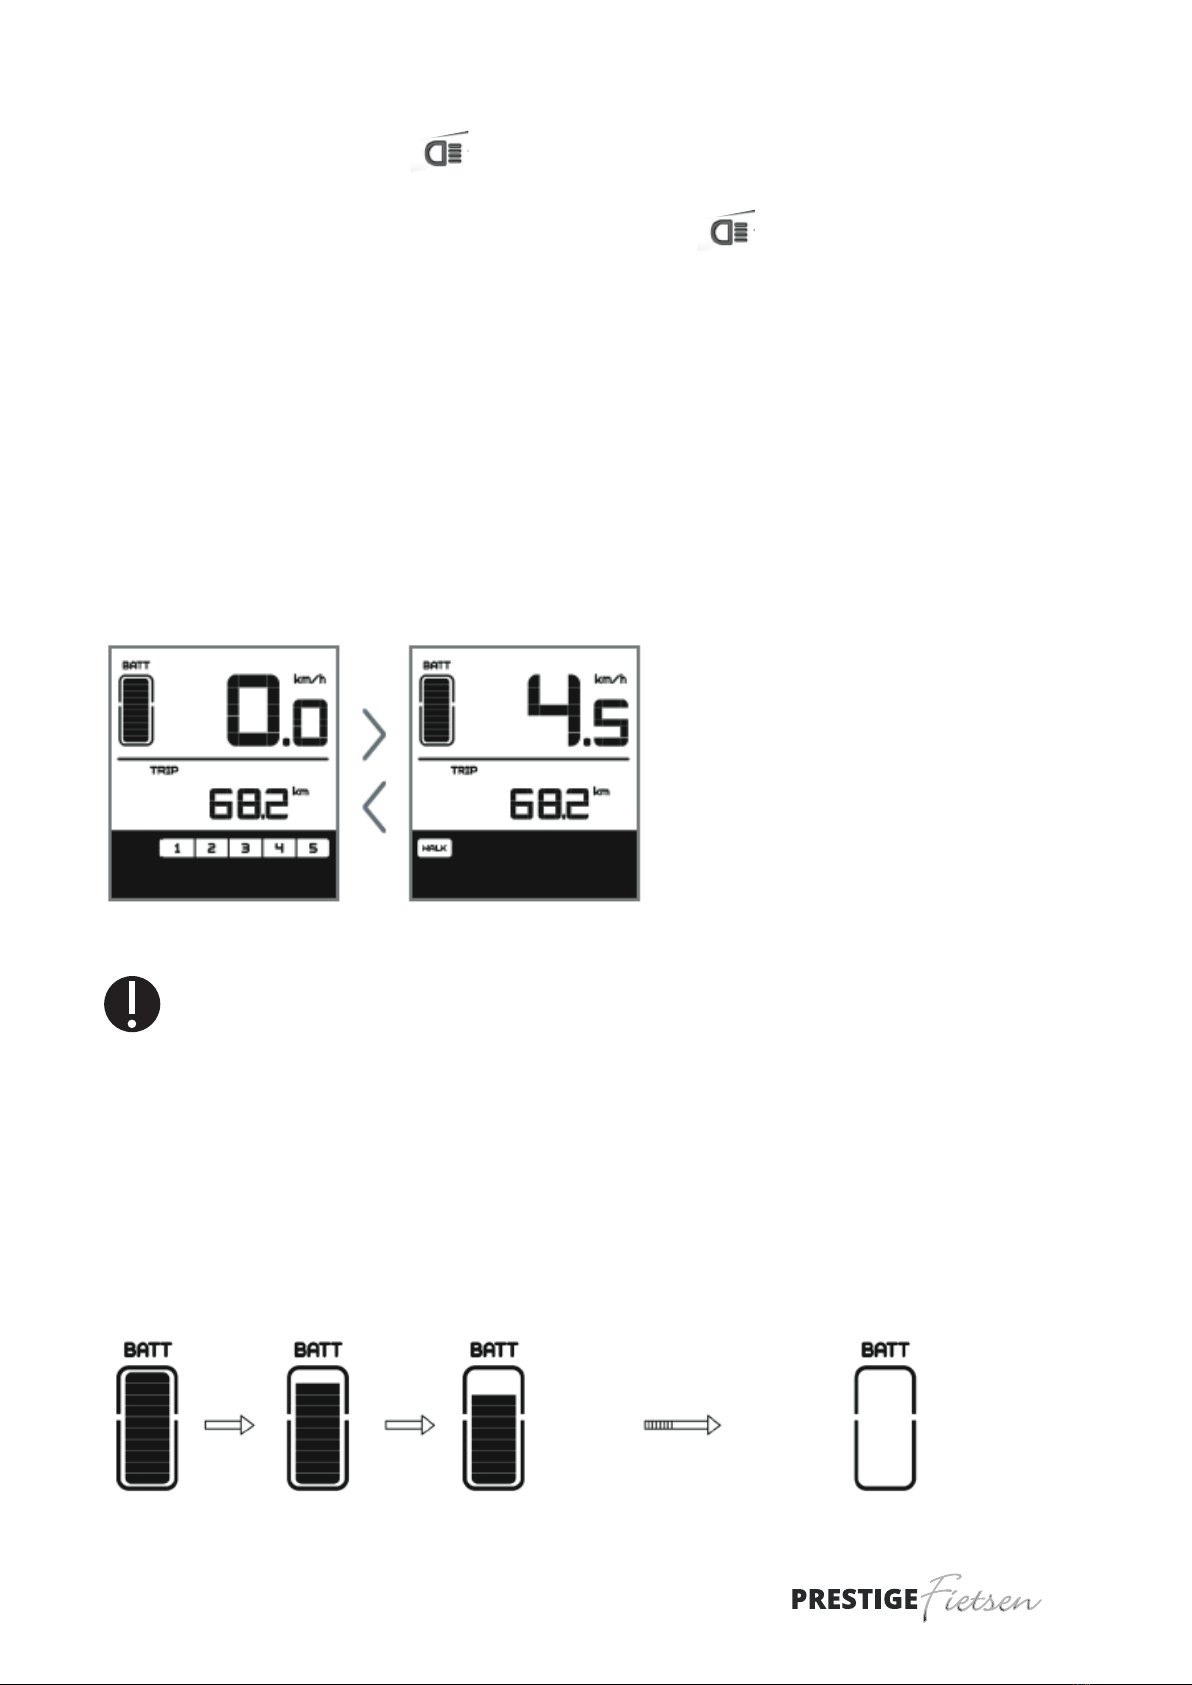
Walking assistance
Press and hold the “-” button.This will put us into the walk assist
mode and the WALK symbol will appear on the screen. When you
release the “-” button the e-bike will end the walk assist mode.
Caution! Only use the walking assistance when you are standing rmly beside the bike
and there is a (slightly) sloping surface. Keep at least one hand on the brake. The Walking
Assistance function has a speed of 6km/h
Battery indication
When the battery is fully charged, the 10 segments will be colored completely black.
As the battery decreases in size, fewer segments will turn black.When the battery is completely
empty and needs to be recharged urgently the 10 segments will be empty and the black edge
of the battery will start to light up.
Press the button for 2seconds:
No walking assistance Walking assistance on

7
4. Bike range and battery capacity
How long is the range of my electric bike?
The total distance you can ride with your Prestige e-bike without recharging is called the range.To
properly assess this, leave the bike/battery on the charger overnight.The range should be measu-
red during one ride and not spread over several days. Batteries discharge slowly, even when the
bike is not being used.When the battery is in the bike, it discharges faster than when it is remo-
ved from the bike and left inside.
Factors
Inuencing factors action radius:
• The total weight (weight of bike + rider + load)
• The resistance (wind force, tire pressure, acceleration, road surface condition and height
differences)
The pedal power level:
• Your driving behavior (timely up- and downshift and the speed driven)
• The outdoor temperature
• Age of battery (Battery capacity decreases as battery ages)
5. Disconnecting and removing the
battery
Disconnecting and removing the battery
On the left front of the pack carrier is the battery lock.This allows you to lock the battery pack
to the bike or disconnect it from the bike.
To unlock the lock: Insert the key into the lock and turn it counterclockwise.
Use the handle on the back to pull the battery pack out from under the rack.
CAUTION! Remove the key after putting back the battery, in connection with
possible loss and/or theft of the key and battery.
6. Battery charging and more info
Battery charging
With the included charger you can charge the battery.You can charge the battery pack either on
the bike or separately from the bike. Place the charger in the left rear corner of the battery pack.
The initial charging time for the Prestige battery is approximately 7 hours. During charging a red
light will light up.When the battery is fully charged, this light will be green.

8
CAUTION! Disconnect the charger when the battery is charged. This will prevent the
battery life from being shortened.
CAUTION! If the battery is not used for a long time, it may suffer irreparable damage.
Be sure to charge the battery every 3 weeks for half an hour.
CAUTION! If the bike is not used for a long time, we recommend removing the
battery from the bike.
CAUTION! Use your battery charger only in dry, well-ventilated areas.
CAUTION! The battery charger is not resistant to moisture and/or drop shocks.
CAUTION! When the battery is completely empty, charge it immediately. If cells are left
empty for a long time, they may be damaged beyond repair.
What else you should know about your battery.
Try to ride your electric bicycle as much as possible, if you don’t use it enough the battery could
discharge and break down.Also try to ride it 2 months a year in the winter months.
The battery is splashproof and therefore resistant to rain.You can therefore use your bike in bad
weather.
However, do not expose the battery to large amounts of water.
The performance of your battery will decrease at low temperatures.
Do not expose the battery to high temperatures (> 50 °C), such as heating, direct sunlight and re.
Do not disassemble the battery. Consult the dealer in case of problems. For long-term storage,
place the battery in a shady, cool and dry place. Use only the supplied charger.
7. Pedal assistance
What is pedal power?
The bike is equipped with electric pedal assistance.The motor supplements your own efforts, incre-
asing your performance while providing less power.
The effect of the pedal assistance depends on the speed at which the pedals are turned and the
The pedal assistance function depends on the speed at which the pedals are rotated and on the
speed of the bicycle. If there is no pedaling, the motor does nothing. If you start up, the motor
provides a lot of support so you can easily get going.
be helped to get going.

9
8. TIRE PRESSURE
Tire pressure affects the range and comfort of your bicycle.
It is advisable to always inate your tires hard. Hard means that you should be able to
(4 to 5bar) On the side of all tires you can nd the maximum tire pressure.
This tire pressure is expressed in Bar. When inating your tire we advise you to use a bicycle pump
that is equipped with a tire pressure gauge.
9. Shifting gears
The bike is equipped with derailleur gears.You can operate the gears by turning the inside of the
right handlebar while cycling. Do not shift more than one
gear at the same time.
Using your gears:
Derailleur gear: Do not change gears while standing still, and denitely do not pedal backwards
while changing gears
10. Checking your bike and tips
Prestige Bicycles recommends that you have your bicycle checked regularly by your dealer.
It is advisable to have the rst service performed within 3 months and the second after 1 year.
1 year. Remember that by checking your bike regularly, you can avoid a lot of unnecessary damage
in the long run and therefore also a lot of unnecessary costs!
Of course you can also contribute to keeping your bike in top condition for as long as possible.
The following paragraphs provide some tips.
General maintenance
1 Check tire pressure and tread
2 Check the wear of the brakes, occasionally adjusting the ne adjustment
3 Clean pedal sensor with sponge and lukewarm water in case of severe dirt
4 Lubricate the chain
5 If a wheel strikes, have it repaired immediately by the dealer.

10
11. Cleaning and treatment
Cleaning your bicycle
You can clean your bike by rst removing the dirt with a brush and then washing it with warm
water.This will make your bike look like new again. Regular cleaning of the bicycle will increase its
service life. Be careful not to use too much water near the battery. Make sure that no dirt gets into
the sensor plate (near the bottom bracket). When cleaning the bike, it is best to remove the battery.
Never use a high-pressure cleaner!
Treatment
In addition to regular cleaning, it is wise to treat certain parts immediately after cleaning. For
example, we recommend greasing chromed parts, unpainted aluminum and stainless steel parts
with acid-free petroleum jelly to prevent oxidation (rust). Rotating parts need grease/oil.
It is recommended that the chain, It is recommended to lubricate the chain, sprockets and axles
regularly.Your dealer can do this for you.
12. Service and inspection
1st service - 250km - or after 3 months
Check wheels and tires.
(Beats in the wheels, spokes tension, tire prole).
Check all xing parts, tighten if necessary.
Brakes: Check brake pads for wear - Adjust cable tension -
Check brake operation.
Check headset for play - Check stem attachment - adjust if necessary.
Lubrication: Clean and lubricate chain with Teon spray or silicone spray.
Electrical System: Charge the battery for 5 hours - Clean the pedal sensor with lukewarm water
and a sponge - Treat the contacts with contact spray treat the contacts with contact spray -
check that everything works correctly.
Derailleur - check that all gears are found smoothly, adjust if necessary

11
Check the following regularly:
Is the battery charged? Are the brakes still working as they should?
Are brake pads, bolts and nuts still tight? Are the cables not damaged?
Are the brake surfaces clean and free of grease? Are there any worn-out brake blocks?
Is my bike adjusted properly? Are the saddle and handlebar not above the maximum position? Is
the angle of the handlebar comfortable?
Is my handlebar properly aligned with the front wheel?
Are my handgrips still secure?
Is the tension of my spokes still sufcient? Do I have a stroke in my wheel?
Are there any broken spokes? Do my tires have the right pressure?
Is there enough tread on my tires? Is the stem xed properly?
Is my saddle tight? Is there no play in my wheels?
Do my lights work? Am I well visible in the dark?
Are the surfaces of the reectors properly clean? Are the reective strips on my tires present and if
so, are they clean? Does the pedal assistance work properly?
Do the gears work as they should?
Is the chain tension correct? Is my bicycle not in need of a cleaning?
Have I recently serviced my bicycle?
13. WaRNINGS
• If you want to charge the battery, use only the supplied battery charger for this purpose.
• Use the battery only for your bicycle.
• Do not spray the bicycle clean with a high-pressure sprayer. A too powerful jet of water may damage
the electronics of the bike.The warranty will be voided.
• If used improperly, you may endanger yourself and others. In addition, improper use voids the in
addition, improper use will void the warranty.
• Do not use any battery for your bicycle other than the one provided by Prestige.
• Do not insert objects into the charger or expose both the charger and the battery and electronics to
water or other liquids.
• For maintenance of your electric bicycle you can always contact your Prestige dealer.
Enjoy your new electric bike! Get started and test it out!

12
Table of contents
Popular Bicycle manuals by other brands


Banana Bike
Banana Bike GT quick start guide

Yeti Cycles
Yeti Cycles 303 wc 2013 owner's manual

Blaupunkt
Blaupunkt E-MOBILITY Carl 280 operating instructions

Fly Products
Fly Products LUNA user manual

Retrospec
Retrospec BEAUMONT MINI Assembly instructions

Green Bike Electric Motion
Green Bike Electric Motion City Premium 2020 instruction manual


