EMMO Utron User manual

1
EMMOM
Monta 2019
1
USER’S MANUAL
EMMO
Utron

2
CAUTIONS
This manual contains important safety, performance, and
service information. Read and understand it along with the
information provided during the on-delivery instructions before
using the product, and keep this manual for future reference.
© 2019 EMMO Inc. All rights reserved. No texts, details, or illustrations from this Manual may be reproduced or
distributed, or become the subject of unauthorized use for commercial purposes. Should you discover any errors, we
would be grateful if you would bring them to our attention.

3
MENU
About EMMO…………………………………………………............................ 4
Rules And Regulations……………………………………………….……….. 5
Speedometer And Controls ……………………………………………....….. 6
Rear Shock ….………………………………..………………………………. 15
Thumb Throttle…………………………………..……………………………. 16
Safety Instructions…………………………………..………………………... 17
How To Ride…………………………………..……………………..…………. 18
How To Charge…………………………………..…………………………….. 19
Maintenance Information………………………………………………….…. 21
E-Bike Registration Form……………………………………………………… 22

4
ABOUT EMMO
Established in 2009, EMMO Inc. is a proud Canadian venture that is
focused on creating a more sustainable future by providing high-
quality electric bicycles. We offer a wide variety of E-bikes that are
suitable for leading a greener, and more stylish, way of living. EMMO
E-bikes are priced competitively with other green solutions. At EMMO,
you will get the best e-bikes and also receive the best service.

5
RULES AND REGULATIONS
Of riding an e-bike
According to Canada’s Motor Vehicle Safety Regulations (MVSR). A qualified e-
bike (defined as Power Assist Bicycle) must meet the following requirements:
• The e-bike must have operable pedals
• Upper wattage limit for the motor is 500W.
Other requirements include a permanently affixed compliance label from the
manufacturer stating that the vehicle is a power-assisted bicycle under statutory
requirements in force at the time of manufacture. Currently, there is no license,
no insurance, and no vehicle registration required to operate a qualified e-bike
according to federal legislation. E-Bike riders share the same rights and
responsibilities as other road users.
However, provinces and local municipalities have the power to restrict the use of e-
bikes. Most provinces require the rider to wear a helmet. Some provinces have
special requirements concerning the age limit to operate an e-bike, the type of
helmet required, and even the number of wheels and wheel size. In Ontario,
typically, e- be-bikes are generally treated the same as regular bicycles. According
to the Ministry of Transportation of Ontario (MTO), the age limit to operate an e-
bike is 16 years old and above; the maximum weight of the bike is 120 kilograms
(265 pounds); the bike must have a brake distance of fewer than 9 meters; Any
modifications made to the bike’s motor to create speeds greater than the legal
speed limit are prohibited.
As the rules and regulations are subject to changes in different provinces
and municipalities. Please check your municipal bylaw and see where you
stand.

6
`
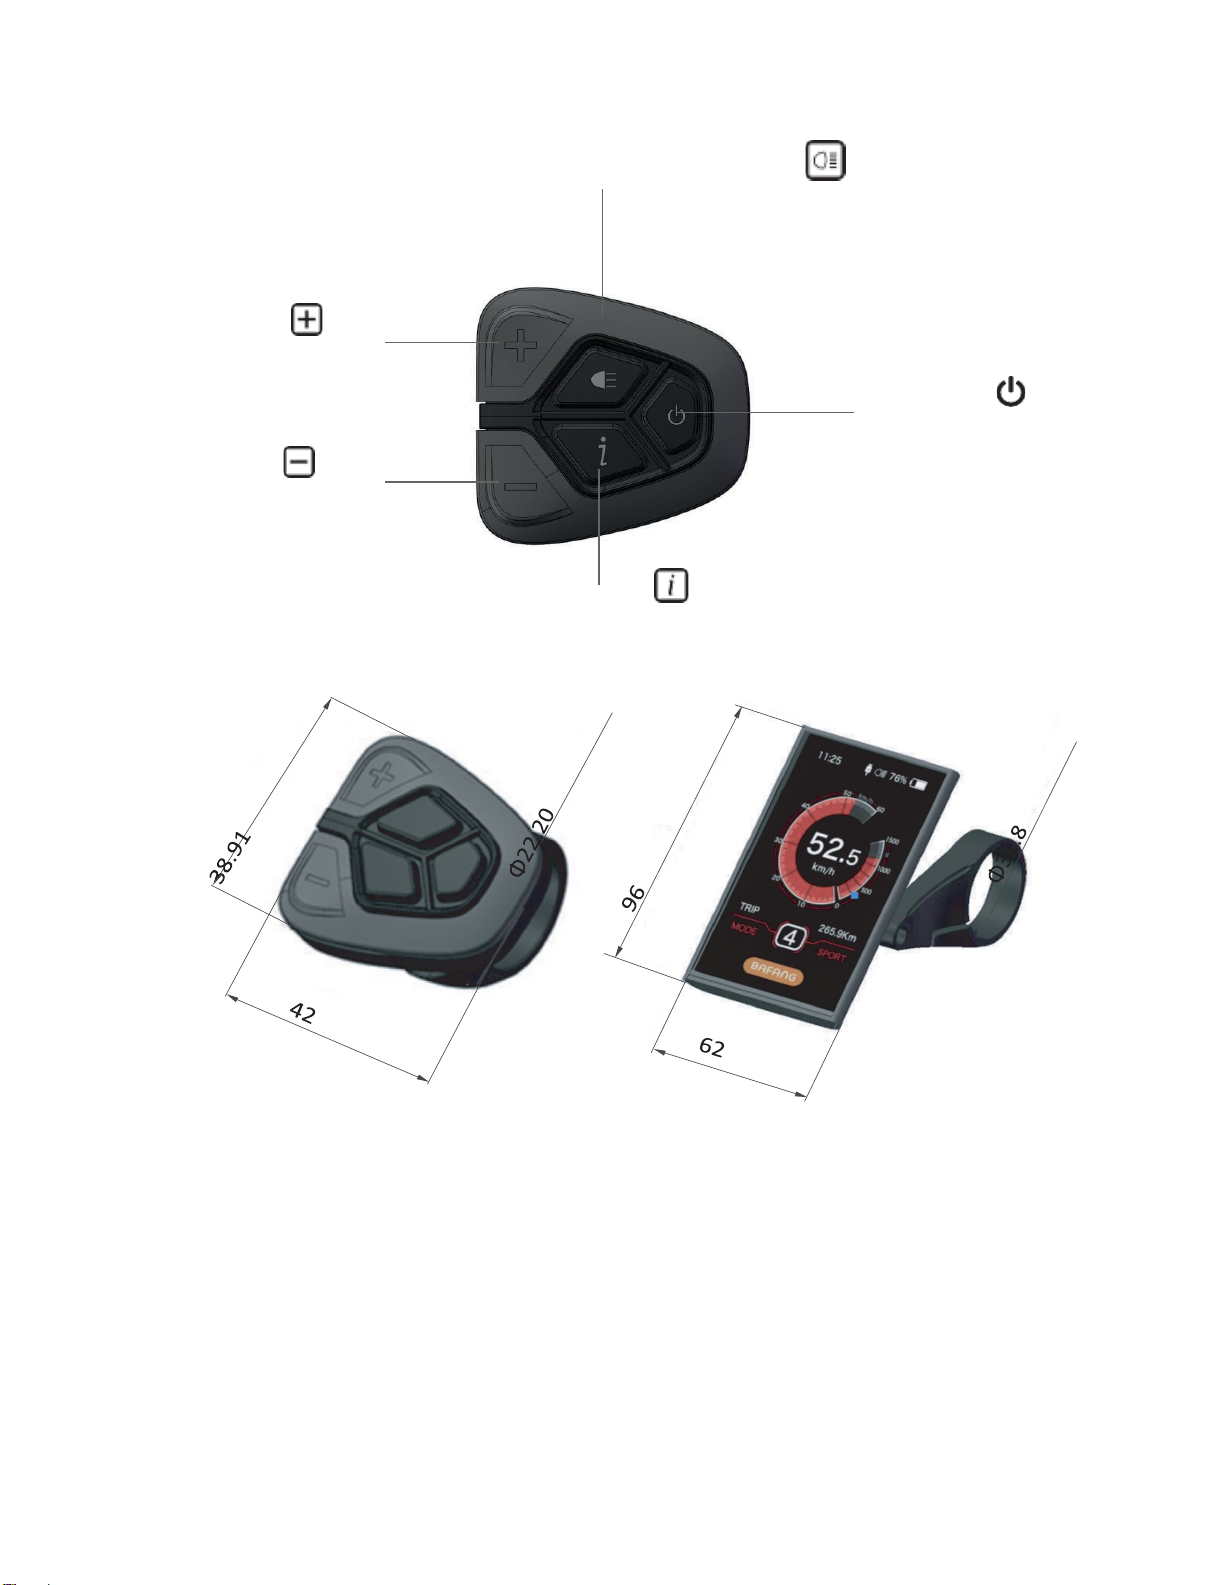
1. Speedometer and Controls
1.1 Product appearance
1.2 Functions
Multiple Power Assist Levels
Walk Assist (slow speed motor assist)
Distance and Odometer (TRIP/TOTAL)
Backlight / Headlight
Current riding speed in real time
Error codes
Power meter (Watts or Amps)
Battery Gauge (Voltage or Percentage)
Note: Voltage is recommended for a more accurate battery capacity
estimation
USB charging port 5V at 0.5A
7
`
1.3 Button definition
Backlight/headlight (if connected)
Minus button
ON/OFF " "
Minus button
Mode
1.4 Product specifications
•
Maximum operating current: 30mA
•
When power is off, leak current is less than 1uA
•
Operating current supplied to the controller: 50mA
•
Operation temperature: -4°F~113°F
•
Storage temperature: -22°F~158°F
•
Storage humidity: 30%-70%
•
Water Resist level: IP65

8
`
CAUTION
Avoid collisions to prevent damage or malfunction.
The unit is IP65 water resistant.
Bolt Size: M3 0.5 x 12mm (Control pad and Mount bracket)
1.5 Interface
Current Time:
The current time in 24-hour clock. Go to the “Set Clock” option in the display
setting to set or change the time.
USB Connection Indicator:
The symbol is displayed on the screen when an external device is connected.
Headlight Indicator:
The symbol is displayed on the screen when the backlight/headlight is on.
Speed Scale:
The speed scale will show both speed and motor power information.
Display Mode:
This displays the current mode selected. The display mode includes single-trip
distance (TRIP), total distance (ODO), maximum speed (MAX), average speed
(AVG), and travel time (TIME).
Current Time
USB Connection Indicator
Headlight Indicator
Display Mode
Speed Scale
MPH
44.4 mile
Battery Level Indicator
Current Speed Display
Pedal Assist Level/Walk Assist
Travel Distance

9
Battery Level Indicator:
The indicator shows the current battery level.
The indicator can show battery level value in percentage or voltage. You can
set this display option in the “SOC View” of the display settings menu.
Current Speed Display:
This displays the current travel speed in metric or imperial. Set your preferred
unit in the “Unit” option of the display setting menu.
Pedal Assist Level/Walk Assist:
This displays the level of the pedal-assist function. It also displays the walk
assist symbol when the walk assist mode is engaged.
Travel Distance:
Display the distance accumulated under the selected mode.
1.6 Functions
On/off:
To turn the unit on, press and hold the power button to start the display. Press and hold the
power button again to switch it off.
Note: The battery must also be turned on (if applicable)
If the password function of the display is activated, you will need to input the correct password
to enter the normal user display interface.
Display Information:
Press the button to cycle through the current information data available on the main menu of
the display. The information is displayed on the bottom of the screen and includes the single-
trip distance (TRIP), total distance (ODO), maximum speed (MAX), average speed (AVG), and
riding time (TIME).
Pedal Assist Level:
The display unit is integrated with the control pad to provide several levels of power. Press the
“+” or “-” button to increase or decrease the power and speed levels.
Walk Assist Mode:
Press and hold the “-” button to activate walking assist mode. The walking icon will be
displayed on the screen and the motor will move the bicycle at about 4 mph (6.4 km/h).

10
`
To turn off the walk assist, let go of the button.
The function is designed for walking alongside the bicycle only. Please do not
use this
function when riding.
When the display is powered ON the default is PAS level 0.
Note: Increasing your PAS level provides more power and speed.
Backlight Display:
Press and hold the light button for a few seconds to dim the display backlight of the device.
This will change the backlight to a darker setting for night riding.
Press and hold the light button again to turn off this feature and return to the default
backlight setting.
If a front light is installed, this will also power the light
1.7 DISPLAY SETTINGS
Preparation:
Make sure the display is turned ON.
To Enter Setting:
Press the button twice quickly and press the button again when “Display Settings” is
selected to enter the Display Settings. This will enable you to adjust the default settings of the
device to your preference.
Controls:
Press the button to select and use the “+” and “-” buttons to toggle between the options.
Unit:
This displays the unit of the speed in Metric (km/h) or Imperial (mph). Press the button once to
save your preferred setting and exit this option. Use the button to scroll down to the next
display setting option.
Brightness:
Use this setting to adjust the default brightness of your device. You may adjust this setting to pre-
set values between 10%, which is the lowest available brightness, and 100% which is the highest
available brightness.
Auto-Off:
This sets the time in minutes that the display system is inactive before turning off.
Max PAS:
This sets the number of pedal assist levels for your motor. You can adjust this level to

11
`
divisions of 3, 5, or 9 levels of the total motor power.
Note: The number of pedal assist levels (3, 5, or 9) you set in your display divides the total
power of the motor among the number of pedal assist levels.
* We highly recommend setting your display to 9 Pedal Assist Levels to have access to
more incremental power levels.
Power View:
This allows you to select your viewing preference for the power of the motor. This may either
be in Watts or in Current (Amps).
SOC View:
This sets how the battery power level is displayed on the screen. The sign can either be
in percentage or in voltage. We recommend using voltage, as this provides a more
accurate gauge of the battery charge level.
TRIP Reset:
This allows you to reset the TRIP readings of the odometer on your display. It is a
one-time
setting and once cleared, your TRIP readings will go back to reading zero.
This reset includes maximum speed (MAXS), average speed (AVG), and single trip distance
(TRIP).
Wheel Size:
This sets the wheel diameter size in inches and should be done before riding your bike. Please
input the correct tire size into the display to enable accurate measurement of speed and other
ride information.
Available Wheel Sizes are: between
6” to 34”
Speed Limit:
Press the button to select this option and adjust the speed limit to your preference. Press
the button again to save your setting and exit this option. Use the button to scroll down
to the next display setting.
Note: Check your local laws regarding
e-bike speeds. Setting the speed above the legal limit
is not advised.
This function may not be available on some models.
AL Sensitivity:
This is used to adjust the back-light dim setting in low light conditions. It will set the light
sensitivity of your device.
Press the button to enter this option and adjust the setting to your preference by using the
and buttons. Use the button to increase the value to the highest (Level 5) and press
the button to reduce it to the lowest value (Level 1). Press it one more time at the lowest
value to turn off this setting.

12
`
Clock Setting:
The clock in this display uses 24-hour notation. Please note that the clock will reset
every time you remove the battery of the device.
To set the clock, press the button on the option and use the and buttons to
adjust each value.
The cursor will appear on the first input digit of the hour section, adjust this input
using the and buttons. Press the button to confirm the selection and switch
to the second input digit. Adjust this as well, using the and buttons. Confirm your
selection and switch to the minute by pressing the button.
Repeat this for the remaining input digit of the clock and press the button to save
the setting and exit this option.
Use the button to scroll down to the “Back” option and select it by pressing the
button to exit the display setting menu.
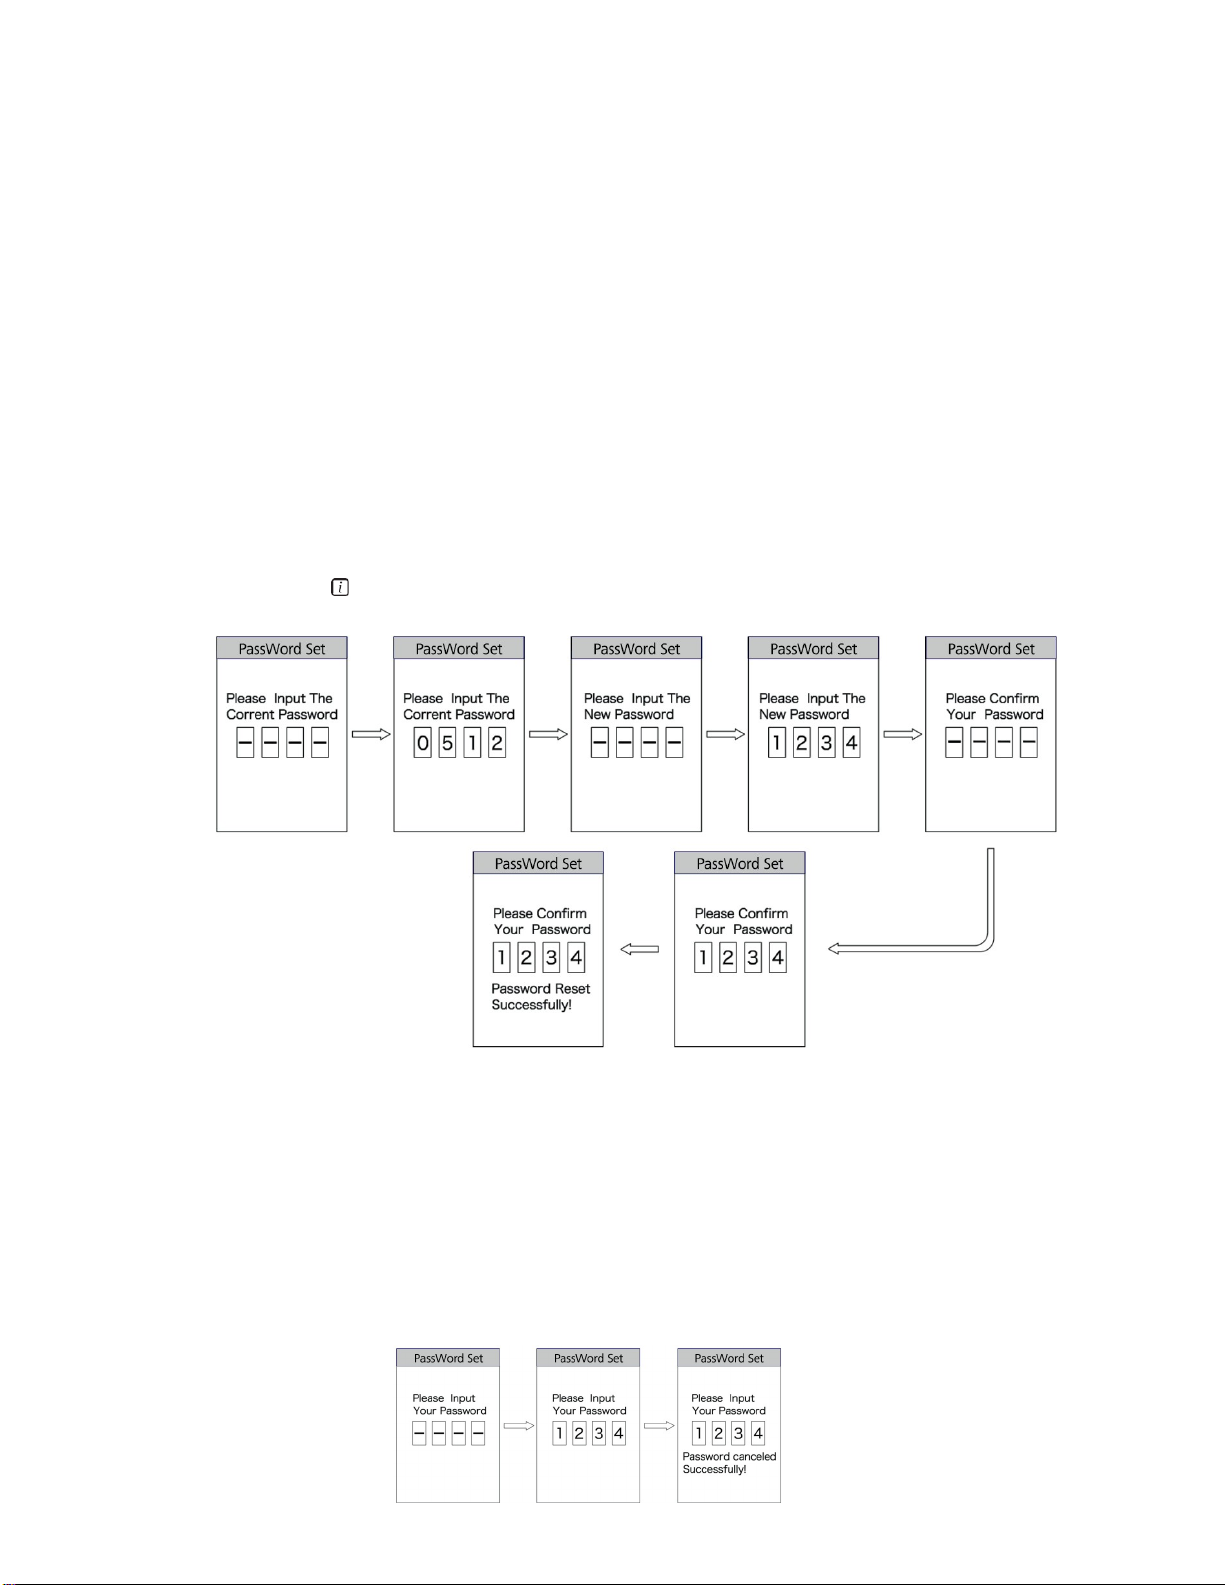
1.8 Password
This option is used to lock the display device and prevent unauthorized access. If
activated, a 4-digit input password will be required to enter the normal user interface
when the device is turned on.
1.8.1 Setting Password
Cycle through the password option using the
button and select “ON”. The
display will show an interface to input your preferred password.
Scroll and Select between numbers “0–9” using the
and
buttons for each
entry slot.
Press the
button to confirm your selection for each slot. Press the
button again to confirm the inputted password.
You will need to enter the password a second time, repeat the above step and input
the same password. If the password is the same as the previous entry, the system
will display a prompt showing that you have successfully set your password. With
an incorrect entry, you will need to repeat the first step and input the password
and reconfirm.
After correctly inputting the password, the interface will automatically exit to the
password menu.
13
`
1.8.2 Changing Password
Once the password is set, the option “Reset Password” will appear in the password
menu.
Select “Reset Password” from the menu, the interface will display a prompt you to
input the current password to access this option. Please input the correct current
password.
Inputting the wrong password 10 times will cause the display system to switch off
automatically.
If the password is correct, the interface will display a prompt to input the new password.
Repeat the process of “Setting Password” reconfirming the password as described
above. The interface will automatically return to the password menu at the end of this
action.
Select the back button to exit this menu
1.8.3 Disable password
To disable the password option, enter the start password interface and select the “OFF”
option. The interface will display a prompt to input the current password to disable the
password option. After correctly entering the current password, the interface will
display a prompt showing you have successfully disabled the password. It will exit
back to the password menu automatically.
If you enter the incorrect password 10 times, the display will turn off automatically.

14
`
1.9 Error Codes
Once the display detected a fault, the icon will be displayed.
Error Codes can be found under Information Error Code
Error Code
Code Definition
04/05
Throttle Fault
06
Low Voltage Cut-Off Protection
07
High Voltage Cut-Off Protection
08
Hall Sensor Fault
10/11
Over Heat Cut-Off Protection
12
Controller Fault
21
Speed Sensor Fault
22
Battery Communication Error
30
Communication Error
15
`
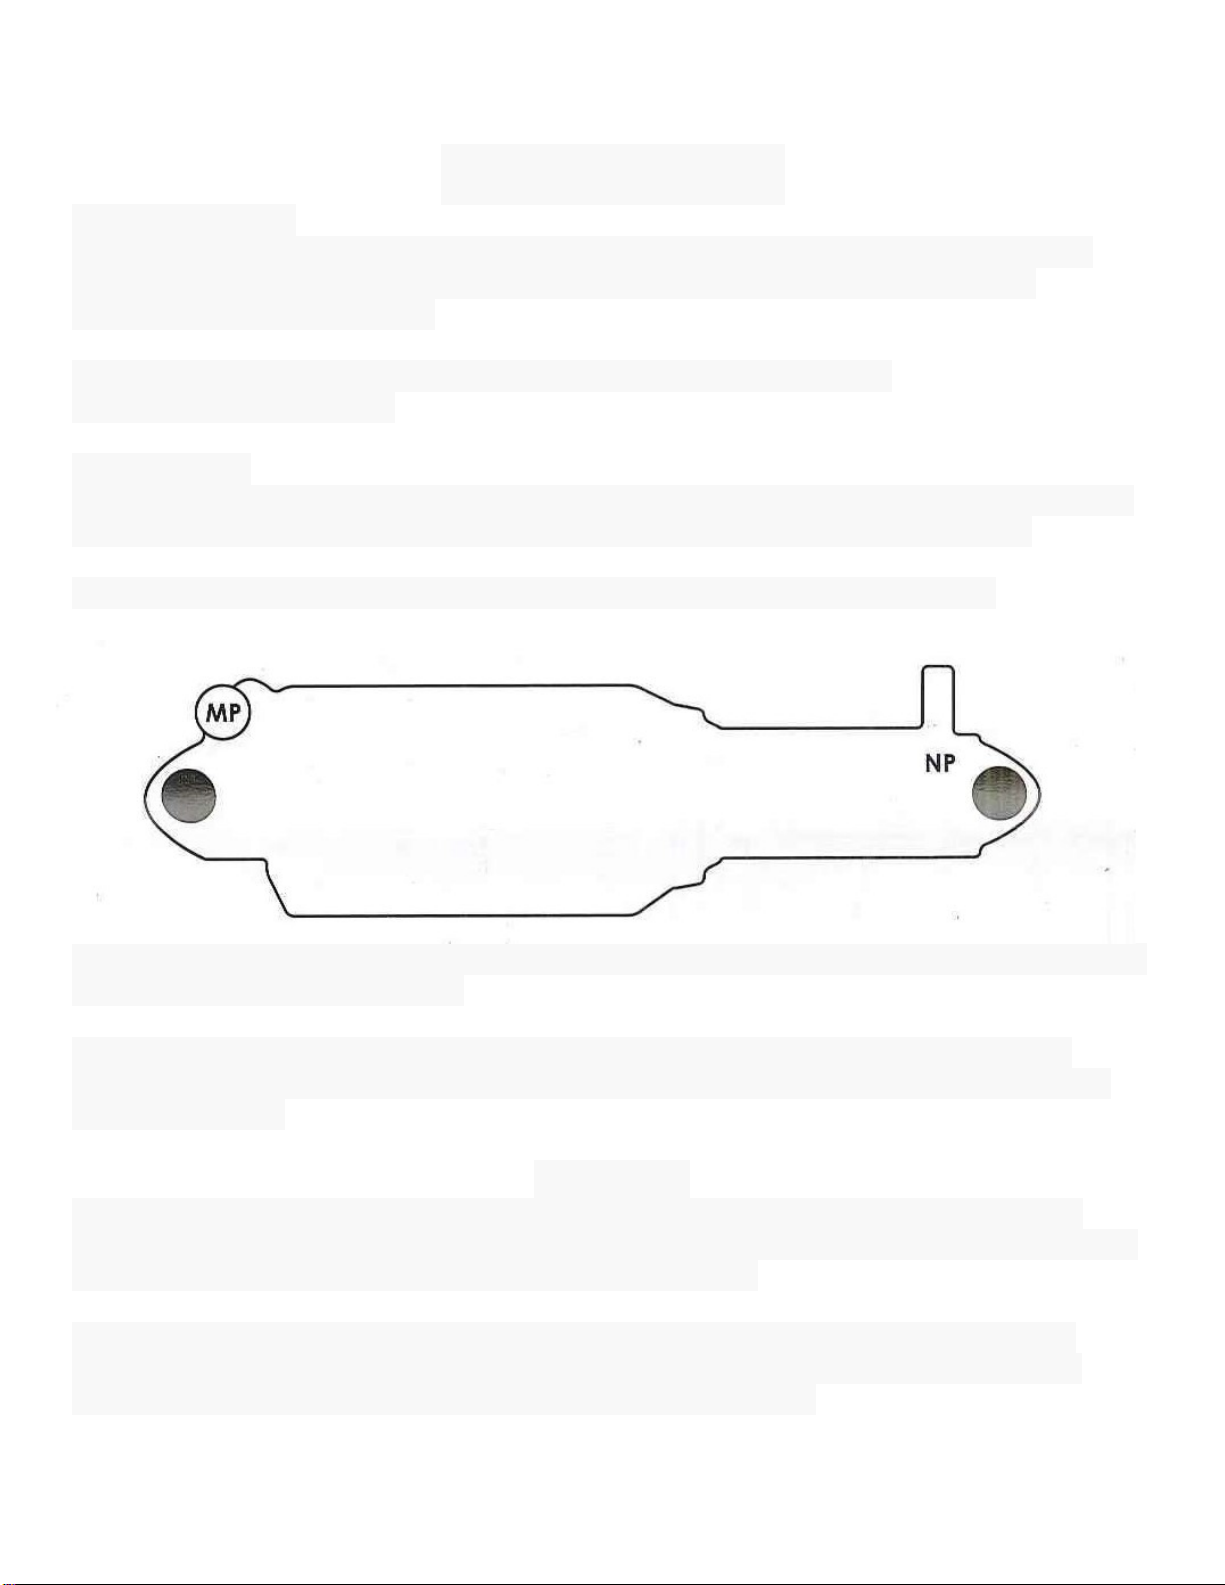
2. Rear Shock
A5RR1 and A5RE
To set the pressure in the main cylinder (valve marked "MP), use a compatible shock
pump. Remove the valve cap and attach the shock pump according to the pump
manufacturer’s specifications.
Recommended air pressure for the main cylinder is 100-150psi.
DO NOT EXCEED 180psi.
A5RR1 ONLY
The A5RRI uses an additional adjustment feature indicated by the air valve positioned at
the smaller end of the shock. To set the negative pressure (valve marked "NP"),
THE NEGATIVE PRESSURE MUST NOT EXCEED THE MAIN PRESSURE.
Lubrication: It is recommended that the main shaft be lubricated every 25-30 hours of use
or after a long period of non-use.
Cleaning: Use only warm water and a lint-free soft cloth to wipe down. Do NOT use
solvents, degreasers, waxes and other chemicals, as they may damage the shock and
void the warranty.
WARNING
Your ExaForm Rear Shock requires regular maintenance to function. ExaForm Rear
Shocks must be regularly maintained by an authorized ExaFrom Service Center. Service
center locations can be found at www.kindshock.com.cn.
Do not disassemble your rear shock. Disassembly could cause damage and severe
personally injury as some of the contents are under pressure. Failure to follow these
warnings and instructions will immediately void your warranty.

16
`
3. THUMB THROTTLE
Gently pushing the throttle
lever downwards to
accelerate.

17
`
1.Battery strength: make sure that you have enough charge for the trip.
2.Tire pressure: on the casing side of the tire you will find the minimum and
maximum pressure that applies to the tire. Insufficient tire pressure will affect
the performance of your bike.
3.Brakes: check and make sure both brakes are in good working condition.
4.Lights/signals: make sure that headlight, signal lights, tail light and brake
light are working well. Make sure you have a working rear reflector/ tail light if
you need to ride the bike at night.
4. SAFETY INSTRUCTIONS
To ensure the safety of you and others,
• Do not ride after you take medications which may affect your riding
ability, drink alcohol, or when you are unwell.
• Please make sure you are familiar with your local bylaw regarding e-bikes.
• Check the road conditions and weather conditions, so as to actively
avoid danger.
• Wear necessary protective equipment, such as a helmet, if required
by local bylaw.
• Perform a basic inspection of the bike before the ride:

18
`
5. HOW TO RIDE THE BIKE
• Sit on the bike. Put on the helmet or
any protective equipment required.
• With your feet still on the floor, turn
the bike on (refer to page 10).
• Before you start off, kick the side
kickstand up.
• When you are ready, start pedaling or
turn the throttle. (NB: You don’t have to
pedal to start the bike.)
19
`
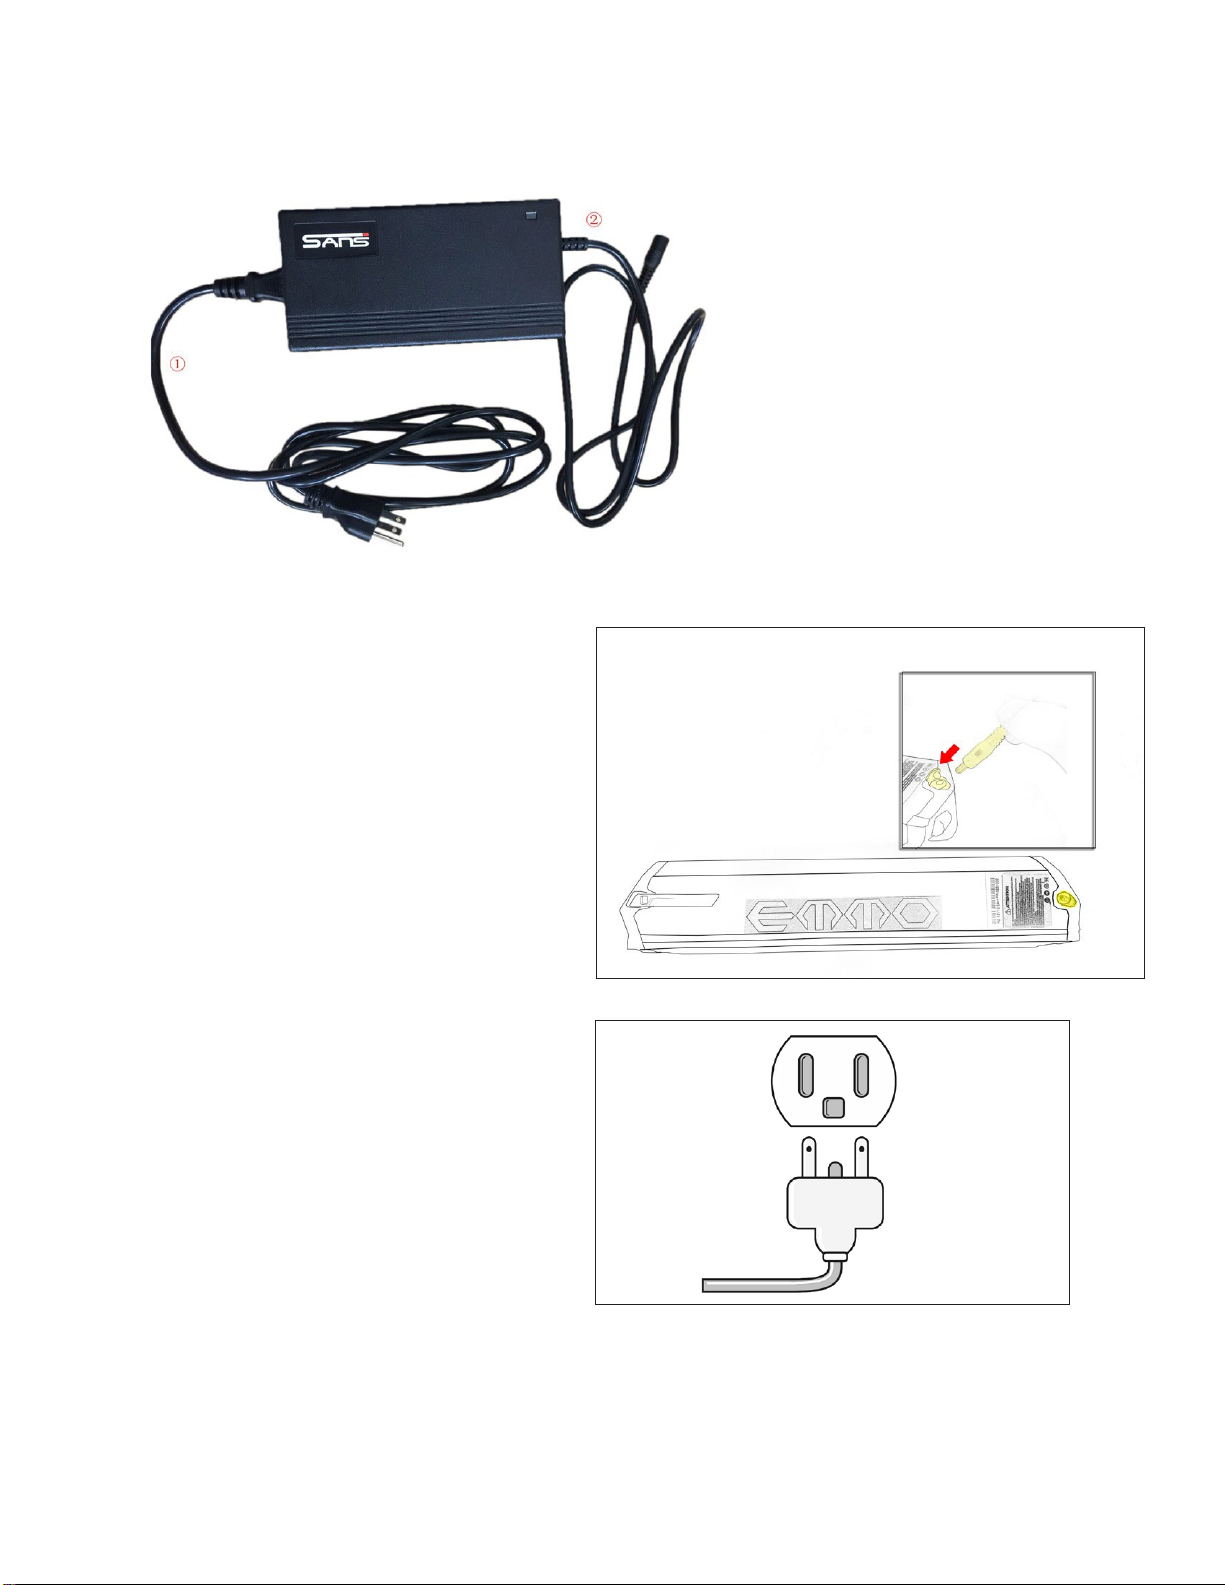
6. HOW TO CHARGE
The charger is separated into
two different parts:
1. A cable with one end that
goes into an 110V power outlet,
and the other end that goes into
the charger box itself.
2. The charger box with a
cable that plugs into the bike.
3. The charger box with a
cable that plugs into the bike.
Step 1. Take the cable from the
charger box and plug it into the
charging port on the battery.
Step 2. Plug the charger into a regular
110V outlet.

20
`
Step 3. Make sure the indicator on the
charger turns red (red indicator means it is
charging, green indicator means the
battery is fully charged.)
Step 4. Once the battery is fully
charged, unplug the charger from the
power outlet first and then unplug the
charger from the battery.
Warning: Do not charge the battery for more than 8 hours. If you
have any concern, please contact your local dealer for assistance.
Table of contents
Other EMMO Bicycle manuals


