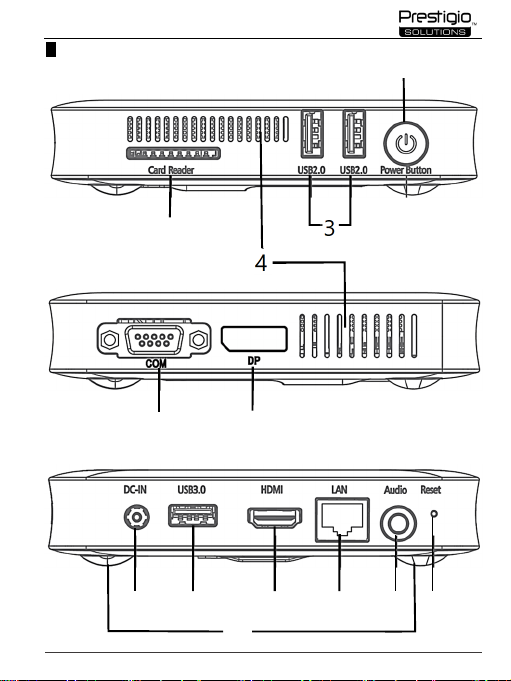
- RS-232 (.I.-5) – for receiving data from the connected user activity sensors;
- USB-A (.I.-3; 8)– for transmitting and receiving data from storage media, for connecting input devices,
and for powering/charging some external devices (up to 5 V, 3 A).
NOTE. Peripherals are not included.
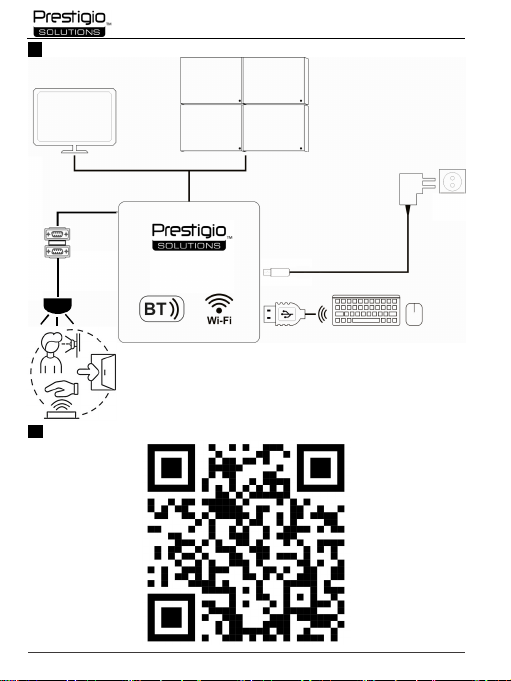
2. Connect the power adapter to the connector on the device (.I.-7). Insert the plug of the adapter
into the power outlet. Turn on the data display device, then turn on the mini PC by pressing the
power button on its housing (.I.-1).
3. Select the interface through which the mini PC is connected to the data display device as the signal
source. This can be done, for example, in the OSD menu of the monitor (depending on the model –
see the instruction manual of the display device).
4. The first time you turn on the data display device, the initial setup interface will appear on the screen.
Follow the step-by-step instructions to configure the operating parameters.
Operation
1. The mini PC is controlled by input devices (keyboard, mouse – not included), connected via wired
(USB) and/or wireless (BT) connection (.II.).
2. Connect external data sources (e.g. USB memory sticks, SD cards) to the mini PC to view information
and play multimedia files on the screen of the display device.
3. The default software installed on the mini PC allows you to play media files. Depending on the user's
needs, additional software can be installed.
4. The mini PC can be connected to a public Wi-Fi network. To do this, you need to set up access through
the Android interface. From the OS menu, click ("Applications"), then ("Settings"), and
("Wireless Network"). In the list of networks that appears, select the desired network and click "Connect".
5. When using the mini PC in marketing firms, you can connect sensors to it to analyze the consumer
activity, as well as install the software necessary to obtain and process data on the mini PC (depending
on the use – see instructions for sensors and software).
6. Before shutting down or restarting the mini PC, complete all active processes. Press the power button
once, then select one of the options that appear on the screen ("Shutdown" or "Restart").
NOTE. For detailed information on the functionality of the mini PC, please refer to the user manual. To
read it, scan the QR code on page 5.
Safety rules
The warnings, precautions and instructions contained in this document do not cover all
possible and dangerous situations. Use common sense when using the device.
1. Do not place the device in dusty or damp rooms to avoid internal short circuits. The device is not water-
proof. Keep it dry.
2. Do not expose the device to any heat sources (e.g., electric heaters) or direct sunlight.
3. Do not block the ventilation holes of the mini PC.
4. Do not crimp or pinch the cables connected to the mini PC. Locate cables where there is no risk of
unintended external interference (if possible, in a protective cable duct).
5. A pause of 30 seconds should be allowed between turning the unit off and on again to prevent
possible damage from overheating.
6. Connect and disconnect cables to the mini PC only when the power is off.
7. Before cleaning the device, turn it off, disconnect the power plug, then wipe the surface with a dry,
soft, lint-free cloth without using any force. Do not use aggressive liquids or abrasive cleaners.
8. Turn off and unplug the device during lightning storms.
9. If you do not use the device for an extended period of time, unplug it from the power outlet.
10. The motherboard has a CR2032 battery for non-volatile memory (CMOS). If it needs to be replaced,
please contact the service center only. Do not try to replace it yourself!
11. Use only certified cables and original accessories supplied and recommended by the manufacturer.