Pretorian Simplyworks ENERGISE User manual

Simplyworks®
INSTRUCTIONS
ENERGISE
Product Description
A feature rich mains controller allowing
switch users to control up to two
electrical appliances with wired or
wireless switches.
ENERGISE includes SimplyWorks® wireless
technology, allowing interference free
activation of appliances at up to 10 metres.
Six selectable modes enable the user
to choose how, and for how long, the
appliance(s) will be turned on.
Four modes give independent switch and
appliance activation: two further modes
provide co-operative control of both
appliances.
ENERGISE will accept any wired switch or
the SimplyWorks® SWITCH 125, SWITCH
75, SEND; or any combination of these.
New
Features
Added

ENERGISE
IMPORTANT SAFETY INSTRUCTIONS. FAILURE TO
COMPLY COULD RESULT IN PERSONAL INJURY.
• Read and pay heed to these instructions and retain for future reference.
• Do not use this unit near water.
• Unit is intended for indoor use only.
• Regularly examine the unit for any signs of damage, particularly to the power cable and the
appliance sockets. Do not use the unit if any damage is found.
• Do not attempt to force incompatible plugs into the appliance sockets or to defeat any
protective shutters.
• The device may be disconnected at any time by unplugging from the mains supply to which
it is attached. Keep the unit sufficiently close to the supply so that disconnection can be
effected quickly in the event of an emergency.
• The unit is not an electrical isolation means. You should treat the appliances connected
to the unit as capable of being energised at any time, even unexpectedly. Ensure that
appliances are unplugged from the unit before attempting any operation which may
constitute a hazard, even if the appliance is not energised.
• Do not disassemble, and do not attempt to replace a worn or damaged power cable. Refer to
an authorised distributor or the manufacturer for all repairs.
• An 8 Amp fuse is fitted at the rear of the unit. The dimensions of the fuse are 20mm x 5mm
diameter. Do not replace this with a fuse of a higher rating under any circumstances.
• A 0.2 Amp fuse is also fitted to the circuit board. In the unlikely event that this needs to be
replaced, refer to qualified servicing personnel.
• Do not use the unit near to sources of flammable gasses or in an explosive atmosphere.

Features
• Six selectable control modes. Four modes provide independent switch operation; two
further modes provide co-operative switch operation.
• Independent switch operation in Direct, Latched, Timed Minutes and Timed Seconds modes.
• Co-operative switch operation in Co-Op and On/Off modes.
• Up to three wireless switches and one wired switch may be connected to each channel.
• Two 230V, 50Hz sockets.
• Two 3.5mm switch input sockets.
• Interference free operation at up to 10 metres distance with SWITCH 125 and SWITCH 75.
• Operates with wired or wireless switches; or a combination of both.
• LEDs for pairing SWITCH 125 and SWITCH 75 and selecting control modes and time settings.
• On-board memory retains the previous mode and time settings even after power-off.
Control Modes
• DIRECT: The appliance operates when
at least one switch is pressed and
deactivated when all switches are
released.
• LATCHED: pressing any switch turns the
appliance on, pressing any switch again
turns the appliance off*.
• TIMED MINUTES: allows the appliance to
operate for a preset period of time from 1
to 15 minutes. Subsequent presses of any
switch do not extend the timer period.
• TIMED SECONDS: allows the appliance to
operate for a preset period of time from
4 seconds to 40 seconds. Subsequent
presses of any switch do not extend the
timer period.
• CO-OP (requires at least one switch to
be paired/connected to both channels).
Both appliances operate when at least
one switch on each channel are pressed
simultaneously. Both appliances cease
operating whenever all switches are
released on either channel.
• ON/OFF (requires at least one switch to
be paired/connected to both channels).
Both appliances operate when at least
one channel 1 switch is pressed and both
cease operating when at least one channel
2 switch is pressed.
* Some toys may incorporate a Latched Mod In
this case we recommend you turn off Latched
Mode on CONTROL PRO.
Quick Set -Up
1 Plug the ENERGISE cable into any
standard mains socket.
2 Plug appliance(s) into the appliance
socket(s) [1]/[2] and turn the appliance(s)
on.
3 Either attach any wired switch into the
corresponding socket(s) [9]/[10] at the
side of ENERGISE or, to operate with
wireless switches, pair SWITCH 125 or
SWITCH 75 to ENERGISE.
4 Press and hold the switch(es) and the
appliance(s) will operate.
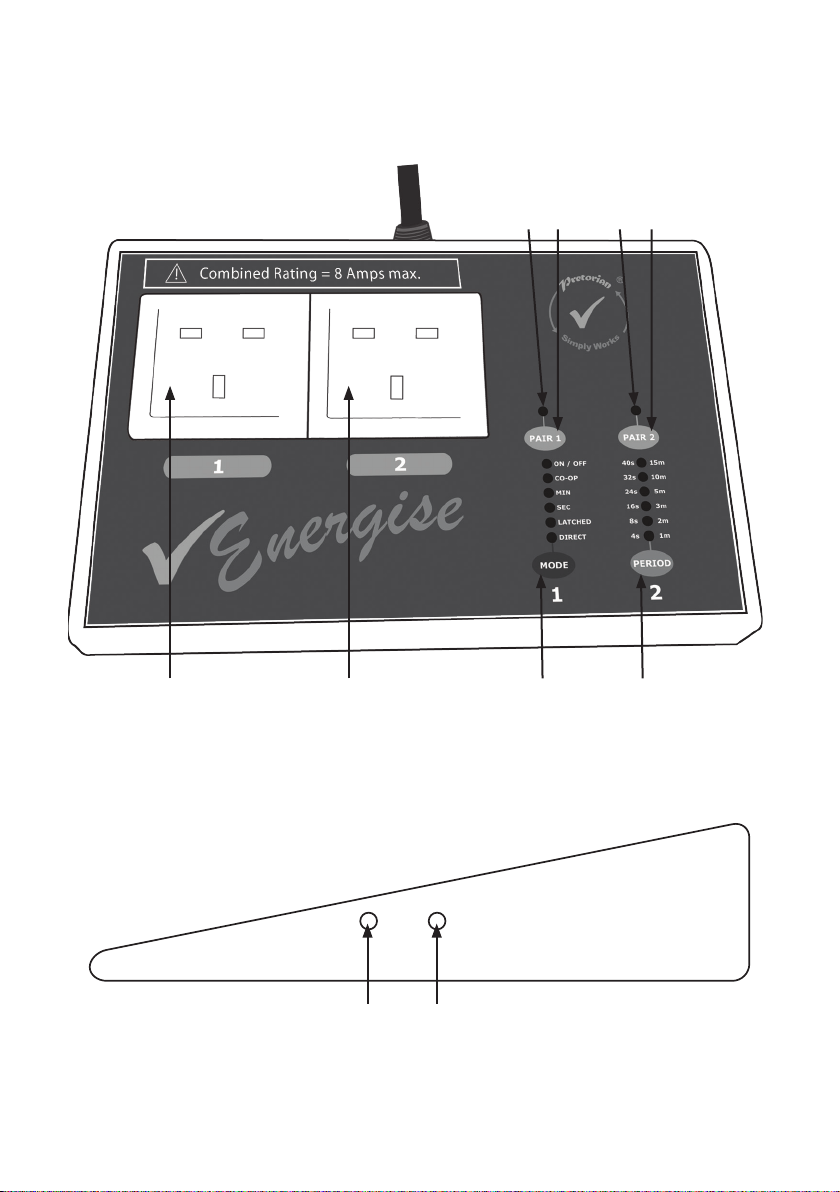
1 2 3 4
5 67 8
9 10

Pairing with Wireless Switches
Place SWITCH 125 or SWITCH 75 close to ENERGISE and briefly press Pair 1 button [5] on
ENERGISE. Pair LED 1 [7] will flash slowly. Immediately press the Pair button on the wireless
switch. Pair 1 LED will continue to flash slowly until pairing is complete when the LED will light
steadily for 5 seconds.
You can pair up to three wireless switches with each channel of ENERGISE, allowing collaboration
between several users. If you attempt to pair a fourth switch, the switch that was used least
recently will be replaced with the new one. The other two switches are unaffected.
Repeat the procedure to pair further wireless switches with pair 2 button [6] on ENERGISE. Pair
LED 2 [8] will flash during the process.
The procedure to pair SEND with ENERGISE is exactly as for SWITCH 125/SWITCH 75; or any
combination of these.
Whenever ENERGISE receives a wireless transmission, the Pair LED [7]/[8] blinks as an
acknowledgement. This is useful when finding which switch is paired with a particular channel.
If at any stage you would like to clear the pairing on either channel, press and hold its respective
pairing button [5/6] until the pairing LED [7/8] flashes rapidly. The pairing information for all
three switches will be erased, allowing you to start over.
Output Status
The Pair LEDs also indicate the status of the output channels [1]/[2]. If channel 1 is activated,
Pair LED 1 [7] lights and if channel 2 is activated, Pair LED 2 [8] lights. The LEDs still blink briefly
if a wireless transmission is received.
Control Modes
ENERGISE has six modes of control, four
of which can be used with either one or two
switches, and two modes which require two
switch operation.
One or two switch modes:
• DIRECT: the appliance activates while any
switch is held down and stops when all
switches are released.
• LATCH: one press activates the appliance
the next press stops the appliance.
• TIMED SECONDS: one press turns the
appliance on for the number of seconds
selected.
• TIMED MINUTES: one press turns the
appliance on for the number of minutes
selected.
NOTE: In the above modes, when using two
switches and two appliances, the operating
modes may be different for each of the two
channels e.g. one appliance operating in
DIRECT mode and one appliance operating in
TIMED SECONDS.
Two switch modes:
• CO-OPERATIVE: At least one switch on
each channel must be held down for both
appliances to operate.
• ON/OFF: Pressing any switch on channel
1 turns both appliances on; pressing
any switch on channel 2 turns both
appliances off.

Selecting Control Modes
To view the settings for channel 1, press the
1/Mode button [3] briefly and the LEDs will
light up to indicate the current mode and
period settings. Note that the Pair 1 LED [7]
lights to show that these are the settings
relating to channel 1. If no changes are made
after 5 seconds, the LEDs are automatically
extinguished. Similarly, to view the settings
for channel 2, press 2/Period [4] briefly. The
Pair 2 LED [8] lights to show that these are the
settings relating to channel 2.
To make changes to the settings, press either
the Mode [3] or Period [4] button while the
LEDs are lit for the relevant channel.
Note that if either channel is set to Co-
Operative or On/Off modes, the other channel
will automatically be changed to the same
setting since both channels are required for
these modes. When leaving either of these
modes, the other channel is set back to its
previous setting.
Settings are saved when the LEDs are
extinguished and are retained even whilst the
power is off.
Turning Outputs Off
If a channel is set to a timed mode, the period for which the appliance is energised may be ended
prematurely by pressing either the Mode [3] or Period [4] buttons briefly.
Safe Operation
Your safety, and that of the people around you, is of
paramount importance. Please read these guidance
notes to ensure that the unit, and the appliances that
are connected to it, are operated in a safe manner.
• Ensure you are familiar with the
appliances you plug into ENERGISE by
reading their operator’s manual and/or
using them separately to begin with.
• If an appliance can cause injury due to
rotating parts, sharp blades or similar,
unplug it from ENERGISE before exposing
the parts which might cause injury. For
example, unplug a food processor from
ENERGISE before lifting the lid.
• Remember that lamps create heat when
energised. Ensure that they are not

close to any combustible material and
that they are not accessible to touch.
• Power cables can be a trip hazard- ensure
they are kept off the floor. Do not allow
cables to hang over the edge of a work
surface where small children can pull on them.
• Wherever possible, keep ENERGISE
out of sight of the user since it can be
a dangerous distraction from the tasks
being taught.
• Whilst ENERGISE uses state of art
wireless technology to communicate
with wireless switches, it is still
possible for appliances to be energised
unintentionally. Ensure the unit is
switched off when not in use.
• Never operate the unit near to water.
• Never open the unit or attempt any kind
of repair.
Maintenance
Before undertaking any cleaning or inspection unplug ENERGISE from the mains supply.
Periodically check the unit to ensure there is no damage to the cable.
Do not use ENERGISE if the cable has been damaged or the unit is wet.
Clean using a dry cloth, never immerse in water or spray water or other liquids on to the unit.
Never carry ENERGISE by its power cable.
ENERGISE has no user serviceable parts. If repair is necessary the unit should be returned to
Pretorian Technologies Ltd or an authorised distributor.
Technical Specification
Input/Output Power:
UK and Europe: 230Vac, 8A*,
50Hz
USA: 120Vac, 8A*, 60Hz
* refers to the total of all
connected appliances.
Fuse ratings:
UK: Fused at 10A in plug.
Panel fuse on rear of unit =
8A, 20mm x 5mm diameter.
Europe: No fuse in plug. Panel
fuse on rear of unit = 8A,
20mm x 5mm diameter.
USA: No fuse in plug. Panel
fuse on rear of unit = 8A,
20mm x 5mm diameter.
All units: PCB protection
fuse = 0.2A slow-blow TR5
type (in socket- no soldering
required).
Never exceed the fuse ratings
quoted above. If in doubt
refer to qualified service
personnel. PCB protection
fuse must always be
replaced by qualified service
personnel.
EMC Compliance
ENERGISE has been tested to,
and is in compliance with, the
following EU standards:
EN60601-1-2
EN55022
EN6100-4-3
EN6100-4-2
Warranty
ENERGISE is warranted for 24 months from the
date of purchase against defects in manufacture
or component failure. The unit is designed for use
in domestic, educational, health and commercial
applications. Use outside these areas will
invalidate the warranty.
ENERGISE is not authorised for use with safety
critical, mission critical or life/health sustaining
apparatus of any kind.
Unauthorised repair or modification, mechanical
abuse or immersion in any liquid will invalidate
the warranty.
www.pretorianuk.com
Unit 37 Corringham Road Industrial Estate
Gainsborough Lincolnshire DN21 1QB UK
Tel +44 (0) 1427 678990 Fax +44 (0) 1427 678992
SimplyWorks®is a registered
trademark of Pretorian Technologies Ltd
S040007:2
Refers to firmware version 44.3 and later
Troubleshooting
Symptom Possible Cause
No power to ENERGISE • Not plugged into wall
socket
• Wall socket not
functioning
• Fuses in ENERGISE blown
Remedy
Wired switch does not operate
appliance • Switch lead broken
• Switch not plugged into
correct socket
• Unit is set to
Co-operative mode
• Appliance not functioning
• Appliance has its own
power switch
• Another switch on the
same channel is already
pressed
• Test with Pretorian Test-IT
and replace if necessary
• Change to correct socket
• Change to another mode
• Plug into a separate wall socket to test.
Replace if necessary.
• Ensure that switch is set to on.
• Release the switch
Wireless switch does not
operate appliance • Switch not paired (watch
for Pair LED blinking).
• Unit is set to
Co-operative mode
• Appliance not functioning
• Appliance has its own
power switch
• Another switch on the
same channel is already
pressed
• Follow pairing sequence for required
channel.
• Change to another mode
• Plug into a separate wall socket to test.
Replace if necessary.
• Ensure that switch is set to on
• Release the switch
Appliance does not turn off
using switch • Unit may be set to a timed
mode.
• Unit may be set to On/Off
mode.
• Another switch on the
same channel is already
pressed
• Check mode setting and change if
necessary.
• Check mode setting and change if
necessary.
• Release the switch
• Plug unit in!
• Check household fuses/ circuit
breakers. Replace or reset if necessary.
• Check 8A fuse at rear of unit. In UK
units check 10A fuse in plug. Replace if
necessary.
Check 0.2A circuit board protection
fuse. This should be carried out by
qualified service personnel.
Table of contents
Other Pretorian Controllers manuals


Popular Controllers manuals by other brands


Timeguard
Timeguard E269H-Synchronous Installation & operating instructions

KEBCO
KEBCO COMBIVERT F6 Instructions for use

Welbilt
Welbilt FRYMASTER FQ4000 FQ120 Basic operation

Hobby King
Hobby King OrangeRX RX3S Guide

Oriental motor
Oriental motor CM10 Series operating manual

Show Tec
Show Tec PLE-30-040 manual


