Prevue Pet Products 3152 User manual

G
T
F
B
LEFT SIDE
FRONT BACK
RIGHT SIDE
GRILLE PLAYTOP
DRA ER PLAYTOP
(jeweltone models)
PLAYTOP
(hammertone models)
SEED GUARDS
TRAY
L2
L1
R2
R1
PT2
G
T
PT1
F
B
{4} stainless steel cups
(short cups for playtop)
{ 2 } wood dowel perches
(short dowel for playtop)
{ 1 } grille safe-clip
{ 2 } cup holders
{ 8 } short hex head
screw & nut pairs for
seed guard
{ 6 } long hex screws
{ 12 } short hex screws
{ 4 } rolling casters
{ 1 } allen wrench
SG3
SG2
SG1SG1
KEY:
PT = Playtop
L = Left panels
B = Back panel
R = Right panels
F = Front panel
SG = Seed Guards
cageassemblyinstructions
Select Cage
Model: # 3152
cage: 24"L × 20"W × 60"H
w/seed guard: 32⅛"L × 28⅛"W
i terior: 23½"L × 19½"W × 34¾"H
wire: [gauge] 9 & 12 [spaci g] ¾"
getting started!
READ THESE NOTES FIRST:
• Enlist A Friend: While this large cage may be assembled
by one person, several steps would be made easier with two
people.
• Count Hardware: If any screw counts are short or parts
are missing, please contact Prevue Customer Service.
• Review All Parts: If wires are bent during shipping,
they may be straightened with needle nose pliers. For seriously
damaged parts, please contact Prevue Customer Service.
•Tools: An allen wrench is included. ou may want to have
a pair of needle nose pliers available. ou may use your own
hand tools, but we DO NOT recommen power rills! Parts
can be over-tightened and damaged/stripped. Prevue is not
responsible for this type of damage.
Review these instructions thoroughly before attempting to
assemble the cage. If you require assistance, please contact
Prevue Customer Service at 800.243.3624 or through links
online at prevuepet.com
parts
steps
1Attach casters to legs of front (F)
and back (B) panels.
2a
THIS STAGE IS EASIER WITH TWO PEOPLE.
Left si e lower (L1) and right si e lower (R1)
panels are interchangeable. Channels on (L1)
and (R1) face interior of cage.
→Ha e one person hold (F) panel upright while
second person installs (L1) and (R1) panels.
(L1) and (R1) panels have tabs at the bottom
corners. These tabs correspond to sleeves on
the legs of (F) and back (B) panels.
Slide the tab on bottom corner of left si e
lower (L1) panel into the sleeve on the leg
of (F). Secure (L1) to (F) with long hex screw.
2b
Following the same procedure, attach right si e
lower (R1) panel to front (F) panel and attach
(L1) and (R1) panels to back (B) panel, inserting
tabs into sleeves and securing with long hex screws.
3After lower cage has been assembled, slide
the grille (G) and tray (T) into their tracks.
To keep the grille securely in place, a safe-clip
is included. Locate the short horizontal bar on
the panel under the grille, and centered directly
under the grille handle.
Hook the open ends of the safe-clip onto the
short horizontal bar. Hook the upper part of
the safe-clip over the handle on the grille.
F
L1
B
R1
SG1
SG1
SG2
SG3
Made in China fo Prevue Pet Products, Inc., Chicago IL USA p evuepet.com 800 243-3624 custome se vice@p evuepet.com3152 — 05/13 — US
4a
THIS STAGE IS EASIER WITH TWO PEOPLE.
Left (L2) and right (R2) side panels are
interchangeable. For these instructions,
(R2) is the panel with the cup doors.
→Make sure cup doors swing out (not into cage).
Side (L2) and (R2) panels slide into tracks
along (F) and (B) panel frames.
Three vertical wires on (L2) and (R2) panels
extend below lower horizontal wire. Align
wires with corresponding holes along top
surface of (L1) and (R1) side panels.
→If extended wires are bent, straighten with
needle nose pliers.
4b
Playtop (PT1) frame (shipped with playtop tray
(PT2) in place) fits over top of cage. Posts extend
down from corners and correspond with openings
on (F) and (B) panels.
Three vertical wires on (L2) and (R2) panels extend
above upper horizontal wire. Align wires with
corresponding holes along bottom of (PT1) frame.
Secure top to frame with short hex screws.
5Before assembling the full playtop unit, this is a good
time to add cup hol ers and stainless steel cups
to the side panel cup doors, and to install the longer
(24¾"L) woo en owel perch.
L2
PT1
R2
PT2
6a
PLAYTOP UNIT for JEWELTONE COLOR MODELS:
Attach two la ers to back edge of playtop
with one short hex screw for each.
Attach cup/perch bar to ladders with one
short hex screw at the top of each ladder.
Attach two la ers to front edge of playtop
and front edge of cup/perch bar.
Slide shortest (21¾"L) perch onto
cup/perch bar.
Insert short cups into holders on
cup/perch bar.
6b
PLAYTOP UNIT for HAMMERTONE COLOR MODELS:
U-bar ships as two pieces. Assemble U-bar and
attach to back edge of playtop frame with two
long hex screws.
Attach cup/perch bar to U-bar with two short
hex screws.
Slide shortest (21¾"L) perch onto cup/perch bar.
Insert short cups into holders on cup/perch bar.
Install la er. Top posts on ladder correspond with
holes on face of cup/perch bar. Bottom posts corre-
spond with holes on front top edge of playtop frame.
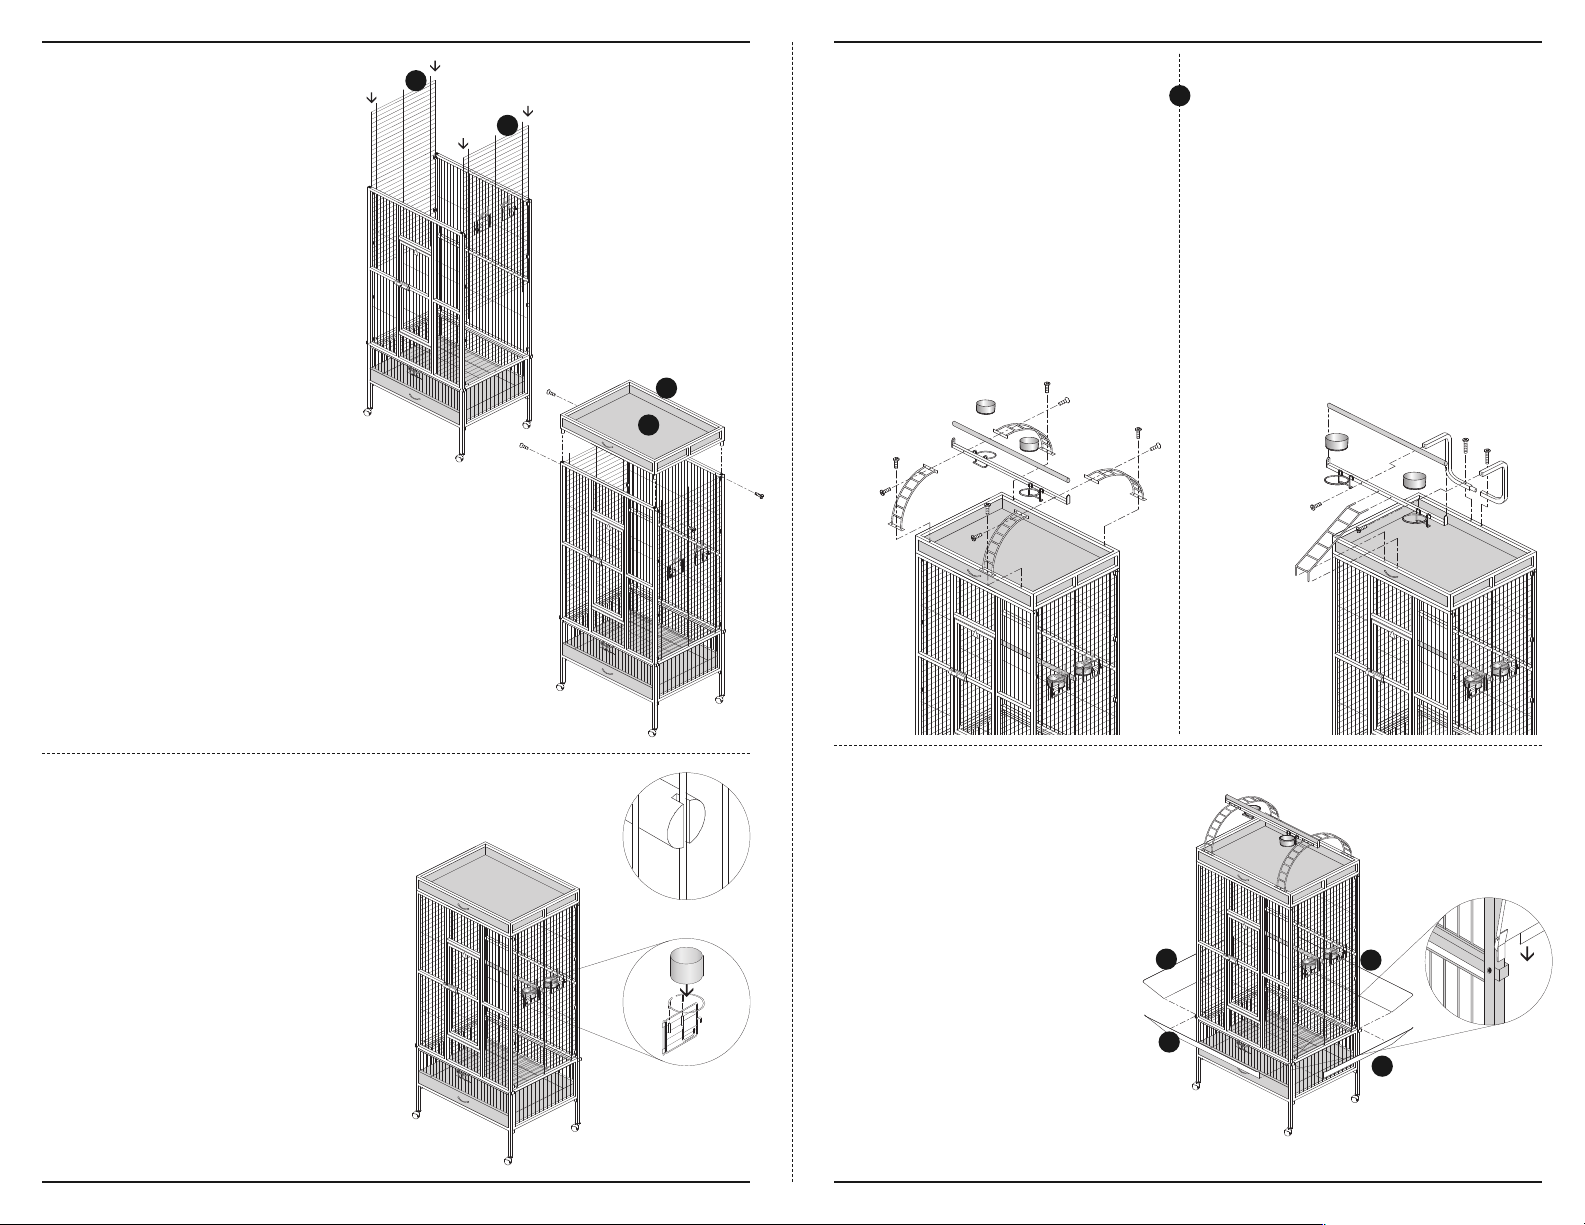
7THIS STAGE IS EASIER WITH TWO PEOPLE.
Left an right si e see guar s (SG1) are
interchangeable. (SG1) guards have tabs at the
corners which fit into sleeves on the legs of
front/back (F)/(B) panels. Slip guards into place.
Front see guar (SG2) panel has a notch at the
center of the front base edge. Slide (SG2)
guard into place. With first person holding
(SG2) guard in position, second person
aligns holes at the corners and secures
guards together with screw & nut pairs. Use
same procedure with back see guar (SG3).
✩Your cage is now fully assemble !
OR
Other Prevue Pet Products Indoor Furnishing manuals

Popular Indoor Furnishing manuals by other brands

Regency
Regency LWMS3015 Assembly instructions

Furniture of America
Furniture of America CM7751C Assembly instructions

Safavieh Furniture
Safavieh Furniture Estella CNS5731 manual

PLACES OF STYLE
PLACES OF STYLE Ovalfuss Assembly instruction

Trasman
Trasman 1138 Bo1 Assembly manual

Costway
Costway JV10856 manual


