Primal Vantage COMFORT ZONE HEH00582 Instruction Manual

C
G
A
D
M
E
B
E
F
H
J
K
I
L
YV
N
U
O
P
R
W
Q
X
Distributed by Primal Vantage Company Inc. 685 Route 10 East, Randolph, NJ 07869
SAFETY MUST BE YOUR FIRST PRIORITY WITH THIS PRODUCT
Instruction and Safety Manual
Every year serious injury and even death occurs from hunting related falls. To ensure your safety, please COMPLETELY read and
follow this safety manual and ALL warning labels BEFORE assembling, installing or utilizing this product.
DO NOT USE THIS PRODUCT BEFORE FULLY UNDERSTANDING ALL SAFETY WARNINGS AND INSTRUCTIONS. IF YOU HAVE
QUESTIONS, ARE UNSUREABOUTANY INFORMATION OR NEED ADDITIONAL INFORMATION CONCERNING YOUR PRODUCT,
CONTACT OUR CUSTOMER SERVICE DEPARTMENTAT 1-866-972-6168 OR VISIT WWW.PRIMALVANTAGE.COM. KEEPAND
MAINTAIN THIS SAFETYAND INSTRUCTION MANUAL IN A SAFE LOCATION FOR FUTURE REFERENCE.
Warning
MODEL: HEH00582
•Always Wear a Safety Harness with this Product
•Practice Using at Ground Level
• Weight Limit: 300 lbs.
•Tree Size: 9”-18” diameter
SIDE X SIDE DELUXE
17’ LADDERSTAND
©2013 (rev. 11/12)

CUSTOMER SERVICE DEPARTMENT 1-866-972-6168
TREESTAND SAFETY WARNINGS
Please read the following instruction manual and warnings labels completely before utilizing this product. Failure to understand and execute the instructions
and warnings may result in serious injury or death. In the event of an accident, have a plan for rescue, including the use of devices that may be easily reached
while suspended.
ALWAYS read and understand all warnings and instructions. Watch the enclosed DVD in it’s entirety before doing anything with this product including
assembly, installation etc. before each use of this product. Failure to read and understand all warnings and instructions and DVD material may result in serious
injury or death. Contact a Customer Service Representative with any questions you may have.
NEVER exceed total weight limit of 500 lbs. DO NOT use if your combined weight with all of your hunting gear and any accessories exceeds 300 lbs. or the
combined weight of two people and equipment exceeds 500 lbs. DO NOT exceed the weight limit of the safety harness, refer to harness manufacturer’s
warnings for weight limit of safety harness. Use of tree stand over the weight limit may result in serious injury or death.
DO NOT use this tree stand while under the influence of alcohol, medication or any illegal substances. Use of tree stand while under the influence of any of
these substances may result in serious injury or death.
NEVER use this treestand during inclement weather. DO NOT use tree stand during thunderstorms, snowstorms, hurricanes, tornadoes or any other weather
conditions that include (but not limited to) lightning, icy conditions, or high winds that could create slippery or dangerous situations. End your hunt and return to
the ground if inclement weather conditions arise.
NEVER use treestand If you are feeling ill, nauseous, dizzy or if you have a prior condition that could cause a problem. i.e., heart condition, joints that lock-up
spinal fusions, etc., or if you are not well rested and alert. Physical ailments can reduce your ability to safely install, utilize, and remove your treestand. Please
consult a physician prior to use.
NEVER use this tree stand if you have a history of health problems such as (but not limited to) heart problems, back problems, high blood pressure, impaired
vision, equilibrium impairments, are afraid of heights, have been advised by a doctor or physician not to climb. If you are not physically fit, well rested, and
alert, or if you have any other physical or mental condition that would impair your ability to properly use this treestand.
NEVER use this tree stand on a tree that is dead, leaning, diseased, loose barked or on a utility pole as the tree may fall, break, or uproot and may result in
serious injury or death. NEVER rely on a branch for support.
NEVER jump or bounce on the treestand’s platform or ladder sections to seat it to the tree. Instead, step firmly on the first rung of the bottom ladder section to
set the ladder into the ground before proceeding to climb the ladder.
NEVER transport any of your equipment with yourself while ascending or descending the tree. You will need to have two hands free during ascending and
descending for safety. Use a haul line to pull up your firearm (unloaded, chamber opened with safety lock engaged, barrel facing towards the ground), bows,
arrows, knives or any other equipment to your tree stand once you have reached your desired hunting height. ONLY pull up hunting equipment after the tree
stand has been secured to the tree and after you and your harness have been secured to the tree. Prior to descending, lower your equipment on the opposite
side of the tree from which you are climbing. Make sure that the unloaded firearm’s safety lock is engaged and the gun barrel is pointing towards the ground.
ALWAYS hunt with a plan and a buddy. Before you leave home, let others know your exact location, when you plan to return and who is with you.
ALWAYS carry emergency signal devices such as a cell phone, walkie-talkie, whistle, signal flare, PLD (personal location device) and flashlight with you at all
times and within reach even while you are suspended in your harness. Watch for changing weather conditions. In the event of an accident, remain calm and
seek help immediately.
ALWAYS inspect the tree stand and the Fall Arrest System (FAS) (Harness) for signs of wear or damage BEFORE each use. Also inspect to ensure that nuts
and bolts are secure. Pay special attention to the harness and straps, guaranteeing that nothing has been frayed or severed. Destroy all products that cannot
be repaired by the manufacturer. Contact a Customer Service Representative for replacement parts. The FallArrest System MUST be discarded and replaced
after a fall has occurred.
DO NOT ATTACH YOUR FULL BODY HARNESS TO YOUR TREESTAND.
NEVER modify your treestand in any way by making repairs, replacing parts, or altering adding or attaching anything to it except if explicitly authorized in
writing by the manufacturer. Improper installation or adjustment may cause serious injury or death. Remove all contents from box. Inspect for any damaged or
missing parts. If any parts are missing or damaged, you must only use certified replacement parts. Using any other replacement parts will void product
warranty. THERE ARE NO EXTRA PARTS. All parts MUST be used to ensure the safety of you and your stand. If you think parts are missing or damaged,
STOP IMMEDIATELY and contact our Customer Service Department. Using the tree stand with missing or damaged parts may result in serious injury or
death. DO NOT return this product to the retailer. Contact a Customer Service Representative if you have any missing, damaged or extra parts.
ALWAYS keep instructions (written and video) in a safe place and review before each use. It is the responsibility of the treestand owner to furnish the complete
instructions to anyone who borrows or purchases the treestand from you. A safe treestand hunting video has been inclluded. Please view it in it’s entirety prior
to using this product.
NEVER use this treestand for any use other than hunting. Our treestands are designed for hunter’s to wear a Full Body Harness. If you are not completely
comfortable and confident with your ability to safely install, ascend, hunt and descend using a Full Body Safety Harness with this treestand, DO NOT
PROCEED.
NEVER use this treestand for trimming trees.
NEVER fall asleep in your stand as you may fall out resulting in serious injury or death.
ALWAYS be sure to check and retighten any bolts BEFORE each new use of treestand.
ALWAYS have a minimum of three people present when installing or removing this treestand.
WWW.TREESTANDCUSTOMERSERVICE.COM

CUSTOMER SERVICE DEPARTMENT 1-866-972-6168
TREESTAND SAFETY WARNINGS
NEVER remove any safety warning
stickers from this product.
Safety must be your first priority
during the use of this product.
NEVER adjust your stand while in use. Practice the attachment of this treestand at ground level before using in a hunting environment. ALWAYS ensure that
you and your treestand are safely secured to a healthy tree. Your tree stand MUST be attached tightly to the tree and secured in place. If the stand is not secure,
it may shift while in use, resulting in serious injury or death.
The Installation Cross Straps and Stabilizer Bar(s) MUST be properly installed before each use of the treestand.
ALWAYS inspect every ladder section connection every time you use the stand before you leave the ground. If ladder sections are separating, with the help of at
least two other people, lower the stand to the ground, make adjustments, and reinstall.
ALWAYS check the ground below the tree stand to make sure it is firm and level. Sloping ground or uneven terrain (one side of a rock or root) can cause your
tree stand to tilt or shift.
ALWAYS maintain three points of contact when climbing the tree stand. (Two feet and one hand or one foot and two hands.)
DO NOT leave your treestand outside since weather or animals may cause damage. Tree growth can also cause stress and damage straps and buckles. It must
be stored inside when not in use.
NEVER wear jewelry or loose fitting clothing, which can cause hazardous conditions. Clothing may be caught in your equipment and cause you to fall. You must
always wear non-slip or rubber boots. Shoelaces must be tucked into your boots. Rings and necklaces MUST NOT be worn.
NEVER use this treestand with a third person. The treestand is designed for use by ONE person or TWO people.
NEVER let children use this treestand without adult supervision. This treestand is not a toy. No one under the age of 18 should attempt to use this product
without direct adult supervision.
DO NOT use tree stand if any nuts or bolts or parts are loose, bent, or crooked.
ALWAYS know your physical limitations. Don’t take chances. If you start thinking about how high you are, don’t go any higher. Instead, choose a minimum
height that will allow for safe, effective and comfortable hunting.
ALWAYS lean forward towards the tree as you climb and attach your harness to the tree BEFORE securing the platform to the tree and stepping onto the
platform. NEVER lean out from the treestand for any reason.
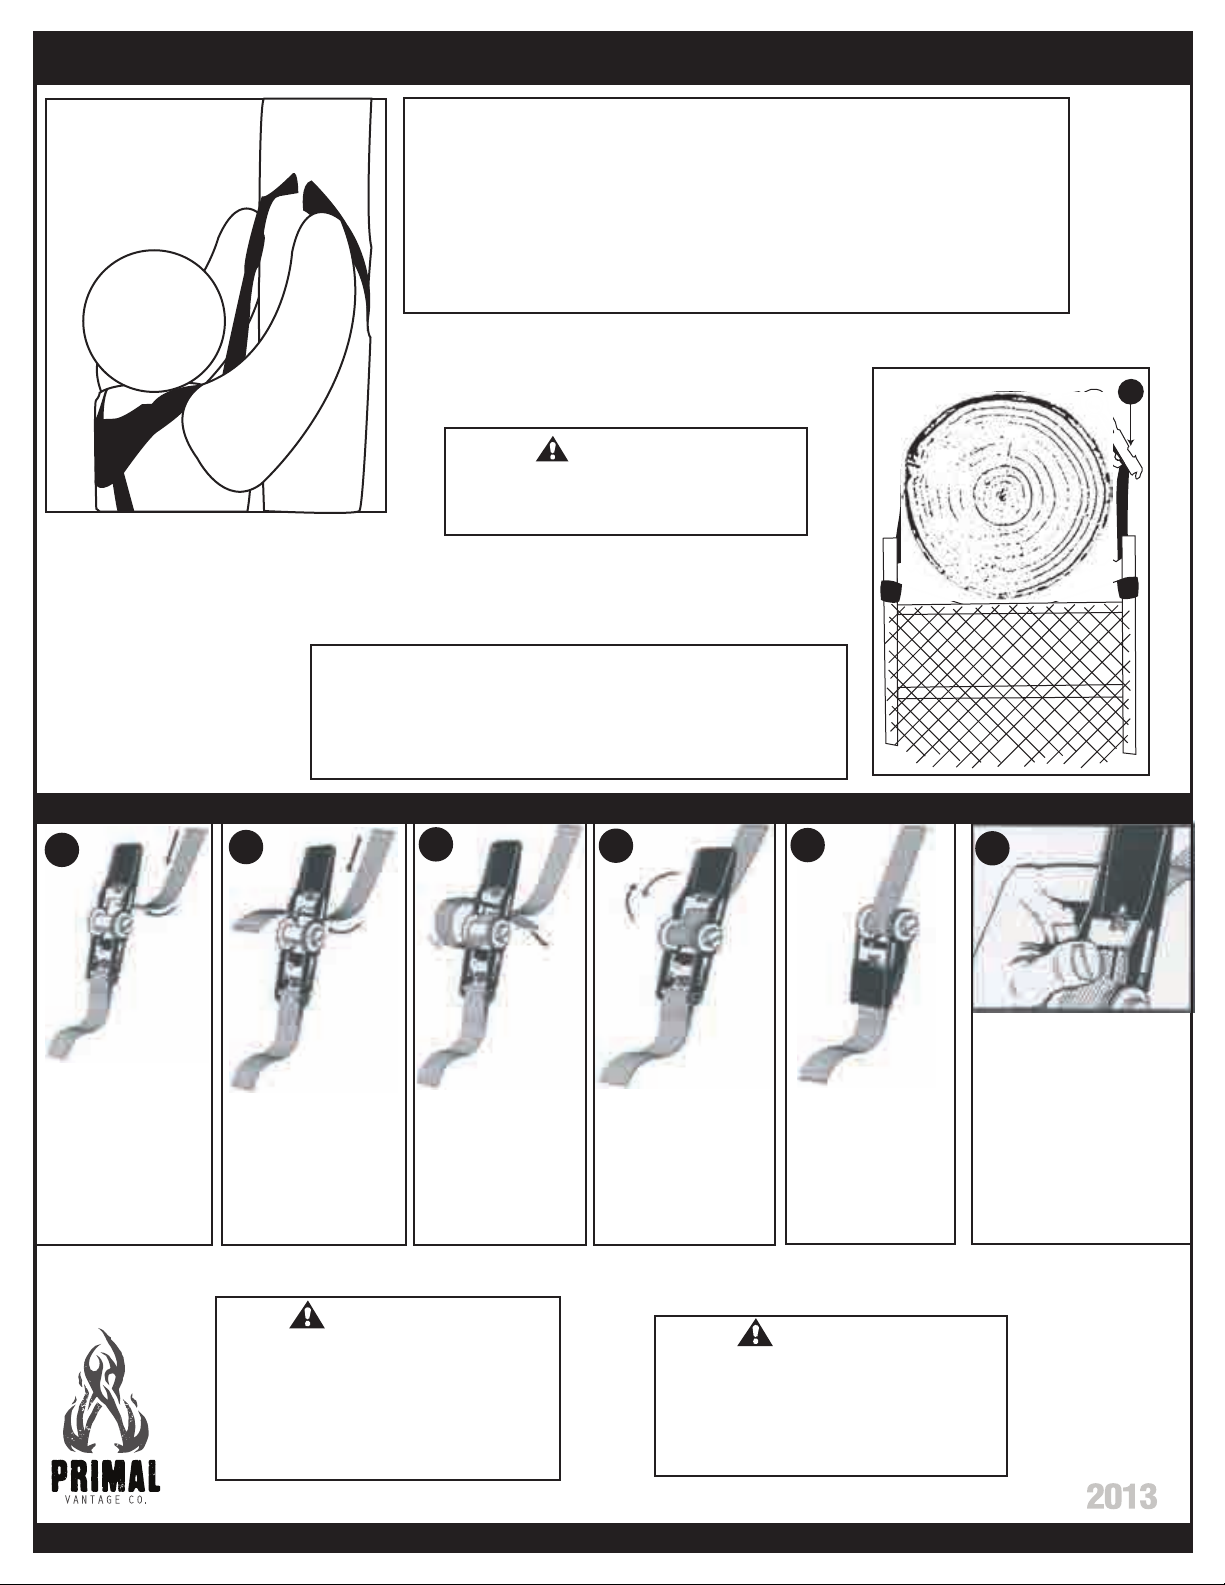
ALWAYS wear a Fall Arrest System (FAS) (Harness) consisting of a full body safety harness after leaving the ground.ATMA Certified Full Body Harness MUST
always be connected to yourself and the tree during ascending, hunting and descending. Single safety belts and chest harnesses are no longer allowed and
should NEVER be used. If you are not wearing a Full Body Harness properly attached to the tree, that is protecting you from a fall, DO NOT leave the ground.
Failure to wear your Full Body Harness may result in serious injury or death. Be aware that falls can occur at anytime after leaving the ground.
ALWAYS read and understand the manufacturer’s Warnings, expiration date (if applicable) and instructions on how to use and how to properly adjust the
harness. Practice the use of a full body safety harness at ground level in the presence of a responsible adult to experience the feeling of hanging suspended
before using in a hunting environment. Failure to follow harness instructions may result in not being able to return to the stand and being suspended in a
harness after a fall, or serious injury or possibly death. If the hunting location is unknown by anyone and communication efforts are unsuccessful, you MUST
have a personal plan for rescue/escape because prolonged suspension in a harness may be fatal. It is important to exercise the legs by pushing against the tree
or doing other forms of continuous leg exercises to avoid blood pooling while being suspended. Hunters with varying degrees of physical fitness may require
different plans to recover/escape the effects of prolonged suspension. Have a personal plan and practice it in the presence of a responsible adult before leaving
the ground. No one escape/rescue plan will work for every hunter on every tree in every circumstance. Only you can determine the best recovery/escape plan
for your situation before leaving the ground.
ALWAYS have a suspension relief device on your person and readily accessible while using a harness. These devices allow the user to relieve the load on the
lower extremities if suspended in a harness and help maintain circulation in the legs, mitigate suspension trauma (blood pooling) or allow descent to the ground.
Several optional products/systems are available that offer self-recovery or self-extraction from a fall when suspended in a harness. Some systems automatically
descend the user while others allow user control. One of these products/systems can be considered for use as an additional safety precaution against prolonged
suspension and suspension trauma, Be sure to follow the manufacturers’ instructions on the safe use of these products/systems.
Hunt from the ground when self-recovery escape is absent. There is time to make a correct decision on what action to take if a fall occurs while wearing a full
body harness. It is important to remember “DO NOT PANIC.” Remain calm and implement your practiced rescue, relief and recovery plan.
NEVER allow the tether strap to get under your chin or around our neck. The length of the harness tether MUST be minimized at all times. It should be adjusted
so that it is above the head with no slack (snug) in the sitting position and you should have the minimum amount of slack possible when climbing.
W A R N I N G
ALWAYS read and understand all warnings and
instructions before each use of this product. Failure
to read and understand all warnings and
instructions may result in serious injury or death.
ALWAYS inspect the tree stand for signs of wear or
damage BEFORE each use. Also inspect to ensure
that nuts and bolts are secure and straps are not
frayed, worn, or broken.
ALWAYS wear a Fall Arrest System (FAS) that
meets TMAstandards after leaving the ground. If
you are not wearing an FAS, DO NOT leave the
ground. Failure to wear an FAS may result in
serious injury or death.
DO NOT use this tree stand while under the influence of
alcohol, medication, or illegal substances. Use of tree
stand while under the influence of any of these
substances may result in serious injury or death.
NEVER use this tree stand if you have a history of health
problems such as (but not limited to) heart problems, back
problems, impaired vision, equilibrium impairments are
afraid of heights or have been advised by a doctor not to
do any strenuous activity. If you are feeling ill, nauseous,
or dizzy DO NOT use this tree stand or If you are not
physically fit, well rested and alert. Physical aliments can
reduce your ability to safely install, utilize and remove
your tree stand.
NEVER use this tree stand during inclement weather
such as (but not limited to) thunderstorms, snowstorms,
hurricanes, icy conditions, or high winds that could create
slippery or dangerous situations.
NEVER use this tree stand on a dead, leaning,
loose barked tree or on a utility pole as the tree
may fall, break, or uproot and may result in
serious injury or death.
DO NOT modify or alter your tree stand.
NEVER step up to the platform. Climbing aids
such as stick ladders, MUST extend above the
platform of the hang-on to allow the user to step
down on the platform. The Full Body Harness
MUST always be attached to the tree even when
stepping down into the tree stand.
NEVER leave the ground without checking every
ladder section connection to ensure they are firmly
connected. If ladder sections are separating, with
the help of at least two other people, remove the
tree stand from the tree, tighten all connections
and reinstall on the tree.
NEVER remove or deface warning labels.
DO NOT use treestand if combined weight of one
person and equipment exceeds 300 lbs. or
combined weight of two people and equipment
exceed 500 lbs. DO NOT exceed the weight limit
of safety harness, refer to harness
manufacturers warnings for weight limit of
safety harness.
SAMPLE
WWW.PRIMALVANTAGE.COM
©2013 (rev. 06/12)

CUSTOMER SERVICE DEPARTMENT 1-866-972-6168 WWW.PRIMALVANTAGE.COM
• ALWAYS thoroughly inspect the tree before installing your product. DO NOT install your TREE/LADDER STAND onto any dead or unsafe tree, telephone or utility
pole, structural column, or man-made structure. Doing so may result in serious injury or death.
• ALWAYS select the proper tree for use with your TREE/LADDER STAND. Select a live straight tree that fits within size limits recommended (minimum tree
diameter must be no less than 9 inches and maximum of 18 inches.). DO NOT rely on a branch for support.
• DO NOT select a tree in the dark or choose a tree in close proximity to a fence. You must not have any stumps or rocks beneath your tree.
• NEVER use TREE/LADDER STAND on a tree that is dead, diseased , leaning or on wet and uneven ground as the tree may fall, break or uproot.
• Your tree must not be wet, icy or slippery or on wet, swampy, or loose ground that allows the tree to be unstable. Check the ground under TREE/LADDER STAND
to ensure it is firm and level.
• Be sure you have a level stand platform. Your tree must not lean or have any irregular shape.
• Tree must not have any loose or scaly bark or excessive vines, nails, screws, or any other sharp objects protruding that may sever webbing on product. Any
surrounding trees must not lean or have dead limbs that may fall onto you or your product.
• NEVER HURRY!! HURRYING CAUSES ACCIDENTS!! While climbing a TREE/LADDER STAND, make slow, even movements no more that ten to twelve inches
at a time. Make sure you have proper contact with tree and/or TREE/LADDER STAND every time you move. On ladder tree stand, ALWAYS maintain three points
of contact with each step and ALWAYS lean forward as you climb.
Several treestands are equipped with a footrest, armrests and/or shooting rail. Neither the footrest, armrests nor the shooting rail have been designed to
support a user’s weight. Under NO circumstances should you place more than fifteen (15) pounds of weight on these structures. Doing so will put the user
in serious risk of injury or death.
CHOOSING A SAFE TREE
PROPER CARE AND MAINTENANCE:
• Inspect for defects (damage, rot, corrosion, cracks, freezing, excessive heat, etc.) before every use is required. Do not use if damage is detected or
suspected.
• We recommend replacing all hardware/cables/nuts/bolts/clips on your tree stand every two (2) years or sooner if inspection finds it necessary. Use only
Primal Vantage approved replacement straps and parts. Use of any other straps or parts, will be viewed as a modification to the product. Any modification
will void the warranties and relieve Primal Vantage from all liabilities. Failure to follow these instructions may result in serious injury or death.
• DO NOT overtighten the hardware. DO NOT use a socket wrench. This can lead to structural damage and may negatively affect the performance of your
stand. Failure to follow these instructions may result in serious injury or death.
• All photos are taken from the front view unless otherwise noted.
• By registering your product, you may be enrolled in our discount program.
You may receive a 20% off coupon for our website store, www.primal-store.com to purchase replacement parts in the future.
• In most cases, bolts come with two nylon washers. One washer will be placed against the bolt head the other washer will be placed against the nut.
©2013 (rev. 06/12)

CUSTOMER SERVICE DEPARTMENT 1-866-972-6168
Distributed by Primal Vantage Company Inc. 685 Route 10 East, Randolph, NJ 07869
Ratchet
Strap (1)
ZM10 Quickclip (4)
YShooting Rail
Adjuster (2)
Seat Platform (1)
C
B
Middle/Bottom
Ladder Section (2)
Shooting Rail (1)
N
WWW.PRIMALVANTAGE.COM
KStep (1)
VShooting Rail
Knob (2)
QAdjustment
Knob (1) Stabilizer Bar (1)
R
SSeat Cushion (1)
XInstallation
Cross Strap (2)
JRear Brace (2)
LFront Brace (2)
Shooting Rail Extender (2)
M
GBackrest (1)
FPlatform Support (2)
Shooting Rail Cover (1)
U
TBackrest Cushion (1)
Handle Rail (2)
E
Platform Brace (2)
I
Yoke (2)
P
Tree Brace(1)
O
Foot Platform (2) (Four Holes on Top)
D
Right Seat Support (1)
H2
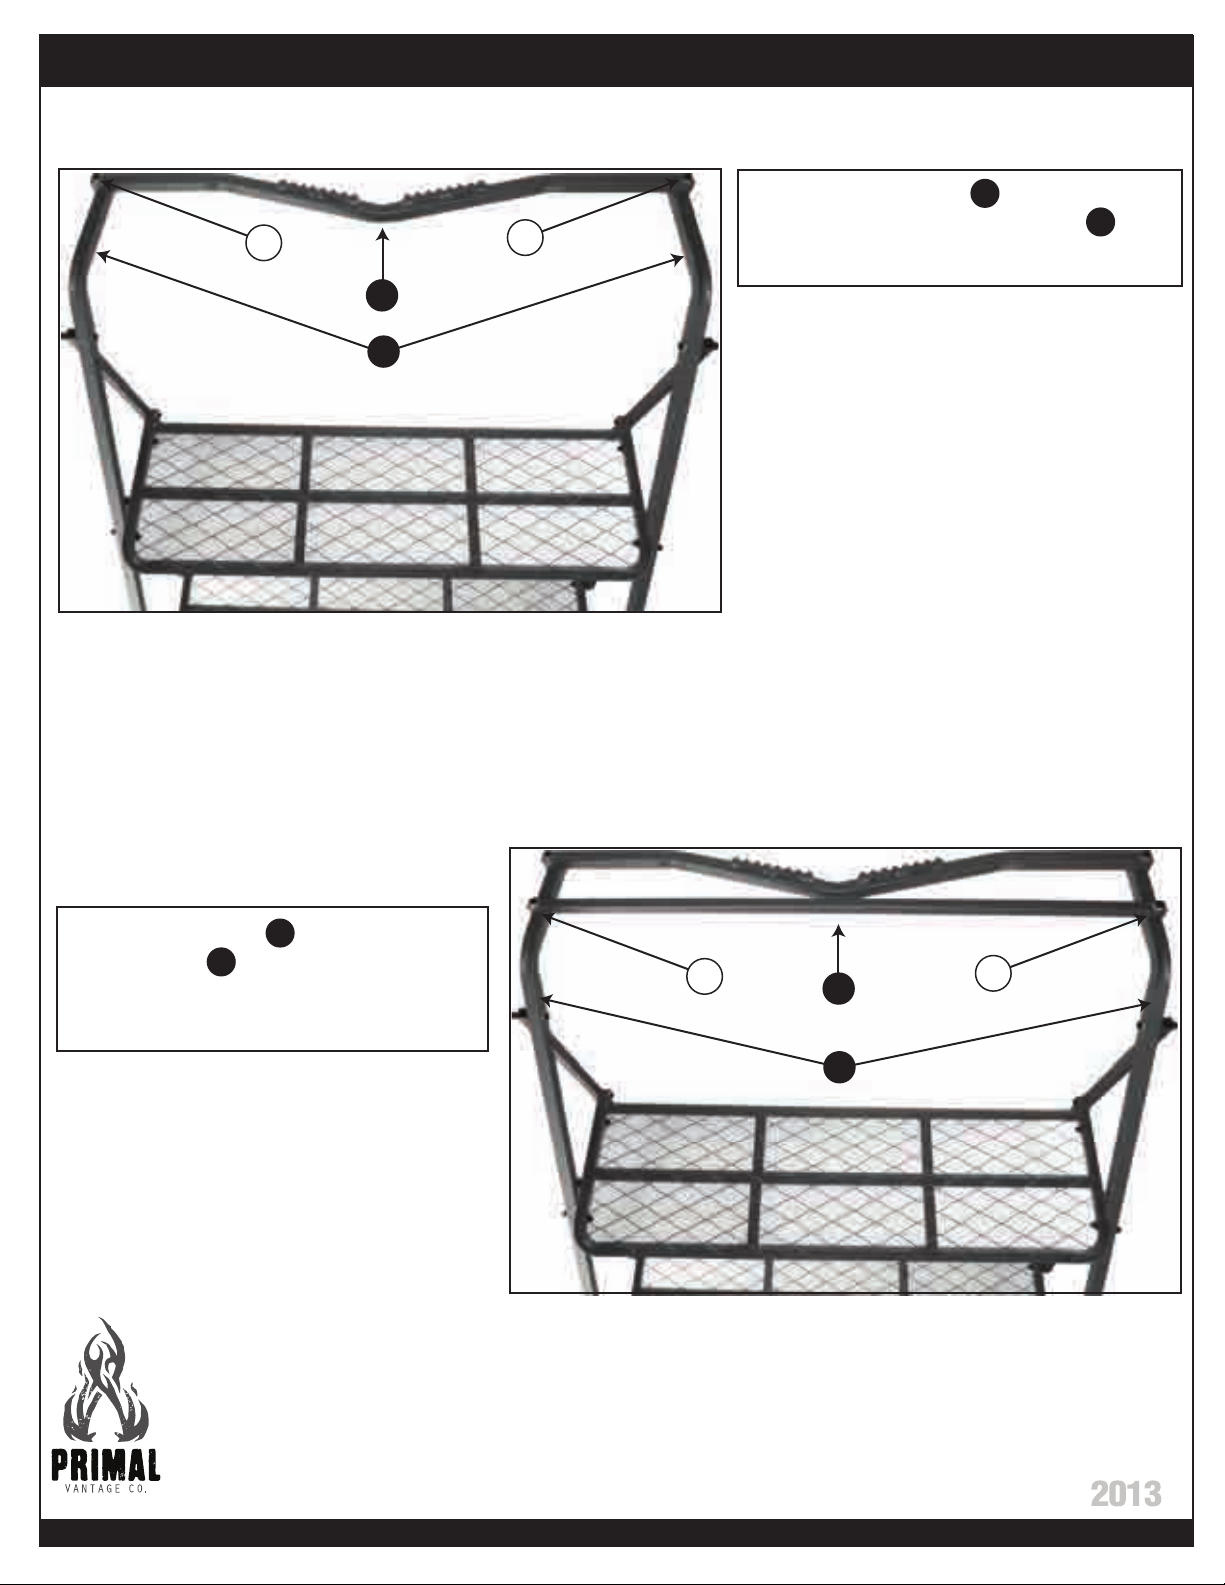
PARTS LIST
HARDWARE
Part # 1265
Part # 1260
4 M12x65mm Bolt....................................
24 M12x60mm Bolt....................................
65
60
Part # 1245W
1 M12x45mm w/wingnut...........................
45w
Part # 1615
Part # 2013
2 Harness...............................................
4 M10 Quickclip.........................................
2 M10x60mm Bolt w/Bushing..................Part # 1061
2 M10x25mm Bolt....................................Part # 1025
61
25
B
A
2 Foot Platform (4 Holes on Top)................Part # DFP-582
C
D
E
F
G
H1
J
K
L
M
1 Top Ladder Section (2 Holes on Sides)..
2 Middle/Bottom Ladder Section............Part # DL-5820
Part # DL-5710
1 Seat Platform.......................................Part # DSP-582
2 Platform Support..................................Part # DPS-582
2 Rear Brace..........................................Part # DRB-582
1 Step.....................................................Part # DS-581
1 Shooting Rail.......................................Part # DSR-581
2 Yoke.....................................................Part # DYK-581
1 Adjustment Knob.........................................Part # AK-100
1 Stabilizer Bar.......................................Part # DSB-500
1 Seat Cushion.......................................Part # DSC-581
1 Backrest Cushion.................................Part # DPBC-582
N
O
P
Q
R
S
T
2 Front Brace..........................................Part # DFB-581
1 Left Seat Support................................Part # DLS-582
2 Shooting Rail Extender........................Part # DSX-581
1 Tree Brace...........................................Part # DTB-581
2 Handle Rail..........................................Part # DHR-582
1 Backrest...............................................Part # DBR-582
2 Buckle Strap........................................Part # BA-100
2 Installation Cross Strap........................Part # ICS-1000
W
X
1 Ratchet Strap.......................................Part # RA-100
Z
Part # 1255
4 M12x55mm Bolt....................................
55 Part # 1241
2 M12x40mm Bolt w/Bushing..................
40
2 Shooting Rail Adjuster.........................Part # DSA-581
Y
I2 Platform Brace.....................................Part # DPB-582
1 Shooting Rail Cover.............................Part # DPRC-581
U2 Shooting Rail Knob..............................Part # DSRK-581
V
H2 1 Right Seat Support..............................Part # DRS-582
Buckle Strap (2)
W
©2013 (rev. 11/12)
MODEL: HEH00582
•Always Wear a Safety Harness with this Product
•Practice Using at Ground Level
• Weight Limit: 300 lbs.
•Tree Size: 9”-18” diameter
SIDE X SIDE DELUXE
17’ LADDERSTAND
A
Top Ladder
Section (1)
(Holes on Sides)
Left Seat Support (1)
H1

CUSTOMER SERVICE DEPARTMENT 1-866-972-6168 WWW.PRIMALVANTAGE.COM
ASSEMBLY INSTRUCTIONS PAGE 1 MODEL: HEH00582
SIDE X SIDE DELUXE 17’ LADDER TREESTAND
Distributed by Primal Vantage Company Inc. 685 Route 10 East, Randolph, NJ 07869 ©2013 (rev. 11/12)
ALL PHOTOS TAKEN FROM FRONT VIEW UNLESS OTHERWISE NOTED
REAR
NOTE: Make sure that Platform Supports F have the
hole on the side towards the rear.
1. Attach Foot Platform D to Platform
Support F using 4-M12x60mm Bolts.
NOTE: Make sure that the flat part of the
Platform is in the front.
60 D
FHole
Hole
60 D
F
2. Attach remaining Foot Platform D to rear
of Platform Support F using 4-M12x60mm
Bolts.
NOTE: Make sure that the rounded edges
of both platforms are against each other.
3. Attach sleeved end of each Handle Rail E to the
OUTSIDE of Foot Platform D using 1-M12x60mm
Bolt on each side.
NOTE: Handle Rails are interchangeable.
The welded brace on each Handle Rail can be on
either side.
60
E
D

CUSTOMER SERVICE DEPARTMENT 1-866-972-6168 WWW.PRIMALVANTAGE.COM
ASSEMBLY INSTRUCTIONS PAGE 2
Distributed by Primal Vantage Company Inc. 685 Route 10 East, Randolph, NJ 07869
MODEL: HEH00582
SIDE X SIDE DELUXE 17’ LADDER TREESTAND
©2013 (rev. 11/12)
60
E
D
55
J
4. Attach Rear Brace J to the OUTSIDE of
rear Platform D using 1-M12x55mm Bolt on
each side.
Attach Rear Brace J to the OUTSIDE of
Handle Rail E using 1-M12x60mm Bolt on
each side.
H1
65
J
E
60
H2
NOTE: The Seat Supports need to be
attached so that the welded bracket is
on the OUTSIDE. 5. Attach front of each Seat Support H1 and H2 to
the INSIDE of Handle Rail E using 1-M12x65mm
Bolt. Attach rear of each Seat Support H1 and H2 to
the INSIDE of Rear Brace J using 1-M12x60mm Bolt.
NOTE: The front of each Seat Support has a rubber
pad on top of it.

CUSTOMER SERVICE DEPARTMENT 1-866-972-6168 WWW.PRIMALVANTAGE.COM
ASSEMBLY INSTRUCTIONS PAGE 3
Distributed by Primal Vantage Company Inc. 685 Route 10 East, Randolph, NJ 07869
MODEL: HEH00582
SIDE X SIDE DELUXE 17’ LADDER TREESTAND
©2013 (rev. 11/12)
D
60 60
55
55
L
L
H1 H2
C
40
H1 H2
H2
C
J
REAR VIEW
CLOSEUP
40
Washer
Washer
Bushing
Nut
6. Attach Front Brace L to the OUTSIDE of Front
Platform D using 1-M12x55mm Bolt.
Attach opposite end of Front Brace L to the
OUTSIDE of Seat Support H1 and H2 using
1-M12x60mm Bolt.
7. Attach Seat Platform C to the brackets on each Seat Support H1 and H2 using
1-M12x40mm Bolt w/bushing on each side.
(See REAR VIEW CLOSEUP for proper installation order).
Insert the bushing through Seat Platform C .
Place Seat Platform C on Seat Supports H1 and H2 so that it is between both brackets.
Place a washer on bolt, insert the bolt through the bracket and through the bushing.
Insert the last washer on the bolt and tighten the nut.
CUSTOMER SERVICE DEPARTMENT 1-866-972-6168 WWW.PRIMALVANTAGE.COM
ASSEMBLY INSTRUCTIONS PAGE 4
Distributed by Primal Vantage Company Inc. 685 Route 10 East, Randolph, NJ 07869
MODEL: HEH00582
SIDE X SIDE DELUXE 17’ LADDER TREESTAND
©2013 (rev. 11/12)
E
G
60 60
E
65 65
O
8. Attach Tree Brace O to the rearmost
holes at the top of Handle Rails E
using 1-M12x65mm Bolt on each side.
9. Attach Backrest G to the top of
Handle Rails E just in front of the Tree
Brace using 1-M12x60mm Bolt on
each side.
CUSTOMER SERVICE DEPARTMENT 1-866-972-6168 WWW.PRIMALVANTAGE.COM
ASSEMBLY INSTRUCTIONS PAGE 5
Distributed by Primal Vantage Company Inc. 685 Route 10 East, Randolph, NJ 07869
MODEL: HEH00582
SIDE X SIDE DELUXE 17’ LADDER TREESTAND
©2013 (rev. 11/12)
Welded
Nut
Y
V
M
25 25
MM
N10. Insert each Shooting Rail Extender M into
Shooting Rail N . Secure with 1-M10x25mm
Bolt on each side.
11. Slide Shooting Rail Adjuster Y onto end of
Shooting Rail Extender M . Make sure the welded
nut is facing the outside. Use Shooting Rail Knob V
to secure.
Insert the bushing into Handle Rail first. Then
insert a washer onto the bolt. Insert the bolt
through the Handle Rail and bushing.
Continue through the Shooting Rail. Add the
last washer and tighten the nut.
M
Bushing Washer
Washer
Nut E61
LEFT
SIDE
CLOSEUP
12. Attach assembled Shooting Rail to Handle Rail E
using 1-M10x60mm Bolt w/bushing on each side.
(See Left Side Closeup for Installation Order)
61
E
M
61
E
M

Distributed by Primal Vantage Company Inc. 685 Route 10 East, Randolph, NJ 07869
ASSEMBLY INSTRUCTIONS PAGE 6
CUSTOMER SERVICE DEPARTMENT 1-866-972-6168 WWW.PRIMALVANTAGE.COM
MODEL: HEH00582
SIDE X SIDE DELUXE 17’ LADDER TREESTAND
©2013 (rev. 11/12)
U
S
T
60 60
P
K
P
A
13. Attach Seat Cushion S to Seat Platform C .
Attach Shooting Rail Cover U to Shooting Rail N .
Attach Backrest Cushion T to Backrest G .
14. Attach Step K to each Yoke P using
1-M12x60mm Bolt.
15. Insert Top Ladder Section A
into each Yoke P . Make sure
that Step K is behind the Yokes.
Distributed by Primal Vantage Company Inc. 685 Route 10 East, Randolph, NJ 07869
ASSEMBLY INSTRUCTIONS PAGE 7
CUSTOMER SERVICE DEPARTMENT 1-866-972-6168 WWW.PRIMALVANTAGE.COM
MODEL: HEH00582
SIDE X SIDE DELUXE 17’ LADDER TREESTAND
©2013 (rev. 11/12)
60
60
60
60
I
A
F
P
F
16. Insert assembled Top Ladder into each Handle Rail E .
Make sure the top step is on the inside of the ladder.
17. Attach one end of Platform Brace I to the OUTSIDE of Platform Support F
underneath Rear Foot Platform using 1-M12x60mm Bolt.
Attach opposite end of Platform Brace I to the OUTSIDE of Top Ladder Section A using
1-M12x60mm Bolt.

Distributed by Primal Vantage Company Inc. 685 Route 10 East, Randolph, NJ 07869
ASSEMBLY INSTRUCTIONS PAGE 8
CUSTOMER SERVICE DEPARTMENT 1-866-972-6168 WWW.PRIMALVANTAGE.COM
MODEL: HEH00582
SIDE X SIDE DELUXE 17’ LADDER TREESTAND
©2013 (rev. 11/12)
Z
X
REAR VIEW
BUCKLE STRAP
REAR VIEW
18. Attach Ratchet Strap Z between Tree Brace and Backrest.
(See Ratchet Instructions).
Attach each Installation Strap X just behind the Ratchet Straps between Tree Brace and Backrest.
(See Installation Strap Instructions).
19. Attach Buckle Strap to Rear Platform D through the mesh. (See Buckle Instructions).
LADDER ASSEMBLY
23. Follow Steps 20-22 above to attach the bottom section to the middle section.
22. Close the quickclip to secure
the ladder sections together.
B
A
20. Insert Ladder Section B
into the sleeved end of Top
Ladder Section A .
21. Insert 1 - Quickclip
through the hole on the
sleeve, and through the
ladder sections on each
side of the ladder.
Distributed by Primal Vantage Company Inc. 685 Route 10 East, Randolph, NJ 07869
CUSTOMER SERVICE DEPARTMENT 1-866-972-6168 WWW.PRIMALVANTAGE.COM
INSTALLATION INSTRUCTIONS PAGE 1
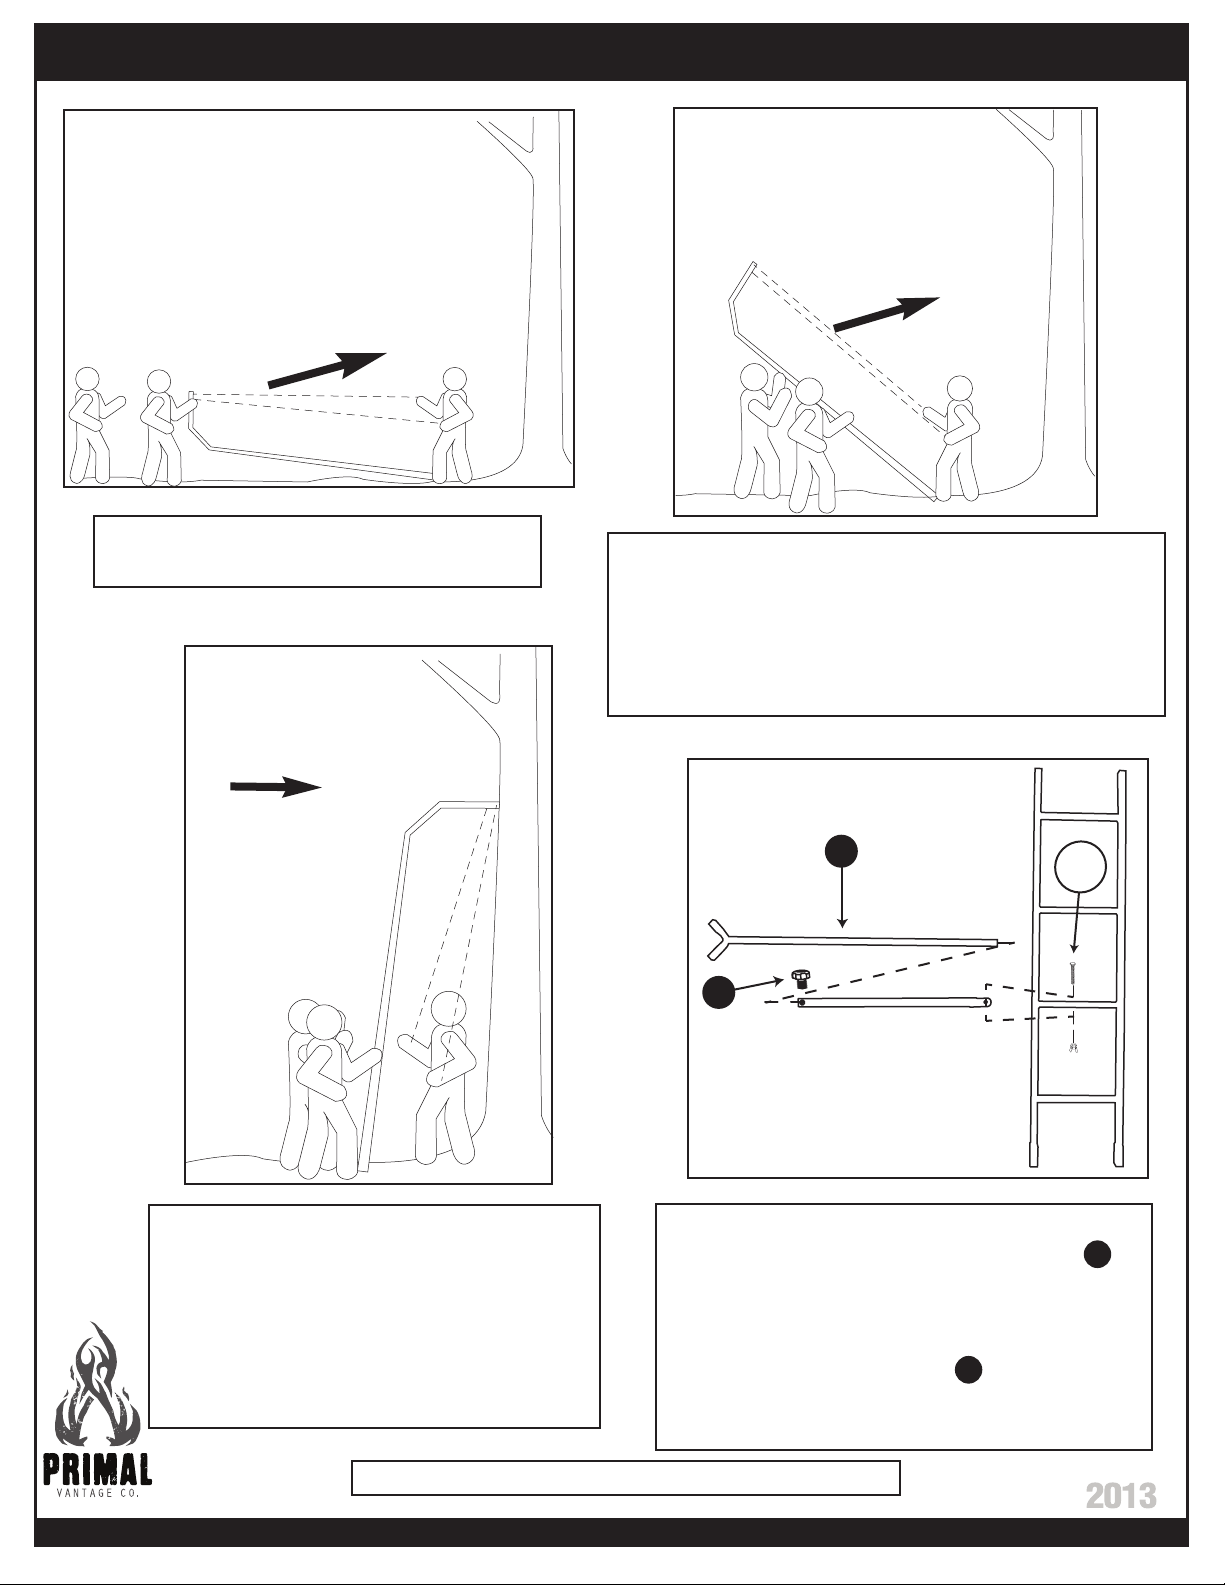
2. One person will stand at the base of ladder with
his/her foot on bottom rung while holding
installation straps. This will prevent tree stand from
sliding. Two people will stand at opposite ends of
tree stand, facing Platform and slowly walk tree
stand upward using rungs of ladder.
2.
NOTE: Drawings are for illustration purposes only and may not depict actual product.
3. As tree stand is being raised, the
person holding Installation Straps will
pull toward themself to take up slack. It
will steady and ease the weight of stand
on the other two people. Continue
walking stand upward, until Tree Contact
is resting against the tree.
©2013 (rev. 11/12)
1. Position bottom of stand 4-5 feet from
base of tree.
1.
4.
45w
R
Q
4. Slide the inner part of the Stabilizer Bar
into the outer part. Attach Stabilizer Bar R to
the second rung of the Middle Ladder Section
with 1 - M12x45mm bolt and 1 wingnut.
Insert the Adjustment Knob Q in the
Stabilizer bar at the proper adjustment point
to the tree.
3.
MODEL: HEH00582
SIDE X SIDE DELUXE 17’ LADDER TREESTAND

Distributed by Primal Vantage Company Inc. 685 Route 10 Randolph, NJ 07869
CUSTOMER SERVICE DEPARTMENT 1-866-972-6168 WWW.PRIMALVANTAGE.COM
©2013 (rev. 11/12)
INSTALLATION INSTRUCTIONS PAGE 2 MODEL: HEH00582
SIDE X SIDE DELUXE 17’ LADDER TREESTAND
7. Cross Installation Straps behind tree.
Attach to the top rung of the bottom
ladder section.
(See Installation Strap Instructions)
7.
W
6.
5. Move base of ladder toward or
away from tree slightly in order to
make Platform as parallel to the
ground as possible.
Apply your full weight to the first
step so it settles into the ground.
5.
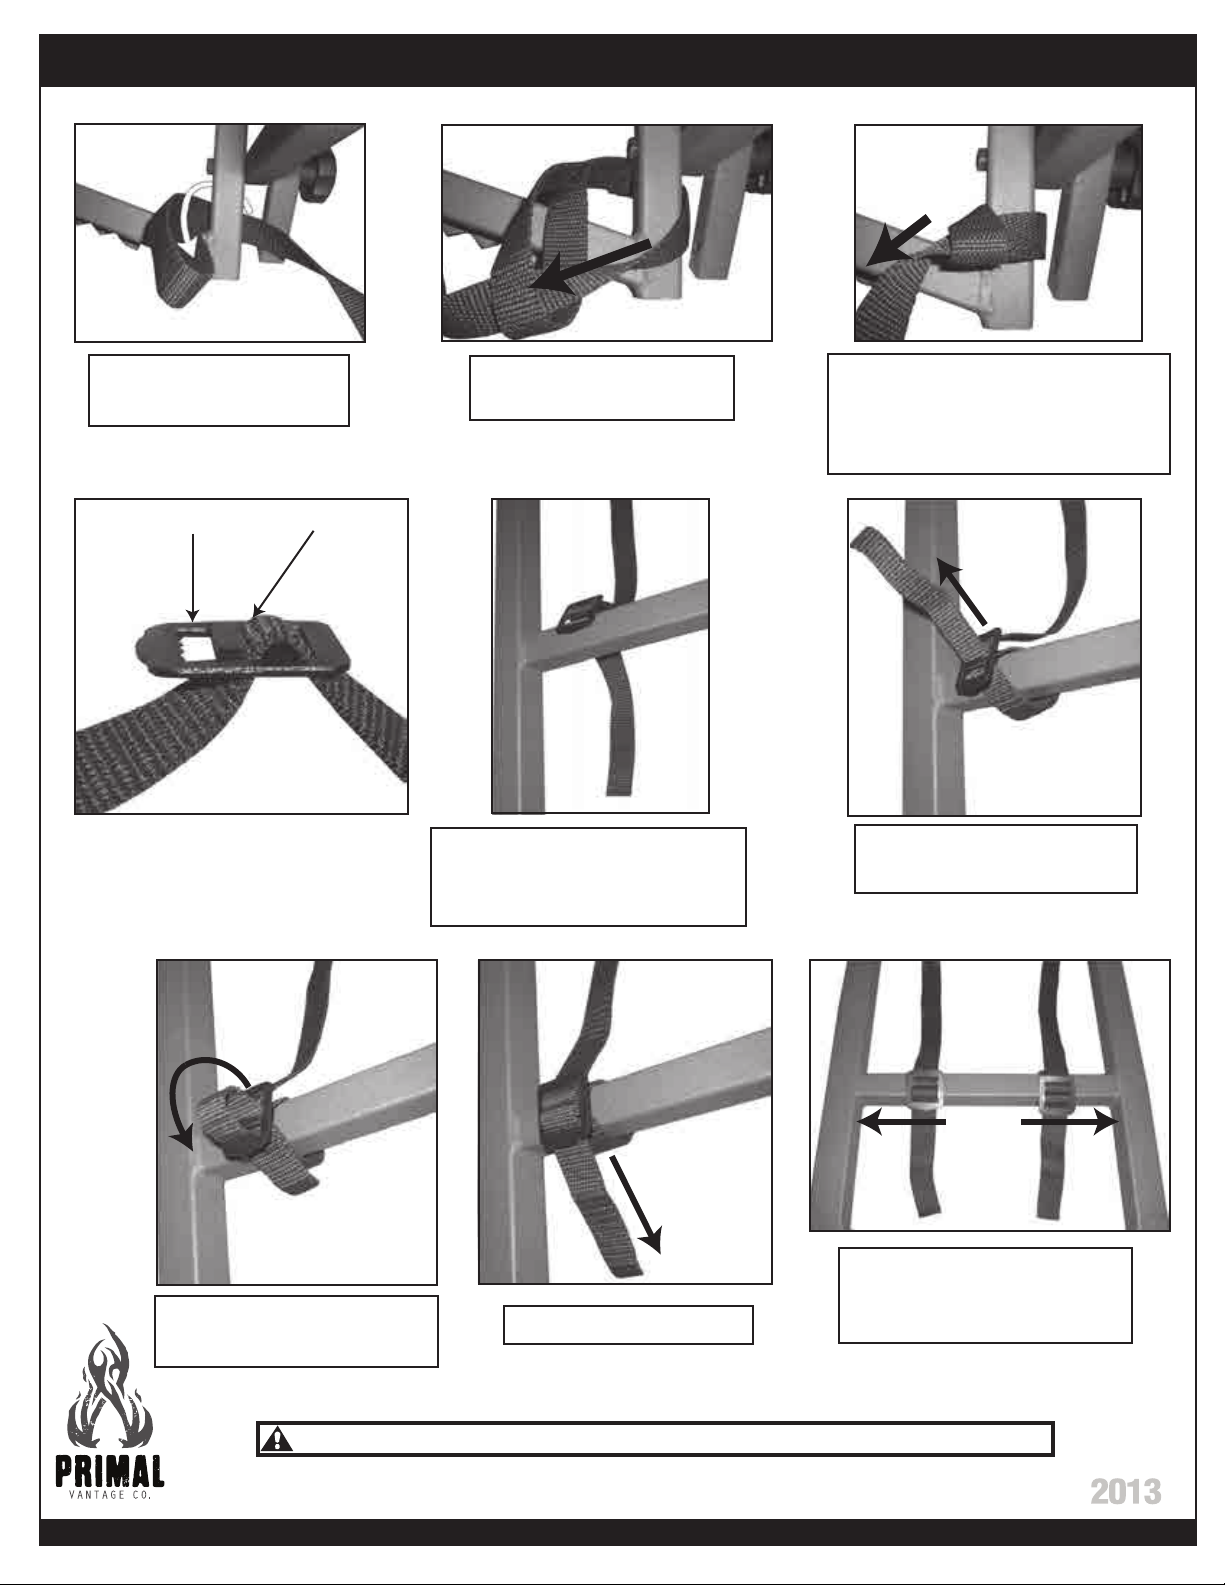
STRAP INSTALLATION
3
Pull Strap to tighten
Hold Strap as shown
1
Insert Strap through looped end
2
Use these same instructions to attach the buckle
Pull strap to desired length.
Hold buckle as shown
Press down on latch and insert
strap underneath teeth as shown.
Pull slack to tighten.
4
BUCKLE INSTRUCTIONS
6. Attach Buckle Strap W just
behind the brace of the inner part
of Stabilizer Bar R by following
the Strap Installation below.
(See Strap Installation Below)
Position the Stabilizer Bar against
the tree and secure it by wrapping
the strap around the back of the
tree once and insert the strap into
the buckle.
(See Buckle Instructions Below)
Distributed by Primal Vantage Company Inc. 685 Route 10 Randolph, NJ 07869
CUSTOMER SERVICE DEPARTMENT 1-866-972-6168 WWW.PRIMALVANTAGE.COM
©2013 (rev. 11/12)
INSTALLATION INSTRUCTIONS PAGE 3 MODEL: HEH00582
SIDE X SIDE DELUXE 17’ LADDER TREESTAND
9. Cautiously climb to the top of the treestand.
Wrap the strap of the ratchet around the back of
the tree once and thread through the ratchet.
(See Detailed Ratchet Instructions Below)
5
After strap is
tight, close
handle to the
locked position
Open ratchet
handle flat and
insert end of
strap through
opening.
12
Pull Strap
through opening
3
Insert tag end
of strap back
through slot in
ratchet wheel.
4
Ratchet handle
back and forth
to tighten strap
6
To release tension,
push spring loaded
retaining lock and
simultaneously pull
on strap.
DETAILED RATCHET STRAP INSTRUCTIONS
Z
9.
WARNING
DO NOT sit on seat platform until
the ratchet has been secured.
WARNING
Stabilizer Bar and Installation
Straps MUST be secured prior
to climbing the Ladderstand.
Failure to comply may result in
serious injury or death.
DO NOT climb ladder without
stabilizer bar installed. Serious
injury or death may occur if
stabilizer bar is not installed.
WARNING
8. After the ladder stand has been secured to the tree with
the installation straps, and the stabilizer bar has been
securely attached to the tree, continue to have two people
hold the ladder, climb cautiously up to the platform. Once
you reach the top, IMMEDIATELY ATTACH YOUR SAFETY
HARNESS TO THE TREE. Keep the tether strap above
your head.
8.
Distributed by Primal Vantage Company Inc. 685 Route 10 Randolph, NJ 07869 ©2013 (rev. 01/13)
CUSTOMER SERVICE DEPARTMENT 1-866-972-6168 WWW.PRIMALVANTAGE.COM
INSTALLATION STRAP INSTRUCTIONS
1. Place looped end of
strap under platform. 3. Pull to tighten. Continue
with these steps to install the
other strap on the other side of
the platform.
2. Insert loose end of
strap through the loop.
4. Place loose end of strap
with clip, under the top rung
of the bottom ladder section.
Slot 2 Slot 1
5. Insert the strap through
Slot 1 on the clip.
6. Insert the strap through
the Slot 2 with the teeth. 7. Pull strap to tighten.
8. Slide the buckles out to
the sides to create tension
on the straps.
DO NOT sit on seat platform until the ratchet and installation straps have been secured.
WARNING
Table of contents
Other Primal Vantage Ladder manuals


Popular Ladder manuals by other brands

Vestil
Vestil COL-3-26-44 instruction manual

Little Giant
Little Giant Safety Step User instructions

Safety Link
Safety Link LADER002.LHD.90 Installation handbook

Vinyl Works
Vinyl Works SLIDE & LOCK SLA001-3 installation instructions

Little Giant
Little Giant HYPERLITE Series Operating and safety instructions

Blue Wave
Blue Wave NE1215 Assembly instructions


Bestway
Bestway FLOWCLEAR 5615G owner's manual

Certa
Certa CTLADTLF6MA user guide

Hailo
Hailo L78 COMFORTLINE Series Instructions for use

Hailo
Hailo 8050 Series Instructions for use

Fontanot
Fontanot pixima MINI Assembly instructions

Werner
Werner MULTILADDER MT-13 Operating procedures and safety instructions