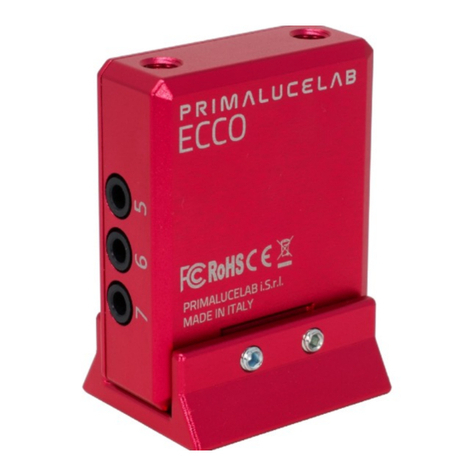
PrimaLuceLab ECCO User manual

VERSION 1.1
Update 02-03-2021
ECCO is made by PrimaLuceLab SpA (Italy). For any matters relating to the use, service and warranty, please refer
to the addresses given in the relevant documents.!
PrimaLuceLab SpA • Via Roveredo 20/B, 33170, Pordenone • www.primalucelab.com
ECCO environmental computerized controller for
EAGLE
USER MANUAL

PrimaLuceLab SpA ECCO user manual
English
WARNING
If improperly handled, ECCO may damage. So please follow the instructions below:
•Do not disassemble
•Do not open, damage or subject to electric shock or excessive impact any part of ECCO. Do not drop.
•Do not short the electronic elements
•Do not expose at temperatures below -20°C and above +60°C
•Do not burn or incinerate any component.
•Do not expose to rain or other atmospheric effect related to water
•Do not bend, modify or force any part of ECCO
Index
Contents of the package
•ECCO environmental computerized controller for EAGLE
•Finder shoe
•2 grub screws
•2 temperature probes
•Micro-USB cable
Contents of the package 1
Using ECCO with the EAGLE 2
ECCO advanced settings 3
Troubleshooting 3
INFORMATION TO USERS 4
Page 1
QUALITY CONTROL
Each ECCO unit, after created in our laboratories, it’s tested by PrimaLuceLab technical experts to check all components. We
verify mechanics and electronics. In case you check any malfunction, please contact us immediately (+ 39-0434-1696106 or
[email protected]). Do not try to disassemble, repair or modify yourselfECCO, without our written approval, in order
not to loose the Producer Warrantee.

PrimaLuceLab SpA ECCO user manual
Using ECCO with the EAGLE
ECCO is designed to work only with the EAGLE (compatible with EAGLE units that comes with power
regulated ports for the dew heaters) and it doesn't need for software or drivers to work. Your EAGLE just
have to be updated with EAGLE Manager at least version 2.0. Please download the latest EAGLE Ma-
nager version from our website https://www.primalucelab.com/astronomy/downloads
In order to use the ECCO, please follow these steps:
• Connect ECCO body to finder shoe support you find in this box and then insert it in your telescope
finder shoe. Insert the temperature probe head in between the dew heater you want to control with
the ECCO and the optics you want to heat.
• Connect temperature sensor to the ECCO port number corresponding to the port number on the
EAGLE you connected the dew heater. For example, if your dew heater for the telescope is connec-
ted to port 5 of your EAGLE, you will connect the temperature sensor to the port 5 of the ECCO.
• Connect the USB cable (you find in this box) in the USB port of the ECCO and in USB port of the
EAGLE.
• After a few seconds, click on the CONNECT button in the EAGLE Manager interface and ECCO will
activate.
• The port (you connected both the dew heater and the temperature sensor) will become orange and
this means ECCO is automatically controlling the dew power based on the dew point that will be di-
splayed on the EAGLE Manager interface. From this moment you cannot manually change the dew
heater power in the orange ports.!
Page 2
Before using the temperature sensors, you have to calibrate them. Wait at least 1 minute from the
moment you connected ECCO to EAGLE USB port. Then, without having the temperature sensors
touch anything and with the temperature sensors close to ECCO, click on "Advanced Settings" but-
ton and press "Calibrate" button. This will calibrate the temperature sensors to match the internal
one in the ECCO. Note: this calibration has to be performed only on the first use or when you chan-
ge/buy new temperature sensors.

PrimaLuceLab SpA ECCO user manual
ECCO advanced settings
Starting from EAGLE Manager 2.0 version, in the Advanced Settings you can find:
- Delta-T: the temperature that ECCO adds to the dew point temperature relative the numbered dew hea-
ter. The larger your optic, the higher we suggest to set this value in order to keep your optic uniformly
heated.
Troubleshooting
Q: When I click on ECCO button in the EAGLE Manager, it doesn’t connect.
A: If you see the “No ECCO found” after you press ECCO button, it means that Windows didn’t properly load the
driver when you connected ECCO’s USB cable to your EAGLE. With the ECCO disconnected from the USB port,
please go to Control Panel, then select Device Manager. Here you see the list of all the devices. Please connect
ECCO’s USB cable and you will see the list updating. If the new found device has a yellow mark, it means that the
driver has not automatically loaded. Make a mouse right-click on it and select “Update Driver”. In the new window
select “Browse my computer for driver software”, click on Browse button and select the folder where you previously
unzipped the “ECCO software package” zip file, that includes also the system driver. This will manually install the
ECCO driver, reboot your EAGLE and connect again to the ECCO in the EAGLE Manager.
Q: My telescope has dew on optics also if I use the ECCO.
A: First of all please check that, when ECCO applies power to dew heaters, they warm up. If the dew heaters are
fine, we suggest you to increase (for example to 2-3 degrees) the Delta-T value in the EAGLE Manager ADVAN-
CED SETTINGS.!
Page 3

PrimaLuceLab SpA ECCO user manual
INFORMATION TO USERS
"
According to art. 26 of Decreto Legislativo 14 marzo 2014, n. 49 "Attuazione della Direttiva 2012/19/UE sui rifiuti di
apparecchiature elettriche ed elettroniche”, the symbol of the barrel placed on the equipment or its packaging indi-
cates that the product at the end of its useful life must be collected separately from other waste.
The user will therefore have to give the end-of-life equipment to the appropriate separate collection centers for
electronic and electrotechnical waste or to return it to the reseller upon the purchase of a new type of equivalent
equipment, one by one.
"
Properly differentiated collection for the subsequent start of dismantled equipment for recycling, treatment and en-
vironmentally compatible disposal helps to avoid possible adverse effects on the environment and health and fa-
vors the reuse and / or recycling of the materials contained in the equipment.
"
The abusive disposal of the product by the user implies the application of the administrative sanctions as per
D.Lgs. 152/2006.
4
Compliance with the RAEE legislation (D.Lgs. 49/2014)
PrimaLuceLab is registered to AEE Register with number
IT17030000009790
PrimaLuceLab adheres to Sistema Collettivo ERP Italia for the com-
pliance to RAEE legislation.!
Page 4

PrimaLuceLab SpA ECCO user manual
1) The PrimaLuceLab product warranty is effective from the date of purchase and is valid only if it is with the invoi-
ce (or receipt) of purchase.#
2) The warranty covers the product against defects in workmanship and includes the cost of the replaced material
and labor.#
3) The warranty does not cover any damage caused to the product or defects or failures that occur due to impro-
per installation , improper use and/or deterioration due to normal wear.#
4) THE GUARANTEE DOES NOT APPLY IN THE FOLLOWING CASES:
- "Repair by anyone not authorised by PrimaLuceLab .
- "Invasive interventions or tampering with internal and/or external parts.
- "Missing of the invoice (or receipt) of purchase.#
TERMS OF SERVICE#
Technical assistance is performed exclusively by PrimaLuceLab or its authorised resellers. All returns must be re-
ceived with our permission (to be asked writing an email to [email protected]) . YOU HAVE TO add to the
shipping the invoice (or receipt) of purchase and the detailed description of the defect. For products without the
invoice (or receipt) of purchase, repair and shipping costs are always paid by the customer.
Page 5
WARRANTY
Table of contents
Other PrimaLuceLab Controllers manuals
Popular Controllers manuals by other brands

Cypress
Cypress CY7C68013 manual

Chromalox
Chromalox IntelliTrace ITC 1 Installation & operation manual

Emerson
Emerson Bettis M Series Installation, operation and maintenance manual

Danfoss
Danfoss VLT Decentral FCD 300 operating instructions
EUROSTER
EUROSTER 11M Operation and assembly manual

Johnson Controls
Johnson Controls FX-PCA2611-0 installation instructions
