Primex PUMP WATCH EXPRESS User manual

PUMP WATCH™EXPRESS
WEB-BASED CELLULAR
MONITORING
User Manual
WATER SYSTEM INTEGRATOR AND CONTROLS PROVIDER
WWW.PRIMEXCONTROLS.COM
-
844-4PRIMEX (477-4639)

PRIMEX®Pump Watch™Express User Manual
WARNINGS
Failure to read and understand the information provided in this manual may result in personal injury or
death, damage to the product or product failure. Please read each section in its entirety and be sure
you understand the information provided in the section and related sections before attempting any of
the procedures or operations given.
Failure to follow these precautions could result in serious injury or death.
Keep these instructions with warranty after installation. This product must be
installed in accordance with National Electrical Code, ANSI/NFPA 70 so as to
prevent moisture from entering or accumulating within the controller housing.
ELECTRICAL SHOCK HAZARD
A qualified service person must install and service this product
according to applicable codes and electrical schematics.
Disconnect power prior to servicing an equipment with the
Pump Watch™Express.
EXPLOSION OR FIRE HAZARD
Do not use this product with flammable liquids. Do not install in
hazardous locations as defined by National Electrical Code,
ANSI/NFPA 70.
• Do not connect power to this equipment if it has been damaged or has
any missing parts.
• Do not install in areas with: excessive or conductive dust, corrosive or
flammable gas, moisture or rain, excessive heat, regular impact shocks,
or excessive vibration.

PRIMEX®Pump Watch™Express User Manual
TABLE OF CONTENTS
Introduction & Pump Watch™Express Introduction Ordering Information..1
Ordering Information...................................................................................3
Pump Watch™Express Setup Form ...........................................................4
Receiving and Inspection............................................................................5
Pump Watch™Express RTU Features .......................................................6
Mounting the Pump Watch™Express RTU.................................................7
Activating the Battery..................................................................................8
Wiring..........................................................................................................9
Pump Watch™Gateway Schematic - View Controller ..............................10
Pump Watch™Gateway Schematic - PC-3000XC Controller...................11
Sensor Wiring ...........................................................................................12
Mounting the Pump Watch™Express Panel & Dimensions .....................13
Wiring Methods.........................................................................................14
System View .............................................................................................15
Wiring........................................................................................................16
Pump Watch™Express Troubleshooting ..................................................17
Logging In .................................................................................................18
Access Levels...........................................................................................19
Viewing/Searching for RTUs.....................................................................20
Placing an RTU on the Map .....................................................................22
User Setup................................................................................................23
Dashboard ................................................................................................24
RTU Setup ................................................................................................25
Online/Offline Trigger Alert Setup.............................................................26
RTU Visualization .....................................................................................27
Main Screen Configuration .......................................................................29
Station Parameter Configuration ..............................................................30
Alarm Notification Setup ...........................................................................33
Connecting Alerts to Users.......................................................................34
Escalation .................................................................................................35
Reports & Trending...................................................................................37
Customer Service Agreement and Terms of Use.........................................

PRIMEX®1 Pump Watch™Express User Manual
INTRODUCTION
Designed for municipal wastewater lift stations and similar applications, the Pump Watch™Express is
a simple and effective RTU for management of a wastewater collection system via a cellular network.
Alarms are monitored and service personnel notied in the event of a failure.
Data logging and trending of critical information enables the User to visually track system performance
and recognize impending problems. The station data can be visualized in a simple and intuitive way
from your web browser on a PC, tablet or smart phone.
The Pump Watch™Express remote monitoring system is designed to be connected to most simplex or duplex
lift station type control panels. The Pump Watch™Express RTU monitors pump run, run time, cycles, amps*,
and flow. It can also monitor system in-flow*, power failure, level and level alarms*. All of this data is then
relayed to the cloud, via a cellular network, to a secure website, and can be accessed and monitored from
virtually anywhere in the world.
The Pump Watch™Gateway uses the RS-485 port to communicate with the following controllers:
Level View
Station View
Energy View
PC-3000XC
The protocol used is Modbus RTU.
* Amps, flow, and level measurements require Pump Watch™Express Premium or Gateway services.

ORDERING INFORMATION
Three versions are available:
• Pump Watch™Express Light (Digital I/O only)
• Pump Watch™Express Premium (Analog & Digital I/O)
• Pump Watch™Express Gateway (RS-485 - Modbus Communication)
The RTU module can be supplied for direct panel mounting, or pre-assembled in NEMA 4X enclosure
for outdoor mounting near an existing panel.
Note: Pump Watch™Express units include 1 year of cellular service, small antenna, & user manual.
Pump Watch™includes 2 years of cellular service, small antenna, a& user manual.
PRIMEX®2 Pump Watch™Express User Manual
Pump Watch™ Express
NEMA 4X
1. Pump Watch™Express RTU
For installation inside a control panel.
Parts Included:
Pump Watch™
Express Premium
+
100/150/200A
Current Transducer
(Premium version only)
ID: 64XXXL
ID: 69XXXP
Pump Watch™
Express Light
or
2. Pump Watch™Express NEMA 4X Panel
For installation outside a control panel or for retrot applications
Includes:
• 10X8X6 NEMA 4X thermoplastic enclosure
• Pump Watch™Express
• DC Power supply and battery backup (Digital I/O only)
• Requires 120/240 VAC supply power
• 100/150/200A to 4-20mA current transducer (Premium version only)
• Can monitor lift stations with up to 2 pumps
or
ID: 67XXXG
Pump Watch™
Express Gateway

PRIMEX®3 Pump Watch™Express User Manual
3. Antenna Options
Standard Antenna
Small Antenna
Small Antenna + Angle Bracket
High Gain Antenna
Included with every Pump Watch™Express unit
suitable for installation of the module in a Fiberglass
or Thermoplastic enclosure
IP67 Compliant
Can be mounted directly to the panel
(through the top or side enclosure wall).
Use with steel/stainless steel enclosure or
when signal is weak.
1m cable with SMA connector.
Surge Protector Option
Mounts on a
1.5” - 2.0” pole
(Pole not included)
Part# Assembly part numbers
1038899 ANTENNA ASSEMBLY, 40FT PUMP WATCH
Assembly Includes
1038516 ANTENNA, CELL, PENTA BAND, OUTDOOR
1038517 BULKHEAD ADAPTOR, N-FEMALE TO SMA-FEMALE
1038518 CABLE ASSY, MA-MALE TO SMA-MALE, 48”
1038520 CABLE ASSY, N-MALE TO N-MALE, 40’
Part# Assembly part numbers
053788 ANTENNA, ADPT WITH SA, BULKHEAD, N-F TO SMA-F
1038518 1038517 1038520 1038516
Includes:
1053788

PRIMEX®4 Pump Watch™Express User Manual
ACTIVATION AND SERVICE
The data management for Pump Watch™remote cellular devices is hosted by: Aqua Management
Incorporated, 6280 S. Valley View Blvd. Suite 212, Las Vegas, NV 89118
All Pump Watch™Express RTUs are provided with a year of pre-paid cellular service. Activation of
your device is required for operation. An account needs to be setup if this is your first Pump Watch™
device.
Activate a new
Pump Watch™or
Pump Watch™Express device.
User must send Activation request
to a PRIMEX®contact person
including the device ID + existing
account name.
PRIMEX®will forward request to AMI via:
Support @aquamanagement.com
Device typically activated within 2
hours
(During office hours 9am-5pm Pacific
time.)
User must fill in the Account Setup
form and send it to a PRIMEX®
contact person.
Data needed:
- Device ID number
- Name and email of End User
(will get the bill for service after the
first year)
- New Account name
(Example: City of Fargo)
- User login name request.
PRIMEX®will forward request to AMI via:
Support @aquamanagement.com
New Account will be created within 24
hours + device activated.
End User
Will receive login instructions via email.
Will verify contact and billing information.
Existing account?
(User already has an
account and
Pump Watch™devices)
YES NO
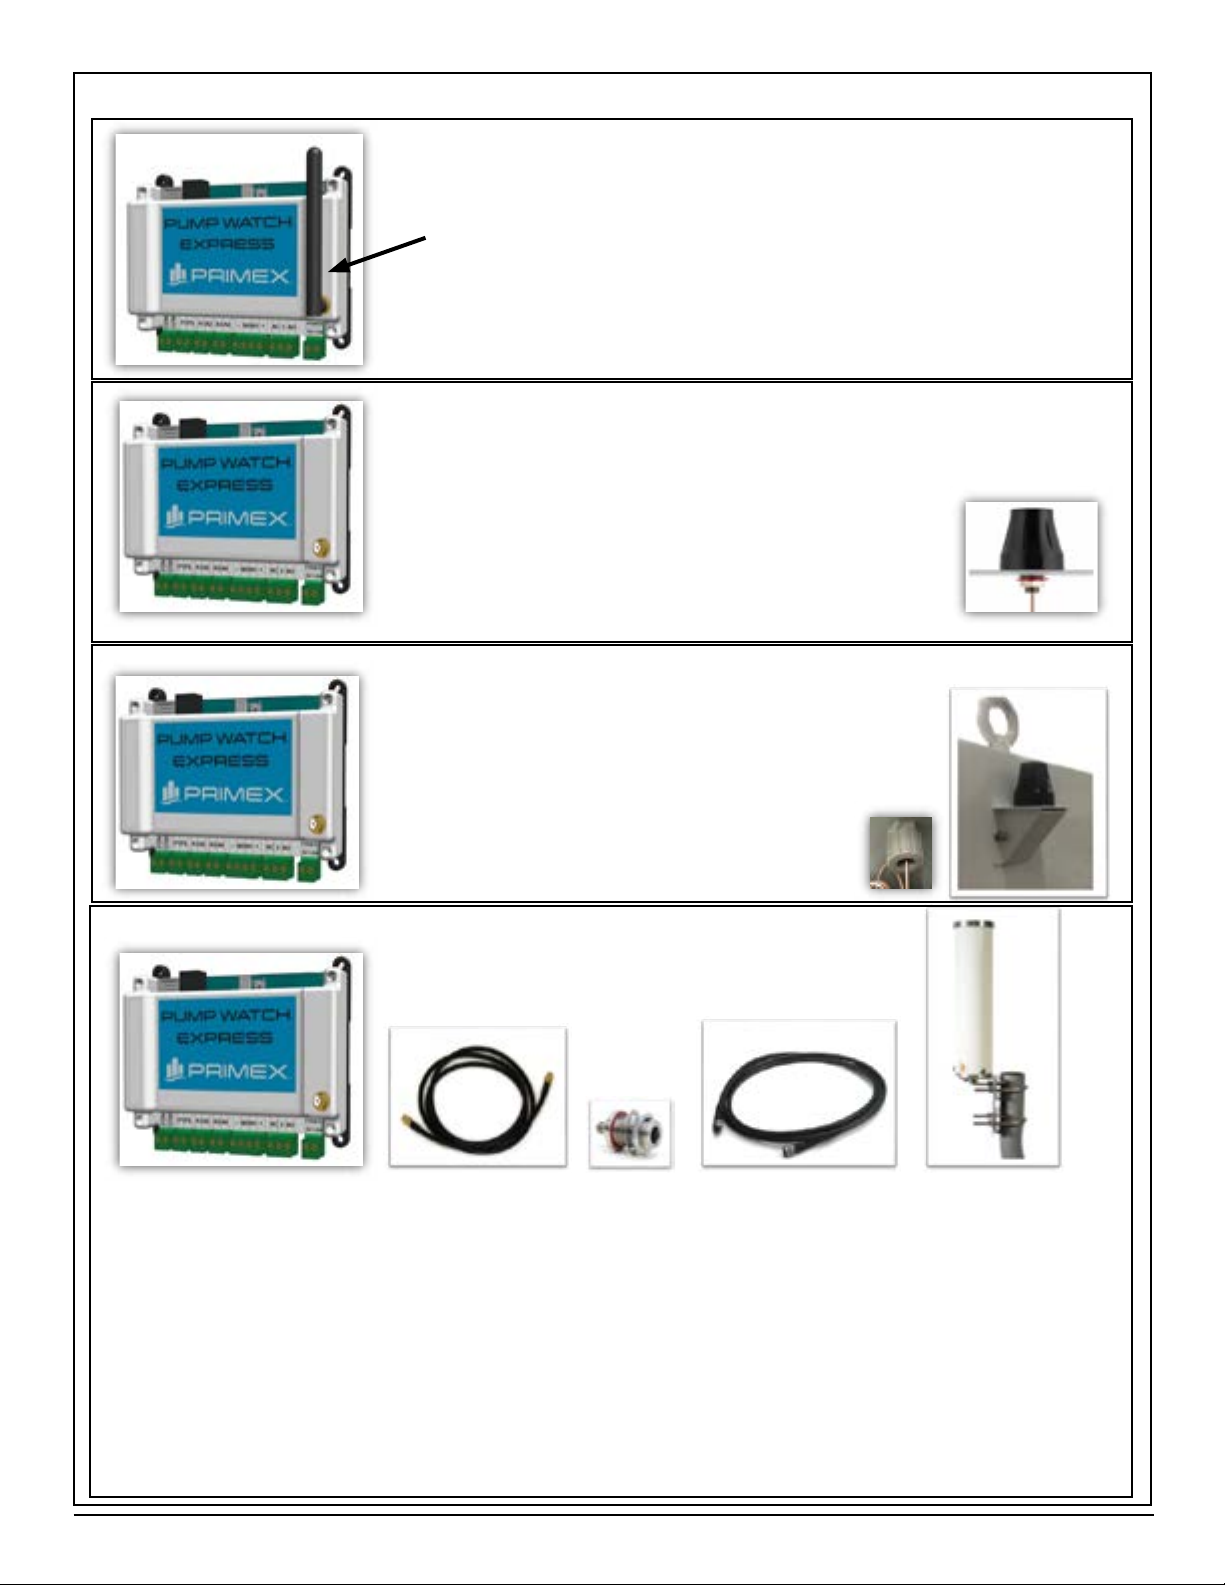
Pump Watch™Express ID number (Located on the device)
LIGHT:
ID: 60XXXLIGHT - 3G GSM
ID: 65XXXLIGHT - CDMA
ID: 64XXXLIGHT - LTE
PREMIUM:
ID: 63XXXPREMIUM - 3G GSM
ID: 68XXXPREMIUM - CDMA
ID: 69XXXPREMIUM - LTE
GATEWAY:
ID: 66XXXGATEWAY - 3G GSM
ID: 62XXXGATEWAY - CDMA
ID: 67XXXGATEWAY - LTE
The Account Setup Form can be downloaded from:
www.primexcontrols.com/pumpwatchremotemonitoring.html
Updated: 7/24/2018
Please fill in foror accounts. If existing account, provide device ID and account name.
Example:
Example: Plymouth
Example:
Example:
Example: 555
Example: plymouth
Example:
Example: Plymouth MN 55441
Example:
Example: 555
Example: mplymouth
End Users who wish to create an account for monitoring Pump Watch devices and those who will be responsible for
the service fee after the initial period is complete.
Example of End Users: A City, Municipality, Water district, Utility Service Company, etc…
This form provides contact and billing information to AMI (Service Company). This will allow them to contact the End
User directly with service renewal options after the initial period is complete.
Information from this new account will be used to setup a login username and password to grant access to the web
portal.
Complete this form and send to your PRIMEX contact person:
Clearwater, FL Julian Atchia (800-746-6287 x3462) julian.atchia@sjeinc.com
Clearwater, FL Russell Gardner (800-746-6287 x5110) [email protected]m
Ashland, OHJason Mailloux (800-746-6287x4110) jason.mailloux@sjeinc.com
Plymouth, MN Troy LaDoux (763-559-0568 x6915) troy.ladoux@sjeinc.com
Detroit Lakes, MN Marty Grabarkewitz (800-746-6287 x3357) marty.grabarkewi[email protected]
It is recommended this form be submittedat least 24 hourspriorto thedeviceactivation.
Once the form is submitted, the User will receive an e-mail from AMI with a link and instructions for login and account
verification. The link will expire after 7 days. Click on the link or cut and paste it intoyour browser URL. Once the
account is verified, power up thedevice forfinal activation and setup. The device is then ready for use.
Once the account is setup, the End Usercan activate additionalPump Watch RTUs in the futurebyfilling in the
and the of the Pump Watchthatneeds to be activated.
1056819C
8/2018

PRIMEX®5 Pump Watch™Express User Manual
RECEIVING AND INSPECTION
(Premium version only)
ID: 64XXXL
ID: 69XXXP
Pump Watch™Express PremiumPump Watch™Express Light
No analog terminals Two analog inputsLight Unit ID
ID: 67XXXG
Pump Watch™Express Gateway
Gateway Unit ID
Premium Unit ID

PUMP WATCH™ EXPRESS FEATURES
PRIMEX®6 Pump Watch™Express User Manual
-
POWER
0V
(GATEWAY)
432112
Battery
Jumper
Switch

MOUNTING THE PUMP WATCH™EXPRESS RTU
5.5”W x 4.5”H x 3.5”D (with antenna at 90 degrees as shown)
Can be din rail mounted or panel mounted with 4 screws.
PRIMEX®7 Pump Watch™Express User Manual

PRIMEX®8 Pump Watch™Express User Manual
ACTIVATING THE BATTERY
Batter Connection
The Pump Watch™Express module is equipped with a small Li ion battery. This battery
will enable operation during power loss (24 Vdc) and send out alert notifications for
power loss and any digital input alerts. Note: The battery is not able to power the
4-20mA loop sensor (Digital inputs only). This battery is shipped disconnect and must
be connected on start up.
Legacy version (external battery):

PRIMEX®9 Pump Watch™Express User Manual
WIRING
PUMP WATCH™EXPRESS PREMIUM RTU SCHEMATIC
24 VDC
Supply
Power
REMOTE
ACTIVATION
CONTACTS
(NON-POWERED)
TORQUE TO: 4.4-7.1 IN-LBS
ATTENTION:
CONNECT CONTACT CLOSURE
INPUTS TO NON-POWERED
CONTACTS ONLY
LEVEL
XDCR
CURRENT
XDCR
PUMP 1 RUNNING
PUMP 2 RUNNING
ALARM 1
ALARM 2
ALARM 3
ALARM 4
COMCOM P1 P2 A1 A2 A3 A4 IN2IN1NC CNO 0V +24
BACKUP BATTERY CONNECTION
-
PUMP WATCH™EXPRESS LIGHT RTU SCHEMATIC
24 VDC
Supply
Power
REMOTE
ACTIVATION
CONTACTS
(NON-POWERED)
TORQUE TO: 4.4-7.1 IN-LBS
ATTENTION:
CONNECT CONTACT CLOSURE
INPUTS TO NON-POWERED
CONTACTS ONLY
PUMP 1 RUNNING
PUMP 2 RUNNING
ALARM 1
ALARM 2
ALARM 3
ALARM 4
COMCOM
P1 P2 A1 A2 A3 A4 NC CNO 0V +24
NO CONNECTION
BACKUP BATTERY CONNECTION
CONNECTION FOR
EXTERNALLY POWERED
LEVEL TRANSMITTER.
CURRENT
TRANSMITTER
LEVEL
TRANSMITTER

PRIMEX®10 Pump Watch™Express User Manual
PUMP WATCH™ GATEWAY SCHEMATIC - VIEW CONTROLLER

PRIMEX®11 Pump Watch™Express User Manual
PUMP WATCH™ GATEWAY SCHEMATIC - PC-3000X CONTROLLER
When using the Pump Watch™Express Gateway with the PC-3000X controller, the following
functions are not available:
• Current monitoring (there is no analog input on the controller for motor Amps).
• Today’s Cycle Starts and Runtime. The previous 24h total is displayed (the controller does
not have Real Time Clock.

PRIMEX®12 Pump Watch™Express User Manual
SENSOR WIRING
CURRENT SENSOR EXAMPLE
Connect the current transducer as shown on the schematics. Open the core of the current
transducer by pressing on the lever. Ensure that one (1) incoming power conductor passes through
the center of the current transducer.
PUMP RUN SIGNAL EXAMPLE
Wire the pump run inputs to
a non-powered auxiliary contact in the
control panel, which closes when the pump
is called to run. These must be wired for
each pump.
Motor contactor auxiliary contacts
for reference only. Actual contactor
conguration may differ.
*Premium version only

PRIMEX®13 Pump Watch™Express User Manual
MOUNTING THE PUMP WATCH™EXPRESS PANEL
Mount the Pump Watch™Express panel using a solid base such as treated posts with a treated plywood
overlay. Mounting on Unistrut or other metal structure is also common. Please use the appropriate
hardware for securely anchoring the panel to the metal structure.
8.5” Enclosure Width
11.125”
Mounting Screws
10.5”
Enclosure Height
5.625” Mounting Screws
6.3” Depth

PRIMEX®14 Pump Watch™Express User Manual
WIRING METHODS
When wiring the Pump Watch™Express panel, be sure to use liquid-tight conduit or strain relief fittings.
Liquid-tight
conduit ttings Liquid-tight conduit
OR
CONDUIT OPTIONS
Use liquid tight fittings and conduit to run cables between the Pump Watch™Express and the
Lift Station control panel. Do not run conduit from the Pump Watch™Express to the wet well.
Conduit

PRIMEX®15 Pump Watch™Express User Manual
SYSTEM VIEW
PUMP WATCH™EXPRESS INSTALLATION EXAMPLE

PRIMEX®16 Pump Watch™Express User Manual
WIRING
SCHEMATIC
-+
* PumpWatch™Express Premium is shown above. See pages 8 and 9 for additional versions.
CONNECTION FOR
EXTERNALLY POWERED
LEVEL TRANSMITTER.
CURRENT
TRANSMITTER
LEVEL
TRANSMITTER

PRIMEX®17 Pump Watch™Express User Manual
PUMP WATCH™EXPRESS TROUBLESHOOTING
Indicating LED on the Pump Watch™Express RTU
Function LED (top of RTU)
LD12 Green - External power (24Vdc). (Right)
LD1 Green - Cellular Modem Power.
LD2 Blue - Connecting to Cellular network (on power up).
LD3 Red - Alarm/Fault present (LIGHT or PREMIUM)
LD4 Yellow - Heartbeat Flash = ONLINE. Fast Flash = OFFLINE
I/O Status LED at the bottom of the RTU
Each input has a corresponding LED indicator above the input terminal
The relay output also has an LED indication.
(See page 12 for details.)
RTU COMMUNICATION
The user can check the RTU signal strength (RSSI) on the web portal. Hover your cursor over the signal
strength icon on the top of the main screen.
RSSI THRESHOLDS
RSSI is a measurement of the power present in a received radio signal (Received Signal Strength Indicator).
The larger the number, the better the reception.
Below is a guideline to appropriate strength thresholds:
1-5 = very poor (no communication
6-8 = poor (inconsistent communication)
9-11 = good (little to no communication issues)
>12 = best
-
POWER
0V
(GATEWAY)
43
2112
Battery
Jumper
Switch
Function LED’s
Table of contents