Primrose 3x10m User manual

Instructions for all 3m width marquees
Thank you for purchasing a Primrose Marquee. We hope you will be very satisfied
with your purchase.
These instructions should tell you all you need to know in order to put the marquee
up. If you would like to see a video of Primrose staff erecting one of our marquees
please visit our website at www.marqueesandpartytents.co.uk
In addition if you have any questions or need any help please do not hesitate to call
us or email us.
Checking your purchase
Please check your marquee well in advance of your event. We have a high level of
quality control at our warehouse and all components are checked before they are
sent out. However we do use third party couriers and it is possible that one box
may not be delivered to you – in this case we can replace it as long as we have
enough time to do so.
First check you have the correct number of boxes (see parts list)
If you haven’t received the correct number of boxes please contact us as soon as
possible.
Please open the boxes and check the contents
www.marqueesandpartytents.co.uk
Customer Services
0118 945 9999

All 3m width marquee frame diagram
(not including optional ground bar kit)
Please refer to parts list insert

WARNING!
1. Please take care not to force the poles and joints together when erecting the
frame as damage may occur to the paintwork and destroy the weatherproofing.
2. Marquees are temporary structures and are not suitable for long-term use. It is
particularly important not to use your marquee in strong winds heavy snow or
extreme weather. Check your local weather forecast before erecting your marquee.
3. Only erect your marquee on a suitable site. The ground must be firm enough to
support the structures weight and for the pegs to hold the marquee in place in windy
weather. You must also be aware of damaging hidden underground structures such
as pipework and sprinkler systems water gas or electric lines and also of overhead
telephone and electric cables.
4. Whilst our marquees are fire retardant please take care with naked flames
(including use of candles oil lamps and heaters) and electrical equipment which
could start a fire. Keep the marquee material away from naked flames and other
heat sources.
Please note: Images included in this document are for illustration purposes only and
may not represent an individual product or be to scale.

ASSEMBLING YOUR MARQUEE
Step 1 – The roof frame
Requires the following parts (please refer to parts list):
Part 1 – 1590mm galvanized pipe
Part 2 – 1940mm galvanized pipe
Part 4 – 120° 3 way connector
Part 5 – 120° 4 way connector
Part 12 – Screws
Please note: Make sure all pipes are pushed firmly into connectors otherwise the roof fabric will not fit
a)To create the two end apex frames.
Lay all parts on the ground as shown in the diagram below.
Make sure that the frame is laying flat on the ground if not then you may need to swap parts 4
over (parts 4 should now provide 3 vertical tubes facing upwards).
Attach poles (parts 1) to connectors (parts 4) using the small screws (part 12). Make sure that
the poles are fully inserted into the connectors before screwing in place.
Repeat for the other end. You should now have two assembled end roof frames.
b) Create the central apexes.
Assemble the central apexes as per the diagram.

The number of central apexes that you will have to construct depends on the size of your
marquee:
Marquee Size Number of Central Apexes
3m x 10m 4
3m x 8m 3
3m x 6m 2
3m x 4m 1
Unlike the two end apexes that you have just constructed these middle frames will not lay flat
on the ground.
Attach poles (parts 1) to connectors (parts 5) using the small screws (part 12). Make sure that
the poles are fully inserted into the connectors before screwing in place.
Repeat for the remaining central apexes. You should now have assembled all of the roof frames.
Please refer to the table above.
c) Join the roof frames together.
Connect all of the central and end apexes together using poles (part 2) and small screws (part
12). It is easiest to start from one end and work your way to the other and to insert the top most
poles first to give your frame stability when erecting. It is also recommended that you assemble
your roof frame in the exact location that you intend your marquee to stand.
The picture below shows the roof frame for a larger 4m x 4m marquee with 2 end apexes and 1
central apex.

Step 2 – The roof canopy
The roof fabric is heavy, we recommend unrolling it onto the frame before
inserting the legs
Requires the following part:
Part 14 - Roof
This part of the assembly process is easier with 3 people for any marquee over 8m
long.
a) Extend the roof along the top central ridge of the roof frame. It helps to have one person in
the middle of the roof and one person at either end. The eyelets will need to be on the inside of
the roof.
Unfold the roof out over the the whole frame pull the fabric gently out to the corners.
Please Note: in extreme weather we recommend that you attach the roof to the frame with
bungees as you go Please see step 3
The picture below shows 3 people unfolding a larger 6m x 8m marquee roof over the frame.

Step 3 –Attaching the legs
Requires the following parts:
Part 3 – 1920mm galvanised pipe
Part 6 – Foot plate (If you are not fitting the optional ground bar kit)
Part G2 – Corner ground plate (If you are fitting the optional ground bar kit)
Part G3 – 3 way ground plate (If you are fitting the optional ground bar kit)
Part 10 – Bungees
Part 12 - Screws
a) Fit the foot plates /ground plates
Each leg pole (Part 3) should be fitted with a foot plate (part 6) if you are not fitting the ground
bar kit. If you have chosen to fit the ground bar kit a 3 way ground plate (part G3) or corner
ground plate (part G2) should be fitted.
Use small screws (part 12) to fix the plates in place.
Please note: there are a series of holes at one end of the leg poles (part 3), this end should
go into the ground plate/foot plate
b) Attach the legs to one side of the marquee
Only fit legs on one side at this stage You may need 3 people for this stage as the marquee
frame is heavy and needs to be lifted to insert the legs
Lift the corner of the marquee roof frame and insert 1 leg pole (part 3) with a corner ground
plate (part G2) or foot plate (part 6) into the roof frame connector (part 4). Make sure that the
holes on the leg pole are facing outwards. Fix in place with a small screw (part 12).
Work down the marquee inserting all of the remaining leg poles if you have chosen to fit the
ground bar kit the poles you need will have 3 way ground plates (part G3) attached. Lastly
insert a leg pole with a corner ground plate (part G2) or foot plate (part 6)
If you have enough people it is easiest to insert all the legs for one side at once, including
the corner legs
c) Attach the roof onto the frame using bungees (part 10)
Please note: Start with the ends of the marquee to ensure the roof is taut before you attach
the sides Ensure every eyelet has a bungee through it
To fit the bungees (see picture overleaf):
Feed a bungee through each eyelet on the roof. Pull the elastic around the back of the pipe and
hook the elasticated loop around the plastic ball. The roof material is quite heavy and tough it
may be easier to pull the roof fabric taut (and to make sure that it is in the right place) whilst
attaching the bungee cord to prevent the bungee from being over-stretched and potentially
snapping. It is particularly important to do this at either end of the marquee especially for the
8m and 10m lengths.

d) Repeat the whole process from part b) attaching the legs to the other side of the marquee.
On a windy day anchor the marquee down at this point using the corner ropes / storm straps
(please refer to steps 6/7 below).
Step 4 – Inserting the ground bar kit (optional)
If you have purchased our optional ground bar kit, now is the time to fit the bars
Requires the following parts:
Part G1 - 1940mm galvanised pipe
Part G1b - 1430mm galvanised pipe
Part G4 - 2 Way ground plate
Part G5 - Screws
The number of G1 pipes running along each 'window' side depends on the size of the marquee
but there should be 2 G1b pipes running along each 3m width 'door' end. Please refer to the
table below to see how many pipes you require.
Size of Marquee No. of G1 pipes along each side
3m x 10m 5
3m x 8m 4
3m x 6m 3
3m x 4m 2
Slot the ground bar kit pipes (part G1) between the 3 way ground plates (part G3) along both
'window' sides of the marquee. Use small screws (part G5) to fix them in place.
At one 'door' end of the marquee slot one ground bar kit pipe (part G1b) into a corner ground
plate (part G2) fixing in place with a small screw (part G5). Now attach one 2 way ground
plate (part G4) and fix in place with a small screw (part G5). Finally insert a second ground
bar kit pipe (part G1b) in the 2 way ground plate (part G4) and fix in place with a small screw
(part G5). Fix this second ground bar kit pipe (part G1b) into the opposing corner ground plate
(Part G2).
Repeat for the opposing end of the marquee.
Picture below shows a ground bar kit fitted to a larger 4m width marquee with missing window and door panels.

Step 5 – Attaching the walls and doors
Requires the following parts:
Part 15 - Side wall with windows
Part 16 - End wall with doors
Part 10 - Bungees
Part 13 - Hooks
Parts 9 and 8 - Pegs (soft ground only)
Please note - the side walls have windows and the end walls have doors
a) Attaching the walls and doors
The walls are designed to fit one between the marquee legs. They should be hung with the arch
at the top and the eyelets at the bottom on the inside.
The walls and doors are hung using the bungees already used to attach the roof. For Luxury
PVC marquees use short bungees to attach the end doors to the roof fabric.
Join adjacent walls together with bungees as shown below. The elastic should pass from one
eyelet around the back of the leg pole through the other wall eyelet and then over the white
plastic ball. Similarly connect the walls to the roof by sharing bungees.
If you have purchased a ground bar kit use bungees to secure the bottom of the walls to the
ground rails.
These images below illustrate how to tie the bungees.

b) Fix leg covers
Once all of the walls and doors have been hung fix the leg covers in place using the Velcro ties
and hooks (part 13)
c) Pegging in
Pegs can only be used on soft ground such as grass or turf. Use the large pegs (part 8) to secure
the feet and small pegs (part 9) to secure the fabric to the ground.
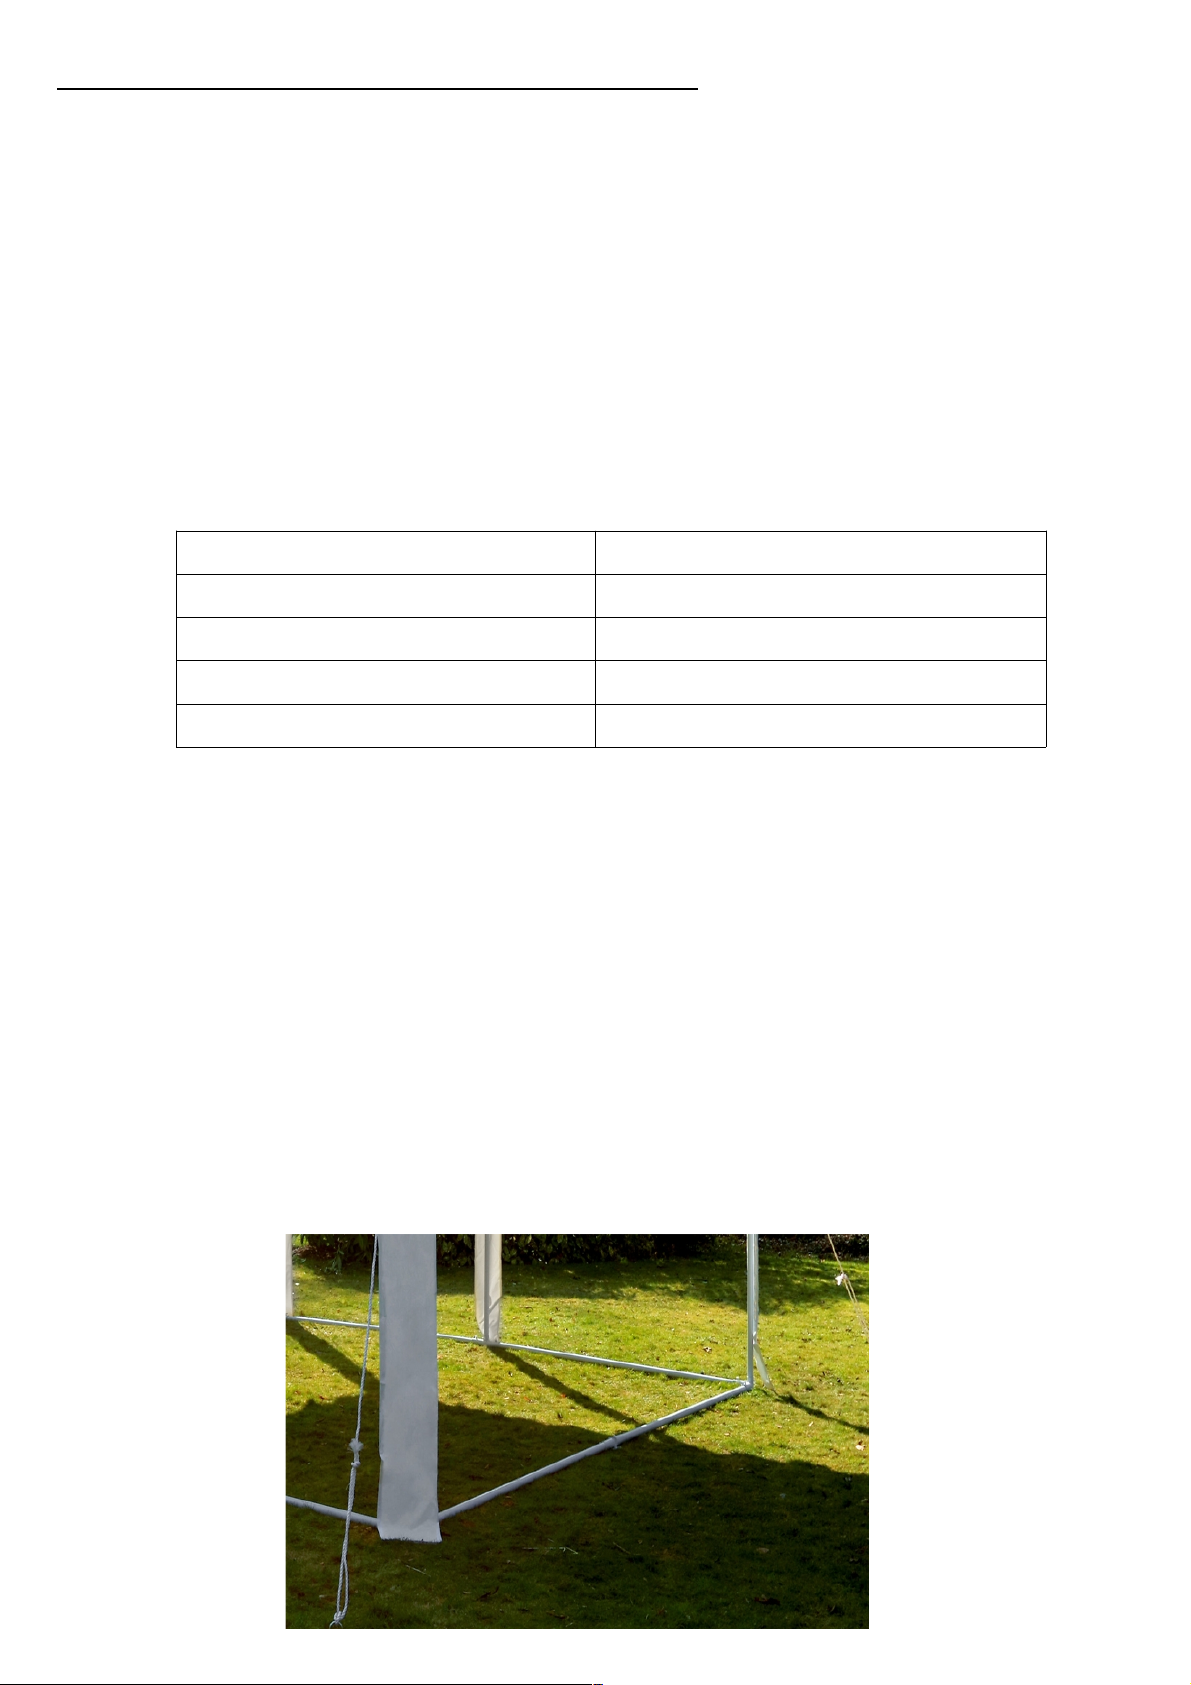
Image below shows small pegs fixing the material down.

Step 6 – Fitting corner ropes (optional)
Requires the following parts:
CR1 - Corner ropes
CR2 - Spiral pegs
Use one rope on each corner of the marquee.
Tie a knot in one end of the rope and feed through the corner eyelet from underneath upward.
Pull the rope through until the knot prevents the rope from pulling through any further. Mark
out an appropriate position for the peg a short distance from the marquee screw the peg into the
ground and tie the other end of the rope to it as securely as possible.
If the marquee is on hard ground you may need to use heavy weights to anchor the marquee
instead of pegs.
Step 7 – Fitting storm straps (optional)
These go on the long sides of the marquee. We recommend you position them 2m apart.
First secure the hook to the bar of the marquee as in the picture below.

Next screw the peg into the ground in an appropriate position.
Feed the strap to the outside of the marquee. Then attach the tensioner. First feed the strap
through the tensioner as shown below.
Next pull the strap through so that it is a little longer than you require.
Secure the strap to the ground by pushing the peg through the metal hook. Tension the strap by
lifting the ratchet up and down.

Marquee Parts List
Number of Boxes:
3x10m
quantity
3 x 8m
quantity
3x 6m
quantity
3 x 4m
quantity
Marquee 14 12 10 8
Ground Bar Kit (optional) 2 2 2 2
Tie down kit (optional) 1 1 1 1
Parts List:
Part
no.
Part Name Diagram 3 x 10m
quantity
3 x 8m
quantity
3 x 6m
quantity
3x 4m
quantity
1 Frame pole 12 10 8 6
2 Frame pole 15 12 9 6
3 Leg pole 12 10 8 6
4 110° 3-way connector 6 6 6 6
5 110° 4-way connector 12 9 6 3
6 Foot plate 12 10 8 6
7 Spiral peg 4 4 4 4
8 Large peg 12 10 8 6
9 Small peg 44 38 32 26
10 Bungee Ball 116 98 80 62
11 Guy Rope 4 4 4 4
12 Screw 78 64 50 36
13 Hook 12 10 8 6
14 Roof canopy 1 1 1 1

15 Side walls 10 8 6 4
16 End walls 2 2 2 2
Ground Bar Kit:
G1 Pipe 1940mm 10 8 6 4
G1b Pipe 1430mm 4 4 4 4
G2 Corner ground
plate
4 4 4 4
G3 3 Way ground
plate (sides of
marquee)
8 6 4 2
G4 2 Way ground
plate (ends of
marquee)
2 2 2 2
G5 Screw 40 34 28 22
Tie Down Kit:
TD1 Strap 8 6 4 2
TD2 Peg 8 6 4 2
This manual suits for next models
3
Popular Outdoor Furnishing manuals by other brands

Sunnydaze Decor
Sunnydaze Decor CLIFDON GF-653 manual

Safavieh Outdoor
Safavieh Outdoor Kamson PAT7071 manual

Hanover
Hanover FNTDN3PCSWC manual

Forever Redwood
Forever Redwood KID SIZE WOOD PICNIC TABLE Assembly instructions

Courtyard Creations
Courtyard Creations KTS136Y-WM Assembly instructions

siena GARDEN
siena GARDEN Florenz J22.416 Assembly instruction


Safavieh Outdoor
Safavieh Outdoor Eloise Arbor PAT5010 Assembly instructions

Sunjoy
Sunjoy A102010800 manual

Breezesta
Breezesta AD-0100 Assembly instructions

Costway
Costway GT3631 user manual

Hanover
Hanover PALMBAYDN7PC-TAN Assembly instructions

Santa & Cole Urbidermis
Santa & Cole Urbidermis NeoRomantico Clasico 1995 Assembly instructions