Prince Castle CG14G-2TP User manual

Contact Grill
CG14G-2TP
CG14G-2TPrev--_EN
Printed in USA 09/06 © 2011 1
Operation
Manual
Product Identification
LIMITED WARRANTY
This product is warranted to be free from defects in material and/or
workmanship for a period of 1 year from date of original installation, not to
exceed 18 months from the date of manufacture.
Any component which proves to be faulty in material and/or workmanship
will be replaced or repaired (at the option of Prince Castle, Inc.) without
cost to the customer for parts and labor. This warranty covers on-location
service (i.e. trip charges and/or mileage). Travel mileage is limited to
100 miles (200 Kilometers) round trip (one trip warranty) from an
authorized service agency or its sub-service agency.
This warranty is subject to the following exceptions/conditions:
•Use of any non-genuine Prince Castle parts voids this warranty.
•All labor to be performed during regular work hours. Overtime premium
(the incremental amount) will be charged to the customer.
•Damage caused by carelessness, neglect and/or abuse (e.g.,
dropping, tampering, or altering parts, equipment damaged in
shipment, by fire, flood or an act of God) is not covered under this
warranty.
•All problems due to operation at voltages other than that specified on
equipment nameplates are not covered by this warranty. Conversion to
correct voltage is the customer’s responsibility.
•Normal adjustments as outlined in this manual are not covered under
warranty.
•This equipment must be serviced by Prince Castle Authorized Service
Agency or a Prince Castle Service Technician during the warranty
period.
•Wearable items such as (springs, Teflon sheets, bearings) are not
included under warranty.
TABLE OF CONTENTS
Product Identification . . . . . . . . . . . . . . . . . . . . . . . . . . . . . . . . . . . . . . . . . . . . 1
Safety Information . . . . . . . . . . . . . . . . . . . . . . . . . . . . . . . . . . . . . . . . . . . . . . 2
Electrical Specifications . . . . . . . . . . . . . . . . . . . . . . . . . . . . . . . . . . . . . . . . . . 2
Model Number . . . . . . . . . . . . . . . . . . . . . . . . . . . . . . . . . . . . . . . . . . . . . . . . . 2
Installation . . . . . . . . . . . . . . . . . . . . . . . . . . . . . . . . . . . . . . . . . . . . . . . . . . . . 2
Initial Start-Up . . . . . . . . . . . . . . . . . . . . . . . . . . . . . . . . . . . . . . . . . . . . . . . . . 3
Seasoning the Cooking Surfaces (Non Chrome Surfaces) . . . . . . . . . . . . . . . 3
Operating Instructions. . . . . . . . . . . . . . . . . . . . . . . . . . . . . . . . . . . . . . . . . . . . 3
Programming Instructions. . . . . . . . . . . . . . . . . . . . . . . . . . . . . . . . . . . . . . . . . 4
Monthly Inspection . . . . . . . . . . . . . . . . . . . . . . . . . . . . . . . . . . . . . . . . . . . . . . 5
Cleaning . . . . . . . . . . . . . . . . . . . . . . . . . . . . . . . . . . . . . . . . . . . . . . . . . . . . . . 5
Platen Temperature Calibration . . . . . . . . . . . . . . . . . . . . . . . . . . . . . . . . . . . . 6
Exploded View . . . . . . . . . . . . . . . . . . . . . . . . . . . . . . . . . . . . . . . . . . . . . . . . . 7
Split Top Wiring Diagrams. . . . . . . . . . . . . . . . . . . . . . . . . . . . . . . . . . . . . . . . 8
355 East Kehoe Blvd. • Carol Stream, IL 60188 USA
Telephone: 630-462-8800 • Toll Free: 1-800-PCASTLE
Fax: 630-462-1460 • www.princecastle.com
P
R
I
NC
E
C
A
STL
E
LLC
WORLDWIDE

Printed in USA 09/06 © 2011 2 CG14G-2TPrev--_EN
Contact Grill
CG14G-2TP
P
R
I
NC
E
C
A
STL
E
LLC
WORLDWIDE
Safety Information
These symbols are intended to alert the user to the presence of
important operating and maintenance instructions in the manual
accompanying the appliance.
To prevent an electric shock hazard, this device must be
bonded to equipment in close proximity with an equipotential
bonding conductor. This device is equipped with a grounding
lug for this purpose and is marked with the following symbol.
This equipment is designed and sold for commercial use only by
personnel trained and experienced in its operation and is not sold
for consumer use in and around the home nor for use directly by the
general public in food service locations.
DO NOT CONNECT THE UNIT TO ANY TYPE OF VOLTAGE OTHER
THAN THAT ON THE NAMEPLATE. DOING SO WILL DAMAGE THE
UNIT AND VOID THE WARRANTY.
CAUTION
WARNING
Electrical Specifications
sttaWzHstloV
006206/05032
Model Number
Model Description
CG14G-2TP Grooved Platens, Split Top, 6-20 Plug
6-20P Plug for Unit
Operating InstructionsInstallation
Before using your new equipment, read and understand all the
instructions and labels associated with the unit prior to putting it
into operation. Make sure all people associated with its use
understand the unit’s operation and safety before they use the unit.
1. All shipping containers should be checked for freight damage both
visible and concealed. This unit has been tested and carefully
packaged to insure delivery of your unit in perfect condition. If
equipment is received in damaged condition, either apparent or
concealed, a claim must be made with the delivering carrier.
NOTE: Concealed damage or loss – if damage or loss is not apparent until
after equipment is unpacked, a request for inspection of concealed
damage must be made with carrier within 15 days. Be certain to retain all
contents plus external and internal packaging materials for inspection.
The carrier will make an inspection and will supply necessary claim forms.
2. This sandwich grill is equipped for the voltage shown on the
nameplate. It will operate on alternating current only, however the
specified voltage must be applied.
DO NOT CONNECT THE UNIT TO ANY TYPE OF VOLTAGE OTHER
THAN THAT ON THE NAMEPLATE. DOING SO WILL DAMAGE THE
UNIT AND VOID THE WARRANTY.
DAMAGED POWER CORDS MUST BE REPLACED BY THE
MANUFACTURER, ITS SERVICE AGENT OR SIMILARLY QUALIFIED
PERSONS IN ORDER TO AVOID A HAZARD.
CAUTION WARNING
Prince Castle reserves the right to change specifications and product design without notice. Such revisions do not entitle the buyer to
corresponding changes, improvements, additions or replacements for previously purchased equipment.

Printed in USA 09/06 © 2011 3 CG14G-2TPrev--_EN
Contact Grill
CG14G-2TP
P
R
I
NC
E
C
A
STL
E
LLC
WORLDWIDE
Initial Start-Up
1. Level unit using the adjustable feet under the unit (approximately 1/2"
adjustment).
2. Before using the unit for the first time, wipe down the exterior and
toasting area with a damp cloth.
3. Take to a well ventilated area and heat for approximately 30 minutes.
NOTE: The grill may emit a small amount of smoke as the cooking
surfaces reach 395°F(202°C). Do not be alarmed, as the smoke is
caused by oils associated with the manufacturing process and will stop
when the burn off is complete.
4. Brush off any debris from the toasting surface.
Seasoning the Cooking Surfaces (Non Chrome Surfaces)
7
First Time Seasoning
Follow your company/corporate guidelines for seasoning cooking surface,
or
1.Bring the grill to 300°F (149°C) and leave it on while doing the next
three steps.
2. Brush the cooking surfaces with a release agent. If using an aerosol
agent, first apply into a cup and then brush onto cooking surface.
3. Let sit for 20 minutes, and then wipe clean using a warm damp cloth.
Daily Seasoning
The grill should not require much seasoning while in use. In most cases,
brushing a light coating of the release agent in the morning and
occasionally throughout the day will be enough to prevent any sticking. It
is not necessary to brush before grilling each item.
Operating Instructions
Cooking Instructions
1. Start up the unit by placing the power switch into the ON position. The
“heat on” indicator, located above the TEMP button, and the letters “lo”
will display in the window. This indicates the unit is in a warm-up mode.
When the preset platen temperatures are reached, the “heat on”
indicator will turn off, the displays will stop flashing, and the unit will
beep three times.
NOTE: Initial warm-up time is approximately 30 minutes.
2. Place a food product on the cooking surface and close the
corresponding lid.
3. Press the product button for this food product and then press the
button a second time, starting the cook timer that is shown on the
display. When the cook timer countdown reaches “0” the unit will beep
and the display will flash. Any timing cycle can be cancelled by simply
pressing the product button again.
4. To turn off the beeper, press the product button. The display will stop
flashing.
5. Raise the lid until it engages the first detent position which holds the lid
up. Using an appropriate utensil, remove the cooked food product.
NOTE: The use of non-metallic utensils is recommended and will prolong
the life of the cooking surfaces. However, metal utensils with rounded
corners may be used.
6. Using a spatula, scrape any residue on the cooking surface into the
center grease tray. Tray should be emptied and cleaned daily. Do not
let food residue constantly sit on the cooking surface as food buildup
will increase sticking and smoking. In addition, carbon may accumulate
on the cooking surfaces and reduce the cooking efficiency.
NOTE: When not in use it is recommended that the lids be closed to
prevent heat loss and save energy.
7. At store closing, turn the unit off by placing the power switch into the
OFF position.
To Switch Between °F and °C
With the power switch in the OFF position, press and hold the left TEMP
button while turning the power switch ON. The display will change to the
opposite temperature mode. To change back enter password 4,3,2, 1,
repeat this process.

Printed in USA 09/06 © 2011 4 CG14G-2TPrev--_EN
Contact Grill
CG14G-2TP
P
R
I
NC
E
C
A
STL
E
LLC
WORLDWIDE
Programming Instructions
Product cook times and platen set point temperatures can be adjusted in
programming mode. While in programming mode, if no button is pressed
for a period of 15 seconds, the unit will automatically exit programming
mode and return to normal operation.
NOTE: Set point temperatures for both right and left side products are
programmed ONLY from the left display (i.e., setting the temperature for
product 2 on the left display will also be the temperature for product 2 on
the right display).
Product Programming — Left Side
A. For approximately 1 second, press and hold the TEMP button on the
left display while at the same time pressing the product button to
program (see Figure 1). The display window will show “- - - -”. Enter the
password 4,3,2,1 (password numbers will not appear on the display).
The display window will then show the current preset cook time and the
selected product LED will flash.
B. Press the UP(1) and DOWN(2) arrow buttons to adjust the cook time.
C. Press the TEMP button to save the new cook time value (see Figure
2). Afterwards, the current set point temperature will be displayed.
D. Press the UP(1) or DOWN(2) arrow button to adjust the temperature.
E. Press the TEMP button to save the setting.
F. Programming of this product is complete. Press the TEMP button
again to exit programming mode or repeat steps B through E to make
additional changes to this product.
Product Programming — Right Side (time only)
A. For approximately 1 second, press and hold the TEMP button on the
right display while at the same time pressing the product button to
program. The display window will show “- - - -”. Enter the password
4,3,2,1 (password numbers will not appear on the display). The display
window will then show the current preset cook time and the selected
product LED will flash.
B. Press the UP(1) and DOWN(2) arrow buttons to adjust the cook time.
C. Press the TEMP button to save the setting.
D. Programming of this product is complete. Press the TEMP button
again to exit programming mode or repeat steps B through C to make
additional changes to this product.
Resetting to Factory Defaults
To revert all settings back to the original factory defaults:
A. Turn the unit off.
B. Press and hold both the TEMP button and the “3” button.
C. Turn the unit back on and wait 5 seconds.
D. Release the TEMP button and the “3” button.
NOTE: All previously saved settings are lost upon resetting the defaults!
Use with caution.
Figure 1
Figure 2

Printed in USA 09/06 © 2011 5 CG14G-2TPrev--_EN
Contact Grill
CG14G-2TP
P
R
I
NC
E
C
A
STL
E
LLC
WORLDWIDE
Monthly Inspection
Check all bolts/screws and tighten if necessary.
Cleaning
DO NOT IMMERSE OR LET THE UNIT STAND IN WATER. DO NOT
HOSE DOWN THE UNIT. KEEP THE UNIT AWAY FROM RUNNING
WATER.
DO NOT SPLASH THE CONTROL HOUSING! DO NOT SPLASH THE
CONDUIT CONNECTING THE TOP AND BOTTOM OF THE GRILL!
DO NOT USE ICE ON COOKING SURFACE!
1. Never use pumice, griddle stones, or abrasives on platen surface.
2. Never strike the griddle surface with a sharp instrument or spatula
edge.
3. Never use steel wool.
4. Never use commercial liquid grill cleaner on the griddle surface.
5. Abusing surface voids the warranty.
CAUTION CAUTION
Daily Operating Hours
1. After each cook cycle remove all grease and food residues from the
cooking surfaces by scraping with a spatula. The spatula should have
rounded corners to prevent the cooking surface from being scratched
or marked.
2. Wipe cooking surface with a damp cloth if necessary to minimize
grease buildup. If sticking begins to happen on a regular basis, apply a
light coat of release agent as described in the “Seasoning the Cooking
Surfaces” section of this manual.
3. Empty grease tray at least daily or as necessary during high use
periods.
After Hours
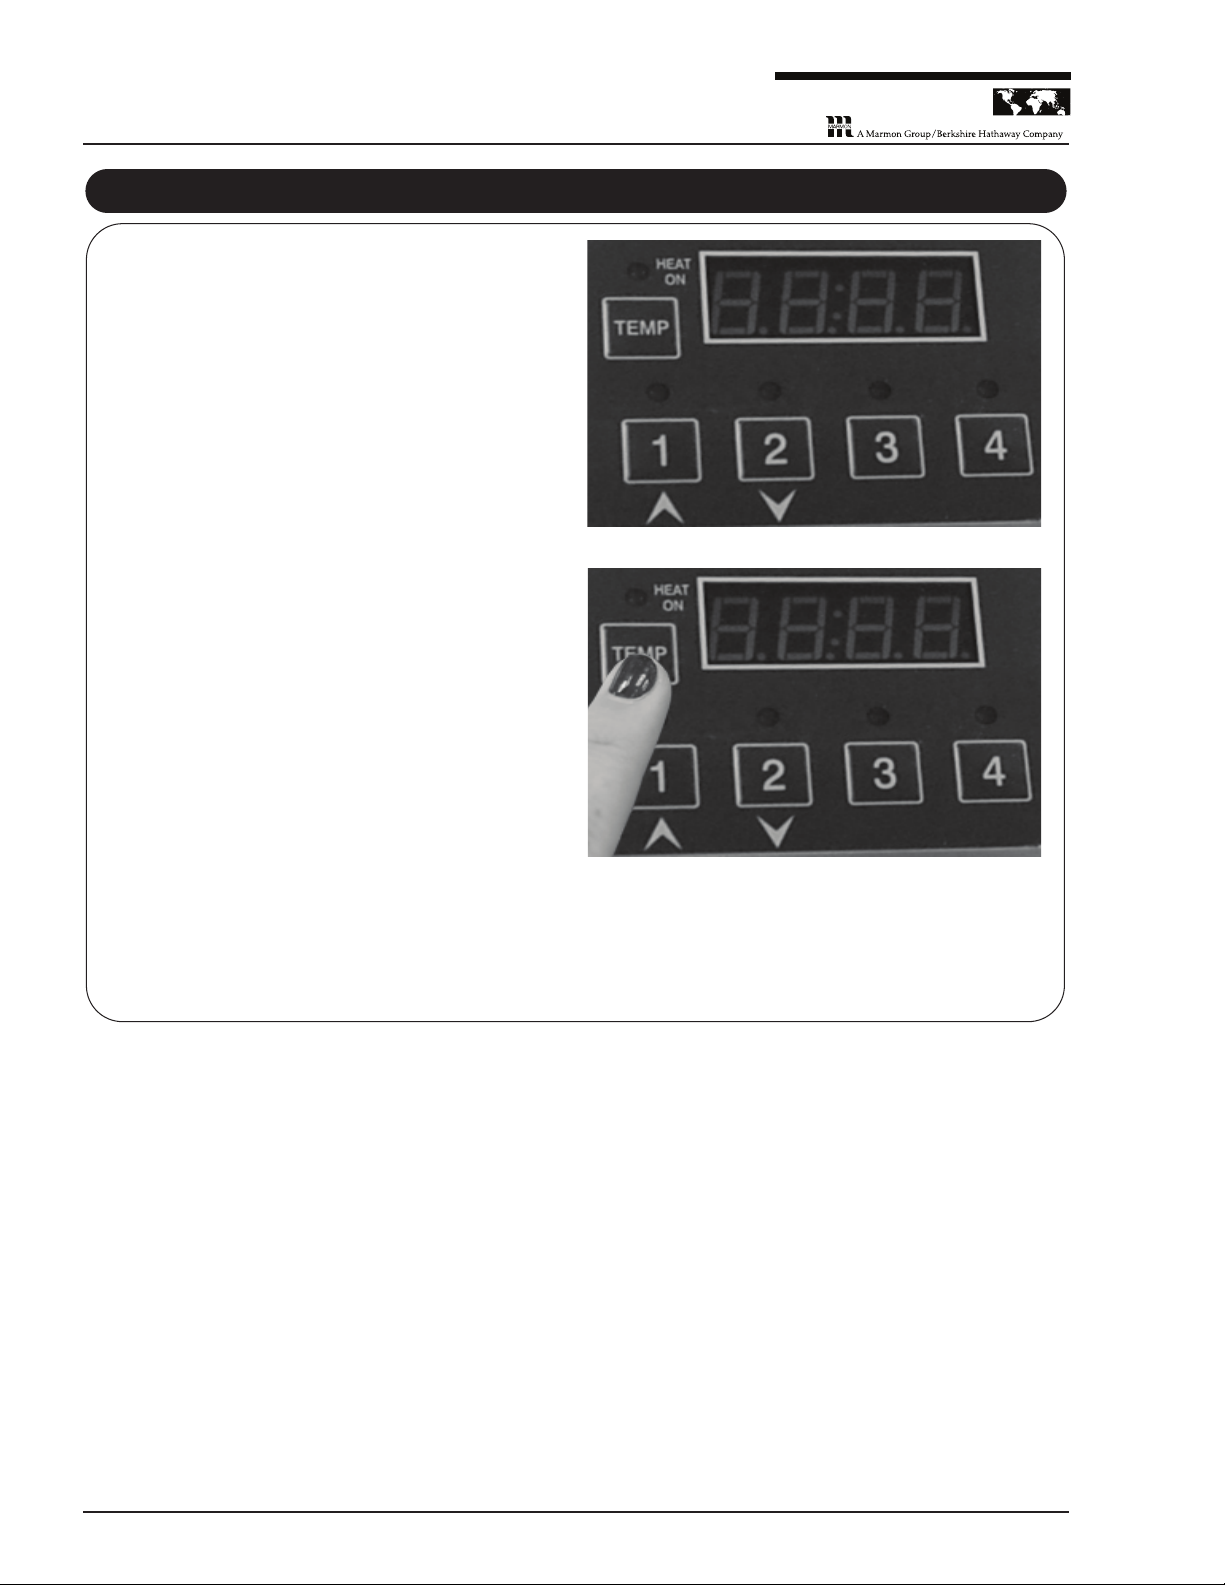
1. When the unit is at operating temperature (minimum of 300°F [149°C])
press and hold the “4” button on the left display for 4 seconds to
activate the cleaning mode. The display will flash “CLn” and “CLy” while
the platens are cooling down and the “heat on” indicators will turn off.
When the platen temperatures all reach 300°F (149°C), the display will
show “CLn” and the unit will beep. Platen temperatures will hold at this
level until the clean mode is cancelled by placing the power switch in
the OFF position.
2. While in the clean mode, remove burned on grease by applying Sizzle
Plus™ or a cleaning mixture consisting of 1 Tablespoon liquid dish
detergent + 1 Cup of warm water to the cooking surfaces with a
sponge or plastic scrubbing pad (remember, cooking surfaces are still
hot).
3. Rinse surfaces with a clean damp sponge or cloth.
4. Repeat as necessary.
5. Apply a light coat of release agent as described in the “Seasoning the
Cooking Surfaces” section of this manual.
6. Use a clean cloth and good nonabrasive cleaner to clean all non-
cooking surfaces including the front displays. Wipe all surfaces with a
soft cloth.
7. To remove carbon buildup (a black matter resulting from burnt on food
residue, oils, and release agents) from the cooking surfaces, use an
approved carbon removal agent (aluminum safe) applied in
accordance with the instructions provided with the agent. After this
process the cooking surfaces will need to be re-seasoned according to
the instructions in the “Seasoning the Cooking Surfaces” section of this
manual.
Platen Surface Limited Warranty Exclusions
Your two sided grill has been designed to give you many years of cooking
reliability and requires minimum maintenance to keep the surface in its
original condition. All platen surfaces are warranted for a period of 1 year
against manufacturing defects to the original owner from the date of
installation. This limited warranty is void if it is determined by Prince Castle
or one of its authorized representatives that the platen surface has been
misused or abused or subjected to the following situations:
1. Improperly installed.
2. Incorrect voltage applied to unit allowing the surface to overheat and
discolor.
3. The misuse of any instrument or tool which scratches or makes
indentations in the surface which could cause the surface to peel,
flake, or chip off.
4. The use of any chemical or abrasive cleaning solution, griddle brick,
stone, screen or other cleaning products which could damage and
affect the performance of the platen surface.
5. The neglect of daily routine maintenance to the platen surface.

Printed in USA 09/06 © 2011 6 CG14G-2TPrev--_EN
Contact Grill
CG14G-2TP
P
R
I
NC
E
C
A
STL
E
LLC
WORLDWIDE
Platen Temperature Calibration
This process is necessary only when a platen temperature reading on the
grill display varies more than a few degrees from the reading of a
calibrated pyrometer used to measure the temperature of the same
platen. The grill is calibrated before leaving the factory so this process
should only be necessary on rare occasions.
1. Turn off the power switch. Press and hold both the UP(1) and
DOWN(2) arrow buttons on the left display while the power switch is
turned on (see Figure 3). Input the passwords, then the display will
show “SET.”
2. Press and release the TEMP button on the left display. The left display
will alternate between the top left platen temperature and “T1”. Press
either the UP or DOWN button to change the displayed temperature to
match the reading from the pyrometer (max adjustment is ±27°F
[±15°C]).
3. Once the left platen has been adjusted, press and release the TEMP
button on the left display again (see Figure 4). The left display will
alternate between the top right platen temperature and “T2”. Press
either the UP or DOWN button to change the displayed temperature to
match the reading from the pyrometer.
4. Once the right platen has been adjusted, press and release the TEMP
button on the left display again. The left display will alternate between
the bottom platen temperature and “T3”. Press either the UP or DOWN
button to change the displayed temperature to match the reading from
the pyrometer. “T3” is the left bottom platen temperature. “T4” is the
right bottom platen temperature.
5. Press the TEMP button on the right display or turn off the power switch
to save the new settings.
Figure 3
Figure 4

Printed in USA 09/06 © 2011 7 CG14G-2TPrev--_EN
Contact Grill
CG14G-2TP
P
R
I
NC
E
C
A
STL
E
LLC
WORLDWIDE
Exploded View
1
Ref. Part No. Description
1 CG-521 Overlay
2 CG-516 Assy PCB Brk
3 CG-531 Connect PCB
4 CG-530 Main PCB
5 CG-537 PCB Cover
6 CG-141 Machined, Upper Grill
7 CG-506 Machined, Lower Grill
8 CG-552 Assy Upper Right Cover
9 CG-553 Assy Upper Left Cover
10 CG-566 Assy Right Protect Plate
11 CG-564 Assy Left Protect Plate
12 CG-009 Back Plate, Upper Heater
13 CG-104 Counter Balance
14 CG-013 Upper Platen Hanger
15 CG-012 Insulation Upper
Ref. Part No. Description
16 CG-567 Power Cord
17 CG-520 Connect PCB Brk
18 CG-527 Body
19 CG-204 Handle
20 65-058 Relay P/N84134020
21 CG-529 Assy Panel Door
22 86-255/CG-900 Leg, 1”H1, 1/4-20MTG Stud
23 CG-535 Cabing Grease Trap
24 CG-517 Grease Tray

Other manuals for CG14G-2TP
2
Table of contents
Other Prince Castle Grill manuals

Prince Castle
Prince Castle MULTIFLEX NCG14 Series User manual

Prince Castle
Prince Castle TX Series User manual

Prince Castle
Prince Castle CG14G-2TP User manual

Prince Castle
Prince Castle 212-G User manual

Prince Castle
Prince Castle McDonald's 247 Series User manual

Prince Castle
Prince Castle CG14G-2TP User manual

Prince Castle
Prince Castle 247SL User manual