Princess 303001 User manual

303001 Princess
Double Induction Plate
Nederlands 3
English 7
Français 11
Deutsch 16
Español 21
Italiano 25
Svenska 30
Dansk 34
Norsk 38
Suomi 42
Português 46
50
58
POWER TEMP TIMER
ON/OFF
POWER TEMP TIMER
ON/OFF

2
A
POWER TEMP TIMER
ON/OFF
POWER TEMP TIMER
ON/OFF
10 5 3 7
846
9
2
11
1
A

3
NL
Gefeliciteerd!
U heeft een product van Princess aangeschaft.
Ons doel is om kwaliteitsproducten met een
smaakvol ontwerp en tegen een betaalbare
prijs te bieden. We hopen dat u vele jaren
plezier zult hebben van dit product.
Het apparaat kan worden gebruikt
door kinderen vanaf 8 jaar en door
personen met een lichamelijke,
zintuiglijke, geestelijke of motorische
handicap of zonder de benodigde
ervaring en kennis indien ze onder
toezicht staan of instructies krijgen
over hoe het apparaat op een veilige
manier kan worden gebruikt alsook
de gevaren begrijpen die met het
gebruik samenhangen. Kinderen
mogen niet met het apparaat spelen.
Reiniging en onderhoud mogen niet
worden uitgevoerd door kinderen
tenzij ze ouder zijn dan 8 jaar en
onder toezicht worden gehouden.
Houd het apparaat en het netsnoer
buiten bereik van kinderen jonger
dan 8 jaar.
Beschrijving (fig. A)
Uw 303001 Princess inductiekookplaat is
ontworpen voor het koken met behulp van
inductieverwarming om pannen direct te
verwarmen. Het apparaat is uitsluitend geschikt
voor gebruik binnenshuis. Het apparaat is
alleen geschikt voor huishoudelijk gebruik.
Geschikte pannen: stalen pannen, roestvrijstalen
pannen, gietijzeren pannen, geëmailleerd
ijzeren pannen, pannen met platte bodem
met een diameter van 14,5 tot 21 cm.
Niet geschikte pannen: keramische pannen,
glazen pannen, koperen pannen, aluminium
pannen, pannen met afgeronde bodem met
een diameter van minder dan 10 cm.
1. Aan/uit-knop
2. Aan/uit-indicator
3. Temperatuurknop (°C)
4. Temperatuurindicator (°C)
5. Vermogensknop (W)
6. Vermogensindicator (W)
7. Timerknop (hh:mm)
8. Timerindicator (hh:mm)
9. +/- knoppen
10. Display
11. Kookplaat met kookzone
Eerste gebruik
Voordat u verder gaat, vragen wij graag uw
aandacht voor de volgende punten:
- Zorg ervoor dat er voldoende ruimte
rondom het apparaat is voor het
ontsnappen van de warmte en voor
voldoende ventilatie.
Reinig het apparaat.•
Zie het gedeelte "Reiniging en onderhoud".
Reinig de accessoires.•
Zie het gedeelte "Reiniging en onderhoud".•
Plaats het apparaat op een stabiel, vlak en•
hittebestendig oppervlak.
Plaats de netstekker in het stopcontact. De•
aan/uit-indicator (2) knippert.
Plaats een geschikte pan op de kookplaat•
(11).
Druk op de aan/uit-knop (1) om het•
apparaat in te schakelen. De aan/uit-
indicator (2) brandt continu.
Stel de maximale temperatuur in (240 °C).•
Het apparaat begint met opwarmen.
Druk op de aan/uit-knop (1) om het•
apparaat uit te schakelen. De aan/uit-
indicator (2) knippert.
Verwijder de netstekker uit het stopcontact.•
De aan/uit-indicator (2) gaat uit.
Laat het apparaat volledig afkoelen.•
Let op: Bij de eerste keer inschakelen van het
apparaat kan gedurende korte tijd een lichte
rookontwikkeling ontstaan en een
karakteristieke geur vrijkomen. Dit is normaal.

4
NL
Gebruik
Instellen van de temperatuur (fig. A)
De temperatuur kan worden ingesteld van
60 °C tot 240 °C.
Druk op de temperatuurknop (3).•
De temperatuurindicator (4) gaat branden.
Druk op de +/- knoppen (9) om de•
temperatuur te verhogen of te verlagen.
De display (10) toont de ingestelde
temperatuur.
Druk op de aan/uit-knop (1).•
De temperatuurindicator (4) gaat uit.
Instellen van het vermogen (fig. A)
Het vermogen kan worden ingesteld op
10 verschillende vermogensniveaus.
Druk op de vermogensknop (5).•
De stroomindicator (6) gaat branden.
Druk op de +/- knoppen (9) om het•
vermogen te verhogen of te verlagen. De
display (10) toont het ingestelde vermogen.
Druk op de aan/uit-knop (1). De•
spanningsindicator (6) gaat uit.
Instellen van de timer (fig. A)
De timer kan worden ingesteld van 1 minuten
tot 240 minuten (4 uur).
Let op: De timer kan uitsluitend worden
ingesteld wanneer de temperatuur of het
vermogen is ingesteld.
Druk op de timerknop (7). De timer-•
indicator (8) knippert. De cijfers voor de
uren beginnen op de display (10) te
knipperen.
Druk op de +/- knoppen (9) om de uren in•
te stellen.
Druk nogmaals op de timerknop (7). De•
timerindicator (8) knippert. De cijfers voor
de minuten beginnen op de display (10) te
knipperen.
Druk op de +/- knoppen (9) om de•
minuten in te stellen. De timerindicator (8)
brandt continu.
Aanwijzingen voor gebruik
Voordat u verder gaat, vragen wij graag uw
aandacht voor de volgende punten:
- Zorg ervoor dat er voldoende ruimte rondom
het apparaat is voor het ontsnappen van
de warmte en voor voldoende ventilatie.
Plaats het apparaat op een stabiel, vlak en•
hittebestendig oppervlak.
Plaats de netstekker in het stopcontact.•
De aan/uit-indicator (2) knippert.
Plaats een geschikte pan op de kookplaat•
(11).
Let op: Indien u het apparaat zonder pan op
de kookplaat inschakelt, zal het apparaat
piepen en niet werken.
Druk op de aan/uit-knop (1) om het•
apparaat in te schakelen. De aan/uit-
indicator (2) brandt continu.
Verricht een van de volgende stappen:•
- Stel de temperatuur in. Zie het gedeelte
"Instellen van de temperatuur".
- Stel het vermogen in. Zie het gedeelte
"Instellen van het vermogen".
Stel de timer in. Zie het gedeelte "Instellen•
van de timer". Het apparaat begint met
opwarmen. De display (10) toont tijdens
het proces de ingestelde temperatuur of
het ingestelde vermogen.
Druk op de timerknop (7) om de•
resterende tijd op de display (10) te zien.
Als de timer volledig heeft afgeteld, klinkt•
een zoemer en schakelt het apparaat
automatisch uit.
Druk op de aan/uit-knop (1) om het•
apparaat uit te schakelen. De aan/uit-
indicator (2) knippert.
Verwijder de netstekker uit het•
stopcontact. De aan/uit-indicator (2) gaat
uit.
Laat het apparaat volledig afkoelen.•
Foutcodes (fig. A)
In geval van specifieke fouten zal de display
(10) foutcodes tonen. Zie onderstaande tabel
voor een uitleg van de foutcodes.
Foutcode Oorzaak / Oplossing
E-0 Er staat geen pan op de kookplaat. Er staat
een pan met een diameter van minder dan
10 cm op de kookplaat. / Plaats een pan
met een diameter van 14,5 tot 21 cm op de
kookplaat.

5
NL
E-1 Beveiliging tegen hoge temperaturen. /
Verwijder de netstekker uit het stopcontact
en wacht totdat het apparaat is afgekoeld.
Kortsluitbeveiliging. / Verwijder de
netstekker uit het stopcontact en wacht
totdat het apparaat is afgekoeld. Ga naar
een gekwalificeerde elektricien.
De temperatuursensor werkt niet. /
Verwijder de netstekker uit het stopcontact
en wacht totdat het apparaat is afgekoeld.
Ga naar een gekwalificeerde elektricien.
E-2 De bodem van de pan is heet. / Verwijder
de netstekker uit het stopcontact en wacht
totdat het apparaat is afgekoeld.
Kortsluitbeveiliging. / Verwijder de
netstekker uit het stopcontact en wacht
totdat het apparaat is afgekoeld. Ga naar
een gekwalificeerde elektricien.
De temperatuursensor werkt niet. /
Verwijder de netstekker uit het stopcontact
en wacht totdat het apparaat is afgekoeld.
Ga naar een gekwalificeerde elektricien.
E-3 Het voltage is meer dan 270 V. / Verwijder
de netstekker uit het stopcontact en wacht
totdat het voltage weer normaal is.
E-4 Het voltage is minder dan 140 V. / Verwijder
de netstekker uit het stopcontact en wacht
totdat het voltage weer normaal is.
E-5 Overspannings-/onderspanningsbeveiliging. /
Verwijder de netstekker uit het stopcontact
en wacht totdat het voltage weer normaal is.
Reiniging en onderhoud (fig. A)
Voordat u verder gaat, vragen wij graag uw
aandacht voor de volgende punten:
- Schakel voor reiniging en onderhoud het
apparaat uit, verwijder de netstekker uit
het stopcontact en wacht totdat het
apparaat is afgekoeld.
- Dompel het apparaat niet onder in water
of andere vloeistoffen.
Voordat u verder gaat, vragen wij graag u uw
aandacht voor de volgende punten:
- Reinig het apparaat niet met bijtende of
schurende reinigingsmiddelen.
- Gebruik geen scherpe voorwerpen om het
apparaat te reinigen.
- Gebruik geen schuursponsjes om het
apparaat te reinigen.
- Gebruik geen staalborstels om het
apparaat te reinigen.
Controleer het apparaat regelmatig op•
mogelijke schade.
Reinig de buitenkant van het apparaat met•
een zachte, vochtige doek. Droog de
buitenkant van het apparaat grondig met
een schone, droge doek.
Veiligheidsinstructies
Algemene veiligheid
Lees voor gebruik de gebruiksaanwijzing•
zorgvuldig door. Bewaar de gebruiks-
aanwijzing voor toekomstig gebruik.
Gebruik het apparaat en de accessoires•
uitsluitend voor de beoogde doeleinden.
Gebruik het apparaat en de accessoires
niet voor andere doeleinden dan
beschreven in de gebruiksaanwijzing.
Gebruik het apparaat niet als een•
onderdeel of een accessoire beschadigd of
defect is. Laat een beschadigd of defect
onderdeel of een accessoire door de
fabrikant of een erkend servicecentrum
vervangen.
Houd altijd toezicht op kinderen om te•
voorkomen dat ze met het apparaat spelen.
Het gebruik van dit apparaat door•
kinderen of personen met een lichamelijke,
zintuiglijke, geestelijke of motorische
handicap of zonder de benodigde kennis
en ervaring kan gevaar veroorzaken.
Personen die verantwoordelijk zijn voor
hun veiligheid moeten uitdrukkelijke
instructies geven of toezicht houden op
het gebruik van het apparaat.
Gebruik het apparaat niet in de buurt van•
badkuipen, douches, wastafels of andere
voorzieningen die water bevatten.
Dompel het apparaat niet onder in water•
of andere vloeistoffen. Verwijder het
apparaat niet met uw handen als het
apparaat is ondergedompeld in water of
andere vloeistoffen. Haal onmiddellijk de
stekker uit het stopcontact.

6
NL
Gebruik het apparaat niet langer als het in
water of andere vloeistoffen ondergedompeld
is geweest.
Elektrische veiligheid
Houd het apparaat en het netsnoer buiten•
bereik van kinderen jonger dan 8 jaar.
Controleer voor gebruik altijd of de•
netspanning overeenkomt met de spanning
op het typeplaatje van het apparaat.
Sluit het apparaat op een geaard•
stopcontact aan. Gebruik indien nodig een
geaarde verlengkabel met een geschikte
diameter (minimaal 3 x 1 mm2).
Installeer voor extra bescherming een•
aardlekschakelaar (RCD) met een nominale
reststroom van maximaal 30 mA.
Bedien het apparaat niet door middel van•
een externe timer of een apart
afstandsbedieningssysteem.
Zorg dat er geen water in de aansluitpunten•
van het netsnoer en het verlengsnoer kan
komen.
Wikkel netsnoer en het verlengsnoer altijd•
volledig af.
Zorg dat het netsnoer niet over de rand•
van een werkblad hangt, dat het niet per
ongeluk verstrengeld kan raken en dat
niemand erover kan struikelen.
Houd het netsnoer uit de buurt van•
warmtebronnen, olie en scherpe randen.
Gebruik het apparaat niet als het netsnoer•
of de stekker beschadigd of defect is. Laat
een beschadigd of defect netsnoer of een
stekker door de fabrikant of een erkend
servicecentrum vervangen.
Trek de stekker niet aan het netsnoer uit•
het stopcontact.
Haal de stekker uit het stopcontact als het•
apparaat niet in gebruik is, voordat u het
gaat monteren of demonteren en voordat
u reinigings- en onderhoudswerk-
zaamheden gaat uitvoeren.
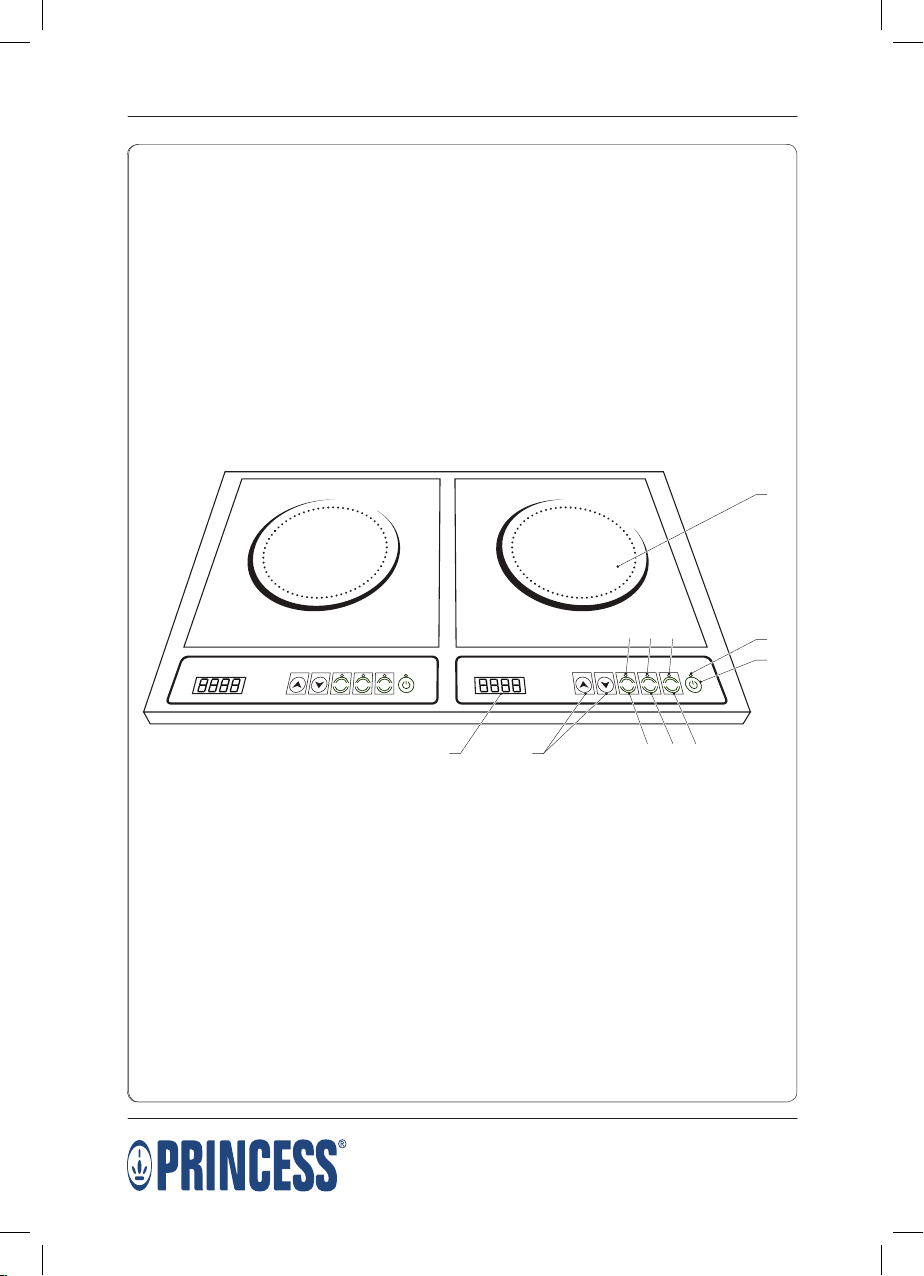
Veiligheidsinstructies voor
inductiekookplaten
Gebruik het apparaat niet buitenshuis.•
Plaats het apparaat op een stabiel en vlak•
oppervlak.
Plaats het apparaat op een hittebestendig•
en spatvrij oppervlak.
Plaats het apparaat niet op een kookplaat.•
Zorg ervoor dat er voldoende ruimte•
rondom het apparaat is voor het
ontsnappen van de warmte en voor
voldoende ventilatie.
Zorg ervoor dat het apparaat niet in•
contact komt met brandbaar materiaal.
Houd het apparaat uit de buurt van•
warmtebronnen.
Bedek het apparaat niet.•
Plaats geen vel papier tussen het kookgerei•
en de kookplaat om te voorkomen dat het
papier wordt verbrand.
De toegankelijke oppervlakken van het•
apparaat kunnen zeer heet worden tijdens
gebruik. Raak de hete kookplaat niet aan.
De kookplaat wordt zeer heet tijdens•
gebruik. Raak de kookplaat niet aan direct
na het verwijderen van het kookgerei.
Het kookgerei wordt zeer heet tijdens•
gebruik. Gebruik ovenhandschoenen om
het kookgerei van de kookplaat te
verwijderen.
Metalen voorwerpen zoals messen, vorken,•
lepels en deksels kunnen heet worden en
mogen dan ook niet op de kookplaat
worden geplaatst.
De kookplaat is gemaakt van gehard glas.•
Gebruik het apparaat niet wanneer de
kookplaat beschadigd is. Indien het
oppervlak is gebarsten, schakelt het
apparaat uit om de mogelijkheid van een
elektrische schok te voorkomen.
Plaats geen leeg kookgerei op de kookplaat.•
Het verwarmen van leeg kookgerei
schakelt de oververhittingsbeveiliging in en
het apparaat schakelt automatisch uit.
Plaats geen voorwerpen die worden•
beïnvloed door magneten (radio's, televisies,
bankkaarten, etc.) in de buurt van het
apparaat.
Verplaats het apparaat niet wanneer het is•
ingeschakeld of nog heet is. Verwijder de
netstekker uit het stopcontact en wacht
totdat het apparaat is afgekoeld.
Disclaimer
Wijzigingen voorbehouden; specificaties kunnen
zonder opgave van redenen worden gewijzigd.

7
EN
Congratulations!
You have purchased a Princess product.
Our aim is to provide quality products with
a tasteful design and at an affordable price.
We hope that you will enjoy this product for
many years.
The appliance can be used by children
from 8 years and above and by
persons with a physical, sensory,
mental or motorial disability, or lack
of experience and knowledge if they
are supervised or instructed on how
to use the appliance in a safe way
and understand the hazards involved.
Children shall not play with the
appliance. Cleaning and maintenance
shall not be made by children unless
they are older than 8 years and
supervised. Keep the appliance and
the mains cable out of the reach of
children younger than 8 years.
Description (fig. A)
Your 303001 Princess induction cooker has
been designed for cooking applications using
induction heating to directly heat pans.
The appliance is suitable for indoor use only.
The appliance is suitable for domestic use only.
Suitable pans: steel pans, stainless-steel pans,
cast-iron pans, enamelled-iron pans, flat-bottom
pans with a diameter from 14.5 to 21 cm.
Non-suitable pans: ceramic pans, glass pans,
copper pans, aluminium pans, rounded-bottom
pans with a diameter of less than 10 cm.
1. On/off button
2. On/off indicator
3. Temperature button (°C)
4. Temperature indicator (°C)
5. Power button (W)
6. Power indicator (W)
7. Timer button (hh:mm)
8. Timer indicator (hh:mm)
9. +/- buttons
10. Display
11. Hotplate with cooking zone
Initial use
Before you proceed, we need you to pay
attention to the following notes:
- Make sure that there is sufficient space
around the appliance to allow heat to
escape and provide sufficient ventilation.
Clean the appliance. Refer to the section•
"Cleaning and maintenance".
Clean the accessories. Refer to the section•
"Cleaning and maintenance".
Place the appliance on a stable, flat and•
heat-resistant surface.
Insert the mains plug into the wall socket.•
The on/off indicator (2) flashes.
Place a suitable pan onto the hotplate (11).•
To switch on the appliance, press the•
on/off button (1). The on/off indicator (2)
lights continuously.
Set the maximum temperature (240 °C).•
The appliance starts heating.
To switch off the appliance, press the•
on/off button (1). The on/off indicator (2)
flashes.
Remove the mains plug from the wall•
socket. The on/off indicator (2) goes off.
Allow the appliance to cool down•
completely.
Note: If you switch on the appliance for the
first time, the appliance may emit a little
smoke and a characteristic smell for a short
period. This is normal operation.
Use
Setting the temperature (fig. A)
The temperature can be set from 60 °C to
240 °C.
Press the temperature button (3). The•
temperature indicator (4) comes on.
Press the +/- buttons (9) to increase or•
decrease the temperature. The display (10)
shows the set temperature.
Press the on/off button (1).•
The temperature indicator (4) goes off.

8
EN
Setting the power (fig. A)
The power can be set to 10 different power
levels.
Press the power button (5). The power•
indicator (6) comes on.
Press the +/- buttons (9) to increase or•
decrease the power. The display (10) shows
the set power.
Press the on/off button (1). The power•
indicator (6) goes off.
Setting the timer (fig. A)
The timer can be set from 1 minute to
240 minutes (4 hours).
Note: The timer can only be set when the
temperature or the power is set.
Press the timer button (7). The timer•
indicator (8) flashes. The digits for the
hours start to flash in the display (10).
Press the +/- buttons (9) to set the hours.•
Press the timer button (7) again. The timer•
indicator (8) flashes. The digits for the
minutes start to flash in the display (10).
Press the +/- buttons (9) to set the minutes.•
The timer indicator (8) lights continuously.
Hints for use
Before you proceed, we need you to pay
attention to the following notes:
- Make sure that there is sufficient space
around the appliance to allow heat to
escape and provide sufficient ventilation.
Place the appliance on a stable, flat and•
heat-resistant surface.
Insert the mains plug into the wall socket.•
The on/off indicator (2) flashes.
Place a suitable pan onto the hotplate (11).•
Note: If you switch on the appliance without
a pan on the hotplate, the appliance will beep
and not operate.
To switch on the appliance, press the•
on/off button (1). The on/off indicator (2)
lights continuously.
Take one of the following actions:•
- Set the temperature. Refer to the
section "Setting the temperature".
- Set the power. Refer to the section
"Setting the power".
Set the timer. Refer to the section "Setting•
the timer". The appliance starts heating.
The display (10) shows the set temperature
or the set power during the process.
Press the timer button (7) to see the•
remaining time on the display (10).
When the timer has counted down•
completely, a buzzer sounds and the
appliance switches off automatically.
To switch off the appliance, press the•
on/off button (1). The on/off indicator (2)
flashes.
Remove the mains plug from the wall•
socket. The on/off indicator (2) goes off.
Allow the appliance to cool down•
completely.
Error codes (fig. A)
In case of specific failures, the display (10) will
show error codes. Refer to the table below for
an explanation of the error codes.
Error code Cause / Solution
E-0 No pan is placed on the hotplate. A pan
with a diameter of less than 10 cm is placed
on the hotplate. / Place a pan with a diameter
from 14.5 to 21 cm onto the hotplate.
E-1 High-temperature protection. / Remove the
mains plug from the wall socket and wait
until the appliance has cooled down.
Short-circuit protection. / Remove the mains
plug from the wall socket and wait until the
appliance has cooled down. Go to a
qualified electrician.
The temperature sensor fails to operate. /
Remove the mains plug from the wall
socket and wait until the appliance has
cooled down. Go to a qualified electrician.
E-2 The bottom of the pan is too hot. / Remove
the mains plug from the wall socket and
wait until the appliance has cooled down.
Short-circuit protection. / Remove the mains
plug from the wall socket and wait until the
appliance has cooled down. Go to a
qualified electrician.
The temperature sensor fails to operate. /
Remove the mains plug from the wall
socket and wait until the appliance has
cooled down. Go to a qualified electrician.

9
EN
E-3 The voltage is more than 270 V. / Remove
the mains plug from the wall socket and
wait until the voltage has returned to normal.
E-4 The voltage is less than 140 V. / Remove the
mains plug from the wall socket and wait
until the voltage has returned to normal.
E-5 Overvoltage/undervoltage protection. /
Remove the mains plug from the wall
socket and wait until the voltage has
returned to normal.
Cleaning and maintenance (fig. A)
Before you proceed, we need you to pay
attention to the following notes:
- Before cleaning or maintenance, switch off
the appliance, remove the mains plug from
the wall socket and wait until the appliance
has cooled down.
- Do not immerse the appliance in water or
other liquids.
Before you proceed, we would like you to
focus your attention on the following notes:
- Do not use aggressive or abrasive cleaning
agents to clean the appliance.
- Do not use sharp objects to clean the
appliance.
- Do not use scouring pads to clean the
appliance.
- Do not use steel-wool pads to clean the
appliance.
Regularly check the appliance for possible•
damage.
Clean the outside of the appliance with a•
soft, damp cloth. Thoroughly dry the outside
of the appliance with a clean, dry cloth.
Safety instructions
General safety
Read the manual carefully before use.•
Keep the manual for future reference.
Only use the appliance and the accessories•
for their intended purposes. Do not use the
appliance and the accessories for other
purposes than described in the manual.
Do not use the appliance if any part or any•
accessory is damaged or defective. If a part
or an accessory is damaged or defective,
it must be replaced by the manufacturer or
an authorised repair agent.
Children should be supervised to ensure•
that they do not play with the appliance.
The use of this appliance by children or•
persons with a physical, sensory, mental or
motorial disability, or lack of experience
and knowledge can give cause to hazards.
Persons responsible for their safety should
give explicit instructions or supervise the
use of the appliance.
Do not use the appliance near bathtubs,•
showers, basins or other vessels containing
water.
Do not immerse the appliance in water or•
other liquids. If the appliance is immersed
in water or other liquids, do not remove the
appliance with your hands. Immediately
remove the mains plug from the wall
socket. If the appliance is immersed in
water or other liquids, do not use the
appliance again.
Electrical safety
Keep the appliance and the mains cable•
out of the reach of children younger than
8 years.
Before use, always check that the mains•
voltage is the same as the voltage on the
rating plate of the appliance.
Connect the appliance to an earthed wall•
socket. If necessary, use an earthed
extension cable of a suitable diameter
(at least 3 x 1 mm2).
For additional protection, install a residual•
current device (RCD) with a rated residual
operating current that does not exceed
30 mA.
The appliance is not intended to be•
operated by means of an external timer or
separate remote-control system.
Make sure that water cannot enter the•
contact plugs of the mains cable and the
extension cable.
Always fully unwind the mains cable and•
the extension cable.

10
EN
Make sure that the mains cable does not•
hang over the edge of a worktop and
cannot be caught accidentally or tripped
over.
Keep the mains cable away from heat, oil•
and sharp edges.
Do not use the appliance if the mains cable•
or the mains plug is damaged or defective.
If the mains cable or the mains plug is
damaged or defective, it must be replaced
by the manufacturer or an authorised
repair agent.
Do not pull the mains cable to disconnect•
the mains plug from the mains.
Disconnect the mains plug from the mains•
when the appliance is not in use, before
assembly or disassembly and before
cleaning and maintenance.
Safety instructions for induction
cookers
Do not use the appliance outdoors.•
Place the appliance on a stable and flat•
surface.
Place the appliance on a heat-resistant and•
splash-proof surface.
Do not place the appliance on a hob.•
Make sure that there is sufficient space•
around the appliance to allow heat to
escape and provide sufficient ventilation.
Make sure that the appliance does not•
come into contact with flammable material.
Keep the appliance away from heat•
sources.
Do not cover the appliance.•
Do not place a sheet of paper between the•
cookware and the hotplate to prevent the
paper from being burnt.
The accessible surfaces of the appliance can•
become very hot during use. Do not touch
the hot hotplate.
The hotplate becomes very hot during use.•
Do not touch the hotplate directly after
removing the cookware.
The cookware becomes very hot during•
use. Use oven gloves to remove the
cookware from the hotplate.
Metallic objects such as knives, forks,•
spoons and lids should not be placed on
the hotplate since they can get hot.
The hotplate is made of tempered glass.•
Do not use the appliance when the
hotplate is damaged. If the surface is
cracked, switch off the appliance to avoid
the possibility of electric shock.
Do not place empty cookware on the•
hotplate. Heating empty cookware will
activate the overheating protection and
the appliance will switch off automatically.
Do not place objects that are affected by•
magnets (radios, televisions, bank cards,
etc.) near the appliance.
Do not move the appliance while it is•
switched on or is still hot. Remove the
mains plug from the wall socket and wait
until the appliance has cooled down.
U.K. Wiring instructions
The wires in the mains lead are coloured in
accordance with the following code:
BLUE NEUTRAL
BROWN LIVE
As the colours of the wire in the mains lead of
this appliance may not correspond with the
colour markings identifying the terminals on
your plug, proceed as follows:
The wire which is coloured BLUE must be
connected to the terminal which is marked
with the letter N or coloured black.
The wire which is coloured BROWN must be
connected to the terminal which is marked
with the letter L or coloured red.
This is a double-insulated appliance and does
not need an earth connection.
Warning! On no account should either the live
or neutral wires be connected to the earth
terminal.
Disclaimer
Subject to change; specifications can be
changed without further notice.

11
FR
Félicitations!
Vous avez acheté un produit Princess. Nous
souhaitons vous proposer des produits de
qualité associant un design raffiné et des prix
accessibles. Nous espérons que vous profiterez
longtemps de ce produit.
Cet appareil peut être utilisé par des
enfants 8 ans ou plus et des personnes
présentant un handicap physique,
sensoriel, mental ou moteur voire ne
disposant pas des connaissances et
de l'expérience nécessaires en cas de
surveillance ou d'instructions sur
l'usage de cet appareil en toute
sécurité et de compréhension des
risques impliqués. Les enfants ne
doivent pas jouer avec l'appareil.
Le nettoyage et la maintenance ne
doivent pas être confiés à des
enfants sauf s'ils ont 8 ans ou plus et
sont sous surveillance. Maintenez
l'appareil et le cordon d'alimentation
hors de portée des enfants de moins
de 8 ans.
Description (fig. A)
Votre plaque à induction 303001 Princess a été
conçue pour les applications de cuisine
utilisant l'induction pour chauffer directement
les poêles. L'appareil est réservé à un usage
à l'intérieur. L'appareil est réservé à un usage
domestique.
Poêles adaptées : poêles en acier, poêles en
acier inox, poêles en fonte, poêles en tôle
émaillée et poêles à fond plat d'un diamètre
de 14,5 à 21 cm.
Poêles inadaptées : poêles en céramique,
poêles en verre, poêles en cuivre, poêles en
aluminium et poêles à fond arrondi d'un
diamètre inférieur à 10 cm.
1. Bouton marche/arrêt
2. Témoin marche/arrêt
3. Bouton de température (°C)
4. Témoin de température (°C)
5. Bouton de puissance (W)
6. Témoin de puissance (W)
7. Bouton du minuteur (hh:mm)
8. Témoin du minuteur (hh:mm)
9. Boutons +/-
10. Écran
11. Plaque chauffante avec zone de cuisson
Utilisation initiale
Avant de procéder, vous devez faire attention
aux remarques suivantes :
- Assurez-vous que l'appareil dispose d'un
dégagement suffisant pour que la chaleur
se dissipe tout en assurant une ventilation
satisfaisante.
Nettoyez l'appareil. Consultez la section•
"Nettoyage et entretien".
Nettoyez les accessoires. Consultez la•
section "Nettoyage et entretien".
Placez l'appareil sur une surface stable,•
plane et thermorésistante.
Insérez la fiche secteur dans la prise murale.•
Le témoin marche/arrêt (2) clignote.
Placez une poêle adaptée sur la plaque•
chauffante (11).
Pour mettre l’appareil en marche, appuyez•
sur le bouton marche/arrêt (1). Le témoin
marche/arrêt (2) s'allume en continu.
Réglez la température maximum (240 °C).•
L'appareil commence à chauffer.
Pour arrêter l’appareil, appuyez sur le•
bouton marche/arrêt (1). Le témoin
marche/arrêt (2) clignote.
Débranchez la fiche secteur de la prise•
murale. Le témoin marche/arrêt (2) s'éteint.
Laissez l'appareil refroidir complètement.•
Remarque : pour sa première mise en marche,
l'appareil peut émettre une légère fumée et
une odeur caractéristique pendant une
période brève. C'est normal.

12
FR
Utilisation
Réglage de la température (fig. A)
La température est réglable entre 60 °C et
240 °C.
Appuyez sur le bouton de température (3).•
Le témoin de température (4) s'allume.
Appuyez sur les boutons +/- (9) pour•
augmenter ou réduire la température.
L'écran (10) affiche la température réglée.
Appuyez sur le bouton marche/arrêt (1).•
Le témoin de température (4) s'éteint.
Réglage de la puissance (fig. A)
Vous pouvez régler 10 niveaux de puissance
différents.
Appuyez sur le bouton de puissance (5).•
Le témoin de puissance (6) s'allume.
Appuyez sur les boutons +/- (9) pour•
augmenter ou réduire la puissance. L'écran
(10) affiche la puissance réglée.
Appuyez sur le bouton marche/arrêt (1).•
Le témoin de puissance (6) s'éteint.
Réglage du minuteur (fig. A)
Le minuteurest réglable de 1 minutes à
240 minutes (4 heures).
Remarque : Le minuteur est réglable
uniquement lorsque la température ou la
puissance est réglée.
Appuyez sur le bouton du minuteur (7).•
Le témoin du minuteur (8) clignote.
Les chiffres des heures commencent
à clignoter sur l'écran (10).
Appuyez sur les bouton +/- (9) pour régler•
les heures.
Appuyez à nouveau sur le bouton du•
minuteur (7). Le témoin du minuteur (8)
clignote. Les chiffres des minutes
commencent à clignoter sur l'écran (10).
Appuyez sur les bouton +/- (9) pour régler•
les minutes. Le témoin du minuteur (8) est
allumé en continu.
Conseils d'usage
Avant de procéder, vous devez faire attention
aux remarques suivantes :
- Assurez-vous que l'appareil dispose d'un
dégagement suffisant pour que la chaleur
se dissipe tout en assurant une ventilation
satisfaisante.
Placez l'appareil sur une surface stable,•
plane et thermorésistante.
Insérez la fiche secteur dans la prise murale.•
Le témoin marche/arrêt (2) clignote.
Placez une poêle adaptée sur la plaque•
chauffante (11).
Remarque : Si vous mettez l'appareil en
marche sans placer une poêle sur la plaque
chauffante, l'appareil émet un bip et ne
fonctionne pas.
Pour mettre l’appareil en marche, appuyez•
sur le bouton marche/arrêt (1). Le témoin
marche/arrêt (2) s'allume en continu.
Effectuez l'une des actions suivantes :•
- Réglez la température. Consultez la
section "Réglage de la température".
- Réglez la puissance. Consultez la section
"Réglage de la puissance".
Réglez le minuteur. Consultez la section•
"Réglage du minuteur". L'appareil
commence à chauffer. L'écran (10) indique
la température réglée ou la puissance
réglée durant le processus.
Appuyez sur le bouton du minuteur (7) pour•
afficher le temps restant sur l'écran (10).
Une fois le compte à rebours de la•
minuterie terminé, une sonnerie retentit et
l'appareil s'arrête automatiquement.
Pour arrêter l’appareil, appuyez sur le•
bouton marche/arrêt (1). Le témoin
marche/arrêt (2) clignote.
Débranchez la fiche secteur de la prise•
murale. Le témoin marche/arrêt (2) s'éteint.
Laissez l'appareil refroidir complètement.•
Codes d'erreur (fig. A)
En cas de défaillance spécifique, l'écran (10)
affiche des codes d'erreur. Consultez la table
suivante pour une explication des codes
d'erreur.
Code d'erreur Cause / Solution
E-0 Aucune poêle sur la plaque chauffante.
Une poêle d'un diamètre inférieur à 10 cm
est placée sur la plaque chauffante. /

13
FR
Placez une poêle d'un diamètre entre
14,5 et 21 cm sur la plaque chauffante.
E-1 Protection contre les hautes
températures / Retirez la fiche secteur
de la prise murale et attendez que
l'appareil refroidisse.
Protection contre les courts-circuits. /
Retirez la fiche secteur de la prise
murale et attendez que l'appareil
refroidisse. Rendez-vous chez un
électricien qualifié.
Le capteur de température ne
fonctionne pas. / Retirez la fiche secteur
de la prise murale et attendez que
l'appareil refroidisse. Rendez-vous chez
un électricien qualifié.
E-2 Le fond de la poêle est trop chaud. /
Retirez la fiche secteur de la prise
murale et attendez que l'appareil
refroidisse.
Protection contre les courts-circuits. /
Retirez la fiche secteur de la prise
murale et attendez que l'appareil
refroidisse. Rendez-vous chez un
électricien qualifié.
Le capteur de température ne
fonctionne pas. / Retirez la fiche secteur
de la prise murale et attendez que
l'appareil refroidisse. Rendez-vous chez
un électricien qualifié.
E-3 La tension est supérieure à 270 V. /
Retirez la fiche secteur de la prise
murale et attendez que la tension
revienne à la normale.
E-4 La tension est inférieure à 140 V. /
Retirez la fiche secteur de la prise
murale et attendez que la tension
revienne à la normale.
E-5 Protection contre les surtensions /
sous-tensions. / Retirez la fiche secteur
de la prise murale et attendez que la
tension revienne à la normale.
Nettoyage et entretien (fig. A)
Avant de procéder, vous devez faire attention
aux remarques suivantes :
- Avant le nettoyage ou l'entretien, arrêtez
l'appareil, débranchez la fiche secteur de la
prise murale et attendez que l'appareil
refroidisse.
- Ne plongez pas l'appareil dans l'eau ou
autres liquides.
Avant de procéder, nous souhaiterions que
vous preniez connaissance des remarques
suivantes :
- N'utilisez pas de produits de nettoyage
agressifs ou abrasifs pour nettoyer l'appareil.
- Ne nettoyez pas l'appareil avec des objets
coupants.
- Ne nettoyez pas l'appareil avec des
tampons gratteurs.
- N'utilisez pas de tampons gratteurs pour
nettoyer l'appareil.
Contrôlez régulièrement les éventuels•
dommages sur l'appareil.
Nettoyez l'extérieur de l'appareil avec un•
chiffon doux et humide. Séchez
soigneusement l'extérieur de l'appareil avec
un chiffon propre et sec.
Instructions de sécurité
Sécurité générale
Lisez avec soin le manuel avant utilisation.•
Conservez le manuel pour référence future.
Utilisez l'appareil et ses accessoires•
uniquement pour leurs fins prévues.
N'utilisez pas l'appareil et ses accessoires
pour tout autre objet que celui exposé
dans le manuel.
N'utilisez pas l'appareil si une pièce ou un•
accessoire quelconque est endommagé ou
défectueux. Si une pièce ou un accessoire
quelconque est endommagé ou défectueux,
il doit être remplacé par le fabricant ou par
un réparateur agréé.
Les enfants doivent toujours être surveillés•
pour s'assurer qu'ils ne jouent pas avec
l'appareil.
L'emploi de cet appareil par des enfants ou•
des personnes présentant un handicap
physique, sensoriel, mental ou moteur
voire ne disposant pas des connaissances et
de l'expérience nécessaires est
potentiellement dangereux.

14
FR
Les personnes responsables de leur sécurité
doivent leur fournir des instructions
explicites voire les surveiller pour utiliser
l'appareil.
N'utilisez pas l'appareil à proximité d'une•
baignoire, d'une douche, d'un lavabo ou
d'autres récipients contenant de l'eau.
Ne plongez pas l'appareil dans l'eau ou•
autres liquides. Si l'appareil est plongé dans
l'eau ou d'autres liquides, ne retirez pas
l'appareil avec vos mains. Débranchez
immédiatement la fiche secteur de la prise
murale. Si l'appareil est plongé dans l'eau
ou autre liquide, ne l'utilisez pas à nouveau.
Sécurité électrique
Maintenez l'appareil et le cordon•
d'alimentation hors de portée des enfants
de moins de 8 ans.
Avant toute utilisation, vérifiez que la•
tension du secteur correspond à celle
indiquée sur la plaque signalétique de
l'appareil.
Connectez l'appareil à une prise murale•
mise à la terre. Si nécessaire, vous pouvez
utiliser une rallonge d'un diamètre adapté
(au moins 3 x 1 mm2).
Pour maximiser la protection, installez un•
dispositif de courant résiduel (RCD)
présentant une intensité de service
résiduelle nominale inférieure ou égale à
30 mA.
L'appareil n'est pas conçu pour être utilisé•
avec une minuterie externe ou un système
de télécommande séparé.
Assurez-vous que l'eau ne peut pas•
s'infiltrer dans les contacts de prise du
cordon d'alimentation et de la rallonge.
Déroulez toujours complètement le cordon•
d'alimentation et la rallonge.
Assurez-vous que le cordon d'alimentation•
ne pend pas sur le bord d'un plan de travail
et ne peut pas être happé ou faire
trébucher quelqu'un accidentellement.
Maintenez le cordon d'alimentation à•
l'écart de la chaleur, de l'huile et des bords
tranchants.
N'utilisez pas l'appareil si le cordon•
d'alimentation ou la fiche secteur est
endommagé ou défectueux.
Si le cordon d'alimentation ou la fiche
secteur est endommagé ou défectueux, il
doit être remplacé par le fabricant ou par
un réparateur agréé.
Ne tirez pas sur le cordon d'alimentation•
pour débrancher la fiche secteur du
secteur.
Débranchez la fiche secteur du secteur•
lorsque l'appareil n'est pas utilisé, avant le
montage ou le démontage de même
qu'avant le nettoyage ou l'entretien.
Instructions de sécurité pour les
plaques à induction
N'utilisez pas l'appareil à l'extérieur.•
Placez l'appareil sur une surface stable et•
plane.
Placez l'appareil sur une surface résistante•
à la chaleur et aux projections.
Ne placez pas l'appareil sur une plaque de•
cuisson.
Assurez-vous que l'appareil dispose d'un•
dégagement suffisant pour que la chaleur
se dissipe tout en assurant une ventilation
satisfaisante.
Assurez-vous que l'appareil n'entre en•
contact avec aucune matière inflammable.
Maintenez l'appareil à l'écart des sources•
de chaleur.
Ne couvrez pas l'appareil.•
Ne placez pas une feuille de papier entre•
l'ustensile de cuisson et la plaque
chauffante afin d'éviter que le papier ne
brûle.
Les surfaces accessibles de l'appareil•
peuvent devenir très chaudes pendant
l'utilisation. Ne touchez pas la plaque
chauffante chaude.
La plaque chauffante devient très chaude•
pendant l’utilisation. Ne touchez pas la
plaque chauffante directement après avoir
retiré l'ustensile de cuisson.
L'ustensile de cuisson devient très chaud•
pendant l'utilisation. Utilisez des gants de
cuisine pour retirer l'ustensile de cuisson de
la plaque chauffante.
Ne placez pas des outils métalliques -•
couteaux, fourchettes et couvercles - sur la
plaque chauffante car ils peuvent devenir
très chauds.

15
FR
La plaque chauffante est en verre trempé.•
N'utilisez pas l'appareil si la plaque
chauffante est endommagée. Si la surface
est fissurée, arrêtez l'appareil pour éviter
tout risque de choc électrique.
Ne placez pas un ustensile de cuisson vide•
sur la plaque chauffante. Le chauffage d'un
ustensile de cuisson vide active la
protection de surchauffe et l'appareil
s'arrête automatiquement.
N'approchez pas de l'appareil des objets•
affectés par les aimants (radio, télévision,
carte bancaire, etc.).
Ne déplacez pas l'appareil s'il est sous•
tension ou encore chaud. Retirez la fiche
secteur de la prise murale et attendez que
l'appareil refroidisse.
Clause de non responsabilité
Sous réserve de modifications ;
les spécifications peuvent être modifiées sans
préavis.

16
DE
Herzlichen Glückwunsch!
Sie haben ein Princess Produkt erworben.
Unser Ziel ist es, Qualitätsprodukte mit einem
geschmackvollen Design zu einem
erschwinglichen Preis anzubieten. Wir hoffen,
dass Sie viele Jahre Gefallen an diesem
Produkt finden.
Das Gerät kann von Kindern ab
8 Jahren und von Personen mit einer
körperlichen, sensorischen, geistigen
oder motorischen Behinderung oder
einem Mangel an Erfahrung und
Kenntnissen verwendet werden,
sofern diese Personen beaufsichtigt
oder über den sicheren Gebrauch
des Geräts unterrichtet wurden und
die damit verbundenen Gefahren
verstanden haben. Kinder dürfen mit
dem Gerät nicht spielen. Die
Reinigung und Wartung darf nur
dann von Kindern durchgeführt
werden, wenn sie älter als 8 Jahre
sind und beaufsichtigt werden.
Halten Sie das Gerät und das
Netzkabel aus der Reichweite von
Kindern, die jünger als 8 Jahre sind.
Beschreibung (Abb. A)
Ihr 303001 Princess Induktionskochfeld wurde
zum Kochen unter Verwendung von
Induktionshitze konstruiert, die die Pfannen
und Töpfe direkt erhitzt. Das Gerät ist nur für
den Gebrauch in geschlossenen Räumen
geeignet. Das Gerät ist nur für den
Hausgebrauch geeignet.
Geeignete Pfannen und Töpfe: Pfannen und
Töpfe aus Stahl, Edelstahl, Gusseisen und
emaillierte Pfannen und Töpfe mit einem
Durchmesser von 14,5 bis 21 cm.
Nicht geeignete Pfannen und Töpfe: Pfannen
und Töpfe aus Keramik, Glas, Kupfer,
Aluminium, Pfannen und Töpfe mit
abgerundetem Boden und Pfannen und Töpfe
mit einem Durchmesser unter 10 cm.
1. Ein-/Aus-Taste
2. Ein-/Aus-Anzeige
3. Temperaturtaste (°C)
4. Temperaturanzeige (°C)
5. Leistungstaste (W)
6. Leistungsanzeige (W)
7. Timer-Taste (hh:mm)
8. Timer-Anzeige (hh:mm)
9. +/- Tasten
10. Anzeige
11. Heizplatte mit Kochzone
Erster Gebrauch
Bevor Sie fortfahren, beachten Sie bitte
unbedingt die folgenden Hinweise:
- Stellen Sie sicher, dass rund um das Gerät
ausreichend Platz vorhanden ist, damit die
Wärme entweichen kann und eine
ausreichende Belüftung gewährleistet ist.
Reinigen Sie das Gerät. Siehe Abschnitt•
"Reinigung und Wartung".
Reinigen Sie das Zubehör. Siehe Abschnitt•
"Reinigung und Wartung".
Stellen Sie das Gerät auf eine stabile, ebene•
und hitzebeständige Oberfläche.
Stecken Sie den Netzstecker in die•
Wandsteckdose. Die Ein-/Aus-Anzeige (2)
blinkt.
Stellen Sie eine geeignete Pfanne oder•
einen Topf auf die Heizplatte (11).
Um das Gerät einzuschalten, drücken Sie•
auf die Ein-/Aus-Taste (1). Die Ein-/Aus-
Anzeige (2) leuchtet kontinuierlich.
Stellen Sie die maximale Temperatur (240 °C)•
ein. Das Gerät beginnt mit dem
Aufheizvorgang.
Um das Gerät auszuschalten, drücken Sie•
auf die Ein-/Aus-Taste (1). Die Ein-/Aus-
Anzeige (2) blinkt.
Ziehen Sie den Netzstecker aus der•
Wandsteckdose. Die Ein-/Aus-Anzeige (2)
erlischt.
Lassen Sie das Gerät vollständig abkühlen.•
Hinweis: Wenn Sie das Gerät das erste Mal
einschalten, kann sich kurz etwas Rauch und
ein charakteristischer Geruch entwickeln.
Dies ist normal.

17
DE
Gebrauch
Einstellen der Temperatur (Abb. A)
Die Temperatur kann von 60 °C bis 240 °C
eingestellt werden.
Drücken Sie auf die Temperaturtaste (3).•
Die Temperaturanzeige (4) leuchtet auf.
Drücken Sie auf die +/- Tasten (9), um die•
Temperatur zu erhöhen oder zu verringern.
Auf der Anzeige (10) erscheint die
eingestellte Temperatur.
Drücken Sie auf die Ein-/Aus-Taste (1). Die•
Temperaturanzeige (4) erlischt.
Einstellen der Leistung (Abb. A)
Die Leistung kann auf 10 verschiedene Stufen
eingestellt werden.
Drücken Sie auf die Leistungstaste (5).•
Die Stromanzeige (6) leuchtet auf.
Drücken Sie auf die +/- Tasten (9), um die•
Leistung zu erhöhen oder zu verringern.
Auf der Anzeige (10) erscheint die
eingestellte Leistung.
Drücken Sie auf die Ein-/Aus-Taste (1).•
Die Stromanzeige (6) erlischt.
Einstellen des Timers (Abb. A)
Der Timer kann von 1 Minute bis 240 Minuten
(4 Stunden) eingestellt werden.
Hinweis: Der Timer kann nur eingestellt
werden, wenn die Temperatur oder die
Leistung eingestellt ist.
Drücken Sie auf die Timer-Taste (7). Die•
Timer-Anzeige (8) blinkt. Die Ziffern für die
Stunden beginnen, in der Anzeige (10) zu
blinken.
Drücken Sie auf die +/- Tasten (9), um die•
Stunden einzustellen.
Drücken Sie erneut auf die Timer-Taste (7).•
Die Timer-Anzeige (8) blinkt. Die Ziffern für
die Minuten beginnen, in der Anzeige (10)
zu blinken.
Drücken Sie auf die +/- Tasten (9), um die•
Minuten einzustellen. Die Timer-Anzeige
(8) leuchtet kontinuierlich.
Hinweise für den Gebrauch
Bevor Sie fortfahren, beachten Sie bitte
unbedingt die folgenden Hinweise:
- Stellen Sie sicher, dass rund um das Gerät
ausreichend Platz vorhanden ist, damit die
Wärme entweichen kann und eine
ausreichende Belüftung gewährleistet ist.
Stellen Sie das Gerät auf eine stabile, ebene•
und hitzebeständige Oberfläche.
Stecken Sie den Netzstecker in die•
Wandsteckdose. Die Ein-/Aus-Anzeige (2)
blinkt.
Stellen Sie eine geeignete Pfanne oder•
einen Topf auf die Heizplatte (11).
Hinweis: Wenn Sie das Gerät ohne Pfanne
oder Topf auf der Heizplatte einschalten, ist
ein Signalton zu hören und das Gerät arbeitet
nicht.
Um das Gerät einzuschalten, drücken Sie•
auf die Ein-/Aus-Taste (1). Die Ein-/Aus-
Anzeige (2) leuchtet kontinuierlich.
Treffen Sie folgende Maßnahmen:•
- Stellen Sie die Temperatur ein. Siehe
Abschnitt "Einstellen der Temperatur".
- Stellen Sie die Leistung ein. Siehe
Abschnitt "Einstellen der Leistung".
Stellen Sie den Timer ein. Siehe Abschnitt•
"Einstellen des Timers". Das Gerät beginnt
mit dem Aufheizvorgang. Während des
Vorgangs erscheint in der Anzeige (10) die
eingestellte Temperatur oder die
eingestellte Leistung.
Drücken Sie auf die Timer-Taste (7), um die•
verbleibende Zeit auf der Anzeige (10) zu
sehen.
Nachdem die Zeitschaltung ganz•
heruntergezählt hat, ertönt ein Summer
und das Gerät schaltet automatisch aus.
Um das Gerät auszuschalten, drücken Sie•
auf die Ein-/Aus-Taste (1). Die Ein-/Aus-
Anzeige (2) blinkt.
Ziehen Sie den Netzstecker aus der Wand-•
steckdose. Die Ein-/Aus-Anzeige (2) erlischt.
Lassen Sie das Gerät vollständig abkühlen.•
Fehlercodes (Abb. A)
Bei bestimmten Fehlern erscheinen Fehlercodes
auf der Anzeige (10). Eine Erklärung der
Fehlercodes geht aus der Tabelle unten hervor.

18
DE
Fehlercode Ursache / Abhilfe
E-0 Es wurde keine Pfanne bzw. kein Topf auf
die Heizplatte gestellt. Es wurde eine Pfanne
oder ein Topf mit einem Durchmesser unter
10 cm auf die Heizplatte gestellt. / Stellen
Sie eine Pfanne oder einen Topf mit einem
Durchmesser von 14,5 bis 21 cm auf die
Heizplatte.
E-1 Überhitzungsschutz. / Ziehen Sie den
Netzstecker aus der Wandsteckdose und
warten Sie, bis das Gerät abgekühlt ist.
Kurzschlussschutz. / Ziehen Sie den
Netzstecker aus der Wandsteckdose und
warten Sie, bis das Gerät abgekühlt ist.
Wenden Sie sich an einen qualifizierten
Elektriker.
Der Temperatursensor funktioniert nicht. /
Ziehen Sie den Netzstecker aus der
Wandsteckdose und warten Sie, bis das
Gerät abgekühlt ist. Wenden Sie sich an
einen qualifizierten Elektriker.
E-2 Der Boden der Pfanne bzw. des Topfes ist
zu heiß. / Ziehen Sie den Netzstecker aus
der Wandsteckdose und warten Sie, bis das
Gerät abgekühlt ist.
Kurzschlussschutz. / Ziehen Sie den
Netzstecker aus der Wandsteckdose und
warten Sie, bis das Gerät abgekühlt ist.
Wenden Sie sich an einen qualifizierten
Elektriker.
Der Temperatursensor funktioniert nicht. /
Ziehen Sie den Netzstecker aus der
Wandsteckdose und warten Sie, bis das
Gerät abgekühlt ist. Wenden Sie sich an
einen qualifizierten Elektriker.
E-3 Die Spannung überschreitet 270 V. /Ziehen
Sie den Netzstecker aus der Wandsteckdose
und warten Sie, bis die Spannung wieder
ihre normale Höhe erreicht hat.
E-4 Die Spannung unterschreitet 140 V. /Ziehen
Sie den Netzstecker aus der Wandsteckdose
und warten Sie, bis die Spannung wieder
ihre normale Höhe erreicht hat.
E-5 Über-/Unterspannungsschutz. / Ziehen Sie
den Netzstecker aus der Wandsteckdose
und warten Sie, bis die Spannung wieder
ihre normale Höhe erreicht hat.
Reinigung und Wartung (Abb. A)
Bevor Sie fortfahren, beachten Sie bitte
unbedingt die folgenden Hinweise:
- Schalten Sie das Gerät vor der Reinigung
und Wartung aus, ziehen Sie den
Netzstecker aus der Wandsteckdose und
warten Sie, bis das Gerät abgekühlt ist.
- Tauchen Sie das Gerät niemals in Wasser
oder andere Flüssigkeiten ein.
Bevor Sie fortfahren, richten Sie bitte Ihre
Aufmerksamkeit auf folgende Hinweise:
- Verwenden Sie keine aggressiven oder
scheuernden Mittel, um das Gerät zu
reinigen.
- Verwenden Sie keine scharfen Gegenstände,
um das Gerät zu reinigen.
- Verwenden Sie keine Scheuerschwämme,
um das Gerät zu reinigen.
- Verwenden Sie keine Reinigungsschwämme
mit Stahlwolle, um das Gerät zu reinigen.
Kontrollieren Sie das Gerät regelmäßig auf•
mögliche Schäden.
Reinigen Sie das Äußere des Geräts mit•
einem weichen, feuchten Tuch. Trocknen
Sie das Äußere des Geräts gründlich mit
einem sauberen, trockenen Tuch.
Sicherheitsanweisungen
Allgemeine Sicherheit
Lesen Sie das Handbuch vor dem Gebrauch•
genau durch. Bewahren Sie das Handbuch
zur künftigen Bezugnahme auf.
Verwenden Sie das Gerät und sein Zubehör•
nur für den Zweck, für den es konstruiert
wurde. Verwenden Sie das Gerät und sein
Zubehör nicht für Zwecke, die nicht in
diesem Handbuch beschrieben sind.
Verwenden Sie das Gerät nicht, wenn ein•
Teil oder Zubehör beschädigt oder defekt
ist. Ist ein Teil oder Zubehör beschädigt
oder defekt, muss es vom Hersteller oder
einem autorisierten Reparaturbetrieb
ausgetauscht werden.
Kinder müssen stets beaufsichtigt werden,•
um sicherzustellen, dass sie nicht mit dem
Gerät spielen.

19
DE
Die Benutzung des Geräts durch Kinder•
oder durch Personen mit eingeschränkten
körperlichen, sensorischen, geistigen oder
motorischen Fähigkeiten oder ohne das
erforderliche Wissen und die nötige
Erfahrung kann gefährlich sein! Die für die
Sicherheit verantwortlichen Personen
müssen klare Anweisungen geben oder
den Gebrauch des Geräts beaufsichtigen.
Verwenden Sie das Gerät nicht in der Nähe•
von Badewannen, Duschen, Bassins oder
anderen Wasserbehältern.
Tauchen Sie das Gerät niemals in Wasser•
oder andere Flüssigkeiten ein. Falls das
Gerät in Wasser oder andere Flüssigkeiten
eingetaucht wurde, nehmen Sie es nicht
mit Ihren Händen heraus. Ziehen Sie sofort
den Netzstecker aus der Wandsteckdose.
Falls das Gerät in Wasser oder andere
Flüssigkeiten eingetaucht wird, darf es
nicht mehr verwendet werden.
Elektrische Sicherheit
Halten Sie das Gerät und das Netzkabel aus•
der Reichweite von Kindern, die jünger als
8 Jahre sind.
Vergewissern Sie sich vor dem Gebrauch•
stets, dass die Netzspannung mit der
Spannung auf dem Typenschild des Geräts
übereinstimmt.
Schließen Sie das Gerät an eine geerdete•
Wandsteckdose an. Verwenden Sie
nötigenfalls ein geerdetes
Verlängerungskabel mit einem geeigneten
Durchmesser (mindestens 3 x 1 mm2).
Lassen Sie als zusätzliche Schutzmaßnahme•
einen Fehlerstromschutzschalter (FI-Schutz-
schalter) installieren, der einen Nenn-
Fehlerstrom von 30 mA nicht überschreitet.
Das Gerät ist nicht dafür ausgelegt, von•
einer externen Zeitschaltuhr oder einem
Fernsteuersystem betrieben zu werden.
Stellen Sie sicher, dass kein Wasser in die•
Steckkontakte des Netzkabels und in das
Verlängerungskabel eindringen kann.
Wickeln Sie das Netzkabel und das•
Verlängerungskabel stets vollständig ab.
Vergewissern Sie sich, dass das Netzkabel•
nicht an der Kante einer Arbeitsplatte
hängen bleibt und nicht versehentlich daran
gezogen oder darüber gestolpert wird.
Halten Sie das Netzkabel von Hitzequellen,•
Öl und scharfen Kanten fern.
Verwenden Sie das Gerät nicht, wenn das•
Netzkabel oder der Netzstecker beschädigt
oder defekt ist. Ist das Netzkabel oder der
Netzstecker beschädigt oder defekt, muss
das Teil vom Hersteller oder einem
autorisierten Reparaturbetrieb
ausgetauscht werden.
Ziehen Sie niemals am Netzkabel, um den•
Netzstecker aus der Wandsteckdose zu
ziehen.
Ziehen Sie den Netzstecker aus der•
Wandsteckdose, wenn das Gerät nicht
gebraucht wird, sowie vor der Zerlegung
bzw. dem Zusammenbau und vor der
Reinigung und Wartung.
Sicherheitsanweisungen für
Induktionskochfelder
Verwenden Sie das Gerät nicht im Freien.•
Stellen Sie das Gerät auf eine stabile, flache•
Oberfläche.
Stellen Sie das Gerät auf eine•
hitzebeständige und spritzgeschützte
Oberfläche.
Stellen Sie das Gerät nicht auf ein Kochfeld.•
Stellen Sie sicher, dass rund um das Gerät•
ausreichend Platz vorhanden ist, damit die
Wärme entweichen kann und eine
ausreichende Belüftung gewährleistet ist.
Stellen Sie sicher, dass das Gerät nicht mit•
entzündlichem Material in Berührung kommt.
Halten Sie das Gerät von Wärmequellen fern.•
Decken Sie das Gerät nicht ab.•
Achten Sie darauf, dass kein Papier•
zwischen das Kochgeschirr und die
Heizplatte gerät, um zu verhindern, dass
das Papier in Brand gerät.
Die zugänglichen Oberflächen des Geräts•
können beim Gebrauch sehr heiß werden.
Berühren Sie nicht die Heizplatte.
Die Heizplatte wird beim Gebrauch sehr•
heiß. Berühren Sie die Heizplatte nicht
unmittelbar nach dem Entfernen des
Kochgeschirrs.

20
DE
Das Kochgeschirr wird beim Gebrauch sehr•
heiß. Verwenden Sie Ofenhandschuhe, um
das Kochgeschirr von der Heizplatte zu
entfernen.
Metallgegenstände wie Messer, Gabeln,•
Löffel und Deckel sollten nicht auf die
Heizplatte gelegt werden, da diese
Gegenstände heiß werden können.
Die Heizplatte besteht aus gehärtetem•
Glas. Verwenden Sie das Gerät nicht, wenn
die Heizplatte beschädigt ist. Hat die
Oberfläche einen Riss, schalten Sie das Gerät
aus, um die Gefahr eines Stromschlags zu
vermeiden.
Stellen Sie kein leeres Kochgeschirr auf die•
Heizplatte. Durch das Erhitzen von leerem
Kochgeschirr wird der Überhitzungsschutz
ausgelöst und das Gerät schaltet automatisch
ab.
Stellen Sie keine Gegenstände in die Nähe•
des Geräts, die durch Magnetismus
beeinflusst werden (Radios, Fernsehgeräte,
Bankkarten, usw.).
Bewegen Sie das Gerät nicht, solange es•
eingeschaltet oder noch heiß ist. Ziehen Sie
den Netzstecker aus der Wandsteckdose
und warten Sie, bis das Gerät abgekühlt ist.
Haftungsausschluss
Änderungen vorbehalten; die Daten können
ohne Vorankündigung geändert werden.
Table of contents
Languages:
Other Princess Hob manuals
Popular Hob manuals by other brands

Zanussi
Zanussi ZME 2002 V Installation and operating instructions

Knau
Knau KHI604B Instruction & installation manual

AGA
AGA Six Four Series Assembly instructions

Panasonic
Panasonic KY-T937VL Operating & installation instructions

Electrolux
Electrolux EHT 6415 user manual

Progress
Progress PAS3100E user manual