Prinetti IA3964 User manual
INSTRUCTION MANUAL
8 LITRE
DIGITAL AIR FRYER
IA3964
Please read and save all instructions to ensure safe and effective use of this Appliance
02 AFTER SALES SUPPORT AU 1300 777 137 NZ 0800 824 556 [email protected]
Contents
General Information and Safety Instructions 03
Parts List Diagram 06
Product Overview 08
Getting Started 09
Before First Use 10
Operating Instructions 11
Cooking Guide 12
Cleaning and Maintenance 14
Frequently Asked Questions 15
Recipes 16
Sweet Potato Fries 16
Potato Crisps 17
Potato Wedges 18
Spicy Fried Chicken Wings 19
Spicy Prawns 20
Lamb Cutlets 21
Chocolate Brownies 22
Grilled Pineapple 23
Warranty Information 24

03
General Information and Safety Instructions
Read this manual thoroughly before first use, even if you are familiar with this type of
product.The safety precautions enclosed herein reduce the risk of fire, electric shock
and injury when correctly adhered to. Please keep this user manual in a safe place
along with your purchase receipt and carton for future reference. If applicable, pass
these instructions and packaging on to the next owner of the appliance.Always follow
basic safety precautions and accident prevention measures when using an electrical
product.
1. Before turning on the Air Fryer ensure the electrical voltage and frequency of the
circuit corresponds to those indicated on the rating label of the product.
2. To protect against fire and electric shock, do not immerse this appliance, cord set
or plug in water or any other liquid.
3. Do not use an extension cord unless completely necessary with the Air Fryer. If an
extension cord is used please ensure that it has a rating equal or exceeding the
rating of this product.
4. Do not pull or carry by the cord, use the cord as a handle, close a door on the cord,
or pull the cord around sharp edges or corners. Keep the cord away from heated
surfaces.
5. Do not bend or damage the power cord.
6. Never force the plug into an outlet.
7. Always unplug the Air Fryer when not in use.To disconnect from the power supply,
grip the plug and pull from the power outlet. Never pull by the cord.The plug must
be removed from the power outlet before cleaning, servicing, maintenance or
moving the Air Fryer.
8. Do not move or lift the Air Fryer while the power cord is still connected to the power
outlet or still on.Always ensure it is switched off and has cooled down before
moving.
9. Do not use the Air Fryer if the plug, cord or the Air Fryer itself is damaged. Please
contact our After Sales Support Line for further advice on 1300 777 137.
10. Unless your home is already fitted with a residual current device (safety switch),
we recommend installing an RCD with a rated residual operating current not
exceeding 30mA to provide additional safety protection when using electrical
appliances. See your electrician for professional advice.
11. The Air Fryer is intended for indoor household use only and not for commercial
purposes.
12. Do not use the Air Fryer for other than its intended use.

04 AFTER SALES SUPPORT AU 1300 777 137 NZ 0800 824 556 [email protected]
13. The Air Fryer is not a toy. Supervise young children to ensure they do not play with
this product.
14. The Air Fryer is not intended for use by persons (including children) with reduced
physical, sensory or mental capabilities or lack of experience or knowledge unless
they have been given supervision or instruction concerning use of the product by a
person responsible for their safety.
15. Do not leave the Air Fryer unattended when plugged in.Always switch off and
unplug when you are not using the Air Fryer.
16. Do not operate or place any part of the Air Fryer on or near any hot surfaces (such
as a gas or electric burner, or a heated oven).
17. Do not cover the appliance whilst in use. If covered there may be a risk of fire.
18. This unit has no user-serviceable parts contained within. Do not attempt to repair,
disassemble or modify the Air Fryer.This will void the warranty.
19. Improper installation may result in the risk of fire, electric shock or injury to person.
20. The manufacturer is not responsible for any eventual damage caused by improper
or faulty use.
21. The use of attachments not sold or recommended by the manufacturer may cause
fire or electric shock or injury.
22. The Air Fryer is not intended to be operated by means of an external timer or any
type of separate remote control system.
23. Do not place the Air Fryer against a wall or against other appliances. Leave at least
15cm of free space around the appliance.
24. Do not touch hot surfaces.The temperature of the outer surface can get very
hot while the Air Fryer is in operation. Always use oven mitts when handling hot
materials and allow metal parts to cool before cleaning.Allow the unit to cool
completely before cleaning.
25. Always operate the Air Fryer on a dry, level surface. Operating on sinks or uneven
surfaces should be avoided.
26. Do not clean with metal scouring pads. Pieces may break off or shift and come in
contact with the electrical parts, creating a risk of electrical shock.
27. Always put the ingredients to be cooked into the supplied pan with frying base. Do
not allow food to come into contact with the heating elements.
28. Do not touch the inside of the Air Fryer while in operation.
General Information and Safety Instructions (cont.)

05
29. During air frying, hot steam is released through the air outlet. Keep your hands and
face at a safe distance from the steam and from the air outlet. Also be careful of
hot steam and hot air when removing the pan from the appliance.
30. Do not place the Air Fryer on or near combustible materials such as curtains and
tablecloth.
31. Do not place anything on top of the Air Fryer.
32. The pan and frying base will become very hot whilst in use, always use oven mitts
when handling the pan and frying base.
33. Allow for the Air Fryer to cool down for approximately 30 minutes before cleaning.
34. Never cook food directly in the pan.Always ensure the frying base is inserted.This
allows for adequate air circulation to cook the food evenly.
CAUTION: Do not touch hot surfaces.The temperature of the outer body can get very
hot while the Air Fryer is in operation. Allow the unit to cool down before cleaning or
packing the unit away for storage.
General Information and Safety Instructions (cont.)
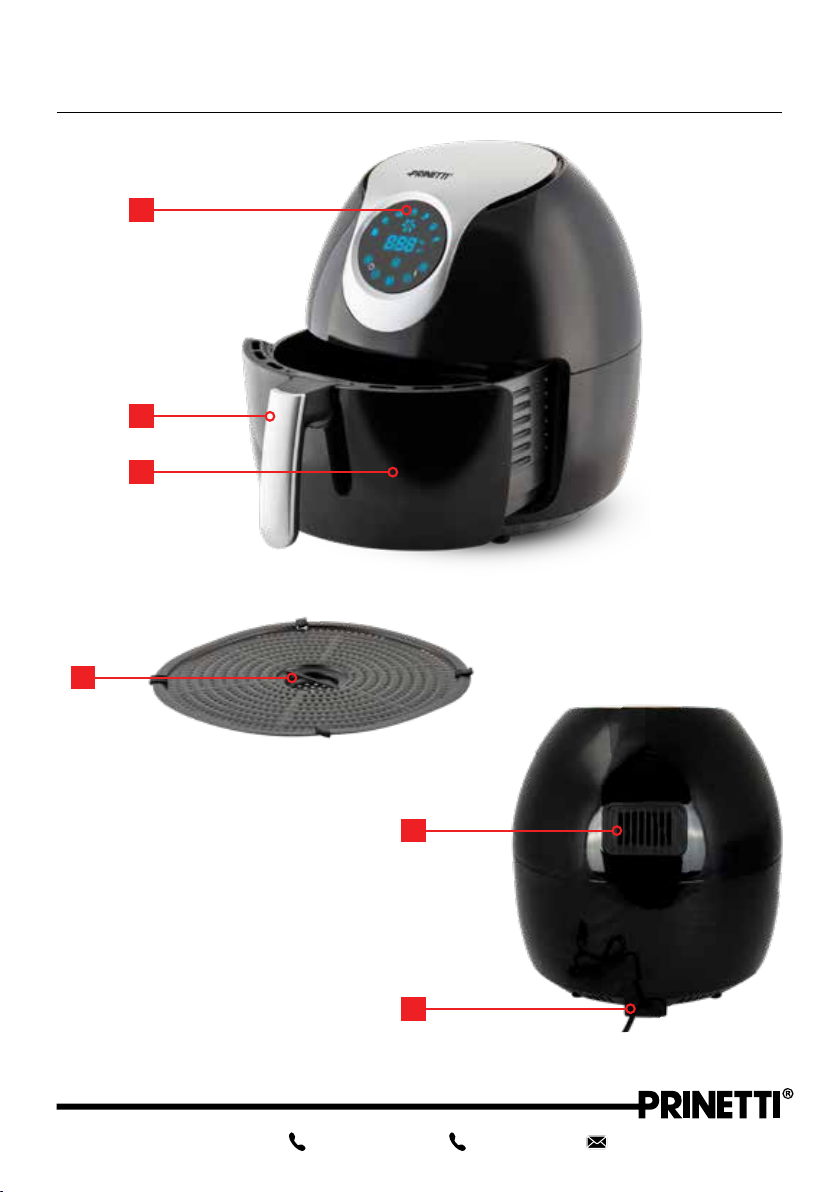
Parts List Diagram
1. Touch Control Panel
2. Handle
3. Pan
4. Frying Base
5. Air Outlet & Oil Smoke Filter
6. Power Input
1
2
3
4
06 AFTER SALES SUPPORT AU 1300 777 137 NZ 0800 824 556 [email protected]
5
6

Parts List Diagram (cont.)
1. Dessert Function
2. Prawn Function
3. Roast Meat Function
4. Fries Function
5. Time Increase/ Decrease Button
6. Fan Icon - will illuminate and spin
when the fan is operating
7. Heating Icon - will illuminate when the
Air Fryer is heating
8. Chicken Function
9. Steak Function
10. Fish Function
11. Time/ Temperature Display
12. Power/Start Button
13. Temperature Increase/ Decrease
Button
14. Menu Function Button
2
3
4
1
5
8
9
10
11
12
6
7
14
13
07
08 AFTER SALES SUPPORT AU 1300 777 137 NZ 0800 824 556 [email protected]
Standby Mode
When the Air Fryer is plugged into a power outlet and turned on it will default into
standby mode.The display panel will flash and the power button will remain illuminated.
Press the power button once and the display panel will light up and show the
default temperature setting of 180°C and the default time setting of 15 minutes. Press
the power button a second time and the Air Fryer will turn on and operate at those
default settings.
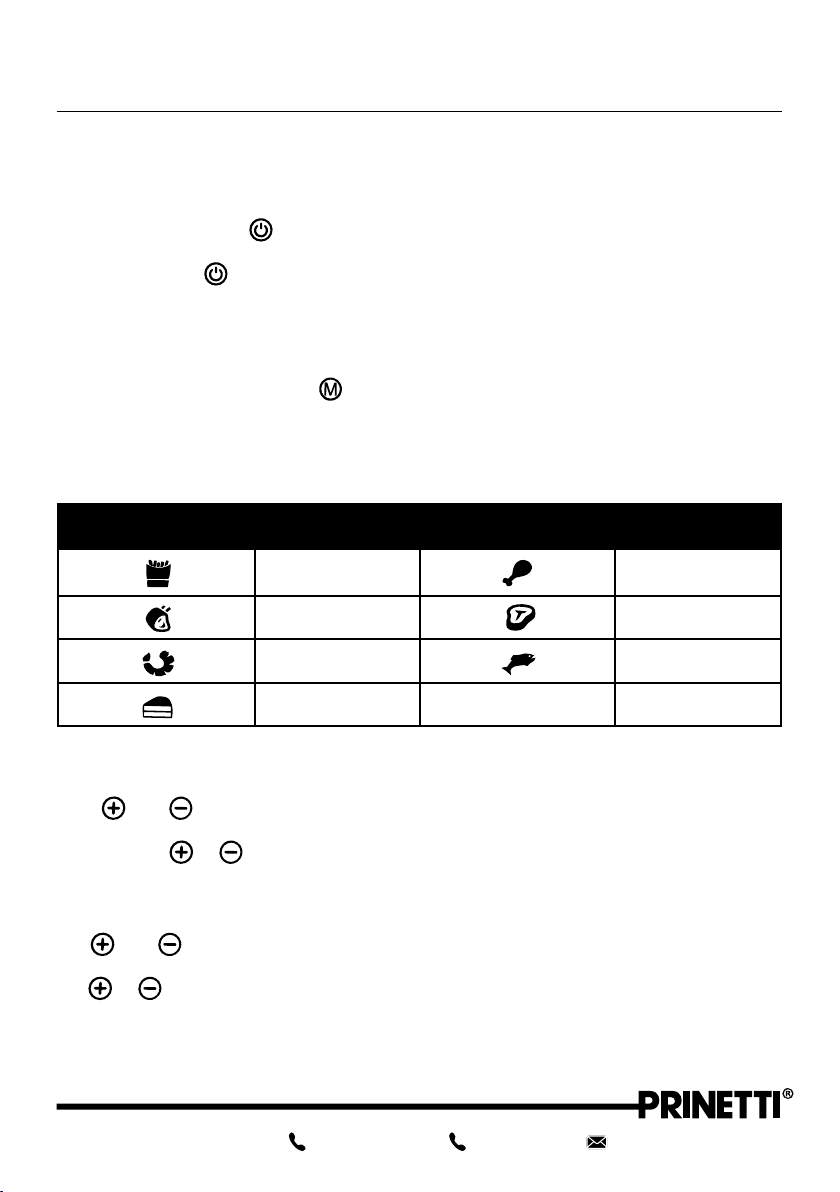
Function
Press the menu function button to scroll through the function settings in the same
order as listed in the table below. When the auto presets are selected, the display panel
will show the preset function symbol and the default temperature and time settings of
each function.You can adjust the time and temperature of each function at any point
(see below for more information).
Menu Function Setting Menu Function Setting
Fries Chicken
Roast Meat Steak
Prawns Fish
Dessert
Temperature Setting
Press and buttons to adjust the temperature setting by -/+ 5ºC increments
(minimum of 80ºC to a maximum of 200ºC). For faster temperature adjustment press
and hold the or temperature button.
Timer Setting
Use and button to adjust the timer settings by -/+1 minute increments (minimum
of 1 minute to a maximum of 30 minutes). For faster timer adjustment press and hold
the or timer button.
Product Overview

09
Quick Start Cooking
For quick and easy use, you can simply press the power button once to illuminate
the display and then press it a second time to commence cooking at the default
setting of 180ºC and 15 minutes.You can adjust the temperature or time at any point.
Auto Preset Options
For extra convenience, the Air Fryer features 7 auto presets to make using the Air Fryer
even easier! The auto preset options include Fries, Roast Meat, Prawn, Dessert, Chicken,
Steak and Fish.To select the auto presets, press the menu function button until the
preset function symbol of your choice appears on the display.To use the default time
and temperature preset to the function, simply press the power button .You can also
adjust the temperature or time setting for the auto presets at any point.The default
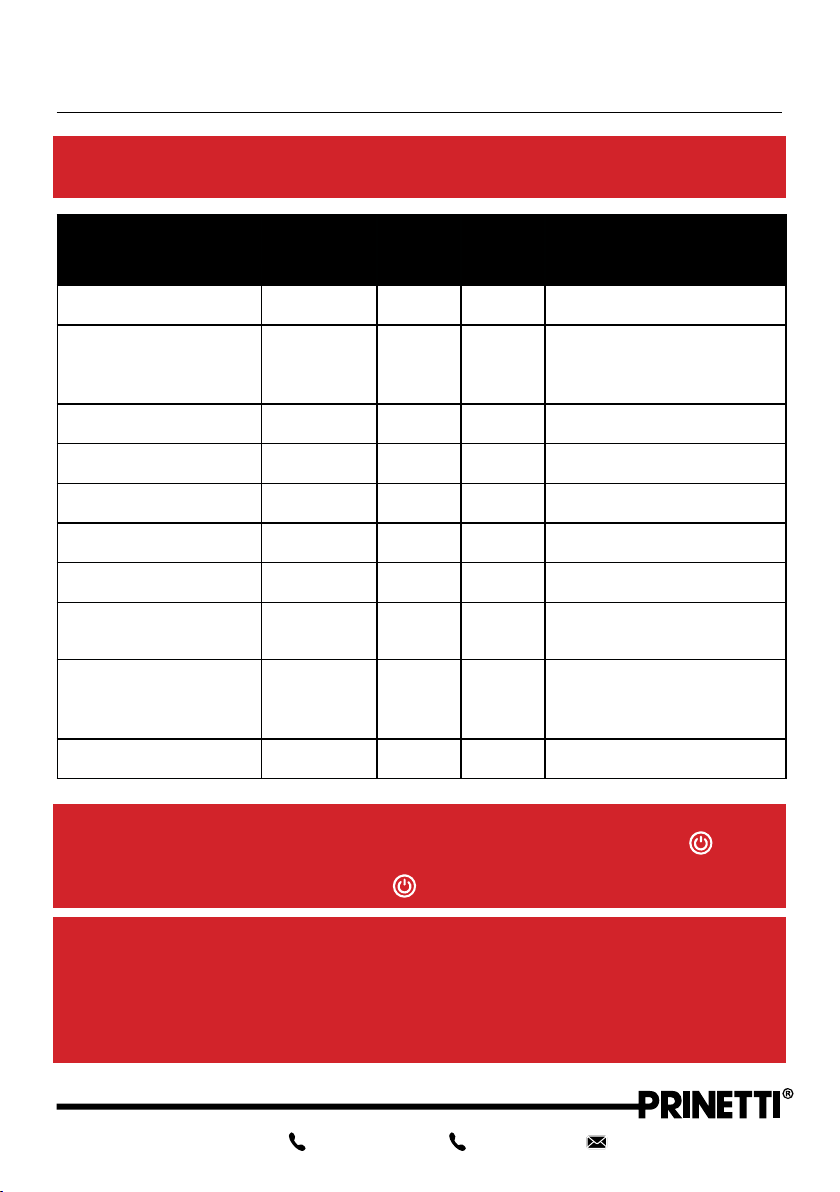
temperature and time for each preset is listed in the table below.
Type Amount
(g)
Temp
(°C)
Time
(min)Remark
Fries 1000g 200°C 20mins Automatically stops
after 20 minutes
Roast Meat 500g 180°C 25mins Automatically stops
after 25 minutes
Prawns 1000g 160°C 20mins Automatically stops
after 20 minutes
Dessert 500g 160°C 30mins
Use baking tin.
Automatically stops
after 30 minutes
Chicken 1000g 200°C 25mins Automatically stops
after 25 minutes
Steak 800g 180°C 20mins Automatically stops
after 20 minutes
Fish 600g 160°C 25mins Automatically stops
after 25 minutes
Getting Started
10 AFTER SALES SUPPORT AU 1300 777 137 NZ 0800 824 556 [email protected]
1. Unpack the product but keep all packaging material until you have made sure
your new Air Fryer is undamaged and in good working order. Plastic wrapping can
be a suffocation hazard for babies and young children so ensure all packaging
materials are out of their reach.
2. Remove the twist-tie which is securing the electrical
cord. Uncoil the cord and straighten it to remove
any kinks. Do not use the product if these parts are
damaged. In case of damage, phone the After Sales
Support Line on 1300 777 137.
3. Place the Air Fryer on a flat, stable and heat resistant
surface. Remove the pan with frying base from the Air
Fryer by holding the top of the Air Fryer with one hand
and pulling back on the handle with the other.
4. Ensure you remove any contents that may have
been packed inside the Air Fryer before turning the
appliance on or putting food into the pan.
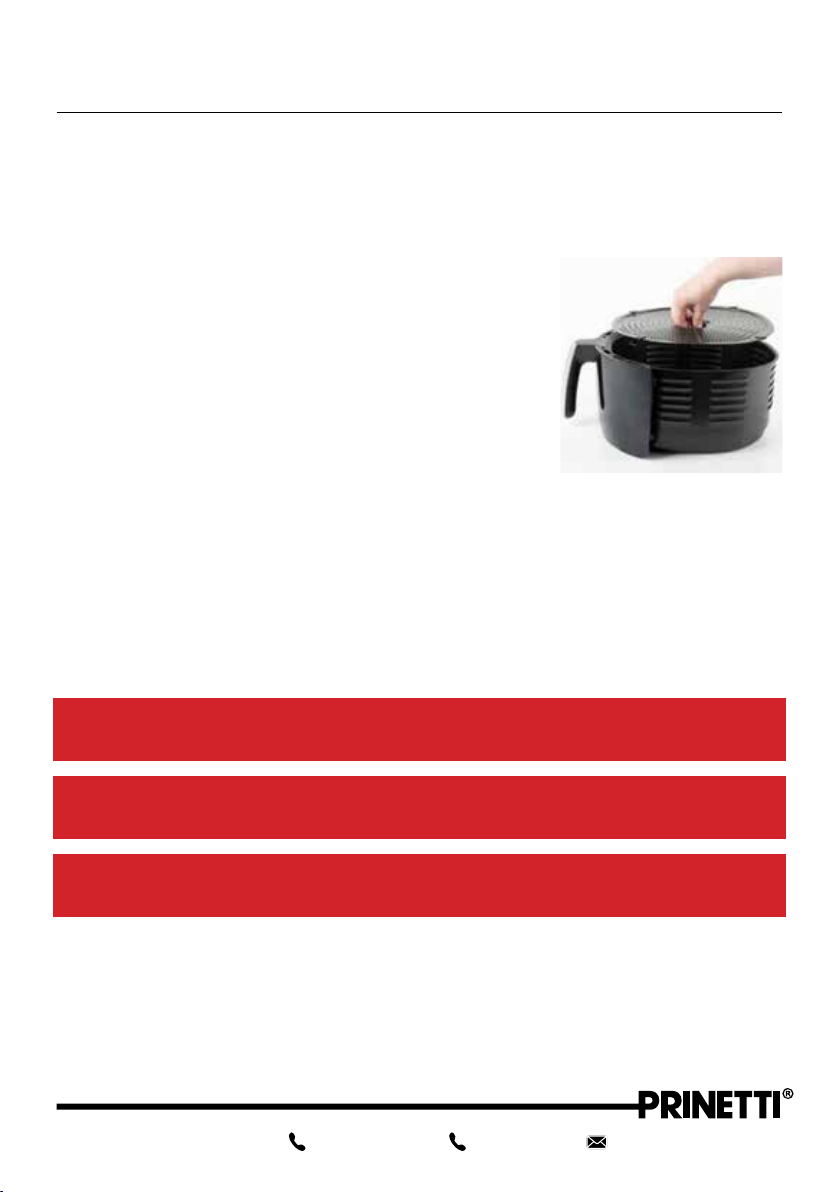
5. To remove the frying base, use the handle found in the centre of the base and lift
upwards (see Fig. 1). Wash the pan and frying base in warm soapy water and dry
thoroughly.
6. Wipe the exterior housing and inner surface of the Air Fryer with a damp cloth and
then dry thoroughly. Do not immerse it in water or other liquids.
7. Place the frying base back into the pan and slide the pan back into the Air Fryer.
WARNING: The pan will be very hot when removed from the Air Fryer. Ensure you
place the pan on a heat resistant surface.
NOTE: You may notice a slight odour being emitted from the Air Fryer during initial
use.This is normal and the odour will cease with continued use.
CAUTION: Never add oil directly into the pan. Mix the oil in a bowl with desired food
prior to placing into the pan.
Before First Use
Fig. 1

11
1. Remove the pan with frying base from the Air Fryer by pulling the handle carefully.
CAUTION: The Air Fryer will stop heating after the pan is pulled out.
2. Place the food to be cooked onto the frying base and insert the pan into the Air
Fryer (see Fig. 2).
NOTE: Never cook food directly in the pan, always
ensure the frying base is inserted.
3. Press the power button to turn the Air Fryer on.
4. Scroll through your desired settings. Use one of
the auto presets or customise the temperature
and timer settings to suit your cooking needs (see
Fig. 3).
5. Once you have chosen a setting, press the power
button .The heating icon and fan icon will
appear and the Air Fryer will begin cooking.When
the Air Fryer has reached the desired temperature
the heating icon will disappear.
6. If you need to flip over or shake food at any point
of the cooking process gently remove the pan with
frying base and place on a heat resistant surface
to make any adjustments.The Air Fryer is equipped
with a safety switch, once the pan with frying base
is removed from the Air Fryer the heating function
will cut out and the display icons will disappear.
Cooking will resume automatically once the pan
with frying base is reinserted into the Air Fryer.
WARNING: Never use your hands to touch or handle food as it will be very hot. Please
ensure you use kitchen tongs or other suitable utensils.
7. The time display will decrease by 1 minute intervals until the timer reaches 0. When
the Air Fryer has finished cooking it will beep five times to alert you it has finished
and then return to stand-by mode.
8. To turn the Air Fryer off at any time during the cooking process, press the power button
once, the heating icon will disappear and the fan icon will continue to spin for 30
seconds.The Air Fryer will then beep five times and then return to stand-by mode.
9. When removing the food from the Air Fryer, use the handle to pull the pan out of the
appliance and then place it on a heat resistant surface.
Operating Instructions
Fig. 3
Fig. 2
12 AFTER SALES SUPPORT AU 1300 777 137 NZ 0800 824 556 [email protected]
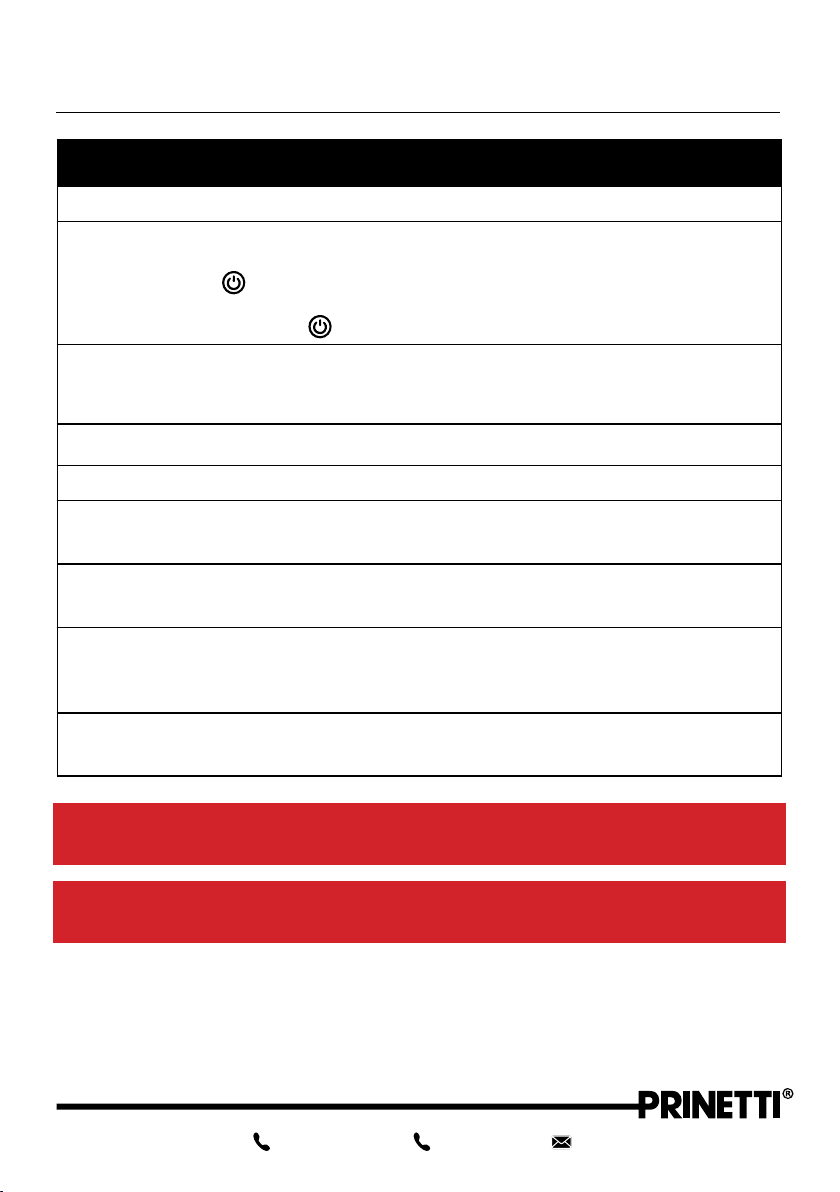
NOTE: The table below is to be used as a guide only.The time and temperature
settings can vary depending on the amount of food being cooked.
Type Min - Max
(g)
Time
(min)
Temp
(ºC)
Additional Info
Frozen Chips 800-1000 30-40 200 Shake
Home Made Chips 800-1000 30-45 200
Add ½ tbsp oil in a bowl
and then mix prior to
placing in the pan
Chicken Nuggets 600-1000 30-40 200 Shake
Chicken Fillets 200-800 25-35 180 Turn over if required
Drumsticks 500-1000 30-40 200 Turn over if required
Steak 200-800 20-30 180 Turn over if required
Pork Chops 500-1000 20-35 200 Turn over if required
Hamburger Patties 350-750 15-25 180 Add ½ tbsp of oil and
turn over if required
Frozen Fish Fingers 250-750 15-20 200
Add ½ tbsp oil in a bowl
and then mix prior to
placing in the pan
Muffins 350-500 20-30 180 Use baking tin
NOTE: Depending on the food you are cooking it may take longer than the 30 minutes
maximum pre-set time.To continue using the Air Fryer, press the power button and
scroll through your desired settings to suit your needs. Once you have chosen the
setting and time press the power button again to continue cooking.
NOTE: Depending on your food, it is recommended to either shake your food (for
smaller items such as chips, nuggets) or flip over for larger pieces of meat (steaks
or chops) halfway during cooking for best results.The Air Fryer is equipped with a
safety switch, once the pan with frying base is removed from the Air Fryer the heating
function will cut out and the display icons will disappear. Cooking will resume
automatically once the pan with frying base is reinserted into the Air Fryer.
Cooking Guide
13
Cooking Guide (cont.)
Cooking Tips
The higher volume of food being cooked, the longer the cooking time.
Shaking smaller food products halfway through cooks food more evenly. If you
need to shake food or turn over the food at any point of the cooking process, press
the power button , pull the pan out of the Air Fryer using the handle, then shake
or turn the food over using tongs. Reinsert the pan with frying base into the Air Fryer
and press the power button to resume the cooking process.
Add some oil to fresh potatoes for a crispier result. Please ensure you cook your
food in the Air Fryer within a few minutes of adding in the oil for best results. Mix the
oil in a bowl prior to placing into the pan. Never add oil directly into the pan.
Do not cook greasy or oily foods such as sausages in the Air Fryer.
Snacks that can be cooked in an oven can also be cooked in the Air Fryer.
For crispy, homemade chips or fries, the optimal amount of food to cook at a time
is 500g.
When making home made chips or fries, the best types of potatoes to use are the
starchy varieties (kennebec, king edward, golden delight or sebago).
For best cooking results, it is advisable to minimise the time and frequency that the
pan is taken out whilst the Air Fryer is on.The temperature inside the Air Fryer needs
to remain consistent to ensure best cooking results.
Cakes and pastries can be also cooked in the Air Fryer. Please follow your own
recipes and use a baking pan suitable for cooking in a conventional oven.
WARNING: Be careful when using metal utensils with this product as the
non-stick coating can be scratched.
WARNING: Never use your hands to touch or handle food as it will be very hot.
Ensure you use kitchen tongs or other suitable utensils.

14 AFTER SALES SUPPORT AU 1300 777 137 NZ 0800 824 556 [email protected]
1. Switch the Air Fryer OFF and ensure you have unplugged it from the power outlet.
Ensure you allow for the appliance to cool down completely before cleaning.
NOTE: Remove the pan to allow the Air Fryer to cool down more rapidly.
2. To clean the pan and frying base begin by removing the frying base (see page 10
for further instructions on how to remove the frying base). Wash the pan and frying
base in hot soapy water. Never use abrasive or strong household cleaners as they
will damage the non-stick coating. Repeat if required for extra stubborn foods.
3. To clean the interior and exterior of the Air Fryer, wipe over with a non-abrasive
damp cloth and dry thoroughly.
4. Clean the heating elements with a cleaning brush to remove any food particles.
5. Make sure all parts are clean and dry before placing them back inside the Air Fryer.
NOTE: Always ensure the Air Fryer is switched off and unplugged when not in use.The
unit should have completely cooled down before cleaning.
WARNING: Never immerse the Air Fryer, cord or plug into water or any liquid when
cleaning.
Storage
• Before packing away the Air Fryer for storage, ensure it is clean and dry.
• We recommend storing the Air Fryer in its original carton to protect it from dust, with
all the parts and accessories.
• Store the Air Fryer in a clean and dry place, out of children’s reach.
• Do not place heavy objects on top during storage.
Cleaning and Maintenance
Frequently Asked Questions
15
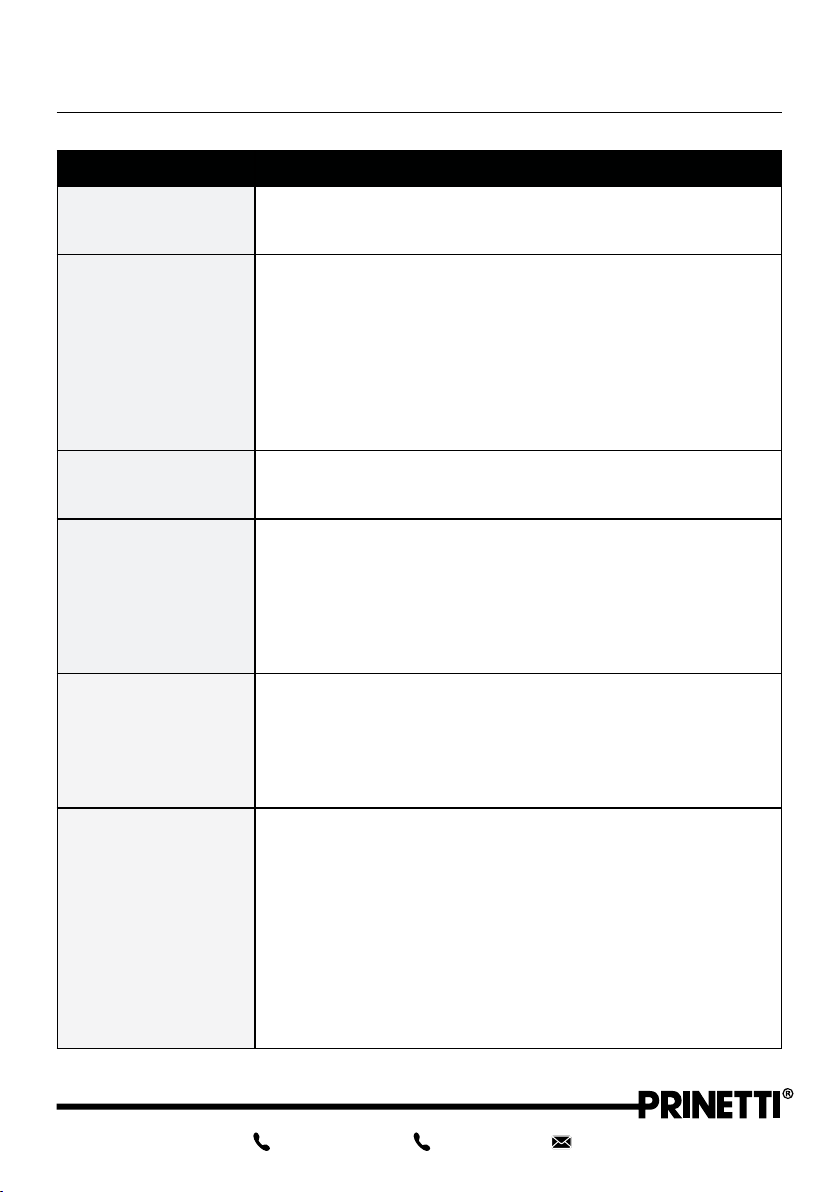
Problem Solution
Why won’t the Air
Fryer turn ON?
Check that the Air Fryer is correctly plugged in and
switched on at the power outlet.
Why isn’t the food
being cooked
thoroughly?
The food capacity has been exceeded, remove some food
and cook in another batch.This will cook the food more
evenly and thoroughly.
The temperature has been set too low, increase the heat.
The food has not had enough time to cook, increase the
cooking time.
Why has the food
cooked unevenly?
Certain foods may need to be shaken midway through the
cooking process.
Why won’t the pan
slide back into the
housing properly?
There is too much food in the pan, remove some food and
try again.
The pan has not been aligned correctly, align the pan with
the center groove located on the inside of the Air Fryer
housing.
Why is there white
smoke being
emitted during
cooking?
The food contained within may be too greasy. Greasy and
fatty foods will emit fat/oil into the pan of the Air Fryer and
when it is heated, may emit a white smoke.Try to avoid
cooking greasy/fatty foods in the Air Fryer.The white smoke
will not affect the cooking process.
Why aren’t the
chips crispy?
There may be a lack of oil and too much moisture. Ensure
you have dried the chips after rinsing. Possibly add more oil
to the chips before cooking.
The chip pieces may be too large, try cutting the potatoes
into smaller pieces for crispier results.
When making home made chips/fries, we recommend
you use starchy varieties (kennebec, king edward, golden
delight or sebago).
16 AFTER SALES SUPPORT AU 1300 777 137 NZ 0800 824 556 [email protected]
Recipes
Sweet Potato Fries
Ingredients
• 1000g sweet potatoes
• 1 tbsp olive oil
• Salt and garlic salt to taste
Method
1. Peel the sweet potatoes and slice them length ways into 15mm thick pieces.
2. Soak the sweet potatoes in water for approximately 20 minutes, then drain and pat
dry on a paper towel.
3. Mix the olive oil, salt and garlic salt in a bowl until evenly combined, then rub the
mixture over the sweet potato slices.
4. Place the sweet potato slices into the pan with frying base.
5. Press the menu function button until the Fries preset appears, then press the
power button to commence cooking.
6. For even cooking, remember to shake halfway through.
Note: These images are for illustrative purposes only and the nished product may dier from the illustration.

17
Recipes (cont.)
Potato Crisps
Ingredients
• 1000g potatoes
• 1 minced garlic clove
• 1 tbsp fresh thyme
• 1 tbsp olive oil
Method
1. Peel potatoes and cut then into 5mm thick slices.
2. Soak potato slices in water for approximately 20 minutes, then drain and pat dry on
a paper towel.
3. Mix the garlic, thyme and olive oil in a bowl until evenly combined, then rub the
mixture over the potato slices.
4. Place the potato slices into the pan with frying base..
5. Press the menu function button until the Fries preset appears, then press the
power button to commence cooking.
6. For even cooking, remember to shake halfway through.
Note: These images are for illustrative purposes only and the nished product may dier from the illustration.
18 AFTER SALES SUPPORT AU 1300 777 137 NZ 0800 824 556 [email protected]
Recipes (cont.)
Potato Wedges
Ingredients
• 1000g potatoes
• 1 tbsp olive oil
• Salt to taste
• 1 tbsp ground cumin
• 1 tbsp ground coriander
• 1 tbsp ground paprika
Method
1. Slice the potatoes into wedges.
2. Soak potato wedges in water for approximately 20 minutes, then drain and pat dry
on a paper towel.
3. Mix the olive oil, salt, cumin, coriander and paprika in a bowl until evenly
combined.Then rub the mixture over the potato wedges.
4. Place the potato wedges into the pan with frying base.
5. Press the menu function button until the Fries preset appears, then press the
power button to commence cooking.
6. Serve with sour cream and sweet chilli sauce (optional).
Note: These images are for illustrative purposes only and the nished product may dier from the illustration.
19
Recipes (cont.)
Spicy Fried Chicken Wings
Ingredients
• 1 minced garlic clove
• ½ tbsp mustard
• 1 tsp paprika
• 1 tbsp olive oil
• 1kg chicken mid wings and drumettes
Method
1. Mix the minced garlic, mustard and paprika in a bowl until evenly combined, then
add in the olive oil and stir.
2. Rub the mixture onto the chicken wings and allow it to marinate for at least 1 hour
prior to cooking.
3. Place the chicken wings into the pan with frying base.
4. Press the menu function button until the Chicken preset appears, then press the
power button to commence cooking.
5. Rotate the chicken wings during the cooking process. Cook until the skin is crispy
and golden brown.
Note: These images are for illustrative purposes only and the nished product may dier from the illustration.
20 AFTER SALES SUPPORT AU 1300 777 137 NZ 0800 824 556 [email protected]
Recipes (cont.)
Spicy Prawns
Ingredients
• 1 tsp olive oil
• 1 clove garlic, minced
• Red chillies, finely diced
• Spicy black pepper
• Paprika (optional)
• 10 medium sized prawns, whole
Method
1. Lightly coat the prawns with olive oil, then place them into the pan with frying base.
2. Press the menu function button until the Prawn preset appears, then press the
power button to commence cooking.
3. Combine the diced chillies, minced garlic, black pepper and paprika (optional),
black pepper, then mix in the olive oil.
4. Use the mixture as a dipping sauce for the prawns.
Note: These images are for illustrative purposes only and the nished product may dier from the illustration.
Table of contents


