BLAZANT FLARE T-26 User manual

26QT/25L
Fuel A New Life
User Manual
Digital Air Fryer Oven
T-26

“When it comes to even the smallest details
of the BLAZANT FLARE™, we went big.
Delivering cooking pleasure after each meal.”
- BLAZANT Team

CONTENTS
· 1 ·
READ ALL INSTRUCTIONS BEFORE USE
For your safety and continued enjoyment of this product, always read the
instruction manual before using.
Important Safety Instructions .............................................................................................
Overview .......................................................................................................................................
Control Details ............................................................................................................................
FLARE™ Lighting Language ...............................................................................................
Technical Parameter ...............................................................................................................
Operating The Air Fryer Oven .............................................................................................
Before First Use .........................................................................................................................
How to Cook with BLAZANT Air Fryer Oven .........................................................................
Using other functions ..............................................................................................................
Maintaining Your Air Fryer (Clean & Store) ............................................................................
Troubleshooting ........................................................................................................................
2
6
7
10
10
10
11
12
12
13
14

IMPORTANT SAFETY INSTRUCTIONS
Read and follow all instructions before using the air fryer oven to prevent the risk of fire,
electric shock, personal injury, or damage.
This guide does not cover all possible conditions that may occur. Always contact our
service team about problems that you do not understand.
WHAT YOU NEED TO KNOW ABOUT SAFETY INSTRUCTIONS
When using electrical appliances, basic safety precautions
should always be followed including the following:
Warnings and important safety instructions in this manual do not cover all possible
conditions and situations that may occur. It is your responsibility to use common sense,
caution, and care when installing, maintaining, and operating your oven.
· 2 ·
Do not touch hot metal
surfaces/ventilation openings. Use
handles to insert/extract the air fry
basket.
Do not use appliances outdoors or
for commercial purposes. For
household use only.
Key Safety Points

· 3 ·
Do not store any materials, other
than manufacturers' recommended
accessories, in this oven when not in
use.
IMPORTANT SAFETY INSTRUCTIONS
General Safety
Only use the appliance on a stable,
dry surface.
Do not clean the unit with metal
scouring pads.
Make sure the appliance is cleaned
thoroughly before using.
Oversized foods, metal foil packages
and utensils must not be inserted
into the Air Fryer as they may involve
a fire or electric shock risk.
This appliance is not intended for use by persons (including children) with
reduced physical, sensory, or mental capabilities, or lack of experience and
knowledge unless they are provided with supervision and instruction.
Close supervision is necessary
when any appliance is used by or
near children. Children should be
supervised to ensure that they do
not play with the.

· 4 ·
Remove all bags and packaging
from the appliance before use.
IMPORTANT SAFETY INSTRUCTIONS
Fire & Burn
Do not place the appliance on or
near a hot gas burner, hot electric
burner, or in a heated oven.
Extreme caution must be used when
moving an appliance containing hot
oil or other hot liquids.
Do not allow the appliance to be
covered by or touch flammable
materials such as curtains, draperies
or walls, when in operation.
Do not allow the appliance to be
covered by or touch flammable
materials such as curtains, draperies
or walls, when in operation.
Do not cover any part of the oven
with metal foil. This will cause
overheating of the oven.
Allow cooling before putting on or
taking off parts.
Do not store/cover any items on top
of the appliance when in operation.
Use recommended temperature
settings for all cooking modes.
Do not let the cord touch hot
surfaces or hang over the edges of
tables or counters.

· 5 ·
To protect against electrical shock do
not immerse cords or plugs or
appliance in water or other liquid.
IMPORTANT SAFETY INSTRUCTIONS
Plug & Cord
A short power supply cord is to be
provided to reduce the risk resulting
from becoming entangled in or
tripping over a longer cord.
Do not operate this appliance with a
damaged cord, or damaged plug,
after the appliance malfunctions, is
dropped, or is damaged in any
manner.
Do not attempt to dislodge food
when the appliance is plugged into
an electrical outlet.
Turn the appliance OFF, then unplug from the outlet when not in use, before
assembling or disassembling parts and before cleaning. To unplug, grasp the
plug and pull from the outlet. Never pull from the power cord.
This appliance has a polarized plug (one blade is wider than the other). To reduce
the risk of electric shock, this plug will fit in a polarized outlet only one way. If the
plug does not completely fit in the outlet, reverse the plug. If it still does not fit,
contact a qualified electrician. Do not attempt to modify the plug in any way.
An extension cord may be used if care is exercised in its use. If an extension cord
is used, the marked electrical rating of the extension cord should be at least as
great as the electrical rating of the appliance. The extension cord should be
arranged so that it will not drape over the countertop or tabletop where it can be
pulled on by children or tripped over unintentionally. If the appliance is of the
grounded type, the cord set or extension cord should be a grounding-type
3-wire cord.

INTRODUCING YOUR NEW AIR FRYER OVEN
Overview
E
F
G
H
I
· 6 ·
Control Panel
Oven Door
Cool-Touch Handle
Heat Sink Hole
Removable Screws
Heating Elements(×4)
Heating Elements(×2)
Cooking Chamber Rack/Pan Positions(×3)
E F
G H I
Cooking Pan
/Drip Tray
Air Fry Basket Crumb Tray Wire Rack Rotisserie Lift
Control Details
· 7 ·
Air Fry
Pizza Air Broil
Bake Toast
Defrost Ferment
Bagel +
-
Time
Temp
Preheat Light
Shake
Remind
°F
Dehydrate
Setting Preheat Shake Cooking Keep Warm
Oven Light
Turn the oven light
on and off any time.
Preheat Remind Button
Let you decide whether you
want to preheat the unit.
Cooking Programs
Automatically suggest time
and temperature (presets).
Shake Button
Push to remind you to shake food
to reach a better cooking result.
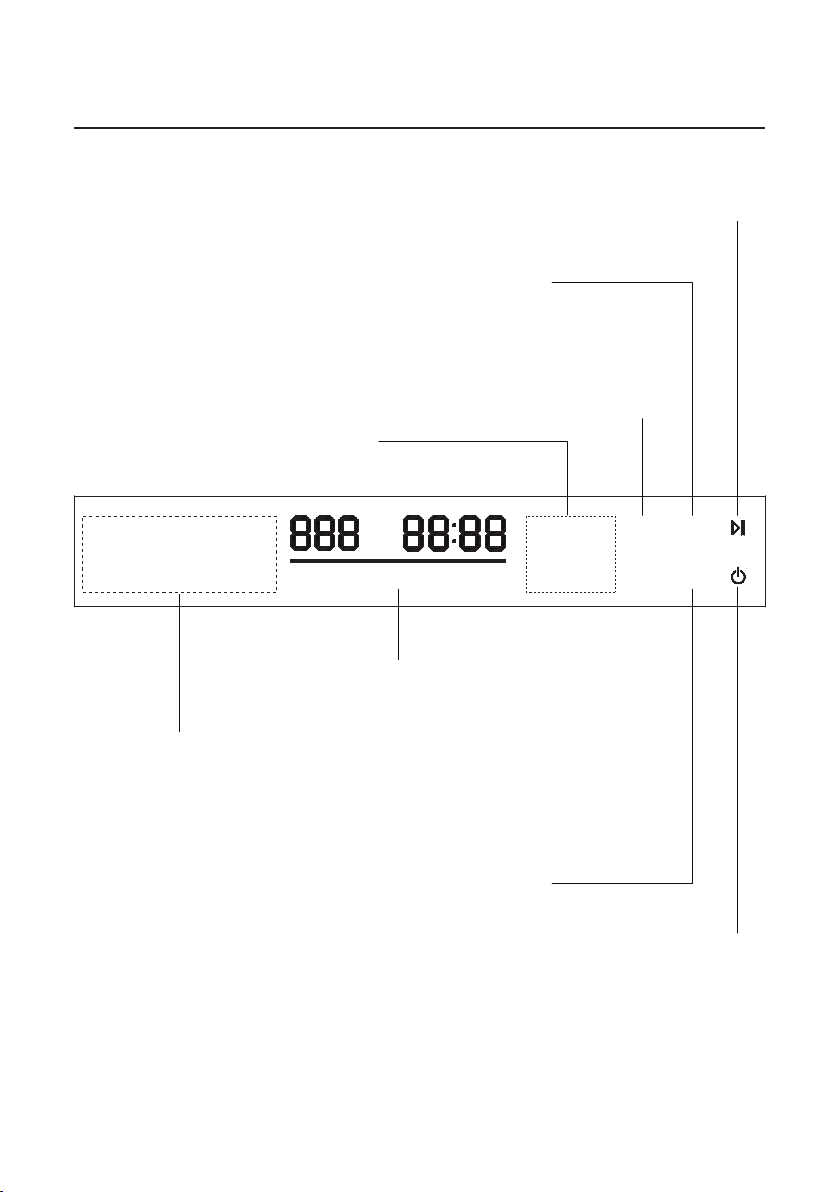
Status Bar
Shows the cooking status in
different programs and modes.
Time/Temperature Control Buttons
Push to increase/decrease time/
temperature.
Start/Pause Button
Push to start/pause a selected
cooking program.
Power/Cancel Button
Push to turn on/off the oven
or cancel the current setting
or ongoing cooking program.

Preheat Remind Button & Indicator
Preheat allows your food to cook evenly at the correct temperature.
1.Press to add or remove a Preheat Reminder before or after starting a cooking cycle.
Note: Preheat Remind only appears when “Air Fry” "Bake" "Air Broil" “Bagel” or“Pizza”
are selected. Note: Preheat Remind only appears when the cavity temperature is lower
than the temperature on the display.
2.The unit will preheat until reaching the set temperature (temperature on the display).
The timer doesn't count during preheating.
3.When preheat is done, the unit will BEEP, and Preheat Remind button will BLINK.
If no action is taken, the appliance will automatically enter the cooking cycle after 5
minutes. The timer starts counting down from the time you set. You can also enter the
cooking cycle directly by pressing the start/pause button.
The appliance will automatically enter the cooking cycle after opening/closing the oven
door. The timer starts counting down from the time you set.
Shake Button & Indicator
Shaking the food helps ensure the air is able to reach all food surfaces.
1.Press to add or remove a Shake Reminder before starting a cooking cycle.
Note: The “Shake” function doesn't available when the "Toast" function is selected.
2.The unit prompts Shake based on your temperature and time setting. The unit will
BEEP, and the Shake button will BLINK for 30 seconds. If you don't do anything within
these 30secs, the unit jumps into the remaining cooking cycle automatically.
· 8 ·

Preheat allows your food to cook evenly at the correct temperature.
1.Press to add or remove a Preheat Reminder before or after starting a cooking cycle.
Note: Preheat Remind only appears when “Air Fry” "Bake" "Air Broil" “Bagel” or“Pizza”
are selected. Note: Preheat Remind only appears when the cavity temperature is lower
than the temperature on the display.
2.The unit will preheat until reaching the set temperature (temperature on the display).
The timer doesn't count during preheating.
3.When preheat is done, the unit will BEEP, and Preheat Remind button will BLINK.
If no action is taken, the appliance will automatically enter the cooking cycle after 5
minutes. The timer starts counting down from the time you set. You can also enter the
cooking cycle directly by pressing the start/pause button.
The appliance will automatically enter the cooking cycle after opening/closing the oven
door. The timer starts counting down from the time you set.
Function Preset Buttons
· 9 ·
Press to select the corresponding cooking function.
FUNCTION Default Time Default Temp
Air Fry (Default)
Air Broil 8 min
25 min 400°F
450°F
Pizza 15 min 450°F
Bagel 15 min 400°F
Defrost 15 min 120°F
Bake 30 min 350°F
Ferment 2H 104°F
Dehydrate 8H 165°F
Toast Shades Level 1-6

Technical Parameter
Light speaks to you
The uniquely-styled lighting language is easily distinguishable. Integrated with LED
through lights, the Air Fryer Oven translates functions such as cook, pause, keep warm,
and preheat/shake reminder into glowing red lighting signals, creating a language that's
exclusive to you.
FLARE™ Lighting Language
· 10 ·
Product Name: Air Fryer Oven
Product Model: T-26
Cooking Capacity: 26 Quarts
Rated Voltage: 120Volts
Rated Frequency: 60Hz
Rated Power: 1600Watts

Before First Use
For best results, follow these steps before using your Air Fryer Oven for the first
time.
1.Read and remove all packing materials and stickers from the inside and outside of the
Air Fryer Oven except for the rating label on the bottom, which should remain on the
unit. Be sure that all accessories are accounted for before throwing away any packag-
ing.
2.Gently wipe the exterior of the oven with a clean, damp cloth and dry thoroughly. Wipe
the interior with mild liquid soap and a damp cloth or sponge.
NOTE: Do not use abrasive cleaners, like steel wool pads, as they may damage the
coating.
3.Hand wash the removable crumb tray and dry thoroughly; the crumb tray is not
dishwasher safe.
4.Hand wash and dry the broil/bake pan, wire rack, basket, and dehydrating racks. The
basket and all racks are top-rack dishwasher safe; the broil pan is not.
5.Place the Air Fryer Oven on a flat, heat-resistant surface positioned at least 2 inches
away from the wall or any other objects.
6.Ensure that the crumb tray is inserted into the bottom of the oven below the door. Do
not operate the unit without a crumb tray in place.
How to Cook with BLAZANT Air Fryer Oven
1.Ensure the crumb tray is inserted on the floor of the cooking chamber and plug-in unit.
2.Place the food on the Air Fry Basket/Cooking Pan/Wire Rack and place it on the corre-
sponding rack position. If cooking with Air Fry Basket or Wire Rack, remember to place
the broil pan in the bottom position in the oven to increase air circulation for better
crispness and also as a drip tray.
3.Slide the pan/basket/rack into the oven.
· 11 ·
FIGUREL ROASTING CHART

4.Press the function button on the control panel. The button will blink.
5.Press the Temp/Time button and set the desired time and temperature by pressing the
w+'r and u-" buttons.
6.Press the Start/Pause button to begin cooking.
Note:For the TOAST function - Press the and buttons to set your shade, 1 being the
lightest and 6 being the darkest. [The shade choice will display in the Temp/Time
display)
7.To pause cooking, press the Start/Pause button once more or open the oven door. The
timer and heat will pause. (The oven may still be hot, however.) To stop the cooking
process completely, press the Power/Cancel button.
8.Cook until the timer ends. The appliance will beep, the word "End" will appear on the
display and the oven will enter the automatic keep-warm function.
Note: Only when "Air fry" "Bake" "Bagel" or "Pizza" is selected, does "Air Broil" will have
the automatic keep-warm function.
9.Carefully remove food from the oven.
10.Enjoy your meal!
Using Other Functions And Cooking Tips
If the buzzer sound bothers you when pressing any button on the control panel, you can
choose to MUTE/UNMUTE it.
Disable Button Beeping
Locate and push the “+” and “-” buttons on the control panel simultaneously and hold
them down for 5 seconds. After a long beeping sound, the buzzer will be disabled.
Enable Button Beeping.
Locate and push the “+” and “-” buttons on the control panel simultaneously and hold
them down for 5 seconds. After a long beeping sound, the buzzer will be Open.
· 12 ·

· 13 ·
MAINTAINING YOUR AIR FRYER CLEAN & STORE
1.Remove the plug from the wall socket and let the appliance cool down completely
before cleaning. Open the oven door to allow the oven to cool down quicker.
2.Thoroughly clean the appliance after every use.
3.Do not clean the Crisp Tray, Air Fry Basket, or the inside of the appliance with metal
kitchen utensils or abrasive cleaning materials, as they may damage the coating.
4.Hand wash the bake/broil pan, wire rack, basket, and dehydrating racks and dry
thoroughly. The racks and basket are also top-rack dishwasher safe.
5.Wipe the outside of the appliance with a moist, soft cloth.
6.Slide out the crumb tray and toss out crumbs. Wipe clean. Remove any baked-on
grease by soaking the tray in hot, sudsy water. Use non-abrasive cleaners like a sponge,
cloth, or brush. The crumb tray is not dishwasher safe.
7.Clean the heating element with a soft cleaning brush to remove any food residue.
8.Make sure the appliance has cooled down completely before cleaning the heating
element.
9.Make sure that the appliance is unplugged and that all parts are clean and dry before
storing.

· 14 ·
TROUBLESHOOTING
PROBLEM SOLUTION
The Air Fryer Oven does not turn on.
White smoke is coming out of the
appliance.
Fresh fries are not crispy when they
come out of the Air Fryer Oven.
Condensation is forming on the
countertop.
Food is fried unevenly in the Air Fryer
Oven.
Food is not crispy when they come
out of the Air Fryer Oven.
Food is not done after the recommended
time.
Plug the Air Fryer Oven into a grounded
wall socket.
Do not overfill the Air Fry Basket
Make sure you dry the potato sticks
properly before you add the oil.
Cut the potato sticks smaller for a crispier
result.
Add slightly more oil for a crispier result.
Adjust the temperature up a little bit or
add 2-3 minutes of cooking time.
White smoke is caused by grease heating
in the air fry basket. Make sure it is
cleaned properly after each use.
Ensure the Air Fryer Oven has at least 5
inches of space around all sides while in
use.
When you fry greasy items in the Air Fryer
Oven, a large amount of fat will drop down
to the drip pan. The fat produces white
smoke and the drip pan might be hotter
than usual. This does not affect the
appliance or the cooking result.
Add less food and cook in batches if
necessary. Your food will also cook more
evenly.
Press the Shake button to let the Air Fryer
Oven prompt you to shake your food at
the proper time.
Make sure to properly dry the food or
lightly brush^pray some oil onto the food
surface for a crispier result.

Table of contents
Other BLAZANT Fryer manuals


