Pro Dunk Hoops Goal Light LED User manual

1
Pro Dunk® Goal Light
Lighting System
Thank you for purchasing our Goal Light. We try hard to ensure that our products
are of high quality and free of manufacturing defects and of missing parts. How-
ever, if you have any problems with your Goal Light, such as a manufacturing
defect or a missing part please contact us at the following:
Toll Free: 1.888.600.8545 Pro Dunk® Hoops
Web: www.produnkhoops.com 22047 Lutheran Church Rd.
FAX: (281) 357-4822 Tomball, TX 77377
Support: www.produnkhoops.com/support
Read this manual all the way through before starting
assembly of your Goal Light. Then read each step
completely before beginning installation.
OWNER’S MANUAL

2
Ref. Qty. Description
A 1 3 Piece Pole System (with pre-assembled power cable)
B 1 Main Pole System Support Arm
C 1 Light Assembly (pre-assembled)
D 2 Halogen Light Bulbs
E 2 Wire Light Guards
F 1 Main Pole Mount Bracket
G 4 10mm x 3cm Hex Bolts
H 1 10mm x 7cm Hex Bolt
I 6 10mm x 2.5cm Hex Bolt
J 8 10mm Flat Washer
K 7 10mm Lock Washer
L 1 10mm Hex Nut
Bill Of Materials
3
Safety Instructions
All tools used to assemble this product
should be used in compliance with manu-
facturer’s guidelines.
Installation of this product will require
heavy lifting and bending. Any person that
is not capable of such activity should not
participate in the installation of this product.
If using a ladder during assemble, use ex-
treme caution and refer to the warnings
and cautions on the ladder.
Due to the size and weight of this product,
we recommend at least (4) capable adults
are present.
Make sure there are no overhead power
lines within a 35 foot radius of the basket-
ball system.
All parts and components necessary to
complete proper installation are included
within this product. Do not use parts not
included with our system. Failure to follow
this requirement could cause product mal-
function and will void warranty of this prod-
uct.
Keep all organic materials away from parts
and components to avoid corrosion.
Never use your Goal Light during rain or
snow
Make sure your lamps are completely dry
before plugging in your Goal Light.
Only use a power source that is 110-120v
that can supply 1,500 WATTS of continu-
ous power.
IMPORTANT
It is the responsibility of purchaser to ensure that
all installers and players fully comply with the de-
tailed instructions set forth in this product installa-
tion manual. Product assembly should be carried
out exactly as instructed and owner supervision
of use and installation is required to prevent risk
of product malfunction or risk injury.
Pro Dunk® Hoops retains the right to
modify this document at any time without
notice or obligation.
Keep this installation manual as a refer-
ence for your safety and the safety of
those playing on the basketball system.
Additional copies of these safety instruc-
tions are available by calling customer
service at 1-888.600.8545 or at
www.produnkhoops.com/support
Check the Goal Light System on a regular ba-
sis to ensure that there are no signs of dete-
rioration or corrosion, loose hardware, or
damaged parts. If you see any signs of dam-
age contact Pro Dunk® Hoops for replace-
ment parts or assistance.
For maintenance repairs please contact a pro-
fessional. produnkhoops.com/installers
Failure to follow these safety instructions
could result in product malfunction, seri-
ous injury, or even death.

4
Installation Overview
In order to have safe fun and a long use of your Goal Light, please note and
heed the following:
1) Prior to Goal Light assembly, check for power lines within 35 feet
of your basketball system. If power lines are within 35 feet of
your basketball system do not install the Goal Light System.
2) Immediately unpack all components and cross check against bill
of materials. Report any shortages to Pro Dunk® Hoops cus-
tomer service at 1.888.600.8545.
3) You must have a Pro Dunk® basketball system with the new 4
threaded mounting holes on the top of the main pole. You may
have to remove 4 plugs to expose these threaded holes.
4) For safety measures, have at least 4 capable persons to assist
you in assembly of your Pro Dunk® Goal Light.
5) Parts can be ordered at www.produnkhoops.com/parts

5
Required Tools
(2) Crescent Wrenches
(3-4) 8ft ladders
(1) Phillips Screw Driver 17mm
Bolt/Nut Sizes
Socket/Wrench Sizes Recommended

6
Assembly
1) Bulb Assembly
WARNING—Be very carful not to touch the Halogen Light Bulbs (D) with your hands.
Using a phillips screwdriver, remove the screw on the top of the front face of the Light Assem-
bly (C). Then remove the glass cover and insert the Halogen Light Bulb (D) into to Light As-
sembly (C). Repeat this for the second Light Assembly (C). Be very carful not to touch the
Halogen Light Bulbs (D) with your hands. Use a clean rag or paper towel to handle the Halo-
gen Light Bulbs (D).

7
2) Assemble Wire Light Guards
Using a small Philips screwdriver remove the screw located on the front face of the Light As-
sembly (C). Be careful to not lose the small screws.
Place the Wire Light Guard (E) where all 4 tabs are installed between the lamp frame and
glass. Line the metal tab up with the Light Assembly (C) screw hole. Then screw the light
housing screw back into the Light Assembly (C) locking the Wire Light Guard (E) in place.
Repeat this step for the second light housing (C).
8
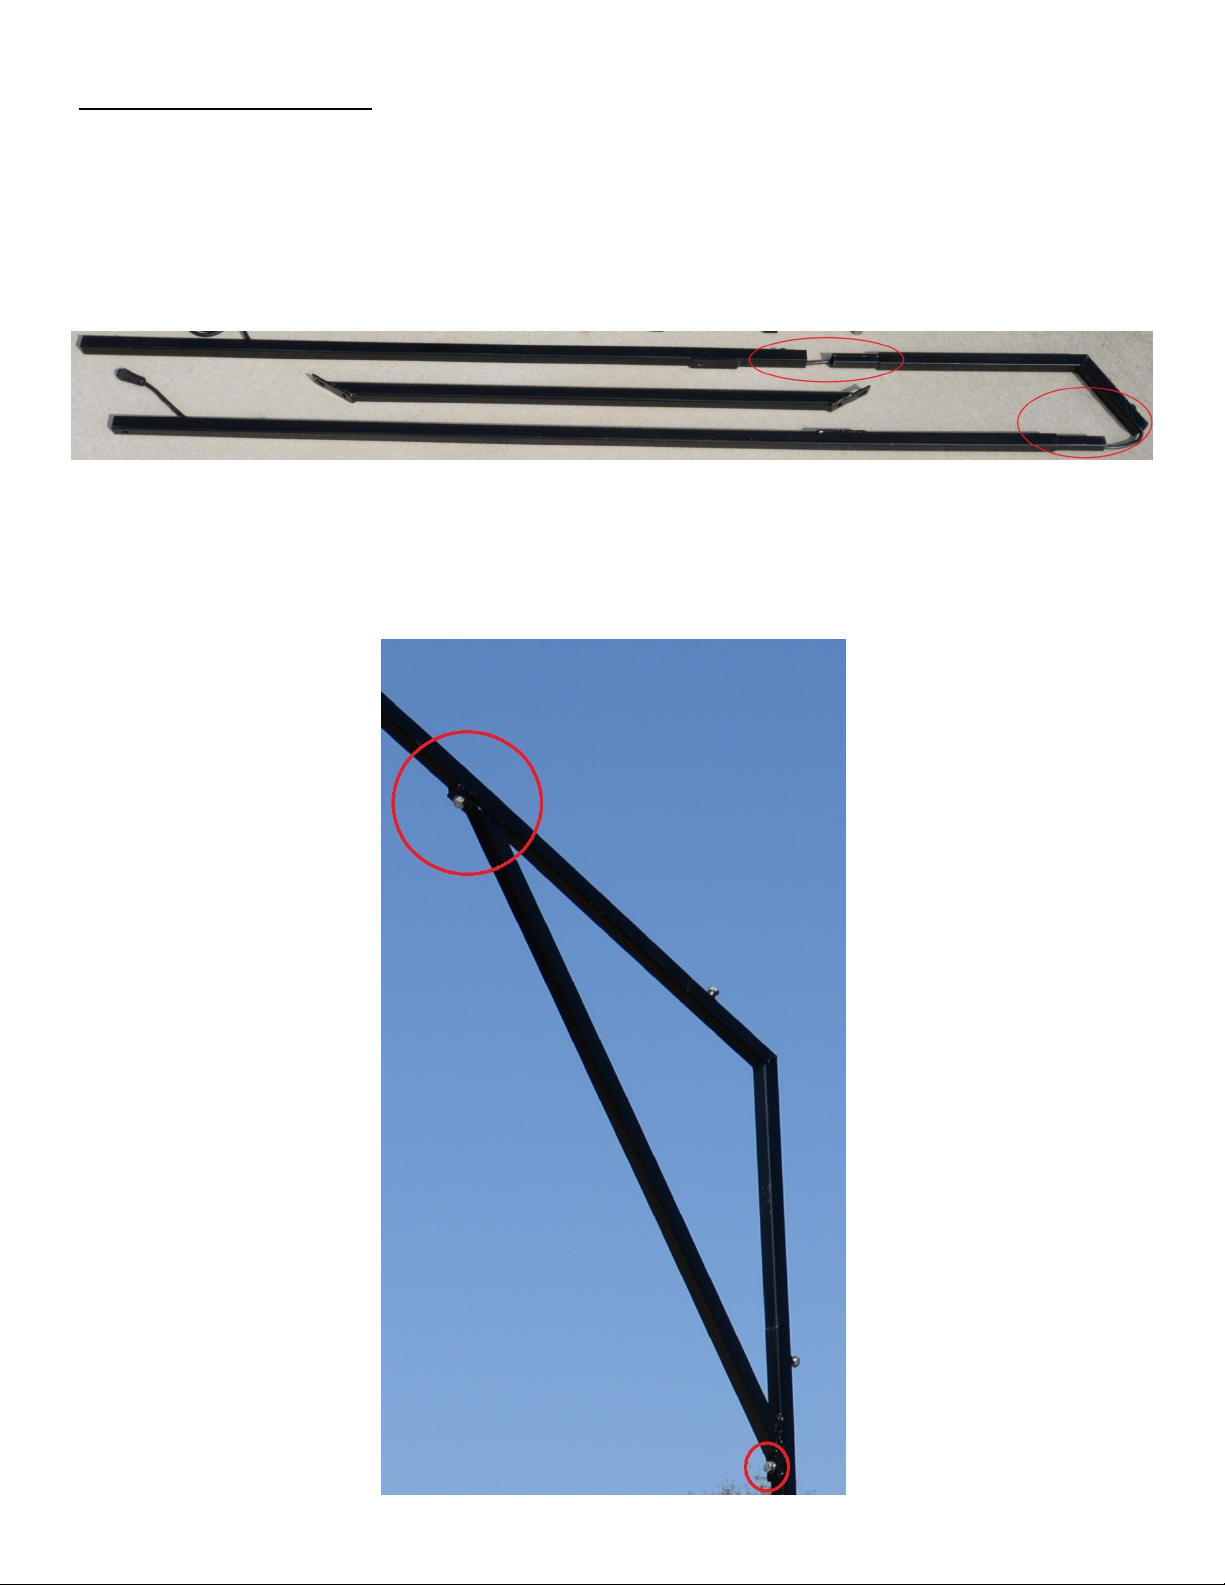
3) Assemble Pole System
Find a large area to assemble the 3 Piece Pole System (A) and Main Pole System Support Arm
(B). Slide the 3 Piece Pole System (A) together and locate the 2 threaded holes that are used to
secure the 3 Piece Pole System (A) together. Using 2 10mm x 3cm Hex Bolts (G) secure the 3
Piece Pole System (A) together.
Locate the 2 threaded holes that are used to secure the Main Pole System Support Arm (B) to
the 3 Piece Pole System (A). Using 2 10mm x 2.5cm Hex Bolts (G), 2 10mm Flat Washers (J),
and 2 10mm Lock Washers (K) to secure the Main Pole System Support Arm (B) to the 3 Piece
Pole System (A).

9
4) Plug Lamp Assembly into Pole Assembly
Connect the waterproof connector on the Lamp Assembly (C) to the waterproof connector on
the 3 Piece Pole System (A). Line up connectors and push firmly together to create a good
connection. Twist the screw connector to create a water resistant seal.

10
5) Check Lights
WARNING—Be very carful not to touch the Halogen Light Bulbs (D) with your hands.
Double check to make sure your Light Assembly (C) is working properly. Using an outdoor
rated extension cord plug your Goal Light into a power source. Ensure that the Light Assem-
bly (C) lights up. If they do not, unplug Goal Light from power and allow the lamps to cool
and adjust the light bulb inside as it might not have a good connection. Repeat step 5 until
both Halogen Light Bulbs (D) light up.
6) Attach Main Pole Mount Bracket (F) to Pro Dunk® Main Pole
Using 4 Hex Bolt 10mm x 2.5cm (I), 4 10mm Lock Washers (K), and 4 10mm Flat Washers
(J) to attach the Main Pole Mount Bracket (F) to your Pro Dunk® Main Pole.

11
7) Slide Assembled Goal Light Pole into Main Pole Mount Bracket (F)
With 3-4 people and 3-4 ladders slide the Goal Light Pole into the Main Pole Mount Bracket
(F) that is attached to the Pro Dunk® Main Pole.
Level the Goal Light Pole from side to side and then secure the Pole Mount Bracket with 2
10mm x 3cm Hex Bolts (G).

12
8) Tighten All Bolts
Once everything is lined up and assembled tighten all bolts and nuts on the Goal Light.
9) Plug Goal Light Into Power
Using an outdoor rated extension cord plug your Goal Light into a power source. To avoid in-
jury, when not using your Goal Light, unplug from any type of power source. Do not use your
Goal Light during or right after any type of precipitation.

13
16) Maintenance
Like any piece of hardware, proper maintenance is required. Several factors such as
the environment, organic materials, herbicides, pesticides, excessive use or misuse
can eventually cause the Goal Light to require maintenance. Failure to do so could
result in system failure, property damage, or even personal injury.
1) All organic materials should be kept away from the Goal Light system at all times.
This will alleviate any chance of rust penetrating the powder coated finish and
causing structural damage.
Examples: grass clippings, moisture, garbage, dirt, etc.
2) If you see any signs of rust on the Goal Light system remove the loose paint, sand
the area with a medium grit sandpaper and apply outdoor enamel to the affected area.
Suggested Touchup Paint: Rustoleum Semi-Gloss Black Enamel
3) If a light bulb goes out please disassemble the Goal Light to replace the light bulb
and reassemble the Goal Light. You can purchase replacement blubs at your local
hardware store. Pro Dunk® Hoops does not carry replacement bulbs.
Replacement Bulb—T3 Double Ended 4.7in. 500 Watt Halogen
4) Never leave the Goal Light plugged in when not in use. This could result in
damage to the Light and can be a fire hazard. When the Goal Light is no longer in
use unplug the light and store your extension cord inside.
5) Never use your Goal Light during or after precipitation.
6) Cause of early light bulb burn out—1.Overloaded breaker 2.Touched light bulb
3.Inadequate extension cable 4.Non GFCI circuit 5.Lightning strike 6.Defective bulb
7.Power surge or brown out 8.Extension cable length is too long
To resolve these #6 please consult your local licensed electrician.
17) Routine System Inspection
Before each use inspect the entire system for any signs of loose nuts and bolts, any
excessive wear and tear, any signs of rust or corrosion.
If replacement parts are needed you can contact Pro Dunk® Hoops directly or navi-
gate to www.produnkhoops.com/parts to purchase parts for your Goal Light. Only
parts provided by Pro Dunk® Hoops should be used for repair. Not doing so could
cause the system to fail resulting in injury or death and voids the limited warranty.
04-27-16
14
Hoops Inc. Goal Light Limited 90 Day Warranty
Hoops Goal Light basketball light systems are warranted to the original purchaser to be free from defects in material
or workmanship for 90 days of ownership by the original retail purchaser. The word “defects” is defined as imperfec-
tions that impair the use of the product.
Warranty Fulfillment
Merchandise must be shipped prepaid with a copy of proof of purchase to Hoops Inc. for examination to see whether it
needs to be repaired or replaced. Any labor costs, travel expenses and any other changes involved in the removal,
installation or replacement of the defective/repaired parts from/to your Hoops Goal Light system will be your (the pur-
chaser's) responsibility. Shipping charges for replaced or warranted merchandise being sent back to the customer
must be prepaid by the customer in advance. If not, the replacement shipment will be sent out collect. Hoops Inc. re-
serves the right to examine photographs or physical evidence of merchandise claimed to be defective, and to recover
said merchandise, prior to authorization of warranty claims.
What is not covered by this warranty
This warranty does not cover defects or damage due to improper installation, shipping, handling, alteration, accidents,
vandalism, weather conditions (rusting), exposure to corrosives, negligence, misuse (anything other than a type of
basketball activity or related contact with the unit), scratching, scuffing or any event beyond the control of the Hoops
Inc.. If unit is not maintained as stated in the user manual the warranty will be void.
Liability
Hoops Inc. shall not be liable for indirect, special, or consequential damages arising out of or in connection with the
use or performance of the products or other damages with respect to any economical loss, loss of property, loss of
enjoyment of use, costs of removal, installation or other consequential damages for breach of any expressed or im-
plied warranty on these products.
Guidelines
Keep your proof of purchase (original retail purchaser). Without it, we will not be able to proceed with any warranty
service.
Call
1-888-600-8545 / Warranty Dept.
Write
Hoops Inc.
Attn: Warranty Dept
22047 Lutheran Church Rd.
Tomball TX 77377
Email
support@hoopsincorporated.com
For the most up to date warranty information please navigate to www.produnkhoops.com.
Other manuals for Goal Light LED
1
Table of contents
Popular Landscape Lighting manuals by other brands


LIGMAN
LIGMAN MALTA 1 installation manual

Saxby Lighting
Saxby Lighting Islay 68784 Instruction leaflet

LIGMAN
LIGMAN EU-10016-3 installation manual

LIGMAN
LIGMAN KI-60475 installation manual

Cooper Lighting
Cooper Lighting McGraw-Edison ZD Credenza specification

Cooper Lighting
Cooper Lighting Generation CLB25MWW5C373 Specification sheet

Malibu Boats
Malibu Boats CM110P instructions

AMP Lighting
AMP Lighting OrchardPro APL-3018-B-BZ Installation & maintenance guide

Cooper Lighting
Cooper Lighting Invue 42 - 175W Specification sheet

ABBA
ABBA SPB12 installation guide

Techmar
Techmar Garden Lights GILVUS + manual

LIGMAN
LIGMAN RADO 1 installation manual