Pro-Star 816 User manual

816 AND 800 KEYSET
USER GUIDE
PROSTAR 816 PLUS
September 1996
TABLE OF CONTENTS
GENERAL INFORMATION
About This Book ....................................................................................... 1
Keyset Diagrams ................................................................................... 2–3
Things You Should Know ...................................................................... 4–5
OUTSIDE CALLS
Making a Call ............................................................................................ 6
Answering a Call ....................................................................................... 6
Recall/Flash .............................................................................................. 6
Busy Line Queuing with Callback ............................................................. 7
Station Toll Override .................................................................................. 7
INTERCOM CALLING
Calling Other Stations ............................................................................... 8
Answering Calls from Another Station ...................................................... 8
Auto Answer/Voice Announce Mode ........................................................ 8
Busy Station Callback ............................................................................... 9
Calling the Attendant ................................................................................ 9
Direct Retry ............................................................................................... 9
CALL PROCESSING
Holding Calls .................................................................................... 10–11
Transferring Calls .............................................................................. 11–12
Camp-On ................................................................................................ 12
Conference Calls .............................................................................. 12–13
Forwarding Calls ............................................................................... 13–14
Forward to Voice Mail ............................................................................. 14
Call Pickup .............................................................................................. 14
DIALING FEATURES
System Speed Dialing ............................................................................ 15
Personal Speed Dialing .................................................................... 15–16
Last Number Redial ................................................................................ 16
Save Number with Redial ....................................................................... 16
Chain Dialing........................................................................................... 16
Automatic Redial of a Busy Number ....................................................... 17
Pulse to Tone Changeover ...................................................................... 17

PAGING AND MESSAGING
Making an Internal Page ......................................................................... 18
Making an External Page ........................................................................ 18
All Page ................................................................................................... 18
Meet Me Answer ..................................................................................... 18
Transfer with Page Announcement ................................................... 18–19
Message Setting and Canceling ............................................................. 19
Returning Messages ............................................................................... 19
Programmed Messages.......................................................................... 20
CONVENIENCE FEATURES
Do Not Disturb ........................................................................................ 21
Mute ........................................................................................................ 21
Background Music .................................................................................. 21
Appointment Reminder/Alarm Clock ...................................................... 21
Door Phone ............................................................................................. 22
Executive Barge-in .................................................................................. 22
Boss/Secretary Hot Line ......................................................................... 22
Call Offer with Alert ................................................................................. 23
Group Listening ...................................................................................... 23
Account Codes ....................................................................................... 23
Ringing Line Preference.......................................................................... 24
Headset Operation .................................................................................. 24
Prime Line Selection ............................................................................... 24
DISPLAY FEATURES
Date and Time......................................................................................... 25
Timer Function ........................................................................................ 25
Automatic Timing of Calls ....................................................................... 25
Display Number Dialed ........................................................................... 25
Station Directory Name ........................................................................... 26

ABOUT THIS BOOK
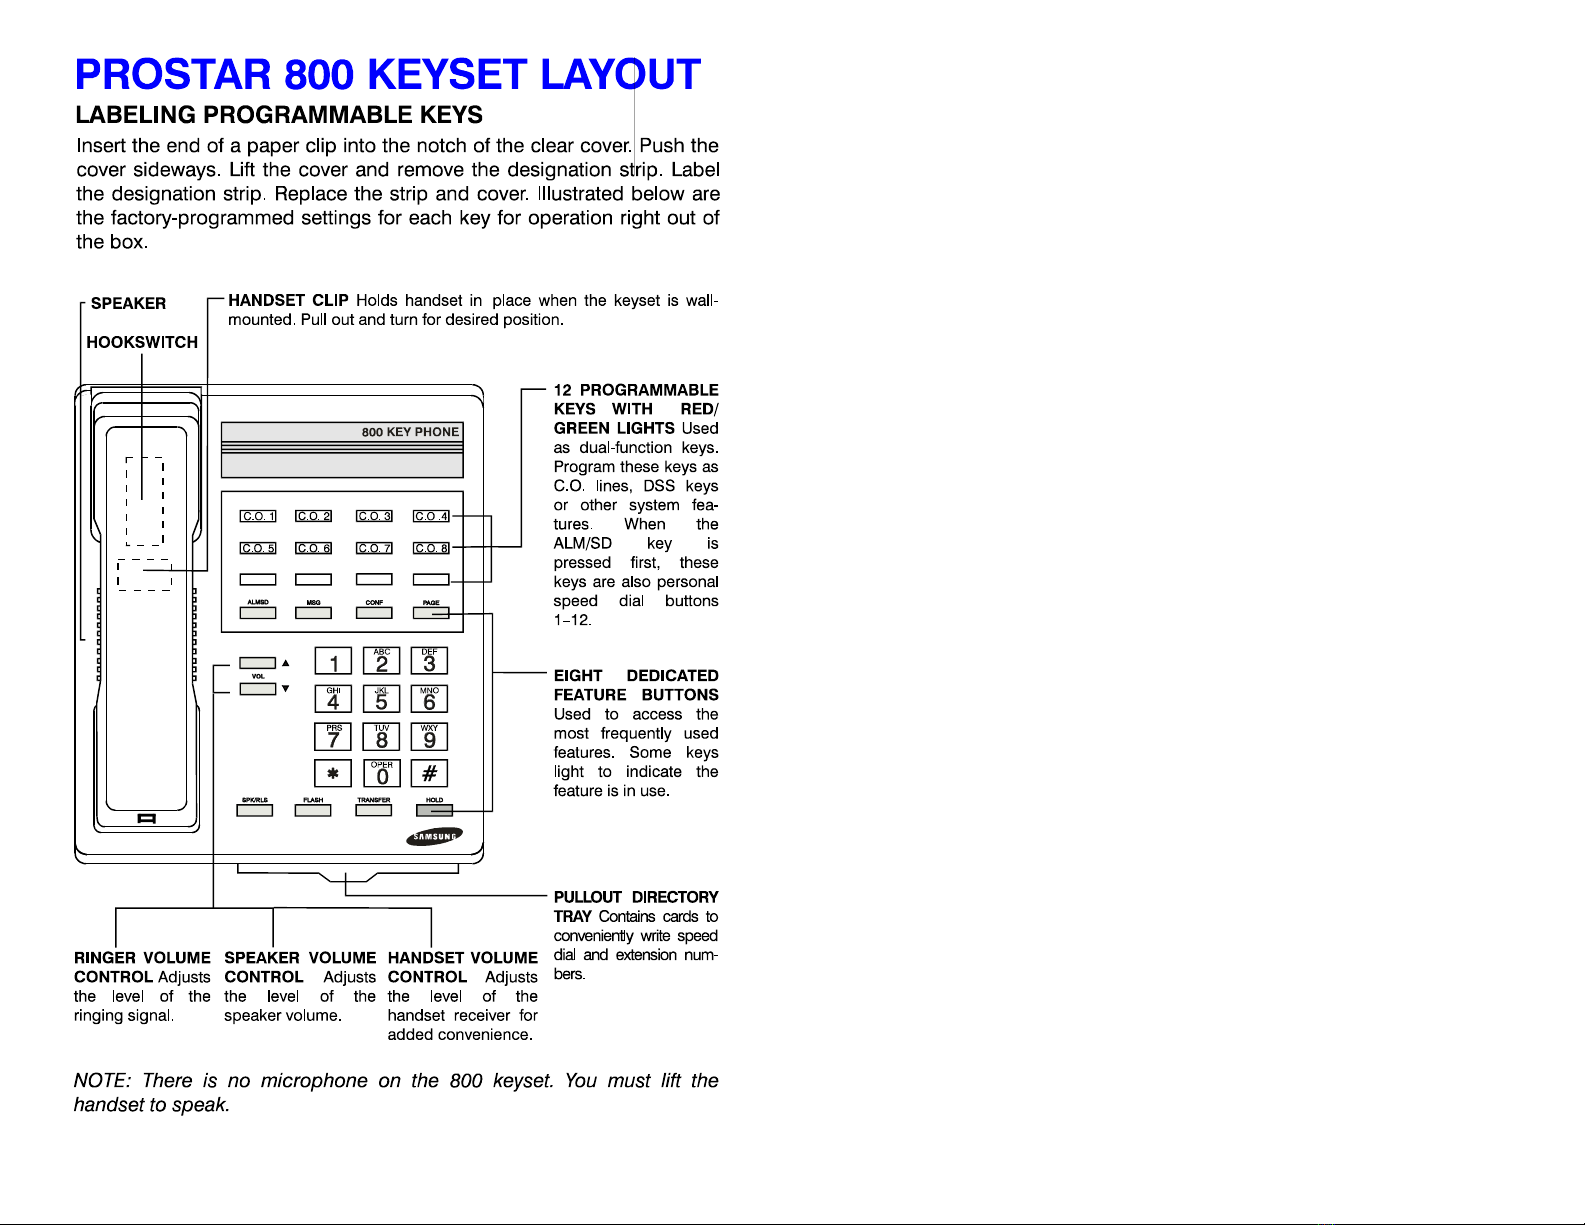
Your keyset is the most visible part of the PROSTAR 816 PLUS computerized
telephone system. No matter what model keyset you are using, with or with-
out a display, telephone calls are handled the same way. The larger 816
keyset has a few additional conveniences that are not available to 800 keyset
users. These are noted throughout this guide.
Please take the time to study this guide and become familiar with the opera-
tion of your keyset. Keep it handy. You may need to look up instructions for
infrequently used features.
Learning to use your keyset correctly will make everyday telephone commu-
nications a breeze.
1 2
3
THINGS YOU SHOULD KNOW
USER ORIENTATION
PROSTAR telephones are called “keysets.” They contain buttons or “keys”
used to access or activate the many features of your office telephone sys-
tem. The 816 keyset has enough buttons to accommodate many of the fea-
tures of the system. However, the basic 800 keyset has fewer buttons and in
some instances, may not have keys to represent every station in the system.
In these cases, a directory number 21–36 is dialed. Instructions are given
throughout this guide when applicable.
Lines from the telephone company are “C.O. lines.” Calls on these lines are
referred to as “outside calls.”
Direct Station Selection (DSS) buttons are programmed to ring specific sta-
tions. You can press a DSS button instead of dialing the extension number. A
DSS button will light steady red when that station is busy (Busy Lamp Indica-
tion). It will flash red when the station is ringing.
SPEAKERPHONE OPERATION
816 keysets come with a built-in speakerphone. Pressing the SPK key will
answer or release a call on the speakerphone. Switching from the handset
to the speakerphone is easy. Press the SPK key (it will light red) and then
hang up the handset. To return to the handset, simply lift it up and the speaker
will be automatically turned off.
800 keyset users do not have a microphone so handsfree calling is not pos-
sible. You may originate a call with the handset in the cradle. When the called
party answers, you will need to lift it to speak with the distant party.
NOTE: With special programming, your 816 keyset may be prohibited from
using the speakerphone feature. Check this before you report a problem
with your speakerphone.
CALL INDICATIONS
PROSTAR provides distinctive ring patterns to your keyset.
zOutside calls have a single ring tone repeated.
zIntercom calls have a double ring tone repeated.
zDoor phone calls and alarm/appointment reminders have a short ring
tone repeated very quickly.
Some of the buttons on your keyset have light emitting diodes (LEDs). Some
4
of these are dual LEDs that light green, red or amber (red and green to-
gether). Some keys only light red.
Outside calls appear on individual line keys and have different indications to
assist you. Here are some simple rules to remember about line keys:
zGreen LEDs indicate lines in use at your keyset.
zRed LEDs indicate lines in use at other keysets.
zFast flashing green LEDs indicate new incoming calls.
zSlow flashing green LEDs indicate calls on hold at your keyset.
zFlashing red LEDs indicate calls on system hold.
zAmber LEDs indicate recalls to your keyset.
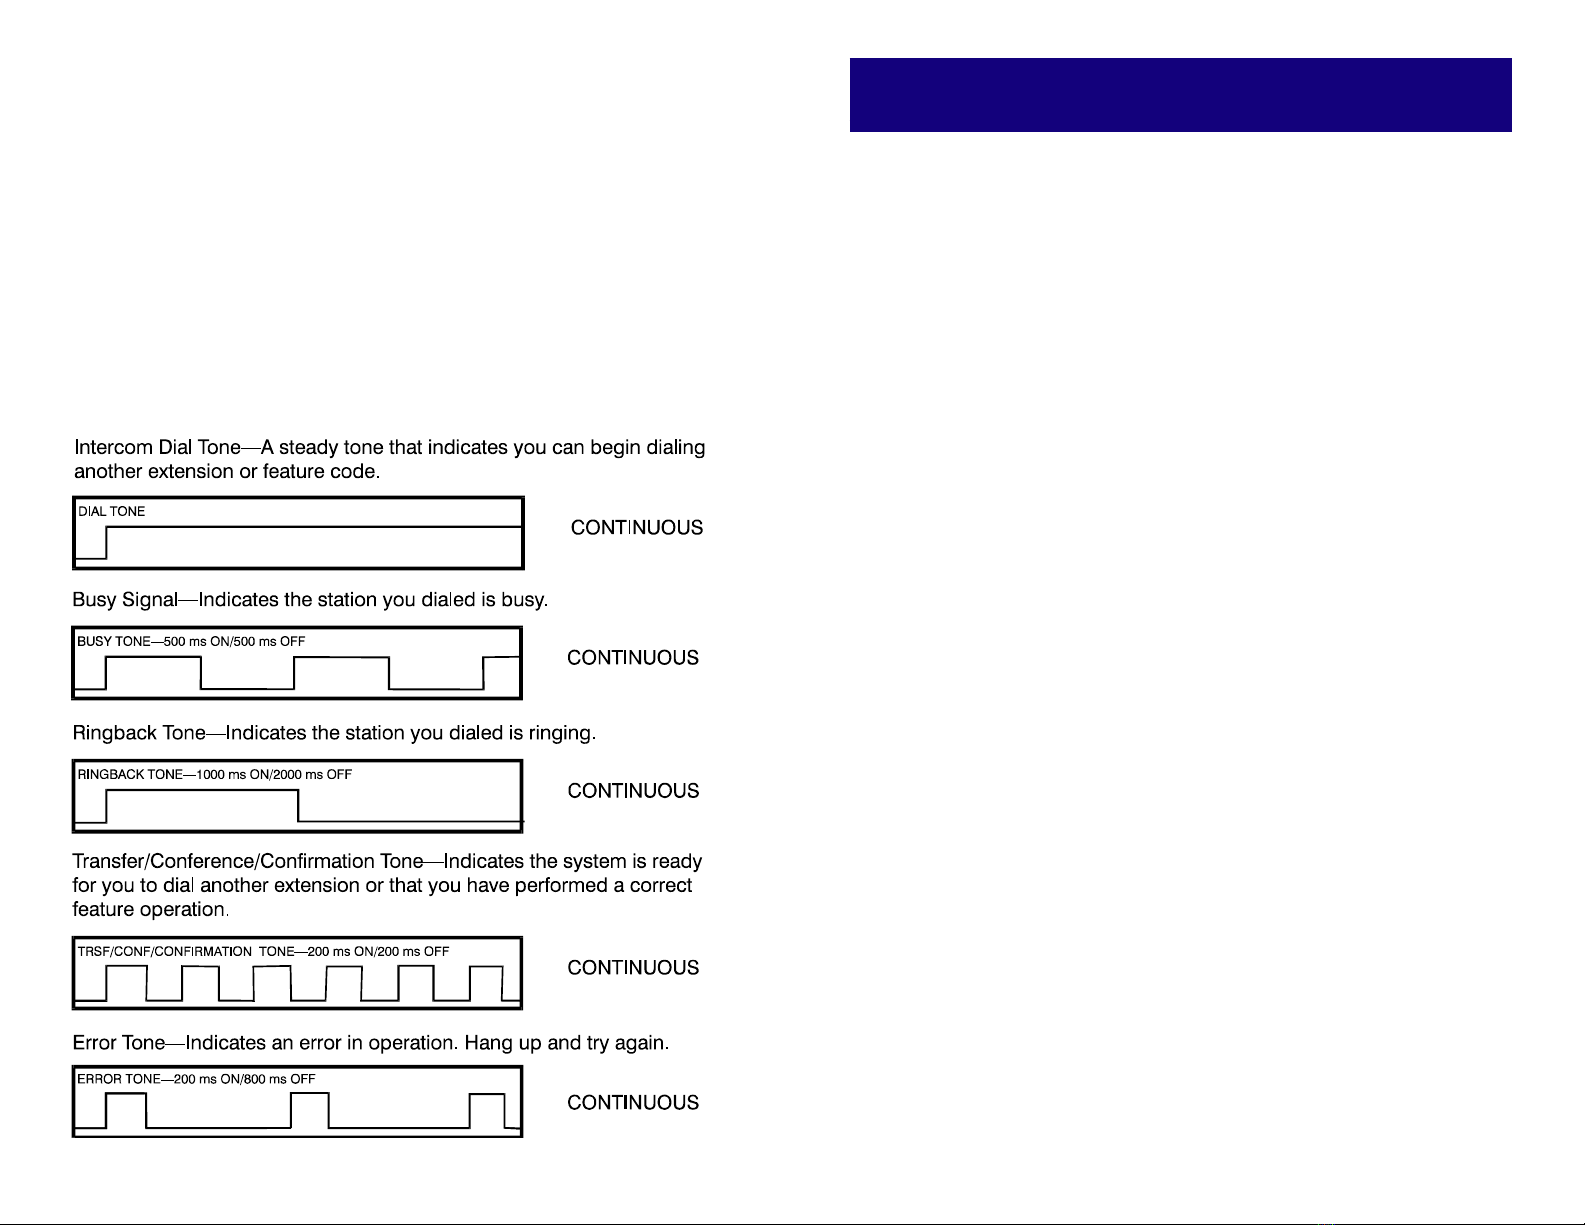
SYSTEM TONES
The system provides several tones to assist you. Some of these tones are
already familiar to you.
5
OUTSIDE CALLS
MAKING A CALL
zLift the handset and press an idle outside line button. Receive dial tone
and dial the telephone number.
OR
zTo use the speakerphone, press an idle outside line button, receive dial
tone through the speaker and dial the telephone number. Speak into the
microphone.
zFinish the call by replacing the handset or pressing the SPK button.
NOTES:
1. If programmed, you may dial 9or 80 to select an available line from
these two line groups.
2. 800 keyset users may place a call with the handset in the cradle but must
lift it to speak when the called party answers.
ANSWERING A CALL
zLift the handset and press the fast flashing green outside line button.
OR
zAnswer the call using the speakerphone by pressing the flashing green
outside line button.
zIf your keyset is assigned ringing, simply lift the handset or press the
SPK button and the call is automatically answered.
NOTE: 800 keyset users must lift the handset to answer the call.
RECALL DIAL TONE
Press the line button you are now using to disconnect the present call and
receive dial tone to make another call on the same line.
SENDING A FLASH
When using a PABX or a CENTREX line, press the line button you are now
using to send hookflash for special operation.
6

BUSY LINE QUEUING WITH
CALLBACK
zPress the desired busy outside line with a steady red light and receive
busy signal.
zPress the CALLBACK button.
zWhen the selected line becomes free and it is your turn, the system will
call you back.
zLift the handset or press the SPK button to be connected to dial tone and
then place the call.
NOTE: A callback will be canceled if it is not answered within 12 seconds.
STATION TOLL OVERRIDE
Your station may be restricted from dialing outside of the system. However,
system programming can allow five numbers to override any restriction in
case of an emergency (e.g., 911, fire, police, ambulance, etc.).
VERY IMPORTANT: Ensure that your installation and service company has
made these provisions for your system.
7
INTERCOM CALLING
CALLING OTHER STATIONS
zLift the handset, press the DSS button for another station or group of
stations and speak into the handset.
zPlace the call using the speakerphone by pressing the DSS button for
another station or group of stations and speak into the microphone (816
keyset only).
zFinish the call by replacing the handset or pressing the SPK button.
NOTE: If your keyset does not have all of the DSS keys, you must dial the
station number 21–36 or the group number 71–73.
ANSWERING CALLS FROM
ANOTHER STATION
zWhen your telephone rings, simply lift the handset or press the SPK but-
ton to be connected to the calling station.
zFinish the call by replacing the handset or pressing the SPK button.
NOTE: 800 keyset users must lift the handset to speak.
AUTO ANSWER/VOICE
ANNOUNCE MODE
(INTERCOM CALLS ONLY)
If selected, your keyset will beep once and then automatically answer an
intercom call. Your microphone and speaker are turned on and you may
speak handsfree. For more private calls, lift the handset and finish the con-
versation.
zTo select this mode, press the AUTO ANS button if it is assigned to your
keyset.
zPress it again to cancel OR
zWith the handset on-hook, dial #10 and then 0for normal ring or 1for
Auto Answer.
zDial #to save your selection.
NOTE: 800 keyset users can select the voice announce mode but must lift
the handset to speak.
8

BUSY STATION CALLBACK
zPress the desired DSS button (with steady red light) or dial the station
number and receive busy signal.
zPress the CALLBACK button.
zWhen the selected station becomes free, the system will call you back.
zLift the handset or press the SPK button to call the now idle station.
NOTE: A callback will be canceled if not answered within 12 seconds.
CALLING THE ATTENDANT
Lift the handset or use the SPK button and dial 0to call your system atten-
dant.
NOTE: 800 keyset users must lift the handset to speak.
DIRECT RETRY
When making an intercom call and you encounter a Busy, No Answer, Do
Not Disturb or Not Equipped condition or the called party hangs up, you can
make another intercom call without hanging up.
9
CALL PROCESSING
SYSTEM HOLD
zWhen you are connected to any outside line or station, press the HOLD
button. The line button will flash green on your keyset and flash red on
other keysets. A DSS button will flash red on your keyset and remain red
on other keysets.
zTo retrieve the outside line again, press the flashing line button from any
keyset.
zA station on hold can only be retrieved at the keyset that placed it on
hold. Press the flashing DSS button.
NOTE: If a line or station does not appear on a button at your keyset, you
cannot put it on hold.
RETRIEVE CALLS FROM
SYSTEM HOLD
You may retrieve a call placed on system hold from a station other than your
own by using one of the three methods below.
If you know the specific line of the held call and that line appears on your
keyset:
zPress the flashing red line button.
If you know the specific line of the held call and that line does not appear on
your keyset:
zLift the handset or press the SPK button.
zDial the specific line number 81–88 corresponding to C.O. line 1–8.
If you do not know the specific line of the held call:
zLift the handset or press the SPK button.
zDial 5plus the extension number of the telephone that placed the call on
hold.
EXCLUSIVE HOLD
When an outside call is placed on exclusive hold, it will flash green at your
station and remain steady red at other keysets. This prevents other users
from picking up the call.
zPress the HOLD button twice.
zTo retrieve the line, press the flashing green line button.
A C.O. line placed on exclusive hold can only be retrieved by the station that
placed it on hold.
10

NOTE: If a line or station does not appear on a button at your keyset, you
cannot put it on hold.
HOLD RECALL
After a call has been left on hold for a pre-programmed period of time, it will
recall the station that placed it on hold.
zWhen your keyset rings, lift the handset or press the SPK button to an-
swer the recall.
zIf you are not able to answer the recall, it will return to the system atten-
dant (operator) after a pre-programmed period of time.
CONSULTATION HOLD
When you are talking on an outside line and it is necessary to consult with
another station:
A. With a DSS key (816 and 800 keyset users):
zPress the idle DSS button of the desired station. The outside call is
automatically put on hold.
zConsult with the other party.
zWhen the inside station hangs up, you will be reconnected to the out-
side line.
B. Without a DSS key (800 keyset users only):
zPress the TRANSFER key. The outside call is automatically put on
hold. Dial extension 21–36.
zConsult with the other party.
zWhen the inside station hangs up, you will be reconnected to the out-
side line.
TRANSFERRING CALLS
Use either the screened or unscreened method below.
A. With a DSS key (816 and 800 keyset users):
zWith an outside call in progress, press the DSS button for the desired
station or group of stations. Your call is automatically put on hold.
zUnscreened: Hang up when you hear ringing and the call is trans-
ferred OR
zScreened: Wait for the party to answer and advise him/her of the call
and hang up. If the transfer is refused, you will be reconnected to the
outside line when the inside station hangs up.
If you change your mind before the called party answers, press the same
DSS button to release the called station and return to the outside line.
B. Without a DSS key (800 keyset users only):
zWith an outside call in progress, press the TRANSFER key. Your call
11
is automatically put on hold. Receive dial tone and dial the desired
extension or group number.
zUnscreened: Hang up when you hear ringing and the call is trans-
ferred OR
zScreened: Wait for the party to answer and advise him/her of the call
and hang up. If the transfer is refused, you will be reconnected to the
outside line when the inside station hangs up.
If you change your mind before the called party answers, press the TRANS-
FER key to release the called station and return to the outside line.
NOTE: If the line being transferred does not appear on the keyset, it will
immediately recall to you as an incomplete transfer.
TRANSFER WITH CAMP-ON
A. With a DSS key (816 and 800 keyset users):
zWith an outside call in progress, press the desired DSS button. The
call is automatically placed on hold.
zIf the station is busy, hang up and the call is camped-on to the busy
station.
B. Without a DSS key (800 keyset users only):
zWith an outside call in progress, press the TRANSFER key and then
dial the desired extension or group number. The call is automatically
put on hold.
zIf the station is busy, hang up and the call will be camped-on to the
busy station.
NOTE: If the line being transferred does not appear on the destination keyset,
it will immediately recall to you as an incomplete transfer.
ANSWERING A CAMPED-ON
CALL
If an outside call has been camped-on to your phone:
zYou will hear a single ring and the line that is waiting for you (the line that
is camped-on) will flash green.
zPlace your present call on hold and press the flashing line button to an-
swer OR
zHang up and the waiting call will ring your keyset.
zLift the handset or press the SPK button to answer.
SETTING UP A CONFERENCE
You may conference up to and including five parties in any combination of
outside lines and internal stations in any order.
12

zWhile engaged in conversation, press the CONF button and receive con-
ference tone.
zMake another call, either station (DSS only) or outside line, and press the
CONF button to add this party.
zRepeat the first two steps until all parties are added.
zPress the CONF button twice to add yourself.
NOTE: All lines and stations to be added to the conference must appear on
buttons on your keyset.
RELEASING A PARTY FROM A
CONFERENCE
While engaged in a conference, follow the steps below:
zPress the CONF button.
zPress the outside line or the DSS button of the party to be released.
zPress the CONF button to return to the conference.
UNSUPERVISED CONFERENCE
CALLS
To allow two or more outside lines to be added to the conference after you
hang up:
zSet up the conference in the usual manner.
zPress the CONF button, press your own DSS button and hang up.
Your PROSTAR 816 PLUS system will release the outside lines after a pre-
programmed amount of time. Depending on your hardware and telephone
company service, the lines can be made to release within seconds.
SET FORWARD ALL CALLS
To forward all of your calls immediately to another station or group:
zWith the handset on-hook, dial #11.
zPress the DSS button or dial 21–36 for the station that will receive your
calls or press the group button or dial 71 or 72 for the group that will
receive your calls.
zDial #.
Your SPK button will flicker as a reminder that you have forwarded your
calls. Use this same procedure to change the Forward All destination.
CANCEL FORWARD ALL
zWith the handset on-hook, dial #11.
13
zPress your own DSS button or dial your own extension number (21–36).
zDial #again. The SPK button will stop flickering.
NOTE: If the SPK button continues to flicker, Forward Busy is activated.
SET FORWARD WHEN BUSY
You may program your telephone to have calls forwarded to another exten-
sion when you are busy on a call.
zWith the handset on-hook, dial #12.
zPress the DSS button or dial 21–36 for the station that will receive your
calls or press the group button or dial 71–73 for the group that will re-
ceive your calls.
zDial #again.
Your SPK button will flicker as a reminder that you have forwarding set at your
keyset. Use the same procedure to change the Forward Busy destination.
CANCEL FORWARD BUSY
zWith the handset on-hook, dial #12.
zPress your own DSS button or dial your own extension number (21–36).
zDial #again. The SPK button will stop flickering.
NOTE: If the SPK button continues to flicker, Forward All is activated.
FORWARD TO VOICE MAIL
(GROUP 3)
If you are using the Starmail voice processing system by Samsung, you can
forward your outside calls to your voice mailbox.
zPress the special assigned FWD key.
zThis key will flash and any other forward conditions will be cleared.
zTo cancel, press this flashing key.
NOTE: If MMC #15 is used to assign one of the round buttons to a forward
condition, there will be no flash.
CALL PICKUP
You may pick up (answer) calls ringing at another station by:
zLift the handset or press the SPK button.
z
Dial 11. You will be connected to any ringing intercom or outside line call.
If you wish to pick up only intercom calls:
zLift the handset or press the SPK button.
zPress the flashing DSS button of the ringing station.
14
DIALING FEATURES
SPEED DIALING—SYSTEM LIST
To dial a pre-programmed telephone number from the system-wide list:
zSelect an outside line.
zPress the ALM/SD button.
zDial the desired speed dial code 10–98.
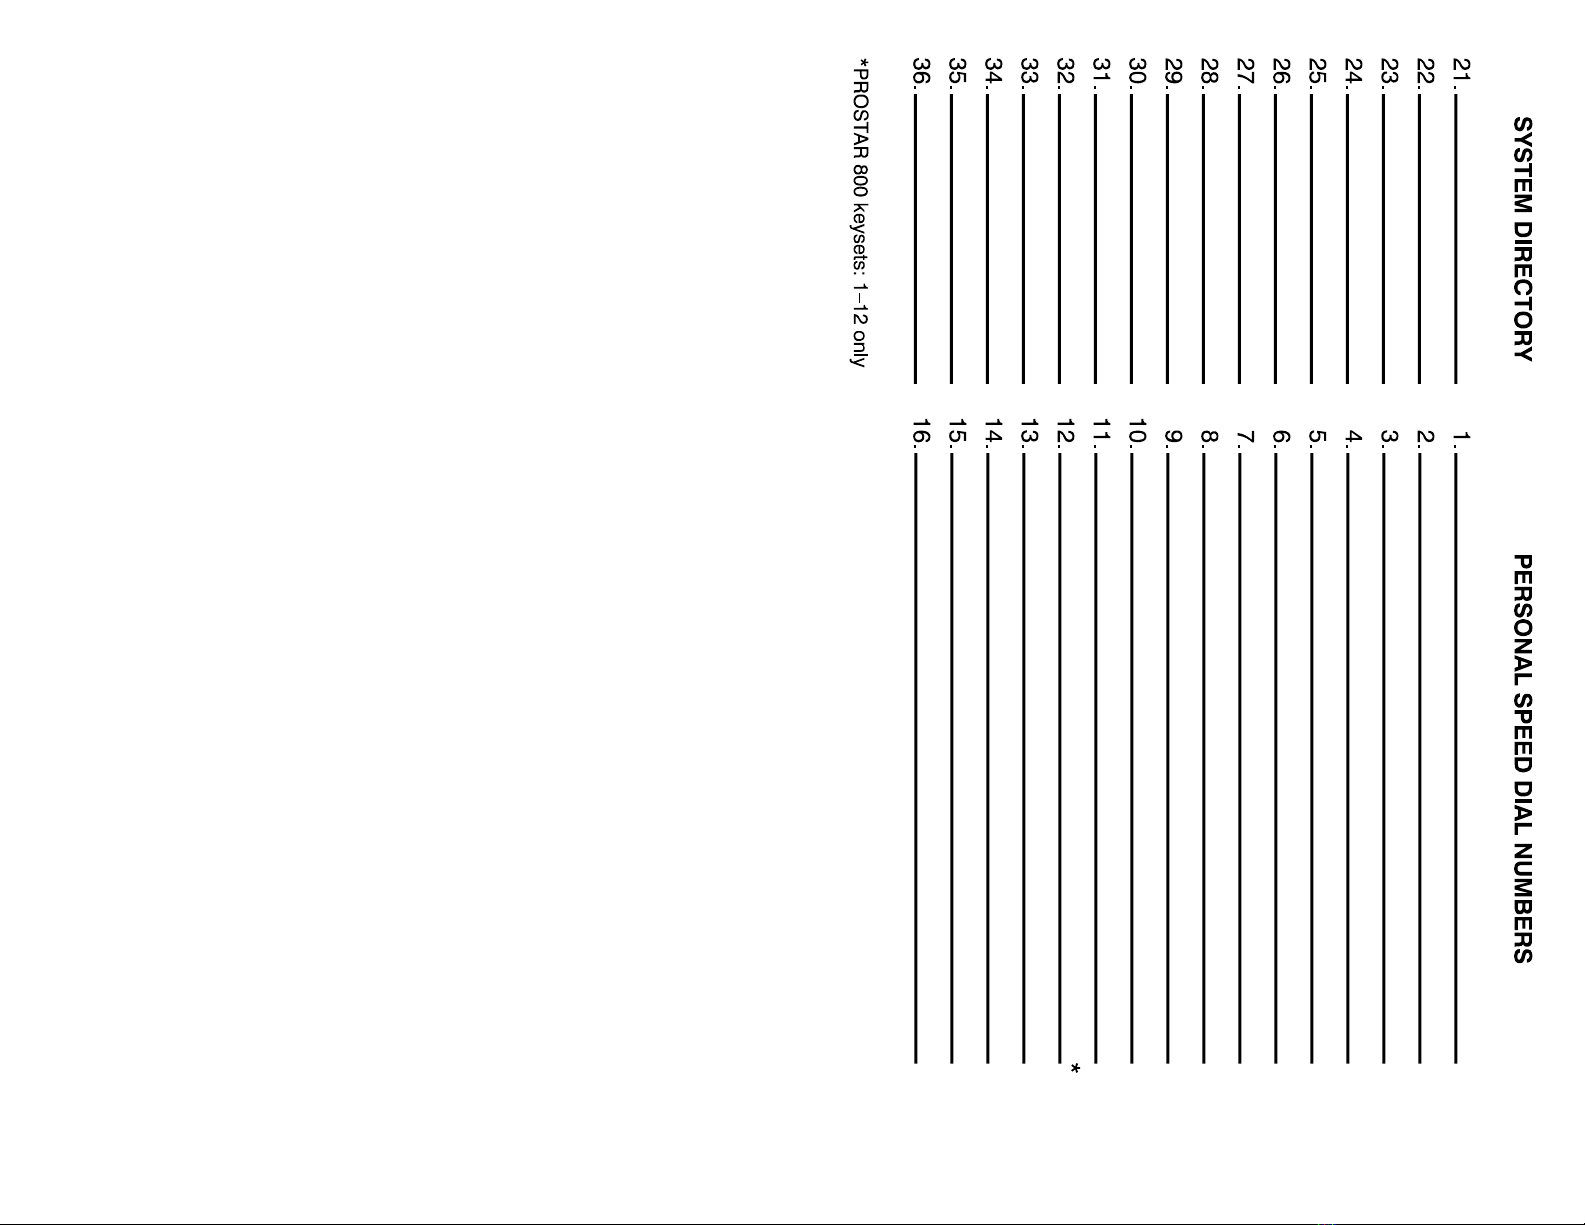
See your system administrator for system listing.
PROGRAMMING PERSONAL
SPEED DIAL NUMBERS
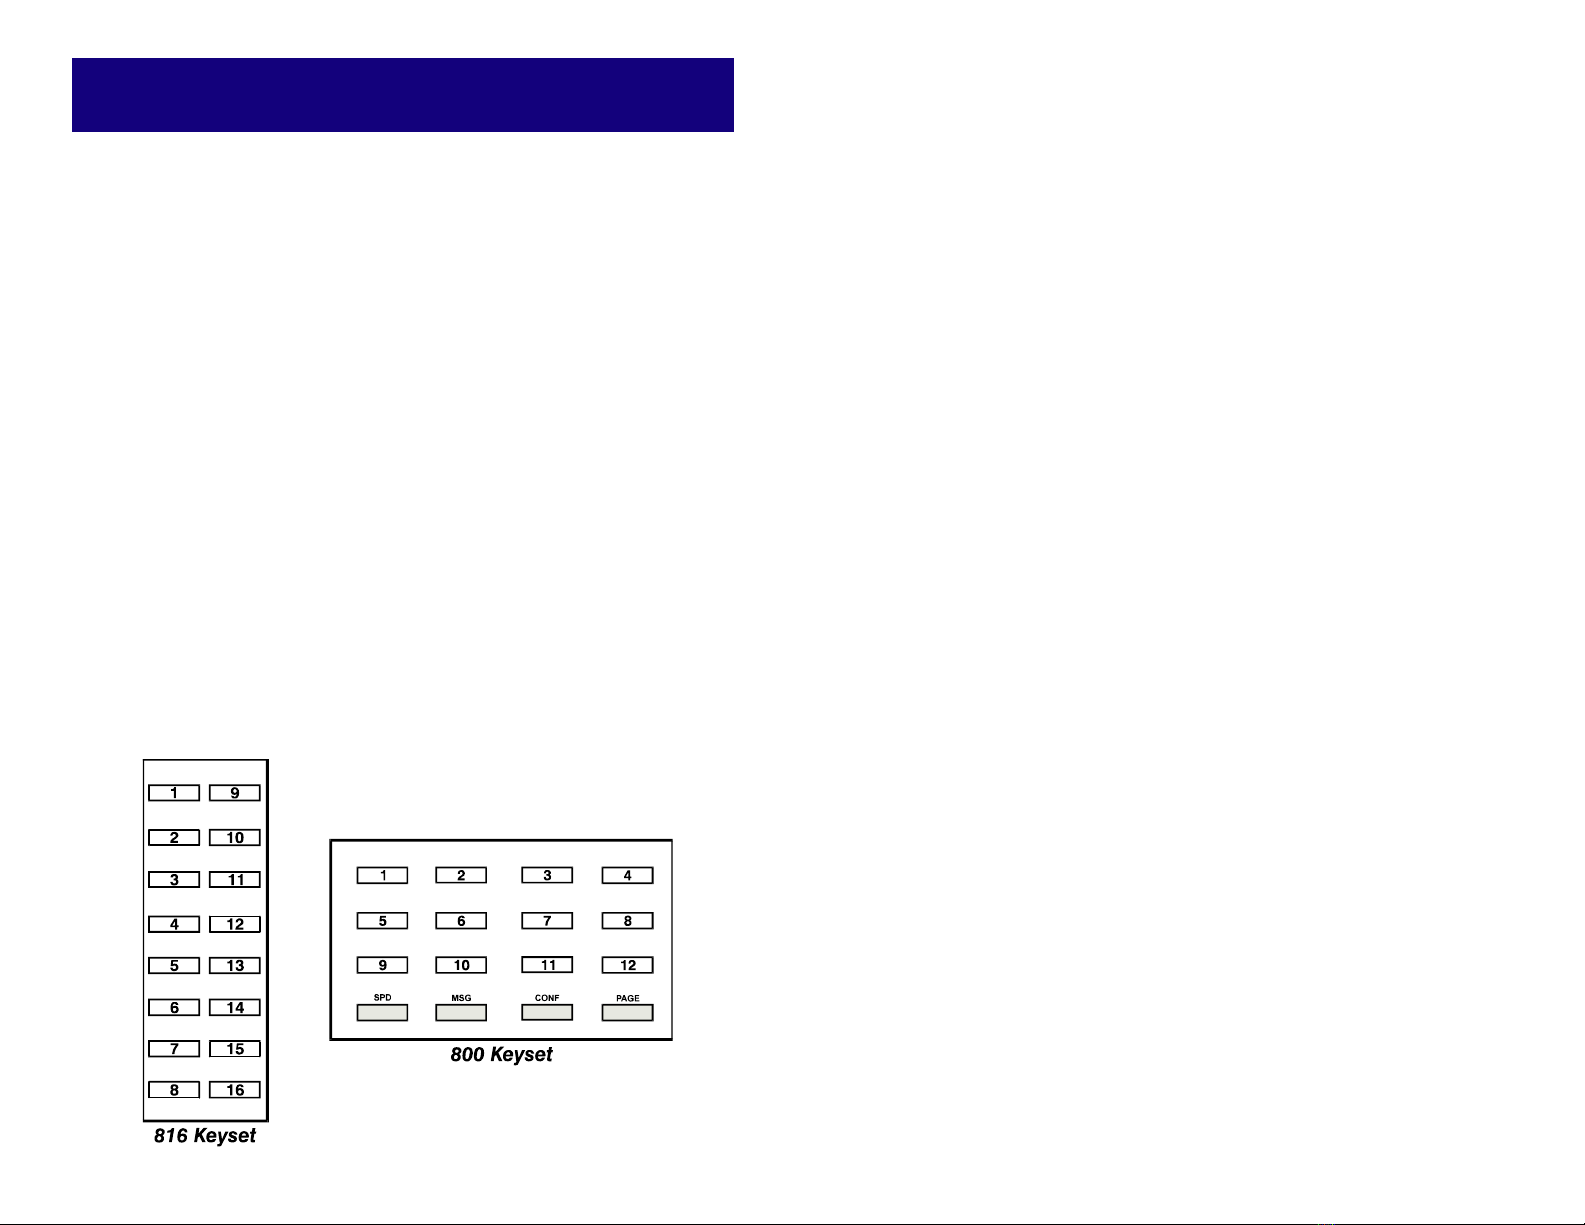
You may program frequently dialed telephone numbers of your choice and
store them in speed dial keys on your keyset. See the diagram at the end of
this section. 816 keyset users have 16 speed dial keys and 800 keyset users
have 12 speed dial keys.
zWith the handset on-hook, press the ALM/SD button.
zPress the corresponding button where the number is to be stored.
zDial the telephone number (maximum 30 digits). If required, press the
HOLD button to insert a three second pause and the MSG button to
insert a hookflash.
zPress ALM/SD to store the number.
Repeat the procedure for each number to be stored. For privacy, numbers
stored in speed dial buttons 1 and 2 will not be displayed.
15
SPEED DIALING—PERSONAL
LIST
To dial a personally programmed speed dial number:
zSelect an outside line.
zPress the ALM/SD button.
zPress the desired speed dial button and the number is dialed for you.
ERASE PERSONAL SPEED DIAL
NUMBERS
zWith the handset on-hook, press the ALM/SD button.
zPress the speed dial button where the number is stored.
zPress the HOLD button to erase.
LAST NUMBER REDIAL
zLift the handset and select an outside line.
zPress the RD button and the last telephone number you dialed will be
automatically redialed.
If you press the RD button with the handset on-hook, the call will be made
through the speakerphone.
SAVE NUMBER WITH REDIAL
To save a number you have just dialed:
zPress the RD button before hanging up.
To redial this saved number at any time:
zDial 4and the outside line is automatically selected and the number is
dialed.
Saving another number will erase the previous one.
CHAIN DIALING
You may manually dial additional digits following a speed dial call OR you
can chain together as many speed dial numbers as required:
zAfter the first number is dialed, press the ALM/SD button again.
zPress a speed dial button or dial system code 10–98.
16

AUTOMATIC REDIAL OF A BUSY
NUMBER
zWhen you receive a busy signal from an outside number, press the AUTO
REDIAL button.
zYour keyset will hold a line and redial the outside number every 45 sec-
onds for up to three attempts.
zYour RD button will flicker while the Auto Redial feature is in use.
zWhen the outside party answers, you will be connected through your
speakerphone. Pick up the handset for a private conversation.
If you make another call, Auto Redial is canceled.
NOTE: 800 keyset users must lift their handsets to speak with the other party.
PULSE TO TONE CHANGEOVER
When you are making an outside call on a dial pulse line, dial #to begin
sending tones.
17
PAGING AND MESSAGING
MAKING AN INTERNAL PAGE
zLift the handset.
zPress your own DSS key, the INTERNAL PAGE button or dial your own
extension number.
zDial zone 1, 2or 3.
zAfter the brief attention tone, make the announcement.
MAKING AN EXTERNAL PAGE
zLift the handset.
zPress the PAGE button or dial 14.
zAfter the brief attention tone, make the announcement.
ALL PAGE
To page all keysets and external speakers at the same time:
zLift the handset.
zPress your own DSS key, the INTERNAL PAGE button or dial your own
extension number.
zDial 0.
zAfter the brief attention tone, make the announcement.
MEET ME ANSWER
After making an internal page or all page, you may have the paged party
meet you for a private conversation.
zPlace an internal or all page instructing the paged person to dial 12.
zAfter the announcement, press your own DSS button or the INTERNAL
PAGE button. You will hear music if it is equipped. Wait for the party to
respond.
zThe paged party must dial 12 to be connected to you.
TRANSFER WITH PAGE
ANNOUNCEMENT
zWhile you are talking on an outside line, make an internal, external or all
18

page (described previously) and the call is automatically put on hold.
zAnnounce to the paged person that he/she has a call and specify the line
number.
zThe paged person answers the call by pressing the outside line button
that was announced.
NOTE: If the held call is to be picked up at a single line extension, inform the
other person to dial 5plus your station number.
SETTING A MESSAGE LIGHT
When you are calling another keyset and you encounter either no answer or
a busy signal:
zPress the MSG button.
zReplace the handset. The MSG button of the called station will light.
NOTE: You cannot set a message at a single line telephone.
REVIEWING MESSAGES
(DISPLAY KEYSET ONLY)
zWith the handset on-hook, press the flashing MSG button.
zStations that have left messages will be displayed (maximum of four).
The station number will be displayed as 21–36. Voice mail will be displayed
as VM.
CANCELING MESSAGES
(DISPLAY KEYSET ONLY)
zWith the handset on-hook, press the flashing MSG button.
zPress the DSS key of the station at which you wish to cancel the mes-
sage.
RETURNING MESSAGES
zLift the handset or press the SPK button.
zPress the flashing MSG button. The station that left you a message will
be called automatically.
zYour MSG button will stop flashing when all messages have been re-
turned.
A voice mail message will be turned off by the voice mail system.
19
SEND PROGRAMMED MESSAGE
(DISPLAY KEYSET ONLY)
You may select a pre-programmed message (maximum of 16 characters) to
appear in the display of calling stations.
zWith the handset on-hook, press the DND button.
zScroll through available messages (listed on the inside back cover of this
user guide) by dialing 4to go forward and 0to back up.
zDial #to select message.
NOTE: If your station is denied the Do Not Disturb feature, you cannot send
programmed messages.
CANCEL PROGRAMMED
MESSAGE DISPLAY
With the handset on-hook, press the DND button.
20

CONVENIENCE FEATURES
DO NOT DISTURB
zWhile on-hook, press the DND button.
zThe DND button lights to remind you of this mode.
zTo cancel, press the DND button. The light turns off.
NOTE: 800 keysets and the attendant station cannot have the Do Not Dis-
turb feature.
MUTE
When you are using the speakerphone, you can turn off the microphone but
still hear the other party through the speaker.
zPress the MUTE button. The light turns on.
zPress the MUTE button again to turn the microphone on and the light
turns off.
NOTE: This feature is not available on the 800 keyset.
BACKGROUND MUSIC
When a music source is supplied, you may listen to music through the speaker
in your keyset.
zWhile you are on-hook, press the HOLD button to hear music.
zPress the HOLD button again to turn music off.
NOTE: Your station may be denied background music.
APPOINTMENT REMINDER/
ALARM CLOCK
To use your keyset as an alarm clock:
zPress the ALM/SD button twice.
zSet the hour and minutes using the dial pad (24 hour clock).
zPress the ALM/SD button. The light will turn on.
zYour keyset will sound three rings at the time you set.
You may cancel the appointment reminder by pressing the ALM/SD button
twice and the HOLD button once.
21
ANSWERING A DOOR PHONE
When you are programmed to receive calls from one or both door phones:
zYou will receive three short rings repeatedly.
zLift the handset or press the SPK button and you are connected to the
calling door phone.
zIf a door lock is installed, dial 3to unlock.
If you are not assigned door phone ringing, dial 11 for call pickup.
CALLING A DOOR PHONE
(ROOM MONITORING)
You may call a door phone and listen to what may be happening outside or
in another room.
zLift the handset and dial 13 for DOOR 1 or 16 for DOOR 2 or press the
DOOR 1 or DOOR 2 button if programmed on your keyset.
zYou will be connected to the specified door phone and can listen or have
a conversation.
EXECUTIVE BARGE-IN
(OVERRIDE)
When your station is specially programmed, you may barge-in on a busy
station.
zPress the desired DSS button with a steady red light or dial an extension
number and hear busy tone.
zDial 5to barge-in.
Barge-in is not allowed if the station is in a conference, on station hold or
sending or receiving a transfer.
BOSS/SECRETARY HOT LINE
If programmed, the BOSS and the SECRETARY stations can have a hot line
between them.
zBy pressing the BOSS/SECR button, one party can make a voice call to
the other with Automatic Answer.
zBoth can override the other’s DND mode when they use the hot line.
When the BOSS station is in the DND mode, all of its intercom calls will ring
the SECRETARY station.
22

CALL OFFER WITH ALERT
When another station is busy and you must get through, you may:
zPress the desired DSS button with the steady red light and hear busy
tone.
zPress the same DSS button again to offer your call to the busy station.
You will hear music if equipped. The busy station will be alerted to this
very important or emergency call by receiving a ring burst each time the
DSS key is pressed.
zThe called party will hear an off-hook signal and your DSS button will
begin flashing at this station to indicate who is offering a call.
zThe called party presses the flashing DSS button to respond. The origi-
nal call is automatically put on hold.
zIf your offered call is accepted, the called party should press the line key
of which you have advised him/her. If the offered call is not accepted,
press the line key to return to the caller.
NOTES:
1. If you are on a C.O. call, you must put it on hold before you can alert a
busy station.
2. You must have a DSS key to use Call Offer.
GROUP LISTENING
When you are engaged on a call using the handset or headset, you may
want other persons to hear the distant party’s voice over the speaker.
zPress the LISTEN button to turn on the speaker. The microphone is not in
use so the distant party does not hear the other parties present in your
office.
zPress it again to turn the speaker off and resume private conversation.
Depending on speaker volume and the acoustics of your office, it may be
advisable to turn the group listening feature off before hanging up. This will
eliminate a momentary squeal.
ACCOUNT CODES
Your PROSTAR 816 PLUS system will allow calls to be charged to a specific
account.
zDuring any C.O. call, press the ACCOUNT button.
zEnter any account code (up to a maximum of twelve characters, includ-
ing 4and #). Your conversation will not be interrupted.
If you make an error, press the ACCOUNT button again and redial the cor-
rect code.
Account codes will be included in the SMDR records. Only the last account
code dialed will be printed. Optional equipment is required to print an SMDR
report.
23
RINGING LINE PREFERENCE
Lifting the handset or pressing the SPK button will automatically answer any
call ringing at your keyset. This feature may be disabled for outside lines,
allowing you to select the ringing line of your choice by pressing the associ-
ated button.
zDial #17.
zDial 0to turn ringing line preference off. Dial 1to turn ringing line prefer-
ence on.
zDial #to save your selection and restore your keyset to normal use.
HEADSET OPERATION
816 and 800 keysets permit the use of customer-provided headsets. See
your local installation and service company for compatibility requirements.
Once the appropriate type of headset is installed, you may turn headset
operation ON and OFF at your convenience.
zWith the handset on-hook, dial #09.
zDial 0to turn OFF the headset and use the handset.
zDial 1to turn ON the headset and turn OFF the handset.
zDial #to save your selection.
PRIME LINE SELECTION
Your keyset may be programmed to automatically select a line or group of
lines when the handset is lifted or the SPK button is pressed. In this mode,
you do not need to select an outside line to make a call.
To make intercom calls from a keyset with the prime line feature, press the
desired DSS button before lifting the handset or pressing the SPK key.
This feature can be used with a delay timer. In this mode, you receive inter-
com dial tone for a programmed amount of time before your prime line is
selected.
24

DISPLAY FEATURES
DATE AND TIME
Display keyset users will always have the current date and time displayed at
their keysets when the keysets are in the idle condition.
TIMER FUNCTION
Display keyset users may use this feature as a simple stopwatch.
zPress the TIMER button to start timing.
zPress the TIMER button again to stop timing.
zRead the elapsed time in the display.
zLift the handset and replace the handset. The display will return to the
date and time.
While you are engaged in conversation, the timer will show the elapsed time
and the number dialed.
zPress the TIMER button to start timing.
zPress the TIMER button again to display the number dialed.
zPress the TIMER button again to show continuous time.
zHang up and the elapsed time will be displayed for three seconds.
AUTOMATIC TIMING OF CALLS
When the automatic timing feature is selected, the system will begin timing
outgoing calls automatically. The duration of each call is counted in seconds
and the display will show a duration of up to 99 minutes.
zWhile on-hook, dial #13.
zThe display shows the auto timer status.
To change dial:
0= Auto timer disable
1= Auto timer enable
z
Dial #to save your selection and restore the keyset to normal use.
DISPLAY NUMBER DIALED
Display keysets will show digits as they are dialed. After the call duration
timer begins, you can press the TIMER button twice to again show the num-
ber dialed.
zPress the TIMER button to display the number dialed.
zPress it again to continue with the call duration timer.
25
STATION DIRECTORY NAME
(DISPLAY KEYSET ONLY)
Display keyset users may view the name of the called or calling station in the
display.
To program your station directory name:
zWith the handset on-hook, dial #. [PROGRAMMING] is displayed.
zDial 14. The display shows your extension number and any previously
programmed name.
zTo clear current data, press HOLD.
zPress your DSS button.
zEnter your name (ten characters maximum) by using the dial pad keys as
detailed below.
zDial #.
DIAL PAD KEY
1234567890
NUMBER 1QA D GJ M P T W :
OF TIMES 2Z B E HK N R U X .
PRESSED 34CF I L OSV Y !
41234567890
EXAMPLE: To display the letter A, press 2 once.
To display the letter K, press 5 twice.
To display the number 8, press 8 four times.
NOTE: The following special keys are also used in this program.
4= Next Use to advance the cursor one position to the right.
MSG = Space Use to skip one cursor position on the right.
ALM/SD = Backspace Use to move the cursor one position to the left.
HOLD = Clear Use to clear current data.
26

NOTES SYSTEM ACCESS CODES
LINE GROUPS PROGRAMMED MESSAGES
LINE GROUP ACCESS 01 DO NOT DISTURB
9 ______________________ 02 IN A MEETING
80 ______________________ 03 OUT OF TOWN
04 ON VACATION
INDIVIDUAL LINE ACCESS 05 OUT ON A CALL
81 ______________________ 06 OUT TO LUNCH
82 ______________________ 07 IN TOMORROW
83 ______________________ 08 PAGE ME
84 ______________________ 09 RETURN AFTERNOON
85 ______________________ 10 GONE HOME
86 ______________________ 11 ______________________
87 ______________________ 12 ______________________
88 ______________________ 13 ______________________
14 ______________________
STATION GROUPS 15 ______________________
16 ______________________
71 ______________________ 17 ______________________
72 ______________________ 18 ______________________
73 ______________________ 19 ______________________
20 ______________________
PAGING ZONES
FEATURE ACCESS CODES
INTERNAL PAGE ZONES
Dial your own extension number plus: 0 OPERATOR
3 UNLOCK DOOR
1 INTERNAL ZONE 1 4 REDIAL SAVED NUMBER
2 INTERNAL ZONE 2 5 + stn HOLD RETRIEVE
3 INTERNAL ZONE 3 #11 + stn SET CALL FORWARD ALL
0 ALL PAGE #11 + your stn CANCEL CALL FWD ALL
(all internal and external zones) #12 + stn SET CALL FORWARD BUSY
#12 + your stn CANCEL CALL FWD BUSY
EXTERNAL PAGE ZONE 12 MEET ME PAGE
14 EXTERNAL PAGE (one zone only) 13 DOOR 1
16 DOOR 2
NOTE: Many station features are assigned to a key on 800 and 816 keysets. Familiarizing
yourself with these keys will provide easier and more efficient use of system features. Advise
your system administrator of any special requirements that you have.
UG-816P-KEY-01 6/95
This manual suits for next models
2
Table of contents


