Olympia 6410 User manual

R
−your key to a wireless world
ERWEITERUNGS-SET // EXTENSION KIT
KIT D’EXTENSION // JUEGO DE AMPLIACIÓN
IL KIT DI COMPLETAMENTO // UITBREIDINGSSET
6410
BEDIENUNGSANLEITUNG
USER GUIDE
MODE D’ EMPLOI
INSTRUCCIONES DE SERVICIO
ISTRUZIONI PER L’USO
GEBRUIKSAANWIJZING
11.02.04


www.olympia-life.com
BEDIENUNGSĆ
ANLEITUNG 1Seite
DEUTSCH
Wichtige Sicherheitsanweisungen 2. . . . . . . . . . . . . . . . . . . . . . . . . . . . . .
Haftungsausschluss 2. . . . . . . . . . . . . . . . . . . . . . . . . . . . . . . . . . . . . . . . .
Bestimmungsgemäße Verwendung 2. . . . . . . . . . . . . . . . . . . . . . . . . . . . .
Konformitätserklärung 2. . . . . . . . . . . . . . . . . . . . . . . . . . . . . . . . . . . . . . . .
Ladestation anschließen 3. . . . . . . . . . . . . . . . . . . . . . . . . . . . . . . . . . . . . .
Akkus einsetzen / Gürtelclip montieren 3. . . . . . . . . . . . . . . . . . . . . . . . . .
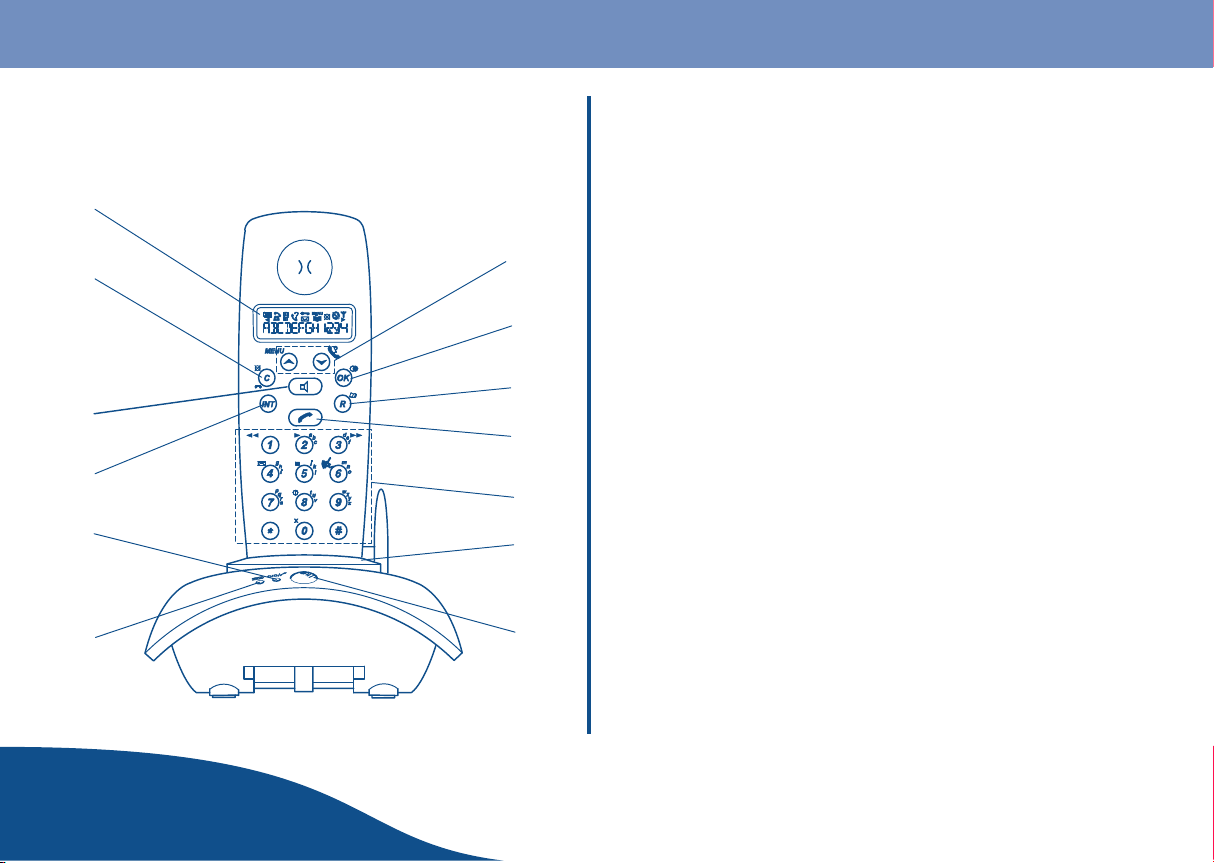
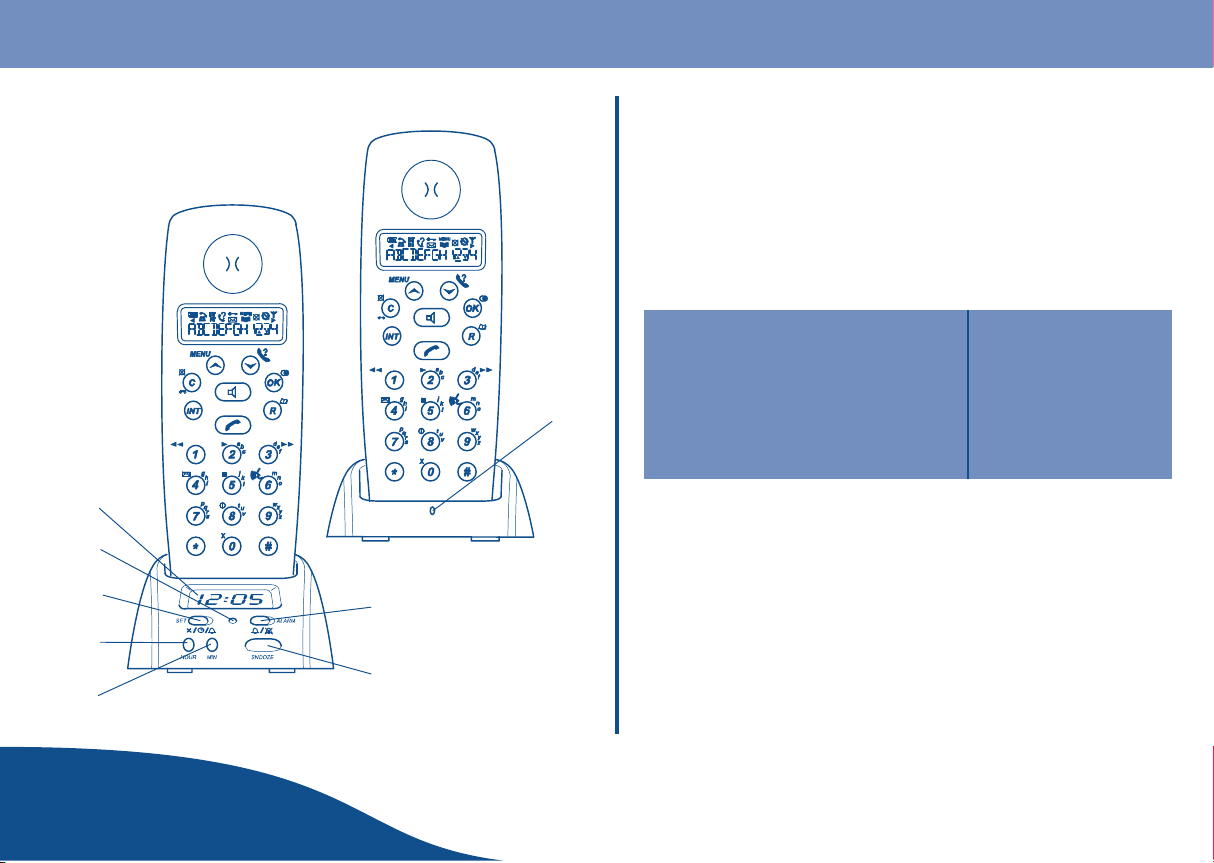
Bedienelemente und Anzeigen 4. . . . . . . . . . . . . . . . . . . . . . . . . . . . . . . . .
Mobilteil ein- / ausschalten 5. . . . . . . . . . . . . . . . . . . . . . . . . . . . . . . . . . . .
Anmelden zusätzlicher Mobilteile 6. . . . . . . . . . . . . . . . . . . . . . . . . . . . . . .
Mobilteile löschen 6. . . . . . . . . . . . . . . . . . . . . . . . . . . . . . . . . . . . . . . . . . .
Garantie 7. . . . . . . . . . . . . . . . . . . . . . . . . . . . . . . . . . . . . . . . . . . . . . . . . . .
ENGLISH
Important Safety Notes 8. . . . . . . . . . . . . . . . . . . . . . . . . . . . . . . . . . . . . . .
Exemption from Liability 8. . . . . . . . . . . . . . . . . . . . . . . . . . . . . . . . . . . . . .
Intended Use 8. . . . . . . . . . . . . . . . . . . . . . . . . . . . . . . . . . . . . . . . . . . . . . .
Declaration of Conformity 8. . . . . . . . . . . . . . . . . . . . . . . . . . . . . . . . . . . . .
Connecting the Charging Station 9. . . . . . . . . . . . . . . . . . . . . . . . . . . . . . .
Inserting the Batteries / Attaching the Belt Clip 9. . . . . . . . . . . . . . . . . . . .
Operating Elements and Indicators 10. . . . . . . . . . . . . . . . . . . . . . . . . . .
Switching the Handset On / Off 11. . . . . . . . . . . . . . . . . . . . . . . . . . . . . . .
Registering Additional Handsets 12. . . . . . . . . . . . . . . . . . . . . . . . . . . . .
Deleting Handsets 12. . . . . . . . . . . . . . . . . . . . . . . . . . . . . . . . . . . . . . . . .
Warranty 13. . . . . . . . . . . . . . . . . . . . . . . . . . . . . . . . . . . . . . . . . . . . . . . . .
FRANÇAIS
Consignes importantes de sécurité 14. . . . . . . . . . . . . . . . . . . . . . . . . . .
Exclusion de la garantie 14. . . . . . . . . . . . . . . . . . . . . . . . . . . . . . . . . . . .
Utilisation conforme aux prescriptions 14. . . . . . . . . . . . . . . . . . . . . . . . .
Déclaration de conformité 14. . . . . . . . . . . . . . . . . . . . . . . . . . . . . . . . . . .
Raccordement du chargeur 15. . . . . . . . . . . . . . . . . . . . . . . . . . . . . . . . .
Mise en place des batteries / Montage du clip de ceinture 15. . . . . . . .
Eléments de commande et affichages 16. . . . . . . . . . . . . . . . . . . . . . . . .
Branchement / débranchement du combiné 17. . . . . . . . . . . . . . . . . . . .
Déclaration de combinés supplémentaires 18. . . . . . . . . . . . . . . . . . . . .
Suppression de combinés 18. . . . . . . . . . . . . . . . . . . . . . . . . . . . . . . . . . .
Garantie 19. . . . . . . . . . . . . . . . . . . . . . . . . . . . . . . . . . . . . . . . . . . . . . . . .
ESPAÑOL
Instrucciones de seguridad importantes 20. . . . . . . . . . . . . . . . . . . . . . .
Exclusión de garantía 20. . . . . . . . . . . . . . . . . . . . . . . . . . . . . . . . . . . . . .
Uso previsto 20. . . . . . . . . . . . . . . . . . . . . . . . . . . . . . . . . . . . . . . . . . . . . .
Declaración de conformidad 20. . . . . . . . . . . . . . . . . . . . . . . . . . . . . . . . .
Conectar la estación de carga 21. . . . . . . . . . . . . . . . . . . . . . . . . . . . . . .
Introducir las baterías / instalar el clip de cinturón 21. . . . . . . . . . . . . . .
Elementos de manejo e indicaciones 22. . . . . . . . . . . . . . . . . . . . . . . . .
Conectar y desconectar la parte móvil 23. . . . . . . . . . . . . . . . . . . . . . . .
Registrar partes móviles adicionales 24. . . . . . . . . . . . . . . . . . . . . . . . . .
Borrar partes móviles 24. . . . . . . . . . . . . . . . . . . . . . . . . . . . . . . . . . . . . .
ITALIANO
Istruzioni importanti di sicurezza 25. . . . . . . . . . . . . . . . . . . . . . . . . . . . .
Esclusione di responsabilità 25. . . . . . . . . . . . . . . . . . . . . . . . . . . . . . . . .
Utilizzo conforme alle disposizioni 25. . . . . . . . . . . . . . . . . . . . . . . . . . . .
Dichiarazione di conformità 25. . . . . . . . . . . . . . . . . . . . . . . . . . . . . . . . . .
Collegare la stazione di carica 26. . . . . . . . . . . . . . . . . . . . . . . . . . . . . . .
Inserire la batteria / Montare il clip da cintura 26. . . . . . . . . . . . . . . . . . .
Elementi di comando e di indicazione 27. . . . . . . . . . . . . . . . . . . . . . . . .
Accensione / Spegnimento portatile 28. . . . . . . . . . . . . . . . . . . . . . . . . . .
Registrazione di portatili supplementari 29. . . . . . . . . . . . . . . . . . . . . . . .
Cancellazione portatili 29. . . . . . . . . . . . . . . . . . . . . . . . . . . . . . . . . . . . . .
NEDERLANDS
Belangrijke veiligheidsaanwijzingen 30. . . . . . . . . . . . . . . . . . . . . . . . . . .
Uitsluiting van aansprakelijkheid 30. . . . . . . . . . . . . . . . . . . . . . . . . . . . .
Voorgeschreven gebruik 30. . . . . . . . . . . . . . . . . . . . . . . . . . . . . . . . . . . .
Verklaring van overeenstemming 30. . . . . . . . . . . . . . . . . . . . . . . . . . . . .
Oplaadstation aansluiten 31. . . . . . . . . . . . . . . . . . . . . . . . . . . . . . . . . . . .
Accu’s erin zetten / riemclip monteren 31. . . . . . . . . . . . . . . . . . . . . . . . .
Bedienings−en weergave−elementen 32. . . . . . . . . . . . . . . . . . . . . . . . .
Handset in−/ uitschakelen 33. . . . . . . . . . . . . . . . . . . . . . . . . . . . . . . . . .
Aanmelden van extra handsets 34. . . . . . . . . . . . . . . . . . . . . . . . . . . . . .
Handsets wissen 34. . . . . . . . . . . . . . . . . . . . . . . . . . . . . . . . . . . . . . . . . .
Garantie 35. . . . . . . . . . . . . . . . . . . . . . . . . . . . . . . . . . . . . . . . . . . . . . . . .

Deutsch
BEDIENUNGSĆ
ANLEITUNG
www.olympia-life.com
2Seite
Wichtige Sicherheitsanweisungen
Um ein zuverlässiges Arbeiten mit dem Telefon zu gewährleisten, beachten
Sie bitte folgendes:
SLesen Sie diese Anweisungen bitte sorgfältig durch und beachten
Sie sie bei der Handhabung Ihres Gerätes.
SStellen Sie die Basisstation auf eine rutschfeste Unterlage und
verlegen Sie die Anschluss−Schnüre unfallsicher.
SSetzen Sie das Gerät weder extremen Temperaturen, noch hoher
Luftfeuchtigkeit aus und schützen Sie es vor direkter
Sonneneinstrahlung und starker Staubeinwirkung.
SReinigen Sie das Gerät mit einem weichen feuchten Tuch.
Verwenden Sie keine Lösungsmittel oder aggressive
Reinigungsmittel.
SSchließen Sie nur zugelassenes Zubehör an.
SVerwenden Sie nur das mitgelieferte Netzteil.
SÖffnen Sie nie das Gerät. Falls Sie das Gehäuse des Gerätes
öffnen, erlischt die Garantie und es besteht die Gefahr eines
Stromschlages.
SReparaturen an defekten Geräten sollten Sie immer nur vom
Kundendienst vornehmen lassen.
SFalls Sie das Gerät über einen längeren Zeitraum nicht nutzen,
empfehlen wir, die Akkus zu entnehmen.
STauschen Sie die Akkus nur mit den von uns empfohlenen Typen
aus. Entsorgen Sie defekte Akkus sachgemäß (kein Hausmüll).
Eine Haftung für Schäden aus nicht bestimmungsgemäßem
Gebrauch des Gerätes können wir nicht übernehmen.
Haftungsausschluss
Wir übernehmen keine Garantie für die Richtigkeit der Informationen, die
sich auf technische Eigenschaften sowie die hier vorliegende
Dokumentation beziehen. Das in dieser Dokumentation beschriebene
Produkt und dessen Zubehör unterliegen einer ständigen Verbesserung
und Weiterentwicklung. Aus diesem Grund behalten wir uns das Recht vor,
Komponenten, Zubehör, technische Spezifikationen sowie die hier
vorliegende Dokumentation des Produktes ohne vorherige Ankündigung
jederzeit zu ändern.
Bestimmungsgemäße Verwendung
Dieses Telefon ist geeignet für das Telefonieren innerhalb eines
Telefonnetzes. Jede andere Verwendung gilt als nicht bestimmungsgemäß.
Eigenmächtige Veränderungen oder Umbauten, die nicht in diesem
Handbuch beschrieben sind, sind nicht zulässig.
Konformitätserklärung
Die Konformität des Telefons mit den
EU-Richtlinien wird durch das CE-Zeichen bestätigt.
Die entsprechende Konformitätserklärung kann unter
www.olympia-life.com angesehen oder heruntergeladen
werden.

Deutsch
www.olympia-life.com
BEDIENUNGSĆ
ANLEITUNG 3Seite
Ladestation anschließen
Stecken Sie den Stecker des Netzteils in die Buchse auf der Unterseite der
Ladestation. Stecken Sie das Netzteil in die Steckdose. Die Ladestation ist
nun betriebsbereit.
Akkus einsetzen / Gürtelclip montieren
Öffnen Sie das Akkufach durch Abwärtsschieben des Akkufachdeckels.
Legen Sie die Akkus vom Typ AAA polrichtig in das Akkufach ein.
Das Mobilteil funktioniert nicht mit falsch eingelegten Akkus. Es
ist auch nicht auszuschließen, dass dadurch Schäden am
Mobilteil entstehen.
Setzen Sie den Deckel wieder auf das Akkufach und schieben Sie ihn nach
oben, bis er einrastet. Stellen Sie das Mobilteil in die Basisstation. Ein
akustischer Quittungston und die Ladeanzeige signalisieren den
Ladevorgang.
Hinweis: Lassen Sie die Akkus bei der ersten Inbetriebnahme mindestens
14 Stunden ohne Unterbrechung laden. Nehmen Sie nach Möglichkeit das
Mobilteil erst dann aus der Basisstation, wenn der Ladevorgang beendet ist.
Somit ist ein optimaler Betrieb gewährleistet.
Montieren Sie den Gürtelclip indem Sie ihn von hinten über die
Gehäuserückwand in die dafür vorgesehenen Öffnungen drücken. Der Clip
ist etwas biegsam und rastet spürbar ein.

Deutsch
BEDIENUNGSĆ
ANLEITUNG
www.olympia-life.com
4Seite
Bedienelemente und Anzeigen
1
2
3
4
6
57
8
9
10
11
12
13
1 LED: Akku−Ladeanzeige
2 LED: Blinkt bei eingehenden Anrufen
Blinkt bei vorliegenden Nachrichten
Leuchtet, wenn Anrufbeantworter aktiv ist
3 Internes Gespräch / Externes Gespräch halten u. übergeben
4 Freisprechen
5 Löschen von Eingaben / Mikrofonstummschaltung
6 Display
7 Pfeiltasten zur Navigation im Menü
8 OK-Taste zum Bestätigen / Ein-/Ausschalten des Mobilteils
9 Rückfragetaste
10 Taste Gespräch annehmen / auflegen
11 Zifferntasten mit Buchstabenbedruckung
12 Mobilteilaufnahme (90 Grad in Basisstation drehbar)
13 Paging-Taste (Mobilteile rufen)
Zeigt den Akkufüllstand an. Blinkt bei leerem Akku.
Zeigt an, dass die Amtsleitung belegt ist.
EXT Zeigt ein extern ankommendes Gespräch an.
INT Zeigt ein intern ankommendes Gespräch an.
Blinkt bei nicht angenommenen Anrufen (Einträge in der Anrufer-
liste sind vorhanden).
Tastatursperre ist aktiv.
¯Telefonbuch ist aufgerufen.
MENÜ Menüfunktion ist aufgerufen.
Zeigt an, dass die Mikrofonstummschaltung aktiv ist.
Zeigt Ruhe vor dem Telefon an (Rufton ist ausgeschaltet).
Leuchtet auf, wenn Mobilteil an der Basis angemeldet ist. Blinkt,
wenn kein Funkkontakt besteht.
Zeigt an, dass die Rufnummer länger ist, als sie dargestellt wer-
den kann.
Zeigt an, dass weitere Einträge vorhanden sind.

Deutsch
www.olympia-life.com
BEDIENUNGSĆ
ANLEITUNG 5Seite
1
2
3
4
6
5
8
7
1 Minutentaste
2 Stundentaste
3 Auswahlschalter Zeiteinstellung / Alarmeinstellung
4 LED: Akku−Ladeanzeige
5 Display
6 Auswahlschalter Alarm an / aus
7 Taste zum Beenden des Alarms
8 LED: Akku−Ladeanzeige
Mobilteil ein- / ausschalten
1. Taste zwei Sekunden gedrückt
halten, um das Mobilteil ein- bzw.
auszuschalten.
Hinweis: Wenn Sie das Gerät in die
Basisstation bzw. Ladeschale stellen,
schaltet es sich automatisch ein und
beginnt zu laden.

Deutsch
BEDIENUNGSĆ
ANLEITUNG
www.olympia-life.com
6Seite
Anmelden zusätzlicher Mobilteile
Für jedes zusätzliche GAP-kompatible Mobilteil muss die Anmeldung an
der Basis vorgenommen werden. An jeder Basis können bis zu fünf
Mobilteile angemeldet werden. Jedes Mobilteil kann an vier Basisstationen
betrieben werden.
1. Taste oder mehrfach
drücken.
2. Taste drücken.
3. Nummer der Basisstation eingeben,
für die das Mobilteil angemeldet
werden soll, z.B. 1.
4. 0000 eingeben.
5. Taste drücken.
Hinweis: (Werkseinstellung ist 0000).
6. Taste an der Basisstation gedrückt
halten, bis zwei Signaltöne zu hören
sind.
Hinweis: Nachdem die Verbindung hergestellt worden ist, werden der
Name und die Nummer des Mobilteils (die nächste verfügbare Nummer,
wenn weniger als 5 Mobilteile bereits angemeldet worden sind) im Display
angezeigt.
Mobilteile löschen
Sie können angemeldete Mobilteile auch wieder löschen bzw. abmelden.
1. Taste oder mehrfach
drücken.
2. Taste drücken.
3. Taste oder mehrfach
drücken.
4. Taste drücken.
5. 0000 eingeben.
6. Taste drücken.
Hinweis: (Werkseinstellung ist 0000).
7. Taste oder mehrfach
drücken.
8. Taste drücken.
9. Taste oder mehrfach
drücken, um das zu löschende
Mobilteil auszuwählen.
10.Taste drücken.
11.Taste drücken.
12.Taste mehrfach drücken, um in
den Stand-By Modus zu gelangen.

Deutsch
www.olympia-life.com
BEDIENUNGSĆ
ANLEITUNG 7Seite
Garantie
Lieber Kunde,
wir freuen uns, dass Sie sich für dieses Gerät entschieden haben.
Sollte sich an Ihrem Gerät wider Erwarten ein technisches Problem
ergeben, beachten Sie bitte folgende Punkte:
SDie Garantiezeit für Ihr Gerät beträgt 24 Monate.
SBewahren Sie unbedingt den Kaufbeleg und möglichst die
Originalverpackung auf. Nur so kann innerhalb der Garantiezeit
eine kostenfreie Reparatur oder ein Austausch stattfinden.
SSollte ein Problem auftreten, bitten wir Sie, zuerst unser
Fachpersonal unter folgender Nummer anzurufen:
01 80−51 98 00 0 (1 Minute = 0,12 )
oder eine E−Mail an
zu schicken.
Unser Fachpersonal kann das Problem mit dem Gerät in der
Regel schnell beseitigen.
SSollte wider Erwarten der Fehler telefonisch nicht beseitigt
werden können, bitten wir Sie, das Gerät in der
Originalverpackung mit einer Kopie des Kaufbeleges an
folgende Anschrift zu senden:
OTAS GmbH
Olympiastraße 1
D−26419 Schortens
SGarantiereparaturen können nur mit beigefügtem Kaufbeleg
erfolgen.
Vielen Dank für Ihr Verständnis.

English
OPERATING
INSTRUCTIONS
www.olympia-life.com
8Page
Important Safety Notes
Please observe the following to ensure reliable operation of the telephone:
SRead this manual thoroughly and observe the operating
instructions and information provided.
SPlace the base station on a non−slip surface and lay the
connection cables so they cannot be the source of an accident.
SDo not expose the equipment to extreme temperatures or high
relative humidity and protect it from direct sunlight and dusty
conditions.
SClean the equipment with a soft, damp cloth. Do not use any
solvents or aggressive cleaning agents.
SOnly connect approved accessories.
SOnly use the power plug supplied.
SNever open the unit. Opening the unit annuls claims under the
terms of guarantee and exposes the person to the risk of an
electric shock.
SRepairs to defective units should only be carried out by service
centers recommended by the sales outlet.
SWe recommend removing the batteries if the equipment is not to be
used for longer periods.
SOnly replace the batteries with types recommended by us. Dispose
of defective batteries according to the applicable local laws (not in
household waste). We assume no liability for damage caused by
using the equipment for unintended purposes.
Exemption from Liability
We cannot guarantee the information which relates to the technical
properties or that contained in this document is correct. The product and its
accessories described in this document are subject to constant
improvement and further development. For this reason, we reserve the right
to modify components, accessories, technical specifications and related
documentation of the product described herein without notification.
Intended Use
This telephone is designed for telephoning within a telephone network. Any
other use is considered unintended use. Unauthorized modifications or
reconstruction not described in this manual are not permitted.
Declaration of Conformity
Conformity of the telephone to the EU directives is con-
firmed by the CE symbol.
The corresponding Declaration of Conformity can be
viewed or downloaded from www.olympia-life.com.

English
www.olympia-life.com
OPERATING
INSTRUCTIONS 9Page
Connecting the Charging Station
Insert the power plug in the socket on the underside of the charging station.
Insert the power plug at the other end in the power outlet. The charging
station is now ready to operate.
Inserting the Batteries / Attaching the Belt Clip
Open the battery compartment by sliding the cover down.
Insert two AAA batteries in the compartment, ensuring correct polarity.
The handset does not work if the wrong batteries are inserted.
It is also possible that the handset could be damaged as a
result.
Replace the cover on the battery compartment and slide it on until it locks in
place. Place the handset in the base station. An acoustic acknowledgement
is issued and the charging indicator signals the charging process has
started.
Note: Allow the batteries to be charged for 14 hours without interruption the
first time they are charged. When possible, only remove the handset from
the base station when the charging process has been completed. This
ensures optimum operation.
Attach the belt clip by pressing it from behind over the back housing panel
and inserting the tabs in the slots provided. The clip is slightly flexible and
snaps audibly into place.

English
OPERATING
INSTRUCTIONS
www.olympia-life.com
10Page
Operating Elements and Indicators
1
2
3
4
6
57
8
9
10
11
12
13
1 LED: Battery charging indicator
2 LED: Flashes with incoming calls.
Flashes when messages have been recorded.
Lights up when the answering machine is activated.
3 Internal call / Hold and forward external call
4 Speakerphone
5 Delete input / Muting function
6 Display
7 Arrow keys to navigate in the menu
8 OK key to confirm input / switch handset on/off
9Re−route call button
10 Take call / End call key
11 Digit keys with letter imprint
12 Handset holder (can be turned 90 degrees in the base station)
13 Paging key (call handset)
Indicates the battery charge status. Flashes when battery is
empty.
Indicates that the outside line is engaged.
EXT Indicates an incoming, external call.
INT Indicates an incoming, internal call.
Flashes in the case of calls not taken (entries still available in the
caller list).
Key input lock is active.
Phonebook has been activated.
MENU Menu function has been activated.
Indicates that the microphone muting is active.
Indicates the ringing tone is deactivated.
Lights up when the handset is registered on the base. Flashes if
there is no radio communication contact.
Indicates that the call number is longer than can be displayed.
Indicates that further entries are present.

English
www.olympia-life.com
OPERATING
INSTRUCTIONS 11Page
1
2
3
4
6
5
8
7
1 Minute button
2 Hour button
3 Set time / alarm selector switch
4 LED: Battery charging indicator
5 Display
6 Alarm on / off selector switch
7 Snooze button, to interrupt alarm
8 LED: Battery charging indicator
Switching the Handset On / Off
13.Press and hold the key two
seconds to switch the handset on or
off.
Note: When the handset is inserted in the
base station or charging unit, it switches
on automatically and starts to charge up.

English
OPERATING
INSTRUCTIONS
www.olympia-life.com
12Page
Registering Additional Handsets
Each additional, GAP−compatible handset must be registered on the base
station. Up to five handsets can be registered on each base station. Each
handset can be operated on four base stations.
1. Press the or keys several
times.
2. Press the key.
3. Enter the number of the base station
which the handset should be
registered, e.g. 1.
4. Enter 0000.
5. Press the key.
Note: (Factory setting is 0000).
6. Press and hold the key on the
base station until two acoustic signals
are audible.
Note: After the connection has been established, the name and number of
the handset (the next available number if less than 5 are already registered)
appear in the display.
Deleting Handsets
Handsets which have been registered can be deleted or deregistered.
1. Press the or keys several
times.
2. Press the key.
3. Press the or keys several
times.
4. Press the key.
5. Enter 0000.
6. Press the key.
Note: (Factory setting is 0000).
7. Press the or keys several
times.
8. Press the key.
9. Press the or key several
times to select the handset to be
deleted.
10.Press the key.
11.Press the key.
12.Press the key several times to
enter Standby mode.

English
www.olympia-life.com
OPERATING
INSTRUCTIONS 13Page
Warranty
In the case of a defect, please return the device together with the receipt
and original packing material to the point−of−sale.

Français
MODE
D'EMPLOI
www.olympia-life.com
14Page
Consignes importantes de sécurité
Afin de garantir un travail fiable avec le téléphone, veuillez respecter les
points suivants:
SLisez soigneusement toutes ces instructions et tenez−en compte
lors du maniement de votre appareil.
SMettez la base sur une surface antidérapante et installez les
cordons de raccordement de sorte qu’il ne soient pas source
d’accident.
SNe soumettez l’appareil, ni à des températures extrêmes, ni à une
forte humidité et protégez−le des rayons de soleil directs et de la
forte poussière.
SNettoyez l’appareil avec un chiffon doux et humide. N’employez
pas de solvants ou de produits d’entretien agressifs.
SNe branchez que des accessoires autorisés.
SN’utilisez que le bloc secteur compris dans la livraison.
SN’ouvrez jamais l’appareil. Si vous ouvrez le boîtier de l’appareil, la
garantie expire et vous risquez un choc électrique.
SNe faites réparer un appareil défectueux que par le service
après−vente.
SSi vous n’utilisez pas votre appareil pendant un certain temps,
nous vous recommandons de retirer les batteries.
SNe remplacez les batteries que par les types de batterie que nous
vous recommandons. Eliminez comme il se doit les batteries
défectueuses (ne les jetez pas dans la poubelle). Nous ne pouvons
pas assumer la responsabilité de dommages causés par un emploi
de l’appareil non conforme aux instructions.
Exclusion de la garantie
Nous n’assumons pas de garantie en ce qui concerne l’exactitude des
informations relatives aux propriétés techniques ainsi qu’à cette
documentation. Le produit décrit dans cette documentation ainsi que ses
accessoires sont soumis à une amélioration et à un développement
constants. Pour cette raison, nous nous réservons le droit d’apporter, à tout
moment et sans avis préalable, des modifications relatives aux
composants, aux accessoires, aux spécifications techniques ainsi qu’à la
documentation actuelle de ce produit.
Utilisation conforme aux prescriptions
Ce téléphone est conçu pour téléphoner à l’intérieur d’un réseau. Toute
autre forme d’utilisation n’est pas conforme aux prescriptions. L’apport de
modifications ou de transformations non décrites dans ce manuel n’est pas
autorisé.
Déclaration de conformité
Le symbole CE confirme que le téléphone est bien
conforme aux directives européennes.
On peut consulter ou télécharger la déclaration de confor-
mité à l’adresse suivante :www.olympia-life.com.

Français
www.olympia-life.com
MODE
D'EMPLOI 15Page
Raccordement du chargeur
Mettre la fiche du bloc secteur dans la prise située sur la partie inférieure
du chargeur. Mettez le bloc secteur dans la prise secteur. Le chargeur est
maintenant prêt à fonctionner.
Mise en place des batteries / Montage du clip de
ceinture
Ouvrez le compartiment à batteries en tirant vers le bas le couvercle du
compartiment. Mettez les batteries du type AAA dans le compartiment à
batteries en respectant la polarisation.
Le combiné ne fonctionne pas si les batteries sont placées
dans le mauvais sens. Il n’est pas à exclure que le combiné
puisse, pour cette raison, subir des dommages.
Reposez le couvercle sur le compartiment à batteries et poussez−le vers le
haut jusqu’à ce qu’il s’enclenche. Posez le combiné sur la base. Un signal
sonore de confirmation et l’affichage du chargement signalent que le
chargement a bien lieu.
Remarque:Lors de la première mise en service, laissez les batteries se
charger sans interruption pendant au moins 14 heures. Si possible, ne
retirez le combiné de la base que lorsque le chargement est terminé. Ainsi,
un fonctionnement optimal est assuré.
Montez le clip de ceinture en l’appuyant par derrière, au−dessus de la paroi
arrière du boîtier, dans les ouvertures prévues à cet effet. Le clip est
relativement souple et s’enclenche bien nettement.

Français
MODE
D'EMPLOI
www.olympia-life.com
16Page
Eléments de commande et affichages
1
2
3
4
6
57
8
9
10
11
12
13
1 DEL: Affichage du chargement des batteries
2 DEL: Clignote à l’arrivée de communications
Clignote si des messages sont parvenus
S’allume quand le répondeur est activé
3 Maintenir et transmettre une communication interne / externe
4 Mains libres
5 Suppression d’enregistrements / désactivation du micro
6 Ecran
7 Touches fléchées pour la navigation à l’intérieur du menu
8 Touche OK pour confirmer / Act./désact. du combiné
9 Touche de mise en attente
10 Touche de prise d’appel / de fin d’appel
11 Touche de chiffres imprimées de lettres
12 Logement du combiné (90 degrés de rotation sur la base)
13 Touche de paging (appel de combinés)
Indique le niveau de remplissage des batteries. Clignote quand
les batteries sont vides.
Indique que la ligne principale est occupée.
EXT Indique l’arrivée d’une communication externe.
INT Indique l’arrivée d’une communication interne.
Clignote quand un appel n’a pas été pris.
Le verrouillage du clavier est activé.
Le répertoire est appelé.
MENU La fonction de menu est appelée.
Indique que la désactivation du micro est activée.
Indique que le téléphone est silenc. (la sonnerie d’appel est désact.).
S’allume quand le combiné est connecté sur la base. Clignote
quand il n’y a pas de contact radio.
Indique que le numéro d’appel est plus long que la possibilité de le
représenter.
Indique qu’il y a d’autres messages.

Français
www.olympia-life.com
MODE
D'EMPLOI 17Page
1
2
3
4
6
5
8
7
1 Touche minute
2 Touche heure
3 Interrupteur de sélection :réglage de l’heure / réglage de l’alarme
4 DEL: Affichage du chargement des batteries
5 Ecran
6 Interrupteur de sélection :alarme act./désact.
7 Touche d’arrêt de l’alarme
8 DEL: Affichage du chargement des batteries
Branchement / débranchement du combiné
13.Appuyer pendant 2 secondes sur la
touche pour activer ou désactiver
le combiné.
Remarque:Quand vous mettez l’appareil
sur la base ou sur la coupe de chargement,
il se branche automatiquement et
commence à se charger.

Français
MODE
D'EMPLOI
www.olympia-life.com
18Page
Déclaration de combinés supplémentaires
Chaque combiné supplémentaire compatible GAP doit être déclaré à la
base. On peut déclarer jusqu’à cinq combinés par base. Chaque combiné
peut être utilisé sur quatre bases.
1. Appuyer plusieurs fois sur la touche
ou .
2. Appuyer sur la touche .
3. Saisir le numéro de la base sur
laquelle le combiné doit être déclaré,
par ex. le 1.
4. Saisir le 0000.
5. Appuyer sur la touche .
Remarque: (réglage usine : 0000).
6. Maintenirappuyée la touche de la
base jusqu’à ce que deux signaux
sonores se fassent entendre.
Remarque: Dès que la liaison est établie, le nom et le numéro du combiné
(le prochain numéro disponible quand moins de 5 combinés sont déjà
déclarés) apparaissent sur l’écran.
Suppression de combinés
Vous pouvez effacer à nouveau des combinés déclarés ou en annuler leur
déclaration.
1. Appuyer plusieurs fois sur la touche
ou .
2. Appuyer sur la touche .
3. Appuyer plusieurs fois sur la touche
ou .
4. Appuyer sur la touche .
5. Saisir 0000.
6. Appuyer sur la touche .
Remarque: (réglage usine : 0000).
7. Appuyer plusieurs fois sur la touche
ou .
8. Appuyer sur la touche .
9. Appuyer plusieurs fois sur la touche
ou pour sélectionner le
combiné à supprimer.
10.Appuyer sur la touche .
11.Appuyer sur la touche .
12.Appuyer plusieurs fois sur la touche
pour parvenir au mode d’attente.
Table of contents
Languages:
Other Olympia Telephone manuals

Olympia
Olympia 612X series User manual

Olympia
Olympia 6110 User manual

Olympia
Olympia 4210 User manual

Olympia
Olympia OL3021 User manual

Olympia
Olympia SMILE ANSWER II User manual

Olympia
Olympia 4520 User manual

Olympia
Olympia Smile User manual

Olympia
Olympia CDP24106 User manual

Olympia
Olympia OL2410 User manual

Olympia
Olympia 4310 User manual