manuals.online logo
Brands
  1. Home
  2. •
  3. Brands
  4. •
  5. Pro-Team
  6. •
  7. Vacuum Cleaner
  8. •
  9. Pro-Team Vac Station User manual

Pro-Team Vac Station User manual

Other Pro-Team Vacuum Cleaner manuals

Pro-Team AviationVac User manual

Pro-Team

Pro-Team AviationVac User manual

Pro-Team ProForce 1200XP User manual

Pro-Team

Pro-Team ProForce 1200XP User manual

Pro-Team GoVac BP User manual

Pro-Team

Pro-Team GoVac BP User manual

Pro-Team GoFree Pro 1073160 User manual

Pro-Team

Pro-Team GoFree Pro 1073160 User manual

Pro-Team GoCartVac User manual

Pro-Team

Pro-Team GoCartVac User manual

Pro-Team Super CoachVac User manual

Pro-Team

Pro-Team Super CoachVac User manual

Pro-Team LineVacer User manual

Pro-Team

Pro-Team LineVacer User manual

Pro-Team ProGen 1073300 User manual

Pro-Team

Pro-Team ProGen 1073300 User manual

Pro-Team MegaVac Manual

Pro-Team

Pro-Team MegaVac Manual

Pro-Team QuietPro BP HEPA User manual

Pro-Team

Pro-Team QuietPro BP HEPA User manual

Pro-Team MegaVac User manual

Pro-Team

Pro-Team MegaVac User manual

Pro-Team Sierra User manual

Pro-Team

Pro-Team Sierra User manual

Pro-Team GoVac BP User manual

Pro-Team

Pro-Team GoVac BP User manual

Pro-Team AviationVac User manual

Pro-Team

Pro-Team AviationVac User manual

Pro-Team Super CoachVac HEPA User manual

Pro-Team

Pro-Team Super CoachVac HEPA User manual

Pro-Team ProGuard 15 User manual

Pro-Team

Pro-Team ProGuard 15 User manual

Pro-Team FreeFlex User manual

Pro-Team

Pro-Team FreeFlex User manual

Pro-Team 1071270 User manual

Pro-Team

Pro-Team 1071270 User manual

Pro-Team Alpine User manual

Pro-Team

Pro-Team Alpine User manual

Pro-Team ProVac User manual

Pro-Team

Pro-Team ProVac User manual

Pro-Team ProGuard 15 User manual

Pro-Team

Pro-Team ProGuard 15 User manual

Pro-Team QuietPro BP User manual

Pro-Team

Pro-Team QuietPro BP User manual

Pro-Team LineVacer Manual

Pro-Team

Pro-Team LineVacer Manual

Pro-Team 1076420 User manual

Pro-Team

Pro-Team 1076420 User manual

Popular Vacuum Cleaner manuals by other brands

Bissell LittleGreen Proheat 1425 Series user guide

Bissell

Bissell LittleGreen Proheat 1425 Series user guide

Panasonic MC-YL637S147-AE Service manual

Panasonic

Panasonic MC-YL637S147-AE Service manual

LG A9 Series owner's manual

LG

LG A9 Series owner's manual

Oreck Cordless Captura BK51700 Series user guide

Oreck

Oreck Cordless Captura BK51700 Series user guide

Kogan KAVACROBVWA user manual

Kogan

Kogan KAVACROBVWA user manual

Kränzle VENTOS 50 ID Use and maintenance

Kränzle

Kränzle VENTOS 50 ID Use and maintenance

NEFF N17XH10 0 Series instruction manual

NEFF

NEFF N17XH10 0 Series instruction manual

EVVO Ai35 instruction manual

EVVO

EVVO Ai35 instruction manual

DeWalt DWH200D instruction manual

DeWalt

DeWalt DWH200D instruction manual

Pontec Pondomatic Vacuum Cleaner operating instructions

Pontec

Pontec Pondomatic Vacuum Cleaner operating instructions

Cleanmaxx PC-P007E instruction manual

Cleanmaxx

Cleanmaxx PC-P007E instruction manual

RIDGID WD1685AU0 owner's manual

RIDGID

RIDGID WD1685AU0 owner's manual

Ezviz RE4P manual

Ezviz

Ezviz RE4P manual

STG global TANVAC HDV3000 Operator's manual

STG global

STG global TANVAC HDV3000 Operator's manual

Shark ROTATOR PRO COMPLETE NV550 Series manual

Shark

Shark ROTATOR PRO COMPLETE NV550 Series manual

Factory M3340 operating manual

Factory

Factory M3340 operating manual

Shop-Vac VN92 SERIES user manual

Shop-Vac

Shop-Vac VN92 SERIES user manual

Nobles 608669 Operator and parts manual

Nobles

Nobles 608669 Operator and parts manual

manuals.online logo
manuals.online logoBrands
  • About & Mission
  • Contact us
  • Privacy Policy
  • Terms and Conditions

Copyright 2025 Manuals.Online. All Rights Reserved.

Items Included for Installation:
a. ProTeam Vac Station
b. Mounting Bracket (Factory Installed)
c. Tool storage for cover plate
d. Wall Bracket
e. 2 in. wall bracket screws (3)
Tools Needed for Installation:
Stud Finder
Pen or Pencil
Measuring Tape or Yard Stick
Level
Phillips Head Screwdriver
Drill with 1/8 in. bit
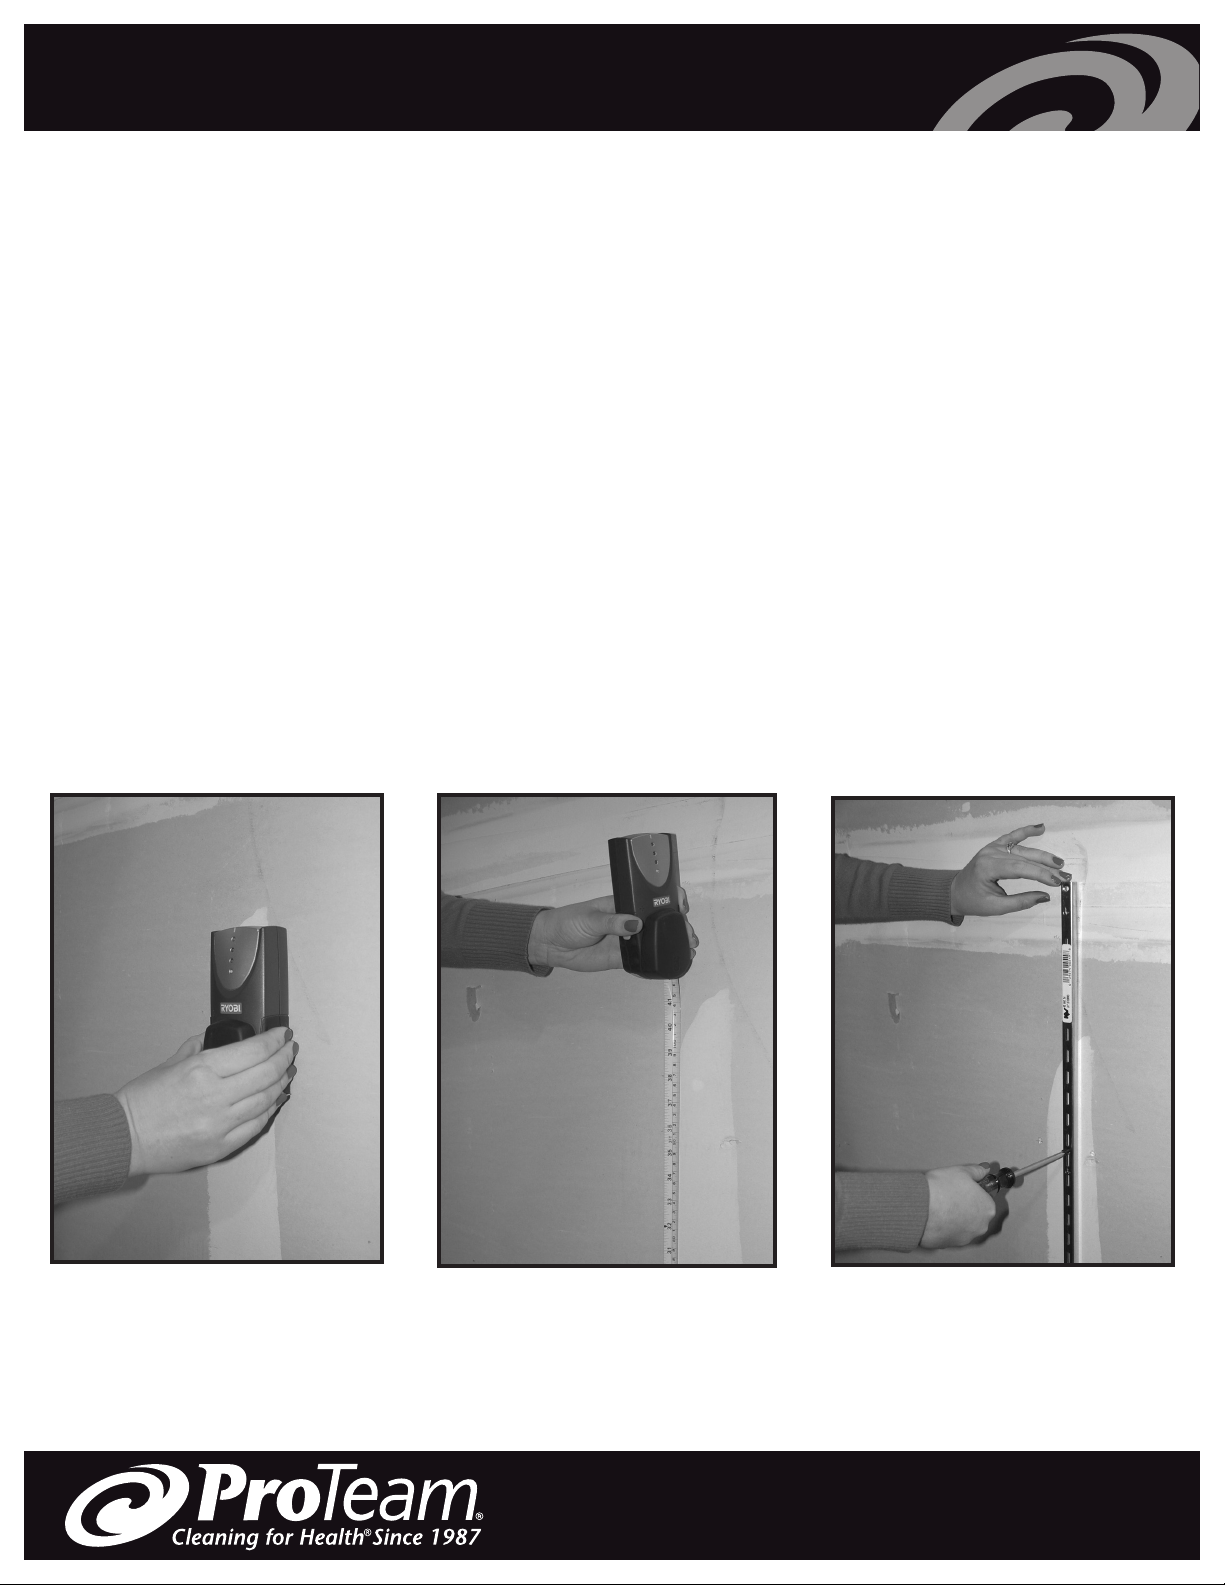
Using a stud finder in the area you wish
to mount the ProTeam Vac Station,
locate and mark a wall stud. Be sure to
mount the Vac Station into a stud, not
just the wall board or sheet rock.
Step 1
Using a tape measure, mark a spot
on the wall 36 in. from the floor.
This will be the location of the
middle mounting hole and screw
for the wall bracket.
Step 3
First Inspect your ProTeam
Vac Station and make sure
that the following items
have been included:
Using a drill with a 1/8 in. bit, drill a
hole 2 in. deep on the mark you made
in step 2. Line the middle hole of the
wall bracket up with the hole and
insert a wall bracket screw. Leave the
screw loose for now.
Step 2
Warning!
DO NOT treat the Vac Station as a toy or seat.
DO NOT take any short cuts or skip steps in the installation of the Vac Station.
Failing to follow instructions, can lead to failure of the Vac Station, damage to the
mounting surface, injury from falling equipment, or any combination thereof.
TURN OFF any ProTeam vacuum before storing it on the Vac Station.
DO NOT LEAVE any ProTeam vacuum plugged in while being stored on the Vac
Station.
USE AND INSTALL ONLY according to the instructions contained in this instruction
sheet. Use only the manufacturer-supplied parts or recommended parts.
DO NOT STORE anything other than your ProTeam vacuum, attachments and
filters on the Vac Station.
DO NOT store any chemicals or materials near the Vac Station that may be
flammable or combustible.
SECURE ONLY to a wall stud. If you are not sure how to find a wall stud, consult
with qualified personnel.
BEFORE DRILLING make sure there are no electrical or pluming lines running
through the wall were you plan to mount the ProTeam Vac Station.
Vac Station Installation
[email protected]
866.888.2168 106848 4/11
Step 4
Vac Station Installation
[email protected]
866.888.2168 106848 4/11
Using a level, align the wall bracket into
the vertical position. Mark the location
of the other two mounting screw points
at both ends of the wall bracket.
Step 5
Rotate the wall bracket back into the
vertical position and place screws in
the last two holes and tighten. Don’t
forget to tighten the center screw
that was left loose in Step 3.
Step 7
Line up the standard guide and mounting
bracket on the Vac Station. Mount the
vac station at the proper height.
You may need to loosen the three mount-
ing screws a little if the bracket doesn’t
slide into a secure fit.
Step 6
Rotate the wall bracket to the side and
with the same 1/8 in. bit, drill two
more holes 2 in. deep, one on each
of the marks you made in Step 4.
Step 8
The proper height of the ProTeam Vac
Station is determined by the user of
the vacuum. The vacuum user should
be able to back up to the Vac Station
and without bending his or her knees
or rising on the balls of his or her feet,
slip the vacuum on or off of the Vac
Station easily.
Step 9
The ProTeam Vac Station has space
to hold all of your ProTeam vacuum
tools, power cord and filters.