Prodigy VOICE User manual

Blood Glucose Monitoring System
®
Owner’s Manual

PRODIGY Voice® Blood Glucose Meter PRODIGY Voice® Blood Glucose Meter
Owner’s Manual Owner’s Manual
2 3
Dear Prodigy®Meter Owner:
Thank you for choosing the Prodigy Voice®meter as
your blood glucose monitoring system. Please read this
manual carefully as it contains important information
about your new Prodigy®system. A warranty
registration card is included with your system. Please
return the completed card to us or complete warranty
online at www.prodigymeter.com.
Prodigy®meters are designed to help you and your
healthcare professionals monitor your blood glucose
levels. This owner’s manual will help you learn how to
use your Prodigy®meter effectively. Customer Care is
available 24 hours, 7 days a week by calling toll free
1.800.243.2636. All questions concerning test results
should be directed to your healthcare professional.
Prodigy®meters have the latest technology for
blood glucose monitoring and are made with quality
components. All Prodigy®meters are easy to use, give
you fast, accurate test results with a minimal sample of
blood, have large, easy-to-read display screens, and are
lightweight and portable for your convenience.
Prodigy®meters:
• Require No Coding, allowing you to save time
and avoid human error due to improper coding.
• Allow you to perform Alternate Site Testing (AST).
• Have memory and data management capabilities.
Prodigy’s®free software gives you and your
healthcare professionals powerful graphic tools to
manage your diabetes.

PRODIGY Voice® Blood Glucose Meter PRODIGY Voice® Blood Glucose Meter
Owner’s Manual Owner’s Manual
4 5
Table of Contents
Letter to Meter Owner..................................................2-3
Table of Contents..........................................................4-5
Important Safety Instructions......................................6-8
Important Health-Related Information................... 9-10
Alternate Site Testing (AST)....................................11-13
About Prodigy®Test Strips ......................................14-16
Key Functions of the Test Strip................................. 14
Important Test Strip Information........................ 15-16
Introduction to Prodigy®Meters ............................17-18
Intended Use.............................................................. 17
Test Principle ........................................................ 17-18
Contents of the Prodigy Voice®Meter ........................18
Setting up the Prodigy Voice®Meter.....................19-30
Key Functions of the Meter................................. 19-20
Meter Display ...................................................... 21-22
Speaking Function............................................... 23-24
Setup Steps........................................................... 25-30
Control Solution Testing..........................................31-38
Performing a Control Solution Test .................. 34-38
Performing a Blood Glucose Test ..........................39-51
Preparing the Lancing Device............................ 39-41
Getting a Blood Sample ..................................... 41-43
Tips for Applying Blood Without Sight............. 44-47
Applying Blood to the Test Strip........................ 48-51
Using the Meter Memory........................................52-54
Specications..................................................................55
Viewing Results on a Personal Computer ..................56
Caring for your Prodigy®Meter..............................57-61
Cleaning your System............................................... 57
Lancing Device .......................................................... 57
Disinfecting your System.................................... 57-58
Storing your System .................................................. 58
Battery ........................................................................59
Low Battery........................................................... 59-60
Battery Replacement........................................... 60-61
System Troubleshooting .........................................62-68
Special Messages ................................................ 62-63
Error Messages .................................................... 63-64
Troubleshooting Guide....................................... 65-68
Information About your Prodigy®Meter...............69-77
Comparing Meter and Laboratory Results....... 69-71
Performance Characteristics .................................... 71
Expected Test Results................................................72
Unexpected Test Results..................................... 73-74
Accuracy of Meter Measurements .................... 75-77
Symbols Information .....................................................78
Warranty Information ....................................................79
Limited Lifetime Warranty ........................................ 79

PRODIGY Voice® Blood Glucose Meter PRODIGY Voice® Blood Glucose Meter
Owner’s Manual Owner’s Manual
6 7
Important Safety Instructions
Read this before using your Prodigy®meter. The
following basic safety precautions should always
be taken.
• Your Prodigy®meter, test strips, lancets and
lancing device are for single patient use only.
Do not share them with anyone, including
other family members. Do not use on
multiple patients.
• Close supervision is necessary when the
device is used by, on, or near children,
handicapped persons or invalids.
• Use the device only for the intended use
described in this manual.
• Do not use test strips and control solutions
with your Prodigy®meter that are not
supplied by Prodigy®.
• Do not use the device if it is not working
properly, or if it has suffered any damage.
• Before using any product to test your blood
glucose, read all instructions thoroughly
and practice the test. Do all quality control
checks as directed and consult with a
diabetes healthcare professional.
• Keep the test strip vial away from children;
the vial cap and the test strips can be a
potential choking hazard.
• Never chew or swallow a test strip. If this
occurs, please seek medical assistance
immediately.
• All parts of this kit are considered
biohazardous and can potentially transmit
infectious diseases, even after you have
performed cleaning and disinfection.
• These devices are intended to be used for
patient self-monitoring and should not be
used to collect blood from more than one
person as this poses a risk of transmitting
blood-borne pathogens such as Hepatitis B
or HIV.
For further information, please refer to:
“FDA Public Health Notication: Use of Fingerstick
Devices on More than One Person Poses Risk
for Transmitting Blood-borne Pathogens: Initial
Communication” (2010) http://www.fda.gov/
MedicalDevices/Safety/AlertsandNotices/
ucm224025.htm

PRODIGY Voice® Blood Glucose Meter PRODIGY Voice® Blood Glucose Meter
Owner’s Manual Owner’s Manual
“CDC Clinical Reminder: Use of Fingerstick
Devices on More than One Person Poses Risk
for Transmitting Blood-borne Pathogens” (2012)
http://cdc.gov/injectionsafety/Fingerstick-
DevicesBGM.html
DO NOT CHANGE YOUR TREATMENT BASED ON A
SINGLE RESULT THAT DOES NOT MATCH HOW YOU
FEEL OR IF YOU BELIEVE THAT YOUR TEST RESULT
COULD BE INCORRECT.
Important Health-Related Information
Severe dehydration and excessive water loss
may cause false low results. If you believe you
are suffering from severe dehydration, consult a
healthcare professional immediately.
Under normal blood concentrations and
conditions, the following should not signicantly
affect results:
• Elevated blood triglycerides
• Reducing substances such as uric acid and
ascorbic acid
• Acetaminophen
• Dopa
• Methyldopa
• L-dopa
• Tolbutamide
If you are experiencing symptoms that are not
consistent with your blood glucose test results
and you have followed all instructions described
in this owner’s manual, contact your healthcare
professional.
8 9

PRODIGY Voice® Blood Glucose Meter PRODIGY Voice® Blood Glucose Meter
Owner’s Manual Owner’s Manual
Test results below 60 mg/dL (3.3 mmol/L) indicate
low blood glucose (hypoglycemia). Test results
greater than 240 mg/dL (13.3 mmol/L) indicate
high blood glucose (hyperglycemia). If your
results are below 60 mg/dL or above 240 mg/dL,
repeat the test, and if the results are still below 60
mg/dL (3.3 mmol/L) or above 240 mg/dL (13.3
mmol/L), consult your healthcare professional
immediately.
Inaccurate results may occur in severely
hypotensive individuals or patients in shock.
Inaccurate results may occur for individuals
experiencing a hyperglycemic-hyperosmolar
state. Please refer to the test strip package insert
for additional important information.
Alternate Site Testing (AST)
There are important limitations to Alternate Site
Testing (AST). Please consult your healthcare
professional before performing AST.
What is AST?
Alternate Site Testing (AST)
means you can use parts
of the body other than
your ngertips to check
your blood glucose levels.
Prodigy®meters allow you to
test on your palm, forearm,
upper arm, calf or thigh.
See Figure 1.
What is the Advantage?
Fingertips feel pain more
readily because they are full of
nerve endings (receptors). At other body sites,
nerve endings are not so numerous and you will
not feel as much pain as you will experience at
the ngertip.
Figure 1
10 11

PRODIGY Voice® Blood Glucose Meter PRODIGY Voice® Blood Glucose Meter
Owner’s Manual Owner’s Manual
When to use AST?
Food, medication, illness, stress and exercise can
affect blood glucose levels. Capillary blood at
the ngertip reects these changes faster than
capillary blood at other sites. Therefore, if you
are testing your blood glucose level during or
immediately after a meal, physical exercise or
stressful event, take the blood sample from your
ngertip only.
Use AST only:
vTwo hours or more after your last meal.
vTwo hours or more after taking insulin.
vTwo hours or more after exercise.
vDuring a relaxed and calm state.
Do not use AST if:
vYou have reason to believe you have
hypoglycemia or hyperglycemia.
vYour routine glucose results are often
uctuating.
vYou are pregnant.
*To increase accuracy when using AST, rub
the puncture site before extracting blood. An
alternate site device is required to perform AST. If
you do not have an alternate site device but would
like to use one, please contact Customer Care at
1.800.243.2636.
12 13

PRODIGY Voice® Blood Glucose Meter PRODIGY Voice® Blood Glucose Meter
Owner’s Manual Owner’s Manual
14 15
About Prodigy® Test Strips
Key Functions of the Test Strip
All Prodigy®meters measure the amount of sugar
in the blood, commonly referred to as blood
glucose. Blood is applied to the opening of the
absorbent channel on the end of the test strip
and is automatically drawn into the test strip.
The test strip consists of the following parts:
Absorbent Channel
Apply a drop of blood and it will be
drawn in automatically.
Conrmation Window
Shows whether enough blood has been drawn
into the test strip’s absorbent channel.
Test Strip Handle
Hold this part to insert the test strip into the test
strip port on the meter.
Contact Bars
Insert this end of the test strip into the meter.
Push it in rmly until it will not go any further.
Please refer to the “Performing a Blood Glucose Test”
section for complete instructions.
Important Test Strip Information
• Store test strip packages in a cool, dry place
between 39°F–104°F (4°C–40°C). Keep
away from direct sunlight and heat. Do not
refrigerate. Do not store in your car.
• Store your test strips in their original vial
only. Do not transfer them to a new vial or
any other container.
• With clean, dry hands you may touch the test
strip anywhere on its surface when removing
it from the vial or inserting it into the meter.
• Do not clean the testing site with alcohol.
Instead, wash the test site thoroughly with
soap and water only.
• Immediately use a test strip after removing it
from the vial, replace the vial cap and close it
tightly to prevent exposure to moisture.
• Only apply a blood sample or a control
Figure 2

PRODIGY Voice® Blood Glucose Meter PRODIGY Voice® Blood Glucose Meter
Owner’s Manual Owner’s Manual
16
solution sample to the test strip’s absorbent
channel. Applying other substances to the
test strip’s absorbent channel will cause
inaccurate results.
• Record the discard date on the vial label
when you rst open it. Discard remaining
test strips 90 days after the rst opening
date.
• Do not use test strips beyond the expiration
date printed on the package.
• After removing the test strip from the vial,
insert it directly into the meter. Do not lay
the test strip on any other surface.
Warning: Keep the test strip vial away from
children; the vial cap and the test strips can
be a potential choking hazard. Never chew or
swallow a test strip. If this occurs, please seek
medical assistance immediately.
17
Introduction to Prodigy® Meters
Intended Use
Prodigy®blood glucose monitoring systems
are intended for use outside the body (in vitro
diagnostic use only) and should only be used for
blood glucose (blood sugar) testing with fresh
capillary whole blood samples.
These systems are intended for use in the home
and in clinical settings and should not be used
for the diagnosis of diabetes or for the testing
of newborns. Consult your healthcare provider if
unusual readings occur.
Test Principle
Blood glucose is measured by an electrical
current that is produced when a blood sample
mixes with the reagent (special chemicals) of the
test strip. The electrical current changes with the
amount of glucose in the blood sample. Prodigy®
meters measure the strength of the electrical
current, calculate your blood glucose level
and then display your result in either mg/dL or
mmol/L.

PRODIGY Voice® Blood Glucose Meter PRODIGY Voice® Blood Glucose Meter
Owner’s Manual Owner’s Manual
18
Prodigy®meters, test strips and control solutions
have been designed, tested and proven to work
together as a system to produce accurate blood
glucose test results.
Important: Use only Prodigy®control solutions
and test strips with your Prodigy®meter. Using
other test strips and control solutions with this
meter can produce inaccurate results.
Contents of the Prodigy Voice® Meter
The Prodigy Voice®meter is available as a meter
kit only. Please review the contents of your
purchase to conrm that all the components are
included as listed on the side of your meter box.
Setting up the Prodigy Voice® Meter
Key Functions of the Meter
Test Strip Slot
Insert the test strip
here. The meter will
turn on automatically.
LCD Display
Guides you through
the test using symbols
and simple messages.
Repeat Button
Repeats last message
spoken.
Set Button
Used to setup the meter.
Data Port
Port for USB cable connection to
your computer.
19
Figure 3

PRODIGY Voice® Blood Glucose Meter PRODIGY Voice® Blood Glucose Meter
Owner’s Manual Owner’s Manual
Key Functions of the Meter
Up & Down Button
Used to navigate
through the system.
“M” Button
Turns the meter on
or performs other
fuctions described in
the manual.
20
Figure 4
Ear Phone Jack
Used to attach
headphones.
21
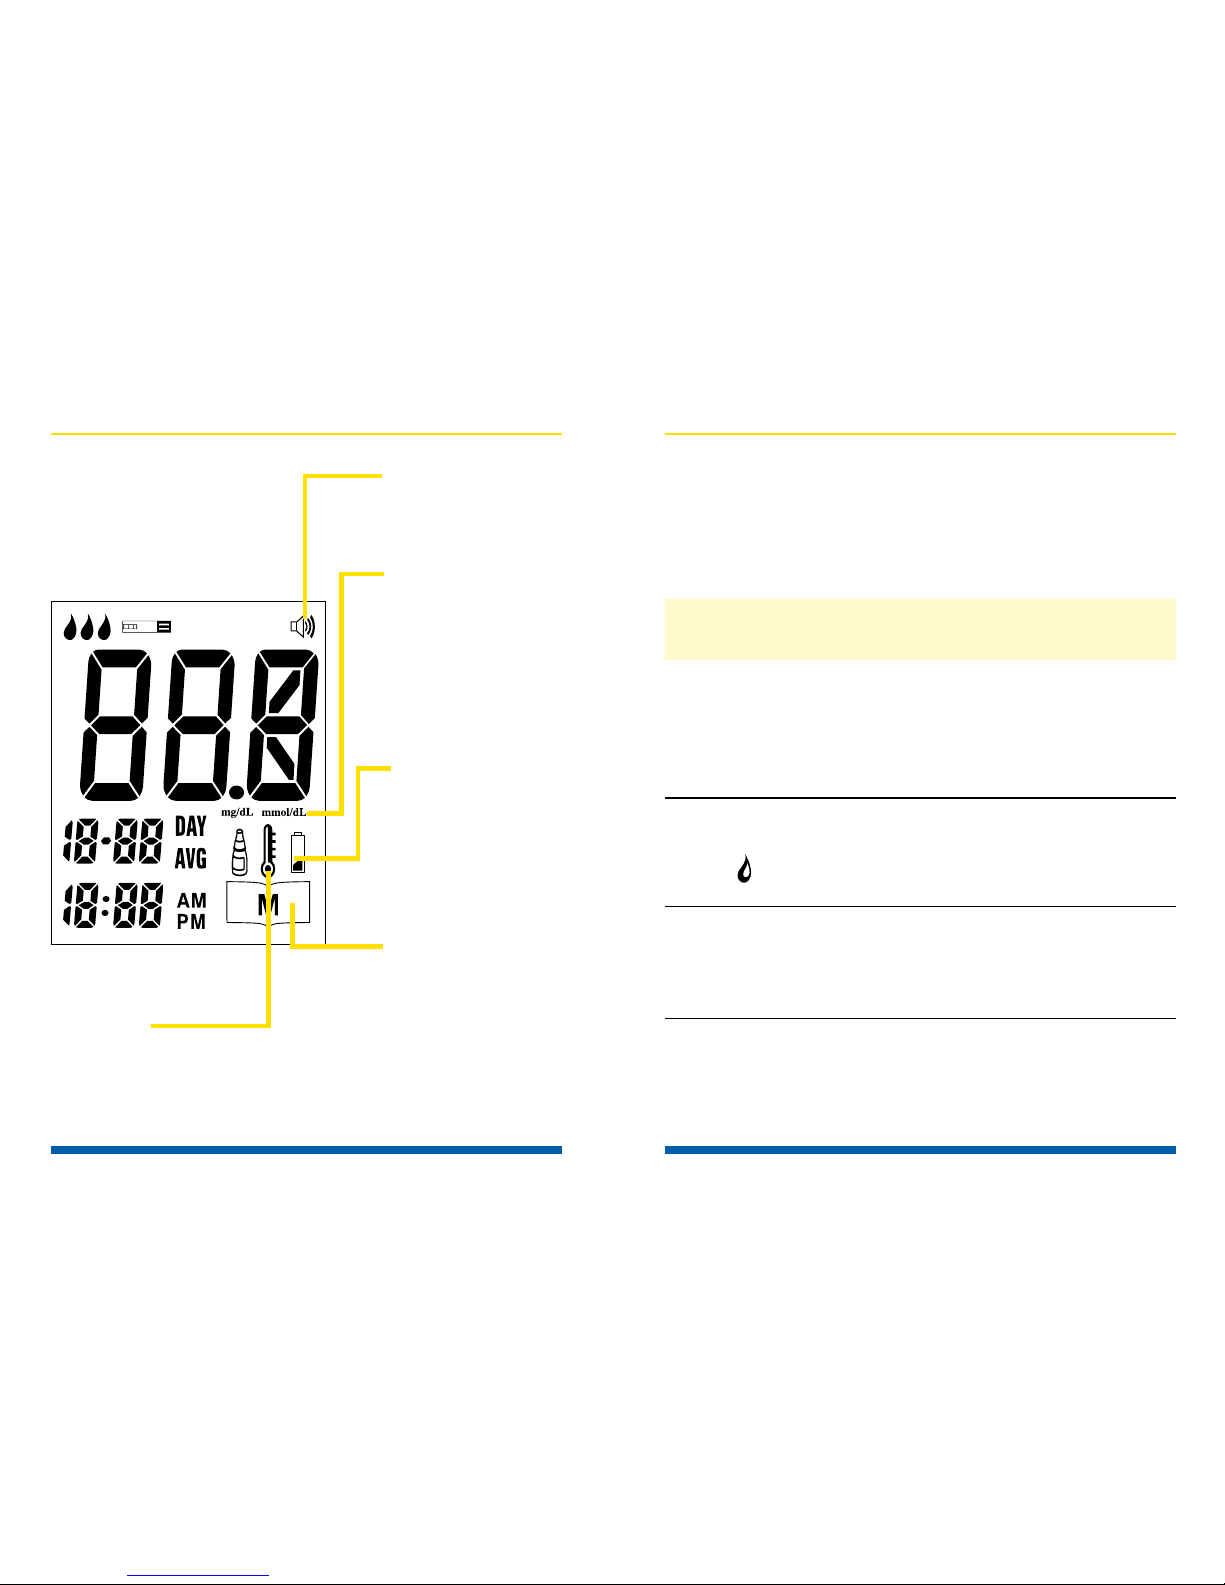
Meter Display
Blood Drop
Symbol
Flashes when
sample should
be applied.
Test Result Area
Displays test results.
Day Average
Indicates that the
display test result
is an average.
Date
Time
Control Solution Test Symbol
Shows that you are in
control solution mode.
Figure 5
Test Strip Symbol
Appears when
the meter is in
testing mode.
PRODIGY Voice® Blood Glucose Meter PRODIGY Voice® Blood Glucose Meter
Owner’s Manual Owner’s Manual
Voice Symbol
Shows if audio
function is on.
Unit of Measure
Indicates what
unit of measure
the test result is
displayed in.
Low Battery
Symbol
Appears when
the battery
power is low.
Memory
Symbol
Appears when
you review the
memory.
22
Figure 6
Temperature
Symbol
Appears when temperature
is outside of operating
range.
23
Speaking Function
The Prodigy Voice®meter talks you through
each step of your setup, testing procedure and
memory recall.
When does the
meter speak?
When the meter is
turned on.
When the meter is ready
to test ( appears on display).
When the test is completed
(the result appears on the
display).
What does the
meter say?
Thank you for using
Prodigy Voice®. Today’s
date November 18,
2013. The time 10:08 PM.
Please apply blood to the
test strip
Your blood glucose (num-
ber) milligrams per decili-
ter/millimoles per liter.

PRODIGY Voice® Blood Glucose Meter PRODIGY Voice® Blood Glucose Meter
Owner’s Manual Owner’s Manual
24
Speaking Function
When does the
meter speak?
When you turn off
the meter
When a used test strip
is inserted
When blood is applied
to the test strip
What does the
meter say?
Goodbye.
Test strip has been used.
Replace with a new one.
Now testing.
25
Setup Steps
The Prodigy Voice® meter has several different
settings that may need to be adjusted before
using the meter. You should check the time and
date each time the batteries are replaced.
STEP 1: Insert the Batteries
Open the battery cover located on the
backside of the meter. Insert two (2)
AAA Alkaline batteries and align them
properly. When batteries are installed
correctly, the meter will turn on.
See Figure 7.
Voice speaks: “Your Prodigy meter is
on. Goodbye.”
STEP 2: Enter Setting Mode
Start with the meter off. Then
press and hold the “SET” button
located on the front of the meter
until the meter speaks. The
meter is now in setting mode.
See Figure 8.
Figure 7
Figure 8
PRODIGY Voice® Blood Glucose Meter PRODIGY Voice® Blood Glucose Meter
Owner’s Manual Owner’s Manual
26
Voice speaks: “Your Prodigy®meter is on. You
are now in setting mode.”
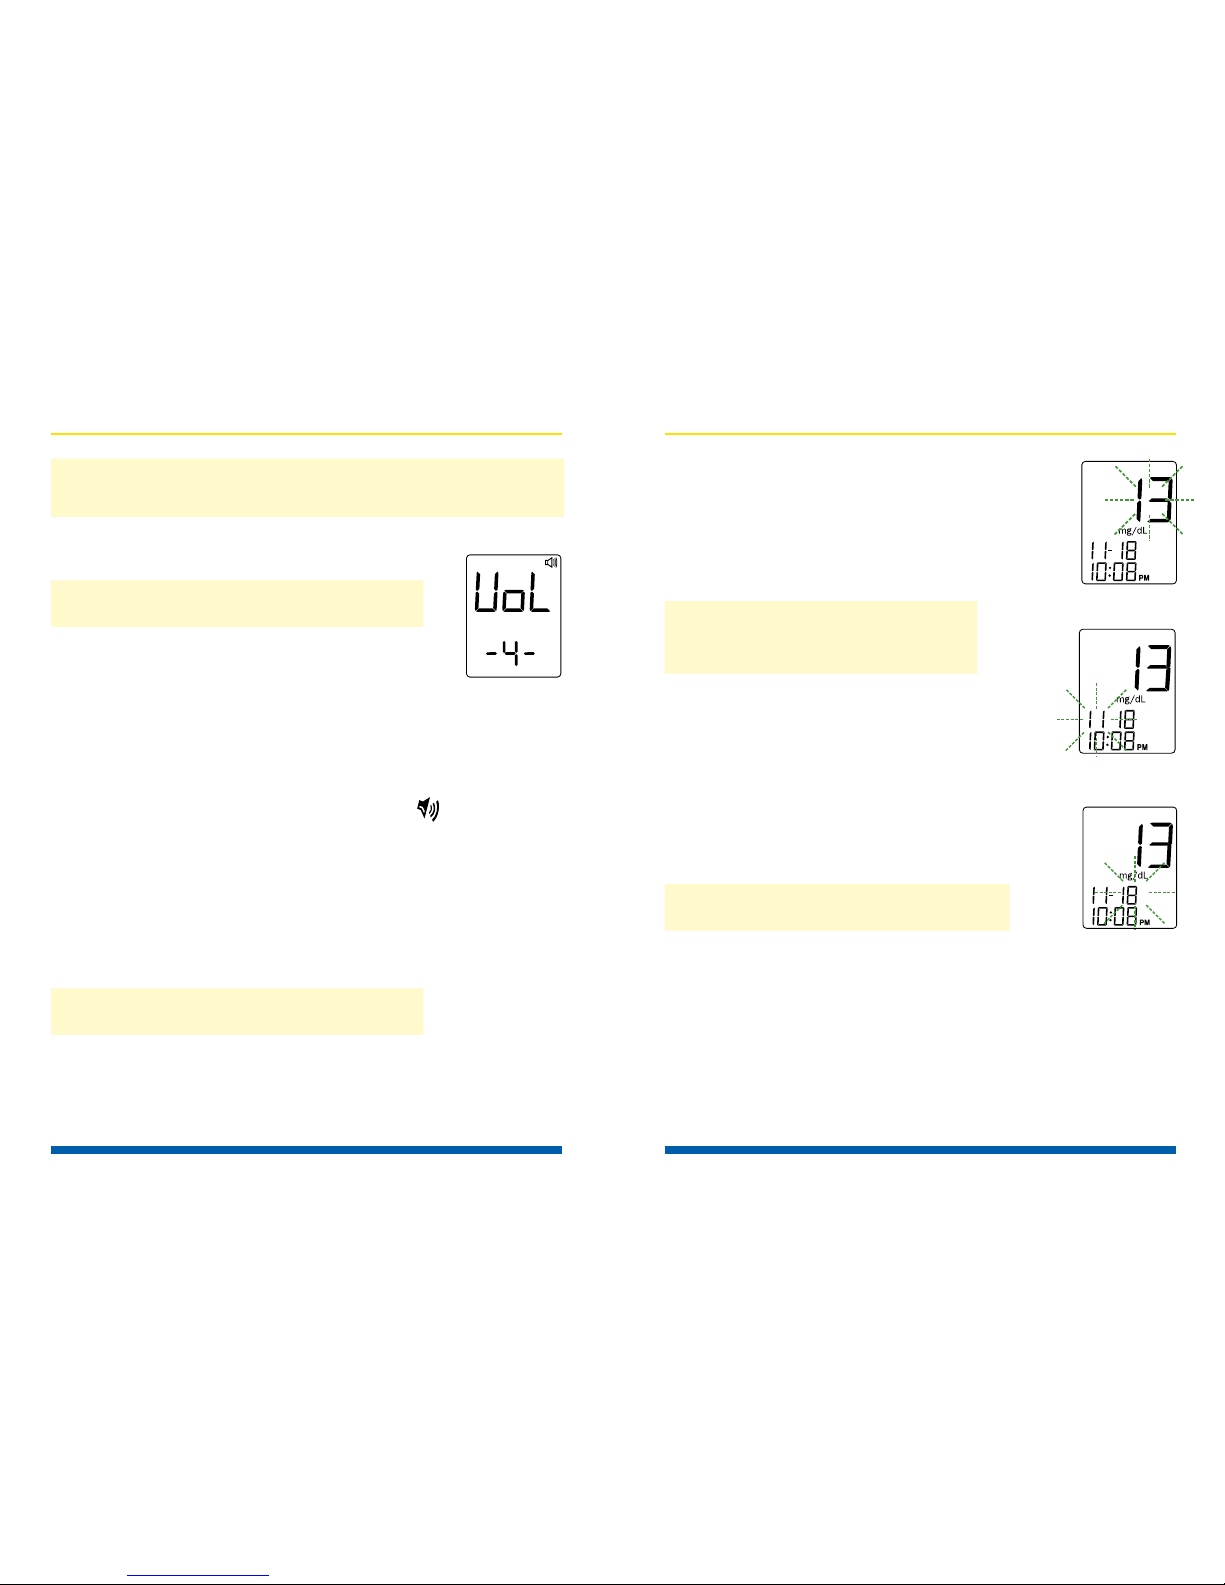
STEP 3: Setting Volume Level
Voice speaks: “Volume Level 4.”
The meter displays “VOL” Press the
“Up” or “Down” button to select the
speaking volume. See Figure 9.
• Number 0 indicates that the speaking function
is turned off.
• Numbers 1 to 7 indicate speaking
volume from low to high, where “ ”
is displayed on the LCD during testing.
Then press the “SET” button and the year
segment will appear and start ashing.
STEP 4: Set the Year
Voice speaks: “The Year 2013.”
See Figure 10.
Press the “Up” or “Down” button to advance the
year. With the correct year on the display, press
Figure 9
27
the “SET” button and the date will
appear on the display with the month
segment ashing. See Figure 11.
STEP 5: Set the Month
Voice speaks: “The Month
November.”
Press the “Up” or “Down” button to
advance the month. With the correct
month on the display, press the “SET”
button and the date segment will
start ashing. See Figure 12.
STEP 6: Set the Date
Voice speaks: “The Date 18.”
Press the “Up” or “Down” button to
advance the date. With the correct date
on the display, press the “SET” button
and the time will appear on the display
with the hour segment ashing.
See Figure 13.
Figure 11
Figure 12
Figure 10

PRODIGY Voice® Blood Glucose Meter PRODIGY Voice® Blood Glucose Meter
Owner’s Manual Owner’s Manual
28
STEP 7: Set the Hour
Voice speaks: “The Hour 10 PM.”
Press the “Up” or “Down” button to
advance the hour. With the correct
hour on the display, press the “SET”
button and the minutes segment will
start ashing. See Figure 14.
STEP 8: Set the Minutes
Voice speaks: “The Minutes 08.”
Press the “Up” or “Down” button to advance the
minutes. With the correct minutes on the display,
press the “SET” button and the current unit of
measurement will start ashing. See Figure 15
STEP 9: Select Unit of Measurement
Voice speaks: “Blood glucose unit
is mg/dL.”
Press and hold the “Up” or “Down” button until
Figure 14
Figure 13
29
the unit of measurement you are
choosing appears on the display. Press
the “SET” button and the memory
segment will start ashing. Your meter
can display test results in milligrams per
deciliter (mg/dL) or millimoles per liter
(mmoL/L).
• The mg/dL unit is standard in the
United States.
• The mmol/L unit is standard in
Canada and Europe.
Important: Day averages are calculated from
results obtained during the 7, 14, 21, 30, 60
and 90 days preceding the current date and
time settings.
STEP 10: Delete Memory
When the “dEL” symbol and the “ ”
symbol appear on the display, you can
choose to clear the memory.
See Figure 16.
Voice speaks: “Deleting record function: To skip,
press ‘Set’ button. If you press the ‘M’ key for
ve (5) seconds, all records will be deleted.”
Figure 16
Figure 15

PRODIGY Voice® Blood Glucose Meter PRODIGY Voice® Blood Glucose Meter
Owner’s Manual Owner’s Manual
30
If you do not want to clear the memory,
press the “SET” button to skip this step.
If you want to clear ALL memory, press
and hold the “M” button for ve (5)
seconds. “- - -” will appear to
indicate all memory has been deleted.
See Figure 17.
Setup is now completed. “OFF” is
displayed before the meter shuts down.
See Figure 18.
Voice speaks: “Volume level one,
the date November 18 2013. The
time 10:08 pm. Milligrams per
deciliter. Goodbye.” Figure 18
Figure 17
31
Control Solution Testing
If your Prodigy® control solution did not come with
a Prodigy® Control Solution Insert, the following
information shall take the place of the insert.
Product Numbers:
Intended Use:
Prodigy® control solution is a red liquid that
contains glucose that will react with test strips and
produce a test result. You can use either high or
low Prodigy® control solution with your Prodigy®
system.
Summary:
Prodigy® control solutions contain certain
amounts of glucose that can be tested with all
Prodigy® brand glucose meters. Test results
should fall within the control ranges printed on
the back of your Prodigy® test strip vial.
990310 (Low) 53310 (Low) 53350 (High)

PRODIGY Voice® Blood Glucose Meter PRODIGY Voice® Blood Glucose Meter
Owner’s Manual Owner’s Manual
32
Caution: The control solution ranges are located
on the back of the Prodigy® test strip vial. They
are not recommended target ranges for your
blood glucose.
Important Information:
• Use only Prodigy® control solutions with your
Prodigy® meter.
• Check the expiration date on the bottle.
Do not use if expired.
• Use within a period of 90 days from the date
that you rst open it. Record the discard date
on the control solution bottle when you rst
open it to serve as a reminder to discard after
90 days.
• For in vitro diagnostic use.
Why Perform a Control Solution Test:
• To ensure that your meter and test strips are
working properly together.
• To allow you to practice testing without using
your own blood.
When to use:
• Once a week (to ensure that you continue to
have accurate results).
33
• When you begin using a new vial of test strips.
• When test strips have been exposed to extreme
environmental conditions.
• If you drop the meter.
• If you change the battery in the meter.
Storage and Handling:
• Store the control solution tightly closed at
temperatures below 86°F (30°C).
• Do not refrigerate. Do not store in your car.
Composition:
Glucose Nonreactive Ingredients
(% w/v) (% w/v)
Low Solution 0.05 99.95
High Solution 0.19 99.81
PRODIGY Voice® Blood Glucose Meter PRODIGY Voice® Blood Glucose Meter
Owner’s Manual Owner’s Manual
Performing a Control Solution Test
Start with the meter off.
STEP 1: Wash your Hands
Wash your hands with mild soap and water
before performing any test. Be sure to dry
them thoroughly.
STEP 2: Insert Test Strip
Insert a test strip with the contact bar end
entering into the test strip slot rst. Push the
test strip as far as it will go without bending it.
The meter turns on automatically.
STEP 3: Mark as a Control Solution Test
After the “ ” symbol appears on the display,
press the “M” button and a “ ” symbol appears
on the display. With the “ ” symbol on the
display, the meter will not store your test result
in the memory. If you decide not to perform
a control solution test, press the “M” button
again and the “ ” symbol will disappear.
34
Important: Be sure that you are in control
solution mode so that the test result will not be
stored in the meter memory.
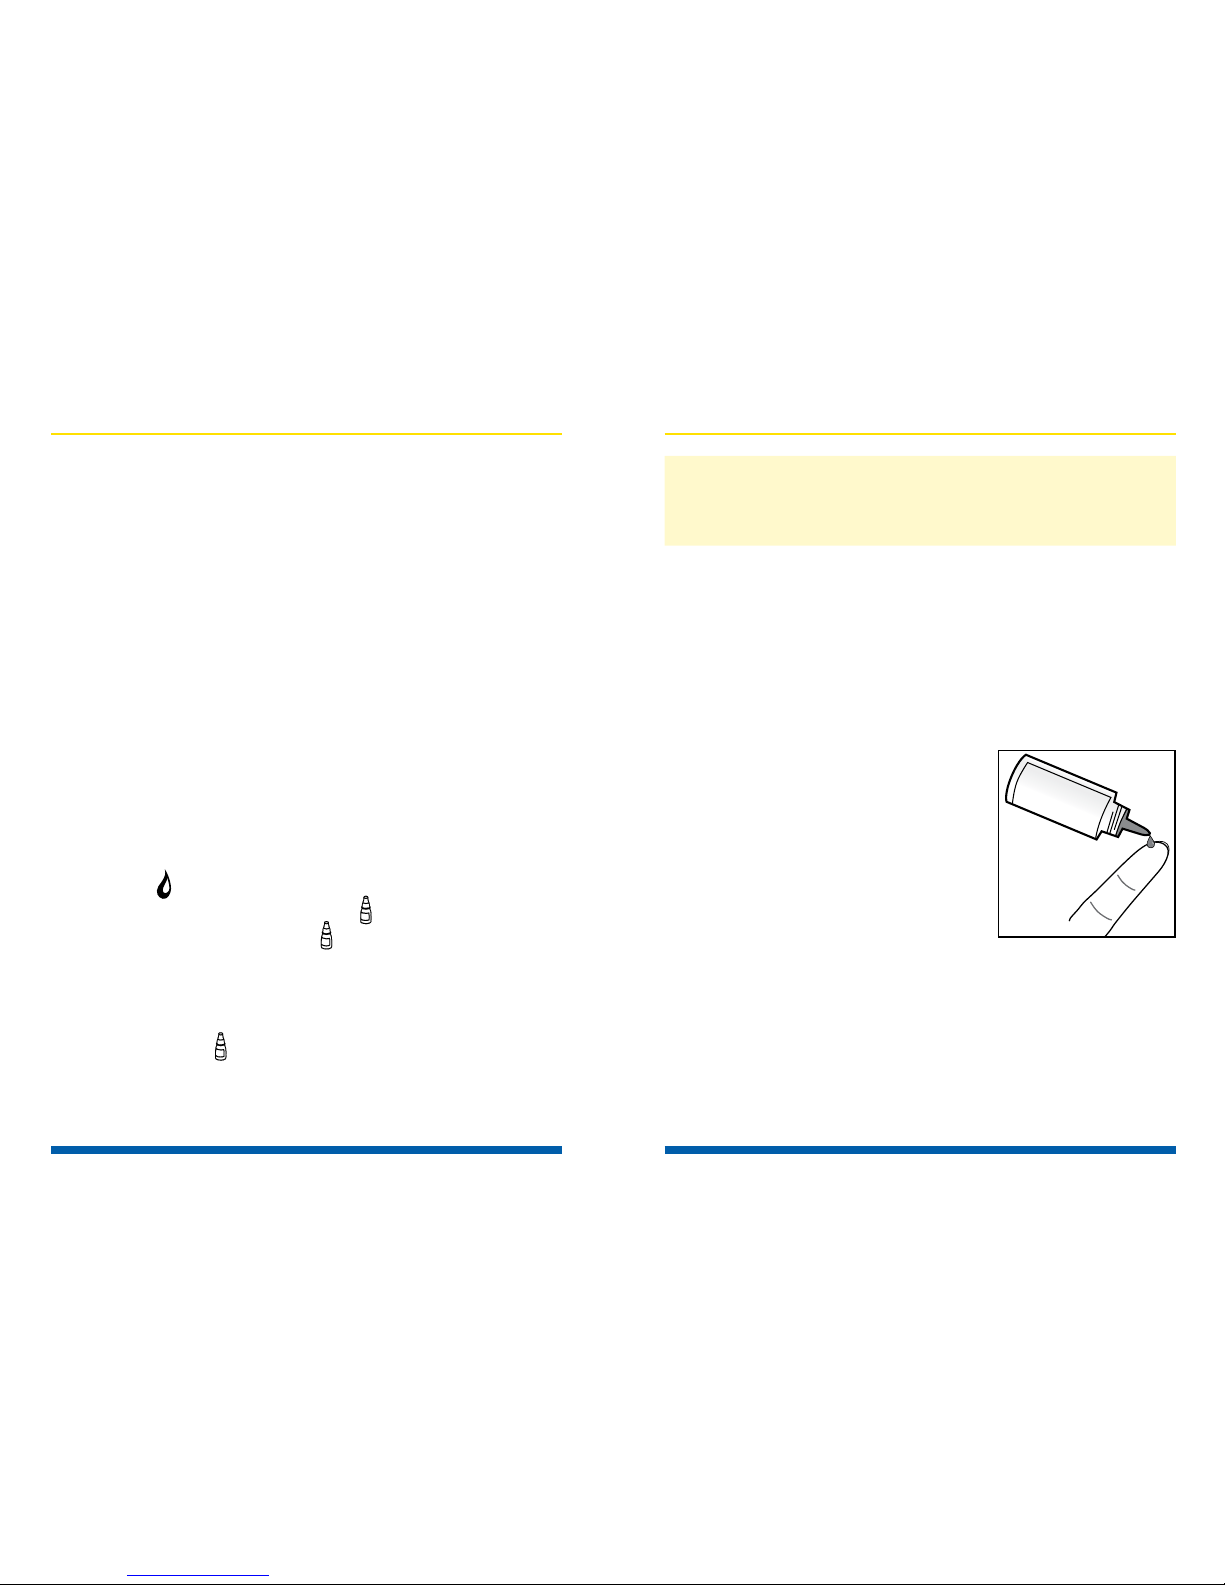
STEP 4: Apply Control Solution
1. Check the expiration and discard dates on
your control solution and test strip vials.
2. Shake the control solution bottle well, then
remove cap.
3. Squeeze the bottle and discard the rst drop
then wipe the dispenser tip with clean tissue
paper or cotton.
4. Squeeze the bottle again to
get a second drop onto a
clean, non-absorbent surface
or on your clean ngertip.
See Figure 19.
5. Bring the tip of the test strip
to touch the drop of solution
until the meter beeps.
35
Figure 19

PRODIGY Voice® Blood Glucose Meter PRODIGY Voice® Blood Glucose Meter
Owner’s Manual Owner’s Manual
Caution: To avoid contaminating the control
solution with the content of the test strip,
DO NOT DIRECTLY APPLY CONTROL SOLUTION
ONTO THE TEST STRIP. See Figures 20 and 21.
STEP 5 : Check if the Test Result is in Range.
After seven (7) seconds, the control solution
test result appears on the display. Compare the
test result with the range
printed on the test strip vial.
Each vial of Prodigy®No
Coding Test Strips may have
a different control solution
range. The result should fall
within the printed range on
the test strip vial.
See Figure 22.
36
Figure 20 Figure 21
Figure 22
Questionable Results:
If the test result falls outside the range printed
on the test strip vial, check the “Trouble-Shooting
Guide” located in the “System Troubleshooting”
section and repeat the test.
Results that fall outside of the expected control
ranges may indicate:
• An error in performing the test
• Control solution bottle not shaken well
• Expired or contaminated control solution
• Control solution that is too warm or too cold
• Test strip deterioration
• Meter malfunction
• Test strips expired
37

PRODIGY Voice® Blood Glucose Meter PRODIGY Voice® Blood Glucose Meter
Owner’s Manual Owner’s Manual
Caution: Do not use test strips or control
solution that have exceeded the discard date,
are expired or have been damaged.
Your results may be inaccurate.
Contact Customer Care
If your test strips have been damaged or if you
continue to get out-of-range results, it means
that the system or the control solution may not
be working properly. DO NOT use the system to
test your blood glucose level. If you are unable to
resolve the problem, contact Customer Care at
1.800.243.2636.
38 39
Performing a Blood Glucose Test
Preparing a Lancing Device
STEP 1: Remove the cap of the
lancing device by twisting it off.
See Figure 23.
STEP 2: Insert a sterile lancet into
the lancet holder of the lancing
device and push down rmly until
lancet is fully seated. Do not twist
the lancet. See Figure 24.
STEP 3: Remove the protective
cap from the lancet by twisting it
and then save it for later use.
See Figure 25.
STEP 4: Replace the cap onto the
lancing device. Screw the cap
until it is snug but not too tight.
STEP 5: Set the lancing level.
The adjustable tip offers ve (5)
levels of skin penetration. To select
the desired depth, twist the
Figure 23
Figure 24
Figure 25
Figure 26
Other manuals for VOICE
2
Table of contents
Languages:
Other Prodigy Blood Glucose Meter manuals

Prodigy
Prodigy Autocode User manual

Prodigy
Prodigy Autocode User manual

Prodigy
Prodigy Autocode User manual

Prodigy
Prodigy Autocode User manual

Prodigy
Prodigy VOICE User manual

Prodigy
Prodigy Preferred User manual

Prodigy
Prodigy Pocket User manual

Prodigy
Prodigy Autocode User manual

Prodigy
Prodigy VOICE User manual

Prodigy
Prodigy Autocode User manual


