Prodigy Pocket User manual
PRODIGY
Owner’s Manual PRODIGY
Owner’s Manual
Prodigy Diabetes Care, LLC www.prodigymeter.com
36 37
Prodigy Diabetes Care, LLC 1.800.243.2636
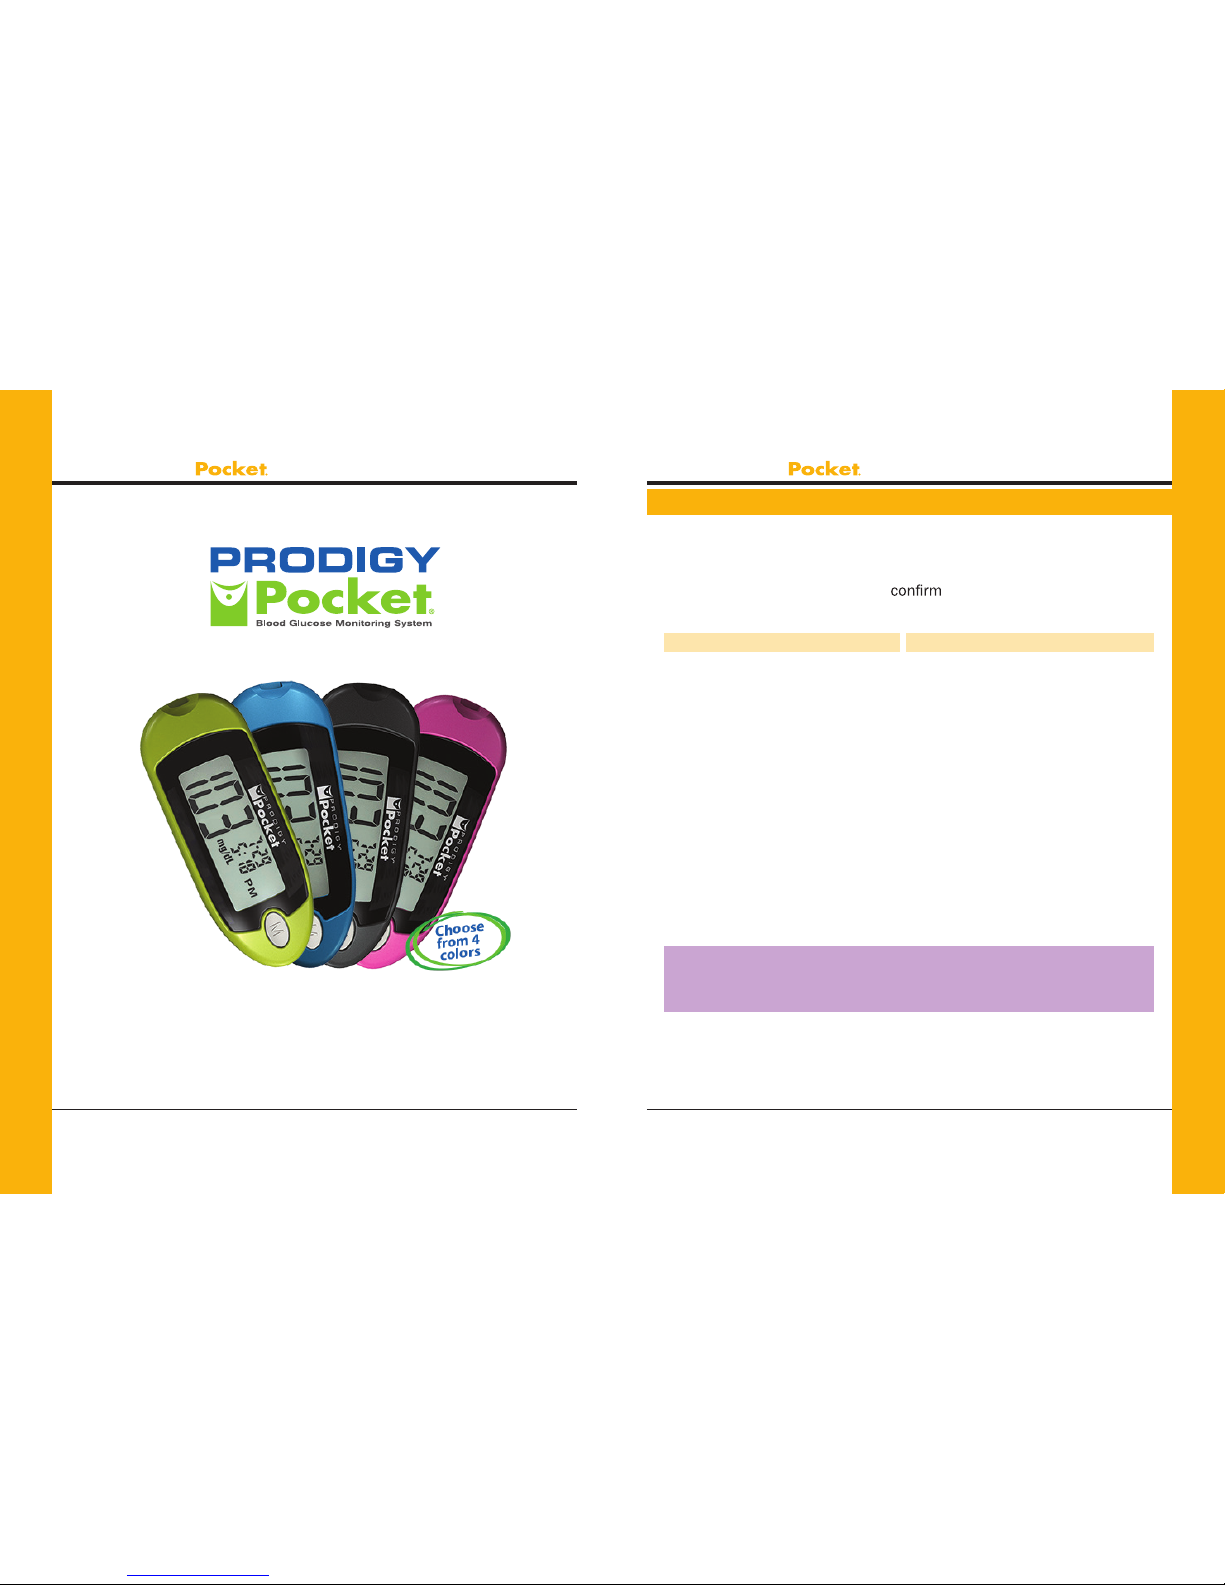
Contentsof the ProdigyPocket®Meter
The Prodigy Pocket®meter is available as a meter only or as a meter
kit. Please check the “REF” number marked on the outside of the box
to see if you have purchased a “Meter” or a “Meter Kit.” Please review
the contents of your purchase to that all the components are
included as listed below:
*Available invecolors (Blue, Green, Black, Pink andCamouage).
Important:Pleasereview the contents of your purchase.
If any items are missing, please return your meter to the place
of purchase.
Meter Includes
• Prodigy Pocket®Meter*
• One (1) 3VCR2032 Battery
• Carrying Case
• Complete Instructions:
1. Manual
2. Logbook
3. Quick Reference
4. Warranty Card
(Additional supplies can be
purchased from your provider.)
Meter Kit Includes
• Prodigy Pocket®Meter*
• One (1) 3V CR2032 Battery
• Prodigy®Control Solution (4 mL)
• Prodigy®Test Strips(10 ct)
• Sterile Lancets (10 ct)
• Lancing Device
• Carrying Case
• Complete Instructions:
1. Manual
2. Logbook
3. Quick Reference
4. Warranty Card

PRODIGY
Owner’s Manual PRODIGY
Owner’s Manual
Prodigy Diabetes Care, LLC www.prodigymeter.com
38 39
Prodigy Diabetes Care, LLC 1.800.243.2636
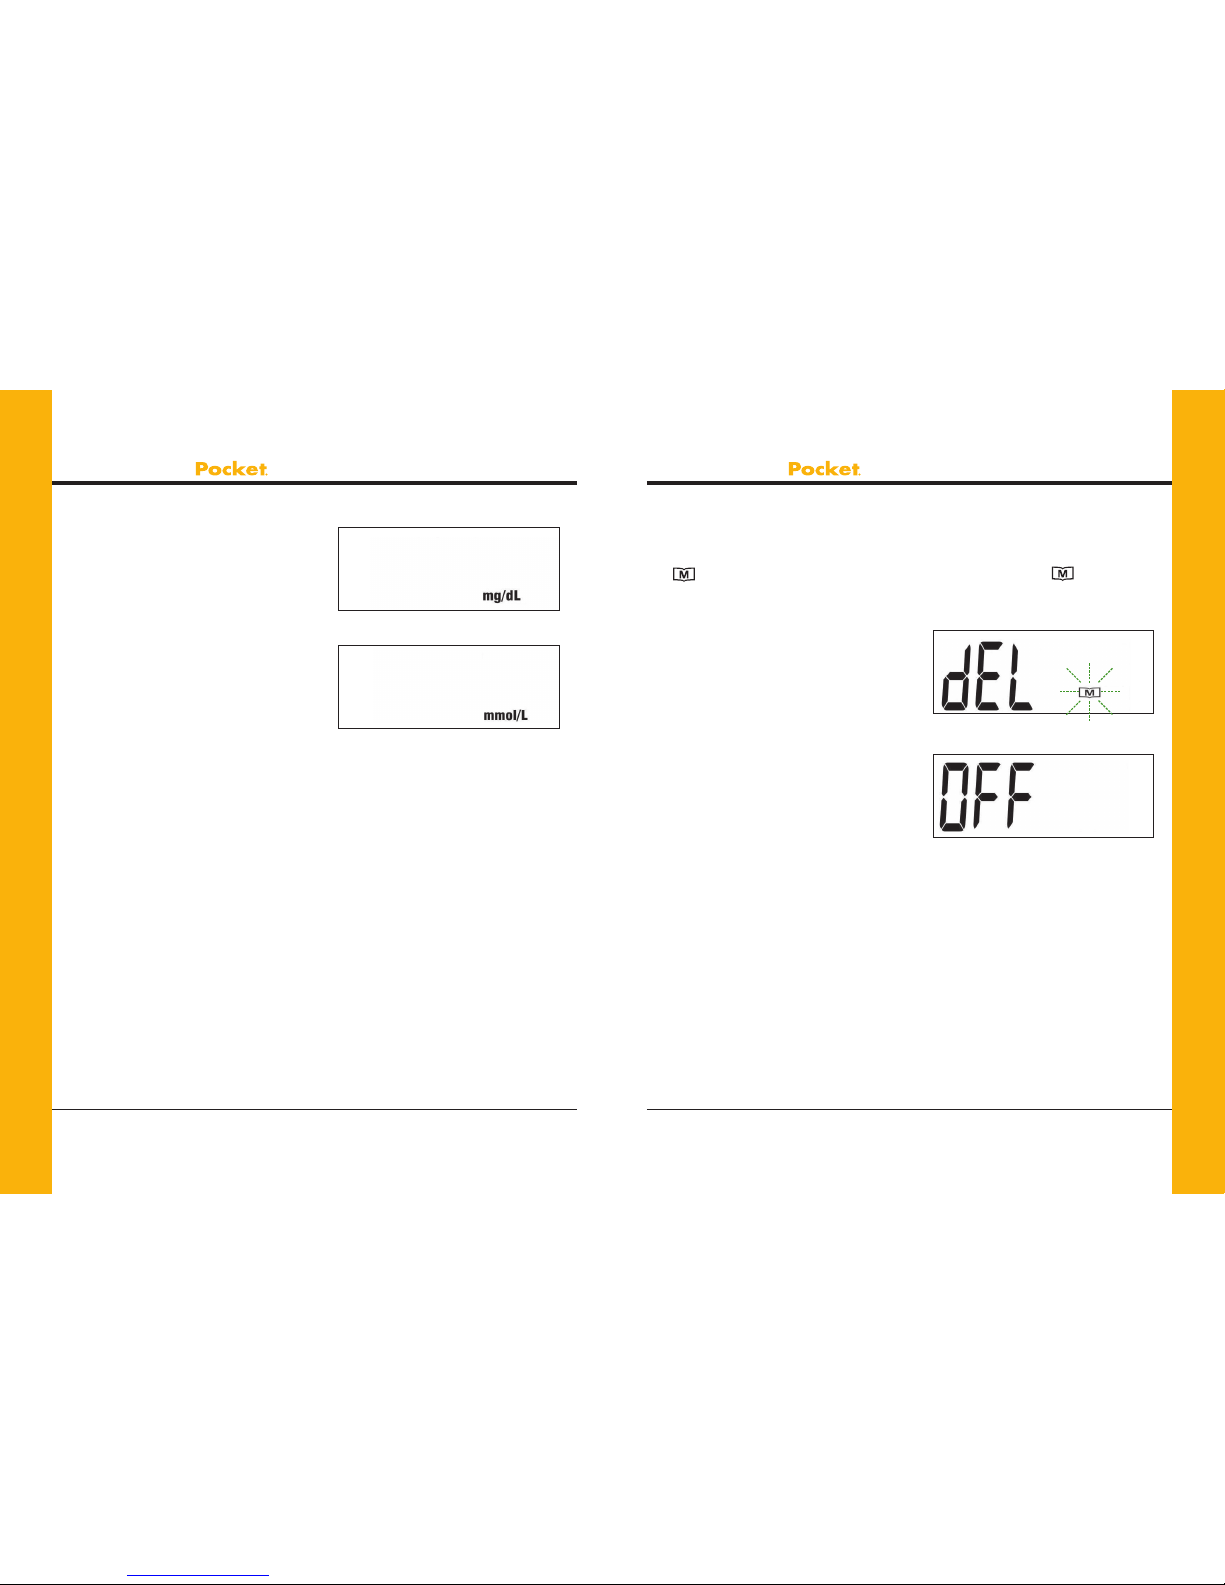
Key Functions of the Meter
Setting Up the Prodigy Pocket®Meter
Test Strip Slot
Insert the test strip here.
The meter will turn on automatically.
LCD Display
Guides you through the test using
symbols and simple messages.
Set Button
Located in the battery compartment;
used to set up the meter.
Data Port
USB Port for USB cable
connection to your computer.
Main Button
Turns the meter on or performs other
functions described in this manual.
Figure 39
Figure 40
Figure 38
Meter Display
Control Solution Test Symbol
Shows that you are in control
solution mode. Your test result will
not be stored in meter memory.
Test
Result Area
Displays test
results.
Blood Drop Symbol
Flashes when sample
should be applied.
Test Strip
Symbol
Appears when
the meter is
turned on.
Unit of Measure
Appears with the test result
to indicate what unit of
measure the test result is
displayed in.
Temperature Symbol
Appears when ambient
temperature is outside of
operating range.
Low Battery
Symbol
Appears
when the
battery power
is low.
Memory Symbol
Appears when you
review the memory.
Day Average
Indicates
that the
displayed test
result is an
average.
Time Date
Figure 41

PRODIGY
Owner’s Manual PRODIGY
Owner’s Manual
Prodigy Diabetes Care, LLC www.prodigymeter.com
40 41
Prodigy Diabetes Care, LLC 1.800.243.2636
Setup Steps
The Prodigy Pocket®meter has the date, time and unit of
measurement presets. However, if you replace the battery, you should
check and update the time and date.
STEP 1: Insert the Battery
Open the battery cover located on the backside of the meter. Insert one
(1) 3 Volt CR2032 lithium battery. The meter should beep and turn on.
STEP 2: Enter Setup Mode
Start with the meter off. Then press the “SET” button located in the
battery compartment. The meter is now in the setup mode.
STEP 3: Set the Year
Theyearappearswiththenumberashing.Pressandreleasethe
“M” button to advance the year. With the correct year on the display,
press the “SET” button and the date will appear on the display with
themonthsegmentashing.
See Figure 42.
STEP 4: Set the Month
Press and release the “M” button
to advance the month. With the
correct month on the display, press
the “SET” button and the date
segmentwillstartashing.
See Figure 43.
Figure 42
Figure 43
STEP 5: Set the Date
Press and release the “M” button to
advance the date. With the
correct date on the display, press
the “SET” button and the time will
appear on the display with the hour
segmentashing.
See Figure 44.
STEP 6: Set the Hour
Press and release the “M” button to
advance the hour. With the correct
hour on the display, press the “SET”
button and the minutes segment
willstartashing.
See Figure 45.
STEP 7: Set the Minutes
Press and release the “M” button
to advance the minutes. With the
correct minute on the display, press
the “SET” button and the current
unit of measurement will start
ashing.See Figure 46.
Important: Day averages are calculated from results obtained
during the 7, 14 and 28 days preceding the current date and time
settings. When the date and time are changed, the 7, 14 and
28–day averages may change.
Figure 45
Figure 46
Figure 44
PRODIGY
Owner’s Manual PRODIGY
Owner’s Manual
Prodigy Diabetes Care, LLC www.prodigymeter.com
42 43
Prodigy Diabetes Care, LLC 1.800.243.2636
STEP 8: Unit of Measure
Press and release the “M” button
until the unit of measurement you
are choosing appears on the
display. See Figures 47 and 48.
Your meter can display test results
in milligrams per deciliter (mg/dL) or
millimoles per liter (mmol/L).
• The mg/dL unit is standard in
the United States.
• The mmol/L unit is standard
in Canada.
Figure 47
Figure 48
STEP 9: Delete Memory
Press the “SET” button and “dEL” willappearwiththeashing
“ ” symbol. When the “dEL”symbolandtheashing“ ” symbol
appear on the display, you can choose to clear the memory. If you
do not want to clear the memory,
press the “SET” button again to
skip this step. If you want to clear
ALL memory, press and hold the
“M” button for four (4) seconds. The
“- - -” image will appear on the LCD
screen to indicate that all memory
has been deleted.
Setup is now completed. Press the
“SET” button to turn off the
meter. “OFF” is displayed before
shut down. See Figures 49 and 50.
Figure 49
Figure 50
PRODIGY
Owner’s Manual PRODIGY
Owner’s Manual
Prodigy Diabetes Care, LLC www.prodigymeter.com
44 45
Prodigy Diabetes Care, LLC 1.800.243.2636
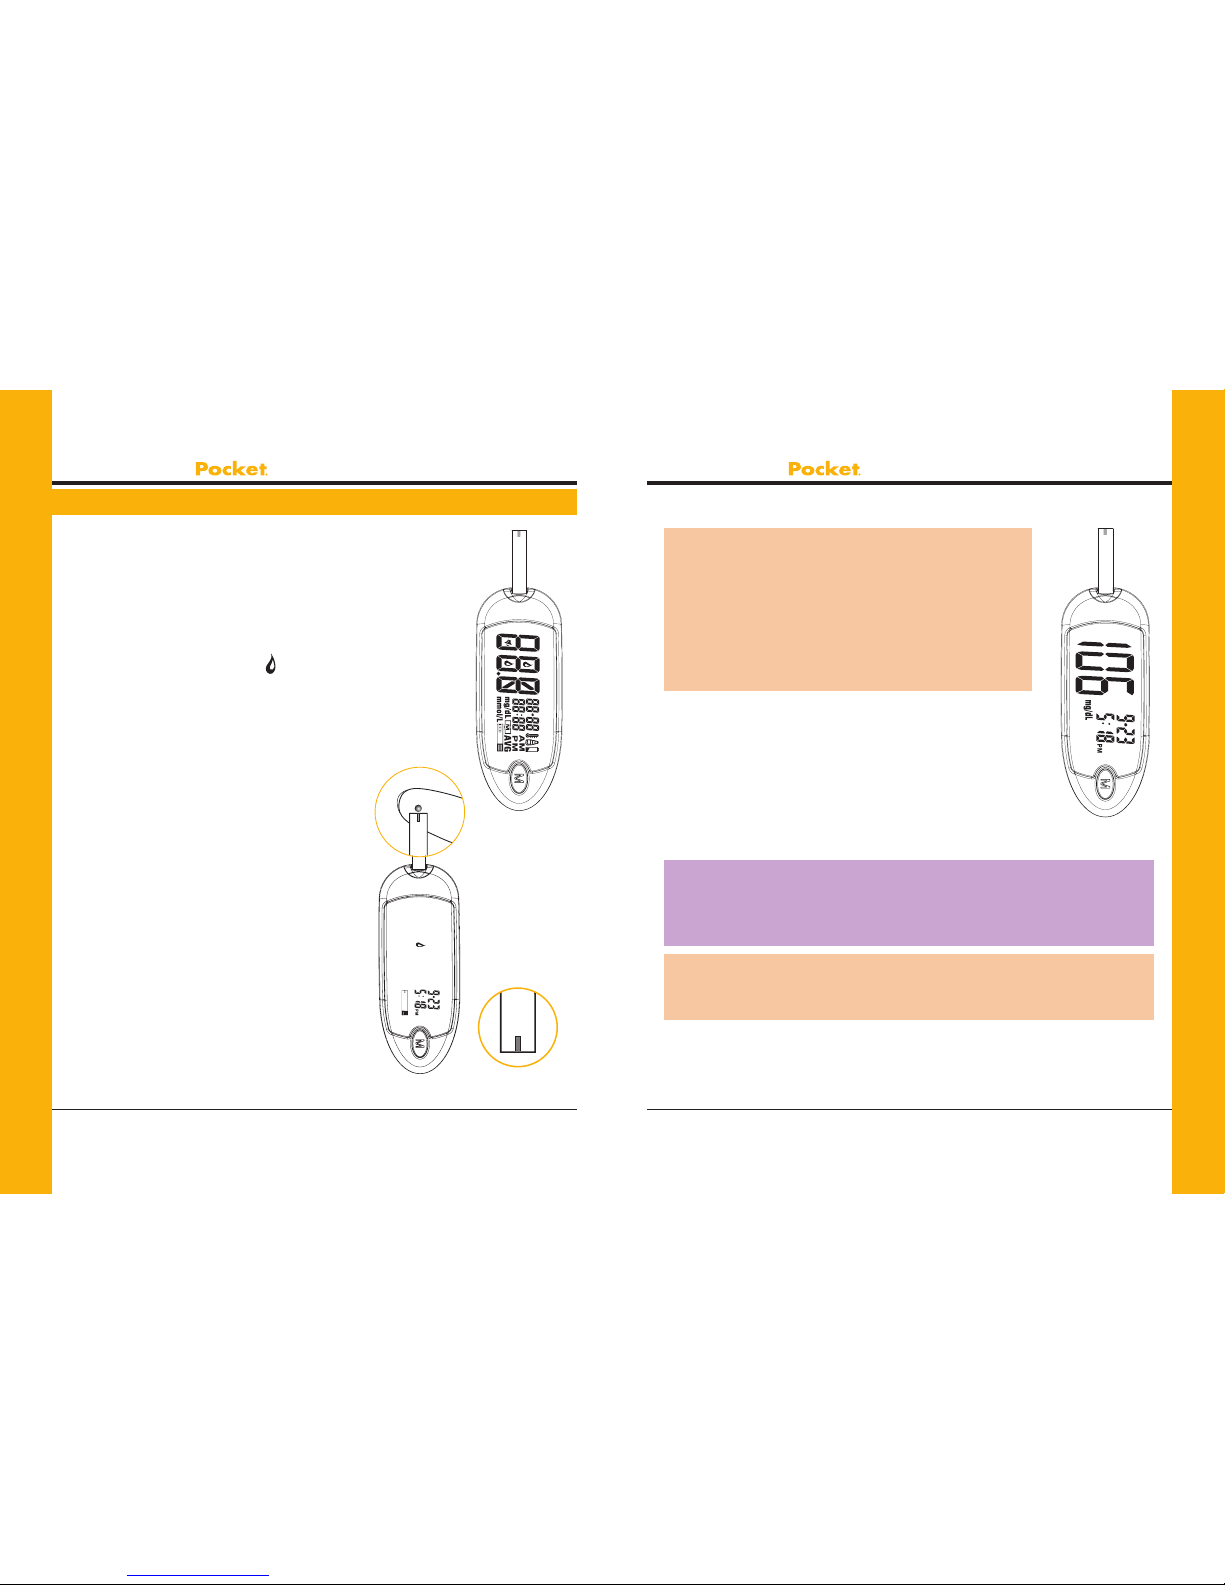
STEP 1: Insert the Test Strip
Insert a test strip with the contact bar end entering into
thetestslotrst.Pushtheteststripasfarasitwillgo
without bending it. The meter turns on automatically.
See Figure 51.
STEP 2: Apply Blood Sample
When the meter shows the “ ”, apply blood to the
opening of the absorbent channel of the test strip
where it meets the narrow channel. Blood will be drawn
into the test strip. See Figure 52.
Theteststripconrmationwindowshould
becompletelylledbeforethemeter
begins to count down. The meter will
beepwhentheconrmationwindowis
full. See Figure 53.
Ifyouhavetroublellingtheteststrip,
please contact Customer Care
at 1.800.243.2636 for assistance.
Performing a Blood Glucose Test
Figure 51
Figure 52 Figure 53
Caution:
DO NOT:
• Smear or scrape the blood onto the
test strip.
• Apply blood to the test strip when the test
strip is out of the meter.
• Put blood or foreign objects into the test
strip port.
STEP 3: Read Your Result
After the meter counts down from 6 to 1, your blood
glucose test result appears along with the unit of
measure, date and time. This blood glucose result
is automatically stored in the meter memory.
Turn the meter off by removing the test strip.
Discard the used test strip carefully to avoid
contamination. See Figure 54.
Important:Ifyoudonotapplyabloodsamplewithinve(5)
minutes, the meter will automatically turn off. You must remove the
test strip and re-insert it again to turn on the meter and restart the
test procedure.
Caution: If you cannot test due to a problem with your testing
supplies, contact Customer Care at 1.800.243.2636. Failure to test
could delay treatment and/or lead to serious medical conditions.
Figure 54
PRODIGY
Owner’s Manual PRODIGY
Owner’s Manual
Prodigy Diabetes Care, LLC www.prodigymeter.com
46 47
Prodigy Diabetes Care, LLC 1.800.243.2636
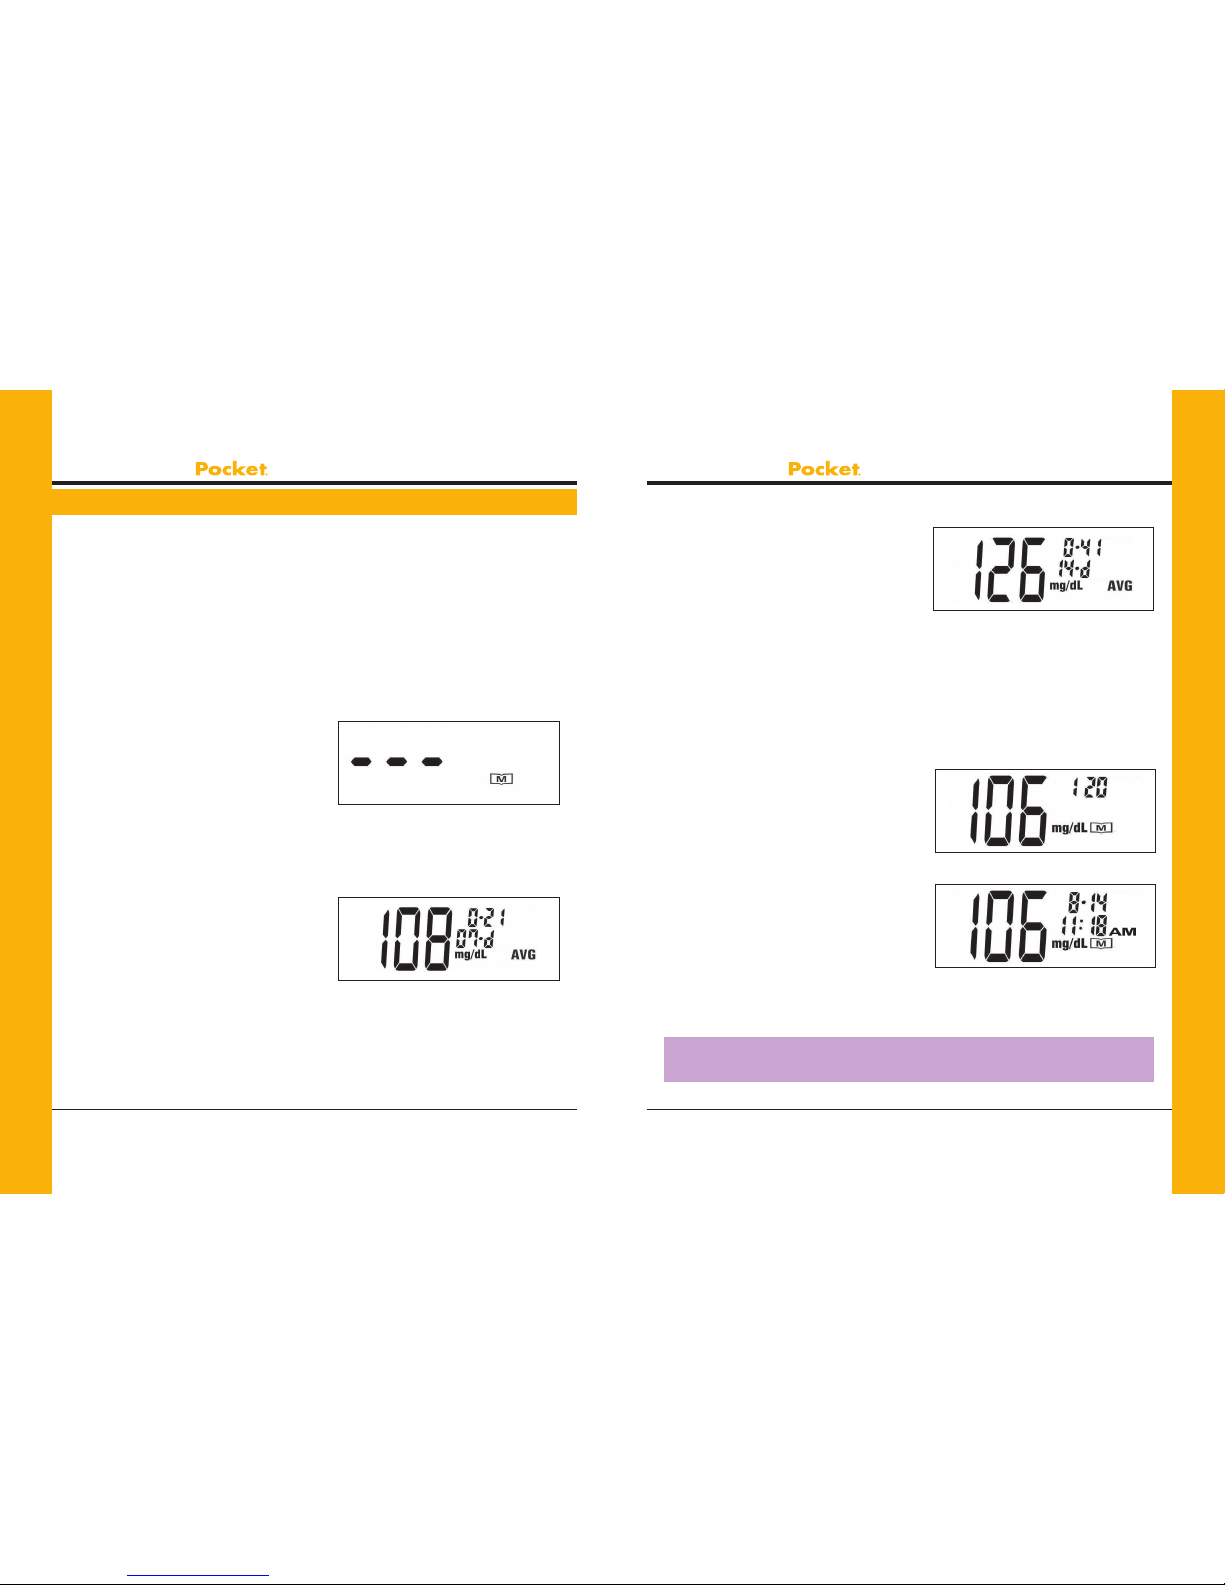
The Prodigy Pocket®stores the 120 most recent blood glucose test
results with date and time in its memory. It also provides you with 7, 14
and 28–day averages of your blood glucose test results. You can review
the individual or average test results by entering the memory mode.
STEP 1: Enter the Memory Mode
While the meter is turned off, press the “M” button twice.
The 7-day average will appear, indicating that you are in the memory
mode. If you continue to press the “M” button, the 14 and 28–day
averages will appear in order.
You can then review the last
120 individual test results in the
memory. When using the meter
forthersttime,“- - -” appears,
showing that there are no test
results in the memory.
See Figure 55.
STEP 2: Recalling Average
Test Results
The 7–day average is calculated
from the blood glucose results
obtained during the last 7 days.
It also indicates how many blood
glucose tests have been performed
within this period, e.g., 21 (21 tests
in the last 7 days). See Figure 56.
Using the Meter Memory
Figure 55
Figure 56
The 14–day average is calculated
from the blood glucose results
obtained during the last 14 days.
See Figure 57.
It, too, indicates how many blood
glucose tests have been performed, e.g., 41 (41 tests in the last 14
days). The 28–day average shows the same information.
STEP 3: Recalling Individual Test Results
After the 28–day average, the most recent test result with date and
time will be shown. Press the “M” button once and the next most
recent test result will appear.
Each time you press and release the
“M” button, the meter will recall up
to your last 120 test results in order.
When the memory is full, the oldest
result is dropped as the newest is
added. After reaching the last set of
results, the meter will display the
7–day average again. See Figures
57 and 59.
STEP 4: Exit the Memory Mode
Press and hold the “M” button for
three (3) seconds to turn off the meter.
Important: If you do not press any button for one (1) minute,
the meter will show “OFF” and turn off automatically.
Figure 58
Figure 59
Figure 57

PRODIGY
Owner’s Manual PRODIGY
Owner’s Manual
Prodigy Diabetes Care, LLC www.prodigymeter.com
48 49
Prodigy Diabetes Care, LLC 1.800.243.2636
Dimensions: 3.54 in. (L) x 1.38 in. (W) x 0.69 in. (H)
90 mm (L) x 35 mm (W) x 17.5 mm (H)
Weight: 1.2 oz with battery
36 g
Power Source: One (1) 3 Volt CR2032 Battery
Battery Life: Over 1,000 tests
Display: LCD
Memory: 120 test results with date and time
External Output: USB Data Port
Auto electrode inserting detection
Auto sample loading detection
Auto reaction time count-down
Auto turn-off after two (2) minutes without action
Temperature warning
Operating Condition: 50°F –104°F (10°C– 40°C), below 85% R.H.
(non-condensing)
Storage/Transportation Condition: 39.2°F –115°F (4°C–46°C),
below 85% R.H.
Measurement Units: mg/dL or mmol/L
Measurement Range: 20– 600 mg/dL (1.1– 33.3 mmol/L)
The specifications may be changed without prior notice.
Specifications
Prodigy Diabetes Care, LLC www.prodigymeter.com
PRODIGY®Blood Glucose Meters Owner’s Manual
84
Limited Lifetime Warranty
Prodigy Diabetes Care, LLC extends a limited lifetime warranty to
consumers who purchase a new Prodigy®brand meter. Under this
limited lifetime warranty, your new meter is covered from the original
date of purchase, as long as it has not been altered, or
misused. Under this limited lifetime warranty, Prodigy®will replace, free
of charge, the meter ifitis defective in material or workmanship.
NO OTHER WARRANTIES, EXPRESS OR IMPLIED, ARE MADE. PDC WILL
NOT BE LIABLE FOR ANY INCIDENTAL OR CONSEQUENTIAL DAMAGES
RESULTING DIRECTLY OR INDIRECTLY FROM THE FAILURE OF THE
PRODUCT TO PERFORM IN ACCORDANCE WITH SPECIFICATIONS.
Some states do not allow the exclusion or limitation of other express
or implied warranties or incidental or consequential damages, sothe
above limitations or exclusions may not apply to you.
Warranty Information

©2012 Prodigy Diabetes Care. Prodigy®, Prodigy Pocket®, Prodigy Voice® and Prodigy AutoCode® are registered
trademarks of Prodigy Diabetes Care. All other trademarks are property of their respective owners.
All rights reserved. PCM262 Rev.4 01/12
AR REP Advena Ltd; 33 Bridge Street,
Hereford HR4 9DQ, UK
EC REP
For Customer Care
call: 1.800.243.2636
www.prodigymeter.com
Prodigy Diabetes Care, LLC 1.800.366.5901
9300 Harris Corners Parkway, Suite 450
Charlotte, NC 28269
Other manuals for Pocket
1
Table of contents
Other Prodigy Blood Glucose Meter manuals

Prodigy
Prodigy Autocode User manual

Prodigy
Prodigy VOICE User manual

Prodigy
Prodigy Autocode User manual

Prodigy
Prodigy Pocket User manual

Prodigy
Prodigy Autocode User manual

Prodigy
Prodigy Autocode User manual

Prodigy
Prodigy VOICE User manual

Prodigy
Prodigy Autocode User manual

Prodigy
Prodigy Autocode User manual

Prodigy
Prodigy Autocode User manual


