Profile CD8700 Service manual

AM/FMHIGHPOWERDETACHABLEFACE
CDPLAYER
CD8700
INSTALLATIONINSTRUCTIONS/OWNERSMANUAL
,
SEL
MU
BND
MOD
LOU
ST
LOC
1
CLK
TOP/
2
INT
43
RPT RDM
56A.P
DIGITALAUDIO
COMPACT
TRK
LOUMU
FLAT
CLASS
POP
ROCK
EQ
INTRPTRDM
CD8700 35Wx4

1
Serial# PurchaseDate
INTRODUCTION
CongratulationsonyourpurchaseofaProfilestate-of-the-artsinglediscCD
player.YourselectionofaProfilecaraudioproductindicatesatrueappreciation
offinemusicalreproduction.Whetheraddingtoanexistingsystemorincluding
yourProfileCDplayerinanewsystem,youarecertaintonoticeimmediate
performancebenefits.
FEATURES
35Wx4PowerOutput LoudFunction
AuxiliaryRCALineInput ISO/DINMounting
Clock BlinkingSecurityL.E.D.
30StationMemory FullElectronicFunctionControls
4BandPresetEqualizer DiscScan,Random&RepeatPlay
KEEPYOURSALESRECEIPT
Takethistimetoattachyoursalesreceipttothemanualandputinasafeplace.
Incaseofanyreasonthisproductmayneedwarrantyservice,yourreceiptwill
benecessarytoestablishpurchasedate.
IMPORTANT! Beforemakinganyconnections,disconnectthecarsbattery
untiltheinstallationiscompletedtoavoidpossibledamagetotheelectrical
system.
Serial# PurchaseDate
,
DualRCALineOutput(Front&Rear) PowerLevelMeter

2CD8700
WheninstallingyourCDplayerinthevehicle,makesureitismountedproperlyinthedash,
usinganaftermarketinstallationkitifneeded.Whenusingthesuppliedmountingsleeve,
Remembertherearemanyelectricalwires,vacuumlines,brakelinesandairbagdeployment
wires.MakesureyouknowwheretheyarewhenmountingtheCDplayertoavoidpuncturing
lines,andshortingwires.
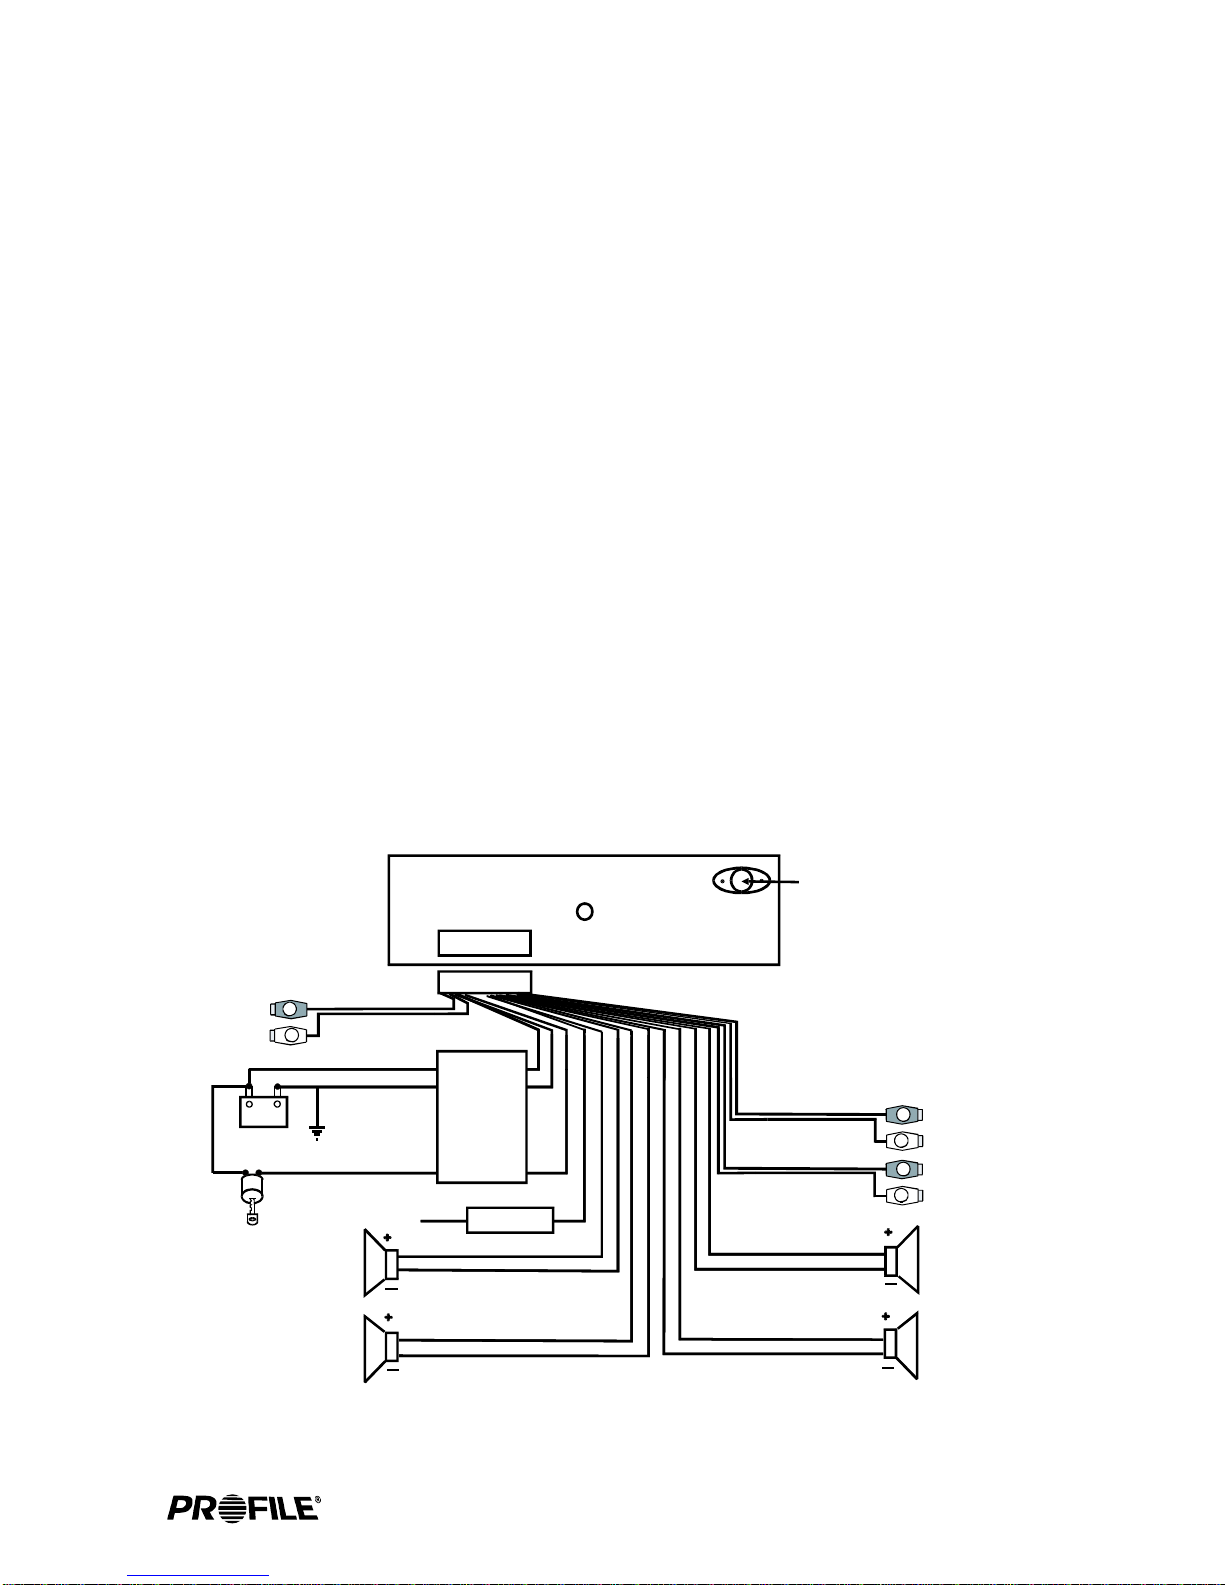
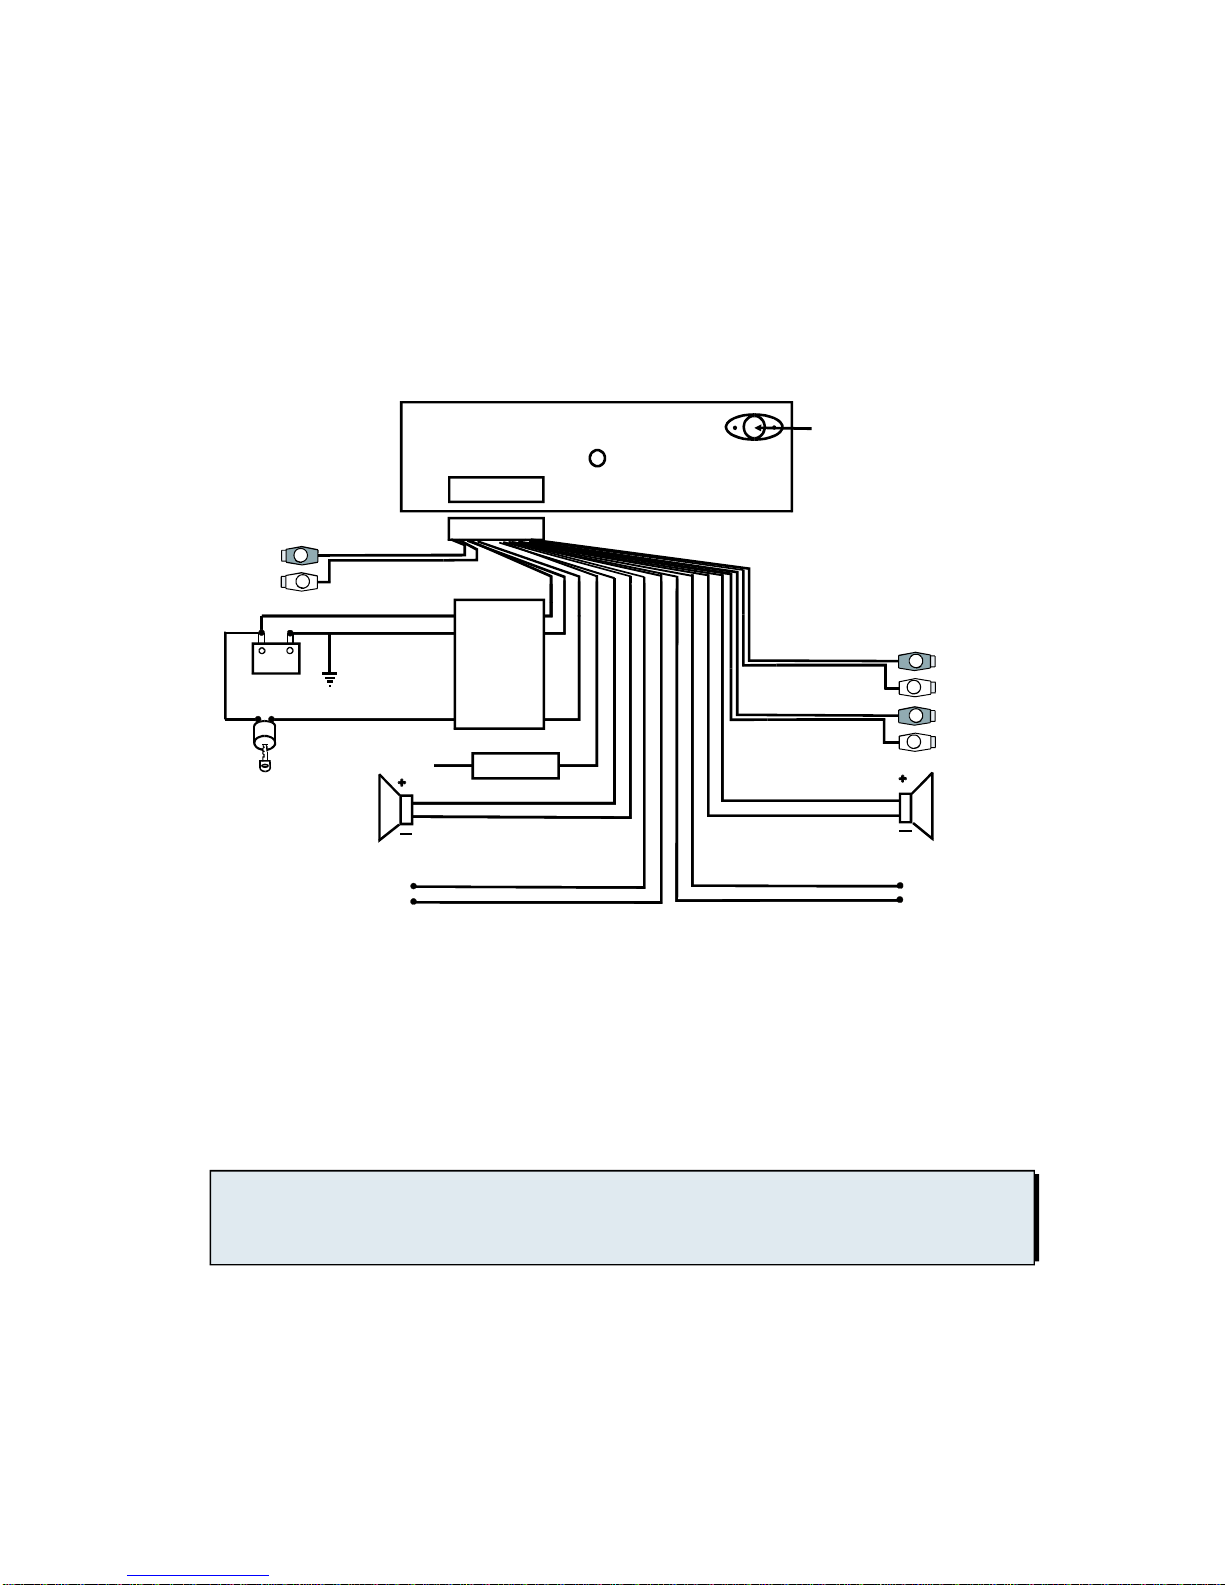
Toensuremaximumpowertransferandsecuresafeconnections,itisrecommendedtouse
highgradebarrelorcrimpcapconnectors.
Exposedwirescanbecutordamaged.Itisbesttorunallwiresthroughthevehicleunderthe
carpetand/orsidepanels.Thisenablestoacleanerinstallationandlessriskofdamage.
Toavoidpossibilityofinducednoisefromthecar'selectricalsystem(i.e.poppingnoisesor
enginenoise),runsignalwiresawayfromthecar'selectricalwiring.
Inordertoreducethechanceofgroundloops(i.e.enginenoise),makethegroundedwireas
shortaspossibletoreducethewire'sresistance.Also,whenusingmultiplecomponents,make
sureallunitsaregroundedatthesamepoint.
Toavoidthepossibilityofpower,signalorspeakershorts,becarefulnottoallowtheamplifier
wirestocomeincontactwithsharpedges.Useagrommettoprotectthewirewhenrunning
throughthefirewall.
SAFETYPRECAUTIONS
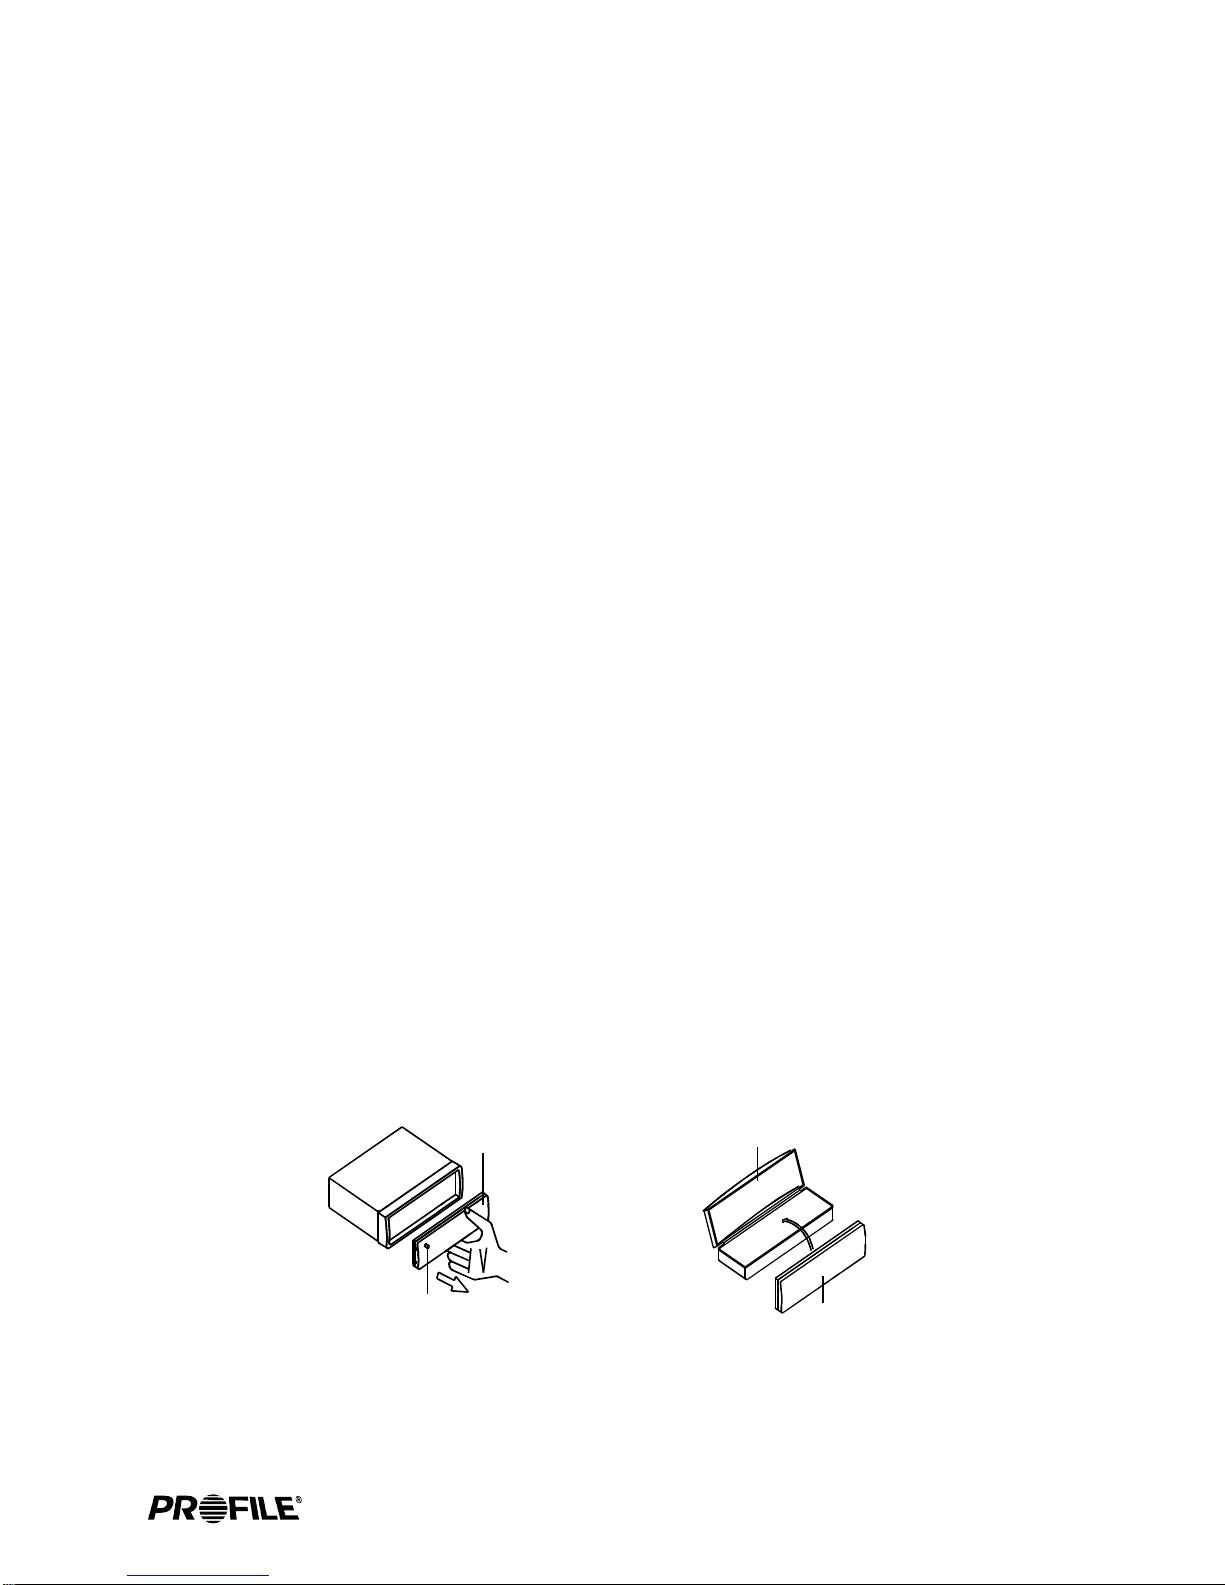
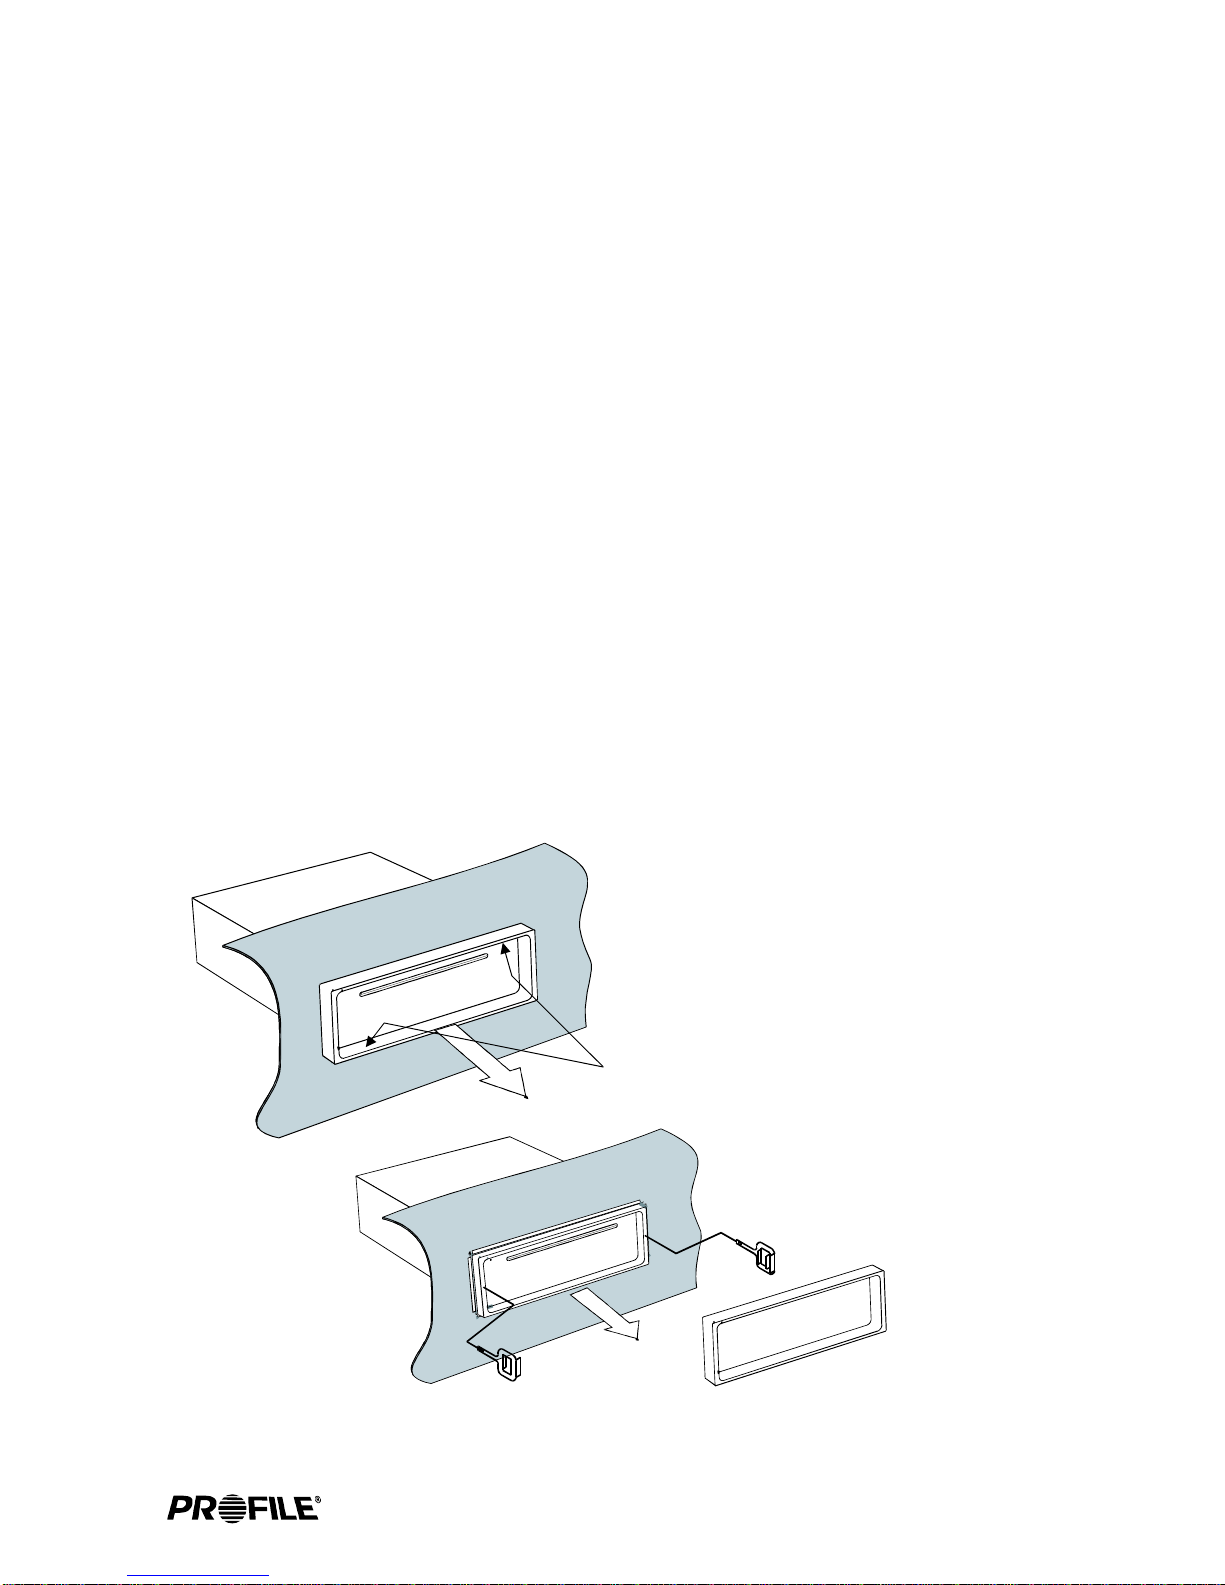
itisamustthatyoualsousethesuppliedbackbracetosupportthebackoftheCD
player.
SecuretheCDplayer
UsecautionwhenmountingtheCDplayer.
Usehighgradewireconnectors.
Donotrunanywiresunderneaththevehicle.
Runsignalwiresawayfromelectricalwires
Makeallgroundwiresasshortaspossibleandterminatedatthesamepoint.
Avoidsharpedgeswhenrunningthewires.
.

3
CAREANDMAINTENANCE
PROTECTIVECASE
(FIG.2)
PresstheOPENbuttontodetachthefaceplate,thentakethefaceplateaway
fromtheheadunit(Fig.1)andputitintheprotectivecase(Fig.2)forsafekeeping.
FACEPLATE
OPENBUTTON
(FIG.1)
CleaningtheCDplayer
Operatinginextremetemperatures
ProtectyourCDs.
CDoperation.
Discskip
Removingandprotectingdetachablefaceplate.
Whencleaningthevehicle,besurenottogetanywaterinorontheCDplayer.Cleanonly
theexteriorsurfaceoftheunitwithadry,cleansofttowelusingnochemicalsolvents.
Sometimestheunitwillnotoperateinextreme,hotorcoldtemperatures.Ifthisisthecase,
waituntilthetemperatureinthevehicleisnormal,thenresumeoperation.
Whennotusingthediscplayer,itisrecommendedthatyouremovetheCD.
Donotleaveanejecteddiscsittingontheedgeofthediscplayerforlongperiodsoftime.
Thediscwillwarpunderdirectsunlight.Alwaysputeachdiscinitscasetoprotectthem
duringtimesofnon-use.
Neverattempttoforceanythingotherthanacompactdiscinthediscslot.Thisdiscplayer
isaprecisioninstrumentthatcouldbedamagedbyaforeignobject.
Whendrivingdownaveryroughroad,thediscmayskip.Thiswillnotscratchordamagethedisc.
Thefaceplateoftheradiomayberemovedasatheftdeterrent.Afterremovingtheface
plate,usethecaseprovidedtokeepthefaceplatefromgettingdamaged.
FACEPLATE

4CD8700
DISCCAREANDPLAY:
Beforeplaying,cleanthediscwithaclean,lint-freecloth.
Wipethediscinthedirectionofthearrow.
Donotusesolventssuchasbenzineorthinners.Commerciallyavailable
cleanersorantistaticspraywilldamagetheunit.
Insertadiscwiththelabeledsurfaceup.
Donottrytoinsertanotherdiscwhenonehasalreadybeeninserted.
Doingsomaydamagetheunit.
Label
surfaceup
Handlethediscbyitsedgetokeepthedisccleananddonottouch
thesurface.
Donotstickpaperortapeonthedisc.
Donotexposethedisctodirectsunlightwhichcancausethedisctowarp.
Alwaysstorethediscinitscaseforprotection.Scratchedupdiscswill
producepoorsoundperformanceandcauseCDplayertoskip.

5
ELECTRICALANDSIGNALCONNECTIONS
FOURSPEAKERSYSTEM
!ConnectBlackwiretochassisground.
!ConnecttheYellowmemorybackupwiretoaConstant+12Voltpowersourcewire.
!ConnecttheRedignitionwiretoaswitched+12Voltpowersourcewire.(Thepower
wirethatisenergizedwhenthekeyisintheaccessoryposition).
!Thebluewireisconnectedonlyifapowerantennaoranamplifierisusedinthe
system.Thiswiresupplies+12VoltoutputwhentheCDPlayeristurnedon,
whichactivatesmostpowerantennarelaysoramplifierturnoncircuits.
YELLOW
ANTENNACONNECTOR
MEMORY+12V
BLACK(GND)
RED(B+)
FRONTRIGHT
SPEAKER
BLUEAUTOANTENNA
WHITE
WHITE/BLACK
GREEN/BLACK VIOLET/BLACK
GRAY/BLACK
GRAY
VIOLET
GREEN
1OAFuse
FILTER
BOX
0.5AFuse
BATTERY
+12V
+-
SWITCHED+12V
(ONWITHIGNITION)
Lowlevelsignaloutputfor
connectiontoamplifieror
signalprocessors.
R
L
R
L
RCHRED
LCHWHITE
RCHRED
LCHWHITE
BLACK
GRAY
FRONTRCAOUTPUT
REARRCAOUTPUT
REARRIGHT
SPEAKER
FRONTLEFT
SPEAKER
REARLEFT
SPEAKER
FUSE
0.5A
R
L
RCHRED
LCHWHITE BROWN
AUXRCAINPUT
Beforemakingthefollowingconnections,taketimetolookoverthevehicleswiringand
determinethelocationandwiresyouwillbeconnectingto.Ifyoudonotwishtocutortap
intothevehiclesexistingfactorywiring,therearewiringkitsavailableatyourcaraudio
retailerthatwillallowyoutoplugdirectlyintothefactorywiringharness.Makesureto
testallwiresbeforeconnectingtotheCDPlayer.
'

6
CAUTION! Tapeunusedwiressotheydonotshortagainstotherwiresor
chassisground.
TWOSPEAKERSYSTEM
CD8700
NOTUSED
NOTUSED
NOTUSED
NOTUSED
YELLOW
ANTENNACONNECTOR
MEMORY+12V
BLACK(GND)
RED(B+)
FRONTRIGHT
SPEAKER
BLUEAUTOANTENNA
WHITE
WHITE/BLACK GRAY/BLACK
GRAY
BATTERY
+12V
+-
SWITCHED+12V
(ONWITHIGNITION)
Lowlevelsignaloutputfor
connectiontoamplifieror
signalprocessors.
R
L
R
L
RCHRED
LCHWHITE
RCHRED
LCHWHITE
BLACK
GRAY
FRONTRCAOUTPUT
REARRCAOUTPUT
FRONTLEFT
SPEAKER
FUSE
0.5A
10AFuse
FILTER
BOX
0.5AFuse
R
L
RCHRED
LCHWHITE BROWN
AUXRCAINPUT

7
MOUNTINGTHECDPLAYER
DINSLEEVEMOUNTING
Insertthemountingsleeveintoa
standardDINcutoutinthedash
kit,dashboardorConsole.
Bendthemountingtabsofthesleeve
withascrewdrivertosecurethebracket
firmlyinplace.
InserttheCDPlayerinthe
mountingsleeveuntilitlocks.
TherearetwodifferentwaystomounttheCDPlayer.InmostJapanesevehiclesyoucan
usethefactorymountingbrackets,takingadvantageoftheISO/DINopening.Ifyourvehicle
doesnothaveISO/DINopening,youcanmounttheCDPlayerusingthesuppliedDINsleeve
andrearsupportbracket.Whenconsideringyourmountinglocation,makesuretheunitwill
beleveled.IfyoucannotmounttheCDPlayerlevel,duetoyourvehiclesdesign,makesure
thereisnomorethana30degreetilt.KeepingthisinmindwillassureproperCDplayand
overallreliability.

8CD8700
AttachthebackbracetotheCD
playerusingthesuppliedhardware.
Thenattachtheotherendofthe
bracetoafirmmountingsurface
(i.e.Dashbrace,firewall,e.t.c.)
ThiswillbracethebackoftheCD
playertoensuresolidmountingto
preventtheftandprovideoptimal
CDplay.
ToAttachtheFacePlate:
1Insertthefaceplatewiththerightsidefirst.
Angleintherightsideoftheplatetotheunit.
2Thenpushintheleftsideofthefaceplate
untilitsnapsinplace.
OncetheCDplayerissecured,fitthetrim
ringoveroutsideedgeoftheradiountilit
snapsintoplace.
FACEPLATE
1
2

9
REMOVINGTHECDPLAYER
Removetherectangulartrimringby
applyingpressurewithyourfinger
tips,thengentlypulloutawayfrom
thedash.
PLACEFINGERTIPSHERE
ISO/DINMOUNTING
IfyouownaJapanesevehicle,youcanusethestandardISO/DINmountingscrewholeson
thesideoftheCDplayertoattachtotheexistingfactorymountingbracket,withoutusing
theprovidedDINsleeve.
RemovethefactoryISO/DINmountingbracketfromthecaralongwiththefactoryradio.
RemovethefactoryradiofromthebracketbyunscrewingthetwoPhillipsscrewsoneach
sideoftheradiopayingcloseattentiontotheirscrewpositionsandsavingthescrewsto
mounttheCDplayer.
RemovethetwospringclipsfromeachsideoftheCDplayerbyremovingthescrews.
TheseclipsarenotusedinISO/DINmountingmethodandmustberemovedtoexposethe
ISO/DINmountingholes.
AlsoremovethedetachablefaceandrectangulartrimringfromtheCDplayerandmount
theCDplayertothefactoryISO/DINbracketusingthescrewsthatyouremovedfrom
thefactoryradio.
ConnectthewireharnessandantennaplugtothebackoftheCDplayer.Thenmountthe
factoryISO-DINbrackettothecar.
Note:ItisnotnecessarytoattachtheouterrectangulartrimringforISO/DINmounting
method.
!
!
!
!
!
ToremovetheCDplayerfromanISO/DINmount,followtheabovemountingprocedure
inreverseorder.
ToremovetheCDplayerfromasleevemount,usethepairofkeysprovided.
!
!
InserttheprovidedremovalkeyintotheopeningoneachsideoftheCDplayer.
Pushthekeysinwarduntiltheysnapinplace.Firmlygrabthekeysandslowly
pulltheCDplayeroutawayfromthedash.

10 CD8700
LOCATIONANDFUNCTIONOFCONTROLS
RESET
23
24
25
6
3 49
101813 14 15 16
12
21
8
11
SEL
MU
BND
MOD
LOU
ST
LOC
1
CLK
TOP/
2
INT
4
3
RPT RDM
56A.P
DIGITALAUDIO
COMPACT
TRK
LOUMU
FLAT
CLASS
POP
ROCK
EQ
INTRPTRDM
CD8700 35Wx4
19
7
11720
22

11
1
2Pressthebuttontodetachthefaceplate.Thiswillallowyoutoremove
thefaceplate.
3ToplayaCD,gentlyinserttheCDintotheslotwiththelabelsidefacingup.The
discwillautomaticallybeloadedintotheunitandstartplayingthefirsttrackof
thedisc.Thedigitaldisplaywillindicatethetracknumber.
4ToremoveaCDonceinserted,pressthebutton.OncetheCDisejected,
theunitswitchestoradiomode.
5Pressthebuttontoincreasethesystemsvolume.
6Pressthebuttontodecreasethesystemsvolume.
7PresstheMODbuttontochangeamongtuner(radio),CD(ifdiscisloaded),
andauxiliaryinputplayingmode.
RadioCDAUX.
8UnderradiomodepresstheBNDbuttontochangebetweenthreeFMbandsand
twoAMbands.
FM1FM2FM3AM1AM2
910
Underradiomode,pressthe9or10buttonmomentarilyandrepeatedly
tochangethefrequencynumberupordownonestep.UnderSEEK1mode,press
andholdthe9or10buttonformorethan2secondstoseektothenextor
previousclearstation.UnderSEEK2mode,pressandholdthe9or10button
tospeedilychangestationsupordown.Changingstationswillstopwhenthebutton
isreleased.(PleaserefertoSEEKonpage13onhowtosettheseekmode
betweenSEEK1andSEEK2.)
””
”
”
”
”
”
”
DETACHFACEPLATE
CDPLAY
EJECTCD
VOLUMEUP
VOLUMEDOWN
MODE
BAND
RADIOTUNE&CDTRACKUP/DOWN,CDFASTFORWARD/REWIND
ToturnONtheunit,pressanybuttonexcepttheandbutton.
ToturnOFFtheunit,pressthebuttonformorethan2seconds.
POWER
”
”
,
,
+
-
I
I

12
In CD playmode, press andhold the 9 or 10 buttonto fast forwardor
fast reverse throughthe song. TheCD resumes playingwhen the buttonis released.
11 PRESET STATIONS
There are 6numbered buttons tostore into memoryand recall stationsfor each
band. Select aband (if needed)as explained in 8 . Tuneto a radiostation that
you wish tostore. Select, press,and hold apreset numbered buttonfor 2 seconds
until you heara beep indicatingthat the stationhas been storedin memory. To
recall a presetstation, simply pushthe numbered presetbutton.
12 FUNCTION SELECT
SEL button allowsyou to displaydifferent functions foradjustments. Press the
SEL button momentarilyand repeatedly tomove the displayfrom Volume, Bass,
Treble, Balance, andFader functions. Usethe 5 and 6 buttons to
adjust the selectedmode. When themode has notbeen adjusted forseveral
seconds, display andmode returns tonormal radio orCD operation.
VOL BAS TRE BAL FAD
(Volume) (Bass) (Treble) (Balance) (Fader)
VOLUME - Pressthe SEL buttononce. Adjust thevolume level usingthe 5
and 6 buttons.
BASS - Pressthe SEL buttontwice. Adjust thebass level usingthe 5 and
6 buttons.
TREBLE - Pressthe SEL buttonthree times. Adjustthe treble levelusing the
5 and 6 buttons.
BALANCE - Pressthe SEL buttonfour times. Adjustthe sound balancebetween
left and rightspeakers using the 5 and 6 buttons.
FADER - Pressthe SEL buttonfive times. Adjustthe sound balancebetween front
and rear speakersusing the 5 and 6 buttons.
Press the SELbutton for morethan 2 secondsto display additionalset of functions
for adjustments, suchas DSP, BEEP,SEEK 1 or2, CLOCK 12/24, and Volume
Last/Adjust.
DSP - Theunit is equippedwith 4 presetequalization modes. Pressthe SEL button
for more than2 seconds todisplay DSP OFF.Then use 5 button to
choose one of4 following presetEQ s inthe following order.
When using presetEQ modes youwill not haveaccess to Bassand Treble
settings.
DSP OFF FLAT CLASS ROCK POP
CD8700
+-
+
-+
-
+-
+-
+-
,+
In CD playmode, press the 9 or 10 button to moveto the nextor previous
track.

13
BEEP - Thebeep sound whenyou press abutton on theunit can beturned on or
off. Press theSEL button formore than 2seconds to displaythe DSP
function. Press theSEL button againmomentarily to displayBEEP ON/OFF.
Then use 5 button to turnon/off the beepsound.
SET VOL -A certain volumelevel can beset to comeon when theunit is turned
on or canbe set tocome on atthe same lastlevel before theunit was
turned off. Pressthe SEL buttonfor more than2 seconds todisplay
the DSP function.Press the SELbutton four timesmomentarily to
display VOL LAST/ADJ.Use 5 buttonto choose betweenVOL LAST
and VOL ADJ.To set thevolume to acertain level, pressthe
SEL button momentarilywhen VOL ADJis displayed. Thenuse 5
and 6 buttonsto adjust tocertain volume levelwhen A-VOL is
displayed.
13 CD TOP/PAUSE
In CD playmode, press theTOP 13 buttonto pause CDplay. Press againto
resume normal play.
In CD playmode, press theTOP 13 buttonfor more than2 seconds togo back
to the topof the discand play thefirst track.
14 CD SCAN
In CD playmode, press theINT 14 buttonto turn onintro playing first10
seconds of eachtrack. When wishto listen tothe whole trackduring intro mode,
press the buttonagain to turnoff intro.
SEEK- The unitis equipped withtwo types ofseeks, SEEK 1and SEEK 2,for radio
stations. Press theSEL button formore than 2seconds to displaythe BEEP
function. Press theSEL button twicemomentarily to displaySEEK 1 or2.
Then use 5 button to switchbetween SEEK 1and SEEK 2.
(This adjustment isonly available duringradio operation)
SEEK 1 mode:Pressing 9 or 10 button formore than 2seconds will seek
up or downto the nextstrong station duringradio operation.
SEEK 2 mode:Pressing 9 or 10 button continuouslywill speedily change
station up ordown until thebutton is released.
12 H /24 H- Theunit is equippedwith two typesof clock formats,12 hour and24
hour. Press theSEL button formore than 2seconds to displaythe DSP
function. Press theSEL button threetimes momentarily toCLOCK 12
or 24. Thenuse 5 buttonto choose between12 and 24.
15 REPEAT PLAY
In CD playmode, press theRPT 15 buttonto continuously playingthe current
track. Press itagain to cancelthe repeat feature.
+
+
+
-
I
I
+
+

14
16 InCDplaymode,presstheRDM16buttontoplayalltracksofthediscinrandom
sequence.Pressitagaintocancelrandomplay.
17 PressLOUbuttononcetoenhancethebasseffect.
Pressagaintocanceltheloudnesseffect.
18 Inradiomode,pressandholdtheA.P.18buttonformorethan2secondsto
activatetheautomaticstoringfunction.Onceactivated,theradiostartssearch-
ingforfirst6strongsignaledstationsandstoresthemintothepresetmemory.
Aftercompletion,theradiowilltunebacktothefirstpresetmemorystation.
Inradiomode,presstheA.P.18buttonmomentarilytoactivatethepreset
scanningfunction.Onceactivated,theradiostartsscanningallpresetmemory
stationsforfewsecondsatatimewhilethepresetmemorynumberflasheson
theLCD.Pressingthebuttonagainwillstopthescan.
19 PresstheMUbuttontosilencethesystem.Pressasecondtimetoresumelistening.
20 Monaural(Mono)orStereomodecanbeselectedforFMtunersreception.For
bestqualitysound,stereomodeshouldbeselected.However,Monomodecanbe
selectedtohelpthereceptionofdistantradiostations.PresstheSTbuttonto
selectbetweenMonoandStereomodes.
21 PresstheCLKbuttontodisplaythetimeontheLCDfor5seconds.Toadjustthe
time,pressandholdtheCLKbuttonuntilthehourflashesandusethe5and
6buttonstoadjustthehour.PressandholdtheCLKbuttonagainuntilthe
minuteflashesandusethe5and6buttonstoadjusttheminute.
22 ThisbuttonisusedtocontrolthesensitivityoftheFMradiotunerwhilesearching
forastation.Whentheradioispoweredon,thelocalmodeisoffbydefault.Press
theLOCbuttontoturnonthelocalmodeonlytoreceivethestrongeststations.
23 Theresetbuttonshouldbepressedwheninstallationiscompleteandalsowhen
allbuttonsdonotoperate.
24 Designedasatheftdeterrent,theredLEDwillflashwhentheunitisturnedoff
andfaceplateremoved.
RANDOMPLAY
LOUDNESS
AUTOMATICSTORING&PRESETSCANNING
MUTE
MONO/STEREO
CLOCK
LOCAL/DX
RESET
SECURITYLED
,
CD8700
+
-
-+

15
TROUBLESHOOTINGTHESYSTEM
Thefollowingchartwillhelpinsolvingmostproblemsthatmayoccur.Shouldanyproblem
persistafteryouhavemadethesechecks,pleaseconsultyournearestProfileretailer.
Beforegoingthroughthischecklist,referbacktothewiringandoperatingprocedures.
SYMPTOM CAUSE SOLUTION
Thevehicle'signitionswitch
isnoton. Turntheignitionswitchtotheaccessory
position.Ifthereisstillnopower,checkthe
fusesatthevehicle'sfuseblockorthe
radio'sfuseleads.
Thefuseisblown. Replacethefusewithanotherfuseofthe
samerecommendedvalue
Thereisadiscalreadyin
theplayer. Removethediscintheplayer,thenputin
thenewone.
Youaretryingtoputthe
compactdiscinupsidedown. Insertthecompactdiscwiththelabelfacing
up.
Thecompactdiscis
extremelydirtyor
defective.
Cleanthecompactdiscwithacompactdisc
cleaningsolutionorreplacethedefective
compactdisc.
Thetemperatureinthecar
istoohot. Cooltheinsideofthevehicle,thentryagain.
Condensationbuild-uponthe
insideoftheunit. Leavethediscplayeroffandturnthe
vehicle'sairconditionerontoremove the
condensationbuild-upinsidetheunit.
Thevolumecontrolisallthe
waydown. Adjustthevolumecontrol.
Thespeakersarebad. Testthespeakerstodetermineiftheyneed
replacing.
Thefunction
buttonsdo
notwork.
Thebuilt-inmicroprocessor
isoperatingincorrectly. Removethedisc,thenre-insertit.Pressthe
resetbutton.
NoPower
Disccannot
beloadedor
ejected.
Nosound.
Newinstallation. PresstheRESETbutton.
E1~E10
Theunitcannotbeoperated becauseoftrouble.Presst
he"RESET"
button . If theindicatorstill appearsafterpressing the"RESET"
Button,yourunitneedsrepair.leaserefertothewarrantysection
ofthismanualfordetailsongettingtheunitserviced.
P
ERRORCODES
23
23
23
23

SYMPTOM CAUSE SOLUTION
Theinstallationangleis
greaterthan30degrees Adjusttheangleoftheunittolessthan30
degrees
Thediscplayerisinstalled
incorrectly Checktoseeiftheunitisfastenedsecurely
withthebackbracesupportingtherearof
theunit.
Thecompactdiscis
extremelydirtyordefective
disc.
Cleanthecompactdiscwithacompactdisc
cleaningsolutionorreplacethedefective
compactdisc.
Condensationbuild-uponthe
insideoftheunit. Leavethediscplayeroffandturnthe
vehicle'sairconditionerontoremove the
condensationbuild-upinsidetheunit.
Theantennaisnot
connectedortheantennais
bad.
Checktheantennaandconnectiontoinsure
properperformance.
Thesignalsinyourlistening
areaareweak. Selectstationsmanuallyandmakesurethe
tunerisinthedistantstereomode.
Theradio
doesnot
work.The
Radiostation
automatic
selection
doesnot
work.
Thecompact
discskips.
16 CD8700

SPECIFICATIONS
GENERAL
CDPLAYER
RADIO
FM
AM
PowerSupplyRequirements...........................................DC12Volts,NegativeGround
ChassisDimensions...................................................................7(W)x6(D)x2(H)
ToneControls...........................................................................................................................
Bass@100Hz..........................................................................................+10dB/-10dB
Treble@10Khz.......................................................................................+10dB/-10dB
Equalizer..................................................................................................................4Presets
MaximumOutputPower.........................................................................................35Wx4
RMSOutputPower..................................................................................................20Wx4
MaximumCurrentConsumption........................................................................10Ampere
Fuses
Memory(Constant)........................................................................................10Ampere
Accessory(Switched).................................................................................0.5Ampere
RCAlineoutvoltage......................................................................................................3.7V
SignaltoNoiseRatio...................................................................................................>85dB
ChannelSeparation......................................................................................................>80dB
FrequencyResponse........................................................................................5Hz~20Khz
UsableDisc....................................................................................CD/CD-R/CD-RWDiscs
FrequencyCoverage..............................................................................87.5to107.9MHz
IF................................................................................................................................10.7MHz
StationPresets...................................................................................................................18
FrequencyCoverage.................................................................................530to1710KHz
IF.................................................................................................................................450KHz
StationPresets...................................................................................................................12
1/2
Duetocontinuingproductimprovement,specificationssubjecttochangewithoutnotice.
17

LIMITEDWARRANTY
ProfileConsumerElectronics,Inc.warrantsthisproducttobefreefromdefectsin
materialandworkmanshipforaperiodofOne(1)Yearfromthedateofsaletothe
originalconsumerpurchaser.Ifthisproductisproventobedefectivewithinthisone
yearperiod,Profilewillrepairitwhensaidproductisreturned,withacopyofthe
datedsalesreceipt,freightprepaidtoProfile.
ThiswarrantyisvalidonlyintheUnitedStates.Thiswarrantydoesnotcoverany
expenseincurredintheremovaland/orre-installationofthisproduct.Thiswarranty
doesnotcoveranyProfileproductdamagedbyaccident,misuse,abuse,improperline
voltage,fire,water,lightning,orotheractsofGod.Thiswarrantyisvoidifanyparts
and/orserviceis/arefurnishedbyanyoneotherthanProfile.Thiswarrantyisvoidif
thefactoryappliedserialnumberisalteredorremovedfromtheproduct.
Thiswarrantydoesnotcovercartons,cases,batteries,brokenormarredcabinets,
magnetictapes,oranyotheraccessoriesusedinconnectionwiththisproductor
consequentialdamagesduetoadefectintheproduct.
Anyimpliedwarranties,includingfitnessforuseandmerchantability,arelimitedin
durationtotheperiodoftheexpresswarrantysetforthabove.Nopersonis
authorizedtoassumeforProfileanyotherliabilityinconnectionwiththesaleofthe
product.Profileexpresslydisclaimsliabilityforincidentalandconsequential
damagesthatmightbecausedbythisproduct.Theremediesprovidedunderthis
warrantyareexclusiveandlieuofallothers.
Thiswarrantygivesyouspecificlegalrights.Youmayhaveotherrightswhichvary
fromstatetostateorprovincetoprovince.Somestatesorprovincesdonotallow
limitationonhowlongwarrantieslast,sotheabovemaynotapplytoyou.Additionally,
somestates/provincesdonotallowtheexclusiontolimitationofconsequentialor
incidentaldamages,sotheabovelimitationorexclusionmaynotapplytoyou.
*Inthespacebelow,recordtheserialnumberthatislocatedonthebackoftheunit
alongwiththepurchasedateandlocation.
ModelNumber__________________ SerialNumber ____________________
PurchaseDate__________________ WherePurchased_________________
RETAINYOURSALESRECEIPTALONGWITHTHISCARD.ITISYOURONLY
VALIDDOCUMENTTORECEIVEWARRANTYSERVICE.

PROFILECONSUMERELECTRONICS,INC.
15060SHOEMAKERAVE
SANTAFESPRINGS,CA90670
TEL:(562)404-9393FAX:(562)404-9433
WWW.PROFILEUSA.COM
WARRANTYREPAIRPOLICY
Intheunlikelyeventofproductfailure,thefollowingprocedures
shouldbefollowed
1)Theunitmustbeunderthe1-yearwarrantyperiod.
2)Theunitmusthavenophysicaldamage.
3)Acopyoftheoriginalproofofpurchasemustbesentwiththeunit.
4)Includeabriefdescriptionoftheproblemorfailurewiththeunit.
5)Includethereturnstreetaddressanddaytimetelephonenumber.
6)Allow2~3weeksforrepair(thisperiodincludesshippingtime).
Sendunitto: PROFILECONSUMERELECTRONICS,INC.
SANTAFESPRINGS,CA90670
TEL:(562)404-9393
15060SHOEMAKERAVE
Note: Allunitsfailingtomeettheaboverequirementswillbe
subjecttoachargeandormaynotberepaired.
Table of contents
Other Profile Car Receiver manuals

Profile
Profile CD6500 Service manual

Profile
Profile MP9900 Quick start guide

Profile
Profile MP9700 Service manual

Profile
Profile CD8200 Service manual

Profile
Profile CD7400 Service manual

Profile
Profile CD7200 Service manual

Profile
Profile PCD920 Service manual

Profile
Profile PCD970R Service manual

Profile
Profile PCD950R Service manual