Profine ZERO Technical manual

uso e installazione
use and installation
installation et mise en route
instalación y uso
Bedienungsanleitung

ZERO | 2
USO PREVISTO
Zero è un’apparecchiatura destinata al trattamento domestico dell'acqua potabile in grado di modicarne le caratteri-
stiche organolettiche, chimiche e ridurne il contenuto salino.
ATTENZIONE
Questa apparecchiatura richiede una manutenzione regolare per garantire la potabilità dell'acqua trattata.
È ASSOLUTAMENTE VIETATO utilizzare l’apparecchiatura per il trattamento di acque di incerta qualità.
È ASSOLUTAMENTE VIETATO utilizzare l’apparecchiatura in assenza di manutenzione periodica.
È ASSOLUTAMENTE VIETATO utilizzare l’apparecchiatura in condizioni igieniche o ambienti non conformi a
quanto indicato nel presente manuale.
È ASSOLUTAMENTE VIETATO alimentare l’apparecchiatura con acque reue, acque di mare o comunque
acque in condizioni chimiche, siche e batteriologiche tali da non rientrare nei limiti di potabilità. (reui
industriali o di lavorazioni chimiche).
L’apparecchio può essere utilizzato da bambini di età non inferiore a 8 anni e da persone con ridotte capacità siche,
sensoriali o mentali, o prive di esperienza o della necessaria conoscenza, esclusivamente sotto sorveglianza diretta
oppure dopo che le stesse abbiano ricevuto istruzioni relative all’uso sicuro dell’apparecchio e alla comprensione dei
pericoli ad esso inerenti.
ATTENZIONE
Think:Water non è responsabile di eventuali danni a persone o cose derivanti dalla mancata osservazione delle
presenti indicazioni.
INTENDED USE
Zero is equipment designed for household water treatment. It is able to modify organoleptic and chemical characteris-
tics of potable water, reducing saline content.
ATTENTION
This equipment requires regular maintenance to ensure treated water potability.
IT IS STRICTLY FORBIDDEN to use the equipment for the treatment of non-drinking water.
IT IS STRICTLY FORBIDDEN to use the equipment in the absence of periodic maintenance.
IT IS STRICTLY FORBIDDEN to use the equipment in hygienic conditions or environments that aren't in com-
pliance with those indicated in this manual.
IT IS STRICTLY FORBIDDEN to supply the equipment with waste water, sea water or water in chemical, physi-
cal and biological that do not meet the potability limits. (Industrial waste or chemical processing).
Children should not play with the appliance.
The device can be used by children aged less than 8 years, and by people with reduced physical, sensory or mental
capabilities, or lack of experience or knowledge, only under surveillance or after their having received instructions
about safe use and understood of the dangers inherent in it.
ATTENTION
Think:Water S.r.l. is not responsible for any damage to persons or property resulting from failure to follow these
directions.

3| ZERO
MODE D’EMPLOI
Zero est un équipement conçu pour le traitement de l'eau domestique. Il modie les caractéristiques chimico-organo-
leptiques de l’eau du robinet, et il réduit sa minéralisation.
AVERTISSEMENT
Cet équipement a besoin de maintenance régulière pour assurer la qualité sanitaire de l’eau traitée.
NE PAS UTILISER cet équipement pour le traitement d’eau non potable.
NE PAS UTILISER cet équipement en absence de maintenance régulière.
NE PAS UTILISER cet équipement pour un autre usage qu’indiqué dans ce manuel.
NE PAS UTILISER cet équipement avec des eaux de rejet, de l’eau de mer ou de l’eau en provenance de
lieux manipulant des produits chimiques, physiques et ou biologiques ne respectant pas la qualité de l’eau
potable (Usine chimique ou de traitement des eaux usagées).
Ceci n’est pas un jouet pour enfants.
Cet équipement ne doit pas être utilise par des enfants de moins de 8 ans, par des personnes handicapées, phy-
siques ou mentales, par des personnes non instruites et/ou formées pour cet équipement, SAUF sous la surveillance
des personnes autorisées et ou après avoir reçu les instructions d’une utilisation en toute sécurité, et après avoir
compris les dangers inhérents à cet équipement.
AVERTISSEMENT
Think:Water srl dégage toute responsabilité pour tout dommage subis par des personnes suite à une mauvaise
utilisation en contradiction avec ce manuel.
VORGESEHENER GEBRAUCH
Zero ist ein Gerät für die Wasseraufbereitung im Haushalt. Es ist in der Lage, die organoleptischen und chemischen
Eigenschaften von Trinkwasser zu verändern und den Salzgehalt zu reduzieren.
ACHTUNG
Diese Vorrichtung muss regelmäßig gewartet werden, um den Anforderungen der Trinkwasserqualität zu entsprechen
und die durch die Behandlung verbesserte Trinwasserqualität, so wie vom Hersteller erklärt, nachhaltig garantieren zu
können.
ABSOLUTES VERBOT das Gerät zur Behandlung von Wässern mit unsicherer Trinkwasserqualität zu be-
nutzen.
ABSOLUTES VERBOT ein nicht regelmäßig gewartetes Gerät zu benutzen. ABSOLUTES VERBOT das Gerät in
Räumen zu benutzen, die nicht die in diesem Handbuch angeführten Hygieneeigenschaften erfüllen.
ABSOLUTES VERBOT das Gerät mit Abwässern, mit Meerwasser oder jedenfalls mit Wässern zu benutzen,
deren Trinkbarkeitseigenschaften nicht erfüllt sind (Industrieabwässer/Chemieabwässer ).
Das Gerät ist kein Spielzeug für Kinder.
Die Benutzung des Gerätes von Kindern ab 8 Jahren und Personen mit eingeschränkten physischen, sensorischen
oder geistigen Fähigkeiten oder unerfahrenen Personen, die das Gerät nicht kennen, muss direkt beaufsichtigt
werden oder diese Personen müssen zum korrekten und sicheren Gebrauch geschult werden und sie müssen die
Gefahren kennen.
ACHTUNG
Think:Water kann für Schäden an Personen oder Sachen nicht verantwortlich gemacht werden, wenn diese auf Nicht-
befolgung der in diesem Handbuch angeführten Anweisungen zurückzuführen sind.

RECOMENDACIÓN DE USO
Zero es un equipo diseñado para el tratamiento de agua doméstico. Es capaz de modicar las características organo-
lépticas y químicas del agua potable, reduciendo el contenido salino.
ADVERTENCIA
Esta máquina requiere una manutención periódica para asegurar la potabilidad del agua potable tratada y el manteni-
miento de las mejoras según lo declarado por el fabricante.
ESTÁ ESTRICTAMENTE PROHIBIDO el uso del equipo para el tratamiento de agua no potable.
ESTÁ ESTRICTAMENTE PROHIBIDO el uso del equipo en ausencia de manutención periódica.
ESTÁ ESTRICTAMENTE PROHIBIDO el uso del equipo en condiciones higiénicas o lugares no conformes a las
indicadas en este manual.
ESTÁ ESTRICTAMENTE PROHIBIDO de alimentar el aparato con las aguas residuales, agua de mar o agua
química, física y biológica que no cumplen con los límites de potabilidad. (Residuos industriales o trata-
miento químico).
Los niños no deben jugar con el aparato.
El dispositivo puede ser utilizado por niños menores de 8 años de edad, y por personas con capacidades físicas,
sensoriales o mentales reducidas, o falta de experiencia o conocimiento, siempre bajo vigilancia o después de haber
recibido instrucciones para un uso seguro del equipo y la comprensión de los peligros inherentes a ello.
ADVERTENCIA
Think:Water srl no es responsable de cualquier daño a personas o propiedades como consecuencia de la desatención
a estas direcciones.

5| ZERO

ZERO | 6
raccordo a T
F/F/M
T-tting
F/F/M
connecteur T
F/F/M
racor en T
F/F/M
T-Anschluss
IG/IG/AG
1 pezzo
1 piece
1 pièce
1 pieza
1 Stück
9400334
tubo 1/4”
pipe 1/4”
tuyau 1/4”
tubo 1/4”
Schlauch 1/4”
1 m
3,28 ft
9300522
terminale dritto
M 3/8”
straight M
adapter 3/8”
union simple M
3/8”
adaptator
recto hembra 3/8”
Gerader
Schlauchadapter
3/8“ AG
1 pezzo
1 piece
1 pièce
1 pieza
1 Stück
9300258
tubo
8X6 mm
pipe
8X6 mm
tuyau
8x6 mm
tubo
8X6 mm
Schlauch
8x6 mm
2 m
6,56 ft
9300733
valvola sfera mini
M/F
mini ball valve
M/F
vanne
arrêt M/F
mini válvula
de bola M/H
IG/AG Mini
Kugelhahn AG/IG
1 pezzo
1 piece
1 pièce
1 pieza
1 Stück
9400300
gomito codolo 1/4”
stem elbow 1/4”
coude 1/4”
codo espiga 1/4”
Winkel-Schlauch
adapter 1/4”
1 pezzo
1 piece
1 pièce
1 pieza
1 Stück
9300728
kit staffa
di scarico
drain clamp
kit
kit égout
kit collarín
de dasagüe
Abuss-
Rohrschellen Kit
1 pezzo
1 piece
1 pièce
1 pieza
1 Stück
1100137
terminale
dritto femmina
straight female
adapter
adapteur
femelle droit
adaptator
recto hembra
Gerader IG
Adapter
1 pezzo
1 piece
1 pièce
1 pieza
1 Stück
9300651
gomito codolo
8 mm
stem elbow
8 mm
coude
8 mm
codo espiga
8 mm
Winkel-Schlauch
adapter 8 mm
2 pezzi
2 pieces
2 pièces
2 piezas
2 Stücke
9300735
O-ring 3021
O-ring 3021
joint torique
3021
junta tórica
3021
O-Ring 3021
1 pezzo
1 piece
1 pièce
1 pieza
1 Stück
1100223
connettore dritto
femmina
straight female
connector
connecteur
femelle droit
conector recto
hembra
Gerader IG
Anschluss
2 pezzi
2 pieces
2 pièces
2 piezas
2 Stücke
9300734
kit rubinetto
faucet kit
kit robinet
kit grifo
Wasserhahn
Set
1 pezzo
1 piece
1 pièce
1 pieza
1 Stück
XO0001BTW

7| ZERO
scarico
drain
egout
Abuss
desagüe
entrata
in
eau brute
entrada
Engang
uscita
out
production
salida
Ausgang
mix
scarico
drain
egout
Abuss
desagüe
entrata
in
eau brute
entrada
Engang
uscita
out
distribution
salida
Ausgang
corretto posizionamento | device correct positioning | différentes installations possibles
posicionamiento correcto | Ausrichtung des Gerätes

ZERO | 8
Prima di procedere all’installazione rimuovere i tappi
gialli entrata (IN) e uscita (OUT) e il tappo scarico
(DRAIN), da reinserire in caso di spostamento della
macchina.
Before installing remove the yellow IN and OUT plugs
and the DRAIN plug, to be inserted again in case of
movement of the device.
Avant l’installation de l’appareil, ne pas oublier d’en-
lever les bouchons jaunes vissés sur les connexions
d’entrée et sortie, ainsi que le bouchon inséré dans
la connexion égout.
Antes de instalar quitar los tapones amarillos da
entrada (IN) y de salida (OUT) y el tapón de desagüe
(DRAIN).
Vor der Installation entfernen Sie bitte die gelben
Ein- und Ausgangsstopfen sowie den Abussstopfen.
Bitte bewahren Sie diese auf, um sie bei einer
Bewegung des Gerätes wieder einzusetzen.
tener premuto il collarino
keep pressed the collet
maintenir la pince pressée
mantener la abrazadera presionada
Halten Sie den Sicherungsring gedrückt
estrarre il tappo
take out the plug
retirer le bouchon
quitar la tapa
Nehmen Sie den Verschlussstopfen heraus
1
2
Rimozione tappo scarico | Drain plug extraction | Extraction du bouchonde egout
Retirar el tapón de desagüe | Ablassschraube entfernen

9| ZERO
installazione circuito di scarico
drain circuit installation
installation circuit égout
instalación conducto de desagüe
Abuss-Installation
DHI
guarnizione
gasket
joint
junta
Dichtung
kit assemblaggio staffa scarico
drain clamp kit assembly
kit égout
kit asamblaje collarín de desagüe
Rohrschellen Kit Montageanleitung
gomito codolo 1/4”
stem elbow 1/4”
coude 1/4”
codo espiga 1/4”
Winkel-Schlauch
adapter 1/4”
1 pezzo
1 piece
1 pièce
1 pieza
1 Stück
tubo 1/4”
pipe 1/4”
tuyau 1/4”
tubo 1/4”
Schlauch 1/4”
1 m
3,28 ft
kit staffa
di scarico
drain clamp
kit
kit égout
kit collarín
de dasagüe
Abuss-
Rohrschellen Kit
1 pezzo
1 piece
1 pièce
1 pieza
1 Stück

ZERO | 10
2/4
1/4
forare ø 6 mm
drill ø 6 mm / 15/64”
foret ø 6 mm
taladrar ø 6 mm
Bohrung ø 6 mm

11 | ZERO
3/4
D
H
I
scarico
drain
egout
Abuss
desagüe

ZERO | 12
B CA F G E
installazione circuito di scarico
drain circuit installation
installation circuit égout
instalación conducto de desagüe
Abuss-Installation
raccordo a T
F/F/M
T-tting
F/F/M
connecteur T
F/F/M
racor en T
F/F/M
T-Anschluss
IG/IG/AG
1 pezzo
1 piece
1 pièce
1 pieza
1 Stück
valvola sfera mini
M/F
mini ball valve
M/F
vanne
arrêt M/F
mini válvula
de bola
IG/AG Mini
Kugelhahn AG/IG
1 pezzo
1 piece
1 pièce
1 pieza
1 Stück
terminale dritto
M 3/8”
straight M
adapter 3/8”
union simple M
3/8”
adaptator
recto hembra 3/8”
Gerader
Schlauchadapter
3/8“ AG
1 pezzo
1 piece
1 pièce
1 pieza
1 Stück
connettore dritto
femmina
straight female
connector
connecteur
femelle droit
conector recto
hembra
Gerader IG
Anschluss
2 pezzi
2 pieces
2 pièces
2 piezas
2 Stücke
tubo
8X6 mm
pipe
8X6 mm
tuyau
8x6 mm
tubo
8X6 mm
Schlauch
8x6 mm
quanto necessario
just enough
juste assez
lo suciente
wie erforderlich
gomito codolo
8 mm
stem elbow
8 mm
coude
8 mm
codo espiga
8 mm
Winkel-Schlauch
adapter 8 mm
2 pezzi
2 pieces
2 pièces
2 piezas
2 Stücke

13 | ZERO
prima dell'installazione chiudere la valvola
entrata acqua fredda
before installation turn off the cold water
valve
fermer la vanne eau froide avant installation
antes de instalar ZERO cerrar la válvula de
entrada de agua fría
Schließen Sie vor der Installation das
Kaltwasserventil
prima del montaggio teonare le parti lettate
before installation cover with teon
prévoir du téon
antes de montar ZERO recubrir la rosca con
teón alrederor de la rosca
Dichten Sie vor der Installation mit Teonband ab

ZERO | 14
1/4 2/4
A
B C
tubo acqua fredda
cold water pipe
tuyau eau froide
tubo de agua fría
Kaltwasserleitung

15 | ZERO
3/4 4/4
G
E
F
entrata
in
eau brute
entrada
Engang

ZERO | 16
4321
Per il funzionamento del rubinetto vedere pagina 18
For the faucet working instruction see page 18
Pour les instructions de fonctionnement du robinet, voir page 19
Para las instrucciones de funcionamiento del grifo, consulte la página 19
Für die Wasserhahn-Betriebsanleitung siehe Seite 19
L
installazione rubinetto
faucet installation
installation du robinet
instalación del grifo
Wasserhahn-Installation
rubinetto
faucet
robinet
grifo
Wasserhahn
1 pezzo
1 piece
1 pièce
1 pieza
1 Stück
distanziale
spacer
espaceur
distanciador
Abstandshalter
1+1 pezzi
1+1 pieces
1+1 pièces
1+1 piezas
1+1 Stücke
guarnizione in
gomma
rubber gasket
joint plat
junta de goma
Gummidichtung
1 pezzo
1 piece
1 pièce
1 pieza
1 Stück
rondella
washer
rondelle
arandela
Kunststoffscheibe
1 pezzo
1 piece
1 pièce
1 pieza
1 Stück
dado ssaggio
xing nut
ecrou
tuerca de jación
Befestigungsmutter
1 pezzo
1 piece
1 pièce
1 pieza
1 Stück

17 | ZERO
1/2 2/2
L
1
4
3
2
forare ø 12 mm
drill ø 12 mm / 15/32”
foret ø 12 mm
taladrar ø 12 mm
Bohrung ø 6 mm

ZERO | 18
K J G E F
installazione circuito uscita
outlet circuit installation
circuit de distribution
instalación conducto de salida
Wasserausgangs-Installation
O-ring 3021
O-ring 3021
joint torique 3021
junta tórica 3021
O-ring 3021
1 pezzo
1 piece
1 pièce
1 pieza
1 Stück
adattatore dritto
femmina
straight female
adapter
adaptateur femelle
droit
adaptator recto
hembra
Gerader IG Adapter
1 pezzo
1 piece
1 pièce
1 pieza
1 Stück
tubo 8X6 mm
pipe 8X6 mm
tuyau 8x6 mm
tubo 8X6 mm
Schlauch 8x6 mm
quanto necessario
just enough
juste assez
lo suciente
wie erforderlich
codolo gomito 8 mm
stem elbow 8 mm
coude 8 mm
codo espiga 8 mm
Winkel-
Schlauchadapter
8 mm
1 pezzo
1 piece
1 pièce
1 pieza
1 Stück
connettore dritto
femmina
straight female
connector
connecteur
femelle droit
conector recto
hembra
Gerader IG
Anschluss
1 pezzo
1 piece
1 pièce
1 pieza
1 Stück

19 | ZERO
1/2 2/2
K J G E
F
uscita
out
distribution
salida
Ausgang

ZERO | 20
1 - Chiudere il rubinetto, inserire la batteria
nel circuito che verrà segnalato da un
lampeggio del LED BLU, quindi inserire
il circuito nel rubinetto entro 30 secondi.
Attendere ora circa 2 minuti no a che i
LED BLU e ROSSO lampeggino entrambi
contemporaneamente per circa 10 secondi.
Questo va ad indicare che Il circuito ha
effettuato correttamente l’avvio.
Sequenza LED installazione
1. Lampeggio LED BLU all’inserimento della
batteria.
2. Nessun lampeggio per circa 2 minuti.
3. Lampeggio per 10 secondi contempora-
neamente del LED ROSSO e del LED BLU
per avvenuta conferma della procedura
di reset.
NON RUOTARE LA MANOPOLA PRIMA
CHE LA SEQUENZA SIA COMPLETATA
2 -Se il reset è avvenuto correttamente,
mentre si eroga acqua, il LED BLU lampeg-
gia. Se il reset non è avvenuto correttamen-
te lampeggia il LED ROSSO.
3 -Quando il circuito di conteggio all’aper-
tura del rubinetto presenterà il lampeggio
del LED ROSSO indica che si è entrati in
riserva dell’autonomia del ltro, è possibile
ancora utilizzare l’acqua ma è necessario
programmare la normale manutenzione.
4 - Al termine dell’autonomia il LED ROSSO
rimarrà sempre acceso sso no all’esauri-
mento della batteria. Questo va ad indicare
che è necessario procedere alla sostituzione
del ltro Prone®. Dopo la sostituzione
del ltro procedere alla sostituzione della
batteria per resettare il conteggio.
5 - Se il rubinetto è in normale funziona-
mento (lampeggio LED BLU in erogazione)
anche sostituendo la batteria il conteggio
non verrà resettato. Tale operazione può
essere effettuata solo a LED ROSSO sso.
In caso di sostituzione anticipata del ltro è
necessario l’intervento di un tecnico per il
reset del conteggio.
1 - Close the tap, insert the battery into
the circuit which will be indicated by BLUE
LED ashing, then insert the circuit into
the tap within 30 seconds. Now wait about
2 minutes until the BLUE and RED LEDs
both ash simultaneously for about 10
seconds. This indicates that the circuit has
successfully started.
LED light installation sequence
1. BLUE LED ashing when the battery is
inserted.
2. No ashing for about 2 minutes.
3. Flashing RED and BLUE LEDs for 10
seconds simultaneously for reset proce-
dure conrmation.
DON’T MOVE THE KNOB TAP BEFORE
THE SEQUENCE IS COMPLETED
2 -If the reset is correct while you are sup-
plying water, the BLUE LED ashes. If the
reset is not correct the RED LED ashes.
3 -When, by opening the tap, the RED LED
counting circuit will ash, it indicates that
the lter autonomy has been reached, water
can still be used but normal maintenance
must be programmed.
4 - At the autonomy end, the RED LED will
always remain on until battery is exhausted.
This indicates that it is necessary to replace
the Prone® lter. After replacing the lter,
replace the battery to reset the count.
5 - If the tap is in normal operation (BLUE
LED ashing during dispensing), even if the
battery is replaced, the count will not be
reset. This operation can only be carried out
with the RED LED always on. In case of early
lter replacement, a technician is required to
reset the count.
impostazione contatore rubinetto
avvio | reset contatore
impostazione contatore rubinetto
avvio | reset contatore
2
3
1
Sequenza LED installazione
LED light installation sequence
Séquence LED installation
Secuencia LED instalación
LED Installations-Sequenz
Other manuals for ZERO
1
Table of contents
Other Profine Plumbing Product manuals
Popular Plumbing Product manuals by other brands

Sterling Plumbing
Sterling Plumbing 14631 Specification sheet
Clou
Clou flush 3 CL/03.03030 installation instructions
Pfister
Pfister Canton F-529-7CN Quick installation guide
TECE
TECE solid operating instructions

Balmani
Balmani VEGA installation guide

Dixon Bayco
Dixon Bayco VR6500 Installation & operating instructions
Glacier bay
Glacier bay 7032E-B6104 Installation and care guide
Symmons
Symmons Dia 353SR-5 Operation & maintenance manual

Lefroy Brooks
Lefroy Brooks X1-2040 Installation, operating, & maintenance instructions
Toto
Toto TX402S quick start guide
Schell
Schell LINUS D-C-T Assembly instructions
Omnires
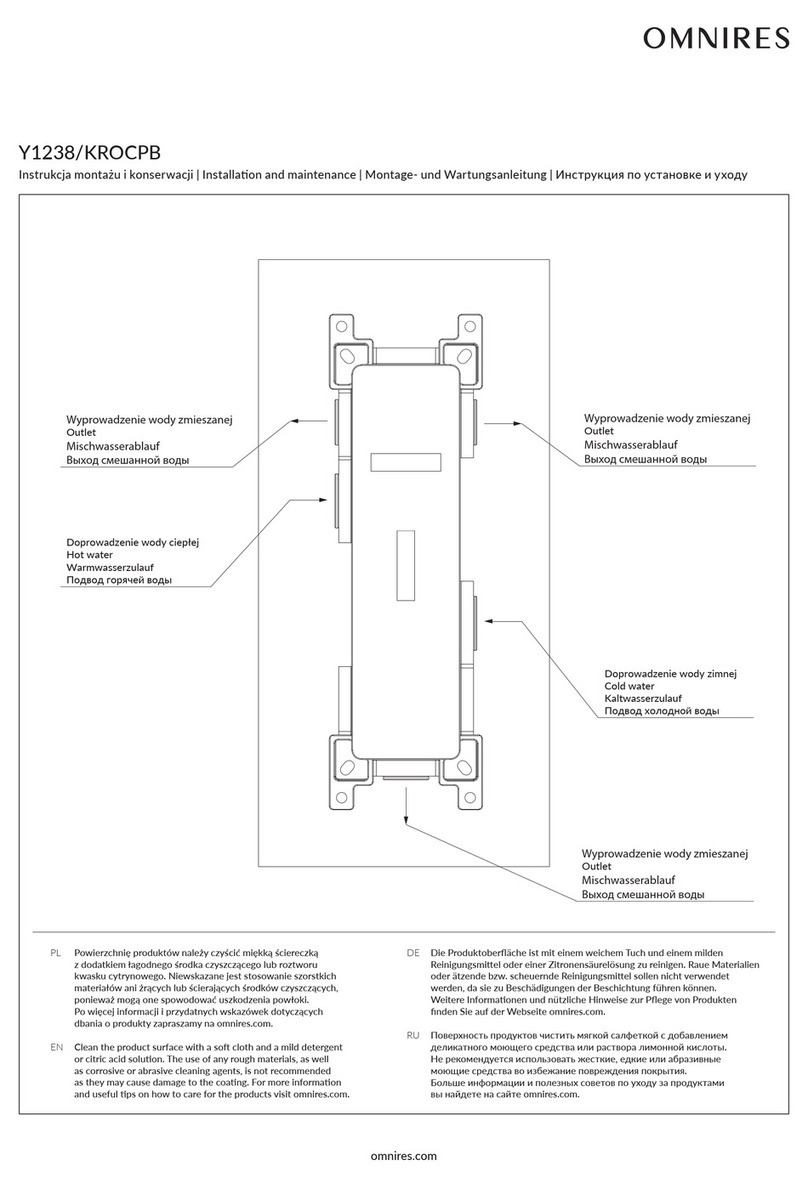
Omnires Y1238/KROCPB Installation and Maintenance
