Profine ZERO Technical manual


ATTENZIONE:
questa apparecchiatura necessita di una regolare manutenzione periodica al ne di
garantire i requisiti di potabilità dell’acqua potabile trattata e il mantenimento dei mi-
glioramenti come dichiarati dal produttore; usare secondo manuale d’uso.
WARNING:
this equipment requires regular maintenance to ensure treated water potability; use
according to the user guide.

use and installation | Zero
3dimensioni | dimensions

4
Zero | uso e installazione
tubo
8X6 mm
pipe
8X6 mm
2 m
6,56 ft
9300733
tubo ¼”
pipe ¼”
1 m
3,28 ft
9300522
raccordo a
T F/F/M
T-tting
F/F/M
1 pezzo
1 piece
9400334
terminale
dritto M
3/8”
straight M
adapter
3/8”
1 pezzo
1 piece
9300258
valvola
sfera mini
M/F
mini ball
valve M/F
1 pezzo
1 piece
9400300
gomito
codolo
¼”
stem
elbow ¼”
1 pezzo
1 piece
9300728
connettore
dritto
femmina
straight
female
connector
2 pezzi
2 pieces
9300734
kit
rubinetto
gooseneck
faucet kit
1 pezzo
1 piece
XO0001BTW
kit staa
di scarico
drain
clamp
kit
1 pezzo
1 piece
1100137
terminale
dritto F
straight
female
adapter
1 pezzo
1 piece
9300651
gomito
codolo
8 mm
stem
elbow
8 mm
2 pezzi
2 pieces
9300735
O-ring
3021
O-ring
3021
1 pezzo
1 piece
1100223
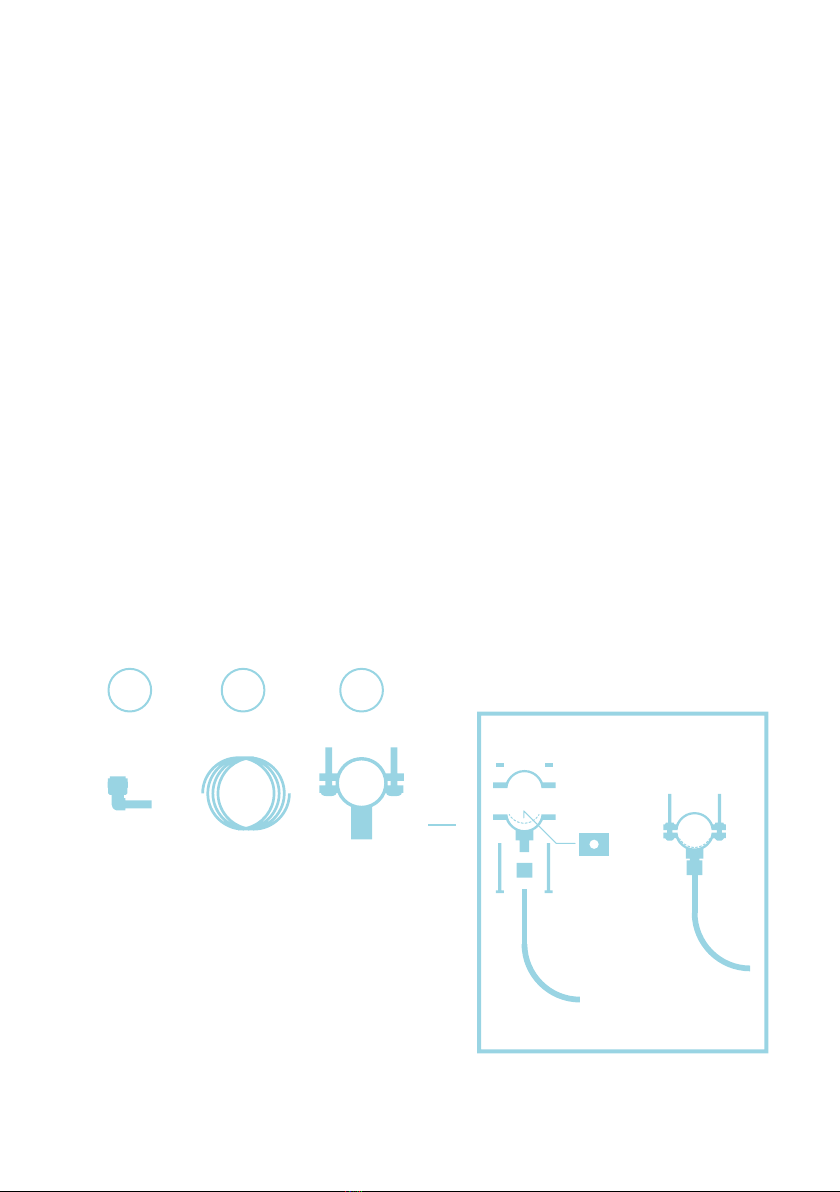
lista componenti | component list

5
use and installation | Zero
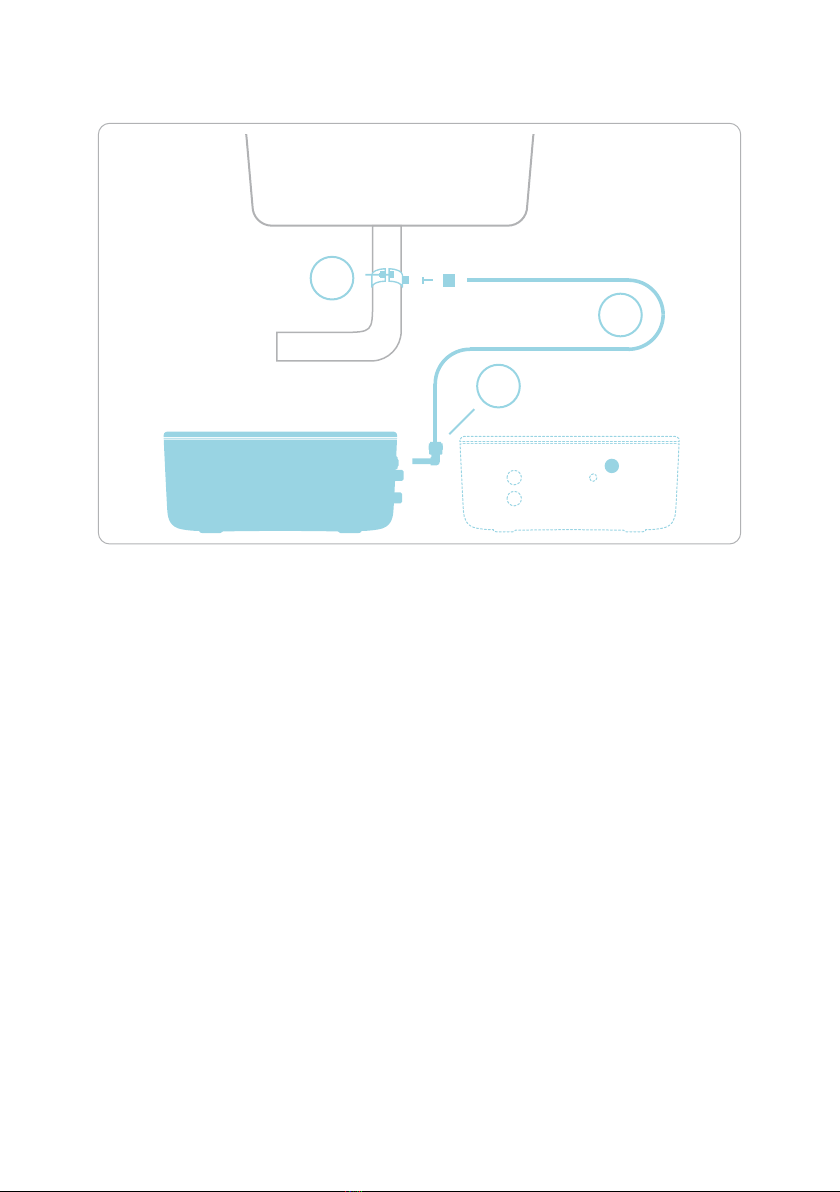
schema generale | installation scheme
scarico
drain
entrata
in
uscita
out
scarico
drain
entrata
in
uscita
out
mix
corretto posizionamento | device correct positioning

installazione
installation
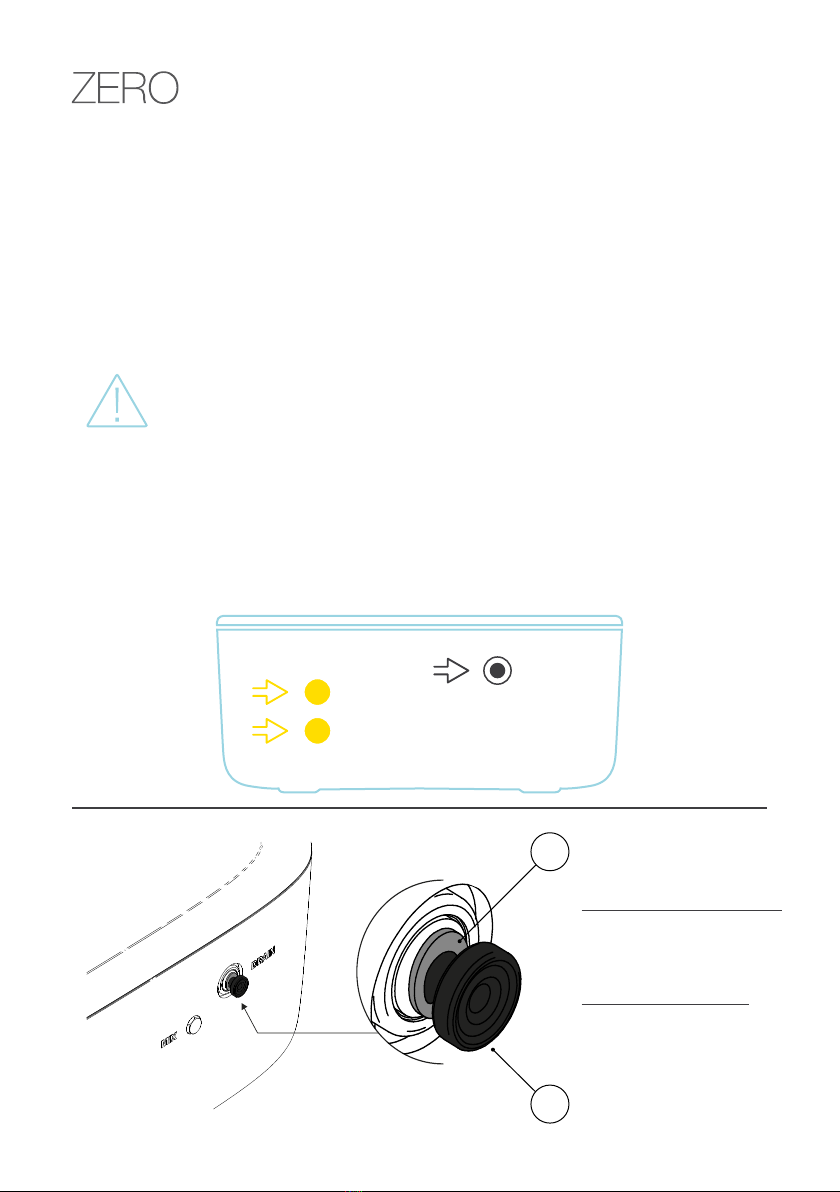
Prima di procedere all’installazione rimuovere i tappi gialli entrata (IN) e uscita (OUT)
e il tappo scarico (DRAIN), da reinserire in caso di spostamento della macchina.
Before installing remove the yellow IN and OUT plugs and the DRAIN plug, to be
inserted again in case of movement of the device.
1 tener premuto il collarino
2 estrarre il tappo
Rimozione tappo scarico
Drain plug extraction
1 keep pressed the collet
2 take out the plug
1
2

use and installation | Zero
7
kit staa
scarico
drain
clamp kit
1 pezzo
1 piece
tubo ¼”
pipe ¼”
quanto
necessario
just enough
codolo
gomito ¼”
stem
elbow ¼”
1 pezzo
1 piece
DHI
guarnizione
gasket
kit assemblaggio staa scarico
drain clamp kit assembly
installazione circuito di scarico
drain circuit installation

8
Zero | uso e installazione
1/4 2/4
forare ø 6 mm
drill ø 6 mm / 15/64”
installazione circuito di scarico | drain circuit installation

9
use and installation | Zero
scarico
drain
D
H
I
installazione circuito di scarico | drain circuit installation

10
Zero | uso e installazione
raccordo a
T F/F/M
T-tting
F/F/M
1 pezzo
1 piece
valvola a
sfera mini
M/F
mini ball
valve M/F
1 pezzo
1 piece
connettore
dritto F
straight
female
connector
1 pezzi
1 pieces
tubo
8X6 mm
pipe
8X6 mm
quanto
necessario
just
enough
codolo
gomito
8 mm
stem elbow
8 mm
2 pezzi
2 pieces
B CA F G E
installazione circuito entrata
inlet circuit installation
terminale
dritto M 3/8”
straight M
adapter 3/8”
1 pezzo
1 piece

11
use and installation | Zero
installazione circuito entrata | inlet circuit installation
prima della
installazione chiudere la
valvola entrata acqua
fredda
before
installation turn o the
cold water valve
prima del montaggio
teonare le parti lettate
before installation
cover with teon
chiudere | close

12
Zero | uso e installazione
1/4 2/4
A
B C
tubo acqua fredda
cold water pipe
installazione circuito entrata | inlet circuit installation

13
use and installation | Zero
entrata
in
3/4 4/4
G
E
F
installazione circuito entrata | inlet circuit installation

14
Zero | uso e installazione
dado
ssaggio
xing nut
1 pezzo
1 piece
rondella
dentata
toothed
washer
1
pezzo
1 piece
rondella in
plastica
plastic
washer
1 pezzo
1 piece
guarnizione
in gomma
rubber
gasket
1 pezzo
1 piece
distanziale
+ O-ring
spacer
with o-ring
1+1 pezzi
1+1 pieces
54321
rubinetto
faucet
1 pezzo
1 piece
Per il funzionamento del rubinetto vedere pagina 18
For the faucet working instruction see pag 18
L
Installazione rubinetto
faucet installation

15
use and installation | Zero
1/2 2/2
L
1
5
4
3
2
installazione rubinetto | faucet installation
forare ø 12 mm
drill ø 12 mm / 15/32”

16
Zero | uso e installazione
O-ring
3021
O-ring
3021
1 pezzo
1 piece
adattatore
dritto F
straight
female
adapter
1 pezzo
1 piece
tubo
8X6 mm
pipe
8X6 mm
quanto
necessario
just
enough
codolo
gomito
8 mm
stem elbow
8 mm
1 pezzo
1 piece
connettore
dritto F
straight
female
connector
1 pezzo
1 piece
K J G E F
installazione circuito uscita
outlet circuit installation

17
use and installation | Zero
uscita
out
1/2 2/2
K J G E
F
installazione circuito uscita | outlet circuit installation

18
Zero | uso e installazione
luce rossa
red light
7 sec
luce blu
blue light
7 sec
luce gialla
yellow light
7 sec
luce spenta
light o
7 sec
luce rossa blu gialla
red blue yellow light
3 sec
Chiudere il rubinetto, inserire la batteria nel circuito,
quindi inserire il circuito nel rubinetto entro 30 secondi.
Vericare ora che i LED lampeggino in questa sequenza:
7 secondi rosso, 7 secondi blu, 7 secondi giallo. Il LED
rimane spento per 7 secondi e se il circuito ha eettuato
correttamente il reset i 3 LED lampeggiano contempo-
raneamente per circa 3 secondi.
Se il circuito non ha eettuato il reset, il LED rosso lam-
peggia e rimane acceso costantemente, quindi rimuo-
vere e reinserire la batteria per ripetere il reset.
Sequenza LED installazione
NON RUOTARE LA MANOPOLA PRIMA CHE LA SE-
QUENZA SIA COMPLETATA
Se il reset è avvenuto correttamente, mentre si eroga
acqua, il LED blu lampeggia. Se il reset non è avvenuto
correttamente lampeggia il LED rosso.
Se il rubinetto è chiuso e non si eroga acqua per più di
8 ore, quando si apre il rubinetto lampeggia il LED giallo
per 3 secondi, attendere che il LED diventi blu prima di
usare l’acqua.
Quando il circuito di conteggio raggiunge i 2800 minuti,
il LED blu smette di lampeggiare, e inizia a lampeggiare il
LED rosso per indicare la riserva, no al raggiungimento
di 3000 minuti.
Al termine di 3000 minuti è necessario cambiare il ltro
Prone®, il LED rosso rimane acceso, indicando che il
ltro Prone®è esausto, anche se il rubinetto non è in
erogazione.
Il LED rosso rimane acceso anche quando è passato
un anno dalla messa in funzione del circuito, indicando
che è comunque necessario cambiare il ltro Prone®.
In entrambi questi casi procedere alla sostituzione del
ltro Prone®e al reset del circuito. Se i 3000 minuti e un
anno solare non sono passati e si rimuove e si reinseri-
sce la batteria il reset del conteggio non viene eettuato
e il circuito registra normalmente i minuti di erogazione.
Close the tap, insert the battery into the circuit, and
insert it into the tap within 30 seconds, verify that the
LEDs ash with this sequence: the red for 7 seconds,
the blue for 7 seconds and the yellow for 7 seconds.
The LEDs remain o for 7 seconds and if the circuit de-
tects a successful reset, the 3 LEDs ash simultaneous-
ly for about 3 seconds. If the circuit didn’t detect the
reset, the red LED ahes and stays on constantly, so
remove and insert the battery again.
LED light installation sequence
ATTENTION: DON’T MOVE THE KNOB TAP BEFORE
THE SEQUENCE IS COMPLETED
If the reset is correct while you are supplying water, the
blue LED ashes. If the reset is not correct the red LED
ashes.
If the tap is closed and you don’t supply water for more
than 8 hours, when you open the tap the yellow LED
ashes for 3 seconds. Wait for the LED becomes blue
before drinking or using water.
When the circuit counter reaches the count of 2800
minutes, the blue LED stops ashing, and the red LED
starts ashing to indicate the reserve, until you get 3000
minutes.
After 3000 minutes are passed, you have to change the
lter, the red LED stays on or doesn’t ash, indicating
that the cartridge is exhausted, even if the tap is not
delivering water. The red LED ashes even a calendar
year passed from circuit start, indicating that you have
to change the lter. In any case reset the circuit. If 3000
minutes and a calendar year didn’t pass and you re-
move and reinsert the battery the reset of count will not
happened and the circuit will store normally the minutes
of delivery.
1
2
3
4
5
1
2
3
4
5
impostazione contatore rubinetto
avvio|reset contatore
12 3 4 5
tap circuit functions
reset | start the circuit

19
use and installation | Zero
uso
use
during the rst activation, if you listen a
noise, please do the following proce-
dure:
• put ZERO in vertical position in
order to let the air ows out from
the system
• realize at least 3 cycles of lling and
emptying to condition the system
• put ZERO in horizontal position
N.B.
the noisiness could disappear after
some cycles and/or after some hours
durante la prima messa in funzione, nel
caso si avvertisse del rumore, procede-
re come segue:
• posizionare ZERO in verticale
per facilitare l’uscita dell’aria dal
sistema
• eettuare almeno 3 cicli di riempi-
mento e svuotamento per condi-
zionare il sistema
• riposizionare ZERO in orizzontale
N.B.
la rumorosità dovrebbe sparire dopo
alcuni cicli e/o dopo alcune ore

20
Zero | uso e installazione
sostituzione cartuccia | cartridge replacement
prima di sostituire le cartucce,
chiudere la valvola entrata acqua fredda e aprire
il rubinetto, no allo svuotamento del serbatoio
before replacing the cartridges, turn o the cold water
valve and turn on the faucet till all the water is exhausted
chiudere | close aprire | open
Other manuals for ZERO
1
Table of contents
Other Profine Plumbing Product manuals
Popular Plumbing Product manuals by other brands

Kohler
Kohler PATIO Series installation instructions

Jafar
Jafar 8895 Operation & maintenance manual

Spectrum Brands
Spectrum Brands Pfister Auden LF-042-AD Quick installation guide

Kohler
Kohler Triton K-T7019 installation guide

Brizo
Brizo RP90472 quick start guide

Axor
Axor Montreux 180 16581 Series Instructions for use/assembly instructions

Outsunny
Outsunny A20-237 instructions

THE BOLD LOOK OF KOHLER
THE BOLD LOOK OF KOHLER K-19480 Homeowner's guide

ROGERSELLER
ROGERSELLER COMPACT 211030 installation instructions

Moen
Moen FINA ExacTemp TS31710 Specification sheet

Graff
Graff C14B-WS Series installation instructions

HomLux
HomLux 063E004435 installation manual