PROIETTA IMPRESSIVE EVO 1200 User manual

!
!
INSTRUCTION MANUAL"
"
IMPRESSIVE EVO 1200/2500
WARNING:"
Read this instruction manual carefully before using the
projector!
Thank you for choosing a PROIETTA product#
721
533
344

INDEX
!
1) SAFETY INFORMATION!
2) TECHNICAL SPECIFICATIONS!
3) PACKAGE CONTENTS!
4) INSTALLATION OF THE PROJECTOR!
5) USE OF THE PROJECTOR!
6) CARE AND MAINTENANCE!
7) CAUSE AND SOLUTIONS OF POSSIBLE PROBLEMS!
8) WARRANTY!
9) DECLARATION OF CONFORMITY!
10) DISPOSAL OF UNUSED PRODUCT!
1!
2!
3!
4!
9!
11!
12!
13!
14!
14!

SAFETY INFORMATION
Read the following security information carefully before performing any operations. The
product described in this manual is a lighting fixture for projecting a light beam into
outdoor environments. !
Any other use is not provided by the manufacturer and therefore relieves him of any
liability for damages arising from misuse. !
The only maintenance operation allowed in warranty is the replacement of the lamp. Any
other repairs must be carried out solely by the manufacturer, who denies any
responsibility for unauthorized interventions.!
Warning: The surface temperature of some projector components can reach high enough
values to burn when touched directly, during and after shutdown.!
Always disconnect the projector from the outlet before any maintenance operation. The
risk of electric shock if you disassemble the projector or some of its parts.!
For reliable operation of the device, the ambient temperature must be between -35°C
(-31°F) and 40°C (104°F).!
The projector must be positioned in such a way that the objects affected by the light
beam are at least 5 meters away from the projector lens.!
Never place the projector on flammable and/or combustible surfaces.!
Be sure to securely attach the projector to an architectural element that ensures its
stability and reliability. All elements used for installation (screws, bolts, brackets, etc.)
must always be adjusted to the load they need to support.!
Use an M12 bolt with a self-locking nut and use a security chain in the event of a
suspended installation.!
Do not place objects on the power cable and in case of damage to the manufacturer for
replacement in order to avoid dangers of electrocution.!
The lamp generates UV radiation, since it’s an high pressure lamp, for this reason it is
important not to look through the opening at the front of the projector to avoid damaging
your eyes. Use protective goggles to replace the lamp.!
Air intakes should never be covered or clogged with any material. Be sure to provide
adequate ventilation to the projector to protect it from overheating. The projector should
not be placed in a closed installation or in a compartment that is too small and without
enough ventilation.!
Never touch the projector and all its components with wet hands.!
1

TECHNICAL SPECIFICATIONS
2
MODEL
IMPRESSIVE EVO 1200/2500
POWER SUPPLY
SUPPLY VOLTAGE
220/240 V
ELECTRICAL FREQUENCY
50/60 HZ
POWER ADJUSTMENT
SUPPLIED LAMP
PHILIPS MSR2000 MSR Gold 2000 W PGJX50 6050K Fast Fit - 6.050 K
PROJECTOR’S
BRIGHTNESS
40.000 lm
LIFE OF THE LAMPS
The manufacturers declare an average life of the lamps of 750 hours.
Since the Impressive has a power switch it is possible to increase the
duration of the same by selecting position 1 as it absorbs less power than
the lamp guarantees.
IP (Protection rating)
54
WEIGHT
32,4 kg
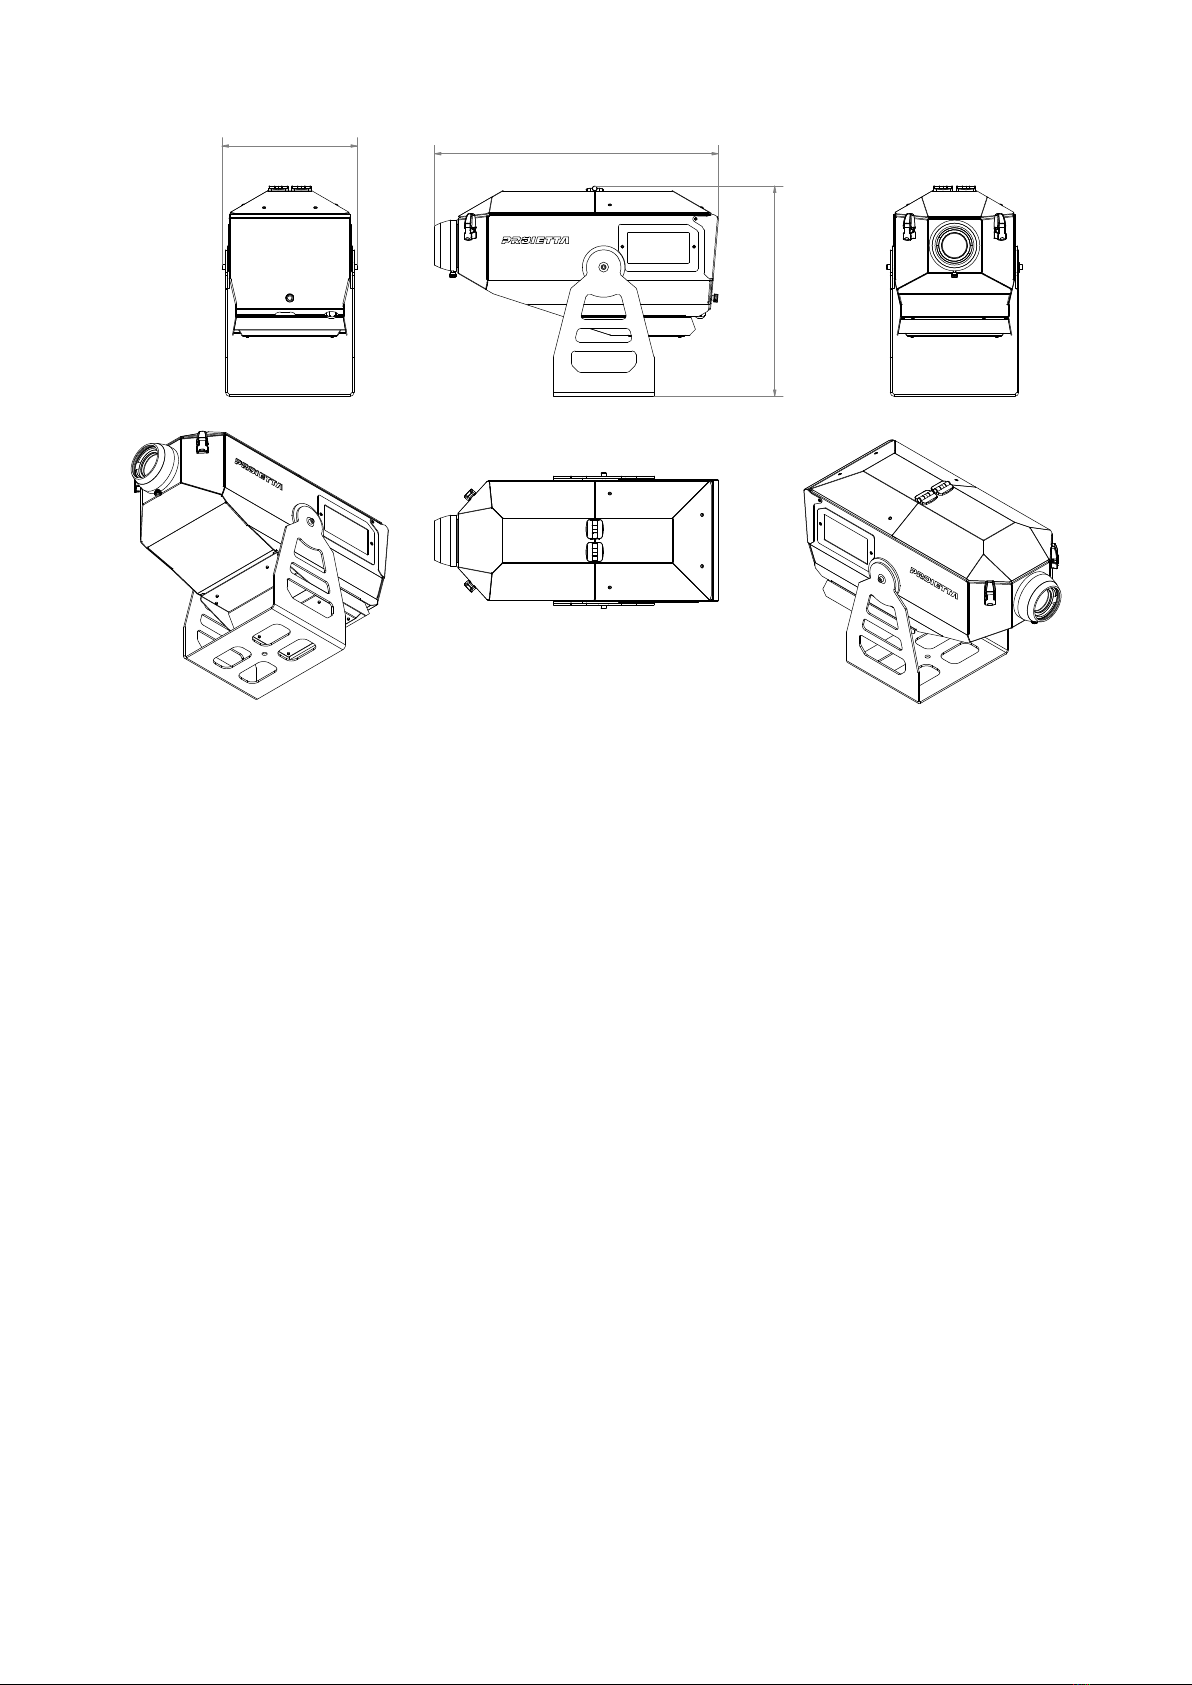
DIMENSIONS
See the drawings below (dimensions in mm)
READ CAREFULLY:
ADJUSTING POWER ON COMPATIBLE LAMPS
(OPERATION THAT MUST BE PERFORMED WITH THE PROJECTOR
SWITCHED OFF) !
LAMPS THAT WORK ONLY IN POSITION 1 (1200W): !
- PHILIPS MSR1200 ASEFF MSR Gold 1200W PGJX50 6000K "
- PHILIPS MSR1500 MSR Gold 1500W PGJX50 6000K Fast Fit !
LAMPS THAT WORK ON BOTH POSITIONS (1200W-2500W): !
- PHILIPS MSR2000 MSR Gold 2000W PGJX50 6050K Fast Fit"
- PHILIPS MSR GoldTM 2500/2 FastFit 1CT/4:"
"
These lamps support both powers:"
Position 1: energy-saving mode and long lamp life."
Position 2: maximum power mode (with this setting the life of the
2000W lamp will be lower than the data indicated by the manufacturer)!
1
2
PACKAGE CONTENTS
Unpack and ensure that there is no transportation damage before using the fixture. If not,
contact the manufacturer immediately. Do not attempt to operate a damaged fixture.!
Verify that the package contains the following items:!
-1 IMPRESSIVE EVO 1200/2500 projector!
-1 lens (chosen when ordering)!
-1 lamp PHILIPS MSR2000 MSR Gold 2000W PGJX50 6050K Fast Fit (already mounted
on the projector)!
-1 hexagonal key!
-3 measuring devices (are used to measure the distance of the lamp holder from the
body of the projector, in case of replacement of the supplied lamp)!
-1 power cable!
3
721
533
344

INSTALLATION OF THE PROJECTOR
Unscrew the knob (unlighted in red in Fig.1) on the back of the projector and open the
door to access the control panel. "
"
Fig. 1
The projector can be set by pressing the button 1, on the control panel, in energy-saving
mode at 1200W and by pressing the button 2 for the maximum power mode at 2500W
(following the informations provided in the section of the technical specifications for
choosing lamps in its respective modes).!
Other elements on the control panel in Figure 1 are: the power button (element A), the
main fuse of 20A for the lamp (element B), secondary fuse of 2A for accessories (element
C)."
"
4
DMX connector
panel to remove
if you install the
DMX4 PRO
control unit
(optional)
1
2
A
B C
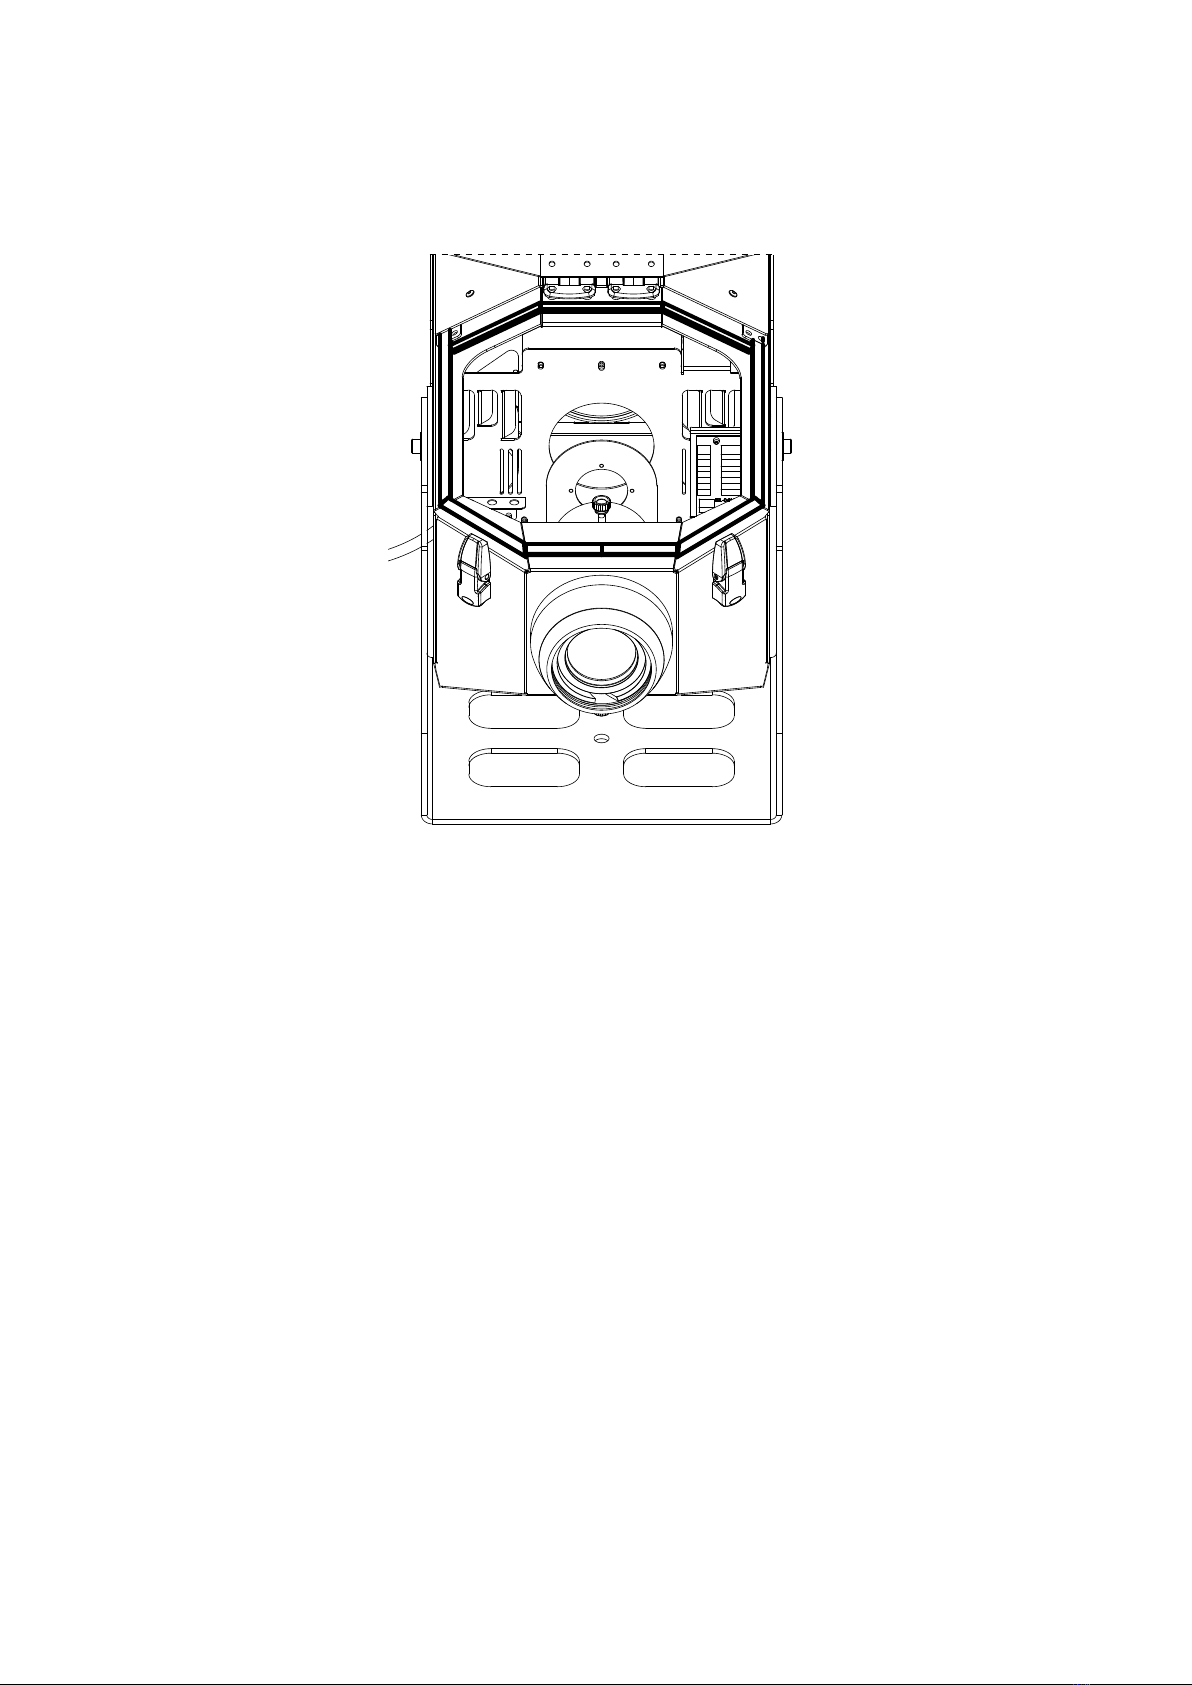
Figure 2 represents the front control panel view that shows the motorized effects
connector and PRODMX4 card (element D)."
"
"
Fig. 2 !
5
D
MOUNTING/REPLACING LAMP
For the assembly/replacement of the lamp, remove the lamp replacement cover (A) as
shown in Figure 3.!
!
Fig. 3!
!
!
WARNING: If you need to replace the lamp, it is recommended that you wait 15 minutes
before opening the lid for access to the lamp after turning offthe projector. At this point
wait other 10 minutes, before touching it, to avoid burning.!
The steps to follow are:!
1. Unscrew the two hexagonal screws on the lid of the lamp holder (A) using the
hexagonal key provided, as shown in Figure 3.!
2. Rotate the lamp counterclockwise by handling it with a cloth for proper replacement.
Take the lamp offand replace it with the new one by inserting it into the appropriate
interlocking housing. Rotate it clockwise so that it can be fixed completely."
"
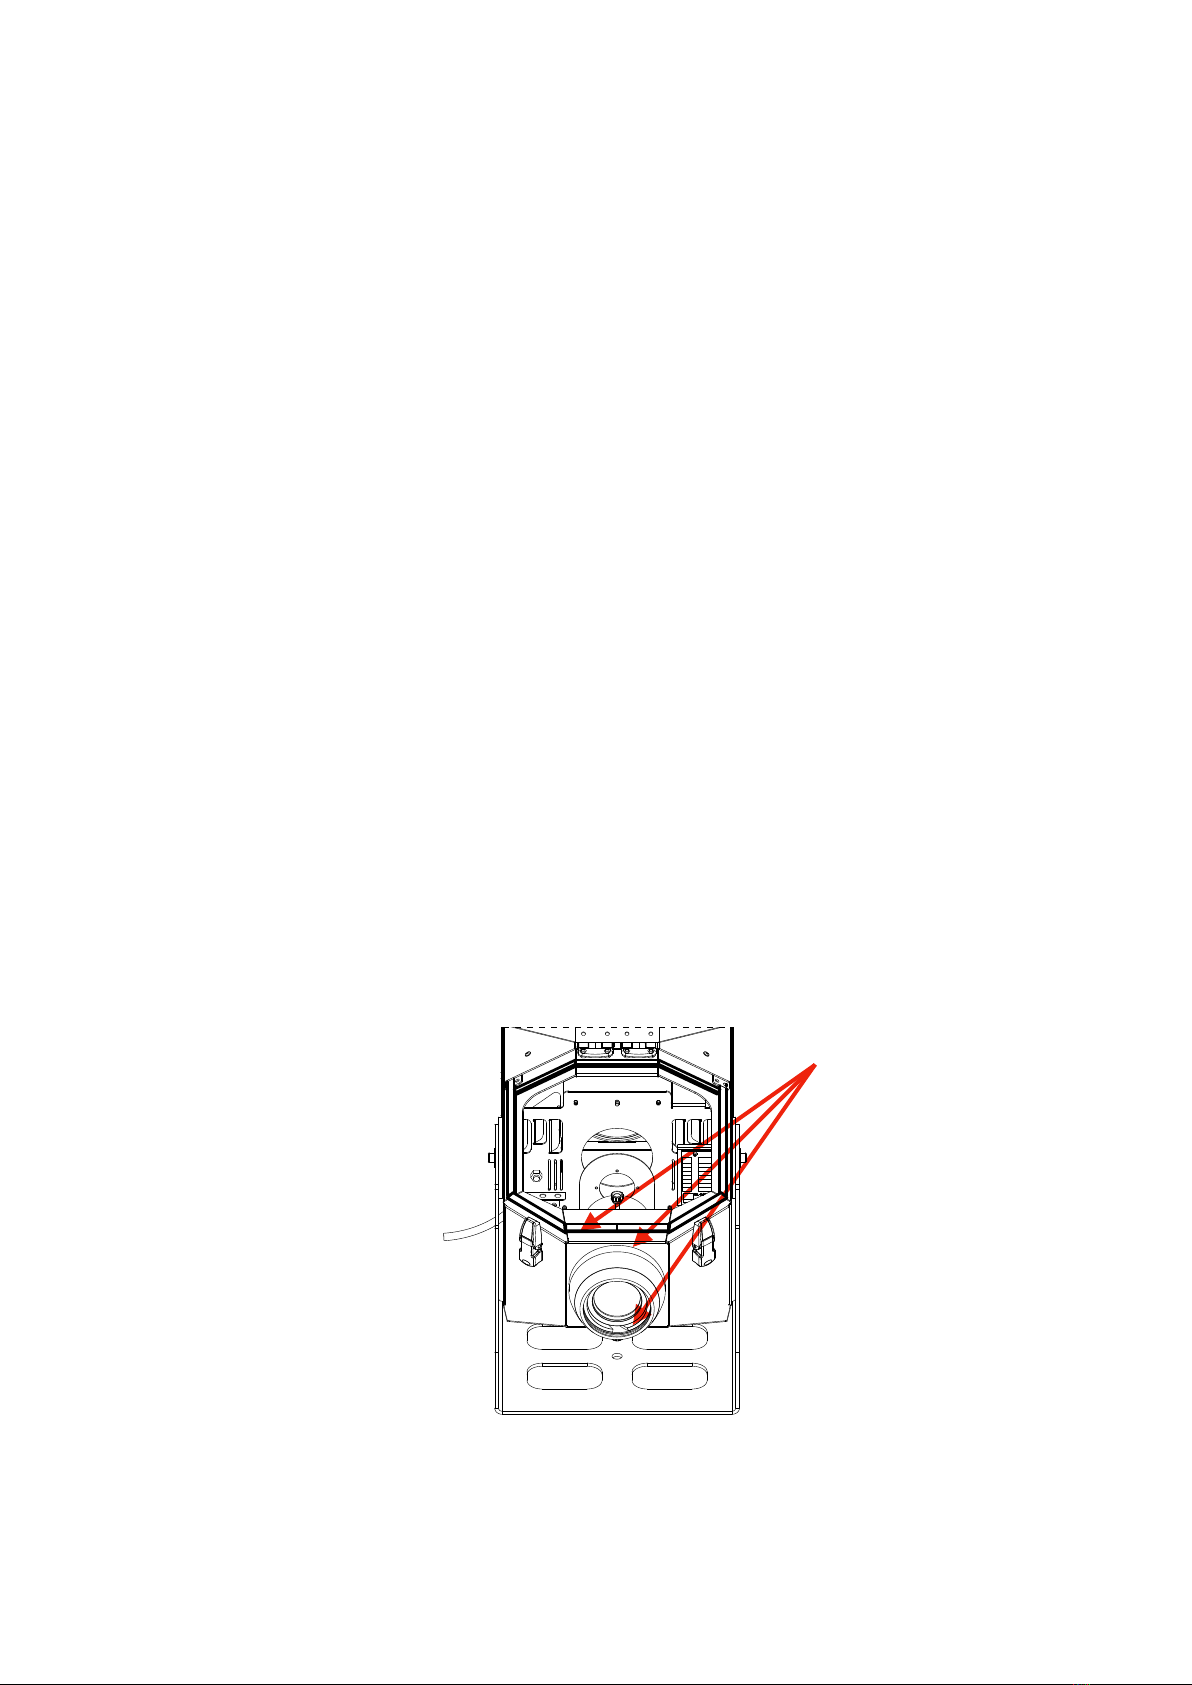
Centering of the lamp (calibration)!
3. At each replacement, the lamp must be centered. The centering operation can be
summarized in the following steps: "
- evaluate the positioning of the lamp by looking it from the front, see Fig. 4. "
- to adjust its position you need to act on the three screws on the lamp holder."
"
"
"
"
"
6
A

Fig. 4"
!
!
!
!
4. The lid of the lamp holder is closed again with the two screws.!
WARNING: The projector can mount lamps of different lengths and, depending on these,
you have to adjust the position of the lamp holder, helping you with one of the three
measuring devices provided (corresponding to the watts of the lamp you intend to
mount). See Figure 5."
7
INCORRECT POSITION"
CORRECT POSITION"
LAMP:
L (lamp lenght)
PHILIPS MSR1200 ASEFF MSR Gold 1200W
PGJX50 6000K
73,00 mm
PHILIPS MSR1500 MSR Gold 1500W PGJX50
6000K Fast Fit
73,00 mm
PHILIPS MSR2000 MSR Gold 2000W PGJX50
6050K Fast Fit
80,00 mm
PHILIPS MSR GoldTM 2500/2 FastFit 1CT/4
100,00 mm
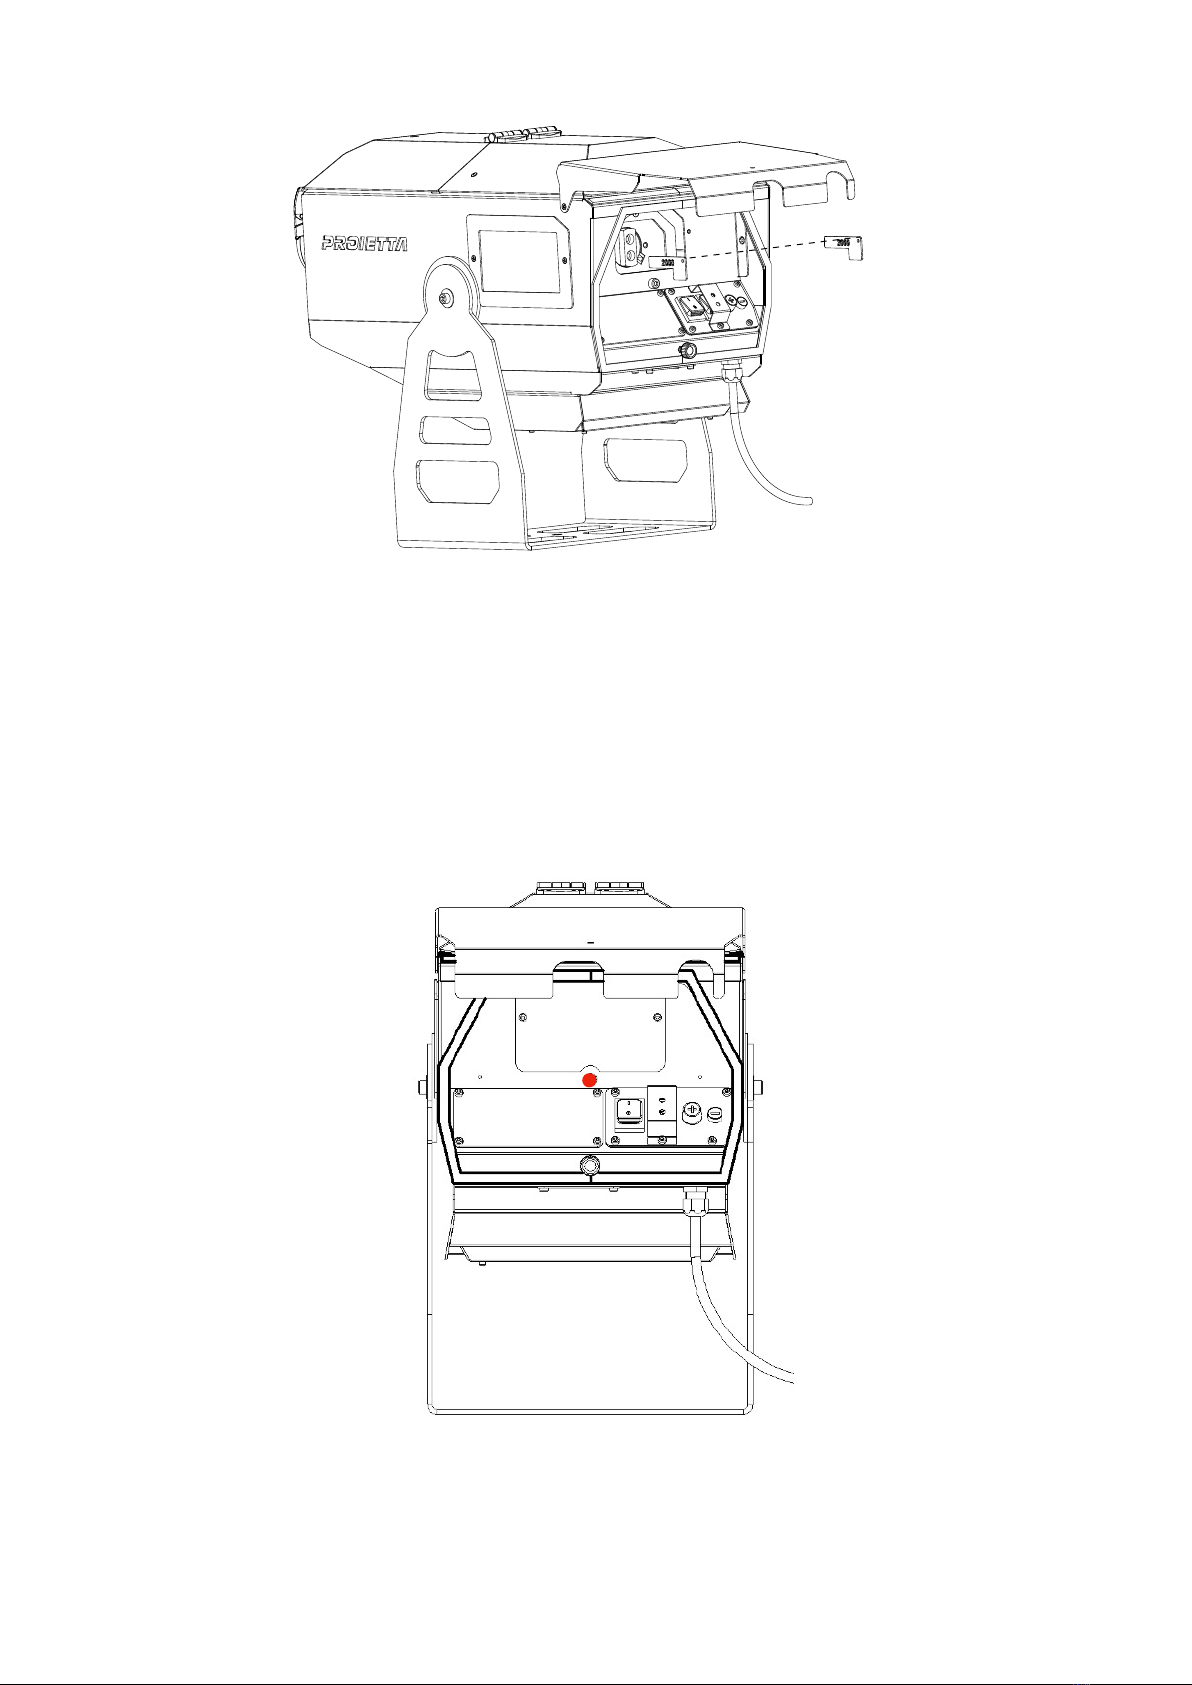
Fig. 5!
!
This operation can be summarized in the following steps:!
-choose the measuring device corresponding to the lamp you want to mount and place
it on the projector to measure the distance to which the lamp holder should be placed,
as shown in Fig. 5.!
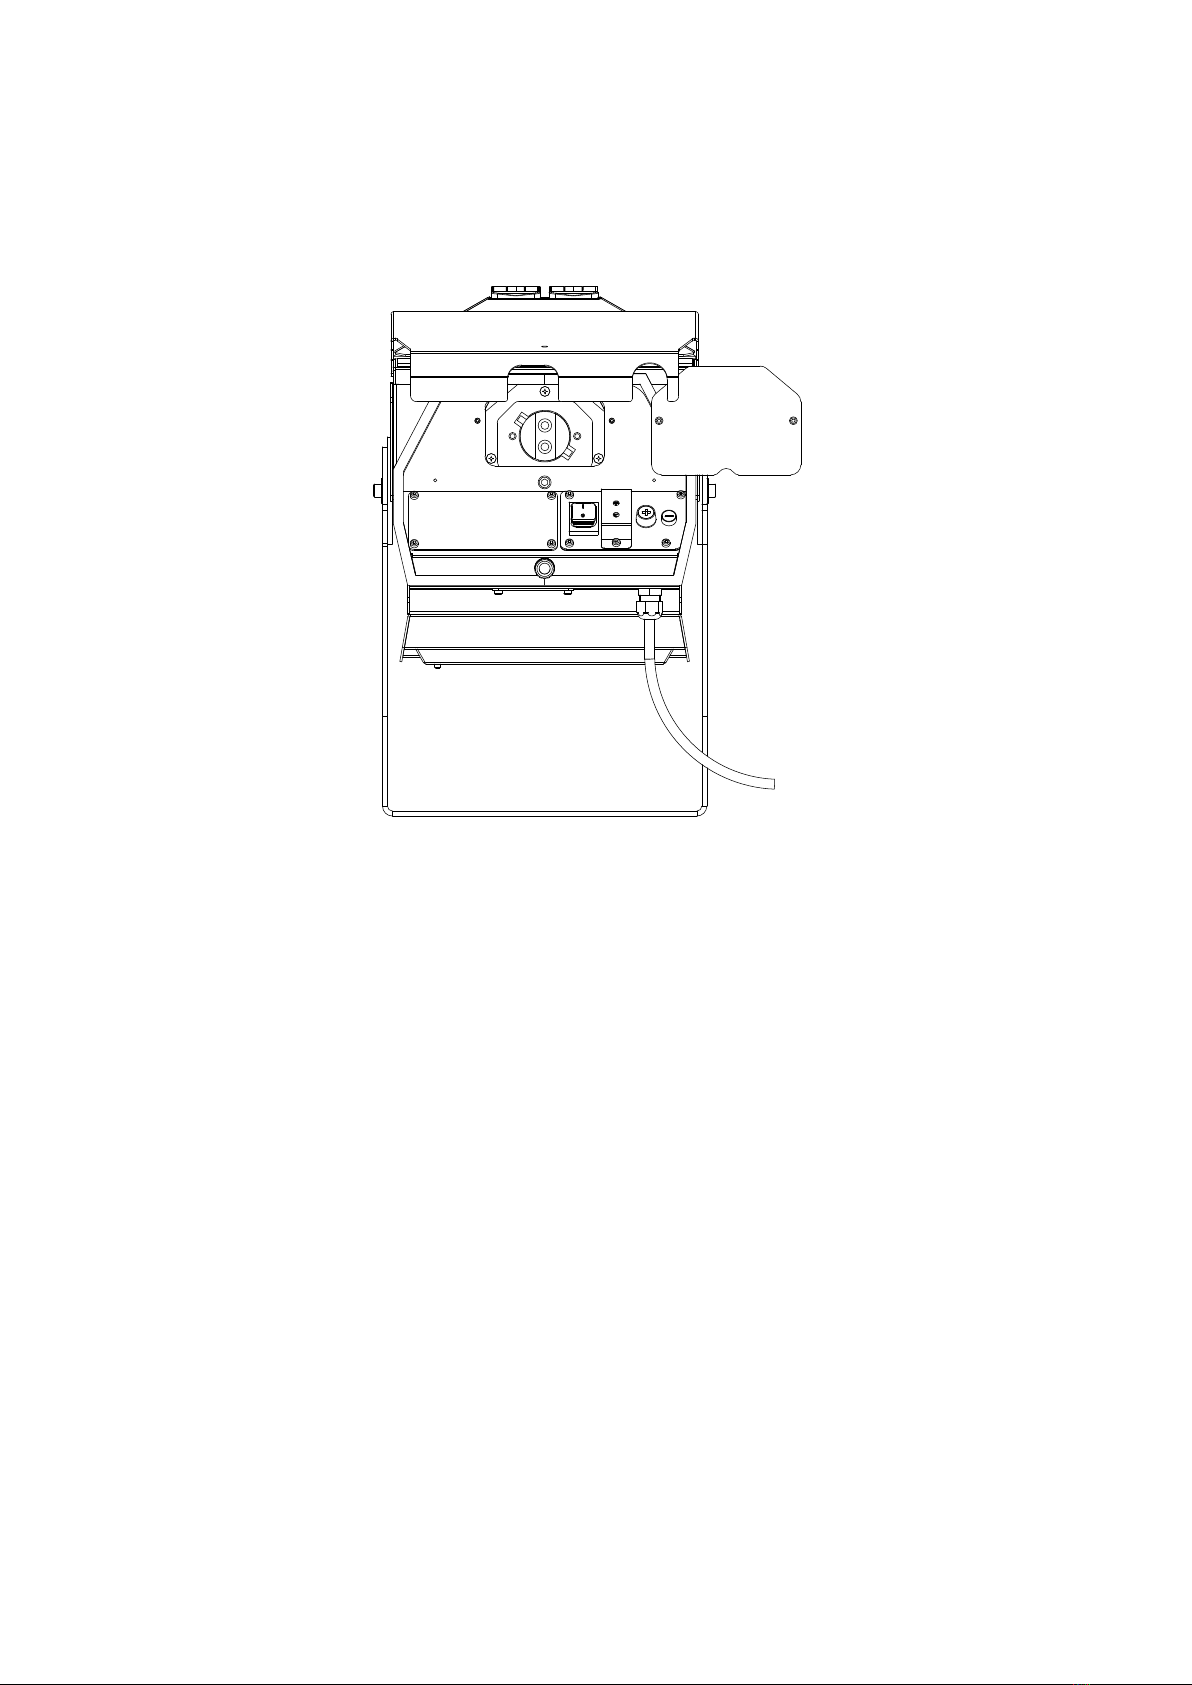
-Act on the hexagonal screw, highlighted in red in Figure 6, to move the position of the
lamp holder forward or backward depending on the distance indicated by the
measuring device."
"
"
Fig. 6"
!
"
6. Close the access door to the control panel making sure that the projector has been
closed properly again and in all its parts before turning it on (the lamp emits rays
harmful to the eyes).!
8

USE OF THE PROJECTOR
1) CONNECTING TO THE POWER GRID
Connect the device to the electrical grid following normal safety procedures that are valid
for any device operating in low voltage.!
The supply voltage must be: 220-240 V, 50-60 Hz and the supply line must be protected
by an efficient grounding link and is equipped with a bipolar switch with differential
thermal 0.03 A safety. !
2) POSITIONING OF THE PROJECTOR
The installation must be carried out by arranging the space in which the device is to be
used in order to be clear from any obstacle. You can tilt the projector by acting on the
screw on the side bracket with the hexagonal key provided.!
For special needs, the device can be fixed with an anchor suitable for the material of the
surface on which it needs to be locked. It is necessary to ensure that all the parts
identified for fixing the projector are in a suitable condition to support the projector.
Finally, make sure that the projector has been fixed permanently to the surface.!
3) IGNITION OF THE PROJECTOR
-Open the lid with the appropriate hooks placed sideways on the projector, see Fig. 7."
"
"
Fig. 7"
!
!
9
A

-Insert the chosen lens into the projector by making sure that knob B is centered relative
to the sagittal axis of the projector, see Fig. 8. Then attach it to the machine body by
rotating the A element on the outside, see Fig. 7."
"
"
Fig. 8!
"
!
!
!
!
-To take advantage of the maximum extension of the lens you need to place the knobs
at the ends, as in Figure 8. Then place the image (Gobo or dynamic effect) centrally and
flat on the plate, following the guides. The ideal focus can be found by moving the
image back and forth, as shown in Fig. 9."
"
"
Fig. 9 "
!
!
!
10
B
direction of
insertion
-Turn on the projector by pressing the power button.!
-Direct the projector to the surface on which you want to make the projection making
sure that it is at least 5 meters away from the projector's lens.!
4) SIZING AND FOCUSING OF THE IMAGE
The focus of the image must be done by simultaneously acting on the knobs of the zoom
lens installed on the projector."
For non-zoom versions, the focus adjustment is almost similar, the only difference is in
the number of knobs; in this case we will have only one. Again, once the knob is
unscrewed, it is enough to move the inner lens until the image looks sharp.!
WARNING: a situation where the edges of the projection are much brighter than the rest
of the image may occur. To change its brightness, you have to adjust the position of the
lamp holder as explained in the paragraph called “mounting/replacing lamp”."
"
The lamp is in the correct position when there is a uniform light effect on the entire image
(there is no greater concentration in the center or edges).!
CARE AND MAINTENANCE
Before you start any maintenance or cleaning operation on the projector remove the
voltage from the power grid. !
Check that the air intake openings are clean and the vents are working. Depending on the
operating environment, the projector will need regular cleaning.!
The product should never be washed, but should be cleaned on the outside only with a
moist cloth. !
It is important to periodically check the seals (G) to ensure maximum water sealing
performance. See Fig. 10.!
Fig. 10!
Any repair that requires the dismantling of the projector assembly screws should only be
carried out by the manufacturer.!
Replacing defective parts with non-genuine parts may render null and void the warranty.!
11
G

CAUSE AND SOLUTIONS OF POSSIBLE PROBLEMS
-The projector does not turn on "
Check that the power grid is present.!
-The projector turns on (there is supply voltage), but does not emit any light beam "
The lamp is exhausted and needs to be replaced.
-Reduced brightness "
The possible causes can be: running low lamp, accidental shift of the reflector, dirt of
optical elements, loss of optimal lamp calibration. The related suggested remedies are:
replace the lamp, calibrate the reflector-lamp system, carry out an accurate cleaning of
the optical elements, if the problem persists contact the PROIETTA customer service.!
-When the projector is connected to the electrical grid the magnetothermal switch
interrupt the current flow "
The line magnetothermal is undersized compared to the characteristics of the projector.
It is necessary to bypass or replace the line magnetothermal.!
-Faulty projection"
The gobo can be broken or dirt has been deposited on the surface of the gobo. Clean
up the gobo with an antistatic cloth and if the problem persists contact PROIETTA
customer service.!
-The projector beam emits flicker"
Faulty fixing of the lamp on the lamp holder, you have to remove and put the lamp
back, checking the shot emitted by the complete interlocking!
EMERGENCY THERMOSTAT!
The projector is equipped with a thermal safety device that turns offthe lamp in case of
overheating, leaving the cooling fan running. "
Since the device is auto-reset, once the operating temperature is reached, the projector
will restart automatically. "
"
"
TIPS: For best results from projections, project images onto dimly lit or dark surfaces,
avoiding reflective surfaces (e.g. mirrors)."
When possible, always prefer light-colored surfaces.!
12

WARRANTY
The product is covered by warranty under the terms of the law (24 months). In case of
malfunction during the warranty period, the product will be repaired or replaced at the
discretion of the manufacturer. "
"
The following informations are required for the use of the warranty: "
- Purchase date (the invoice date is valid) "
- Detailed description of the issue. !
It is essential to follow the safety instructions and warnings contained in this manual. "
Any damage caused by non-compliance with the manual causes the warranty to expire.
The manufacturer does not take any responsibility for damages or problems caused by
non-compliance with the manual."
"
Any repair that requires the dismantling of the projector assembly screws should only be
carried out by the manufacturer, who denies any responsibility for unauthorized
interventions. The dismantling (even partial) of the projector not carried out by the
manufacturer causes the warranty to expire. "
"
The only maintenance operation allowed is the replacement of the lamp. Any other repairs
must be carried out solely by the manufacturer, who denies any responsibility for
unauthorized interventions."
"
The parts of consumption are not covered by the guarantee. "
"
13

DECLARATION OF CONFORMITY
The product to which this manual refers is in accordance with the Directives of
the European Community. The examination is made clear by the application of
the CE mark on the product and the declaration of compliance. !
The device meets the requirements of the 2002/95/CE (RoHS) Directive; the
General Safety Information Regulations: EN60598-1, EN60598-2-17 and the
European Parliament's Directive 2004/108/EC on Electromagnetic Compatibility. !
DISPOSAL OF UNUSED PRODUCT
The device must be disposed of in accordance with the applicable laws relating
to lighting products. In any case, it should not be thrown between normal waste
or dispersed in the environment, the latter action, although legally pursued, is a
serious danger to animals and people and a source of long-term pollution. The
product cannot be treated as a simple urban waste and must be disposed of
appropriately in accordance with existing waste disposal regulations.!
Avigliana, 11/09/2019
PROIETTA srl!
Viale Dei Mareschi 4/d - 10051 - Avigliana - TO (Italy) p.iva (VAT number) IT09964950019!
14
20
DICHIARAZIONE DI CONFORMITA'
PROIETTA s.r.l.
Sede legale e operativa: Viale dei Mareschi 4/d, 10051 Avigliana (To), Italy
Dichiara che:
Il dispositivo: proiettore
Modello: Impressive 1200-2500
È progettato e realizzato in accordo con i requisiti essenziali elencati nelle seguenti direttive:
- Direttiva 2006/95/EC del Parlamento Europeo, relativa ad apparecchi elettrici progettati per
utilizzo entro certi limiti di voltaggio e in particolare conformi al seguente standard: IEC 60598.
- Direttiva 2004/108/EC del Parlamento Europeo, relativa alla compatibilità elettromagnetica.
Smaltimento dei rifiuti in accordo con la direttiva 2008/98/EC del Parlamento Europeo sui rifiuti,
e direttiva 2002/96/EC del Parlamento Europeo sullo smaltimento di apparecchiature elettriche
ed elettroniche (WEEE), nonché la direttiva 2002/95/EC del Parlamento Europeo sulle
restrizioni nell'uso di certe sostanze pericolose in apparecchiature elettriche ed elettronica e
suoi emendamenti.
Avigliana Italy 08/01/2015
PROIETTA srl
Viale Dei Mareschi 4/d 10051 Avigliana-To (Italy) p.iva /VAT. IT09964950019
tel +39 011 9761039 fax +39 011 9761099 proietta@proietta.com - www.proietta.com
This manual suits for next models
1
Table of contents
Other PROIETTA Projector manuals


