PROIETTA IRIDIUM 150 User manual
!
!
INSTRUCTION MANUAL"
"
IRIDIUM 150
WARNING:"
Read this instruction manual carefully before using the
projector!
Thank you for choosing a PROIETTA product#

INDEX
!
1) SAFETY INFORMATION!
2) TECHNICAL SPECIFICATIONS!
3) USE OF THE PROJECTOR!
4) CARE AND MAINTENANCE!
5) CAUSE AND SOLUTIONS OF POSSIBLE PROBLEMS!
6) WARRANTY!
7) DECLARATION OF CONFORMITY!
8) DISPOSAL OF UNUSED PRODUCT!
1!
2!
3!
6!
6!
7!
8!
8!

SAFETY INFORMATION
Read the following safety information carefully before performing any operations. The
product described in this manual is a lighting fixture for the projection of a light beam in
indoor and outdoor environments. !
Any other use is not provided by the manufacturer and therefore relieves him of any
liability for damages arising from misuse.!
Any repair that requires the dismantling of the projector assembly screws should only be
carried out by the manufacturer, who denies any responsibility for unauthorized
interventions. "
Warning: The surface temperature of some projector components can reach high enough
values to burn when touched directly, during and after shutdown.!
Always disconnect the projector from the outlet before any maintenance operation. You
risk taking the electric shock if you disassemble the projector or some of its parts.!
For reliable operation of the device, the ambient temperature must be between -25°C
(-13°F) and 45°C (113°F).!
The projector must be positioned in such a way that the objects affected by the light
beam are at least 5 meters away from the projector lens.!
Never place the projector on flammable and/or combustible surfaces.!
Be sure to firmly secure the projector to an architectural element that ensures its stability
and reliability. All elements used for installation (screws, bolts, brackets, etc.) must always
be adjusted to the load they need to support.!
Use an M12 bolt with a self-locking nut and use a security chain in the event of a
suspended installation.!
Do not place objects on the power cable and in case if it was damaged contact the
manufacturer for replacement in order to avoid danger of electrocution.!
Air intakes should never be covered or clogged with any material. Be sure to provide
adequate ventilation to the projector to protect it from overheating. The projector should
not be placed in a closed installation or in a compartment that is too small and without
enough ventilation.!
Do not look at the beam of light to avoid damaging your eyes.!
Never touch the projector and all its components with wet hands.!
1

TECHNICAL SPECIFICATIONS
MODEL
IRIDIUM
POWER SUPPLY
SUPPLY VOLTAGE
220/240 V
ELECTRICAL FREQUENCY
50/60 Hz
LED
NOMINAL POWER
150 W
PROJECTOR’S BRIGHTNESS
12.000 lm
COLOR TEMPERATURE
6.000 K
LIFETIME
30.000 h
IP (Protection rating)
65
WEIGHT
8 kg
DIMENSIONS
See the drawings below (dimensions in mm)
2
295,0P170,0
321,5
130,0
235,0
145,0
15,0
238,0
283,0
295,0
200,00
55,0183,0
FX LED 150
USE OF THE PROJECTOR
1) CONNECTING TO THE POWER GRID
Connect the device to the electrical grid following normal safety procedures that are valid
for any device operating in low voltage.!
The supply voltage must be: 220-240 V, 50-60 Hz and the supply line must be protected
by an efficient grounding link and is equipped with a bipolar switch with differential
thermal 0.03 A safety. !
2) INSTALLATION INSTRUCTIONS
The installation must be carried out by arranging the space in which the device is to be
used in order to be clear from any obstacle. You can tilt the projector at the desired angle
using the side handles. !
For special needs, the device can be fixed with an anchor suitable for the material of the
surface on which it needs to be locked. It is necessary to ensure that all the parts
identified for fixing the projector are in a suitable condition to support the projector. Make
sure that the projector has been fixed permanently to the surface, then follow the steps
below:!
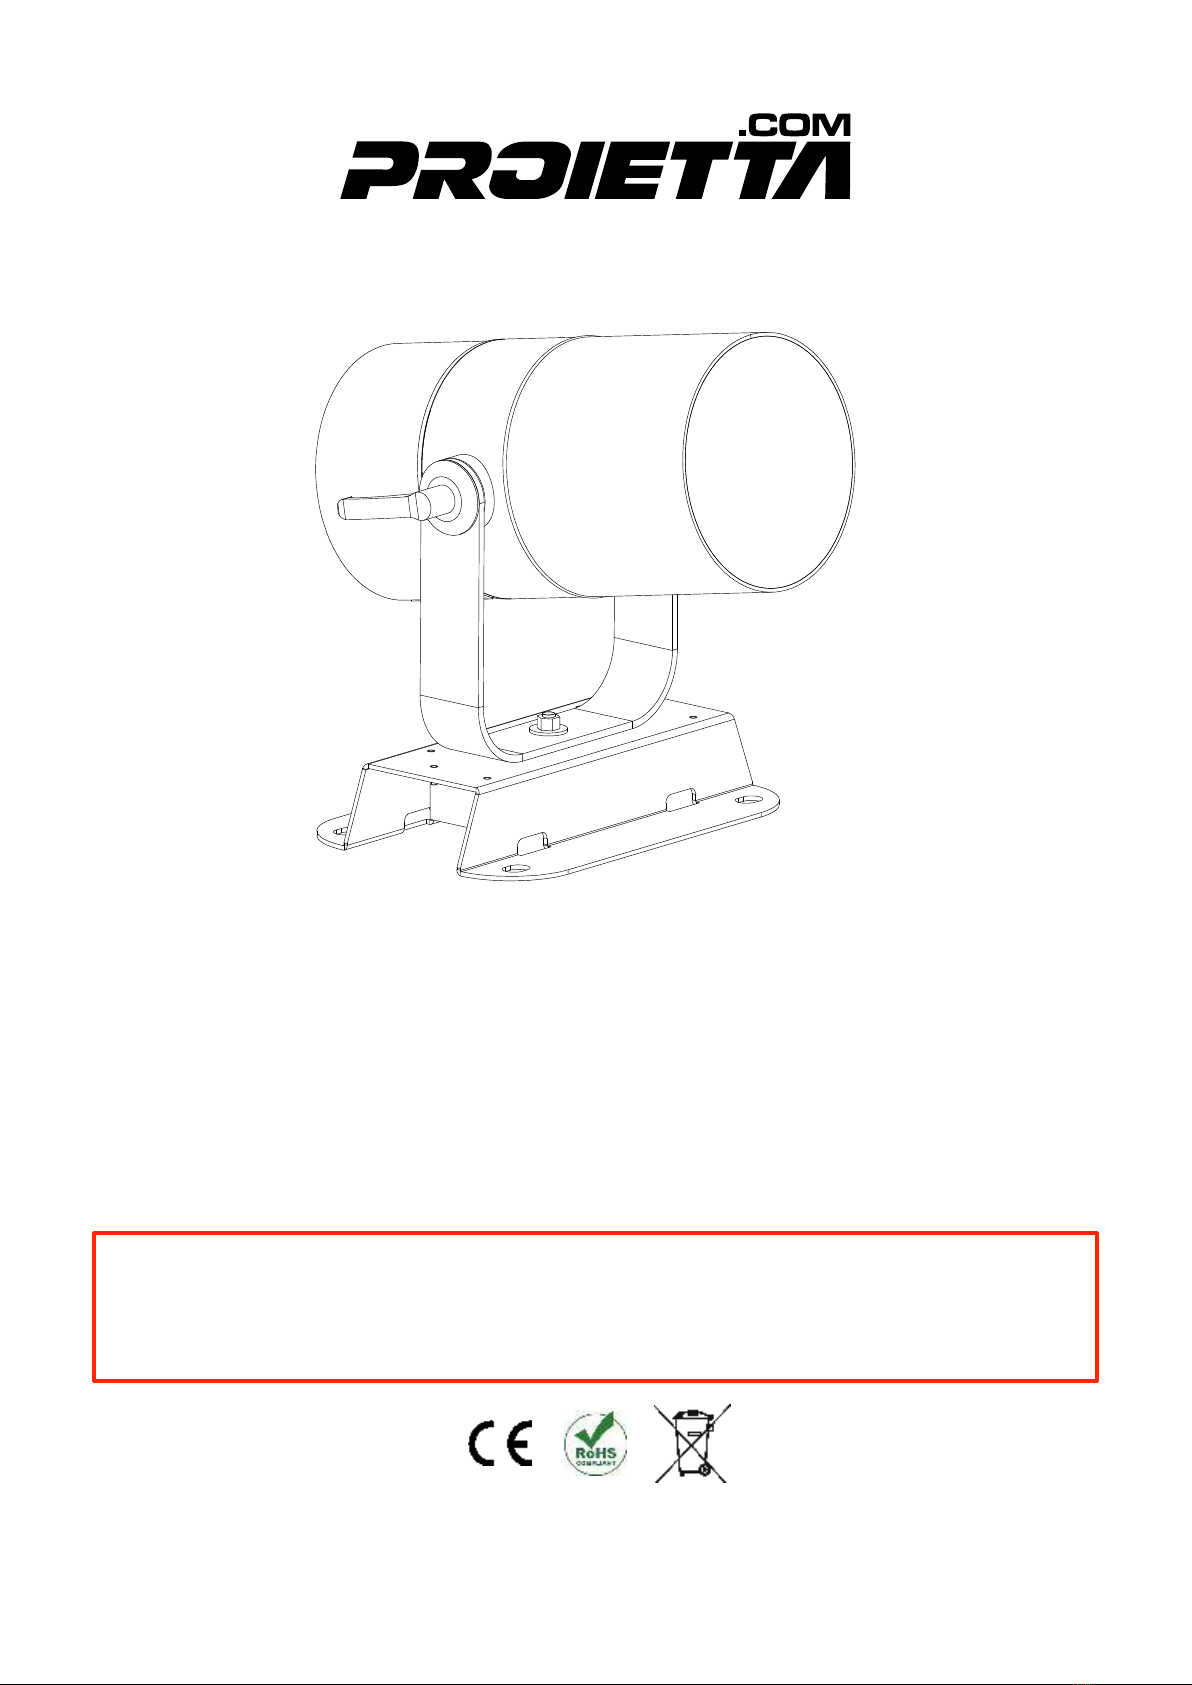
-Unscrew the front cover, as in Fig. 1."
"
"
Fig. 1"
!
!
!
-Remove lens and shaper by unscrewing the two knobs that keep them assembled with
the projector body, as in Fig. 2."
"
"
Fig. 2!
!
!
3

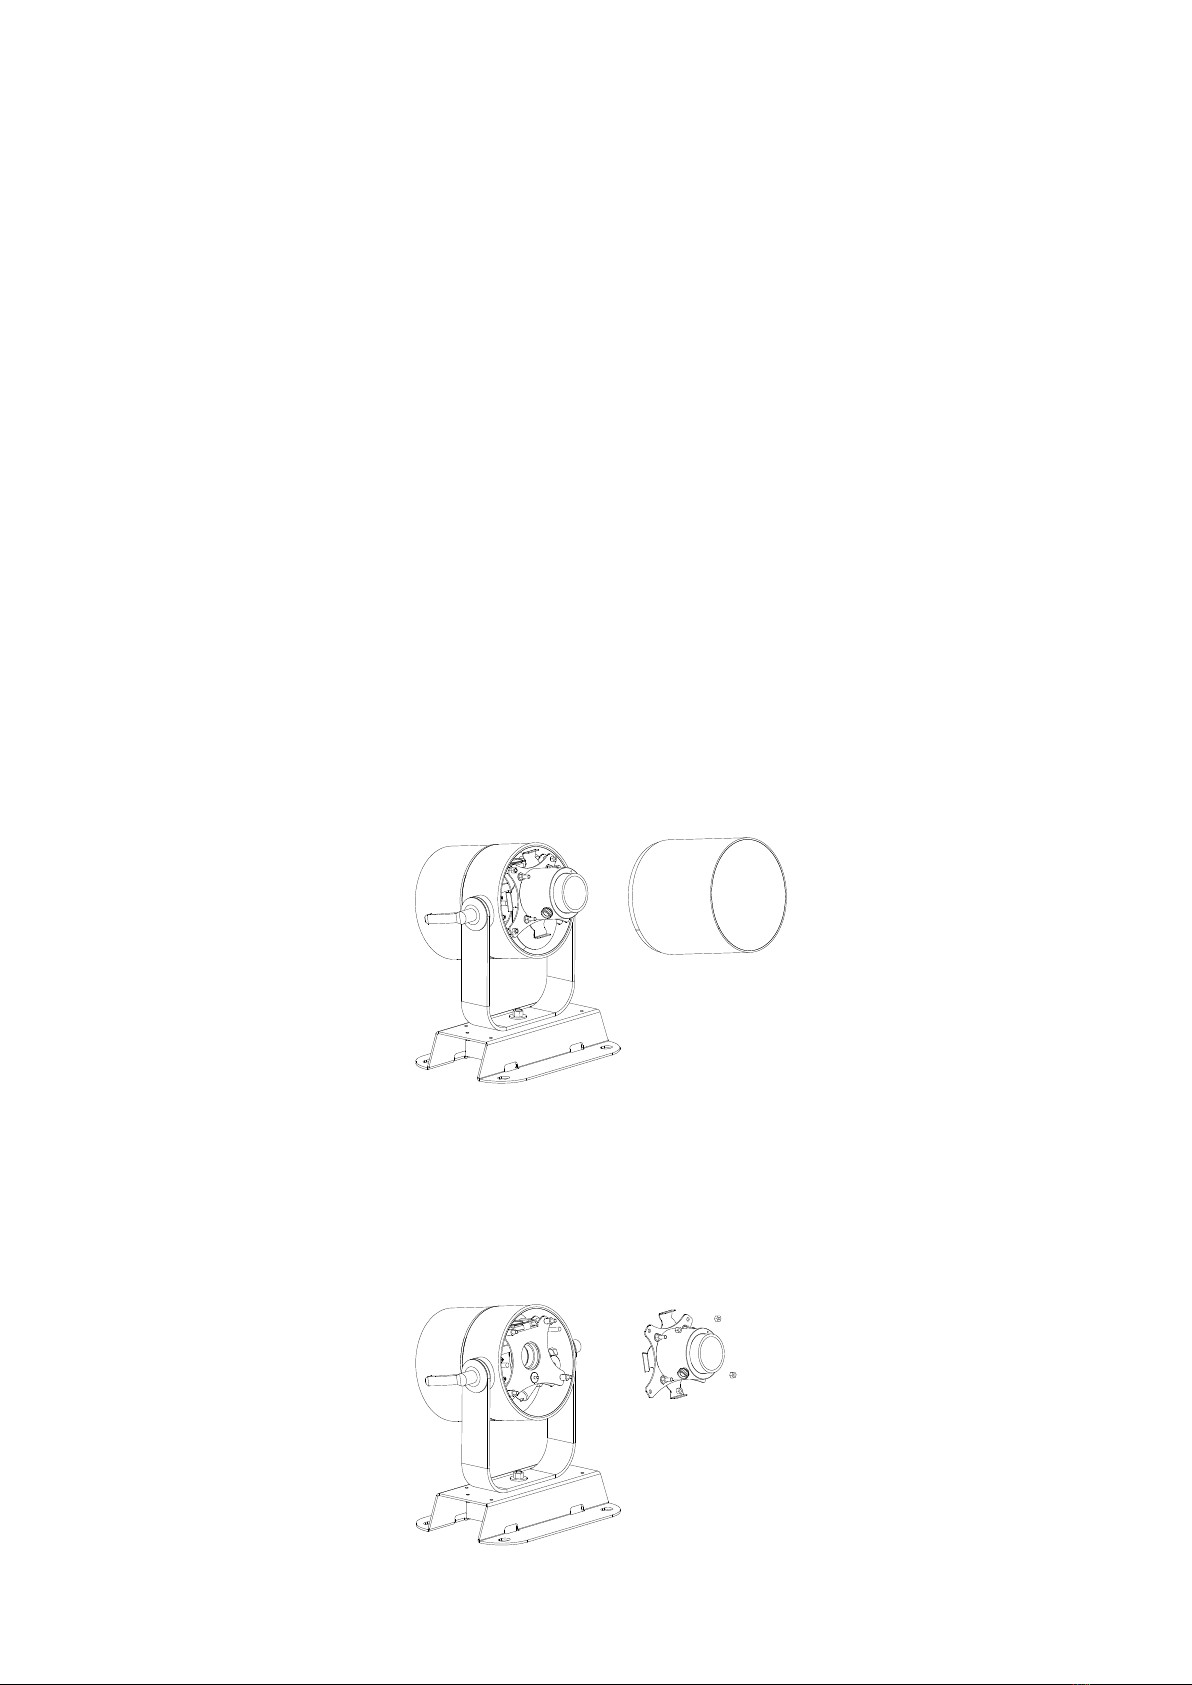
INSTALLATION OF THE GOBO (STATIC EFFECT) !
-Remove the retention ring by pressing the two ends towards each other.!
-Carefully insert the gobo upside down with the engraved side facing the light source.!
-Put the retention ring back."
Fig. 3"
INSTALLATION OF THE DYNAMIC EFFECT!
-Unscrew the nut and remove the O-ring seal.!
-Carefully insert the dynamic effect with the engraved side facing the light source.!
-Put the O-ring seal again and screw the nut without over-tightening it.!
Fig. 4!
4
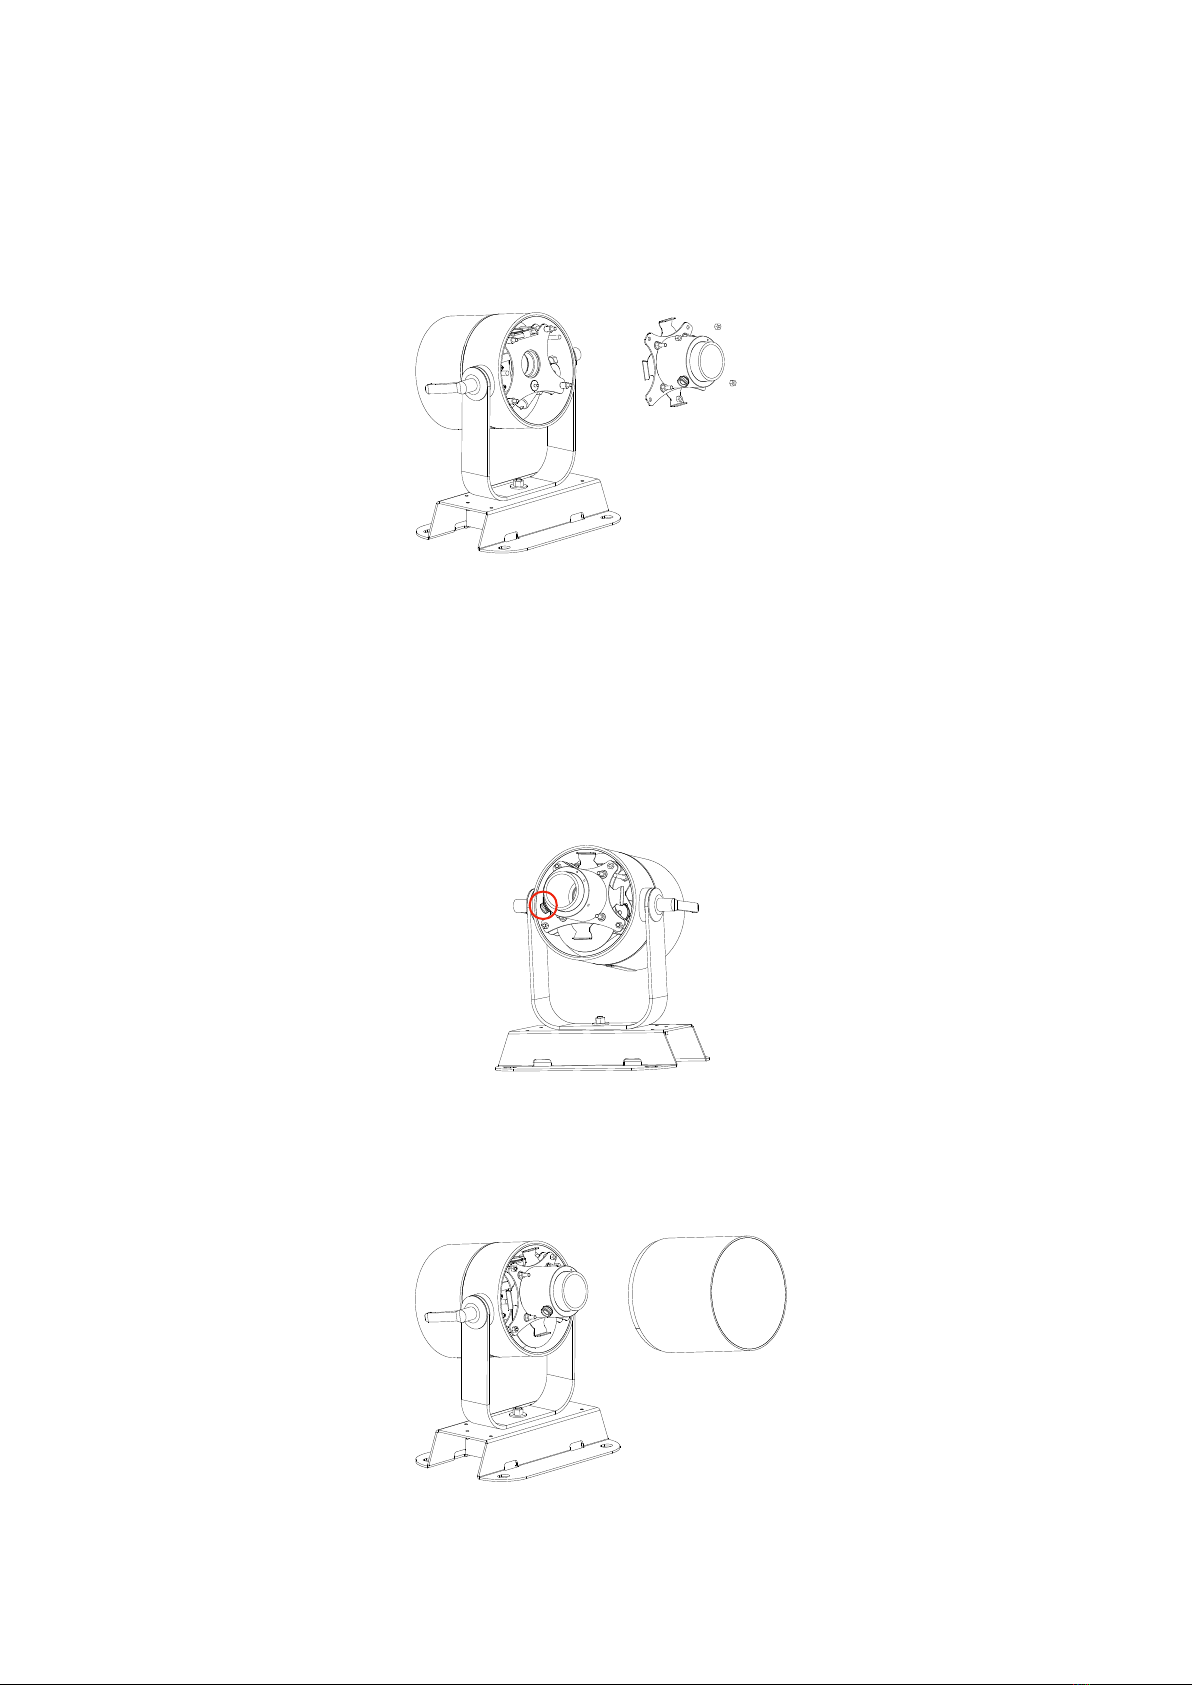
-Reassemble lens and shaper screwing the two knobs that keep them assembled with
the projector body, as in Fig. 5."
"
"
Fig. 5!
!
!
3) SIZING AND FOCUSING OF THE IMAGE
Direct the projector to the surface on which you want to make the projection making sure
that it is at least 5 meters away from the projector's lens.!
Loosen the A knob that hold the lens assembled and move it until the image looks sharp.
Then screw the A knob again to fix the lens."
"
Fig. 6"
"
-Screw the front cover, as in Fig. 7.!
!
!
!
!
5
A

CARE AND MAINTENANCE
Before you start any maintenance or cleaning operation on the projector remove the
voltage from the power grid. !
Check that the air intake openings are clean and the vents are working. Depending on the
operating environment, the projector will need regular cleaning.!
The product should never be washed, but should be cleaned on the outside only with a
moist cloth. It is important to periodically check the seals to ensure maximum water
sealing performance.!
Any repair that requires the dismantling of the projector assembly screws should only be
carried out by the manufacturer.!
Replacing defective parts with non-genuine parts may render null and void the warranty.!
CAUSE AND SOLUTIONS OF POSSIBLE PROBLEMS
-The projector does not turn on "
Check that the power grid is present.!
-Reduced brightness"
can be caused by the end of the life-cycle of LED or the presence of dirt in the optical
elements. Perform an accurate cleanup of the optical elements, if the problem persists
contact PROIETTA customer service.!
-When the projector is connected to the electrical grid the magnetothermal switch
interrupt the current flow !
The line magnetothermal is undersized compared to the characteristics of the projector.
It is necessary to bypass or replace the line magnetothermal.!
-Faulty projection"
The gobo can be broken or dirt has been deposited on the surface of the gobo. Clean
up the gobo with an antistatic cloth and if the problem persists contact PROIETTA
customer service.!
TIPS: For best results from projections, project images onto dimly lit or dark surfaces,
avoiding reflective surfaces (e.g. mirrors)."
When possible, always prefer light-colored surfaces.!
6

WARRANTY
The product is covered by warranty under the terms of the law (24 months). In case of
malfunction during the warranty period, the product will be repaired or replaced at the
discretion of the manufacturer. "
"
The following informations are required for the use of the warranty: "
- Purchase date (the invoice date is valid) "
- Detailed description of the issue. !
It is essential to follow the safety instructions and warnings contained in this manual. "
Any damage caused by non-compliance with the manual causes the warranty to expire.
The manufacturer does not take any responsibility for damages or problems caused by
non-compliance with the manual. "
Any repair that requires the dismantling of the projector assembly screws should only be
carried out by the manufacturer, who denies any responsibility for unauthorized
interventions. The dismantling (even partial) of the projector not carried out by the
manufacturer causes the warranty to expire. "
The parts of consumption are not covered by the guarantee. "
7

DECLARATION OF CONFORMITY
The product to which this manual refers is in accordance with the Directives of
the European Community. The examination is made clear by the application of
the CE mark on the product and the declaration of compliance. !
The device meets the requirements of the 2002/95/CE (RoHS) Directive; the
General Safety Information Regulations: EN60598-1, EN60598-2-17 and the
European Parliament's Directive 2004/108/EC on Electromagnetic Compatibility. !
DISPOSAL OF UNUSED PRODUCT
The device must be disposed of in accordance with the applicable laws relating
to lighting products. In any case, it should not be thrown between normal waste
or dispersed in the environment, the latter action, although legally pursued, is a
serious danger to animals and people and a source of long-term pollution. The
product cannot be treated as a simple urban waste and must be disposed of
appropriately in accordance with existing waste disposal regulations.!
Avigliana, 22/09/2021
PROIETTA srl!
Viale Dei Mareschi 4/d - 10051 - Avigliana - TO (Italy) - VAT number: IT09964950019!
8
Table of contents


