manuals.online logo
Brands
  1. Home
  2. •
  3. Brands
  4. •
  5. Project Source
  6. •
  7. Outdoor Light
  8. •
  9. Project Source FY05-005BLK-M User manual

Project Source FY05-005BLK-M User manual

ITEM #
0156459
0156460
W
A
LL LANTERN
M
ODEL
#FY05-005BLK-M
FY05-005WH
Français p. 8
Español p. 15
2
3
PA
CKAGE CONTENTS
P
A
RT
DESCRIPTION Q
UANTITY
A
W
all

xture
1
BGlass shade
1
CSide screw (preassembled to Wa
ll xture (A))
2
E
E
O
utlet box
s
crew
Q
ty
.
2
C
rossbar
(
Not actual size)
Q
ty
. 1
M
ounting
s
crew
(preassembled
t
o Crossbar
(EE))
Q
ty
. 2
W
ire nut
Q
ty
. 3
HARDW
A
RE CONTENTS
B
A
A
Decorativ
e
n
ut
(
preassembled
to Mounting
screw (AA))
Q
ty
. 2
B
BB
B
B
C
C
DD
L
owes.com
L
owes.com
B
A
B
B
B
C
S
AFETY INFORMA
T
ION
W
A
RNING
CAUTION
PREPA
RA
T
ION
Please read and understand this entire manual before attempting to assemble, operate or install
t
he product.
• TURN OFF ELECTRICITY
at ma
in fuse box (or circuit breaker box) before beginning
installation by removing fuse (or switching off circuit breaker).
• MINIMUM 90° C SUPPL
Y
CONDUCT
ORS.
• CONSUL
T
A
QUALIFIED ELECTRICIAN TO ENSURE CORRECT BRANCH CIRCUIT
CONDUCTOR.
• If in doubt about electrical installation, consult a licensed electrician.
Before beginning assembly of product, make sure all parts are present. Compare parts with
package contents list and hardware contents list. If any part is missing or damaged, do not attempt
t
o assemble the product.
Estimated A
ssembly Time: 15 minutes
To
ols Required for
A
ssembly (not included): Flathead screwdriver
, Phillips screwdriver,
Pliers,
Electrical tape, Wire cutters, Safety glasses.
Helpful To
ols (not included): Wire strippers.
ManualShelf © 2013-2023 USA
54
Hardware Used
H
ardware Used
x
2
Hardware Used
x
3
W
ire nut
x
x
2
2
x
1
2
2
x
x
A
SSEMBL
Y INSTRUCTIONS
1
2
3
O
utlet box screw
Decorative nut
Decorative nut
Mounting screw
M
ounting screw
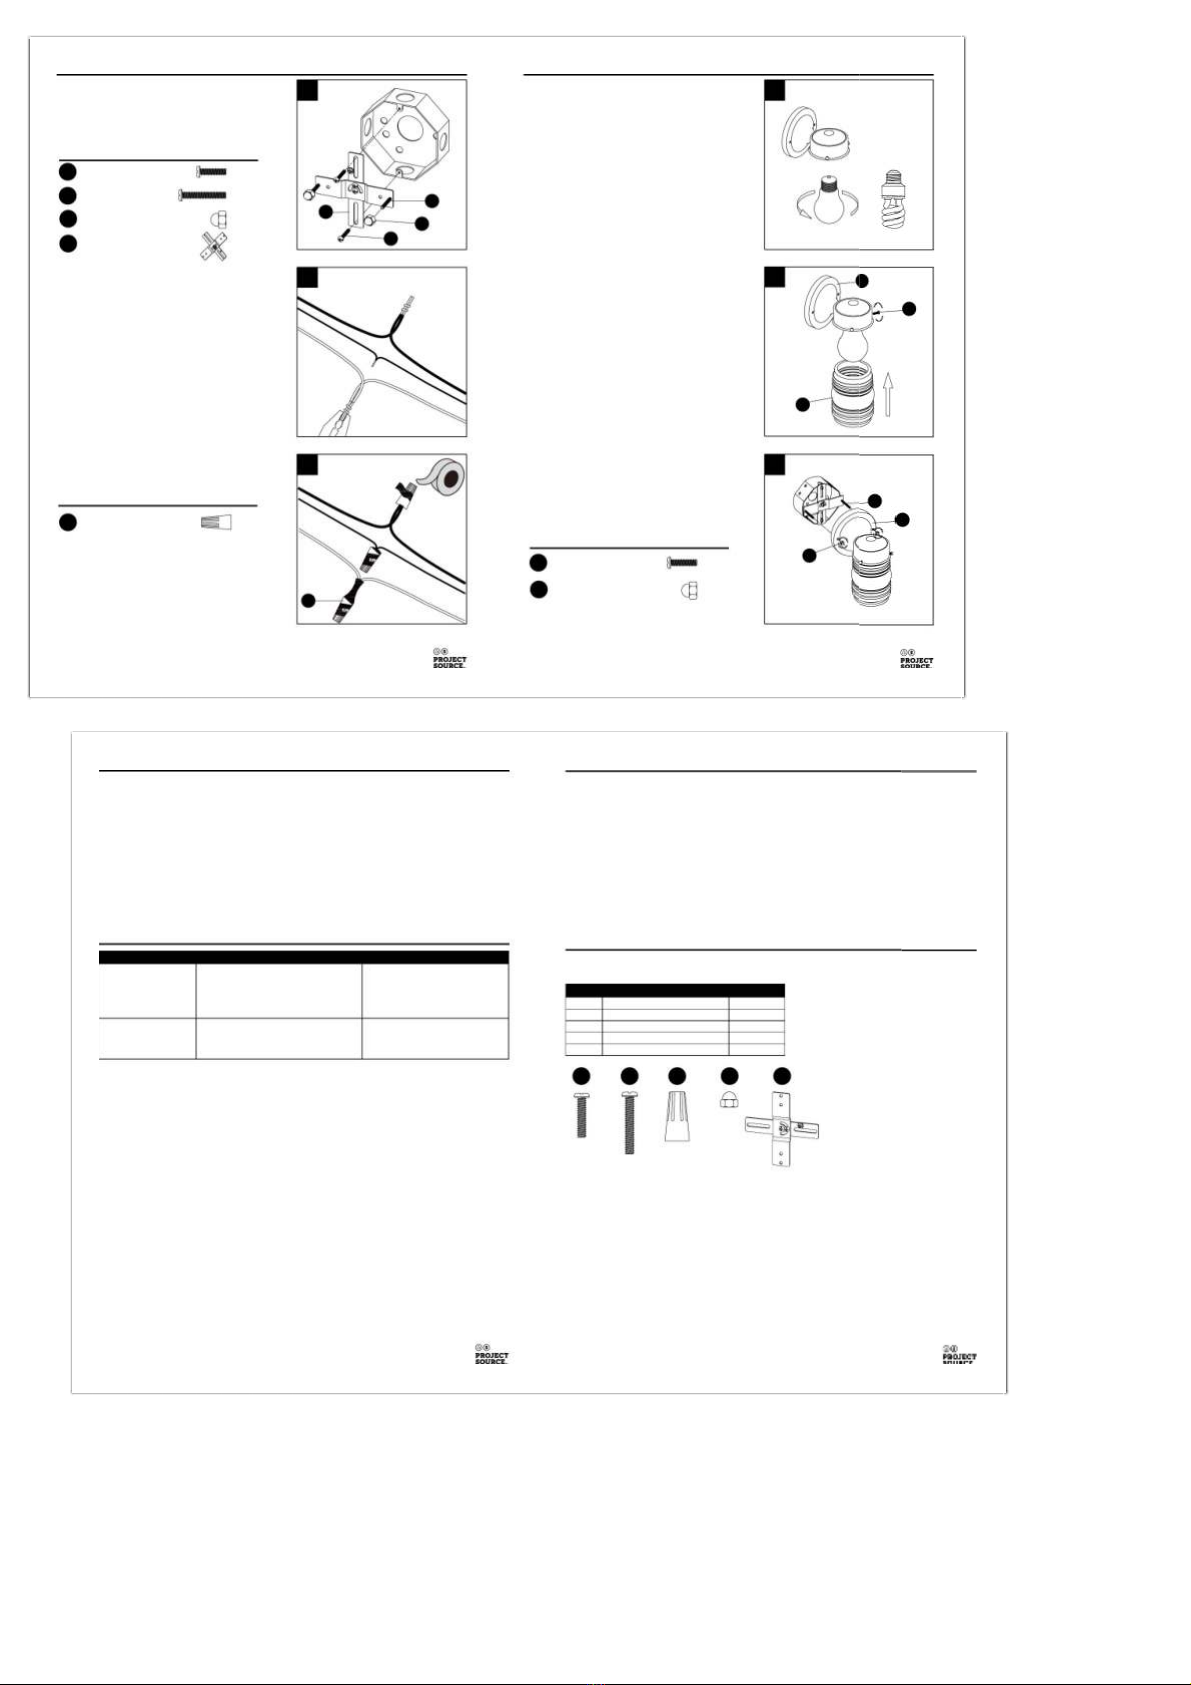
1. Remove decorative nuts (DD) from mounting
screws (AA) preassembled on crossbar (EE).
Then, attach crossbar (EE) to outlet box (not
included) with outlet box screws (BB). Note: The
mounting screws (AA) should protrude away from
the outlet box.
3.
A
ttach wire nuts (CC). T
a
pe wire nuts (CC)
and wires together
.
B
B
A
A
A
A
B
BB
B
B
D
D
DD
B
EE C
rossbar
B
CC
AA
DD
B
B
EE
CC
A
SSEMBL
Y INSTRUCTIONS
4
5. Install glass shade (B) on wall xture (A). Secur
e
with preassembled side screws (C).
5
C
A
6
4
. Install light bulb (not included). Use one 60-
watt max. standard-base bulb or one 13-watt
standard-base CFL.
6
. Insert wall xture (A) through the protruding
mounting screws (AA) and secure with
previously removed decorative nuts (DD).
Then, add silicone sealant (not included)
between mounting surface and canopy of wall
xture (A), leaving the bottom clear so moisture
can drip down.
B
A
A
A
DD
L
owes.com
L
owes.com
2
. Strip 3/4 in. of insulation from wire ends.
T
w
ist stripped ends together with pliers (not
included), black to black (power) and white to
white
(neutral).
A
ttach copper wire to ground
wire.
If necessary
, attach copperH
elpful hint:
ground wire to grounded junction box.
o
r
7
Printed in C
hina
6
CARE AN
D
M
AINTENANCE
• Clean with soft, dry cloth. Do not use abrasives.
W
ARRANTY
REPLACEMENT P
A
RTS LIST
For re
placement parts, call our customer service department at 1-866-389-8827, 8 a.m. - 6 p.m.,
EST, Monday - Thursday, 8 a.m. - 5 p.m., EST, Friday.
PA
RT DESCRIPTION
P
A
RT #
A
A
Mounting screw 109-041800
B
B
109-042600Outlex box screw
C
C
W
ire nut
3
75-022000
D
D
Decorative nu
t1
10-08070
0
EE C
rossbar
152-103000
L
owes.com
L
owes.com
Project Source
®
is a registered trademark
o
f LF
,
LLC.
A
ll rights reserved.
T
ROUBLESHOOTING
PROBLEM POSSIBLE CAUSE CORRECTIVE
A
CTION
B
ulb won’t light.
1. Bulb is burned out.
2. P
ower is off.
3. Faulty wire connection
.
4
. Faulty switch.
1. Replace light bulb.
2. Make sure power supply is on.
3. Check wiring.
4. Te
st or replace switch.
F
use blows or circuit
b
reaker trips when
l
ight is turned on.
Crossed wires or power wire is
grounding out.
Check wire connections.
D
D
B
A
A
B
B
B
B
B
C
C
EE
T
he manufacturer warrants all of its lighting xtures against defects in materials and workmanship
f
or three (3) years from the date of purchase. If within this period the product is found to be
d
efective in material or workmanship, the product must be returned, with a copy of the original
s
ales receipt as proof of purchase in the original carton, to the place of purchase. The
manufacturer will, at its o
ption, repair
,
replace or refund the original purchase price to the
consume
r
. This warranty does not cover xtures becoming defective due to misuse, accidental
d
amage, improper handling and/or installation and specically excludes liability for direct,
i
ncidental
o
r consequential damages.
A
s some states do not allow exclusions or limitations on an implied
w
arranty
, the above exclusions and limitations may not apply to you. This warranty gives you
s
pecic legal rights, and you may have other rights that vary from state to state.

This manual suits for next models

3

Other Project Source Outdoor Light manuals

Project Source 40017 User manual

Project Source

Project Source 40017 User manual

Project Source IJC1691H-3 User manual

Project Source

Project Source IJC1691H-3 User manual

Popular Outdoor Light manuals by other brands

brennenstuhl HL DA 85 M operating instructions

brennenstuhl

brennenstuhl HL DA 85 M operating instructions

Jula 422-106 operating instructions

Jula

Jula 422-106 operating instructions

WE-EF LTM440-AP Installation and maintenance instructions

WE-EF

WE-EF LTM440-AP Installation and maintenance instructions

Performance In Lighting GUELL 1 quick start guide

Performance In Lighting

Performance In Lighting GUELL 1 quick start guide

urban ambiance UHP3917 installation instructions

urban ambiance

urban ambiance UHP3917 installation instructions

Orion AL 11-1138/1 Mounting and safety instructions

Orion

Orion AL 11-1138/1 Mounting and safety instructions

Acuity Brands Lithonia KAXW LED installation instructions

Acuity Brands

Acuity Brands Lithonia KAXW LED installation instructions

nordlux Canto 2 Mounting instruction

nordlux

nordlux Canto 2 Mounting instruction

FOSCARINI Cri Cri manual

FOSCARINI

FOSCARINI Cri Cri manual

IKEA Strala manual

IKEA

IKEA Strala manual

EINHELL TC-CL 18/1800 Li Original operating instructions

EINHELL

EINHELL TC-CL 18/1800 Li Original operating instructions

SLV Elektronik TRUST 30 operating manual

SLV Elektronik

SLV Elektronik TRUST 30 operating manual

LIGMAN TANGO 35 installation manual

LIGMAN

LIGMAN TANGO 35 installation manual

tulux 9010G Mounting instruction

tulux

tulux 9010G Mounting instruction

Lake Lite LL-SDL-Round manual

Lake Lite

Lake Lite LL-SDL-Round manual

FontanaArte NOBI 3392 quick start guide

FontanaArte

FontanaArte NOBI 3392 quick start guide

LIGMAN PIB-50006 installation manual

LIGMAN

LIGMAN PIB-50006 installation manual

RH BECKMAN SCONCE 21 installation instructions

RH

RH BECKMAN SCONCE 21 installation instructions

manuals.online logo
manuals.online logoBrands
  • About & Mission
  • Contact us
  • Privacy Policy
  • Terms and Conditions

Copyright 2025 Manuals.Online. All Rights Reserved.