Prolights Tribe BATPINIR User manual
MANUALE UTENTE
USER MANUAL
BATPINIR
IT - EN
BATTERY POWERED LED PIN SPOT

REV.004-07/17
Music & Lights S.r.l. si riserva ogni diritto di elaborazione in qualsiasi forma delle presenti istruzioni per l’uso.
La riproduzione - anche parziale - per propri scopi commerciali è vietata.
Al ne di migliorare la qualità dei prodotti, la Music&Lights S.r.l. si riserva la facoltà di modicare, in
qualunque momento e senza preavviso, le speciche menzionate nel presente manuale di istruzioni.
Tutte le revisioni e gli aggiornamenti sono disponibili nella sezione 'Manuali' sul sito www.musiclights.it

3
BATPINIR
• BATPINIR
• Manuale utente
Contenuto dell'imballo:
INDICE Sicurezza
Avvertenze generali
Attenzioni e precauzioni per l’installazione
1 Introduzione
1. 1 Descrizione
1. 2 Speciche tecniche
1. 3 Elementi di comando e di collegamento
2 Installazione
2. 1 Montaggio
3 Funzioni e impostazioni
3. 1 Funzionamento
3. 2 Funzionamento tramite il controller IRC
4
4
5
5
6
7
8
9
BATPINIR
4
ATTENZIONE! Prima di effettuare qualsiasi operazione con l’unità, leggere con attenzione
questo manuale e conservarlo accuratamente per riferimenti futuri. Contiene informazioni
importanti riguardo l’installazione, l’uso e la manutenzione dell’unità.
SICUREZZA
Avvertenze generali
• I prodotti a cui questo manuale si riferisce sono conformi alle Direttive della Comunità Europea e per-
tanto recano la sigla .
• Il dispositivo funziona con pericolosa tensione. Non intervenire mai al suo interno al di fuori delle ope-
razioni descritte nel presente manuale; esiste il pericolo di una scarica elettrica.
• Questo dispositivo appartiene alla Classe di protezione III, pertanto deve operare sempre con un ap-
propriato trasformatore di tensione. Controllare periodicamente l’unità, il cavo di alimentazione ed
il trasformatore. Assicurarsi che quest’ultimo sia della tipologia corretta, come indicato nel pannello
posteriore del dispositivo.
• Le operazioni di collegamento alla rete di distribuzione dell’energia elettrica devono essere eettuate
da un installatore elettrico qualicato. Vericare che frequenza e tensione della rete corrispondono alla
frequenza ed alla tensione per cui l’unità è predisposta, indicate sulla targhetta dei dati elettrici.
• L’unità non per uso domestico, solo per uso professionale.
• Evitare di utilizzare l’unità:
- in luoghi soggetti ad eccessiva umidità;
- in luoghi soggetti a vibrazioni, o a possibili urti;
- in luoghi a temperatura superiore ai 40°C.
• Evitare che nell’unità penetrino liquidi inammabili, acqua o oggetti metallici.
• Non smontare e non apportare modiche all’unità.
• Tutti gli interventi devono essere sempre e solo eettuati da personale tecnico qualicato. Rivolgersi al
più vicino centro di assistenza tecnica autorizzato.
• Se si desidera eliminare il dispositivo denitivamente, consegnarlo
per lo smaltimento ad un’istituzione locale per il riciclaggio.
Attenzioni e precauzioni per l’installazione
• Prima di iniziare qualsiasi operazione di manutenzione o pulizia disconnettere l’unità dalla rete di ali-
mentazione.
• Questo prodotto è solo per uso interno. Per prevenire il rischio di incendi o scosse elettriche, non espor-
re il prodotto alla pioggia o all’umidità.
• Evitare di installare l’unità in prossimità di fonti di calore.
• Per la pulizia del prodotto non usare solventi tipo acetone o alcool per non danneggiare la nitura
esterna e le serigrae dei pannelli.
• Se il dispositivo dovesse trovarsi ad operare in condizioni dierenti da quelle descritte nel presente
manuale, potrebbero vericarsi dei danni; in tal caso la garanzia verrebbe a decadere. Inoltre, ogni altra
operazione potrebbe provocare cortocircuiti, incendi, scosse elettriche, rotture ect.

5
BATPINIR
- 1 - INTRODUZIONE
1.1 DESCRIZIONE
BATPINIR è un proiettore a batteria con sorgente LED ideato per rivoluzionare il concetto di illuminazione
d’accento in applicazioni temporanee. Il sistema ottico ad alta ecienza è stato studiato combinando un
chip LED bianco da 2W con una lente ad alta ecienza ad emissione 5°, risultando altamente luminoso,
compatto ed energy-saving. L’autonomia di ben 6 ore della batteria, con controllo remoto IR a distanza
rende BATPINIR ideale per molteplici applicazioni come centropista o accent-lighter per matrimoni, confe-
renze, showroom, clubs. L’hardware di bordo prevede due possibili soluzioni di montaggio, con magnete
per applicazione rapida su qualsiasi superce metallica oppure con clamp a forbice per ssaggio su binari
di controsotto. BATPINIR prevede anche l’applicazione di ltri colore oppure di correzione temperatura
selezionando diverse sfumature di colore. BATPINIR è disponibile sia in confezione singola che nella ver-
sione PIN6PACK che include sei pezzi in una borsa di trasporto con caricatore collettivo e kit di ltri colore.
1.2 SPECIFICHE TECNICHE
Sorgente luminosa e ottica
• 1x2W Cold White LED
• Angolo di proiezione: 5°
• Angolo di campo: 10°
• Filtri colore inclusi: warmwhite, rosso, verde, blu, giallo
• Durata media diodi LED: >50.000 ore
Funzionamento ed elettronica
• Funzionamento 100% wireless attraverso batteria a litio e controllo a infrarossi
• Batteria al litio è longeva, ricaricabile, ultraleggera
• Protezione elettronica per la gestione della batteria permette di estendere la vita e aumentare i cicli di
ricarica
• Durata batteria: 6 ore
• Tempo di ricarica: 3 ore
• Interruttore ON/OFF per accensione del proiettore
• Modalità IR: Ricevitore Infrarossi incorporato per remote controller
• Frequenza dei diodi anti-icker (400Hz) per videoriprese
Corpo e alimentazione
• Corpo in alluminio pressofuso, grado di protezione: IP33
• Clamp con chiusura a forbice con anello per il posizionamento su binari da controsotto
• Base magnetica per il ssaggio su qualsiasi supercie metallica
• Alimentazione: DC9V 1000mA (esterna)
• Assorbimento medio: 13W
• Peso: 0,3kg
• Dimensioni (LxAxP): 190x88x58mm
• Peso PIN6PACK: 3.5Kg
• Dimensioni PIN6PACK: 794x300x85mm
BATPINIR
6
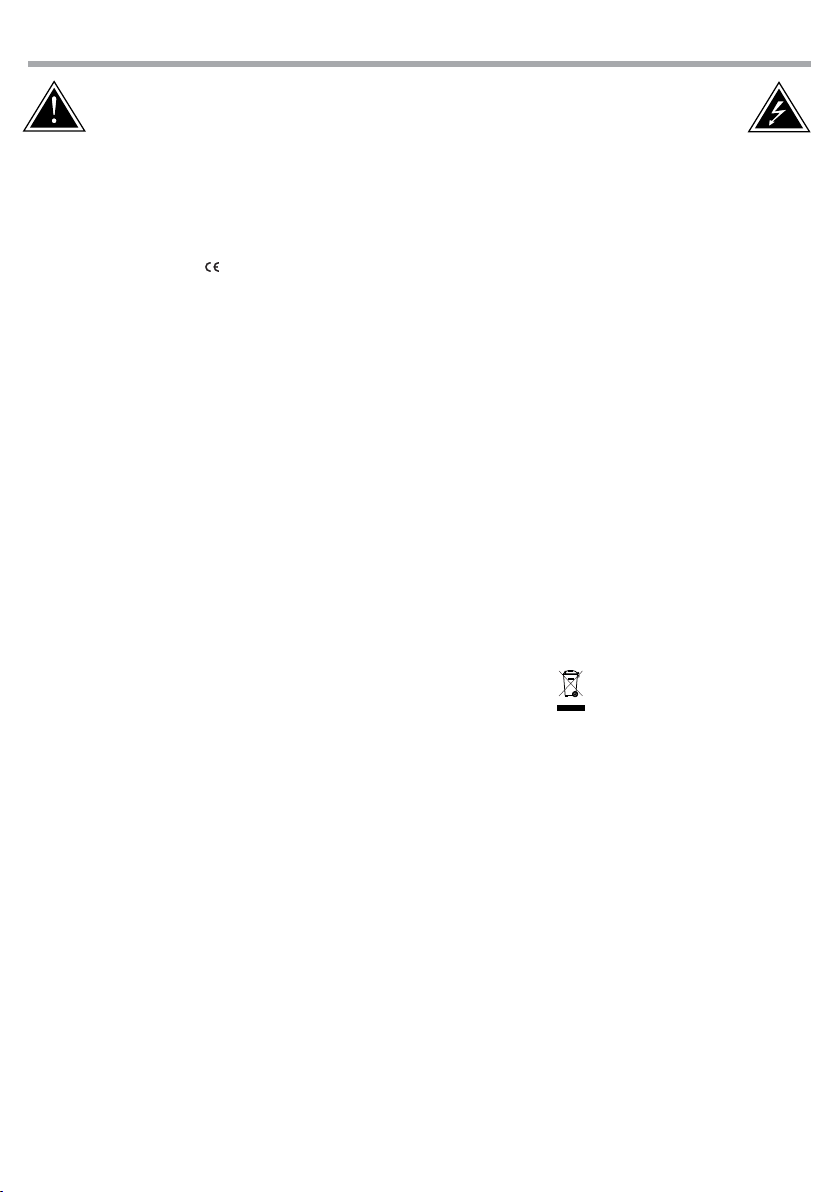
Fig.1
1. MANOPOLA DI REGOLAZIONE
2. INGRESSO ALIMENTAZIONE
3. INTERRUTTORE ALIMENTAZIONE ON/OFF
4. STAFFA DI MONTAGGIO
5. ANELLO DI SICUREZZA
6. BASE GIREVOLE per regolazione rotazione
7. BASE MAGNETICA per ssaggio su superci
metalliche
8. MORSETTO A PINZA per ssaggio a supporti
a sotto.
Pannello Posteriore
4
7
8
56
1
2
3
23
1
1.3 ELEMENTI DI COMANDO E DI COLLEGAMENTO
7
BATPINIR
- 2 - INSTALLAZIONE
2.1 MONTAGGIO
Il BATPINIR è un faretto LED, perfetto per illuminazioni centrali, di pannelli e di punti d’interesse.
La base magnetica permette di ssare l’unità alla maggior parte delle superci metalliche, eliminando la
necessità di utilizzare i morsetti. Il morsetto a pinza con occhiello di sicurezza integrato consente il ssag-
gio a supporti agganciati sul sotto.
L’unità può essere montata anche a testa in giù, su una traversa. Per il ssaggio occorrono dei supporti
robusti per il montaggio. L’area di collocazione deve avere una stabilità suciente e supportare almeno
10 volte il peso dell’unità.
Inoltre assicurarsi di rispettare tutte le avvertenze in materia di sicurezza.
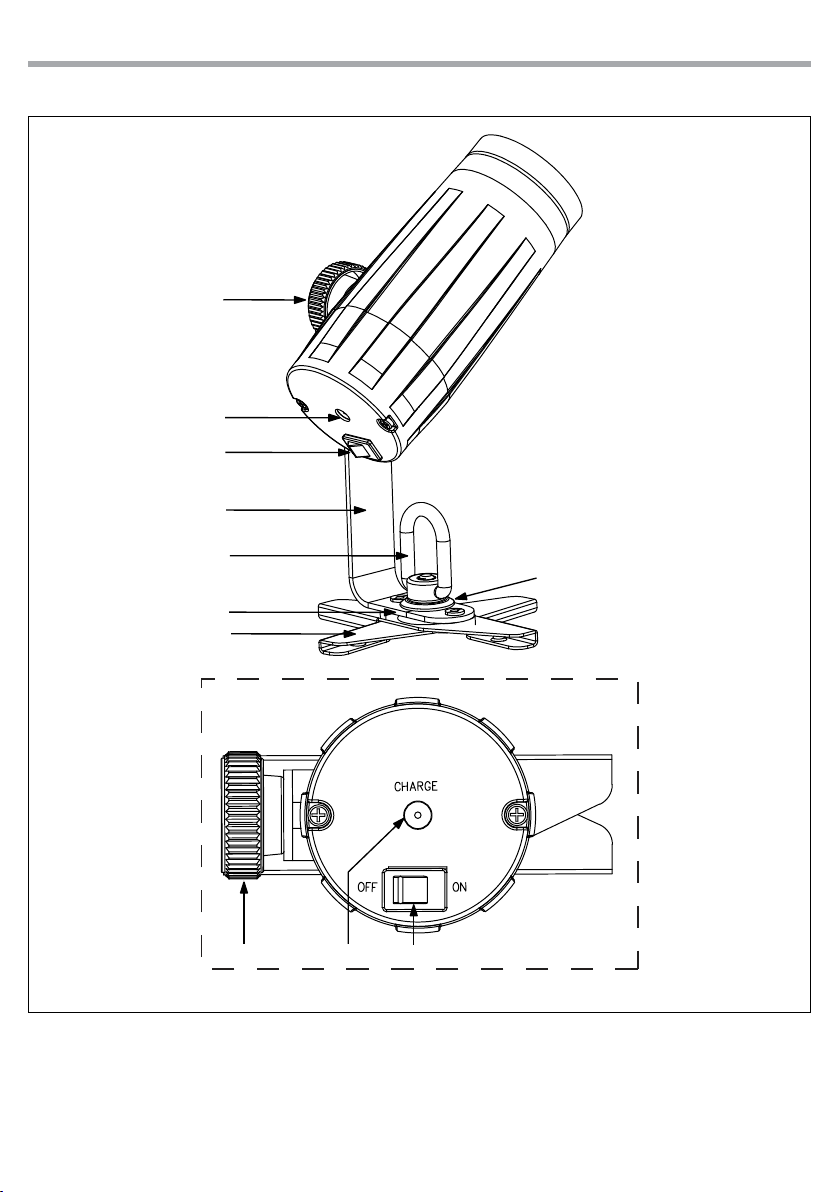
• È assolutamente necessario assicurare il faretto contro la caduta utilizzando un cavo di sicurezza (1)
• Orientare il BATPINIR intervenendo, se necessario, sulla manopola (2) della staa di montaggio.
Fig.2
1
2
BATPINIR
8
Fig.3
- 3 - FUNZIONI E IMPOSTAZIONI
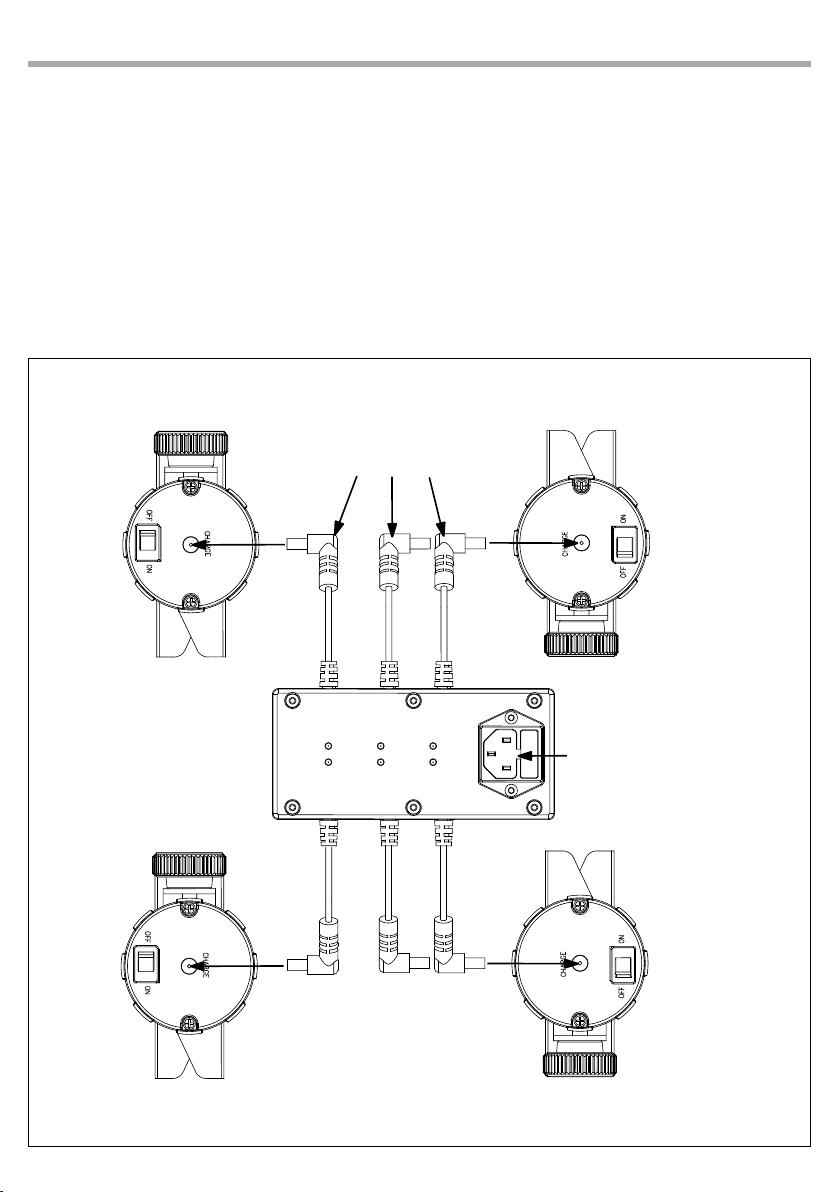
3.1 FUNZIONAMENTO
Il BATPINIR è dotato di alimentatore esterno DC9V 1000mA; viene fornito con una batteria ricaricabile al
litio per il funzionamento senza cavo.
Per caricare la batteria è suciente collegare il cavo di alimentazione in qualsiasi momento, prima, duran-
te o dopo il funzionamento. Per caricare la batteria prima o dopo il funzionamento, con tutti i LED spenti,
lasciare l’interruttore di accensione in posizione O. L’indicatore luminoso sull’alimentatore esterno si illu-
mina in Rosso quando la batteria è in carica e in Verde quando la batteria ha completato la carica.
Per una durata ottimale, caricare la batteria 24 ore prima dell’utilizzo iniziale.
Il tempo massimo di funzionamento è pari a 6 ore; il tempo di ricarica della batteria è di 3 ore.
ALIMENTAZIONE
BATPINIR
ALIMENTAZIONE
PRINCIPALE

9
BATPINIR
Operazioni varie
Per regolare l’intensità luminosa del BATPINIR:
• Premere + oppure - per aumentare o diminuire l’intensità del fascio di luce.
Per oscurare le luci:
• Premere BLACK OUT sul telecomando.
• Verranno spente tutte le luci no alla successiva pressione del pulsante.
NOTA - Il telecomando non risponde ad alcun input quando è attivo il Black Out. Se il telecomando non
risponde quando viene premuto un pulsante, provare a premere Black Out; probabilmente il BLACK OUT
era stato attivato involontariamente.
3.2 FUNZIONAMENTO TRAMITE IL CONTROLLER IRC
Per poter comandare il BATPINIR con il telecomando a raggi infrarossi assicurarsi di puntare il telecoman-
do direttamente verso il ricevitore dell’unità.
Fig.4
IR REMOTE
BLACK
OUT AUTO
STROBE SPEED
SOUND
SENSI-
TIVITY
%MANUAL FADE
SNAP
RG B
+0
123
456
7 8 9

BATPINIR
10
Guida all’uso della batteria
Inizializzazione di una nuova batteria
Ogni nuovo faro contenente una batteria al litio, dovrebbe essere inizializzata al primo utilizzo per massimizzarne
l’ecienza.
Per fare questo:
1. Caricare completamente l’unità per un minimo di 5-6 ore.
2. Scaricare completamente, quindi ricaricare completamente la batteria
3. Ripetere questo ciclo altre 2 volte per ottenere una durata ottimale della batteria.
Ottimizza le prestazioni della batteria
1. Le batterie al litio funzionano in modo ottimale quando vengono utilizzate regolarmente. Lunghi periodi con batteria
al minimo riducono la durata della batteria.
2. Ricaricare la batteria appena possibile, lasciare le batterie scariche per lunghi periodi, riduce la durata della batteria.
3. Conservare le unità contenenti batterie al litio a temperature fredde. Una temperatura ambientale troppo alta riduce
notevolmente la durata di una batteria al litio.
4. Scollegare l'alimentazione dall'unità quando la ricarica è completa.
5. Non utilizzare durante il caricamento.
Se non lo usi per molto tempo
1. Carica la batteria circa al 50%. Un dispositivo con la batteria completamente scarica, potrebbe esaurirsi al punto da
rendere impossibile una nuova ricarica. Se invece il dispositivo resta inattivo per un lungo periodo con la carica al 100%,
la capacità della batteria potrebbe deteriorarsi e la sua autonomia potrebbe risentirne.
2. Spegni il dispositivo, in modo da impedire che la batteria continui a essere utilizzata.
3. Riponi il dispositivo in un luogo fresco e asciutto, a una temperatura inferiore ai32°C.

11
BATPINIR

All rights reserved by Music & Lights S.r.l. No part of this instruction manual may be
reproduced in any form or by any means for any commercial use.
In order to improve the quality of products, Music&Lights S.r.l. reserves the right to modify the
characteristics stated in this instruction manual at any time and without prior notice.
All revisions and updates are available in the‘manuals’section on site www.musiclights.it

1
BATPINIR
Packing content • BATPINIR
• User manual
TABLE OF CONTENTS Safety
General instructions
Warnings and installation precautions
1 Introduction
1. 1 Description
1. 2 Technical specications
1. 3 Operating elements and connections
2 Installation
2. 1 Mounting
3 Functions and settings
3. 1 Operation
3. 2 Operation through the IRC Controller
2
2
3
3
4
5
6
7

BATPINIR
2
WARNING! Before carrying out any operations with the unit, carefully read this instruction
manual and keep it with cure for future reference. It contains important information about
the installation, usage and maintenance of the unit.
SAFETY
General instruction
• The products referred to in this manual conform to the European Community Directives and are there-
fore marked with .
• The unit is supplied with hazardous voltage. Leave servicing to skilled personnel only. Never make any
modications on the unit not described in this instruction manual, otherwise you will risk an electric
shock.
• This device falls under PROTECTION CLASS III. It has to be always operated with an appropriate trans-
former. From time to time check the device, the power cord and transformer. Make sure that the trans-
former is the correct type, the one stated on the rear panel.
• The connection to the main network of electric distribution must be carried out by a qualied electrical
installer. Check that the main frequency and voltage correspond to those for which the unit is designed
as given on the electrical data label.
• This unit is not for home use, only professional applications.
• Never use the xture under the following conditions:
- in places subject to excessive humidity
- in places subject to vibrations or bumps;
- in places with a temperature of over 40°C or less than 2°C.
• Make certain that no inammable liquids, water or metal objects enter the xture.
• Do not dismantle or modify the xture.
• All work must always be carried out by qualied technical personnel. Contact the nearest sales point for
an inspection or contact the manufacturer directly.
• If the unit is to be put out of operation denitively, take it to a local recycling
plant for a disposal which is not harmful to the environment.
Warnings and installation precautions
• Before starting any maintenance work or cleaning the projector, cut o power from the main supply.
• The unit for indoor use only. To prevent or reduce the risk of electrical shock or re, do not expose the
unit to rain or moisture.
• Do not install the xture near sources of heat.
• When cleaning the xture, please do not use solvents such as acetone or alcohol, since they may dam-
age the of the unit outer nish and the printings on the panels
• If this device will be operated in any way dierent to the one described in this manual, it may suer
damage and the guarantee becomes void. Furthermore, any other operation may lead to dangers like
short circuit, burns, electric shock, etc.

3
BATPINIR
- 1 - INTRODUCTION
1.1 DESCRIPTION
BATPINIR is a battery-powered projector with LED light source designed to revolutionize the concept of
accent lighting in temporary applications. The high-ecient optical system has been studied by combin-
ing a 2W white LED chip with a special 5° lens, resulting incredibly bright, compact and energy-saving. The
battery life of 6 hours and the remote control of the xture through IR, makes BATPINIR ideal for many ap-
plications such as centerpieces or accent-lighter for weddings, conferences, showrooms, clubs. The hang-
ing hardware provides two possible mounting solutions, magnet for fast application on any metal surface
or with a scissor clamp for mounting on ceiling rails. BATPINIR also provides for the application of lters
or color temperature correction by selecting dierent shades of color. BATPIN is available in a single pack-
age, or in the set version PIN6PACK which includes six pieces in a carrying case with collective charger and
color gel kit.
1.2 TECHNICAL SPECIFICATIONS
Light source and optics
• 1x2W Cold White LED
• Beam angle: 5°
• Field angle: 10°
• Included lter gel: warmwhite, red, green, blue, yellow
• LEDs average life span:> 50,000 hours
Electronics and features
• 100% working wireless with lithium battery and IR control
• Lithium battery is long-lived, rechargeable, lightweight
• Electronic protection for battery management allows you to extend the life and increase the recharge
cycles
• Battery life: 6 hours
• Charging time: 3 hours
• Mode IR: Built-in infrared receiver for remote controller
• Frequency diode anti-icker (400Hz) for camera recordings
Structure and Power supply
• Cast aluminum body, degree of protection: IP33
• Scissor clamp with eye loop to hang on every ceiling track
• Magnetic base to attach the pinspot on every metal surface
• Power supply: DV 9V 1000mA (external)
• Average consumption: 13 W
• Weight: 0,3kg
• Dimensions (WxHxD): 190x88x58mm
• Weight PIN6PACK: 3.5Kgs
• Dimensions PIN6PACK: 794x300x85mm

BATPINIR
4
1.3 OPERATING ELEMENTS AND CONNECTIONS
Fig.1
1. LOCKING KNOB for the mounting bracket.
2. POWER IN
3. POWER SWITCH ON / OFF
4. MOUNTING BRACKET
5. SAFETY RING to attach safety cable
6. REVOLVING BASE for rotation adjustment
7. MAGNETIC BASE for mounting on metal
surfaces
8. CLAMP for xing on the ceiling.
Rear panel
4
7
8
56
1
2
3
23
1

5
BATPINIR
- 2 - INSTALLATION
2.1 MOUNTING
The BATPINIR is a battery-powered LED pin spot, perfect for lighting centerpieces, cakes, and focal points.
Its magnetic base axes to most metal surfaces, eliminating the need for clamps. The built-in scissor clip
with safety loop easily attaches to drop ceiling supports, for quick setup and cable management.
The unit can also be mounted upside down to a cross arm. For xing, stable mounting clips are required.
The mounting place must be of sucient stability and be able to support a weight of 10 times of the unit’s
weight.
When carrying out any installation, always comply scrupulously with all the regulations (particularly re-
garding safety) currently in force in the country in which the xture’s being used.
• Always additionally secure the pin spot with the safety rope from falling down (1).
• Adjust the BATPINIR and use the knob (2) to slightly release or tighten the locking mechanism of the
bracket if is necessary.
Fig.2
1
2
BATPINIR
6
- 3 - FUNCTIONS AND SETTINGS
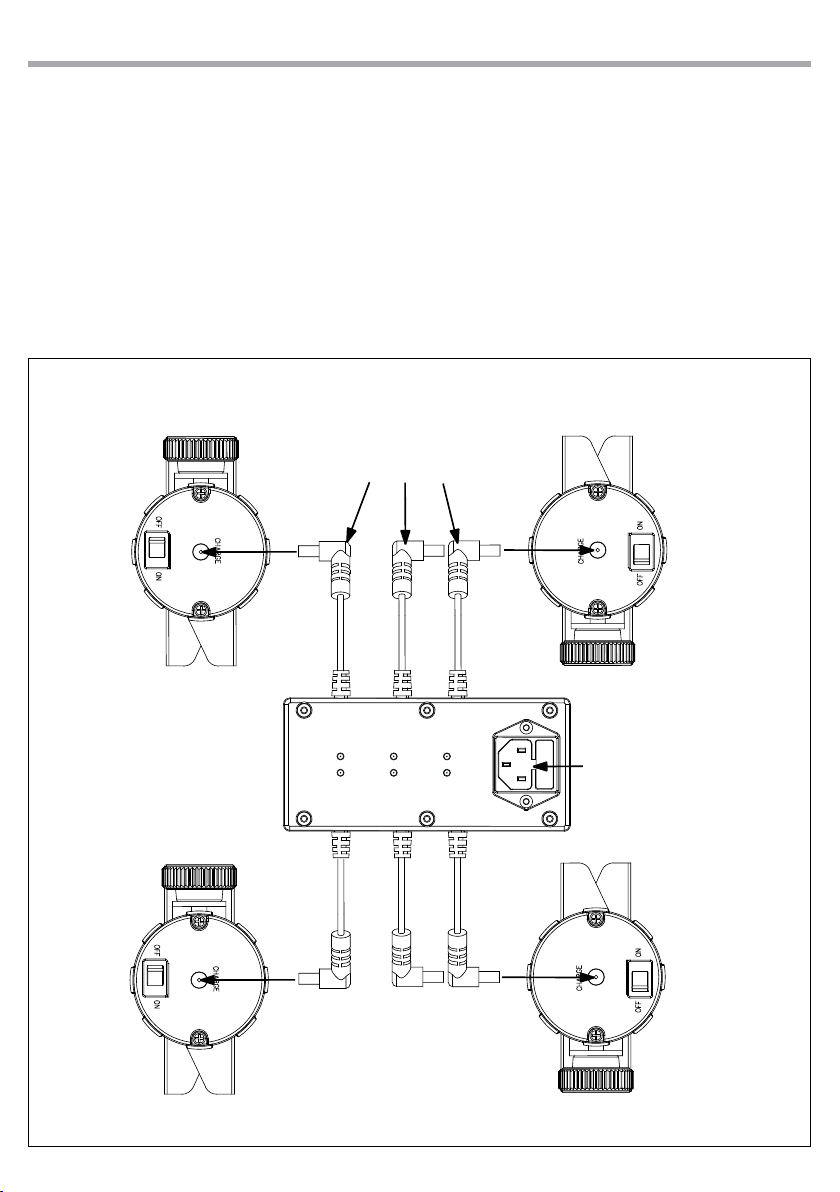
3.1 OPERATION
The BATPINIR has an external auto-ranging DC9V 1000mA power supply.
This device comes with a rechargeable lithium battery for cable-free operation. To charge the battery,
simply plug in the external power cord at any time before, during, or after operation.To charge the battery
before or after operation with the LED o, leave the power switch in the O position. The indicator light
on the external power supply turns red while the battery is charging, then it turns green when the battery
is done charging.
For optimal battery life, charge the BATPINIR battery 24 hours prior to initial use.
The maximum operating time is 6 hours; the charging time of the battery is 3 hours.
Fig.3
MAIN POWER
POWER IN

7
BATPINIR
3.2 OPERATION THROUGH THE IRC CONTROLLER
To control the BATPINIR with the infrared remote control make sure to point the controller directly at the
receiver on the product.
Miscellaneous Operation
To adjust the brightness of the BATPINIR:
• Press + or – to increase or decrease the intensity of the light beam.
To black out the lights:
• Press BLACK OUT on the controller.
• This will turn o all the lights until the button is pressed again.
NOTE - The controller will not respond to any inputs when Black Out is activated. If the remote does not
respond when a button is pressed, try pressing BLACK OUT. You may have inadvertently activated BLACK
OUT.
Fig.4
IR REMOTE
BLACK
OUT AUTO
STROBE SPEED
SOUND
SENSI-
TIVITY
%MANUAL FADE
SNAP
RG B
+0
123
456
7 8 9

BATPINIR
8
Battery Guide
New Lithium Battery Initialisation
Any new xture containing a Lithium battery should be initialised when rst purchased to maximise its battery life.
To do this:
1. Fully charge the unit for a minimum of 5 to 6 hours.
2. Fully discharge, then fully recharge the battery.
3. Repeat this cycle another 2 times for optimum battery life.
Maximizing Battery Performance
1. Lithium batteries perform best when in regular use. Long idle periods will reduce the battery life.
2. Recharge the battery at the earliest opportunity, leaving batteries discharged for long periods will reduce battery life.
3. Store units containing Lithium batteries at cool temperatures. High ambient temperatures signicantly reduce the life
of a Lithium battery.
4. Disconnect power from the unit when charging is complete.
5. Do not use xtures whilst charging.
Long term storage
1. Charge your xture’s battery to around 50%. If you store a xture with a fully discharged battery, it could fall into a
deep discharge state. If you store it fully charged, the battery may lose some capacity, leading to shorter battery life.
2. Power down the device to avoid additional battery use.
3. Place your device in a cool, moisture-free environment that’s less than 32° C (90° F).
Table of contents
Languages:


