PROLiMA TECH Megahalems Rev.B User manual

1
2
3
4
5
6
8
9
10
11
12
7
X1
X4
X4
X1
X2
X4
X1
X1
X1
X4
X6
X2
Megahalems Rev.B CPU Cooler
P
Prolima
tech
www.prolimatech.com
User Manual
Component English Français Deutsch Italiano
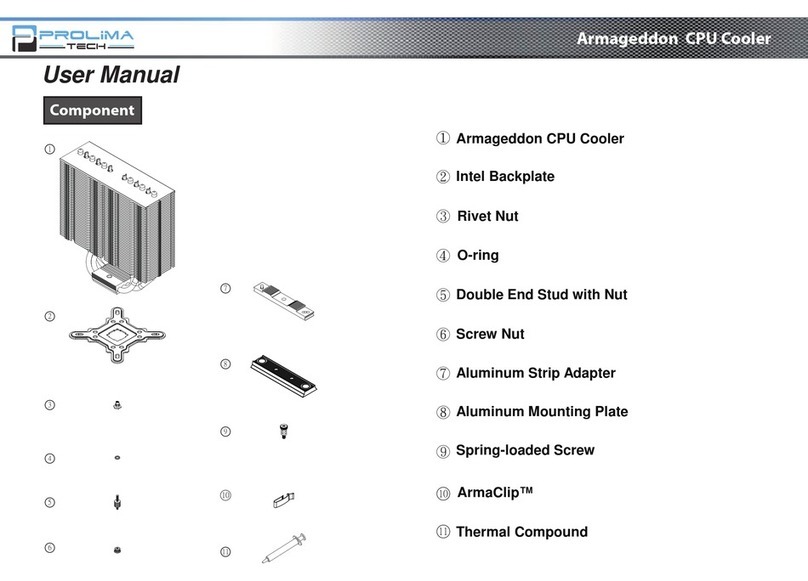
①Heatsink Body x1
②Intel Backplate x1
③Custom LGA775
backplate spacer x1
④Rivet Nut x4
⑤O-ring x6
⑥Aluminum Strip Adapter x2
⑦Double End Stud with Nut x4
⑧Screw Nut x4
⑨Aluminum Mounting Plate x1
⑩Spring-loaded Screw x2
⑪Fan Mounting Clip x4
⑫Thermal Compound x1
①Corps du dissipateur thermique x1
②Plaque arrière Intel x1
③Entretoise sur mesure pour
plaque arrière LGA775 x1
④Écrou à river x4
⑤Joint torique x6
⑥Adaptateur fin en aluminium x2
⑦Goujon à deux bouts avec écrou x4
⑧Ecrou de vis x4
⑨Plaque de montage en aluminium x1
⑩Vis de pression x2
⑪Clip de montage du ventilateur x4
⑫Composé thermique x1
①Kühlkörper x1
②Intel-Rückplatte x1
③Angepasster LGA775-
Rückplattenabstand-halter x1
④Nietmutter x4
⑤Dichtungsring x6
⑥Aluminiumstreifen x2
⑦Schraubenbolze mit Mutter x4
⑧Schraubenmutter x4
⑨Aluminummontag-eplatte x1
⑩Federschraube x2
⑪Lüftermontagek-lemme x4
⑫Wärmeleitpaste x1
①Corpo del dispersore dicalore x1
②Backplate Intel x1
③Spaziatore backplate LGA775 x1
④Bullone x4
⑤Anello toroidale x6
⑥Adattatore piastra d’alluminio x2
⑦Bullone tenditore con dado x4
⑧Dado x4
⑨Pista di montaggio d’alluminio x1
⑩Vite a molla x2
⑪Fermaglio di montaggio ventola x4
⑫Composto termico x1
Español 繁體中文 日本語 한국어
①Cuerpo del disipador x1
②Placa de apoyo Intel x1
③Separador de la placa base
LGA775 personalizado x1
④Tuerca con remache x4
⑤Junta tórica x6
⑥Adaptador de tira de aluminio x2
⑦Pasador de doble extremo
con tuerca x4
⑧Tuerca x4
⑨Placa de montaje de aluminio x1
⑩Tornillo de apriete por resorte x2
⑪Abrazadera de sujeción del
ventilador x4
⑫Compuesto térmico x1
①散熱器本體 x1
②Intel 背板 x1
③LGA775 專用背板墊片 x1
④螺柱 x4
⑤O 型環 x6
⑥轉接鋁條 x2
⑦雙頭手轉螺絲 x4
⑧手轉螺帽 x4
⑨鋁壓板 x1
⑩彈簧螺絲 x2
⑪風扇線扣 x4
⑫導熱膏 x1
①ヒートシンク本体 x1
②Intel バックプレート x1
③LGA775 専用
バックプレートスペーサー x1
④リベットナット x4
⑤Oリング x6
⑥アルミアダプタ x2
⑦スタッドナット x4
⑧スクリューナット x4
⑨アルミプレート x1
⑩バネネジ x2
⑪ファン固定クリップ x4
⑫サーマルグリス x1
①히트싱크 본체 x1
②Intel 백플레이트 x1
③LGA775
전용백플레이트 스페이서 x1
④리벳 너트 x4
⑤O링x6
⑥알류미늄 스트립 어댑터 x2
⑦더블 엔드 스튜드 너트 x4
⑧스크류 너트 x4
⑨알류미늄판 x1
⑩스프링 스크류 x2
⑪팬지지 클립 x4
⑫써멀 컴파운드 x1

Installation
P
Prolima
tech
User Manual
www.prolimatech.com
Step 4
Step 5
Step 2
Step 3
Step 1
Step 6
Step 1
Insert the rivet nuts through the corresponding holes (for 775,
1156, 1366) on the backplate followed by the O rings. For 775
platforms, please apply the custom LGA775 spacer to the center of
the backplate where the crater is. Next, attach the entire backplate
to the backside of the motherboard with the rivet nuts sticking out
from the top side.
Note: To remove the rivet nuts from the backplate, have the
backplate face down on a hard surface and pad against it to loosen
the rivet nuts.
Step 2
Screw in by hand the shorter threaded end of the double-end stud
from front side of the motherboard.
Step 3
Put on the Aluminum Strip Adapter on each side of heatsink. Use
the screw nuts to secure in place.
Step 4
Spread out evenly the thermal compound on the CPU and on the
bottom of heatsink base.
Step 5
Place the heatsink onto the CPU and slide in the aluminum
mounting plate between the heatpipes. Use a screw driver to
tighten on the spring-loaded screws to the alu-minum mounting
plate.
Step 6
Attach the fan mounting clips to the heatsink. Secure the fan with
fan mounting clips.
Paso 1
Inserte las tuercas con remache a través de los oricios correspon-
dientes (para las plataformas 775, 1156 y 1366) de la placa de
apoyo y a continuación las juntas tóricas. Para plataformas 775,
aplique el separador LGA775 personalizado en el centro de la
placa de apoyo donde se encuentra el cráter. A continuación,
acople toda la placa de apoyo en la parte posterior de la placa
base de forma que las tuercas sobresalgan por el lado superior.
Nota: para quitar las tuercas con remache de la placa de apoyo,
coloque dicha placa boca abajo en una supercie dura y pise
suavemente en ella para aojarlas.
Paso 2
Atornille a mano el extremo roscado más corto del pasador de
doble extremo desde el lado frontal de la placa base.
Paso 3
Coloque el adaptador de tira de aluminio en cada lado del
disipador de calor. Utilice las tuercas para jar todo.
Paso 4
Distribuya uniformemente el compuesto térmico por el procesa-
dor y en la parte inferior de la base del disipador.
Paso 5
Coloque el disipador en el procesador e inserte la placa de
montaje de aluminio deslizándola entre los conductos de
disipación de calor. Utilice un destornillador para apretar los
tornillos de apriete por resorte a la placa de montaje de aluminio.
Paso 6
Acople las abrazaderas de montaje del ventilador en el disipador.
Fije el ventilador con las abrazaderas de montaje.
步驟一
依序將螺柱裝入背板孔位(孔位由內至外為775、1156、1366規
格),依序套上O型環固定螺柱,(注意:若為LGA775平台,需再
將專用墊片放至背板中央凹處)最後將整個背板組靠至主機板背
面,使四個角落的螺柱突出主機板面即可(註:若要從背板取下
螺柱,將背板面朝下,將螺柱用力頂至桌面或硬物,使型環脫
落即可取下
步驟二
分別將雙頭手轉螺絲短邊朝下與背板旋緊
步驟三
放上二邊轉接鋁條,分別鎖上手轉螺帽
步驟四
分別將CPU及Megahalems散熱器銅底均勻塗上導熱膏
步驟五
將散熱器放在CPU上,放入鋁壓板,使用十字螺絲起子將彈簧螺
絲及鋁壓板鎖固
步驟六
將風扇線扣扣住風扇即完成安裝
ステップ1
順序に従って、リベットナットをバックプレートの穴に挿入し(穴
の位置は内側から外側に向かって775、1156、1366規格)、順序に
従って、Oリングでリベットナットを固定します(注意:LGA775プラ
ットフォームの場合、専用のバックプレートスペーサーをバックプ
レート中央の凹み部分に置く)。最後にバックプレートのモジュー
ルをマザーボードの裏面に近付け、四隅のリベットナットをマザ
ーボードに突き出せば完了です(注:バックプレートからリベット
ナットを取り外すには、バックプレートを下に向けてリベットナッ
トを机の上か、硬い物などに打ちつけ、リングを脱落させると取り
外せます)。
ステップ2
スタッドナットの短い方を下にしてバックプレートに締め付けま
す。
ステップ3
アルミアダプタをヒートシンクの両側に置き、それぞれスクリュー
ナットを締め付けます。
ステップ4
CPUとMegahalemsヒートシンクの底面にサーマルグリスを均一
に塗布します
ステップ5
ヒートシンクをCPU上に置き、アルミプレートを入れ、プラス・ドラ
イバーでバネネジとアルミプレートをしっかり固定します。
ステップ6
ファン固定クリップでファンを固定して取り付け完了です。
1단계
리벳 너트를 백플레이트 나사홀에 순서대로 장착하고(나사홀의
규격은 안쪽에서 밖으로 775, 1156, 1366이다), O링을 순서대로
설치하고 리벳 너트로 고정시킵니다. 단, LGA775플렛폼일 경우
백플레이트 중앙부분 움푹 파인 곳에 전용 스페이서를 설치해야
합니다. 그다음 리벳너트가 장착된 백플레이트를 마더보드
뒷면에 맞추어 끼웁니다.
*참고:백플레이트면을 아래를 향하게 한다음 탁자나 딱딱한
물체에 대고 리벳 너트를 밀어 내면 백플레이트에서 리벳 너트를
빼낼 수있습니다.
2단계
더블 엔드 스튜드 너트의 짧은 쪽을 아래로 향하게 하여
백플레이트에 연결하고 조여줍니다.
3단계
히트싱크의 양쪽에 알류미늄 스트립 아답터를 설치하고 스크류
너트로 조여줍니다.
4단계
써멀 컴파운드를 CPU와히트싱크 바닥면에 발라줍니다.
5단계
히트싱크를 CPU위에 올려 놓고 알류미늄판을 장착한 다음 십자
스크류 드라이버를 사용해 스프링 스크류와 알류미늄판을
조여줍니다.
6단계
팬 지지 클립으로 팬을 고정시키면 설치가 완료됩니다.
Fase 1
Inserire i bulloni nei fori corrispondenti (per 775, 1156, 1366) sul
backplate, seguiti dalle guarnizioni ad anello. Per le piattaforme
775, applicare lo spaziatore LGA775 al centro del backplate dove
c’è la cavità. Quindi, attaccare l’intero backplate sulla parte
posteriore della scheda madre usando i bulloni che fuoriescono
dal lato superiore.
Nota: Per rimuovere i bulloni dal backplate, collocare il backplate a
faccia in giù su una supercie solida e dare dei colpetti per
allentare i bulloni.
Fase 2
Dalla parte frontale della scheda madre stringere a mano
l’estremità lettata più corta del bullone tenditore.
Fase 3
Installare l’adattatore piastra d’alluminio su ciascun alto del
dispersore di calore. Usare i dadi per ssare.
Fase 4
Stendere in modo uniforme il composto termico sulla CPU e sulla
parte inferiore della base del dispersore di calore.
Fase 5
Collocare il dispersore di calore sulla CPU e far scorrere la piastra di
montaggio d’alluminio tra i tubi termovettori. Usare un cacciavite
per stringere le viti a molla alla piastra di montaggio d’alluminio.
Fase 6
Attaccare i fermagli di montaggio ventola al dispersore di calore.
Fissare la ventola con i fermagli di montaggio ventola.
Etape 1
Insérez les écrous à river dans les trous correspondants (pour
775, 1156, 1366) sur la plaque arrière, en faisant suivre par les
joints toriques. Pour les plates-formes 775, veuillez appliquer
l'entretoise sur mesure pour LGA775 au centre de la plaque
arrière où se situe le cratère. Attachez ensuite la plaque arrière
entière au dos de la carte mère avec les écrous à river sortant
par le côté supérieur.
Remarque : Pour enlever les écrous à river de la plaque arrière,
retournez la plaque arrière vers le bas sur une surface dure et
rembourrée pour détacher les écrous à river.
Etape 2
Vissez avec les mains la petite extrémité letée du goujon à
deux bouts du coté avant de la carte mère.
Etape 3
Posez l’adaptateur n en aluminium de chaque coté du
dissipateur thermique. Utilisez les écrous de vis pour attacher
correctement.
Etape 4
Appliquez uniformément le composé thermique sur l’unité
centrale et sous la base du dissipateur thermique.
Etape 5
Posez le dissipateur thermique sur l'unité centrale et faites
glisser la plaque de montage en aluminium entre les conduits
de chaleur. Utilisez un tournevis pour serrer les vis de pression
sur la plaque de montage en aluminium.
Etape 6
Attachez les clips de montage du ventilateur sur le dissipateur
thermique. Attachez le ventilateur avec les clips de montage du
ventilateur.
Schritt 1
Stecken Sie die Nietmuttern – gefolgt von den Dichtungsringen – durch
die entsprechenden Löcher (bei 775, 1156, 1366) in der Rückplatte. Bei
775-Plattformen bringen Sie bitte den angepassten LGA775-Platzhalter
in der Mitte der Rückplatte an; an der genannten Stelle bendet sich eine
Vertiefung. Befestigen Sie anschließend die gesamte Rückplatte an der
Rückseite des Motherboards, wobei die Nietmuttern an der Oberseite
herausragen.
Hinweis: Zum Entfernen der Nietmuttern von der Rückplatte müssen Sie
die Rückplatte nach unten zeigend auf einer festen und stabilen
Oberäche platzieren. Verwenden Sie zwischen Platte und Oberäche
eine weiche Unterlage; entfernen Sie dann die Nietmuttern.
Schritt 2
Drehen Sie das kürzere Einschraubende der Schraubenbolzen von der
Vorderseite des Motherboards von Hand hinein.
Schritt 3
Befestigen Sie die Aluminiumstreifen an beiden Seiten des Kühlkörpers.
Sichern Sie diese mit Schraubenmuttern.
Schritt 4
Verteilen Sie die Wärmeleitpaste gleichmäßig auf der CPU und der
Unterseite des Kühlkörperbodens.
Schritt 5
Platzieren Sie den Kühlkörper auf der CPU, schieben Sie die Aluminium-
montageplatte zwischen die Heizrohre. Befestigen Sie die
Federschrauben mit einem Schraubendreher an der Aluminiummon-
tageplatte.
Schritt 6
Befestigen Sie die Lüftermontageklemmen am Kühlkörper. Sichern Sie
den Lüfter mit den Lüftermontageklemmen.
English DeutschFrançais Italiano
Español 日本語 한국어
繁體中文
1366
1156
775
remove the rivet nuts
LGA775 backplate spacer
Megahalems Rev.B CPU Cooler
Other PROLiMA TECH Computer Hardware manuals
Popular Computer Hardware manuals by other brands
York
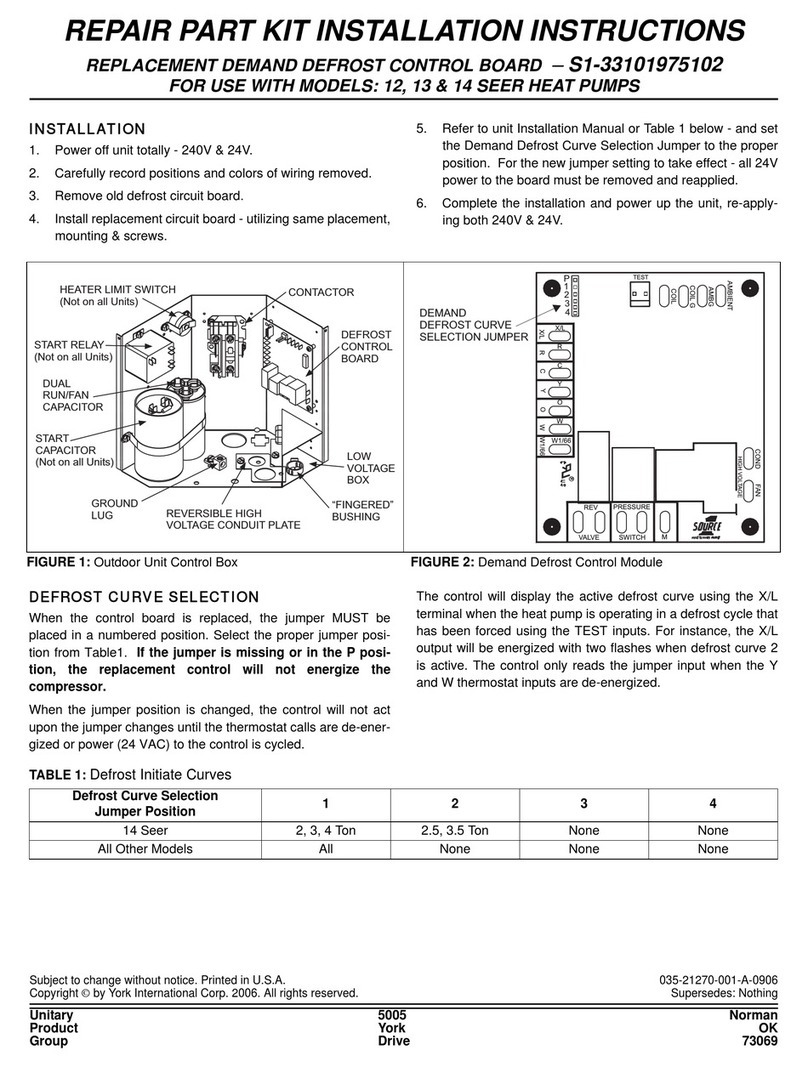
York S1-33101975102 installation instructions
Nuvoton
Nuvoton ISD91300 Series Technical reference manual
Adaptec
Adaptec RAID 51245 Release notes

Giada
Giada PC610 user manual
GigaDevice Semiconductor
GigaDevice Semiconductor GD32 Series Application note

GigaDevice Semiconductor
GigaDevice Semiconductor GD32VW553 user guide
