Proline EC5FRESH User manual

PROLINE
REFRIGERATEUR
BRF40
PROLINE
VENTILATEUR
EC5FRESH
MANUEL D'UTILISATION
Besoin d'aide ? Rendez-vous sur https://sav.darty.com

EC5FRESH
Air Cooler
Rafraîchisseur d’air
Luchtkoeler
Refrigerador de aire
Refrigerador de ar
MPORTANT SAFETY INSTRUCTIONS
PLEASE READ THE FOLLOWING SAFETY WARNINGS AND THE INSTRUCTIONS CAREFULLY
BEFORE USING THE APPLIANCE AND KEEP FOR FUTURE REFERENCE.
Warnings
• This appliance is intended for domestic household use only and should not be used for any
other purpose or in any other application, such as for non-domestic use or in a commercial
environment.
• If the supply cord is damaged, it must be replaced by the manufacturer, its service agent
• This appliance can be used by children aged from 8 years and above and persons with
reduced physical, sensory or mental capabilities or lack of experience and knowledge if
they have been given supervision or instruction concerning use of the appliance in a safe
Children shall not play with the appliance.
Cleaning and user maintenance shall not be made by children without supervision.
•
• Clean the water tank every three days.
• Be aware that high humidity levels may encourage the growth of biological organisms in
the environment.
•et. If dampness
output volume cannot be
orbent materials, such as
carpeting, curtains, drapes, or tablecloths, to become damp.
• Never leave water in the reservoir when the appliance is not in use.
•er before next use.
• Warning : Micro-organisms that may be present in the water or in the environment where
the appliance is used or stored, can grow in the water reservoir and be blown in the air
causing very serious health risks when the water is not renewed and the tank is not
cleaned properly every 3 days.
1
•
has formed on the sides of the tank or on interior surfaces, and wipe all surfaces dry.
•
“OPERATION, CLEANING, MAINTENANCE AND DESCALING” on pages of the manual.
• The battery must be removed from the appliance before it
is scrapped.
• The appliance must be disconnected from the supply mains when removing the battery.
• The battery is to be disposed of safely.
•
• Batteries of the same or equivalent type as recommended are to be used.
• Batteries are to be inserted with the correct polarity.
• Exhausted batteries are to be removed from the product.
• The supply terminals are not to be short-circuited.
• Attention should be drawn to the environmental aspects of battery disposal. Don’t throw
used batteries in dustbin. Please contact your retailer in order to protect the environment.
• The batteries (batteries installed) shall not be exposed to excessive heat such as sunshine,
• If battery leakage occurs, avoid contact with skin. Isolate the leaking battery in a sealed
plastic bag and put it in the scrap following the instructions environmental protection. If
contact with the skin, mucous membranes or eyes, rinse thoroughly with water and
contact your doctor or ophthalmologist.
• Do not recharge non-rechargeable batteries because of the risk of explosion.
Safety Information
•
water tank, and before cleaning.
• Do not pull the power cord to unplug the appliance from the mains socket. Always grasp
the plug to pull out.
• Do not use outdoors.
• Do not leave the appliance unattended while in operation.
• Do not cover the air inlet or outlet on the appliance. Do not place items on the appliance.
2
12
•Do not have the air inlet and outlet of the unit close to walls, curtains and other objects, or
•Do not insert or allow objects to enter any ventilation or exhaust opening.
•Do not operate the appliance with wet hands.
•Do not put any combustible item over the appliance while in operation.
•
• Never locate or use the appliance where it may fall into a bathtub or other water
container.
•
objects are stored.
•
well, the appliance will not work. When the appliance is working, do not remove the
•Always unplug the appliance from the mains socket when moving from one location to
another.
•When the appliance is running, do not knock at or shake it heavily, which may lead to
automatic shutdown. When this case occurs, restart the appliance.
•Do not place the appliance directly below the power outlet.
•Do not use the appliance under direct sunshine.
•
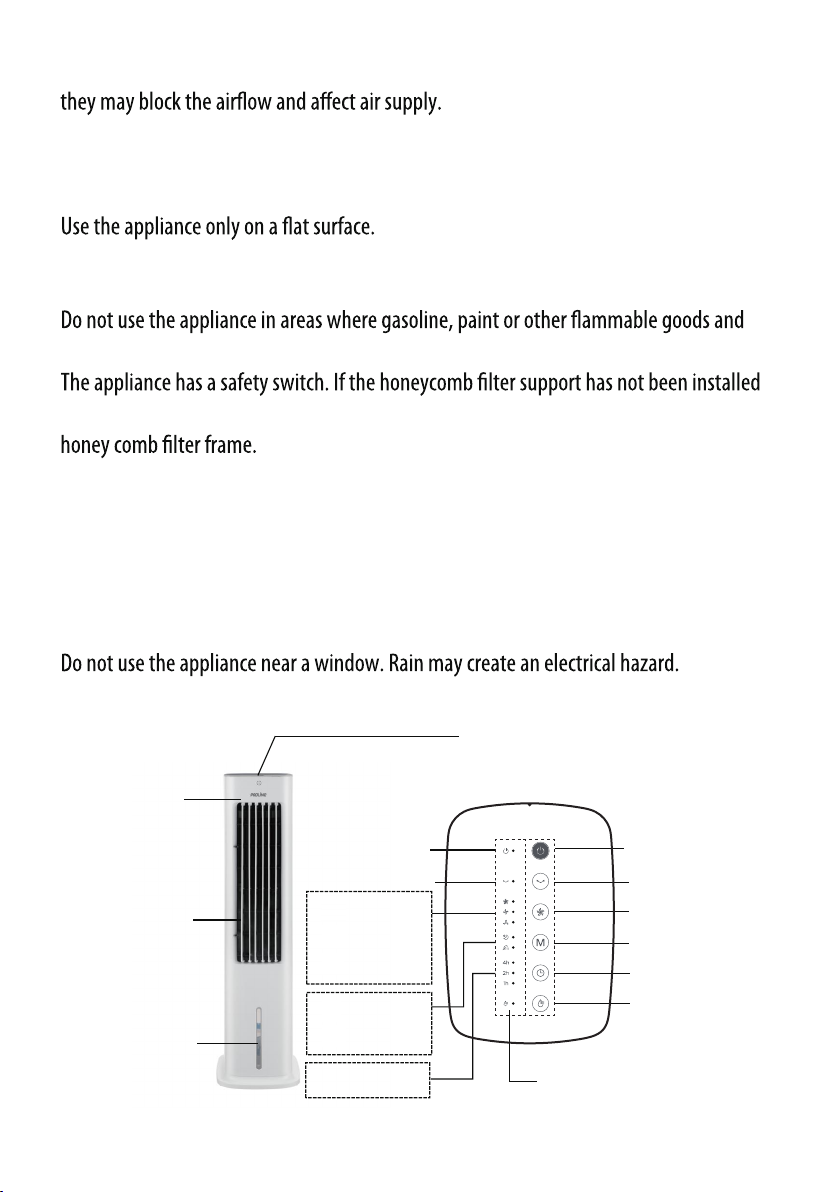
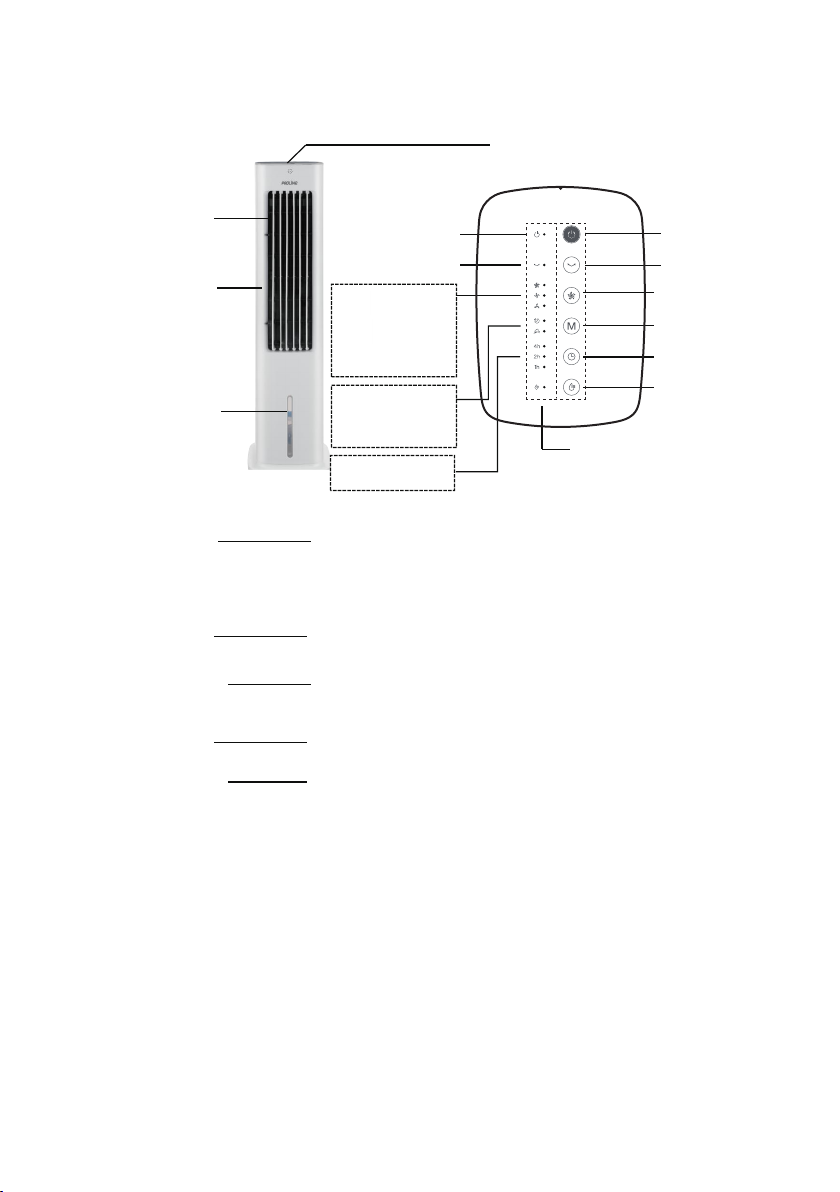
PRODUCT OVERVIEW
Control panel
Horizontal
louvers (inside)
Power on/standby
Buttons
Indicator lights
Power on/o
Vertical louvers
Water level indicator
Swing
Speed
Mode
Timer
Cool function
Swing
High
Medium
Low
Sleep
Natural
1h, 2h, 4h
Cool function
3
OPERATION
The appliance features the functions oan, cooling and humidication.
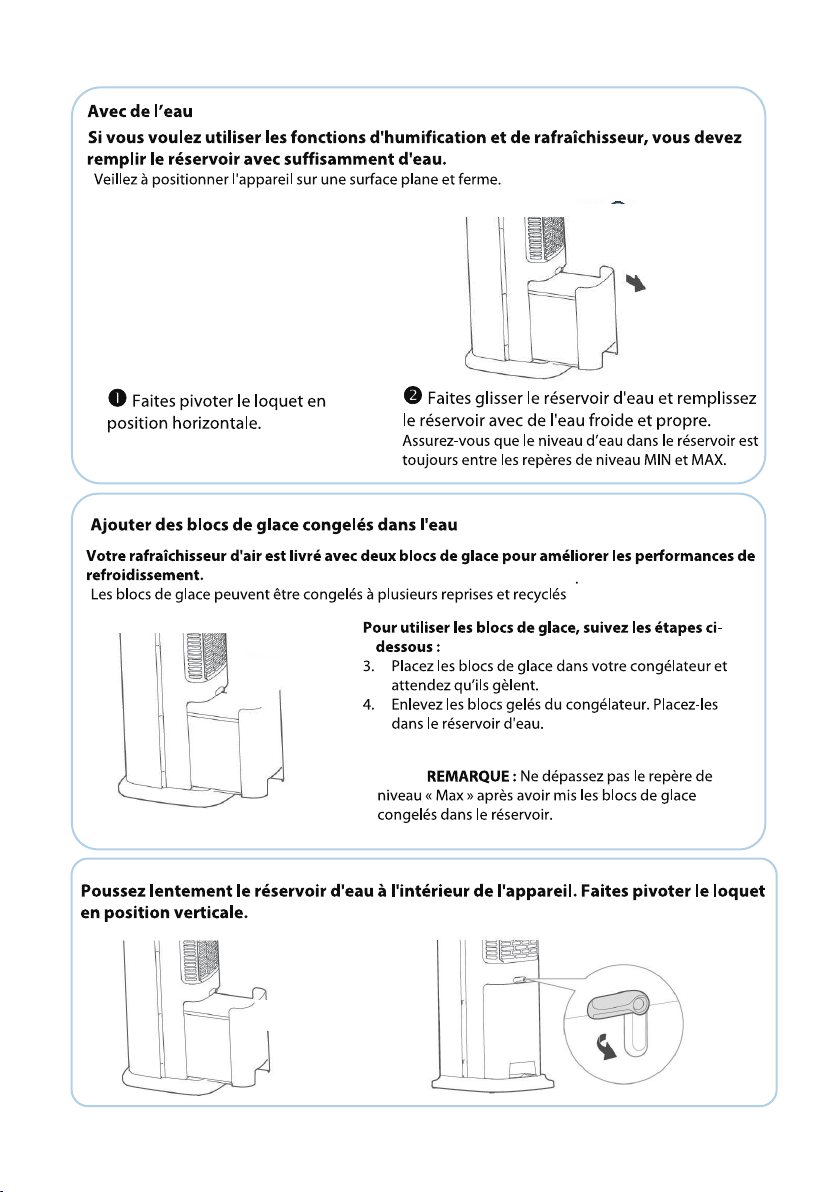
Add Water
If you want to use the humdication and cooling functions, you need to ll the tank with
sucient water.
Make sure to position the appliance on a rm level surface.
Add Frozen Ice Boxes in Water
Help cool water faster
No Water
Use as a fan
Add Water
Use as a cooling fan + humidier
Handle
Filter
Honeycomb
cooling pad
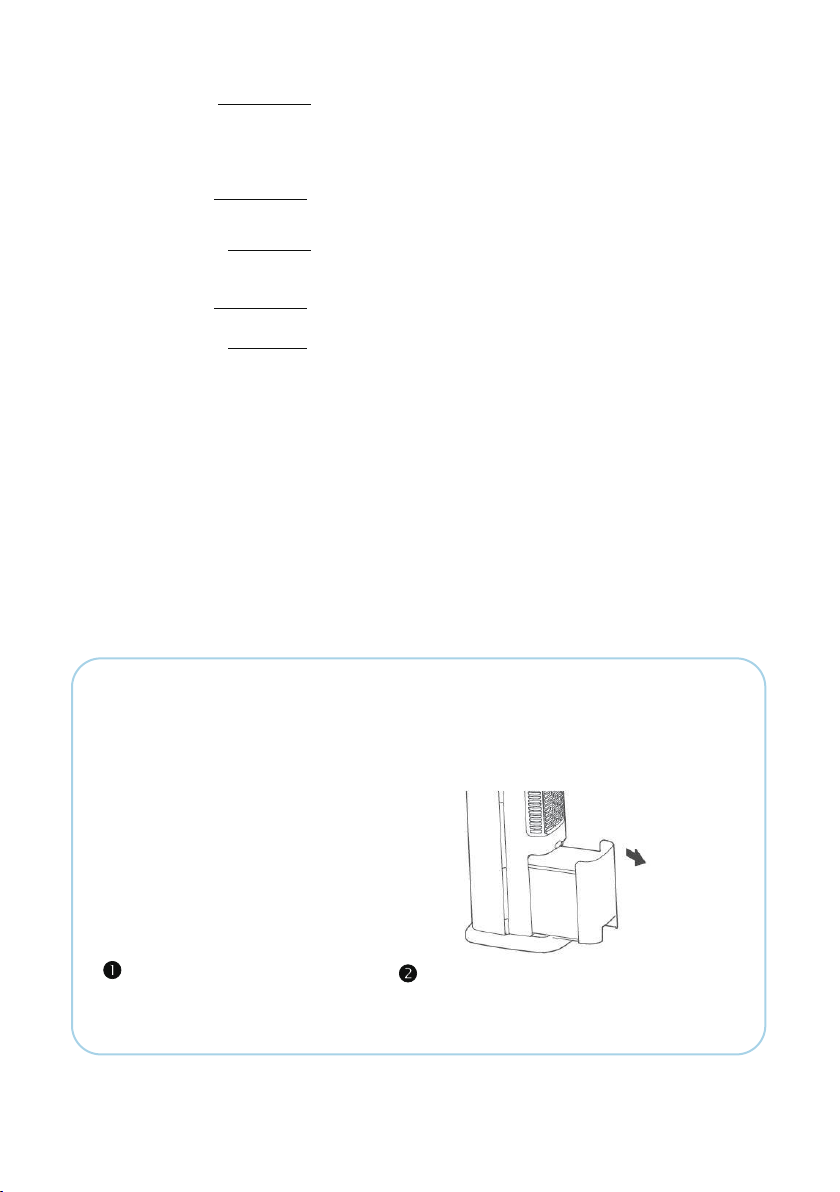
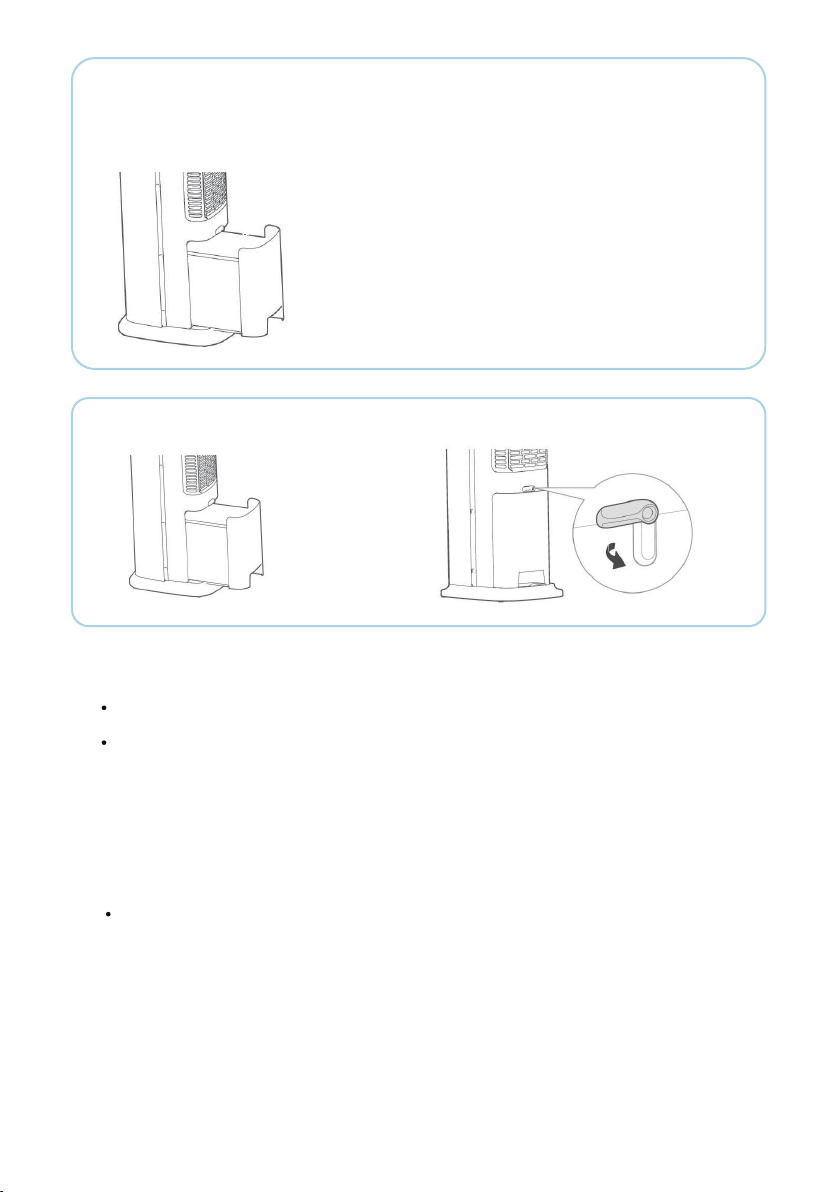
Water tank
Water tank latch
Rotate the latch to keep it
horizontal.
Slide out the water tank and ll the tank with
clean cold water.
Be sure water in the tank is always between the
“max” and “min” water level marks.
4
Add Frozen Ice Boxes in Water
Your air cooler is equipped with 2 ice boxes to enhance cooling performance.
The ice boxes can be frozen repeatedly and recycled.
Slowly push the water tank inside the appliance. Rotate the latch to the veritcal position.
Using the Function Buttons
Plug in the appliance and press to turn on the appliance.
The power indicator light will illuminate.
To turn o the appliance, press again. The power indicator light will go out.
SPEED
To use the ice boxes, follow the steps below :
1
. Put the ice boxes in your freezer and wait for them
to freeze.
2
. Remove frozen ice boxes from the freezer. Put
them in thewater tank.
NOTE : Do not exceed the “max” mark after
putting the frozen ice boxes in the tank.
Repeatedly press to select the desired fan speed.
The corresponding indicator light will illuminate to indicate the selected speed.
Low Medium High
5

MODE
Repeatedly press to select the desired mode.
The corresponding indicator light will illuminate to indicate the selected mode.
No
indicator light Normal Mode: The appliance will operate at the selected speed.
Sleep Mode: The appliance will decrease the fan speed step by step
and go on circularly.
Natural Mode: The appliance will stimuate the wind in the natural
environment. It will operate among dierent fan speeds and go on
circularly.
SWING
Press to activate the swing function.
The corresponding indicator light will illuminate and the vertical louvers will begin to move from
side to side automatically.
When you have the desired horizontal wind direction, press again, the vertical louvers will be
stopped at your selected position.
You can manually adjust the horizontal louvers to change vertical airow.
To deactivate this function, press again. The corresponding indicator light will go out.
Adjust the lever
to change the
vertical airow.
6

COOL FUNCTION
Press to activate this function.
The corresponding indicator light will illuminate.
To deactivate this function, press again. The corresponding indicator light will go out.
NOTE :
Check water level in the water tank before running the COOL function.
Make sure that water in the tank is always above the “min” water level mark.
WATER SHORTAGE ALARM
If there is insucient water in the tank, the appliance will beep a few times and the cool indicator light will
ash.
To rell the water tank :
1. Unplug the appliance.
2. Wait for 2 minutes before removing the water tank to allow any excess water in the honeycomb
cooling
pad to drip intothe tank.
3. Fill the water tank with clean cold water up to the “max” water level mark.
4. Replace the water tank in the appliance.
The front visual water marks will
remind you when to add water.
7
NOTE :
Do not use the cool function with stale water in the tank. Emptythe tank and rell it with fresh water if
the water has been left in the tank for an extended period of time.
It is recommended to rell the tank with fresh water at least once every two days.
ON / OFF TIMER
You can use this function if you want the appliance to turn on or o automatically.
O timer:
In running status, repeatedly press until the corresponding indicator light(s) illuminate(s). The
timer allows you to program the appliance for up to 7 hours of use.
Once the set time has elapsed, the appliance will automatically turn o.
On timer:
In o status, repeatedly press until the corresponding indicator light(s) illuminate(s). The
timer allows you to program the appliance for up to 7 hours.
You can set the desired mode, speed, swing and cool functions.
Once the set time has elapsed, the appliance will automatically operate at your settings.
Using the Remote Control
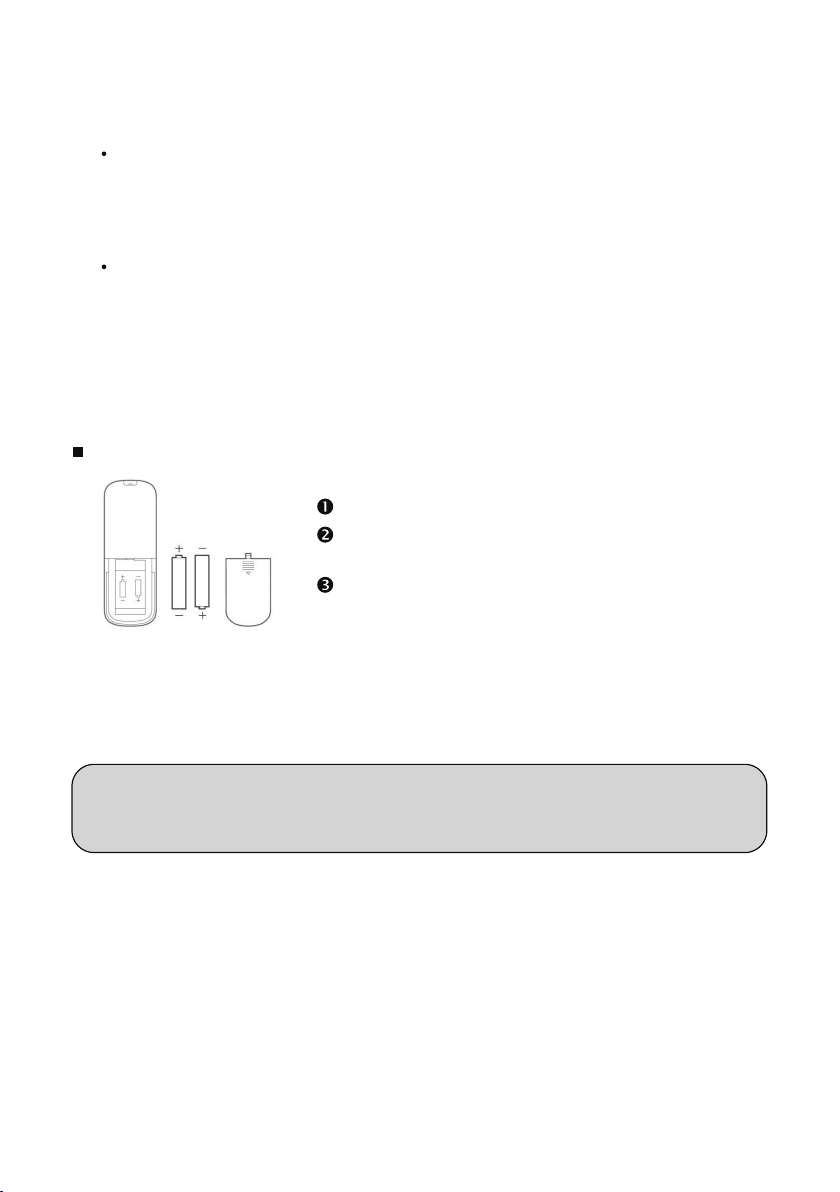
Inserting or changing the batteries
Battery handling and usage :
Only adults should handle the batteries. Do not allows a child a to use this remote control unless the
battery cover is securely attached to the remote control.
The battery type used in this remote is two AAA size batteries (not included). These batteries are located in
the remote control and are readily accessible.
Battery removal : Follow the above steps to open the battery cover and then remove
the batteries.
Open the battery cover.
Insert two AAA batteries (not included), observing
the polarities in the battery compartment.
Close the battery cover. You will hear a click.
8
Point the remote control at the front of the appliance and press the desired button.
The buttons on the remote control work with the same functions as the control panel.
If you will not use the remote control for an extended period of time, please remove the batteries.
CLEANING, MAINTENANCE AND DESCALING
Turn offand unplug the appliance from the mains socket before cleaning.
To clean the outside, use the slightly damp cloth to remvoe dirt and dust.
Do not immerse the appliance in water or any other liquid.
Never use abrasive or chemical cleaning agents.
Emptying and Cleaning the Water Tank
Please empty and clean the water tank at least once every 3 days.
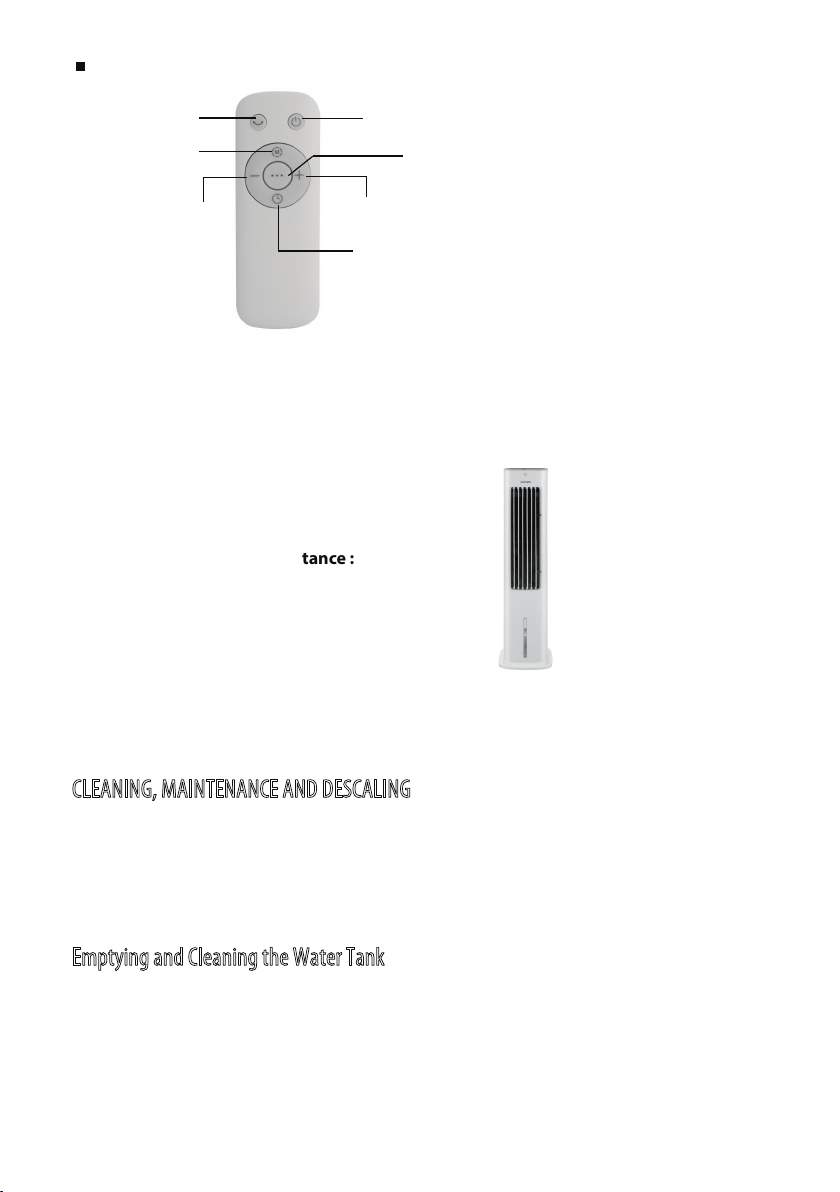
Max. distance :
5 meters
How to use the remote control
Swing button
Power on/ standby button
Mode button
Cool function button
Button for
decreasing speed
Button for increasing speed
Timer button
9
15
Wait for 2 minutes before removing the water tank to allow any excess water in the
honeycomb cooling pad to drip into the tank.
1. Rotate the tank latch to the hori ontal position and then pull out the water tank.
2. Remove the ice boxes from the water tank.
3. Remove the water pump module.
4. Remove the water tank from the appliance and empty the tank.
5. Clean the water tank under running water using a damp cloth or a soft brush.
Descaling the Water Tank
If there is minal desposits in the water tank, fill the tank with a 50/50 solution of water
and white vinegar. Let the tank to soak for an hour or two.
Empty the tank and then you can also rinse the tank with warm soapy water.
Use brush or cloth to clean the water tank. Rinse thoroughly with clean water.
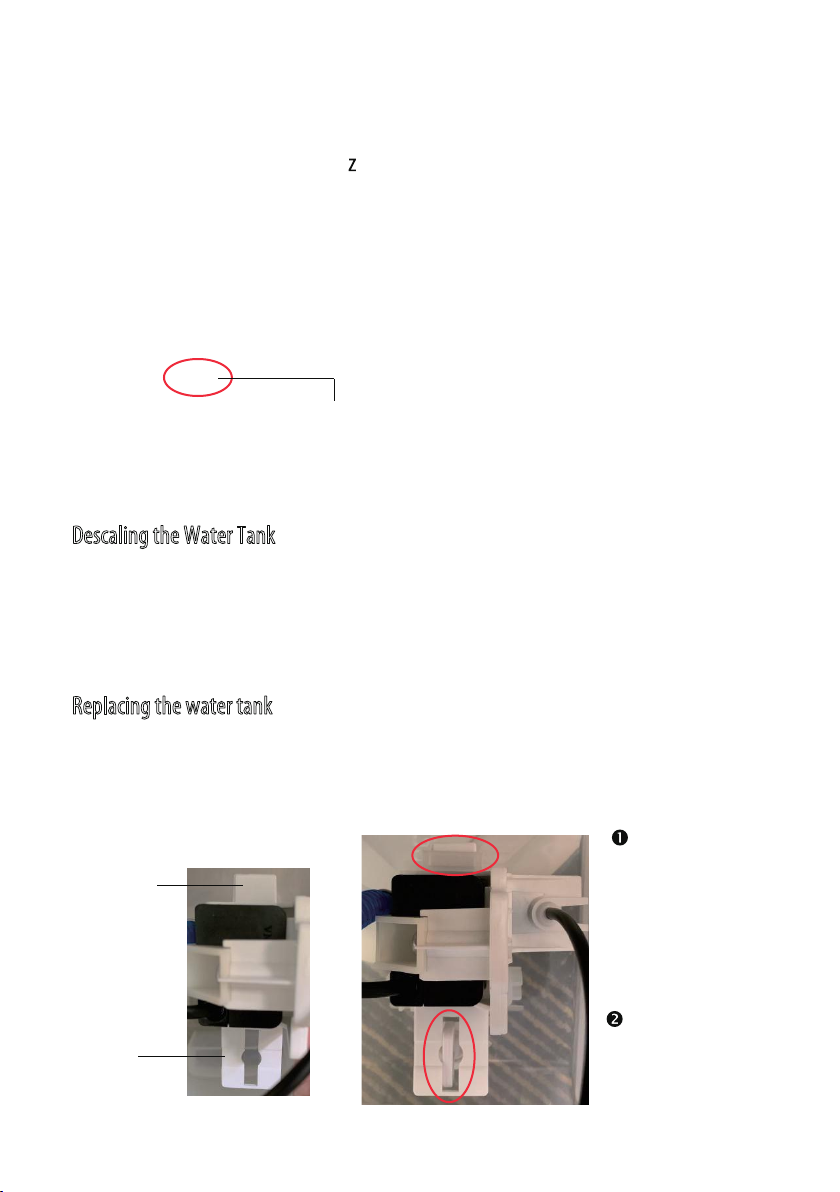
Replacing the water tank
After cleaning and descaling the water tank, make sure it is dry before replacing in the
appliance.
1. Attach the water pump module to the water tank.
Twist this knob.
Protrusion
Insert the
protrusion into the hole
on the bottom of the
water tank.
Align the knob with
the slot and then lower the
water pump module.
Slot
10
NOTE :
Ensure the water pump module is installed correctly, or the appliance may not work
properly.
2. Refill the tank with sufficient clean cold water up to the maximum level.
3. Slowly push the tank inside the appliance and then rotate the tank latch to the
vertical position.
Cleaning the Filter and Honeycomb Cooling Pad
It is recommended to regularly clean the filter and honeycomb cooling pad to maintain
the cooling performance and remove particles filtered from the air.
1. Remove the filter and then remove the honeycomb cooling pad.
2. Clean them with a clean cloth or a soft brush to remove all
the dust and dirt particles. If necessary, clean them under
running water. Dry thoroughly.
Twist the knob to lock
the water pump module
in place.
Rotate the latch at the bottom of the lter to
the horizontal position. Then remove the
honeycomb cooling pad.
11
3. Attach the honeycomb cooling pad to the filter and rotate the latch clockwise to lock
it in place.
4. Attach the filter to the appliance. You will hear a click.
NOTE :
Ensure the filter is installed correctly, or the appliance may not work properly.
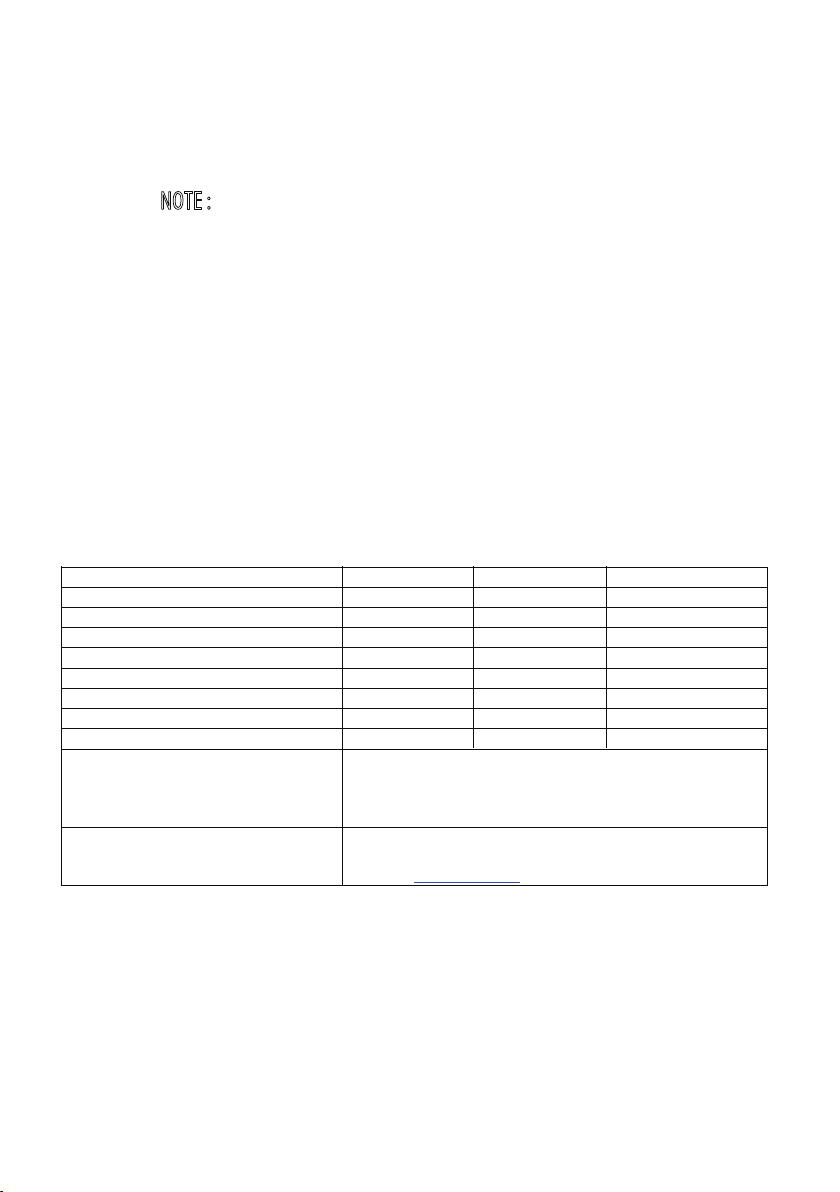
SPECIFICATIONS
Ratings: 220-240V~ 50 Hz
55W
Description
Symbol
Value
Unit
Maximum fan ow rate
F
5,80
m
3
/min
Fan power input
P
41,00
W
Service value
SV
0,14
(m3/min)/ W
Standby power consumption
PSB
0,21
W
O power consumption
POFF
—
W
Fan sound power level
LWA
62,65
dB(A)
Maximum air velocity
C
1,87
meters/sec
Seasonal electricity consumption
Q
13,36
kWh/a
Measurement standard for service
value
EN 60704-2-7:1998
EN 60704-1:2010+A11:2012
EN 50564:2011
EN ISO 5801:2008
Contact detail for obtaining more
information
Etablissements Darty & ls ©
129 Avenue Gallieni, 93140 Bondy, France
Website: www.darty.com
12

DISPOSAL
As a responsible retailer we care about the environment. As such we urge you to follow the
correct disposal procedure for the appliance and packaging materials. This will help conserve natural
resources and ensure that it is recycled in a manner that protects health and the environment.
You must dispose of this appliance and its packaging according to local laws and regulations.
Because this appliance contains electronic components, the appliance and its accessories must be
disposed of separately from householdwaste when the appliance reaches its end oife.
Contact your local authority to learn about disposal and recycling.
The appliance should be taken to your local collection point for recycling. Some collection points accept
appliance free of charge.
We apologise for any inconvenience caused by minor inconsistencies in these instructions, which may
occur as a result of product improvement and development.
Etablissements Darty & ls ©, 129 Avenue Gallieni, 93140 Bondy, France 16/11/2020
13

MISES EN GARDE IMPORTANTES
MERCI DE BIEN VOULOIR LIRE LES CONSIGNES DE SÉCURITÉ ATTENTIVEMENT AVANT
D’UTILISER L'APPAREIL ET CONSERVER POUR RÉFÉRENCE ULTÉRIEURE.
Attention
• Cet appareil est destiné à un usage domestique uniquement. Toute utilisation autre que
celle prévue pour cet appareil, ou pour une autre application que celle prévue, par
exemple une application commerciale, est interdite.
• Si le câble d'alimentation est endommagé, il doit être remplacé par le fabricant, son
• Cet appareil peut être utilisé par des enfants âgés d'au moins 8 ans et par des personnes
ayant des capacités physiques, sensorielles ou mentales réduites ou dénuées d’expérience
ou de connaissance, s'ils (si elles) sont correctement surveillé(e)s ou si des instructions
relatives à l'utilisation de l'appareil en toute sécurité leur ont été données et si les risques
encourus ont été appréhendés.
Les enfants ne doivent pas jouer avec l’appareil.
Le nettoyage et l'entretien par l'usager ne doivent pas êtr
surveillance.
• Débrancher l'appareil lors du remplissage et du nettoyage.
• Nettoyer le réservoir d‘eau tous les trois jours.
• Des taux d'humidité élevés peuvent contribuer au développement d‘organismes
biologiques dans l‘environnement.
ni humide. En cas d'humidité,
réglage du débit de
pas laisser de matières
absorbantes, telles que tapis, rideaux, tentures ou nappes, s‘h
• Ne jamais laisser d‘eau dans le réservoir lorsque l‘appareil n'est pas utilisé.
avant sa prochaine utilisation.
• Avertissement : Des micro-organismes pouvant être présents dans l'eau ou dans
14

l'environnement dans lequel l‘appareil est utilisé ou stocké peuvent se développer dans le
réservoir d‘eau et être projetés dans l‘air, entraînant des risques très graves pour la santé
si l‘eau n‘est pas renouvelée et que le réservoir n'est pas nettoyé correctement tous les 3
jours.
• Vider le réservoir et le remplir à nouveau tous les trois jours. Avant le remplissage, rincer le
réservoir à l‘eau du robinet ou le nettoyer à l'aide de produits de nettoyage, si cela
sur les parois du réservoir ou sur ses surfaces internes, et essuyer toutes ces surfaces.
• En ce qui concerne les informations détaillées sur la manière du remplissage, du nettoyage
DETARTRAGE” en pages .
• La batterie doit être retirée de l'appareil avant que celui-ci ne soit mis au rebut.
• L'appareil doit être déconnecté du réseau d'alimentation lorsqu'on retire la batterie.
• La batterie doit être éliminée de façon sûre.
pas être mélangées avec les
piles usagées.
• Utiliser uniquement des piles du même type que celles recommandées par le fabricant.
• Les piles doivent être installées en respectant la polarité +/-.
• Les piles usagées doivent être enlevées de l'appareil.
• Ne pas court-circuiter les piles.
• Il convient d’attirer l’attention sur les problèmes d’environnement dus à la mise au rebut
ollecte prévus pour cet
• Les piles ne doivent pas être exposées à une chaleur excessive telle que celle du soleil, d'un
feu ou d'origine similaire.
• Si une fuite d’électrolyte se produit, éviter tout contact a
bus en suivant les
consignes de protection de l'environnement. En cas de contact de l'électrolyte avec la
médecin traitant ou votre ophtalmologue.
• Ne pas recharger les piles non rechargeables à cause des
risques d’explosion.
15
l'environnement dans lequel l‘appareil est utilisé ou stocké peuvent se développer dans le
réservoir d‘eau et être projetés dans l‘air, entraînant des risques très graves pour la santé
si l‘eau n‘est pas renouvelée et que le réservoir n'est pas nettoyé correctement tous les 3
jours.
• Vider le réservoir et le remplir à nouveau tous les trois jours. Avant le remplissage, rincer le
réservoir à l‘eau du robinet ou le nettoyer à l'aide de produits de nettoyage, si cela
constitue une exigence du fabricant. Éliminer tout tartre, dépô
sur les parois du réservoir ou sur ses surfaces internes, et essuyer toutes ces surfaces.
• En ce qui concerne les informations détaillées sur la manière du remplissage, du nettoyage
TTOYAGE, ENTRETIEN ET
DETARTRAGE” en pages XX-XX.
• La batterie doit être retirée de l'appareil avant que celui-ci ne soit mis au rebut.
• L'appareil doit être déconnecté du réseau d'alimentation lorsqu'on retire la batterie.
• La batterie doit être éliminée de façon sûre.
pas être mélangées avec les
piles usagées.
• Utiliser uniquement des piles du même type que celles recommandées par le fabricant.
• Les piles doivent être installées en respectant la polarité +/-.
• Les piles usagées doivent être enlevées de l'appareil.
• Ne pas court-circuiter les piles.
• Il convient d’attirer l’attention sur les problèmes d’environnement dus à la mise au rebut
ollecte prévus pour cet
l'environnement).
• Les piles ne doivent pas être exposées à une chaleur excessive telle que celle du soleil, d'un
feu ou d'origine similaire.
• Si une fuite d’électrolyte se produit, éviter tout contact a
bus en suivant les
consignes de protection de l'environnement. En cas de contact de l'électrolyte avec la
médecin traitant ou votre ophtalmologue.
• Ne pas recharger les piles non rechargeables à cause des
risques d’explosion.

Consignes de sécurité
ur lorsqu'il n'est pas utilisé, lors
du remplissage du réservoir d’eau et avant de le nettoyer.
• Cet appareil n’est pas destiné à une utilisation en plein air.
en marche.
l’appareil.
oximité des murs, des rideaux et
ation ou d’évacuation.
onnement.
où il pourrait tomber dans une
baignoire ou dans tout autre contenant d’eau.
de la peinture ou d'autres objets
• L'appareil dispose d'un interrupteur de sécurité. Si le supp
pas été bien installé, l'appareil ne fonctionnera pas. Lorsque l'appareil fonctionne, ne
à l'autre.
cela pourrait entraîner un arrêt automatique de fonctionnement. Si cela se produit,
t.
créer un risque de choc électrique.
16
DESCRIPTION DU PRODUIT
FONCTIONNEMENT
L'appareil dispose des fonctions de ventilateur, de refroidissement et d'humidication.
Ajouter des blocs de glace
congelés dans l'eau
Cela aidera à refroidir l'eau plus
rapidement
Sans eau
Utilisation comme
ventilateur
Avec de l’eau
Utilisation comme ventilateur
rafraîchissant + humidicateur
Panneau de contrôle
Ouïes verticales
Ouïes
horizontales
(internes)
Indicateur de niveau
d’eau
Mise en marche /
Veille
Oscillation
Vitesse
Mode
Minuteur
Fonction de
r
afraîchissement
Boutons
Indicateurs
lumineux
Bouton marche/arrêt
Oscillation
Forte
Moyenne
Faible
Sommeil
Naturel
1h, 2h, 4h
Fonction de
rafraîchissem
Poignée
Filtre
Coussin de
refroidissement
en nid d'abeille
Réservoir d'eau
Loquet du réservoir d’eau
17
18
Table of contents
Languages:
Other Proline Air Conditioner manuals


 Operation manual")


