Prolira DeltaScan User manual
Disclaimer
The DeltaScan Monitor is intended for use by healthcare professionals in a clinical setting,
who are fully responsible to use the device in accordance with these Instructions for Use.
The manufacturer Prolira BV can in no way be held liable if the DeltaScan Monitor is
incorrectly used, is not maintained, is poorly maintained, is incorrectly set, or is used by
unqualied persons.
These Instructions for Use may not be reproduced or used in any way without the prior written
permission of Prolira BV. All rights reserved. Subject to alteration.
The compatible hardware and software versions for the DeltaScan Monitor that are subject
of this Instructions for Use can be found in the compatibility Matrix on the Prolira website
location http://prolira.com/ifu-prolira-deltascan/
INSTRUCTIONS
FOR USE
Monitor
Device : DeltaScan Monitor
Doc. Type : Instructions for Use
(English)
System Ver : R2
Date : 2019-12-12
: 006.201.D

Page 2
TABLE OF CONTENTS
1. INTRODUCTION TO THE DELTASCAN MONITOR 3
1.1 Intended Use 3
1.2 Intended User, User Prole, And Use Environment 3
1.3 Intended Patient 3
1.4 The DeltaScan Monitor Components 4
1.5 Operating Principle And Delirium Probability Score 6
2. HOW TO USE THESE INSTRUCTIONS FOR USE 8
2.1 General 8
2.2 Meaning Of The Symbols Used 8
3. TURNING ON AND OFF 9
4. PREPARATION FOR USE 10
5. USE 19
6. AFTER USE 24
7. CHARGING 25
8. MENU 27
8.1 Last 5 Valid Results 27
8.2 Set Language 27
8.3 Start Demo 27
8.4 Exit Menu 27
9. MOUNTING TO A ROLL STAND 26
10. CLEANING, STORAGE, AND MAINTENANCE 27
10.1 Cleaning 27
10.2 Transport And Storage 27
10.3 Maintenance 27
11. POSSIBLE PROBLEMS DURING USE 30
11.1 Problems, Causes And Solutions 30
11.2 Errors And Warnings That Can Be Presented
On the Monitor Screen 32
12. TECHNICAL AND REGULATORY INFORMATION 34
13. REFERENCES 37
14. ANNEX A: FULL LABELLING OF DELTASCAN PATCH AND BOX 38

Page 3
Device : DeltaScan Monitor
Doc. Type : Instructions for Use
(English)
System Ver : R2
Date : 2019-12-12
: 006.201.D
Copyright: Prolira
1. INTRODUCTION TO THE DELTASCAN MONITOR
1.1 INTENDED USE
The DeltaScan Monitor is intended to support the clinical assessment of delirium
by providing a Delirium Probability based on electroencephalography (EEG) signals.
The Delirium Probability or DeltaScan Score, which is the DeltaScan Monitor detection
and monitoring parameter, may be used as an aid in the diagnosis of the state of a
patient’s delirium.
Contra indications and exclusions: children (under 18 years of age), patients under sedation,
patients using Lithium, patients with a metal plate or a metal device in the head, patients
with dementia or other conditions that aect slowing of EEG signals (such as brain injury),
very agitated patients (not being able to follow measurement instructions, see section 1.3).
1.2 INTENDED USER, USER PROFILE, AND USE ENVIRONMENT
Intended user is a licensed healthcare physician or other medical professional working
under the responsibility of a licensed healthcare physician.
Intended users can be colour-blind and still use the device safely.
Reading the Instructions for use is sucient for safe and eective operation of the device.
The use environment is hospitals.
1.3 INTENDED PATIENT
The intended patient is a hospitalized, awake adult, who is at risk of delirium as
decided by the responsible licensed healthcare physician or a medical professional
working under the responsibility of a licensed healthcare physician. This implies that the
patient is to be screened with the DeltaScan Monitor, meaning detection and monitoring
for delirium is applied.
In order to take a measurement, the following instructions apply for the patient:
•be awake
•the patient should be relaxed, in sitting or lying position
•and keep the eyes closed
Page 4
1
2
3
4
5
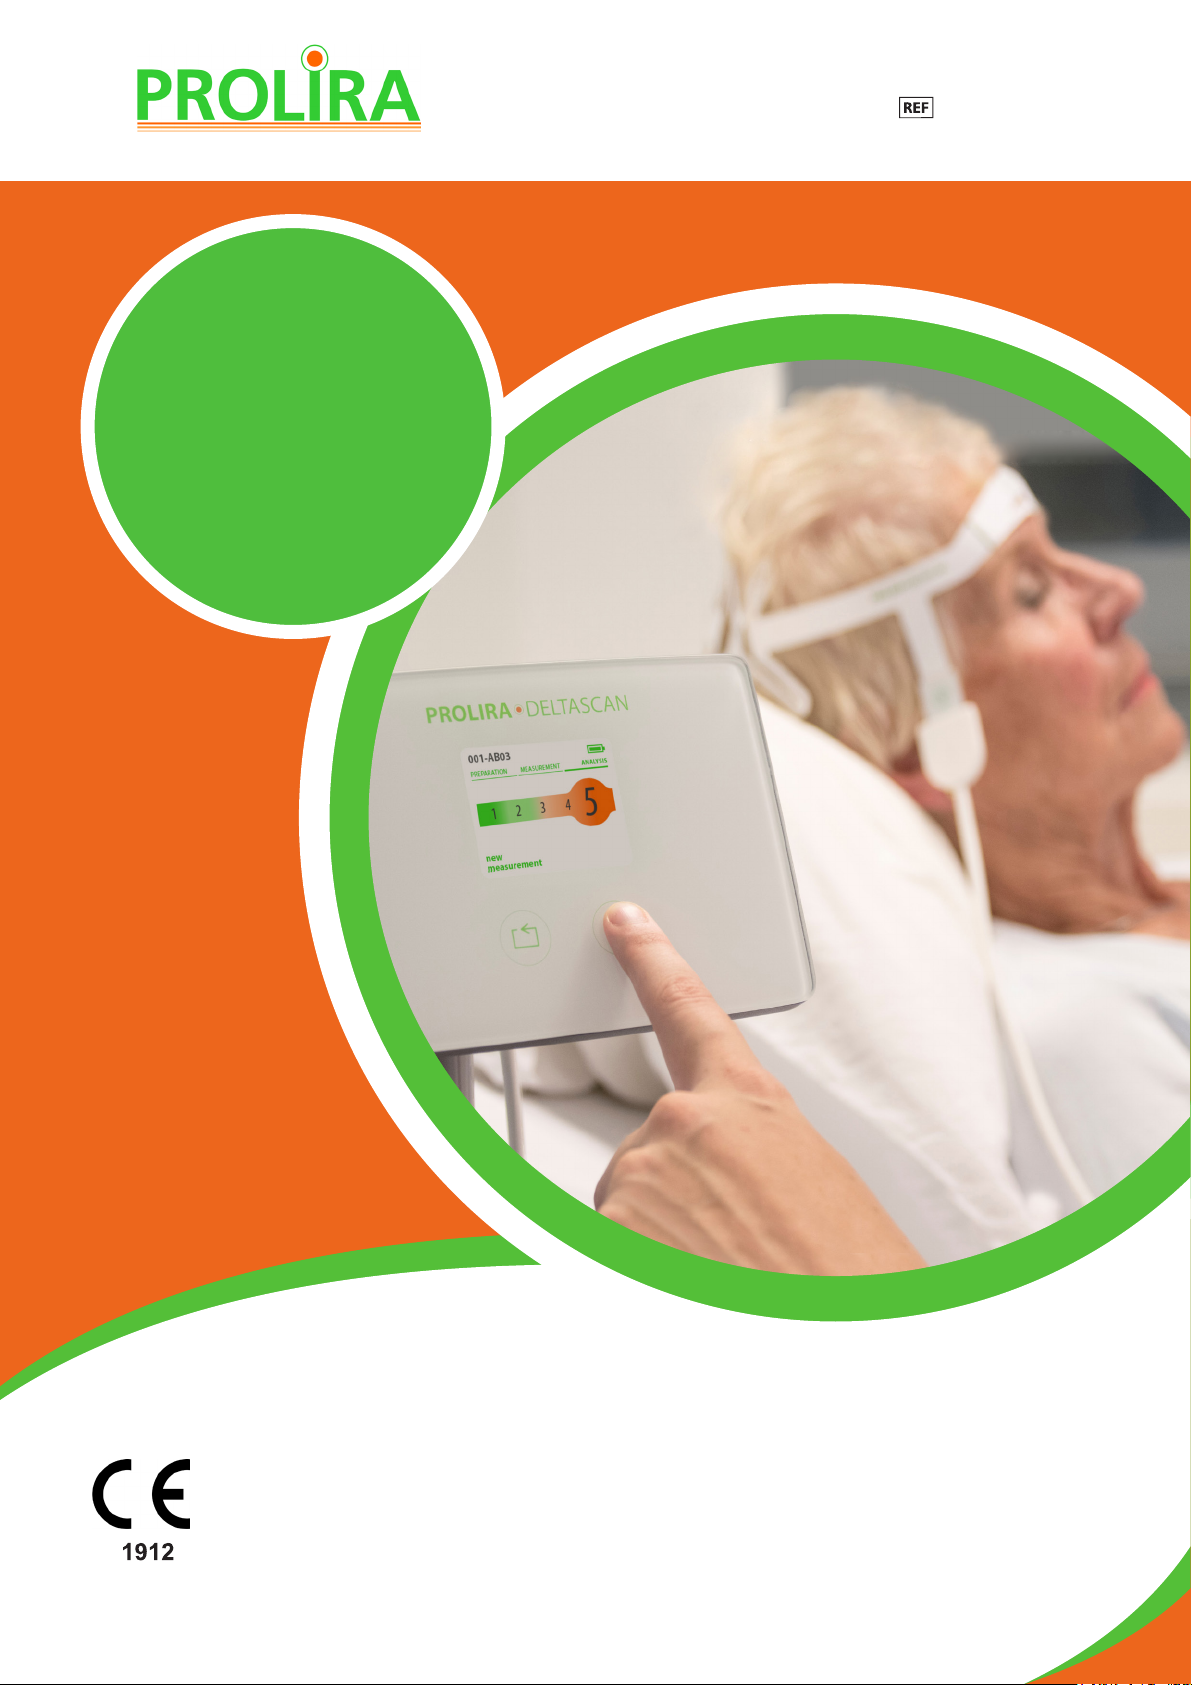
1.4 THE DELTASCAN MONITOR
COMPONENTS
1) Monitor
2) Patch connector
3) Recording button
4) Charger for Monitor
5) The DeltaScan Monitor
should exclusively be used
with a DeltaScan Patch.
Figure 1: DeltaScan Monitor Components.

Page 5
Device : DeltaScan Monitor
Doc. Type : Instructions for Use
(English)
System Ver : R2
Date : 2019-12-12
: 006.201.D
Copyright: Prolira
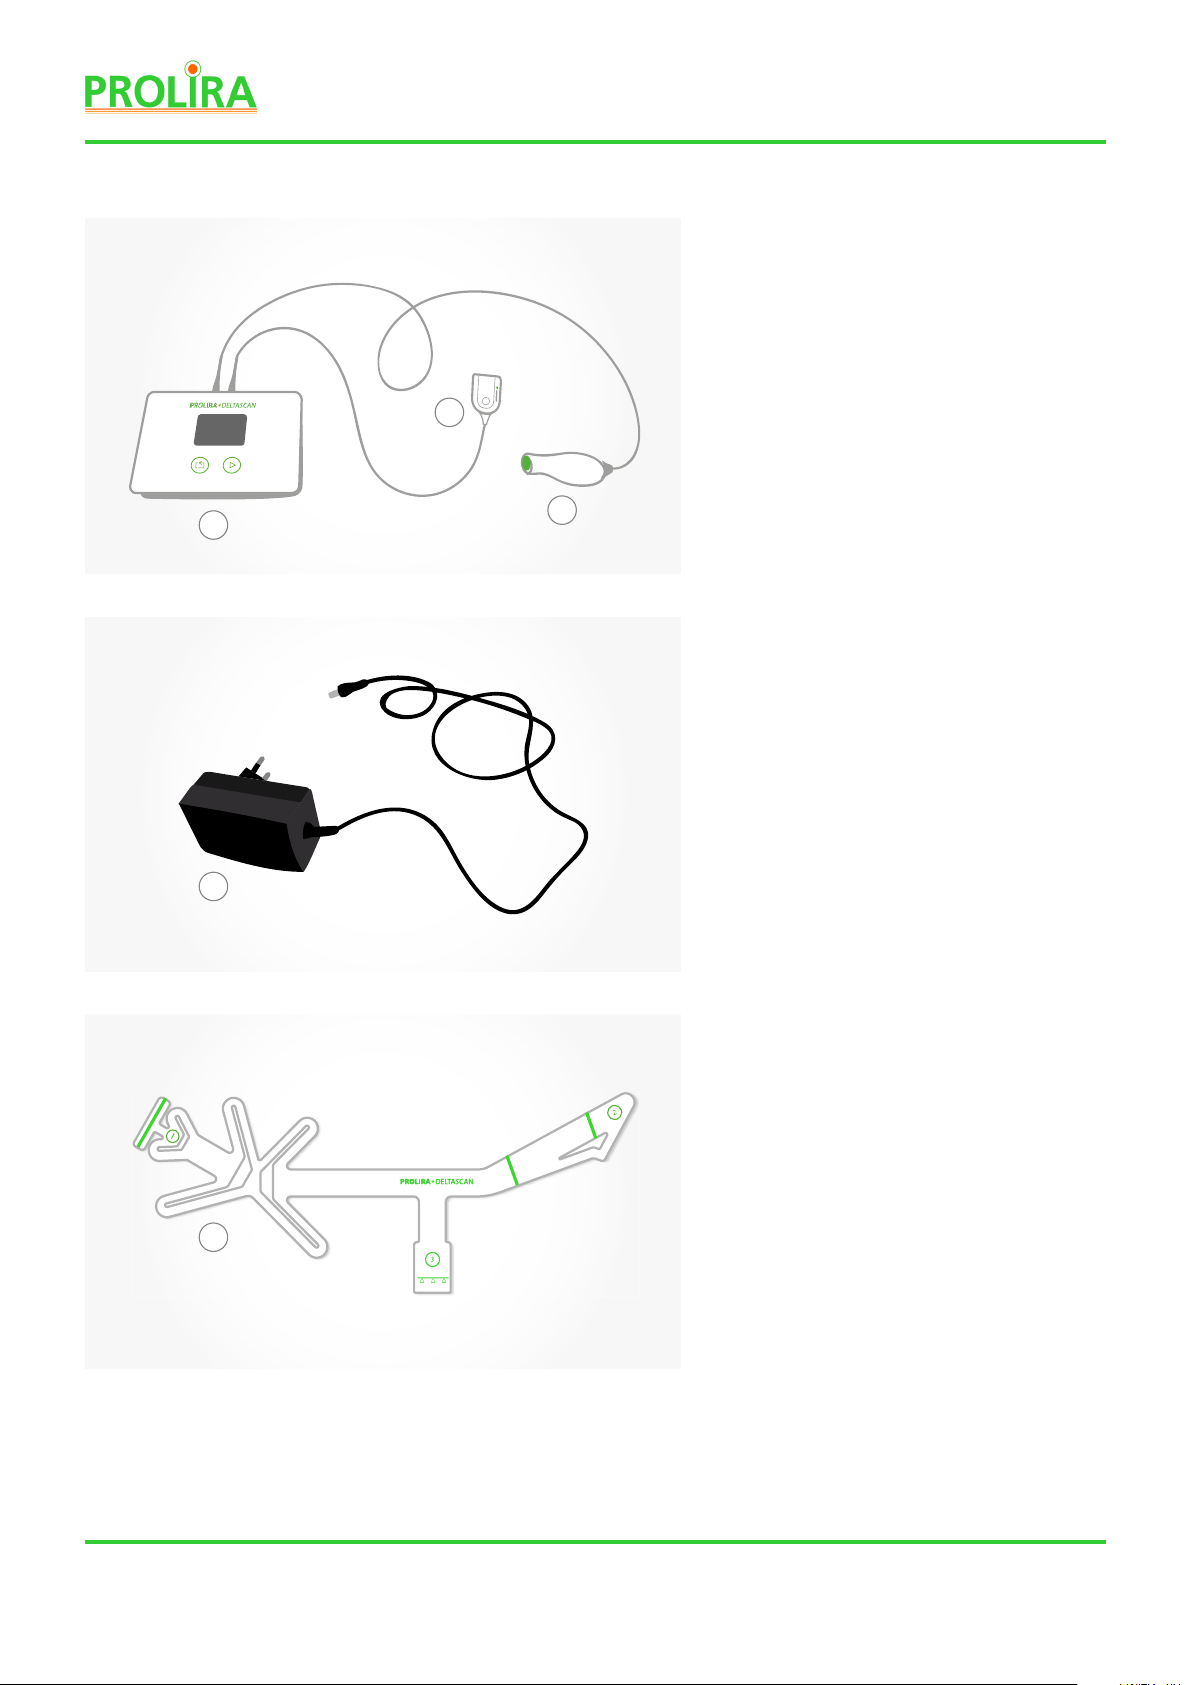
The DeltaScan Monitor (see
Figure 2) consists of:
1) Monitor (1)
2) Patch connector (2)
on cable
3) Recording button (3)
on cable
4) Charger for Monitor (4)
The DeltaScan Monitor should
only be used in combination
with a DeltaScan Patch
(See Figure 1: nr 5 and
Figure 2: nr 5).
To improve xation of the
DeltaScan Patch electrode on
the crown of the head
(Pz location), it is advised to
use a self-adhesive HairLock
from the dispenser-box
(see Figure 2: nr 7)
The DeltaScan Monitor can
be mounted to a GCX
Rollstand (see Figure 2: nr 6),
(see also section 9).
1
2
7
3
4
5
6
Figure 2: DeltaScan Monitor complete set-up.
Page 6
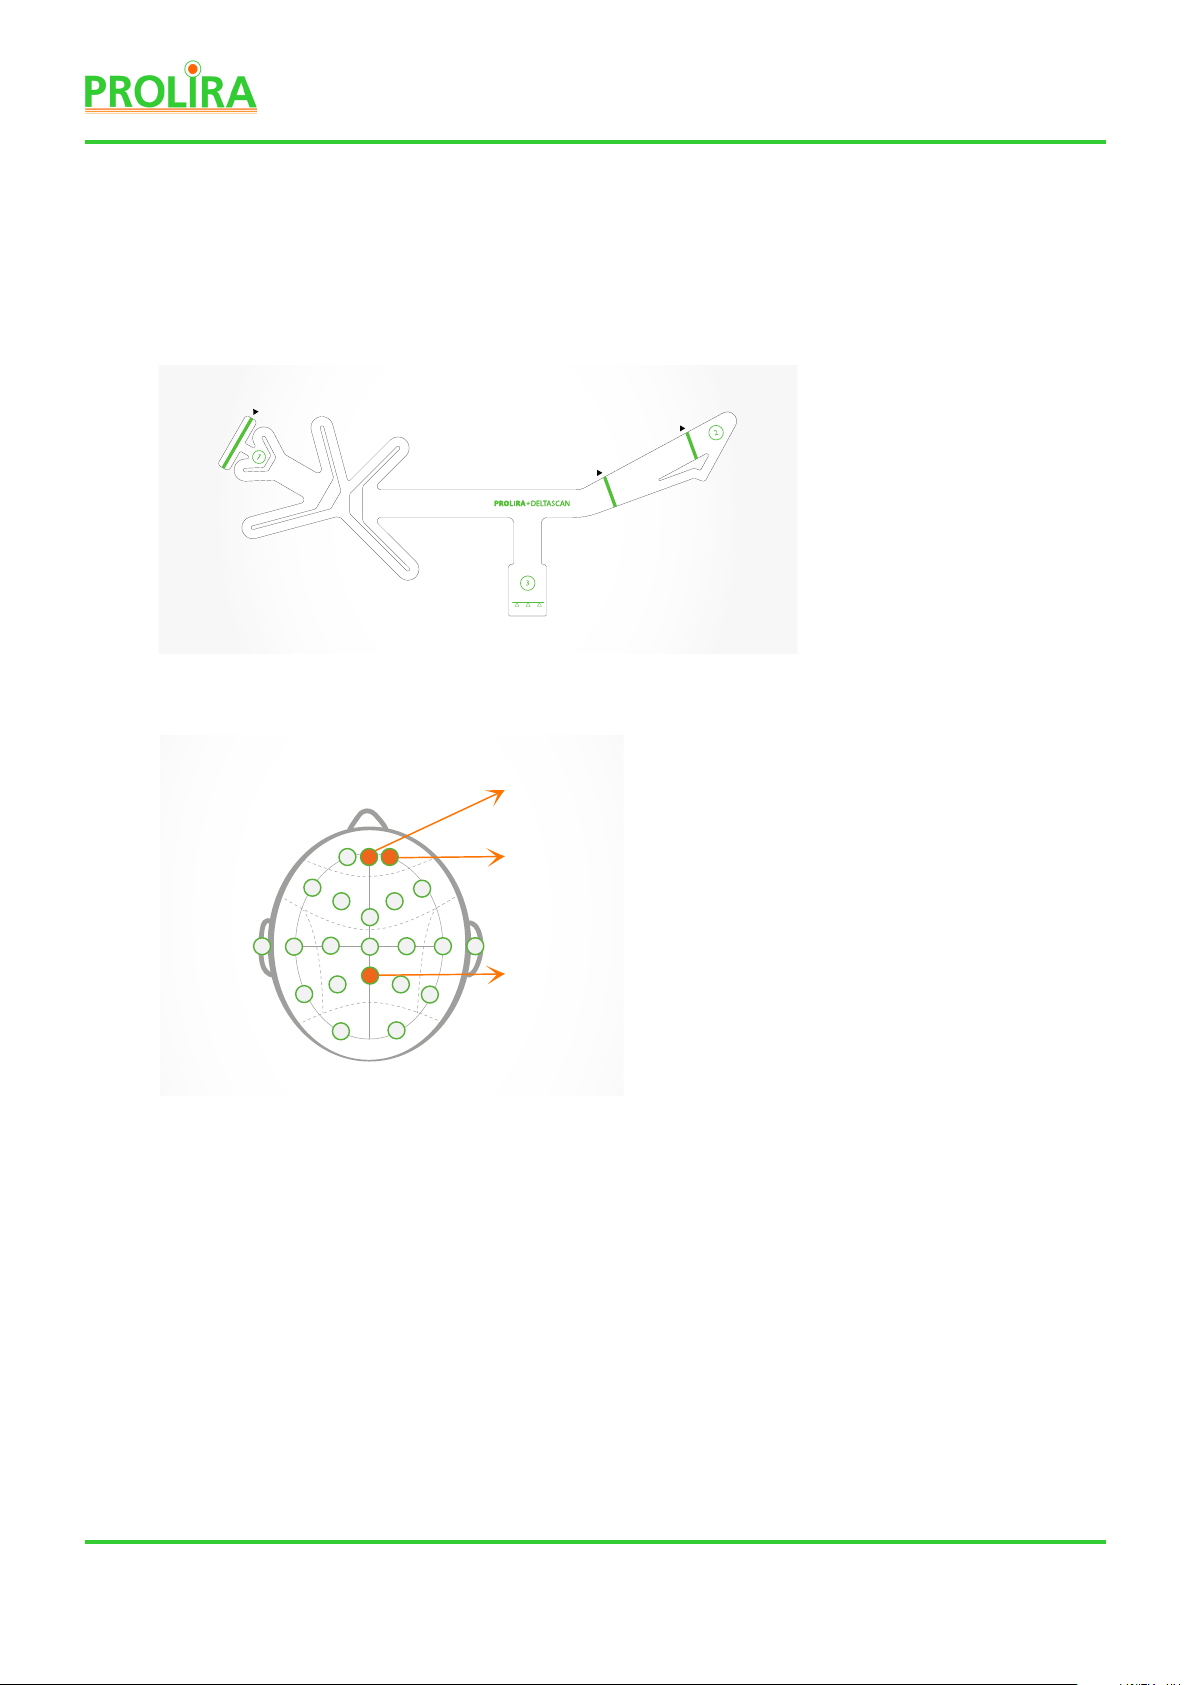
1.5 OPERATING PRINCIPLE, AND DELIRIUM PROBABILITY SCORE
The dedicated, self-adhesive DeltaScan Patch includes 3 electrodes,
to easily collect relevant EEG signals of the patient:
•The 1st electrode on or close to
Pz (on the crown of the head)
•a second electrode on or close to
Fp2 (above the patient’s right eyebrow)
• a third (Reference) electrode on or
close to Fpz (above the nose on the
forehead)
Pz, Fp2 and Fpz refer to dened EEG
electrode locations in the standard
10/20 EEG setup (see Figure 4).
The acquired EEG signals are amplied, digitized, and processed by the software algorithms
of the DeltaScan Monitor, to present a Delirium Probability or DeltaScan Score to the user.
The DeltaScan Monitor provides signal analysis technology intended for use as an adjunct
to clinical judgment. The DeltaScan Score should always be interpreted in conjunction with
other available clinical signs for clinical judgment.
Do not rely solely on the DeltaScan Score alone for starting or adapting delirium treatment
(which may include administration of medication). Clinical assessment should be leading in
deciding on patient treatment.
Figure 3: DeltaScan Patch includes 3 electrodes (3 green stripes).
Figure 4: DeltaScan Patch electrode locations.
CZ
FZ
F1
F3 F4
F8
A1 A2
T3 C3 C4 T4
T5
P3 P4
T6
O1 O2
Fp1
PZ
Fp2
Pz
Fpz Fp2
Fpz (ref)
ELECTRODE 1
(Pz , crown)
ELECTRODE
(Fp2, eye)
ELECTRODE
(Fpz, nose)

Page 7
Device : DeltaScan Monitor
Doc. Type : Instructions for Use
(English)
System Ver : R2
Date : 2019-12-12
: 006.201.D
Copyright: Prolira
The DeltaScan Monitor embeds state-of-the-art technologies for signal conditioning, signal
quality judgement and artefact removal technologies, to minimize the disturbance of the EEG
signals by artefacts. Artefacts appear in EEG signals, due to for example poor skin contact of
electrodes, head and body motion of the patient, or eye movements.
To understand Prolira’s technology, the fundamentals of the proprietary waveshape analysis
are explained. As published by Kooi et al. [1] and Numan et al [2], delirium leads to general
slowing of EEG in the delta range (1 to 4 Hz).
The DeltaScan algorithm detects and quanties those specic EEG waveshape patterns that
are characteristic for delirium. These patterns dier from healthy EEG recordings.
The DeltaScan Monitor provides the user with the DeltaScan Score on a scale of 1 to 5.
Table1 explains the technical meaning and clinical interpretation of DeltaScan’s 5-point scale.
It is recommended to write the Delirium probability (or DeltaScan score) in the patient le.
Especially for scores 4 and 5 it is recommended to consult the patient’s healthcare physician
without delay.
Score on
DeltaScan Monitor
Technical meaning
of each score
Clinical interpretation
for each score –
Delirium Probability
The amount of characteristic waveshapes is
very low, which correspondents with patients
classied by delirium experts as NOT delirious.
See [2,1] for the classication procedure.
Very unlikely
The amount of characteristic waveshapes is
low, which correspondents with patients
classied by delirium experts as NOT delirious.
Unlikely
The amount of characteristic waveshapes
in the EEG corresponds ambiguously with
patients classied by delirium experts.
Indecisive on whether
the patient has delirium
or not
The amount of characteristic waveshapes is
large, which corresponds with patients
classied by delirium experts as delirious.
Likely
The amount of characteristic waveshapes is
very large, which corresponds with patients
classied by delirium experts as delirious.
Very likely
Table 1: Delirium Probability – DeltaScan score.

Page 8
2. HOW TO USE THESE INSTRUCTIONS FOR USE
2.1 GENERAL
These Instructions for Use explain how the DeltaScan Monitor works
and how to use it. Instructions can be identi ed by the word ‘Step’.
Follow the instructions carefully to obtain a reliable measurement and DeltaScan score.
In the event of problems, please consult section 11 ‘Problems during use’.
Please note! Always keep a copy of the Instructions for Use near the DeltaScan Monitor
(for example attached to the rollstand, in case the DeltaScan Monitor is mounted to
a rollstand).
2.2 MEANING OF THE SYMBOLS USED
Please note! If the label on the Monitor or Patch connector cable or Recording button cable
is damaged or missing, please contact Prolira.
Manufacturer Caution
Serial number Type BF applied part
Catalogue number Do not use if
package is damaged
Batch code CE marking of
conformity
Temperature limit:
15 - 35 °C Keep dry
Humidity limitation:
10 - 95 RH Separate Collection
Refer to instruction
manual/booklet ESD Susceptibility Symbol
Medical device symbol Consult instructions for
use
Do not re-use Use by date
10%
95%
15°C
35°C
Table 2: Symbols used.
%
Page 9
Device : DeltaScan Monitor
Doc. Type : Instructions for Use
(English)
System Ver : R2
Date : 2019-12-12
: 006.201.D
Copyright: Prolira
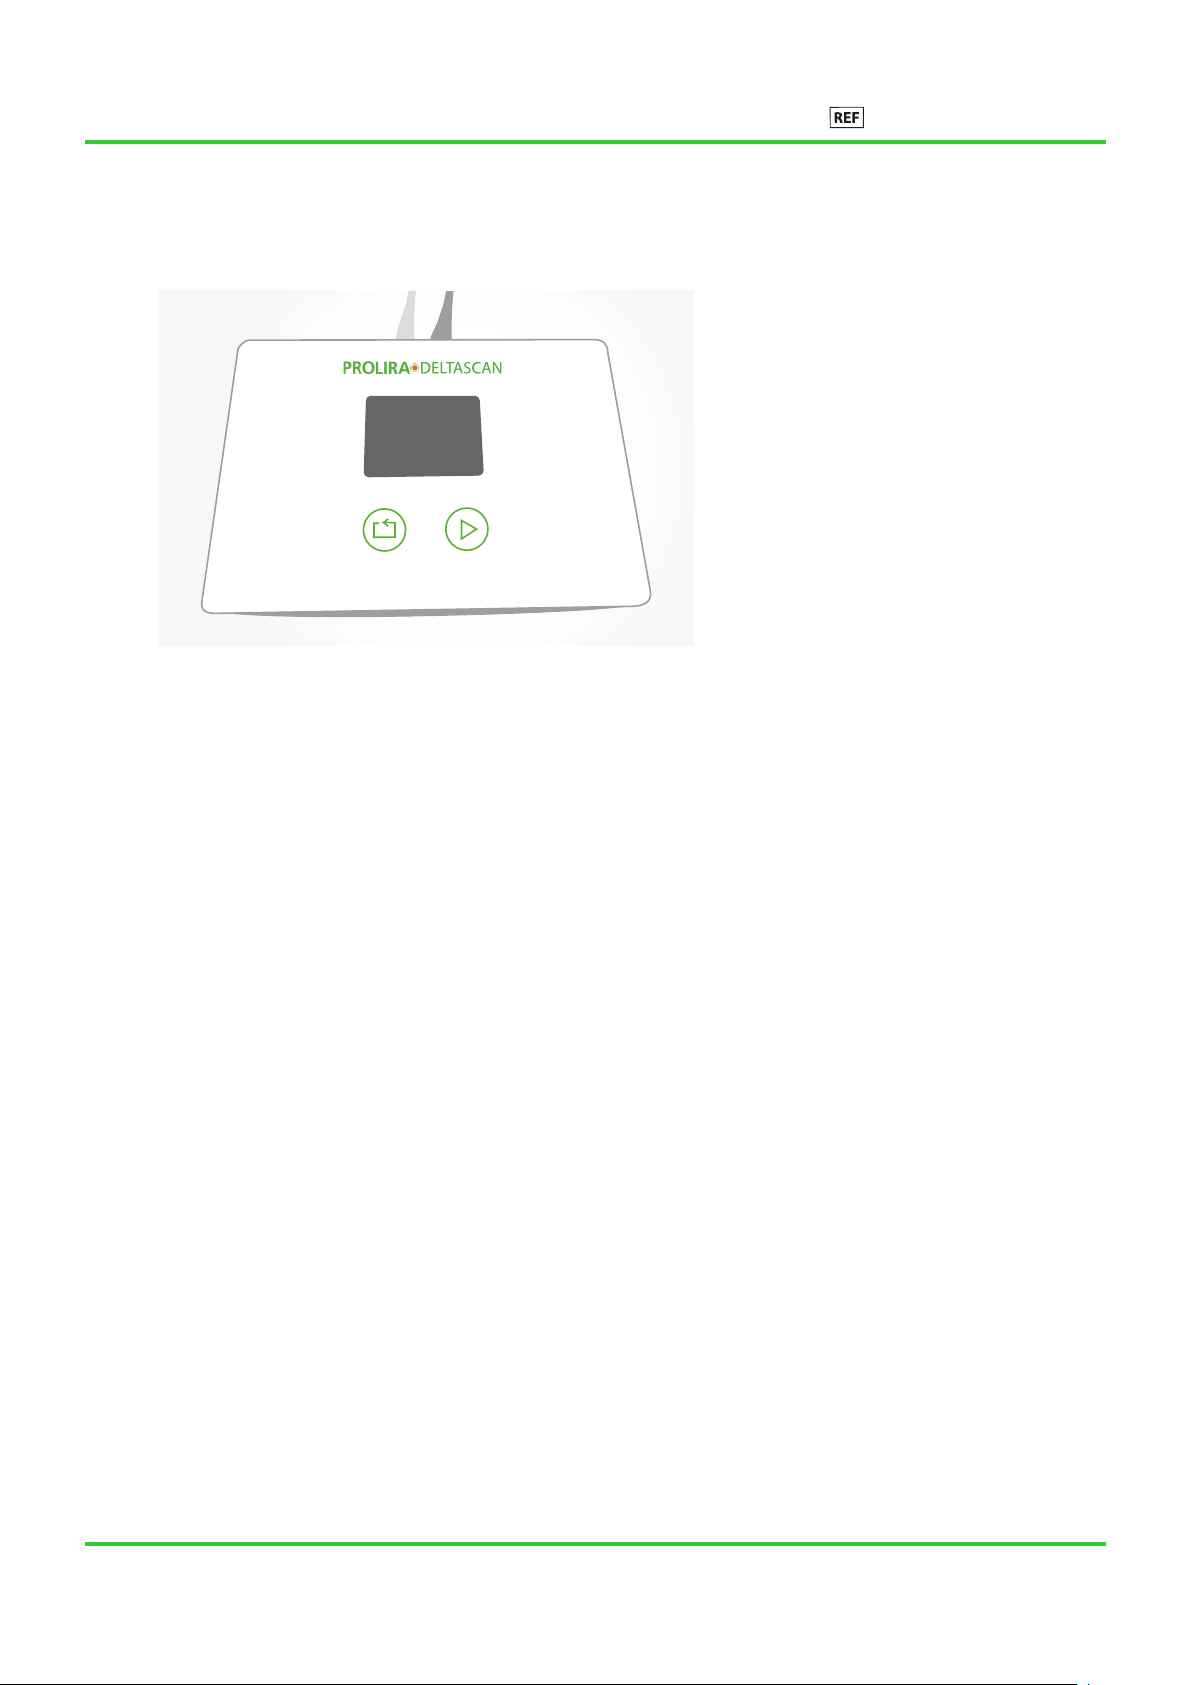
3. TURNING ON AND OFF
The DeltaScan Monitor does not
have an ON/OFF switch.
It turns ON by briey pressing
either one of the two keys on the
Monitor (see Figure 5).
To turn it OFF, press either one
of the two keys on the Monitor
for 10 seconds.
The Monitor will switch OFF
automatically if it is not used
for 5 minutes.
right
key
left
key
Figure 5: Location of the two keys on the Monitor.

Page 10
4. PREPARATION FOR USE
For a measurement, the following items are needed (also see Figure 1):
• a DeltaScan Patch (REF: 001.000.A).
• if the patient has hair on the crown of the head at the position for electrode 1,
it is advised to take measures for improved electrode contact: use a HairLock (REF:
003.000.A) to part the hair and keep surrounding hair gently out of the way.
• a DeltaScan Monitor (REF: 006.000.A) with Patch connector (REF: 006.901.A),
and Recording button cable (REF: 006.902.A) plugged in.
• a Charger (REF: 006.004.A) for the DeltaScan Monitor, to be used in case the battery
level is too low to take a measurement.
Figure 6 below indicates the location of the user, the patient, and the DeltaScan Monitor
during a measurement on a patient in bed.
• Patients laying on their back are hardest to measure.
• Patients laying on their left side are generally easier to measure.
• Patients sitting on a chair (or bed) are easiest to measure.
Warning!
Do not use the device when
damage is visible on the
device or its cables.
Warning!
Use DeltaScan Monitor
exclusively with DeltaScan
Patch.
Figure 6.a: Recommended position for a DeltaScan measurement when
the patient lies in bed.
Figure 6.b: Patients may also lie on
the left side, sit in bed or sit on a
chair.
Page 11
Device : DeltaScan Monitor
Doc. Type : Instructions for Use
(English)
System Ver : R2
Date : 2019-12-12
: 006.201.D
Copyright: Prolira
For a correct measurement with DeltaScan, carry out the following preparation steps,
to apply a single use DeltaScan electrode Patch correctly to the patient’s head.
Please note! The labelling of the DeltaScan Patch is included in full in Annex A.
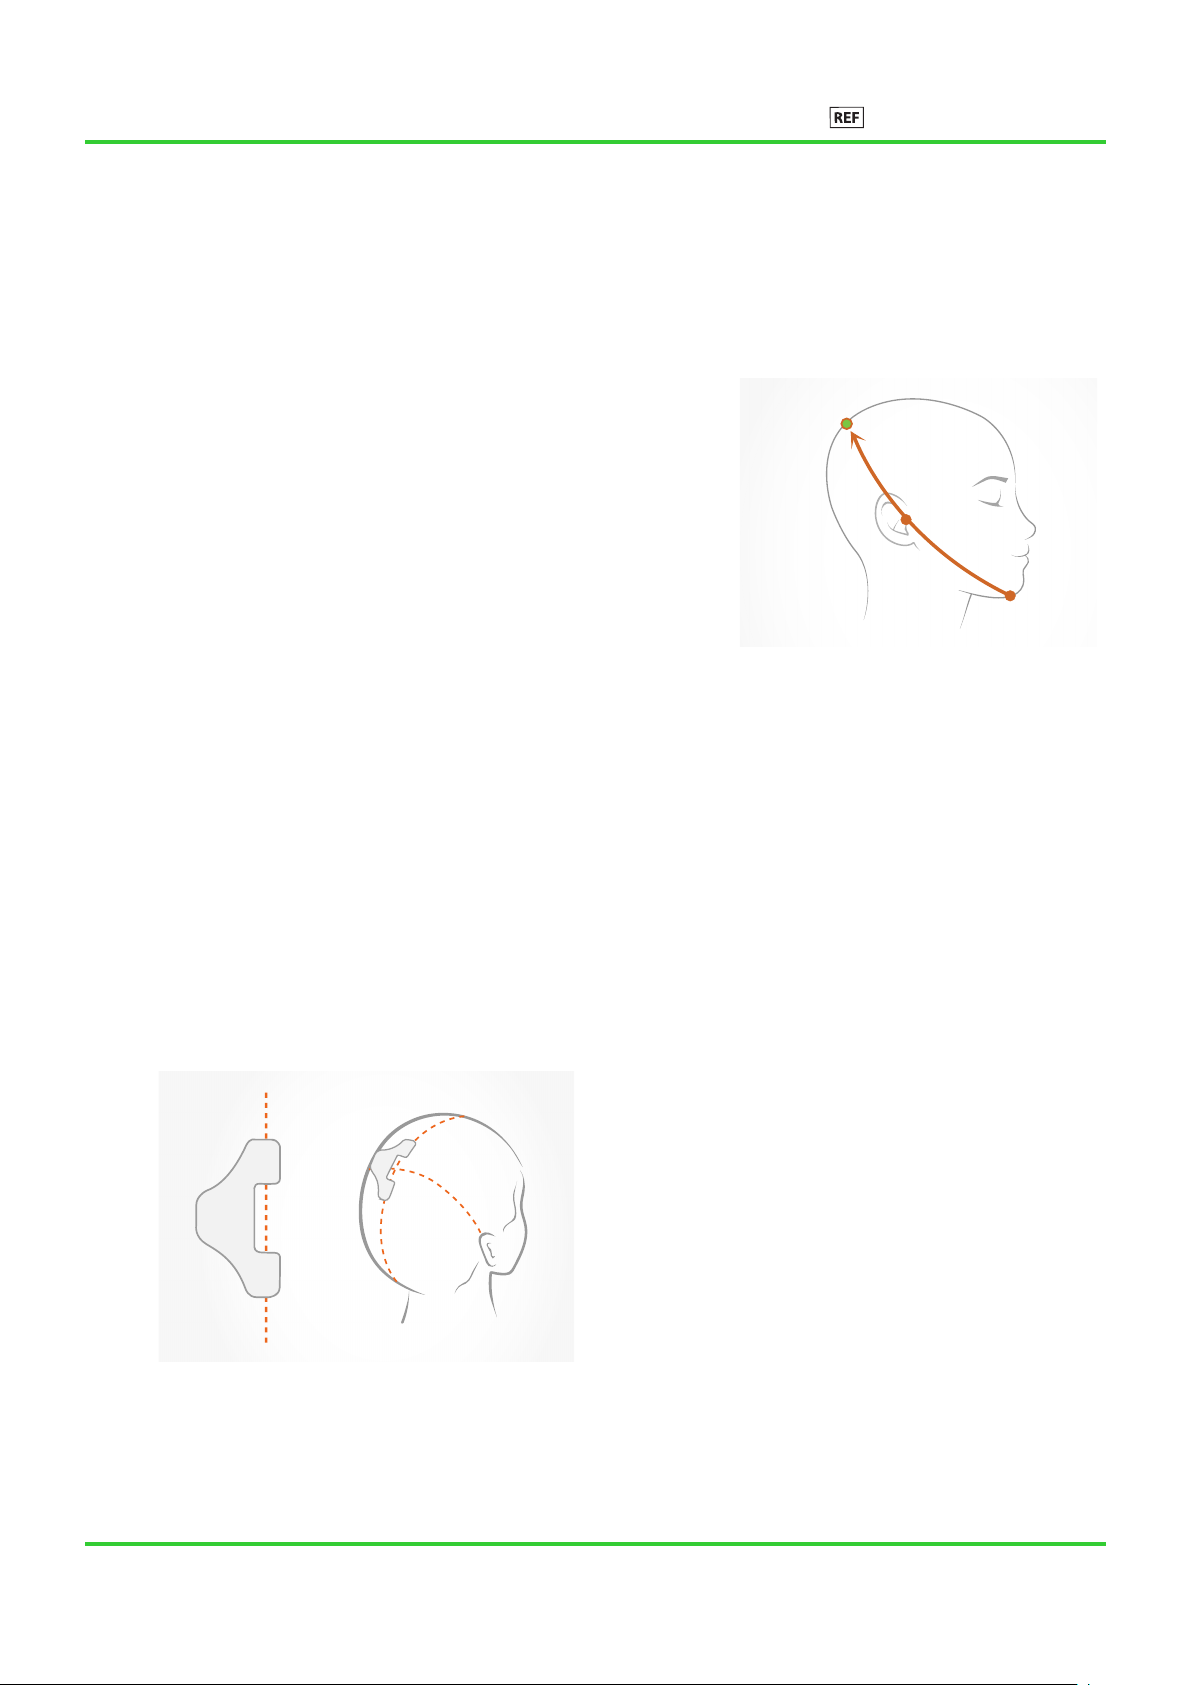
Step 1: Determine the crown on the head
• The crown of the head is the correct position
for electrode 1 of the DeltaScan Patch.
This position can be determined according
to Figure 7.
Step 2: Prepare the crown, such that a hair free
strip of skin is exposed
• If the patient has hair on the crown of the head,
to improve electrode contact with the skin, it is
advised to prepare the crown.
• Make a vertical parting line in the hair and apply the self-adhesive HairLock,
as it helps to gently keep surrounding hair out of the way.
First apply Hairlock part 1 (see Figure 8), and then apply part 2 (see Figure 9).
If HairLock part 1 and 2 are correctly applied on the head, a strip of skin is
exposed in the slot between HairLock part 1 and 2 (see Figure 10.a.).
HairLock part 1
• Position Hairlock part 1
just left of the crown on the
middle of the head.
Figure 8: HairLock Part 1 correctly applied.
Figure 7: Crown of the head, correct
position for DeltaScan Patch electrode 1
(and HairLock, in case HairLock is used).

Page 12
HairLock part 2
• Slide Hairlock part 2 over part 1
align and press for xation.
Figure 9: HairLock Part 1 and 2 correctly applied.
Figure 10.a: Parting in hair, with HairLock correctly applied:
a strip of skin is exposed in the Hairlock slot.
Figure 10.b: HairLock not correctly applied,
there is no parting in the hair, and there is
no skin exposed. Furthermore, HairLock
part 2 is not correctly aligned.

Page 13
Device : DeltaScan Monitor
Doc. Type : Instructions for Use
(English)
System Ver : R2
Date : 2019-12-12
: 006.201.D
Copyright: Prolira
HairLock part 2
• Slide Hairlock part 2 over part 1
align and press for xation.
Figure 12: Ten20 applied in the HairLock
slot.
Step 3: Prepare the skin of the
patient for a good EEG
• To ensure a good EEG with
DeltaScan, it is important to
ensure good electrode contact
with (good adhesion on) the
skin.
Prolira advises the use of a
Dynarex Electrode Skin Prep
Pad (see Figure 11.a.). Use this
Dynarex wipe, to scrub and
wipe the skin in the HairLock
slot and the skin on the
patients forehead.
• We further advise to apply
a thin visible layer of Ten20
Conductive Neurodiagnostic
electrode paste (Weaver and
company, see Figure 11.b.) in
the HairLock slot to improve
adhesion of the electrode (see
Figure 12).
Figure 11.a: Dynarex
Electrode Skin Prep Pad.
Figure 11.b: Ten20
Conductive Neurodiagnostic
Electrode Paste.

Page 14
Figure 13: How to hold point 1 when
applying the DeltaScan Patch.
Figure 14: Position electrode 1 (the green stripe) of DeltaScan Patch
on the crown of the head, in the HairLock slot, if a HairLock is used.
Step 4
Take a packaged DeltaScan Patch, and tear the packaging open.
Remove the DeltaScan Patch from its packaging and keep the Patch dry.
Please note! Only use if the packaging of the DeltaScan Patch is intact, dry,
and if the date of use is not past the expiry date.
Warning! Keep DeltaScan Patch dry once removed from its packaging.
Warning! Use DeltaScan Patch on dry skin only.
Please note! In case of wet skin, for example caused by sweating, please dry the patient’s
skin rst, before applying the Patch.
Please note! The DeltaScan Patch must not yet be connected to the DeltaScan Patch
connector.
• Hold point 1 of the DeltaScan Patch between thumb and index nger. Remove the liner
from the back of point 1, as indicated in Figure 13.
• Position the electrode (indicated by a green stripe) on the crown of the patient’s head
(in the HairLock slot if a HairLock is used), as indicated in Figure 14.

Page 15
Device : DeltaScan Monitor
Doc. Type : Instructions for Use
(English)
System Ver : R2
Date : 2019-12-12
: 006.201.D
Copyright: Prolira
Step 5
• Face the patient. Hold point 2 of the
DeltaScan Patch between thumb and
index nger, and remove the liner,
as indicated in Figure 15.
•Position the Reference electrode
(the vertical green stripe next to nr 2) at the
center of the forehead above the nose, and
one nger above the eyebrow.
The triangle shape of the DeltaScan Patch
(under the green stripe) points towards the
nose. The other electrode (green stripe)
automatically is at the right position too, above
the eyebrow. See Figure 16.
Step 6
Press the 3 electrodes (the 3 green stripes)
and the green logo rmly to the patient’s skin for
ve seconds.
Please note! for the proper reception of EEG
signals (which are microvolts of brain activity) it
is very important that the electrodes have good
contact with the skin. Therefore, the electrodes
must be pressed and well attached to the skin,
before the start of a measurement.
During a measurement the electrodes may not
be touched (not even a pillow or headrest may
push against or touch the electrodes).
Figure 15: Remove the liner while holding
point 2 of the DeltaScan Patch.
Figure 16: Position the electrodes above the
nose and eyebrow.
Page 16
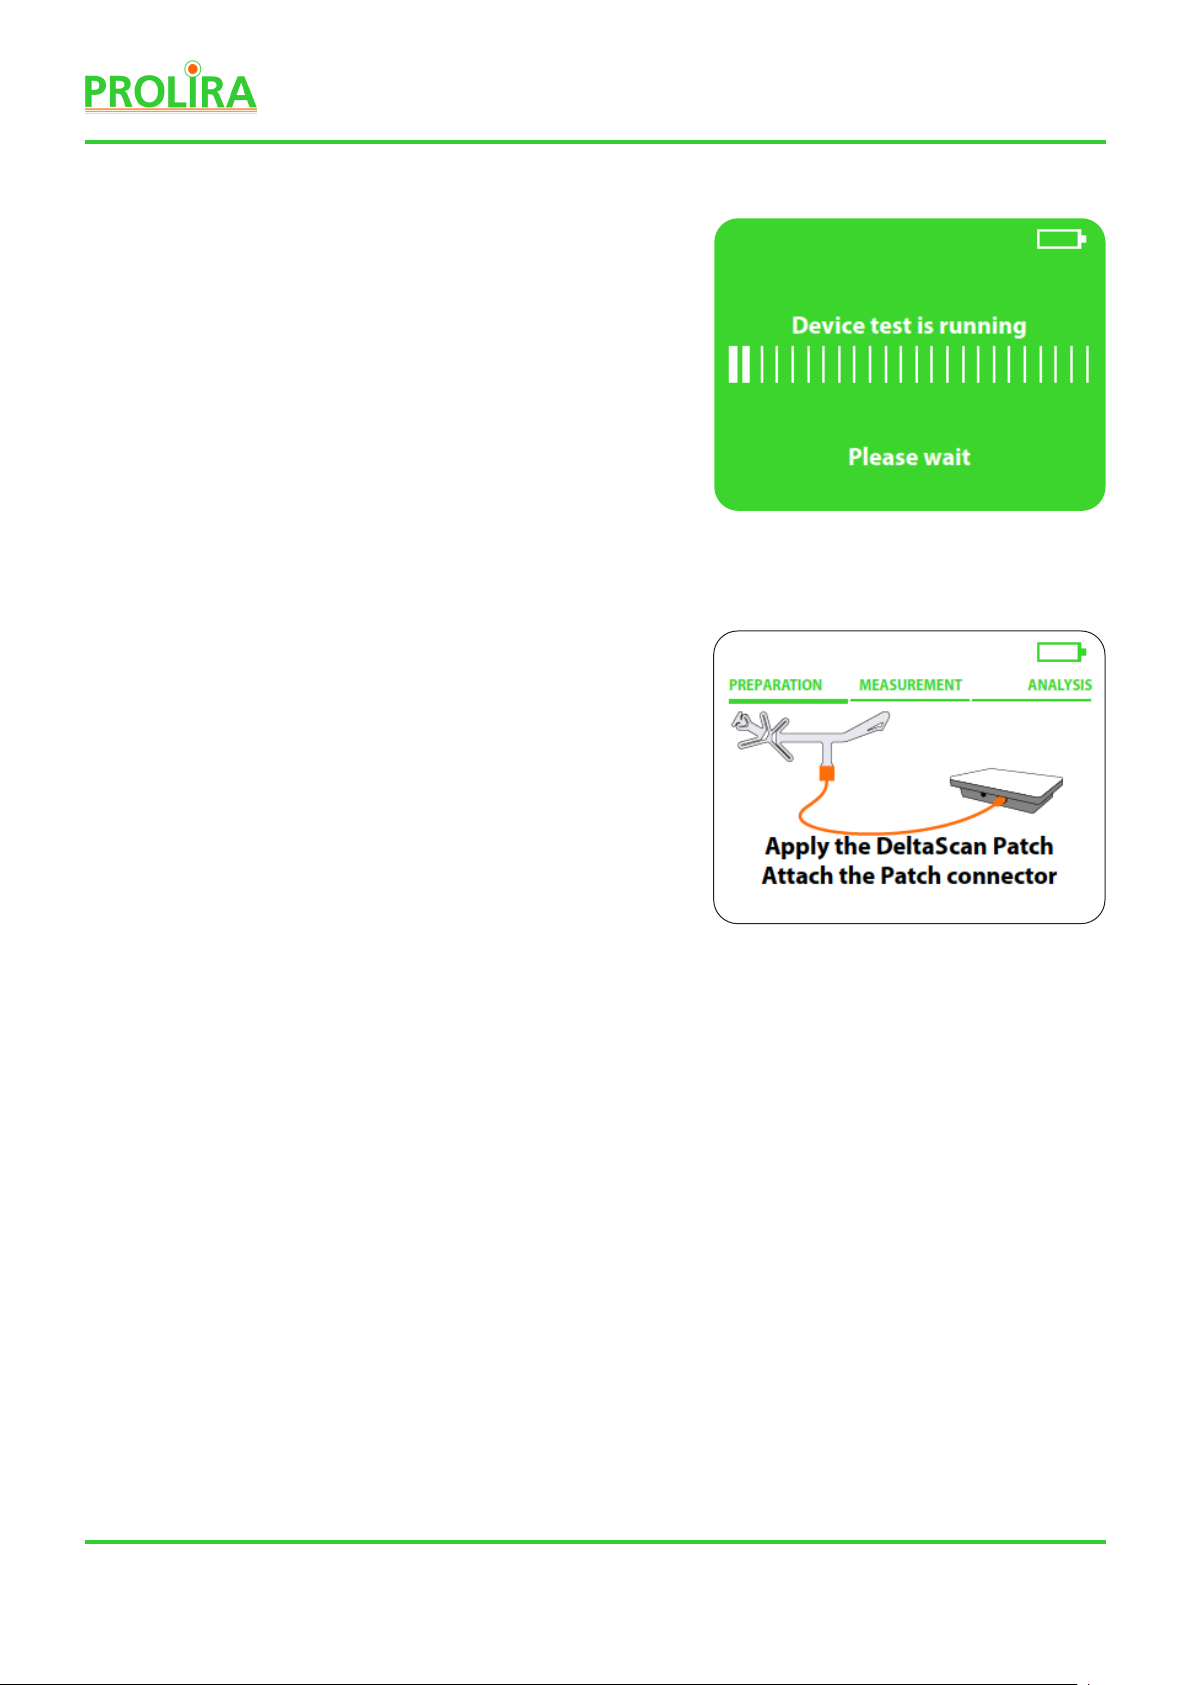
Step 7
Turn the DeltaScan Monitor ON. Wait until the
‘device test’ is completely run.
While running the ‘device test’, the Monitor
displays the screen of Figure 17.
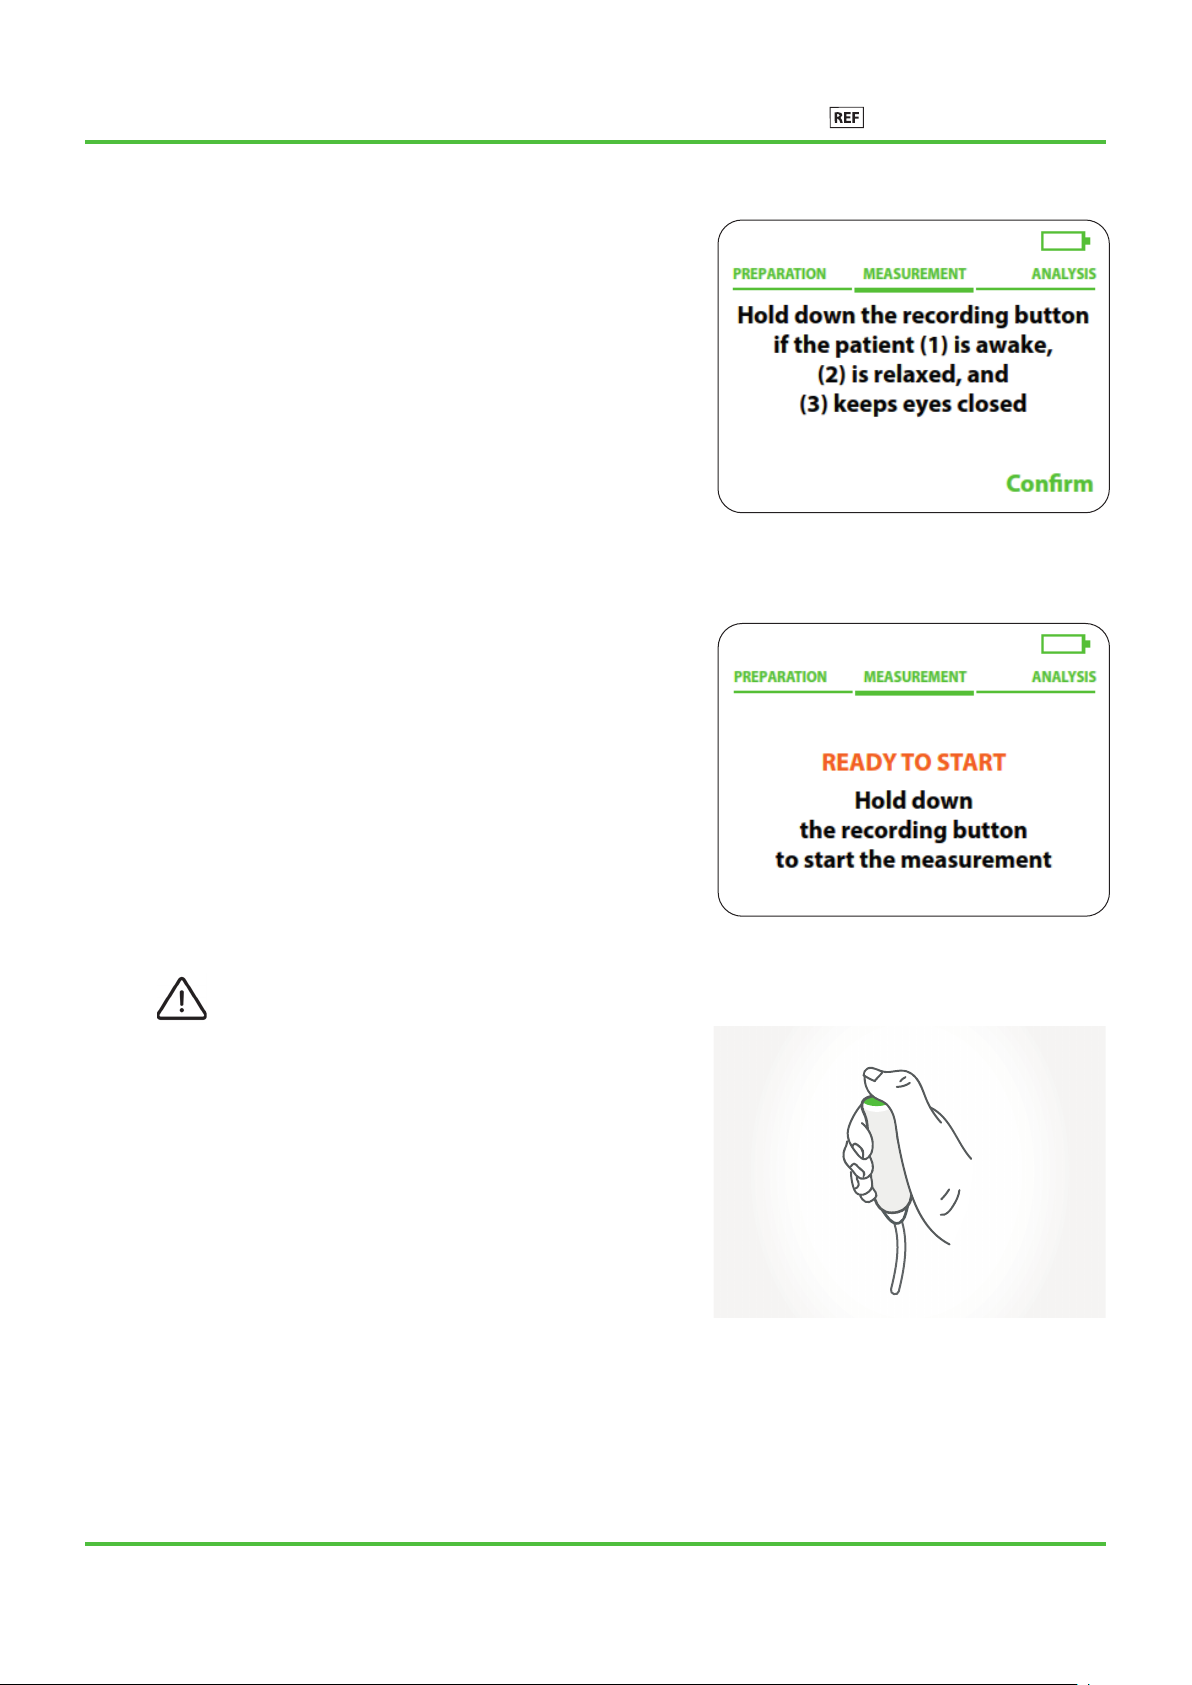
Step 8
When the device test was successful,
the Monitor screen will automatically ask
the user to apply and connect the DeltaScan
Patch, as is displayed in Figure 18.
Figure 17: Monitor screen indicating that
the ‘device test’ is running.
Figure 18: Monitor screen asks the user to
apply and connect the DeltaScan Patch.

Page 17
Device : DeltaScan Monitor
Doc. Type : Instructions for Use
(English)
System Ver : R2
Date : 2019-12-12
: 006.201.D
Copyright: Prolira
Step 9
•Connect the Patch connector to the
DeltaScan Patch that is already applied
to the patient’s head. Hold point 3 of
the DeltaScan Patch rmly between
thumb and index nger. Avoid pulling
on the DeltaScan Patch, ensure that the
electrodes stay well attached to the skin.
•Slide the Patch connector over the 3
green triangles, up to the line, until a
hard stop is felt, and the Patch cannot
advance further. See Figure 19.
Figure 19:
A) Point 3 on the DeltaScan Patch (positioned on the right cheek of the patient) with indication
for inserting the Patch into the Patch connector.
B) Hold the Patch connector between thumb and index nger.
C)Slide the Patch connector over the 3 triangles on the DeltaScan Patch.
D)Slide the Patch connector up to the line, until a hard stop is felt.
E) The Patch is now well connected. The Connection-LED should now be green (see Figure 18).
A.
B. C.
D. E.

Page 18
• Check if the Connection-LED (the top LED
on the Patch connector) turns green, to
indicate that the Patch is well connected
(see Figure 20).
If the Patch connector is not correctly
attached to the Patch or if the electrodes
do not make proper contact to the patient’s
skin, the Connection-LED will blink orange.
In that case, check the Patch connector
and/or press electrodes rmly to the
patient’s skin for contact. Repeat until the
Connection-LED turns green.
Also, the monitor indicates if the Patch
connector is well attached (see Figure 21.)
Please note! In case of repeated mal
connection, remove the DeltaScan Patch
from the patient’s head.
Then start again at step 3: re-prepare the
skin and apply a new Patch to the patient.
Then reattach the Patch connector, until
the Connection-LED turns green.
Please note! It may require a little force to
insert the DeltaScan Patch into the Patch
connector.
Please note! Ensure the Patch connector cable
is free and not entangled with the Recording
button cable or anything else.
The preparation is now completed,
and a measurement can be taken.
Figure 21: Monitor screen when Patch and
electrodes are well connected.
Figure 20: The Connection-LED is green if the
DeltaScan Patch is well connected.
Page 19
Device : DeltaScan Monitor
Doc. Type : Instructions for Use
(English)
System Ver : R2
Date : 2019-12-12
: 006.201.D
Copyright: Prolira
5. USE
Step 1
Once all preparation steps have been
carried out properly, the Monitor displays
the screen of Figure 22.
The user is asked to read the instructions
“Hold down the recording button
• if the patient is (1) awake,
• (2) is relaxed and
• (3) keeps eyes closed”
The user must Con rm this step by pressing
the right key on the Monitor (close to the
word “con rm” on the screen).
Step 2
Figure 23 displays the screen that provides
the instructions for the start of the
measurement.
The user must hold down the Recording
button to start the measurement, see
Figure 24.
Warning! Make sure that the patient is
(1) awake, (2) relaxed and (3) keeps the eyes
closed while taking a measurement.
Figure 20: The Connection-LED is green if the
DeltaScan Patch is well connected.
Figure 22: Monitor screen asking for
con rmation of the instructions.
Figure 23: Monitor screen providing
instructions to perform a measurement.
Figure 24: Recording button is pressed during
measurement, as long as the patient complies
to the 3 instructions.

Page 20
Step 3
IMPORTANT: measure only if the patient complies to the instructions!
A successful DeltaScan measurement takes about 2 minutes, but sometimes
a measurement may take longer.
It is very important that the patient follows the instructions during the
entire measurement. Following the instructions means that the patient:
• (1) is awake,
• (2) is relaxed (sits or lies calm and keeps the muscles in the face relaxed,
e.g. does not clench the jaws, does not talk or frown)
• (3) keeps the eyes closed.
The user keeps pressing the recording button, as long as the patient complies to
the instructions. During the EEG measurement, the user must stay focused on the
face of the patient and check continuously whether the patient still complies to
the three instructions.
It is the user’s responsibility to release the Recording button immediately,
if the patient does not comply to the instructions. Releasing the Recording button
means that the EEG measurement is interrupted (paused).
Reasons for releasing the recording button (and pausing the EEG measurement) are:
A. Patient falls asleep.
The user releases the recording button immediately.
The user wakes the patient up and reinstructs the patient.
As soon as the patient complies, the user can press the
Recording button again and the measurement continues.
B. Patient is not relaxed.
Patient is e.g. clenching the jaw, grinding the teeth or talking. The user
releases the recording button immediately. The user instructs the patient
to relax and sit or lie still. As soon as the patient complies, the user can press
the Recording button again and the measurement continues.
C. Patient opens the eyes.
The user releases the recording button immediately.
The user instructs the patient to close the eyes again.
As soon as the patient complies, the user can press the
recording button again and the measurement continues.
Table of contents


