prologue IW004 36-5136 User manual

Wireless
Weather Station
Trådlös väderstation
Trådløs værstasjon
Langaton sääasema
Art.no. Model
36-5136 IW004 Ver. 201209
EnglishSvenskaNorskSuomi


3
English
Wireless Weather Station
Art.no 36-5136 Model IW004
Please read the entire instruction manual before using the product and save it for future
reference. We reserve the right for any errors in text or images and any necessary
changes made to technical data. If you have any questions regarding technical
problems please contact our Customer Services.
Important details:
• Other wireless equipment using the same frequency can reduce the transmission range.
• The range of all wireless equipment depends on the type of obstacles located
between the transmitter and the receiver (e.g. a concrete wall will interfere with
the signal more than a plasterboard wall).
If you experience problems, try the following:
• Turn off any other existing wireless equipment to check if this is the cause of the problem.
• Move any other existing wireless equipment. Shorten the distance between
the sending and receiving devices and reduce the number of obstacles (walls,
furniture, etc) between them.
Care and maintenance
Clean the product using a lightly moistened cloth. Only use mild cleaning agents,
never solvents or corrosive chemicals.
Disposal
This product should be disposed of in accordance with local regulations.
If you are unsure how to proceed, contact your local authority.

15
26
374 89
10
11
12 16 19
13 17 18
21
14 15
20
4
English
Buttons and functions
Main unit
Display screen
1. Outdoor humidity
2. Outdoor humidity trends (see Trends section below)
3. Displays readings from sensor channels 1, 2 or 3
4. Signal strength icon for sensor unit
5. Max and min temperature display
6. Outdoor temperature
7. Outdoor temperature trends (see Trends section below)
8. Battery status icon for sensor unit
9. Barometric pressure
10. Weather forecast
11. Indoor humidity
12. Indoor humidity trends (see Trends section below)
13. Frost warning icon
14. Indoor barometric trends (see Trends section below)
15. Clock (local time or dual time zone)
16. Indoor temperature
17. Indoor temperature trends (see Trends section below)
18. Day
19. Date
20. Activated alarm icon
21. Month
MADE IN CHINA
23
27
22
24
28
29 30 31 32
25
26
5
English
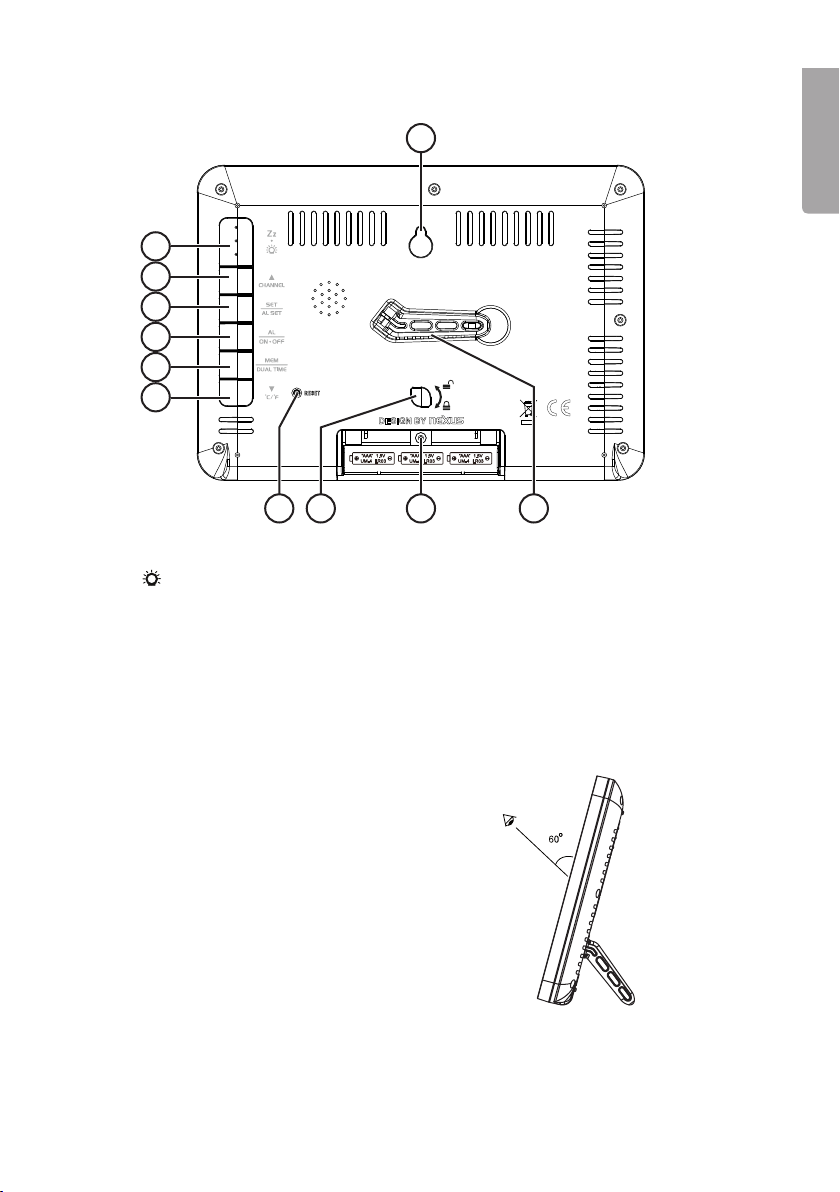
Back panel
22. Hole for hanging
23. [Zz/ ] Snooze/display light
24. [▲/CHANNEL] Selects sensors 1, 2 or 3. Moves up/increases.
25. [SET/AL SET] Sets date, time and alarm
26. [AL ON/OFF] Alarm on/off
27. [MEM/DUAL TIME] Memory button for max/min temperature,
display of local time/dual time zone.
28. [▼/ºC/ºF] Temperature unit selector. Moves down/decreases
29. [RESET] Returns to default factory settings
30. Desk stand slot
31. Battery compartment
32. Table stand
Note:
The display is clearest when looking at it
at an angle of 60 degrees.
Table of contents
Languages:
Other prologue Weather Station manuals


Popular Weather Station manuals by other brands


ADE
ADE WS 1711 operating instructions

WAREMA
WAREMA EWFS Weather station eco Operating and installation instructions

Auriol
Auriol z29592 Operation and safety notes

Auriol
Auriol 296289 Operation and safety notes

Hyundai
Hyundai WS 2266 instruction manual

La Crosse Technology
La Crosse Technology WS-2210 Operation manual

La Crosse Technology
La Crosse Technology WS-811561 manual

Ventus
Ventus W177 owner's manual

National Geographic
National Geographic VA Colour RC instruction manual

Instant Transmission
Instant Transmission MA 10410 instruction manual

Lutron Electronics
Lutron Electronics PHB-318 Operation manual

Oregon Scientific
Oregon Scientific Alizé BAR266 user manual