prologue IW007 User manual

Wireless
Weather Station
Trådlös väderstation
Trådløs værstasjon
Langaton sääasema
Funk-Wetterstation
Art.no. Model
36-5087 IW007 Ver. 20141211
EnglishSvenskaNorskSuomiDeutsch


A
B
C
D
E
F
G
H
3
English
Wireless Weather Station
Art.no 36-5087 Model IW007
Please read theentire instruction manual before using theproduct and save it for
future reference. We reserve theright for any errors in text or images and any necessary
changes made to technical data. If you have any questions regarding technical problems
please contact our Customer Services.
Important details:
• Other wireless equipment sharing thesame frequency can reduce
thetransmission range.
• Therange of all wireless equipment depends on thetype of obstacles located
between thetransmitter and thereceiver (e.g. aconcrete wall will interfere with
thesignal more than aplasterboard wall).
If you experience problems, try thefollowing:
• Turn off any existing wireless equipment to see if that could be causing theproblem.
• Move thewireless equipment and/or shorten thedistance and reduce thenumber
of obstacles (walls, furniture, etc) between thetransmitter and receiver.
Product description
• Wireless weather station with; temperature, humidity, wind speed, direction and
wind chill factor, pressure, rainfall and simple next-day weather forecast.
• Wireless sensor which monitors wind, rain and temperature at ranges up to
40 m line-of-sight.
• Outdoor temperature and humidity sensor.
• Memory for themax and min temperature and humidity readings.
• Time and date display.
Contents
A. Main unit
B. Anemometer
C. Anemometer mounting arm
D. Stand
E. Anemometer mounting base
F. Anemometer mounting pole
G. Rain catcher
H. Outdoor temperature sensor

1
9
2
10
3
11
4
12
5
6
7
8
13
4
English
Buttons and functions
Main unit
Remove theprotective film from thescreen.
Rear panel of main unit
1. [SNOOZE]
2. [SCALE] Choose aunit of measurement
3. [MAX/MIN] Display max/min history of
thetemperature and wind speed
4. [HISTORY] Display pressure history,
reset rain gauge
5. [CHANNEL] Channel selector
6. Wall bracket
7. Table stand attachment
8. [RESET] Reset main unit
9. [UP] Increase setting
10. [SET] Clock and alarm settings
11. [ALARM] Alarm settings
12. [DOWN] Decrease setting
13. Battery cover

16 17
18
14
15
19
20
23
21 22
5
English
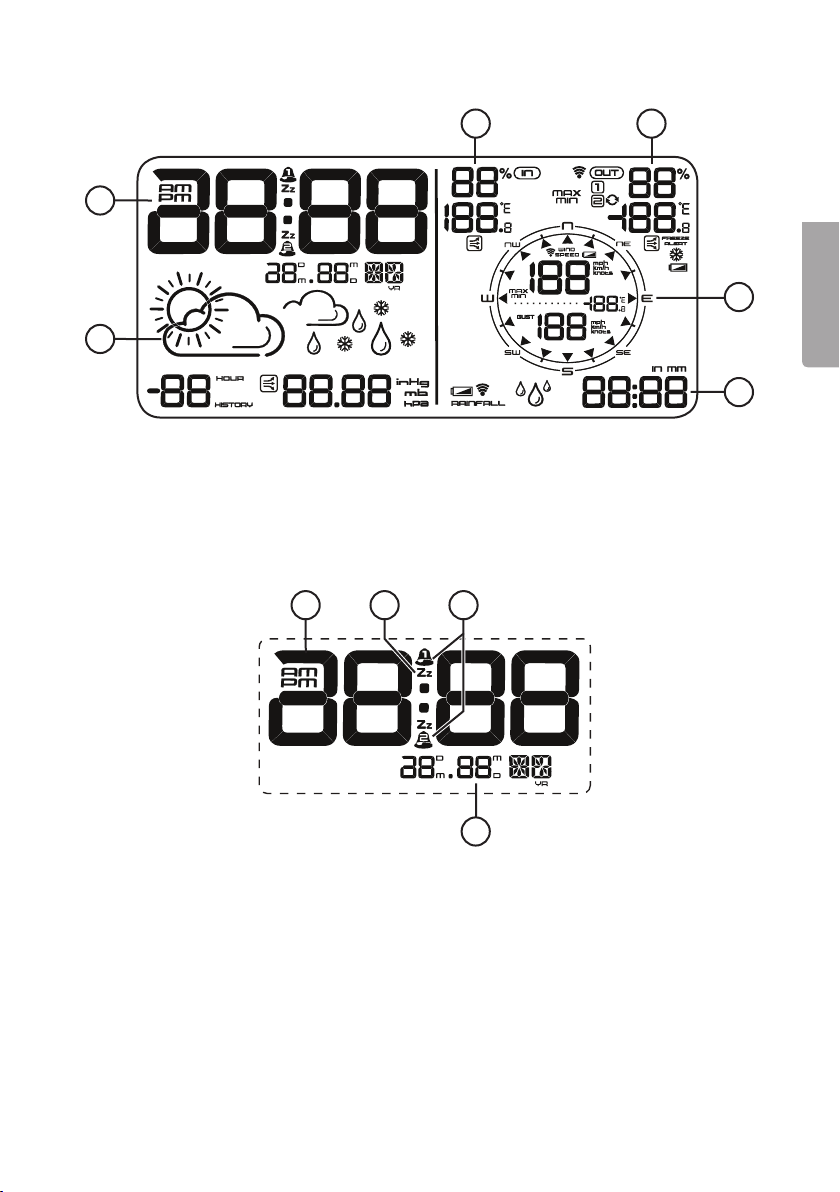
LCD display
14. Time and alarm
15. Forecast and pressure
16. Indoor humidity and temperature
17. Outdoor humidity and temperature
18. Wind
19. Rain
Time and alarm
20. 12/24 hour clock
21. Icon which shows when thesnooze function is activated
22. Icon which shows when Alarm 1 and/or Alarm 2 is activated
23. Date

25
26
24
27
28
29 39
45
30
31 41
34
44
33
43
32
42
35
36 3837
40
6
English
Forecast and pressure
24. Weather history
25. Pressure icon
26. Sunny, sunny intervals and
cloudy symbols
27. Rain or snow symbol
28. Barometer
29. Indoor temperature and humidity
30. Indoor temperature trend
31. Wind speed
32. Speed of thewind gusts
33. Rain icon
34. Signal indicator for therain gauge
35. Rain catcher battery level indicator
36. MAX/MIN indicator
37. Icons which indicate when readings
from sensor 1 or 2 are displayed.
38. Alternative display mode for
thereadings from sensor 1 and 2.
39. Outdoor temperature and humidity
40. Frost warning
41. Outdoor sensor battery level indicator
42. Outdoor temperature trend (rising/falling)
43. Anemometer battery level indicator
44. Wind chill
45. Rain gauge
Indoor humidity and temperature, wind and rain

7
English
Getting started
Note: Move themain unit and sensors to their intended locations and make sure that
you can receive readings from all thesensors before installing theunits permanently.
Batteries
Main unit
1. Open thebattery cover on theback of themain
unit by sliding it in thedirection of thearrow.
2. Insert 3×AA/LR6 batteries. Note thepolarity
markings at thebottom of thebattery
compartment to ensure correct insertion.
3. Refit thebattery cover.
4. Carefully press [RESET] thefirst time
themain unit is switched on and then again
every time thebatteries are replaced.
Rain gauge
1. Undo the4 screws holding thebattery cover
in place.
2. Insert 2×AA/LR6 batteries. Note thepolarity
markings at thebottom of thebattery
compartment to ensure correct insertion.
3. Put thebattery cover back and tighten thescrews.
Outdoor temperature and humidity sensor
1. Open thebattery cover on theback of thesensor
by sliding it in thedirection of thearrow.
2. Insert 2×AAA/LR03 batteries. Note thepolarity
markings at thebottom of thebattery
compartment to ensure correct insertion.
3. Refit thebattery cover.
Anemometer
1. Open theanemometer by twisting off
thelower part.
2. Open thebattery cover by sliding it in
thedirection of thearrow.
3. Insert 2×AA/LR6 batteries. Note thepolarity
markings on theside of thebattery
compartment to ensure correct insertion.
4. Refit thebattery cover.

8
English
Checks and installation
Note:
• Theweather station has no on/off switch. It is operational as soon as
thebatteries are inserted.
• Thescan for signals from thesensors and thedisplay of data from thesensors
occurs automatically as soon as thebatteries have been inserted.
Mounting the main unit
• Themain unit should be located indoors, away from any potential sources of
interference such as TVs and computers.
• Since themain unit contains asensor for pressure, humidity and indoor
temperature, it should not be located too close to sources of heat such as
cookers or heaters/radiators. Neither should it be located in aplace where it is
permanently exposed to direct sunlight.
• Fasten themain unit to awall using thebracket on theback or stand it
on its table stand.
Mounting the rain gauge
Note: Thegauge is self-emptying but should be kept indoors at temperatures below
zero to prevent thewater freezing and damaging it.
• Place thegauge in anopen space at least 45 cm above theground.
• Make sure that thegauge is placed on alevel surface.
• Secure thegauge using 2 screws.
Dismantling the rain gauge for cleaning
1. Carefully remove
thegrille using
asuitable object.
2. Carefully remove
thefilter.
3. Lift out thesensor unit.
4. Re-assemble in reversed order. Make sure that
thesensor unit is correctly aligned. Themetal pins
should fit into theholes and thelittle magnet should
be against theinside of thehousing.
Magnet

a
b
c
9
English
Mounting the outdoor temperature and humidity sensor
Note: Theweather station can be supplemented by
theaddition of anextra sensor (our art no: 36-5123).
• Mount thesensor upright (not horizontally or on its
side) on ahorizontal surface or on awall using
theincluded holder.
• Make sure that thesensor is shielded from direct
sunlight or heavy rain.
Mounting the anemometer
Note: Make sure that the “N” mark on thesensor is pointing north in order for
theweather station to indicate thecorrect wind direction.
• Install theanemometer in anopen space where it is fully exposed to thewind.
• Theanemometer can be mounted on aroof using
theincluded pole and base.
• Theanemometer can be mounted on
awall using theincluded mounting arm.
a) Wind direction indicator.
b) TheN indicator marked on top of
theanemometer must be fixed to point north.
c) Wind speed indicator.

10
English
Operation
Setting the clock
1. Hold in [SET] for 3 seconds – “12 hr” flashes.
2. Press [UP] or [DOWN] to set 12/24-hour clock. Note: The “AM” and “PM” icons
appear only when theclock is set to 12-hour format.
3. Whilst theselected time format is flashing, press [SET] again – thehours display
will flash.
4. Press [UP] or [DOWN] to set thehours.
5. Press [SET] again – theminutes display will flash.
6. Press [UP] or [DOWN] to set theminutes.
7. Press [SET] again – M & D will flash on thedisplay.
8. Use [UP] or [DOWN] to select adate format.
9. Press [SET] again – theyear display will flash.
10. Use [UP] or [DOWN] to set theyear.
11. Press [SET] again – themonth display will flash.
12. Use [UP] or [DOWN] to set themonth.
13. Press [SET] again – thedate display will flash.
14. Use [UP] or [DOWN] to set thedate.
15. Press [SET] again – theselection of languages will flash.
16. Use [UP] or [DOWN] to set thelanguage. Thelanguages are EN (English),
GE (German), FR (French), IT (Italian) and SP (Spanish).
17. Press [SET] again to finish making settings. Thecorrect day sets automatically
in accordance with set date.
Note: If [SET] is pressed once more after step 17 above, you will enter thetime zone
setting. This feature only works on models with radio-controlled (atomic) clocks, not
this model. Thetime zone setting is activated by ashort press on [SET].
Setting alarm 1 and 2
1. In clock mode, press [ALARM] once – “AL1” and thetime of alarm 1 will appear
on thedisplay.
2. Hold in [SET] for 3 seconds – thehours display will flash.
3. Press [UP] or [DOWN] to set thehours.
4. Press [SET] again – theminutes display will flash.
5. Press [UP] or [DOWN] to set theminutes.
6. Press [SET] to finish setting alarm 1. Thealarm 1 icon will appear on thedisplay.
7. Press [ALARM] once. “AL 2” and thetime of alarm 2 will appear on thedisplay.
8. Set thetime in thesame way as you did for alarm 1.
9. Press [ALARM] to finish.
Note: If thesettings process is interrupted for over 10 seconds, theunit automatically
reverts to clock mode.
Checking the alarm times
1. In clock mode, press [ALARM] once to view thetime set for alarm 1.
2. Press [ALARM] twice to view thetime set for alarm 2.

11
English
Turning the alarm on/off
1. In clock mode, press [ALARM] once – “AL1” and thetime of alarm 1 will appear
on thedisplay.
- Press [SET] to turn alarm 1 on.
- Press [SET] once more to turn alarm 1 off.
2. Press [ALARM] again. “AL 2” and thetime of alarm 2 will appear on thedisplay.
- Press [SET] to turn alarm 2 on.
- Press [SET] once more to turn alarm 2 off.
Note: When thealarm is activated, it sounds for 60 seconds. Press any button to turn
thealarm off. If thealarm time is not altered, thealarm will sound again thesame time
thenext day.
Snooze
When thealarm is activated, thealarm icon will flash. Press [SNOOZE] to temporarily
deactivate thealarm. Thealarm will sound again after 8 minutes. Thesnooze function
can be repeated as many times as you like.
Selecting units of measurement
1. Press [SCALE] once – theunit of pressure measurement will flash.
2. Press [UP] or [DOWN] to select either inHg (inches of mercury) or mbar/hPa
(millibar or hectopascals)
3. Press [SCALE] once – theunit of temperature measurement will flash.
4. Use [UP] or [DOWN] to set either ºC or ºF.
5. Press [SCALE] once – theunit of wind speed measurement will flash.
6. Use [UP] or [DOWN] to set either km/h, mph or knots.
7. Press [SCALE] once – theunit of rain measurement will flash.
8. Use [UP] or [DOWN] to set either inches or millimetres.
9. Press [SCALE] once again to finish.
Temperature and humidity
Connecting a second temperature and humidity sensor
1. Hold in [CHANNEL] on themain unit until all thetemperature and humidity values
show “- -”. Themain unit will scan for asignal from sensors 1 and 2.
2. Open thebattery cover on theback of thesensor by sliding it in thedirection
of thearrow.
3. Insert 2×AAA/LR03 batteries. Follow themarkings in thebattery compartment
to ensure correct polarity.
4. Refit thebattery cover.
5. Thereadings from sensor 2 will appear on thedisplay after afew seconds.

12
English
Temperature and humidity display options
Once asecond outdoor sensor has been connected, theuser has thechoice of
one of 3 temperature and humidity display options.
• Press [CHANNEL] once to display thereading from channel 1.
• Press [CHANNEL] once more to display thereading from channel 2.
• Press [CHANNEL] once more to display thereadings from both sensors
alternatively at 10 second intervals. appears on thedisplay.
Temperature trend
Thetemperature trend icon shows theinclination of thecurrent temperature in relation
to thefive latest readings from theprevious hour.
Rising Steady Falling
Frost warning
Thefrost warning icon is displayed if any of theoutdoor sensors detects atemperature
of 4 ºC or lower.
Wind
Wind speed
Thedisplayed wind speed is anaverage value based on thereadings taken during
theprevious minute.
Gust
If thewind speed is constant, no gust reading will be displayed.
Agust reading is only displayed if thewind speed exceeds 8 km/h and thegusts of
wind vary by at least 4 km/h.
Wind chill
Thewind chill is acombination of thetemperature and thewind speed.
Awind chill reading is displayed if thetemperature is below 10 ºC at thesame time as
thewind speed is higher than 1 km/h.
Wind direction
Make sure that themark on thesensor is pointing north to ensure accurate wind
direction readings. Refer to theChecks and installation – Mounting theanemometer
section above.

13
English
Sunny Cloudy Sunny intervals
Rainy Snowy
Rain
When themeasured rain reaches 999.9 mm, “Err”
will appear on thedisplay. Hold in the [HISTORY]
button for 2 seconds to reset therain gauge.
Therain gauge displays theamount of precipitation in thefollowing way
No rain Light rain Heavy rain
Forecast
Theweather forecast is based on how thepressure changes over time and predicts
theweather for thenext 12–24 hours. Theforecast might not necessarily display
thecurrent weather conditions.
Atmospheric pressure
• 940 mbar/hPa – indicates astorm/bad weather.
• 1050 mbar/hPa – indicates good weather.
Theweather forecast will appear as follows:
Rising or falling pressure
Thepressure trend, whether rising, constant or falling, is displayed as follows:
Rising Steady Falling

14
English
• Themain unit will compare thecurrent pressure with theaverage readings from
theprevious hour.
• Theicon will change if thecurrent reading rises or falls by more than 2 mbar.
• Press [HISTORY ] repeatedly to view thepressure for thelast 19 hours.
• If no button is pressed within 5 seconds themain unit reverts to displaying
thecurrent pressure.
Viewing the max/min readings
1. Press [MAX/MIN] once to display themaximum indoor/outdoor temperature and
maximum wind speed.
2. Press [MAX/MIN] once more to display theminimum indoor/outdoor temperature
and minimum wind speed.
3. Press [MAX/MIN] once again to return to normal display mode.
4. If no button is pressed within 5 seconds themain unit returns to
normal display mode.
Resetting the max/min readings
1. Press [MAX/MIN] to display themaximum indoor/outdoor temperature and
maximum wind speed.
2. Hold in [MAX/MIN] for 2 seconds to reset thereadings for themaximum
indoor/outdoor temperature and maximum wind speed to zero.
3. “- - -” will appear in thedisplay for 2 seconds.
4. Press [MAX/MIN] once more to display theminimum indoor/outdoor temperature
and minimum wind speed.
5. Hold in [MAX/MIN] for 2 seconds to reset thereadings for theminimum indoor/
outdoor temperature and minimum wind speed to zero.
6. “- - -” will appear in thedisplay for 2 seconds.
7. Press [MAX/MIN] once again to return to normal display mode.
8. If no button is pressed within 10 seconds themain unit returns to
normal display mode.
Care and maintenance
• Clean theweather station using alightly moistened cloth. Only use mild cleaning
agents, never solvents or corrosive chemicals.
• For optimum results, thebatteries in all theunits should be replaced regularly.
• Never mix old and new batteries.

15
English
Troubleshooting guide
Themain unit does not
display temperature and
humidity readings from
theoutdoor sensor/s.
• Check thebatteries and replace if necessary.
• Hold in [CHANNEL] to scan for asignal from
thesensor/s.
• Make sure that thedistance between thesensor and
themain unit is not too far.
• Make sure that thesignal is not blocked by furniture.
• Press [RESET] to reset themain unit.
Themain unit does not
register any rainfall when
it rains.
• Check thebatteries and replace if necessary.
• Press [CHANNEL] to scan for asignal from
thesensor/s.
• Make sure that thedistance between thesensor and
themain unit is not too far.
• Make sure that thesignal is not blocked by furniture.
• Press [RESET] to reset themain unit.
• Make sure therain catcher is level.
• Check therain gauge by pouring in some water.
You should be able to hear thesensor unit moving
from side to side.
• Dismantle therain gauge and clean it thoroughly.
Refer to theGetting started – Checks and installation
– Dismantling therain gauge for cleaning section
above.
Themain unit is not
registering any wind
speed readings.
• Check thebatteries and replace if necessary.
• Press [CHANNEL] to scan for asignal from
thesensor/s.
• Make sure that thedistance between thesensor and
themain unit is not too far.
• Make sure that thesignal is not blocked by furniture.
• Press [RESET] to reset themain unit.
• Make sure that theanemometer is mounted correctly.
• Try to generate areading by rotating theanemometer
by hand. Try moving theanemometer to abetter location.
Disposal
This product should be disposed of in accordance with local regulations.
If you are unsure how to proceed, contact your local authority.

16
English
Specifications
Main unit
Size 190×150×30 mm
Weight 270 g
Measurement range Pressure: 800–1050 mbar/hPa (± 5 mbar/hPa)
Temperature: 0 to 50 °C / 32 to 122 ºF (± 1.5 °C / 3.0 ºF)
Humidity: 20–95% RH (± 5% RH)
Batteries 3×AA/LR6
Outdoor temperature and humidity sensor
Size 40×80×20 mm
Weight 60 g
Range up to 40 m
Measurement range Temperature: -20 to +70 °C / -4 to +158 ºF (± 2.5 °C/5.0 ºF)
Humidity: 20–95% RH (± 8% RH)
Battery 2×AAA/LR03
Frequency 433 MHz
Anemometer
Size 152×418×214 mm
Range up to 40 m
Measurement range Wind speed: 0–160 km/h / 0–100 mph
Wind direction: 16 positions
Batteries 2×AA/LR6
Frequency 433 MHz
Rain gauge
Size 156×95×60 mm
Weight 60 g
Range up to 40 m
Measuring range Rainfall: 0–999.9 mm
Rainfall measurement increments: 0.05 mm
Batteries 2×AA/LR6
Frequency 433 MHz

A
B
C
D
E
F
G
H
17
Svenska
Trådlös väderstation
Art.nr 36-5087 Modell IW007
Läs igenom hela bruksanvisningen före användning och spara den sedan för framtida bruk.
Vi reserverar oss för ev. text- och bildfel samt ändringar av tekniska data. Vid tekniska
problem eller andra frågor, kontakta vår kundtjänst (se adressuppgifter på baksidan).
Tänk på att:
• Annan befintlig trådlös utrustning på samma frekvensband kan påverka
räckvidden negativt.
• Räckvidden på all trådlös utrustning påverkas av vilka hinder som finns mellan
sändaren och mottagaren (t.ex. en betongvägg dämpar signalen avsevärt mer än
en gipsvägg).
Vid funktionsproblem, prova följande lösningar:
• Stäng av övriga befintliga trådlösa utrustningar för att kontrollera om de kan vara
orsaken till problemet.
• Flytta den trådlösa utrustningen och/eller förkorta avståndet, samt minska antalet
hinder (väggar, möbler etc.) mellan sändaren och mottagaren.
Produktbeskrivning
• Trådlös väderstation med presentation av temperatur, luftfuktighet, vindhastighet,
vindriktning, kyleffekt, lufttryck, nederbörd samt enkel väderprognos för
kommande dygn.
• Trådlösa givare för vind, regn och temperatur med räckvidd upp till 40 m vid fri sikt.
• Utomhusgivare för temperatur/luftfuktighet.
• Minne för max-/min.temperatur och lufttryckshistorik.
• Klocka med tid och datum.
Förpackningen innehåller
A. Huvudenhet
B. Vindmätare
C. Väggfäste för vindmätare
D. Stödben för huvudenhet
E. Fot för vindmätarens stödben
F. Stödben för vindmätare
G. Regnsensor
H. Givare för utomhustemperatur

1
9
2
10
3
11
4
12
5
6
7
8
13
18
Svenska
Knappar och funktioner
Huvudenhet
Ta bort ev. skyddsfilm från huvudenhetens display.
Huvudenhet baksida
1. [SNOOZE]
2. [SCALE] Välj enhet
3. [MAX/MIN] Visa max-/min.historik för
temperatur och vindhastighet
4. [HISTORY] Visa lufttryckshistorik,
nollställ regnmätare
5. [CHANNEL] Välj kanal
6. Fäste för väggmontering
7. Fäste för bordsstöd
8. [RESET] Återställ huvudenheten
9. [UP] Ändra värde uppåt
10. [SET] Inställningar för klocka och
alarm
11. [ALARM] Alarminställningar
12. [DOWN] Ändra värde neråt
13. Batterilucka
16 17
18
14
15
19
20
23
21 22
19
Svenska
LCD-display
14. Tidvisning och alarm
15. Prognos och lufttryck
16. Luftfuktighet och temperatur inomhus
17. Luftfuktighet och temperatur utomhus
18. Vind
19. Regn
Tidvisning och alarm
20. 12/24-timmarsklocka
21. Ikon som visas när snoozefunktion är aktiverad
22. Ikon som visas när Alarm 1 och/eller 2 är aktiverat
23. Datum

25
26
24
27
28
29 39
45
30
31 41
34
44
33
43
32
42
35
36 3837
40
20
Svenska
Prognos och lufttryck
24. Väderhistorik
25. Ikon för lufttryck
26. Indikering för soligt, halvklart
och molnigt
27. Indikering för regn eller snö.
28. Barometer
29. Temperatur och luftfuktighet
inomhus
30. Temperaturtrend inomhus
31. Vindhastighet
32. Vindhastighet i vindbyarna
33. Ikon för regn
34. Signalindikator för regnmätare
35. Batteriindikator för regnsensor
36. MAX/MIN-indikator
37. Ikoner som visar att värden från
givare 1 eller 2 visas
38. Alternativa visningslägen för värden
från givare 1 och 2
39. Temperatur och luftfuktighet utomhus
40. Frostvarning
41. Batteriindikator för utomhusgivare
(temperatur och luftfuktighet)
42. Temperaturtrend utomhus, uppåt/nedåt
43. Batteriindikator för vindgivare
44. Vindens kyleffekt
45. Regnmätare
Luftfuktighet och temperatur inomhus, vind- och regn
Table of contents
Languages:
Other prologue Weather Station manuals


Popular Weather Station manuals by other brands

La Crosse Technology
La Crosse Technology CA84688 Faqs

Ea2
Ea2 BL508 user manual

La Crosse Technology
La Crosse Technology Wireless Weather Station instruction manual

Inovalley
Inovalley SM80 operating instructions

Bresser
Bresser MeteoTemp Baro HZ colour instruction manual

La Crosse Technology
La Crosse Technology WS-9077TWC-IT instruction manual


