Prolux CA2000 User manual
CA2000
AIR PURIFIER
Please read in the User Manual carefully before using the product. Please
keep the User Manual in good custody for reference.

2
Contents
Foreword
2
Features
3
Safety Notices
4
Components
5
Control Switches
6
How to use
7
Maintenance
8
Technical Data
9
Circuit Diagram
10
Troubleshooting
11
Service
12
Warranty
12
Foreword
Congratulations on the purchase of your Prolux CA2000 Air Purifier. Clean pure air is
just a few steps away.
Most people spend about 80% of their time indoors every day, so indoor air quality is
very important to their health. Allergens and pollutants are caused from a variety of
sources which is why the CA2000 is equipped with multiple stages of filtration. Dirty
air in and clean air out! Speaking of dirty air, how would you like to save money and
have cleaner air? The CA2000 is equipped with an auto dirt sensor that turns on the air
purifier automatically when the air is dirty. This saves you money and leaves your air
cleaner.

3
The CA2000 is equipped with a large surface sealed HEPA filter (for purifying large
areas), carbon filter for odors and allergens, ionic cleaning for dust and dirt removal,
automatic dirty air sensor, and multi-speed fan.
We hope you and your family can enjoy cleaner healthier air through the use of Prolux’s
latest Air Purifier. Welcome to the CA2000.
Features: Model CA2000
•Washable pre-filter for cleaning dust and large particles
•Large Surface HEPA Filter for cleaning small particles and allergens
•Carbon Filter for cleaning air and odors
•Anion filtration for cleaning air and reducing dust particles
•Auto Sensor feature automatically turns air purifier on when air is dirty and shuts
off when air is clean
•Multi-speed fan for super quiet cleaning to super powerful cleaning
•Using full power, it cleans nearly 1500 square feet per hour
•Sleep mode that allows for quiet operation and all lights turn off
•AC motor for long durable life
•3-Year factory warranty
•Indicator displays when to change HEPA filter
•Timer that allows the unit to automatically turn off in 1 hour, 4 hours, or 8 hours
•Attractive high-end design
•Works on any standard 120 volt outlet
•Energy efficient: not only can it automatically shut off when done but only uses
20 watts
•Weighs less than 10 lbs for easy movement
•Dimensions are only 14 x 7 x 22

4
Safety Notices
•Please do not disassemble, repair or modify the machine by yourself.
Unauthorized servicing may cause fire or malfunction.
•Only use appliance on 120 volt-rated outlets.
•Do not use air purifier around water, pesticides, cleaning chemicals, grease, oil,
water vapor, moisture or with wet hands as electric shock of fire may occur.
•Do not damage, change, or alter the air purifier in any way. If power line is
damaged, fire and electric shock risk may result.
•When removing filter screen, turn power to off and unplug unit from wall.
•Do not install machine in damp places or humid and foggy rooms, such as
bathrooms.
•Do not install or use the Air Purifier outdoors.
•Don't install the machine near heat sources, as heat may cause damage to the unit.
•Install the unit at least 3 inches away from wall surface to provide sufficient air
flow from the Air Purifier and avoid blockage. Do not block air inlet or outlet.
•Do not put your fingers or foreign bodies into air inlet and outlet. This may cause
risk of electric shock and injury.
•Stop the Air Purifier when pesticides or powerful chemicals are in use as to
prevent chemicals from being absorbed into the HEPA filter or re-circulated in the
air.
•If the Air Purifier will not be used for an extended time, please unplug the power.
Hold the plug to pull out the plug, but do not pull from the power cord, which
may damage the power cord.
•Do not shake, sit or stand on the unit, which may result in malfunction.
•When using the Air Purifier make sure it is in the upright position.
•The machine cannot be used to remove some toxic chemicals or gases.
•Don't use the machine where smoke and dust are produced in large quantities.
•Please make sure the unit is used beyond 2m from devices producing faint
electromagnetic waves, such as: TV, radio, telephone, etc., because of
electromagnetic interference.
5
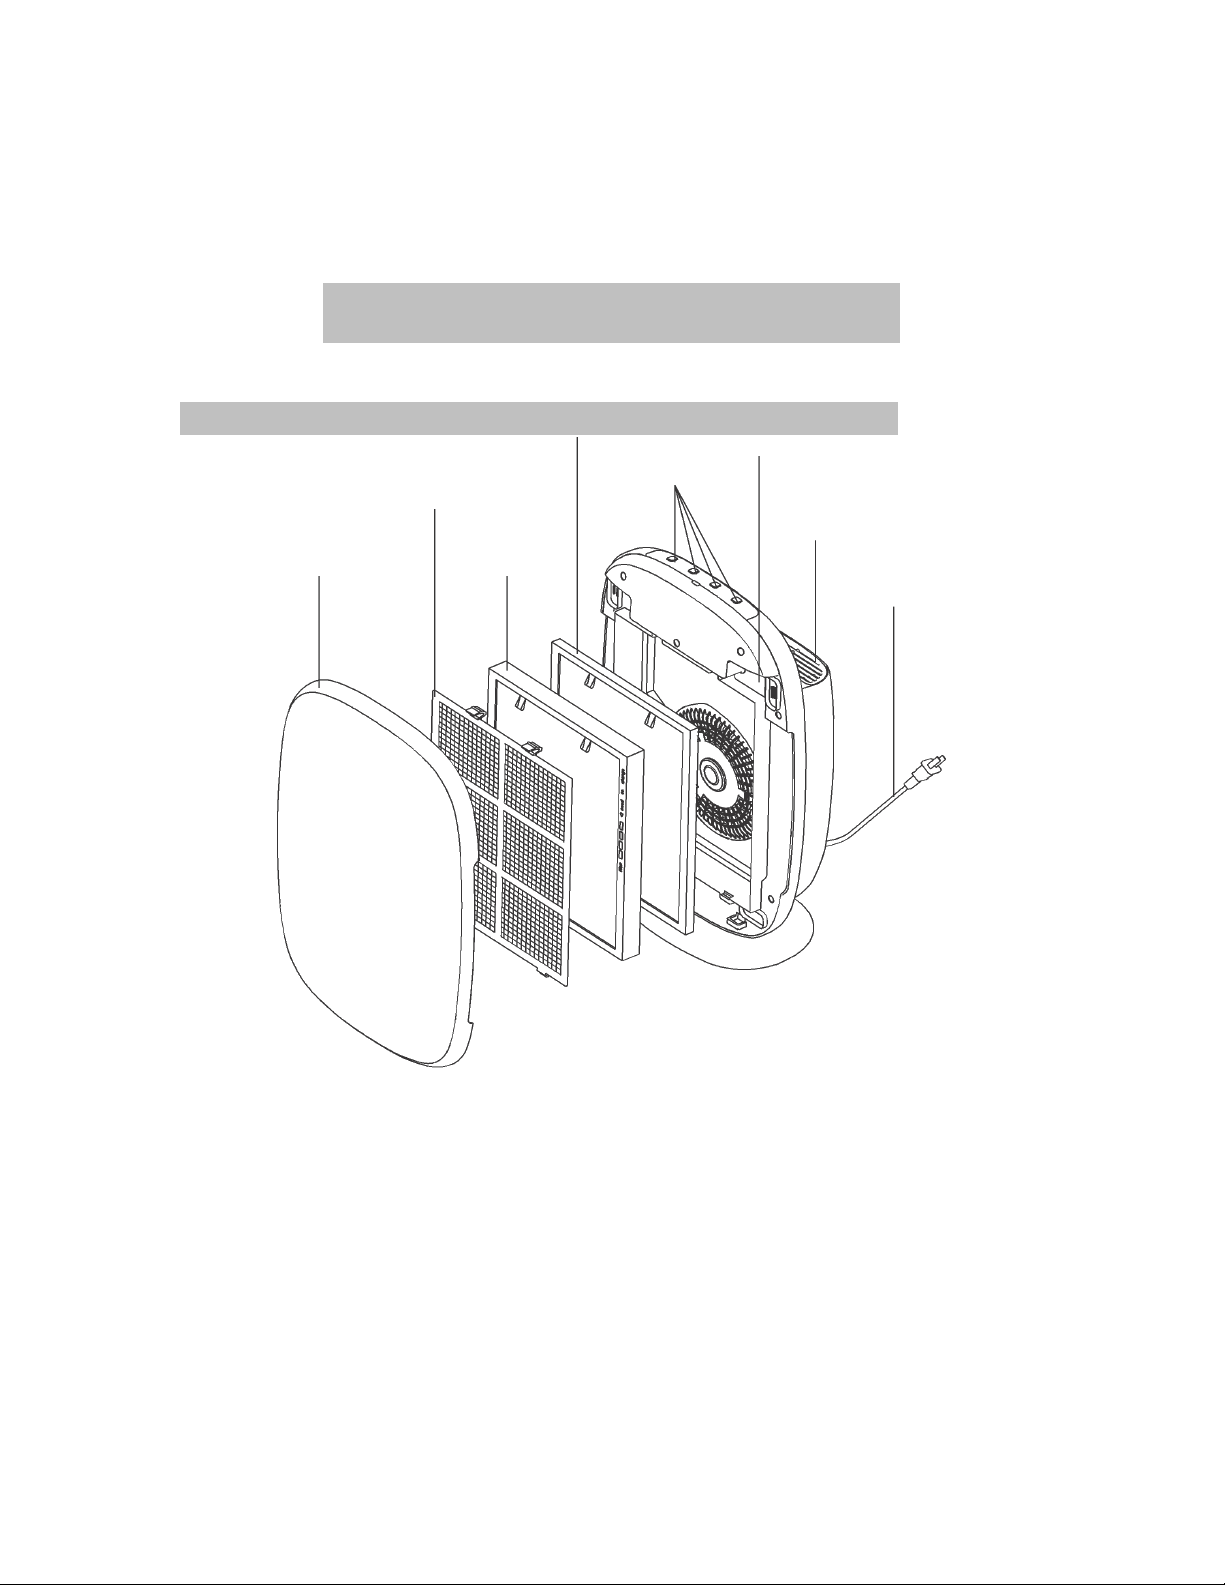
Air Purifier Components
1. 2. 3. 4. 5. 6. 7. 8.
1. Front Cover
2. Pre-filter
3. HEPA Filter
4. Charcoal Filter
5. Control Buttons
6. Induction Cover (Sensor Inside)
7. Air Flow Outlet
8. Power Cord

6
Function
switch
intr
oduction
1. 2. 3. 4. 5.
1. Air Quality Sensor: Blue = Good, Red = Bad
2. On/Off Switch
3. Anion Switch
4. Fan Speed
5. Timer
1. Air quality- particulate sensor device is installed in the Air Purifier. During the first 3
minutes of starting up the unit, the air quality indicator light flashes red and blue
alternately. After 3 minutes, if the air quality is good, air quality indicator light is blue.
If the air quality is detected to be bad or getting worse, the air quality indicator is red. If
the air quality is medium (between clean and dirty), the indicator light shows purple.
When the unit is in automatic mode, this machine adjusts according to the air quality,
adjusting the air volume of the machine automatically, to be truly intelligent.
Note:
①Because the smell sensor is based on the air cleanliness when power plug is inserted,
it’s suggested to insert the plug (the benchmark of smell sensor varies according to
indoor air cleanliness automatically) when the indoor air is clean (for example, no
smoke smell).
②If the Air Purifier is put in the room with contaminated air quality, the indicator of Air
Purifier may show error until air is clean (for the correct way please refer to ①).
2. Turn ON/OFF machine -After unit is connected with main power supply, buzzer
makes two harmonious tones with two flashing lights and the machine is in power-up
mode.
Press ON/OFF button and enter into automatic mode, the buzzer makes three
harmonious tones and ON/OFF indicator light is on, displaying in red. The machine will
automatically purify the air according to the air quality. When air quality indicator light is
blue, the machine will adopt a low speed gear to purify air. When air quality indicator
light is red, the machine will adopt a high speed gear to purify air.
7
3. Anion switch - Anion Air Purifier device is installed in the machine and it can release
millions of anions to the air which helps clean the air and reduce allergens. Press
ANION button and anion indicator light is on, displaying in blue. Anion function is
in ON state at this time. Press ANION button again and anion indicator light is off, then
anion function is in OFF state.
4. Air speed - Three speed modes are contained in this unit: Sleep Mode (very quiet),
Auto mode (used during the day), and Standard mode (used in dirty rooms or full power
cleaning). The default mode is the automatic mode, but to change the mode simply press
the Air speed button. In sleep mode all the indicator lights will turn off after 30 seconds.
Press air speed button again and the red air speed standard mode indicator light is ON.
At this time the machine transfers into high speed status. If the sleep mode has been on
for 12 hours, the air purifier will automatically turn OFF.
5. Countdown timing- This function is used to turn off the Air Purifier after a specific
period of time. Press Countdown timer button and countdown timing device starts at this
time. To change timer to a different time simply press the Countdown timer button again.
The options are 1 hour, 4 hours, and 8 hours.
How to Use
To use the unit simply assemble the unit as instructed. Make sure all filters
are installed with no plastic packing around them. Plug the unit into a live
120 volt wall outlet and press the ON button. The unit will then begin to
purify air. You may then choose which air purifying mode to use.
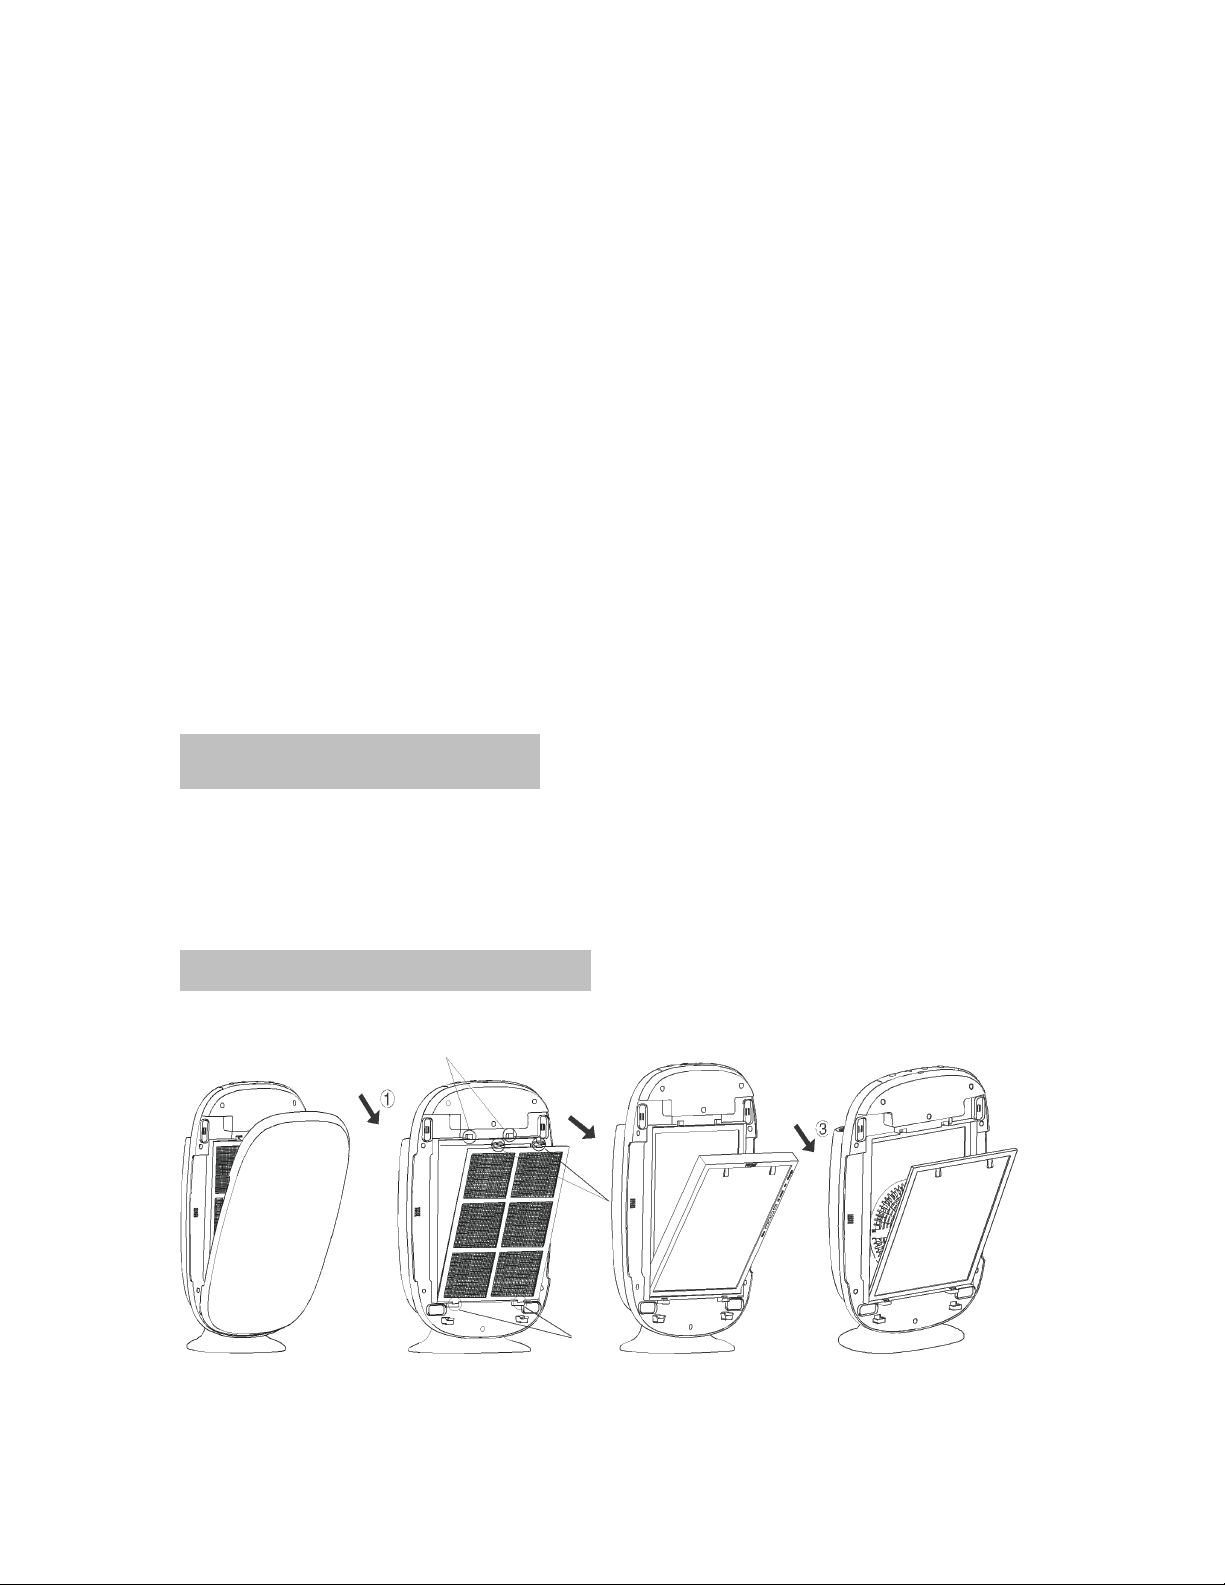
Disassemble the Air Purifier
1. 2. 3. 4.
8
1. Unplug the unit, then pull the front cover off and lift upwards so the
front cover will come off.
2. Remove the pre-filter by pressing down on the two fasteners at the top
of the filter. The filter is then removed.
3. Pull the HEPA filter towards you and remove it.
4. Pull the Carbon Odor Filter towards you and remove it.
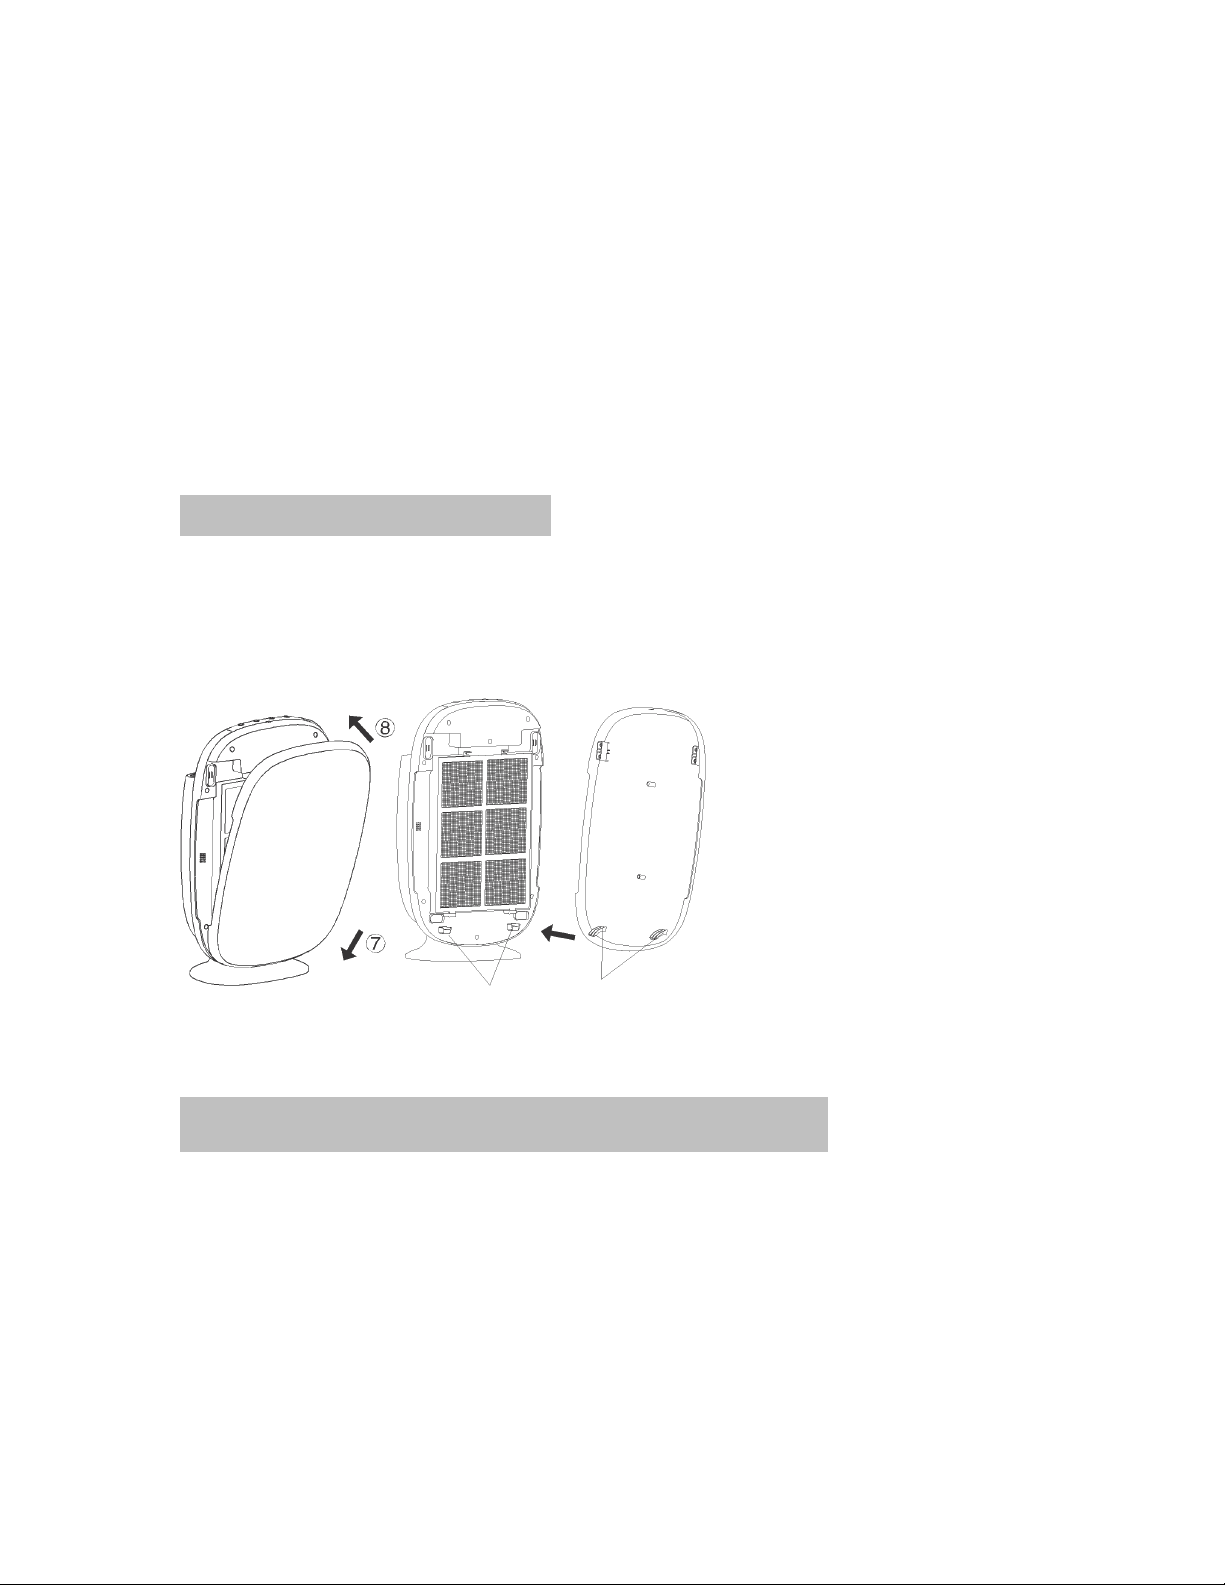
Assemble the Air Purifier
For Installation of the Air Purifier filters, follow the previous steps in
reverse.
To install the cover back on the Air Purifier, follow these steps:
Align the two fasteners at the bottom of the front cover in the 2 holes on the Air Purifier
unit.
Cleaning and maintenance
1. Cleaning the outside of the unit: Unplug unit from wall. Wipe unit with soft cloth and
warm water. Remove front panel and clean inside if necessary. Ensure that the machine
is completely dry before using it again.
2. Cleaning Pre-filter: Pre-filter’s purpose is to filter out larger debris in the air. It is
important to keep this filter clean otherwise the performance of the Air Purifier may

9
decline. To clean it, blow out backwards lightly with compressed air OR rinse with
warm water. Allow to properly dry before reuse.
3. HEPA Filter: When cleaning HEPA filter front side (back side will not need to be
cleaned) you may knock or remove dirt (do not use water to clean) or lightly use
compressed air. Please don’t press HEPA filter screen when cleaning. When filter screen
replacement indicator lights up, contact your authorized dealer you bought the air purifier
from to purchase additional filters.
4. Carbon Filter: The purpose of the carbon filter is to remove particles and absorb odors
for clean smelling air. The Carbon filter cannot be washed and when no longer effective,
it needs to be replaced.
Technical Data
Model
CA2000
Power supply
120V~60HZ
Rated power
20W
Contour dimension
13x7x21 inches
Weight
9.3 lbs.
Air quan
tity
Standard mode≥1424 sq ft/hr
Sleep mode≥550 sq ft/hr
Concentration of anion
3×10 per cm3
Suggested applicable area
500 sq ft (max
1500 sq ft)

10
Circuit Diagram
1.
2. 3.
1. Air Quality Sensor
2. Motor
3. Anion Generator

11
Tr
oubleshooting
Malfunction
Possible Reasons
Solutions
Unit unable to start
If the unit is not getting power from the
cord.
If the unit is not turned on.
Check to make sure cord is firmly
plugged into wall outlet. Check to
make sure wall outlet is live and has
electricity.
Press the ON button to turn on unit.
No air blown out
Filter is clogged or dirty or filter is
still in its plastic case.
Unit is turned to sleep mode
(reduced power).
Remove the plastic packages around all
filters and reinstall.
Remove foreign objects in filters,
replace filters, or clean dirty filters.
Does not reach full cleaning effect.
Obstacle near machine
Too much dust in filters or air
If HEPA adsorbing too much
pollutant
Unit didn’t run long enough.
Remove barrier to intake or exhaust of
unit.
Replace or clean filters and HEPA filter
Allow unit to run longer to clear the air.
Strange odor in air outlet
Too much odor temporarily in air.
If HEPA adsorbing too much
pollutant
Allow the unit to run longer to clear
temporary odor from unit.
If HEPA filter has absorbed room odor
clean or replace filter (s).
For all other reasons contact your authorized dealer for any additional
problems not covered here.

12
Aft
er-sale
Service
In case of any questions or warranty work, contact the authorized dealer where you
purchased the unit.
For fastest service when reporting a failure, please provide details such as your name,
address, telephone number, product model and what the failure is.
3 Year Warranty Terms:
1. This Prolux CA2000 unit is covered by parts and labor for the length of 3 years from
purchase date.
2. The warranty covers all parts of the unit except for filters.
3. Prolux warranties this product for the term of 3 years for parts and labor. The
Consumer is responsible for all shipping or delivery costs associated with the warranty.
4. The warranty is non-transferable and may only be used by original purchaser.
5. To send the unit in for warranty work the consumer must:
1. Contact the authorized dealer where they purchased the product, explain the
details of the problem, and get an RMA number to send the product in for
warranty work.
2. Ship the unit to the warranty center in the United States with proof of
purchase, their return shipping address, and a check for $25 for return
shipping costs.
3. The Prolux service center will then repair or replace the unit as needed and
ship back to the address provided by the consumer.
Table of contents
Other Prolux Air Cleaner manuals


