Prolycht Orion 300FS User manual
User Manual
© 2021 PROLYCHT Lighting Co., Ltd. All rights reserved.


Preface
Thank you for choosing Prolycht's Orion 300 FS color spot light. Orion 300 FS is by far the
most versatile spot light. It combines new semiconductor technology, innovative six-channel
color mixing technology and latest camera research achievements. It is powerful, portable
and reliable, made to be a brand-new weapon you can use for various film and video
production applications.
Safety Instructions
The light fixture is used for professional lighting. The lighting system and accessories must be
used by professional or trained personnel. All operations must follow the relevant safety
instructions:
1.All instructions must be read and understood before use, including the transport,
installation and operation of the equipment;
2. The weight of the lamp head and light accessories must be taken into account when
handling and lifting;
3. Check all cable connections before using. Make sure all cables are appropriately
labeled to prevent tripping;
4. In case the wire is damaged, it must be replaced with the same kind of wire;
5. In case the light source is damaged, it can only be replaced by Prolycht’s certified service
agent or Prolycht’s licensed full-time personnel;
6. The lamp head may reach high temperature when operating. To prevent from burns, staff
must operate carefully when touching the lamp body. it is recommended to wear
appropriate protective devices;
7. Be alert to fire and burn hazards and do not place flammable materials and objects in front
of the lamp;
8. Make full inspection lamp head electrical connection, safety isolation and insulation
protection before using;
9. Do not block and cover the light head vents with objects to prevent overheating;
10. Do not operate the lamp head when the light shield is closed, which may cause
overheating;
11. Before each usage, make visual inspection. Ensure regular electrical inspection at least
every 6 months. Record and form an archive;
12. Operating in explosive environment is prohibited;
13. Do not use the equipment in a humid or dusty environment, which may cause short circuits
and the risk of electric shock;
14. Do not operate the damaged equipment until a professional maintenance personnel
checked;
15. The lamp head and accessories must be safely connected to prevent falling;
16. Before cleaning maintenance or repair, the product must be shut down and the power
cable must be removed from the power outlet. Do not operate when the product is charged;
17. Do not immerse the lamp head in water or other liquids to prevent damage to equipment
and risk of electric shock;
18. When repairing is required, do not remove the lamp head on your own. The product must
be handed over to a designated qualified maintenance personnel. Incorrect removal may
damage the equipment or even cause electric shock when re-using;
- 1 -

CE Compliance Statement
The Orion products comply with the following EU-specified specifications:
1. Directive 2014/30/EU of the European Parliament and of the Council of 26 February 2014
on the harmonization of the laws of the Member States relating to electromagnetic
compatibility;
2.Safety requirement of the European Union LVD 2014/35/EU directive and its latest
amended version;
3. Directive 2011/65/EU of the European Parliament and the Council of 8 June 2011 on the
restriction of the use of certain hazardous substances in electrical and electronic equipment.
EU uniform standards implemented:
EN 55015:2013+A1:2015
EN 61547:2009
EN 61000-3-2:2014
EN 61000-3-3:2013
EN 60598-2-17:2018
EN 60598-1:2015
19. Do not place cables, plugs and contact parts in water to prevent the risk of electric shock;
20. Radiation and glare from the head of the lamp can cause damage to people and animals
(e.g. sunburn, impaired vision). Within the minimum distance (2.5m) specified in the
equipment and operating instructions, exposure to the beam for more than 8 hours per day
will cause injury;
21. Do not use non-recommended batteries, cables and other accessories, which may
damage the equipment, or even cause fire and electric shock;
22. When maintenance is required, must contact the designated authorized maintenance
personnel. Any malfunction caused by unauthorized self-removal is not within the scope of the
repair;
23. The lamp heads and all components that do not have the necessary protection must be
protected by other appropriate protective measures, make sure they are placed in
weatherproof positions, under protective roofs, and ensured that air flow around the
headlights was unrestricted;
24. Check and make sure that the weight of the lamp head, accessories and cables is lower
than the maximum safety load of the bracket;
25. When the lamp head is fixed on the bracket, the screws must be tightened and make sure
the bracket itself is balanced to prevent falls which may damage the equipment and threaten
personal safety;
26. This product is certified by RoHS, CE and FCC. Please strictly refer to the relevant
national standards for operation and use. Incorrect use causes damage to the equipment and
is not covered by the product warranty;
- 2 -
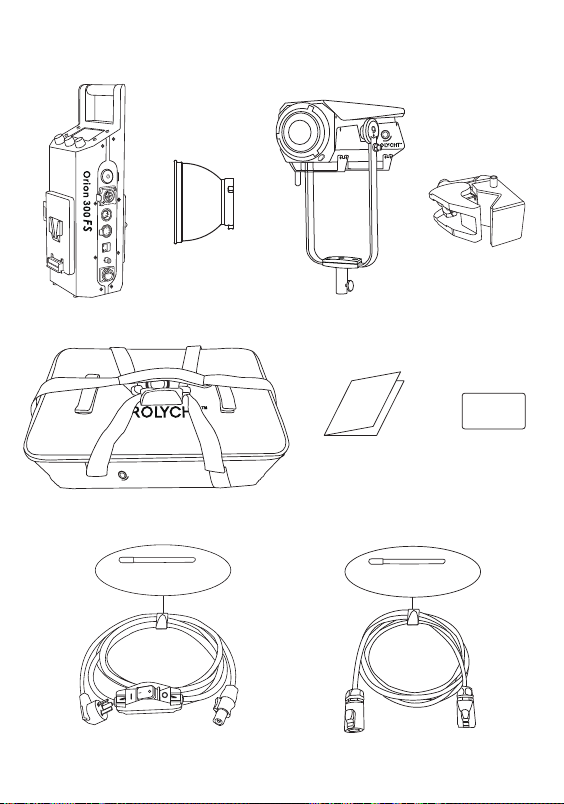
1.Packing List
- 3 -
Control Box Standard Reflector
Carrying Bag
AC Power Cable Connecting Cable
Quick Release
Clamp
User Manual Warranty Card
Lamp Head
Velcro Strap Velcro Strap
PROLYCHT
TM

Clamp Handle
Heat Outlet
Lamp Head Input Port
Product Label
Product ID
Yoke
Clamp Handle
Tripod
Standard
Reflector
Light – Emitting Surface
Mount Lock
Bowens Mount
2.Product Details
Lamp Head
- 4 -
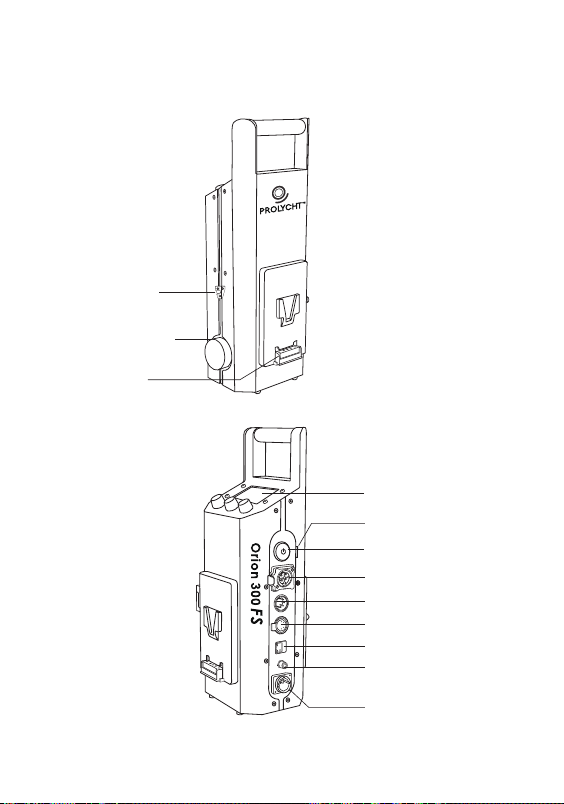
- 5 -
(reserved)
AC Power Port
Control Interface
USB Port
Power Switch
Control Box Output Port
DMX In
DMX Out
LAN Port
Data com. Port
Battery Plate
Quick Shoe
Bluetooth Antenna
Controller Box
- 6 -
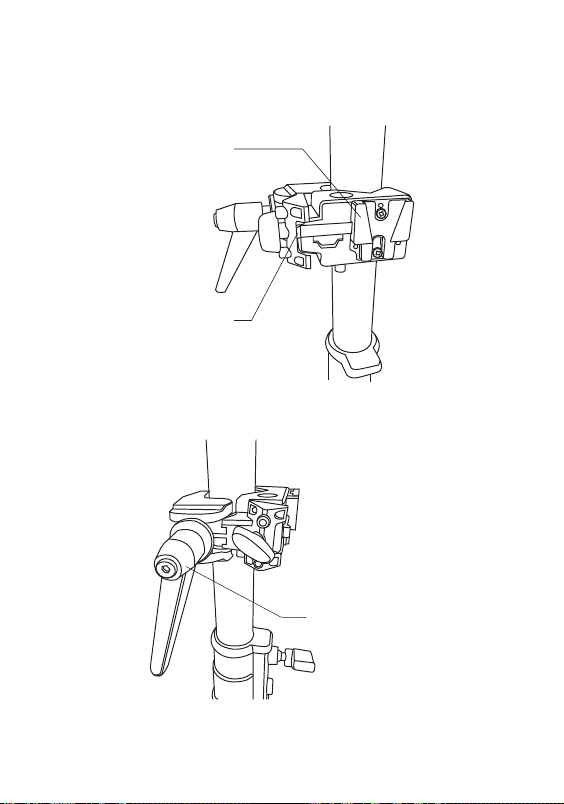
Quick Release Clamp
V Slot
(use to fix control box)
Spring Flake
(press to uninstall)
Claw Handler
(rotate to fix the claw
onto the tripod)

3.Installation
a) Turn On the Power b) Clip the Control Box
①Use the power cable to connect the
controller box and AC 100V~240V
Turn to lock
③When disassembling, press the spring
flake and remove the control box up.
③Press the power button on the controller
box
②Use the connecting cable to connect
lamp head and the controller box
②Insert the control box from top to
bottom into the fast-loading Clamp’s
card piece.
①Install the quick release clamp on the
control box
- 7 -
Turn to lock
Slide down to lock
spring
flake
- 8 -
4.Operations
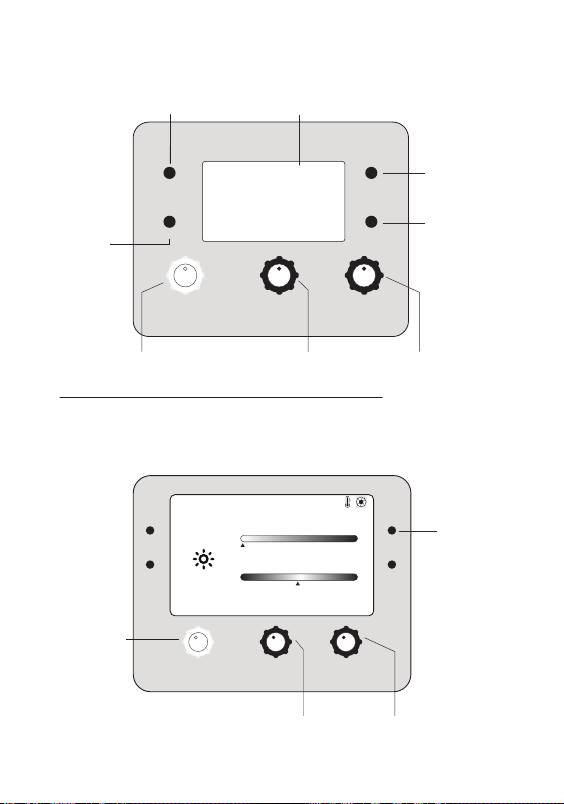
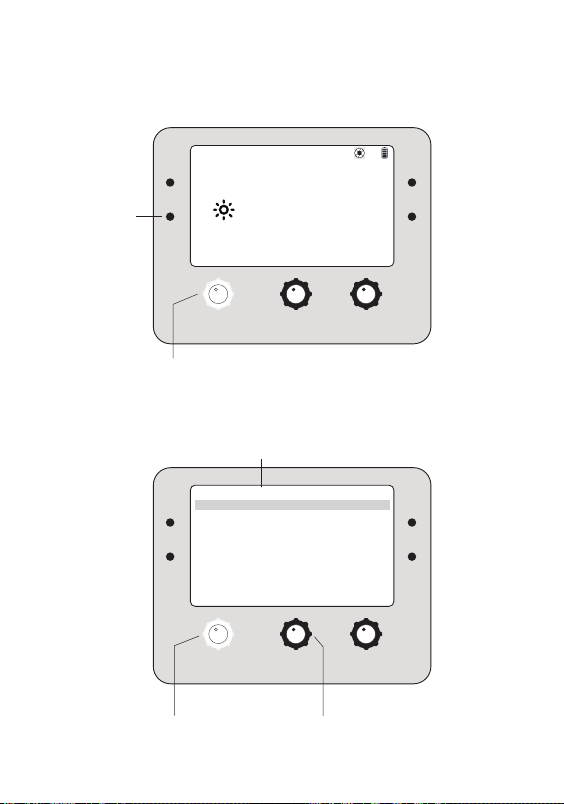
MENU
BACK
MODE
PRESET
INTENSITY / SELECTOR
a) CCT Mode
MENU
BACK
MODE
PRESET
INTENSITY / SELECTOR
BACK
MENU LCD Full Color Screen
MODE
PRESET
Right Knob Central Knob
INTENSITY/SELECTOR Knob*
*This is a multi-function knob, which can be turned or pressed
Adjust CCT Adjust Green/Magenta Deviation
Adjust Intensity
Switch to Next
Lighting Mode
CCT
100%
long press PRESET to save
2000K
G/M:+0.00
A

- 9 -
Main page Advanced setting page
b) Saturation Offset
MENU
BACK
MODE
PRESET
INTENSITY / SELECTOR
long press PRESET to save
Saturation Offset
100%
Offset:0.00
5600K3200K
A
c) HSI Mode
Adjust OffsetAdjust CCT
Adjust Intensity
MENU
BACK
MODE
PRESET
INTENSITY / SELECTOR
Adjust Hue Adjust Saturation
Adjust intensity
100% Hue:00°
Saturation:10%
HSI
long press PRESET to save
Press to enter
adv. setting page
A
MENU
BACK
MODE
PRESET
INTENSITY / SELECTOR
ADV.Settings: HSI
CCT
7300K
Adjust CCT of the central white point
Left-knob to select.Central-knob to modify

- 10 -
MENU
BACK
MODE
PRESET
INTENSITY / SELECTOR
Main page
Adjust CCT
Adjust intensity
Press to enter
Gel database
MENU
BACK
MODE
PRESET
INTENSITY / SELECTOR
LEE > 700 Series
700.
perfect Lavender
701.
Provence
702.
Special Pale Lavender
703.Cold Lavender
704.Lily
706.King Fals Lavender
708.Cool Lavender
709.Electric Lilac
710.Spir Special Blue
711.Cold Blue
-
Gel Brand Gel Category
Gel brand Gel Category
Rosco Color Correction
Color Correction
LEE
CalColor
Cinelux
600 Series
700 Series
Cosmetic
Color Filters
Storaro
Selection
Switch Gel brand Switch Get category
Turn to scan,
Press to confirm
d) Gel Mode
Gel database page
A
59.8%
Gel
ROSCO
3202.
Full CTB
3200K 5600K
press BACK for more gels
- 11 -
MENU
BACK
MODE
PRESET
INTENSITY / SELECTOR
Adjust Intensity
Press to enter
Source database
e) Source Matching Mode
Main page
99.7%
Other
Green Glow Stick
A
Source
Matching
press BACK for more sources
MENU
BACK
MODE
PRESET
INTENSITY / SELECTOR
Incandescent Fluorescent Discharge Other
01.Candle
02.Gas Fire
03.Sun Direct
04.Sun Overcast
05.SUn Blue Hour
06.Mobile Phone
07.Computer Monitor
08.Electro-luminescent
09.Blow Torch
10.Road Flare
Switch Source Category
Turn to Scan
Press to Confirm
Source Category
Source Database

- 12 -
MENU
BACK
MODE
PRESET
INTENSITY / SELECTOR
f) Light Effect Mode
Advanced Setting Page
Adjust Speed
Change intensity
Press to enter adv. setting page
Control
(Start/Pause/Off)
Press to Enter
Effect Database
Back to the main page
Turn to Scan
Press to Confirm
Source Database Page
0.00%
press BACKfor more effects.
Speed
A
Light Effect
Strobe
MENU
BACK
MODE
PRESET
INTENSITY / SELECTOR
Adjust Parameter
Select Parameter
MENU
BACK
MODE
PRESET
INTENSITY / SELECTOR
ADV. Settings: Strobe
TYPE COLORS SAT
Color 03-color 100%
GEL MODE
3202
CCT DUV
2700K +0.00
Left-knob to select.Central-knob to modify.
Light Effect
01.Fire
02.Candle
03.Paparazzi
04.Lightning
05.Club
06.Police
07.FireWorks
08.Strobe
09.Television
10.Party
Main page

- 13 -
100% Hue:00°
Saturation:10%
A
HSI
long press PRESET to save
MENU
BACK
MODE
PRESET
INTENSITY / SELECTOR
Select Color
Adjust Intensity
33.3%
单色控制
49.7% 68.2% 22.6% 65.0%
Central-knob to select.Left-knob to modify
Single Color
g) RGBACL Mode
h) Save, Retrieve and Delete Data
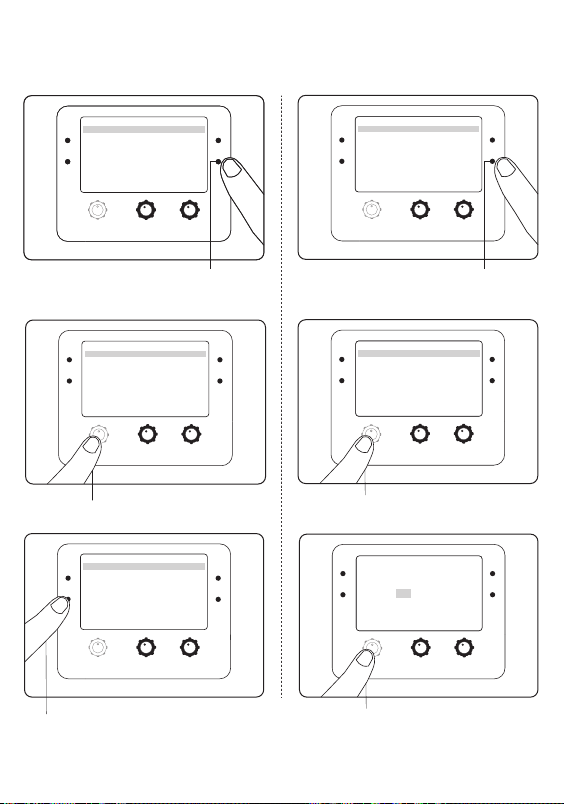
(i) Save
①Long press the PRESET button on any
lighting mode
MENU
BACK
MODE
PRE
INTENSITY / SELECTOR
②Press to confirm
SELECTOR
MENU
BACK
MODE
PRESET
SELECTOR
MENU
BACK
MODE
PRESET
Save to Preset?
Yes
06
NO
33.3% 49.7% 68.2% 22.6% 65.0% 33.0%
A
- 14 -
(ii) Retrieve
①Press the Preset button to enter the
PRESET page
MENU
BACK
MODE
PRE
INTENSITY / SELECTOR
MENU
BACK
MODE
PRE
INTENSITY / SELECTOR
②Turn to scan, press to confirm
③Press the BACK button
Preset List
01.<CCT>57.1% 3000K +0.0
02.<CCT>54.5% 5200K -0.13
03.<CCT>54.6% 7000K -0.13
04.<AR>0.1% 6550K -0.13
05.<HSI>0.1% 18 45%
06.Empty
07.<Effect>Fireworks
08.<Gel:Rosco>3200K 3202.Full CTB
09.Empty
10.Empty
SELECTOR
MENU
BACK
MODE
PRESET
Preset List
01.<CCT>57.1% 3000K +0.0
02.<CCT>54.5% 5200K -0.13
03.<CCT>54.6% 7000K -0.13
04.<AR>0.1% 6550K -0.13
05.<HSI>0.1% 18 45%
06.Empty
07.<Effect>Fireworks
08.<Gel:Rosco>3200K 3202.Full CTB
09.Empty
10.Empty
MENU
K
MODE
PRESET
INTENSITY / SELECTOR
Preset List
01.<CCT>57.1% 3000K +0.0
02.<CCT>54.5% 5200K -0.13
03.<CCT>54.6% 7000K -0.13
04.<AR>0.1% 6550K -0.13
05.<HSI>0.1% 18 45%
06.Empty
07.<Effect>Fireworks
08.<Gel:Rosco>3200K 3202.Full CTB
09.Empty
10.Empty
(iii) Delete
①On the preset list page, long press the
PRESET button until the entry turns red
MENU
BACK
MODE
PRE
INTENSITY / SELECTOR
Delete Mode
01.<CCT>57.1% 3000K +0.0
02.<CCT>54.5% 5200K -0.13
03.<CCT>54.6% 7000K -0.13
04.<Source>Tungsten bulb
05.Empty
06.Empty
07.Empty
08.Empty
09.Empty
10.Empty
③Press to confirm deletion
SELECTOR
MENU
BACK
MODE
PRESET
确认删除
是 否
Delete Confirm
Yes No
MENU
BACK
MODE
PRESET
②Turn to scan, press to confirm
SELECTOR
Delete Mode
01.<CCT>57.1% 3000K +0.0
02.<CCT>54.5% 5200K -0.13
03.<CCT>54.6% 7000K -0.13
04.<Source>Tungsten bulb
05.Empty
06.Empty
07.Empty
08.Empty
09.Empty
10.Empty

- 15 -
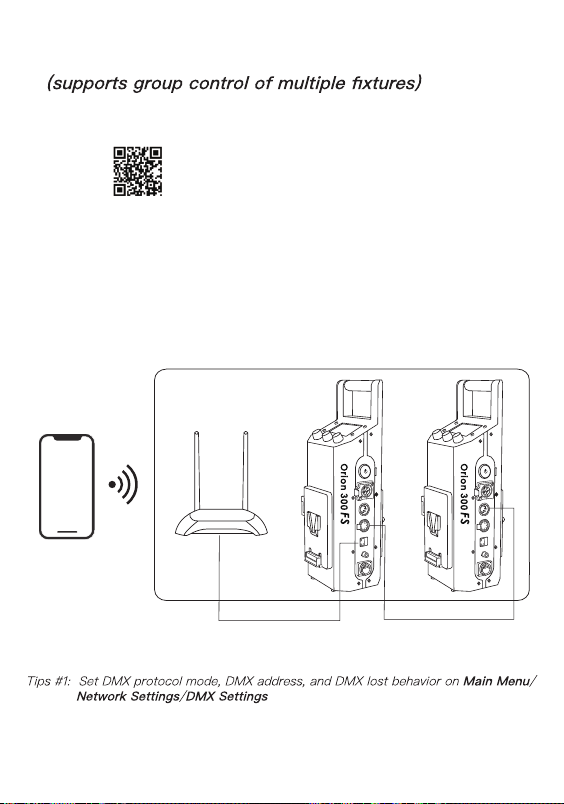
Daisy chain multiple Orion 300 FS using DMX cables
② Turn on Bluetooth on the phone/tablet
③ Connect your phone/tablet to any Orion 300 FS in the DMX
network
4.Use ChromaLink Control Multiple Fixtures
a) Use Bluetooth Mode
Steps:① Download and open ChromaLink App
ChromaLink
Bluetooth
- 16 -
Daisy chain multiple Orion
300 FS using DMX cables
Connect via Ethernet cable
Steps:① Download and open ChromaLink App
②Daisy chain multiple fixtures using DMX signal cord and
connect any of the fixture in the network to a router via Ethernet
cable.
③Turn on your phone/tablet’s Wifi and connect it to the router.
④Open ChromaLink App, and follow the tutorial.
b) Use Wifi Mode
ChromaLink
Wifi
Router

- 17 -
Key Specs
Optical Interface Bowens
Light Aperture 50mm/1.97''
Power Consumption 300W ~ 320W
Battery Configuration Two V-mount 14.8V Batteries
Weight Light Head 3.7 kg/ 8 lbs
Power Box 3.2 kg/ 7 lbs
White Light 2,000 K to 20,000 K with Green-Magenta adjustment
Color Modes CCT, Skin-tone, HSI, Individual Color, Gel,
Source matching, Dynamical Effects
Color Rendition
3200 ~ 6500K:
CRI : 96 Average
TLCI : 96 Average
TM-30 Rf 94 Average
Illuminance 1m 30,000lx (Standard reflector)
Dimming 0 ~ 100% smooth, with selectable dimming curves

© 2021 PROLYCHT Lighting Co., Ltd. All rights reserved.
www.prolycht.com
2784 Homestead Road #304, Santa Clara, CA, 95051
Table of contents
Other Prolycht Spotlight manuals


