Promate PW2700 User manual

Operator Manual
GASOLINE PRESSURE WASHER
IMPORTANT –Please make certain that persons who are to use this
equipment thoroughly read and understand these instructions and any
additional instructions provided prior to operation.
Record the model and serial numbers of your pressure washer below:
Model No._____________________ Serial No._______________________

FOREWORD
Thank you for purchasing our product. This operator manual is for proper
handling, minor checking and maintenance of the pressure washer. Before
using your pressure washer: Please read these instructions completely and
carefully in order to make the best use of it as well as operate it safely.
Due to constant efforts to improve our products, certain procedures and
specifications are subject to change without notice, if you have any
questions, please contact Promate Service.
CONTENTS
1 Safety Precautions 3
2 Pressure Washer Terminology 4
3 Assembly Attachments 4
4 Preparing the Pressure Washer 7
5 Starting the Pressure Washer 9
6 Operating the Pressure Washer 9
7 Maintenance and Storage 12
8 Specifications 17
9 Troubleshooting Guide 17
10 Service Information 21
Pressure Washer Exploded View 22-27

1. SAFETY PRECAUTIONS
The electric power generated by the gasoline engine of the pressure washer can be used for
many kinds of electric appliances. When handling it, please keep to the following matters.
Please make sure you review each precaution carefully.
READ OPERATING INSTRUCTIONS: Read and understand tool labels, safely
warning and precaution in this manual before operating the tool.
FIRE HAZARD: Heat from engine exhaust can ignite combustible materials,
building structures or gas tanks resulting in a fire. Place the tool on a flat surface
a safe distance from building or other combustible material. Ensure is directed
away from tool.
ELECTRICAL SHOCK: This tool produces hazardous electrical voltage.
WEAR APPROVED EYE PROTECTION: This tool has rotating and moving parts
that could become airborne if damaged.
POISONOUS FUMES: This tool uses a gasoline powered engine that produces
poisonous fumes from its exhaust.
EXPLOSION HAZARD: Fuel and its vapors are extremely flammable and
explosive.
ROTATING PARTS: Starter and other rotating parts on this tool can entangle
loose items or accessories resulting in moderate to severe injury.
HOT SURFACES: Engine muffler and other engine parts can become very hot.
KICKBACK: Starter cord can kickback (recoil) very rapidly.
UNIT IS HEAVY: Take care when lifting or moving unit.
INJECTION HAZARD: Pressure washers can produce puddles, fluid streams
severe enough to penetrate animal or human skin.
SLIPPING AND FALLING: Pressure washers produce puddles of slippery liquid
that can result in falls. Kickback from spray wand can result in falls when using
unstable platforms.
Improper and unsafe use of this pressure washer can result in death, fire, and/or body injury.
This instructions manual contains important information about the products safety.
3

2. PRESSURE WASHER
TERMINOLOGY
Following are the common terms associated
with the use of pressure washers:
PSI: Pounds per square inch-common
unit measure used for water pressure, air
pressure, hydraulic pressure and pounds
of force.
GPM: Gallons per minute (liters per
minute[metric])-common unit measure
used for flow rate of water.
Bypass Mode: In mode, high pressure
pump recirculates water because spray
gun trigger is not squeezed.
Thermal Relief Valve: When in Bypass
Mode: this valve releases a jet of water
to prevent water temperatures from
reaching harmful levels that damage the
pump. Once the water has cooled, the
temperatures from reaching harmful
levels that damage the pump. Once the
water has cooled, the thermal relief valve
will reset itself. DO NOT allow pump to
run without spraying in (In Bypass Mode)
for more than 5 minutes.
3. ASSEMBLY/
ATTACHMENTS
This pressure washer requires some assembly
and will be ready for use after servicing with
manufacturer approved oil and fuel. If you
have any problems with the assembly of your
pressure washer, please call Promate Service
for assistance, have the model, revision, and
the serial number from the data tag available.
3-1. Pressure Washer
WARNING! Unit is heavy. DO
NOT attempt to lift and remove
the pressure washer unit from
the carton.
1. Using a boxcutter, open the carton
completely by cutting the four corners
allowing the sides to lay flat. Leave the
pressure washer on the carton.
2. Remove all the items except the pressure
washer from the box and inspect for
completeness (See Functional Description).
3. Carefully tip the pressure washer forward
and place on its front side and proceed to
assemble the unit using the provided tools.
4. Insert the shaft through the holes in the
bottom frame tubing as shown.
5. Assemble the wheels to the shaft, insert
the Cotter Pins using a pair of pliers (not
provided).
6. Assemble the Legs to the bottom frame
tubing (using the nuts and Bolts) as shown.
Tighten all mounting hardware.
7. After completion of wheel/leg assembly.
Carefully place the pressure washer on its
wheels and legs.
8. Pull the handle lock pic and fully raise the
handle upright. Release and snap the
locking hole in the frame.
9. Assemble the top and bottom gun holders
(using the nuts and Bolts) to the frame as
shown. Tighten all mounting hardware.
3-2. Pressure Hose to Pressure Pump
Pull back the high-pressure outlet fitting
collar, Insert Pressure Hose inside the fitting
4

and release collar. Tug on the hose to make
sure it is secured.
3-3. Pressure Hose to Spray Gun
1. Pull slip ring on female quick-disconnect
fitting of high-pressure hose back.
2. Insert male quick-disconnect fitting on
spray gun into female quick disconnect on
high pressure hose.
3. Release slip ring on female quick-
disconnect and twist. Listen for "click" to
ensure both quick disconnects are
coupled.
4. Pull high pressure hose and spray gun in
opposite direction to ensure they DO
NOT separate.
3-4. Spray Wand to Spray Gun
1. Remove the protective plastic cap at the
inlet of the wand.
2. Thread spray wand onto spray gun.
3. Tighten the nut to secure the wand to
the Gun.
3-5. Selecting the Right Nozzle
To prevent damage to your surface and
to select and nozzle size for your
application, always start with lowest
pressure nozzle size (White) and
continue changing to the higher nozzle
size until the best work result is
achieved.
The Pressure Washer comes furnished
with five spray nozzles. Each nozzle is
color coded and delivers a specific spray
pattern and pressure for a particular
cleaning job. The size of nozzle
determines the size of the fan spray and
the pressure out of the nozzle.
0° Nozzle –Red: This nozzle delivers
a pinpoint of pressurized water and is
extremely powerful. It covers a small
area of cleaning only, and should only
be directed at surfaces that can
withstand high pressure such as metal
or concrete. DO NOT use this nozzle to
clean wood.
5

15° Nozzle –Yellow: This nozzle
delivers a powerful 15-degree spray
pattern for intense cleaning of small
areas. This nozzle should only be used
on areas and materials that can
withstand high pressure.
25° Nozzle –Green: This nozzle
delivers a 40-degree spray pattern and
a less powerful stream of water. This
nozzle should only be used on areas that
can withstand pressure from this nozzle.
40° Nozzle –White: This nozzle
delivers a 40-degree spray pattern and
a less powerful stream of water. This
nozzle can cover a wide area and should
be used for most general cleaning Jobs.
Chemical Nozzle –Black: This nozzle
is used to apply special chemicals and
cleaning solutions. This nozzle produces
the weakest pressure stream. The
Pressure Washer nozzles are stored in
receptacles on a panel mounted to the
handle of the washer. Colors on the
panel identify the nozzle location and
spray panel.
3-6. Nozzles to Spray Wand
Never place hands in front of nozzle.
Never grasp hose or fittings during
pressure washer operation. Never
attempt to attach or remove spray
wand or hose fittings while pressure
washer system is pressurized.
Turn off pressure washer and lock
the gun trigger before attempting to
change pressure nozzles.
1. To attach nozzle into female quick-
disconnect spray wand and press to
snap in the nozzle.
2. To detach, slide down slip ring on
female quick disconnect to eject the
nozzle.
3-7. Pressure Pump to Water
Supply
1. Connect the Garden hose to the
water supply and turn water supply
on to fill the hose with water and also
remove any debris in the hose. Turn
OFF water supply.
2. Make sure that the filter inside
pressure washer water inlet is clean
and undamaged. Thread the Garden
hose fitting into water hose inlet.
6

Hand tighten the inlet nut.
3. Turn on water supply.
The pressure washer requires a
minimum of 20 PSI and a flow rate
of 5 GPM.
4. PREPARING THE
PRESSURE WASHER
The pressure washer is shipped with
shipping oil plug to prevent oil
leakage from the pump during
shipping. To replace the shipping
plug with the Breather plug
(provided) perform the following:
Failure to remove shipping plug and
replace it with the dipstick/oil plug
will damage pressure pump. Failure
to add pump Breather Plug could
void warranty.
1. Using a wrench, remove shipping
plug from pressure pump. Discard
shipping plug.
2. Remove pump Breather plug from
parts bag and insert ii into pressure
pump.
3. Tighten pump Breather plug securely
by hand. DO NOT use wrench to
lighten. Using a wrench to lighten
pump Breather Plug could strip
threads.
4. Use the oil level glass window on the
side of the pump to ensure that
pump oil is at mid-point or above.
5. Add oil to pressure pump if level is
below the prescribed level. Use only
30-weight non-detergent oil.
4-1. Adding Engine Oil
1. Move the pressure washer OUTSIDE
and place on flat and level surface.
2. Remove the engine oil dipstick and
place funnel in the oil reservoir.
3. Pour the supplied engine oil (30
weight) until oil level reaches the
threads inside the oil reservoir.
4. Hand tighten the oil dipstick and
clean any spilled oil.
7

4-2. Low Oil Sensor
To prevent engine damage caused by an
insufficient amount of oil in the
crankcase, engine is equipped with low
oil sensor. If the oil is below the safe
amount, the sensor will activate and will
prevent engine start-up or will stop the
running engine.
If pressure washer shuts off and the oil
level is within specifications, check to
see if pressure washer is sitting at an
angle that forces oil to shift.
Place on an even surface to correct this.
If engine fails to start, the oil level may
not be sufficient to deactivate low oil
level sensor. Add oil as described above.
4-3. Adding Fuel
1. Move the pressure OUTSIDE and
place on a flat and level surface.
2. Remove the gas tank cap. Carefully
add 87 Octane (or higher) grade
gasoline to the tank. DO NOT overfill.
Leave room for the gasoline to
expand.
3. Replace and hand tighten gas cap
and wipe off any spilled fuel.
Fuel and fuel vapor are extremely
flammable and explosive.
Fire or explosion from misuse
of fuel can cause severe
burns and even death.
Failure to use fuel as
recommended in this manual
will void the warranty.
When adding fuel to the Pressure
Washer, observe the following:
DO NOT USE unapproved gasoline such
as E85 (85% ethanol/15%gasoline)
DO NOT mix oil with gasoline.
DO NOT modify engine to run on
alternate fuels.
Turn pressure washer OFF and let ii cool
for at least two minutes before
removing fuel cap. Loosen fuel cap
slowly to release pressure.
Keep fuel away from sparks, open
flames, pilot lights, heat and other
ignition sources.
DO NOT light a cigarette or smoke near
open fuel tank or container.
Clean area around fuel fill cap and
slowly remove cap to allow any pressure
to escape. Install fuel cap and allow any
spilled fuel to evaporate before starting
engine.
DO NOT Overfill fuel tank. Slowly add
unleaded gasoline (A) to fuel tank (B).
Use extreme caution not to fill fuel
above baffle (C). This allows appropriate
space for fuel expansion.
8

4-4. Using the Pressure Washer at
High Altitudes
Engine carburetor is factory adjusted for
optimum operation from Oto 1500 meters
above the sea level. Approximately 10% of
power drop in the engine is expected with
respect to each 1000 meters of altitude. To
maintain proper emissions compliance and
optimum performance & fuel consumption,
high altitude adjustment may be required for
altitudes above 1500 meters. If adjustment is
required, contact Promate Service.
5. STARTING THE
PRESSURE WASHER
Prior to starting the Pressure Washer, make
sure to have the following:
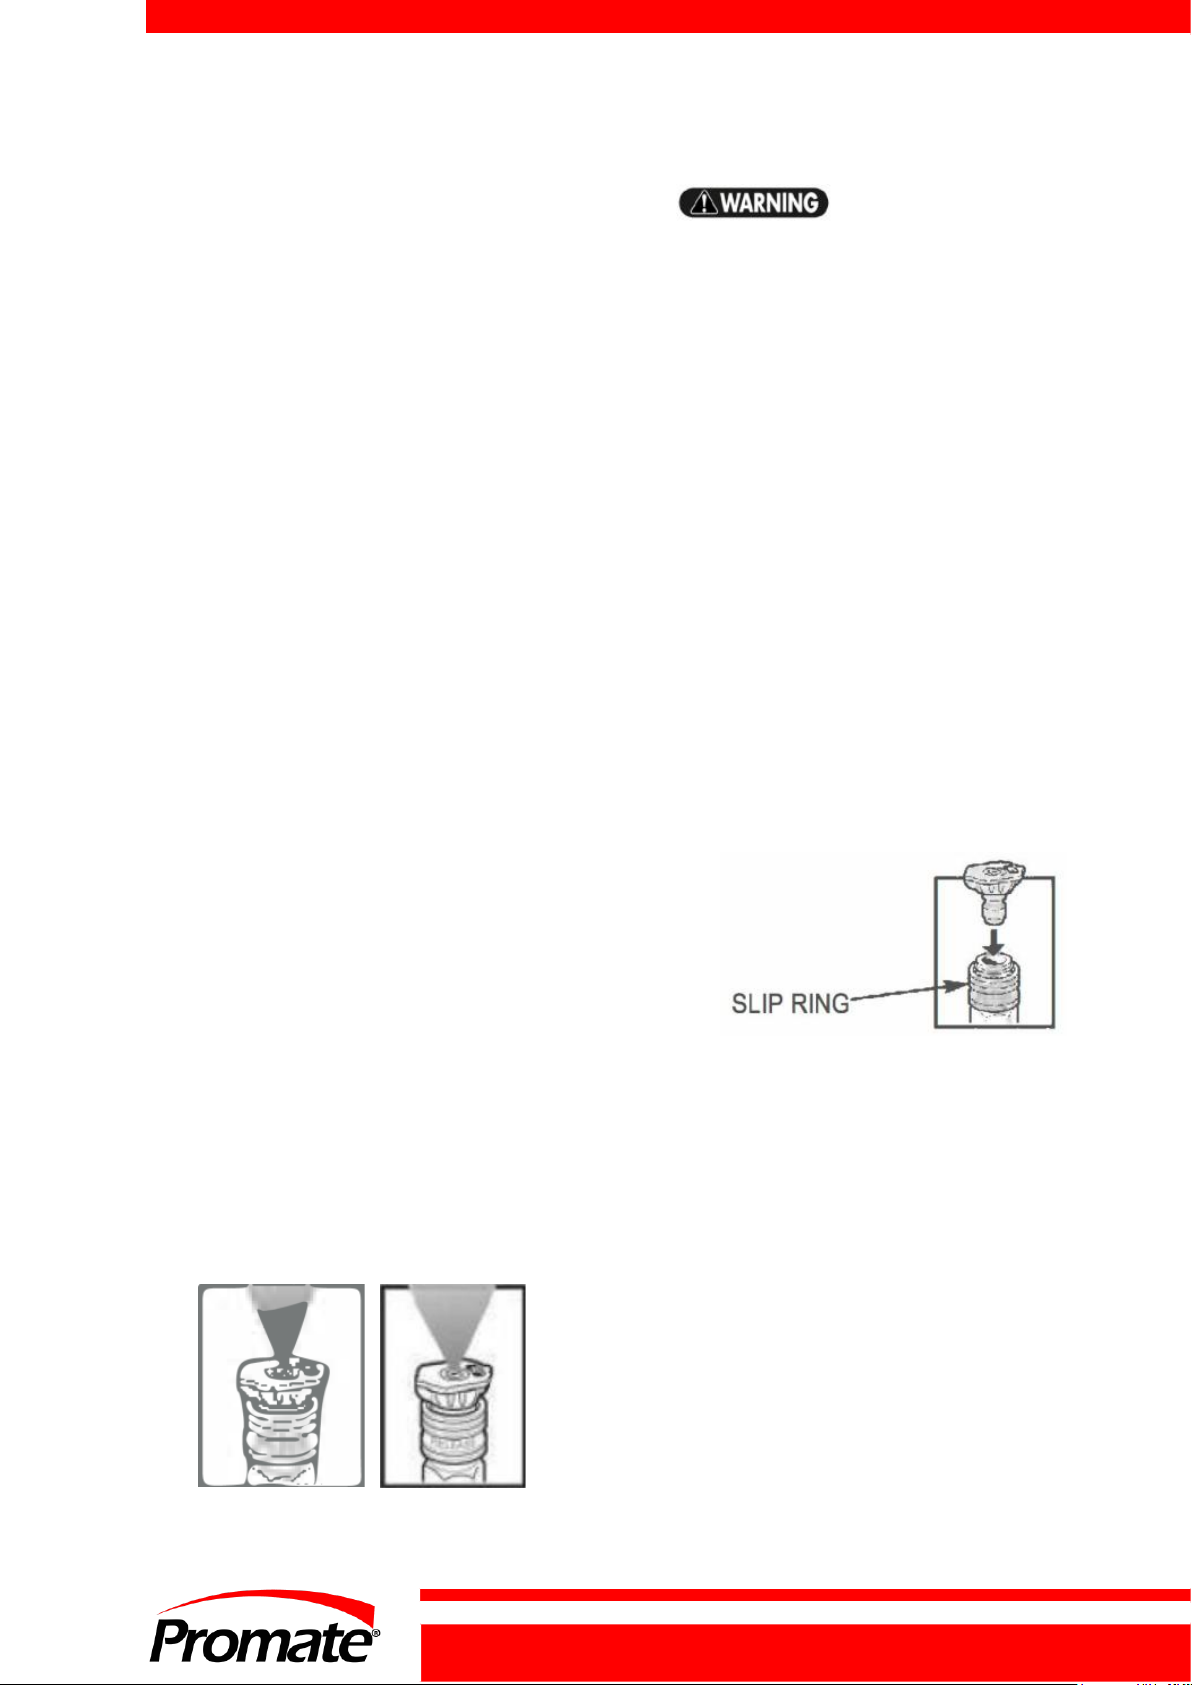
1. Selected a proper size nozzle for the job
at hand (see “Selecting the Right
Nozzle for the Job”).
2. Attached the pressure washer to the
water source and turned on the source
(see “Pressure Pump to Water
Supply”).
3. For your protection, wear the protective
safety glasses provided.
4. Move the pressure washer outside in a
fully ventilated area.
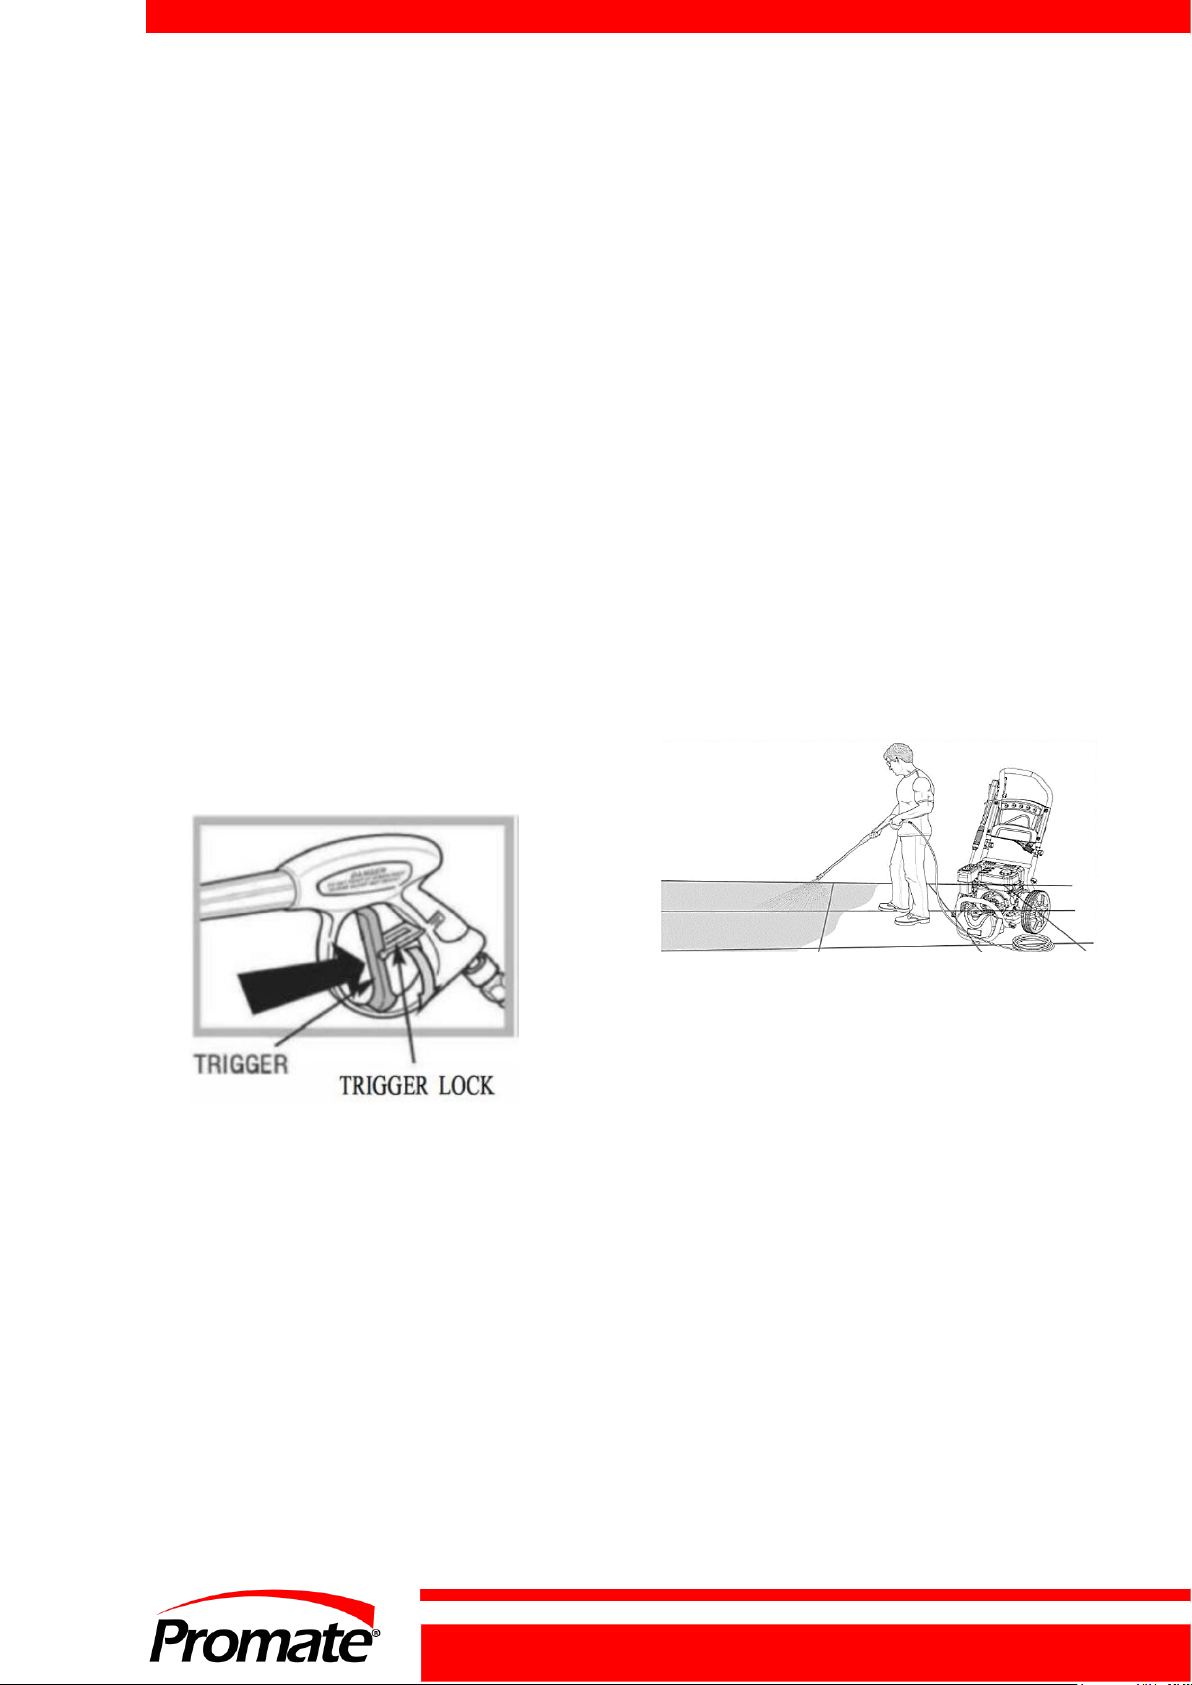
5. Place the pressure washer on a FLAT and
level surface and close to the working
surface. Keep a minimum of 5 ft. (1.5
meters) CLEARANCE on all sides of the
engine including top. Face the engine
exhaust outlet AWAY from dwellings.
6. Make sure the Throttle level is set to the
"FAST" position (left).
7. Slide the fuel valve lever to "ON" position
(right) to allow the fuel to flow to the
engine.
8. Slide the Choke lever to "START" position
(left).
9. Turn the Engine ON/ OFF switch clockwise
to ON position.
10. Point nozzle to a safe direction and
squeeze the spray gun trigger to allow for
easier engine start.
11. To start the engine, pull starter cord
slowly until resistance is felt, then pull
rapidly to avoid kick back. Repeat until the
engine starts to run. Then, release the
trigger.
12. Slide the chocke lever to “RUN” (right)
position.
6. OPERATING THE
PRESSURE WASHER
DO NOT leave pressure washer in by-pass
mode for more than two minutes at a
time. Water temperature inside the
pressure pump will rise to a dangerous
level resulting in damage to the internal
components of the pump. Failure to follow
this warning will void warranty.
9

DO NOT run the pressure pump without
the water supply connected and turned
on.
Damage to the pressure washer resulting
from failure to follow this Instruction WILL
void the warranty.
ALWAYS wear approved safety glasses
when operating pressure washers. Spray
can splash back or propel objects,
including incorrectly attached accessories.
6-1. Using the Spray Gun
To engage the Trigger lock, pull the lock up
until it clicks into the slot.
To disengage the Trigger lock, push the lock
down and into its original position.
6-2. To Operate the Trigger
1. Squeeze the trigger to start water flow
through the nozzle.
2. Release the trigger to stop water flow.
6-3. Washing / Cleaning
1. Firmly grip Spray Gun with Bolt hands.
2. Point the nozzle to a safe direction and
squeeze the Spray trigger to allow the
pump top purge air impurities in the
system and then redirect the nozzle to the
working surface.
3. When finished, release the gun trigger to
stop water flow.
6-4. Usage Tips
• For most effective cleaning, keep spray
nozzle from 8 to 24 inches away from
cleaning surface.
• If you get spray nozzle too close,
especially using high pressure mode
being cleaned, you may damage
surface being cleaned.
• DO NOT get closer than 6 inches when
cleaning tires.
6-5. Pressure Adjustment
Increase distance: To vary the pressure
on the surface being cleaned, vary the
distance between spray wand and the
surface being cleaned.
Change pressure wand nozzle:
Completely shut down Pressure Washer
and stop gasoline engine, Change Spray
Nozzle for desired pressure (see 3-5.
Selecting the Right Nozzle). Then,
restart the engine.
Adjust pump pressure regulator: The pump
10

pressure regulator allows pressure adjustment
at the pump. Turn pressure regulator knob on
pressure pump counterclockwise/clockwise to
decrease/increase pressure.
6-6. Using Chemicals and Cleaning
Solvents
Use only soaps and chemicals for use
with Pressure Washer. DO NOT USE
CHLORINE BLEACH.
Chemicals, Soaps and cleaning solvents
will not siphon when a high-pressure
nozzle is used. Use the chemical Nozzle
(Black).
To Apply Detergent
1. Prepare detergent solution as
recommended by the manufacturer.
2. Remove the detergent tank lid located in
front of the pressure washer.
3. Fill tank with prepared detergent solution.
A small funnel may help with this task.
Replace the detergent tank lid.
4. Lock the trigger and attach the Detergent
Nozzle (Black) to the Wand.
5. Unlock the trigger and squeeze spray gun
trigger and apply detergent to a dry
surface, starting at lower portion of area to
be washed and work upward, using long,
even, overlapping strokes.
Wetting the surface first is not recommended,
as it dilutes the detergent and reduces its
cleaning ability.
6. Allow detergent to "soak in" for 3-5 minutes
before washing and rinsing. Reapply as
needed to prevent surface from drying. Do
Not allow detergent to dry on surface
(prevents streaking).
To Rinse
1. Replace the nozzle with an appropriate
high-pressure nozzle (see 3-5. Selecting
the Right Nozzle). Squeeze the trigger
and wait for the detergent lo clear.
2. Keep the spray gun at a safe distance
from the area you plan to spray.
3. Apply a high-pressure spray to a small
area, and then check the surface for
damage. If no damage is found, it is okay
to continue cleaning.
4. Start at the top area to be rinsed, working
down with same overlapping strokes as
you used for used for washing and
applying detergent.
To Flush System
When you have completed the use of
detergent injection system:
1. Turn off the engine and fill the detergent
tank with clean water.
2. Remove the nozzle and then turn engine
back on.
3. Point the wand toward a safe direction and
11

squeeze the trigger to flush clean water
through the detergent tank and the system
until it is thoroughly clean.
Leaving chemicals and cleaning solutions
Inside the pressure pump could damage It.
Damages created by leaving soaps, chemicals
and cleaning solutions inside the pump can
void the warranty.
Cleaning Tips
• Never use the pressure washer water inlet
to siphon detergent or wax.
• If you have the nozzle too far away from
the surface being washed, the cleaning will
not be as effective.
DO NOT get closer than 6 inches when
cleaning.
6-7. Shutting Down the Pressure
Washer
1. Top stop the engine switch on the side of
the engine to OFF position.
2. Slide Fuel Valve lever to the left to stop
fuel flow to the engine.
3. Turn off the water supply and disconnect
Garden hose from the pressure washer.
4. Squeeze the gun trigger to release any
remaining water in the system.
5. Store spray gun on the side and hoses
inside the hose housing inside the handle.
Allow engine to cool down before folding
handle.
Never tum off the water supply with the
engine running. This will cause the pressure
pump to overheat, resulting in internal
damage.
The pressure washer must be properly
stored. Refer 7. Maintenance and
Storage.
7. MAINTENANCE AND
STORAGE
7-1. Maintenance
Regular maintenance will improve
performance and extend life of pressure
washer.
The Pressure Washers’ warranty does not
cover items that have been subjected to
operator abuse or negligence. Only by
maintaining pressure washer in accordance
with instructions in this manual will the full
value of the warranty be honored.
Some adjustments will need to be made
periodically to properly maintain the pressure
washer. All service and adjustments should be
made at least one time each season. It is
important that the maintenance chart below
be followed.
12

Engine Maintenance Schedule
Frequency
Items
Each
time
Every
month or
20 Hrs
Every 3
months or
50 Hrs
Every 6 months
or 100 Hrs
Every year or
300 Hrs
Engine Oil
Check oil
level
x
Replace
x
Air Cleaner
(Filter)
Check
x
Clean
x
x*
Replace-
Clean
x
Deposit Cup
x
Spark Plug
Clean-
Adjust
x***
Replace
x
Spark
Arrester
Clean
x
Idling
Check-
Adjust
x
Valve
Clearance
Check-
Adjust
x
Fuel Tank
Clean
x
Fuel Supply
Line
Check
Every two year (Replace if necessary**)
*Recommended to be performed more often than in the schedule if operated in dusty
environments.
** Recommended to be performed by authorized dealers.
*** Adjust gap to 0.6 to -0.7 mm
13

Checking Pressure Pump Oil
1. Check oil site gauge on pressure pump. Oil
should cover site gauge.
2. Remove dipstick/oil plug from crankcase
and wipe clean.
3. Oil level is correct if it covers lower half of
dipstick.
Changing Pressure Pump Oil
1. Place container under pressure pump oil
drain plug.
2. Using a wrench, loosen oil drain plug.
3. Remove oil drain plug and drain oil into
container.
4. Replace oil drain plug and retighten using
the wrench.
5. Loosen and remove breather plug from top
of pressure pump.
6. Add NEW 30 weight engine oil to pump
case until the oil level raises above the
midpoint on the oil level window on the
side of the pump
7. Replace and hand lighten the breather
plug.
Cleaning the Nozzle
Occasionally, the spray wand can become
clogged with foreign materials such as dirt.
When this happens, excessive pressure can
develop. Whenever the pressure nozzle
becomes partially clogged, the pump pressure
will pulsate. It should be immediately cleaned.
1. Make sure pressure washer is shut off and
spray gun trigger is locked.
2. Remove high pressure spray nozzle from
the spray wand. Using the nozzle cleaning
needle (provided), remove any
obstructions by inserting and carefully
moving the pin back-and -forth through
nozzle hole under clean running water.
3. After cleaning, remove the needle from
nozzle and store for future use.
4. Reassemble pressure nozzle to spray
wand.
Cleaning the Water Inlet Screen
Filter
The water inlet screen filter should be
checked periodically and cleaned if necessary.
1. Disconnect inlet water hose.
2. Remove filter by grasping end and pull
straight back.
3. Clean screen filter by flushing both
sides with water.
4. Insert screen filter back inside water
inlet port.
14

Do not operate pressure washer without
screen filter in place. Impurities entering
pressure pump can cause internal damage.
Cleaning the Pressure Washer
Daily or before use inspections should include
areas around and underneath pressure
washer looking for signs of fuel or oil leaks.
Preventative maintenance should be taken if
leaks are found. Clean accumulated debris
from outside and inside pressure washer.
Ensure all linkages, springs and other engine
controls are kept clean. Inspect cooling air
slots and openings on pressure washer.
Openings must be kept clean and
unobstructed for peak performance of
pressure washer.
Engine components should be kept clean
reducing risk of overheating and ignition of
accumulated debris.
Use a damp cloth to wipe exterior surfaces
clean.
Use a soft bristle brush to loosen caked on
dirt or oil.
Use a shop-vacuum to pick up any loose
dirt and debris.
7-2. Storage
Fuel and fuel vapor are extremely flammable
and explosive.
Fuel and fuel vapor are extremely
flammable and explosive. Fire or
explosion from misuse of fuel can
cause severe burns and even death.
Engine
Gasoline fuel can become stale when stored
over 30 days. Stale fuel causes acid and gum
deposits to form in the fuel system or crucial
carburetor parts. To Keep fuel fresh, add the
provided fuel stabilizer tablets to the fuel tank
(read instructions in the back for directions).
Draining gasoline is unnecessary if the fuel
stabilizer is used according to the instructions
that come with it. Run Pressure Washer
engine for a minimum of two minutes, after
stabilizers added to fuel, to allow it to circulate
throughout the engine. The engine fuel can
be stored up to 24 months.
Store gasoline from one season to another
unless it's been treated with fuel stabilizer.
Replace fuel container, if metal, and if it
begins to rust. Rust and dirt and debris can
contaminate fuel supply and components
resulting in poor performance and /or internal
damage to engine. Fuel should be stored in
newer approved plastic storage containers.
To Protect Against Rust Formation
During Storage, Oil the Cylinder
Bore:
• Remove spark plug and pour
approximately½ oz (15ml) of clean
engine oil into the cylinder.
• Install spark plug and pull starter cord
slowly to distribute oil.
• Make sure engine ON/OFF switch is
OFF. Slowly pull the starter cord 2 to 3
times to distribute and coat the cylinder
bore with oil. DO NOT start engine at
this time.
Fuel and fuel vapor are extremely flammable
and explosive.
Fire or explosion from misuse of fuel
can cause severe burns and even
death.
Failure to use fuel as recommended
in this manual will void the warranty.
15

Pressure Pump
1. Drain all water from pressure hose, coil and
store it in cradle of pressure washer
handle.
2. Drain all water from spray gun and spray
wand by holding spray gun in vertical
position with nozzle pointed downward.
Squeeze trigger to remove fluids from
spray gun and spray wand. Store in spray
gun/hose holder.
3. Store chemical hose, high pressure hose
and spray wand so they are protected from
damage, such as being run over.
It is RECOMMENDED that you follow these
steps to protect the internal seals of pressure
washer when storing unit for more than 30day
and/or when freezing temperatures are
expected.
1. Obtain a funnel, six ounces of RV antifreeze
and approximately 36 inches of Garden
hose with a male hose connector on one
end.
Use only RV antifreeze. Any other type of
antifreeze is corrosive and can damage
pressure pump.
2. Connect 36-inch length of Garden hose to
water inlet of pressure pump.
3. Add RV antifreeze using the funnel.
4. Make sure engine ON/OFF switches OFF.
Slowly pull engine starter cord several
times until antifreeze comes out of
pressure hose connection of pressure
pump.DO NOT start engine this time.
5. Remove hose to water inlet of pressure
pump.
Pressure Washer
1. Cover pressure washer with a suitable
cover that does not retain moisture such as
a plastic- or plastic-coated tarp.
2. Store pressure washer in a clean, dry area.
Certain storage covers can be flammable or
can melt in higher temperatures. Do not place
storage cover over pressure washer unit until
it has completely cooled.
Preparing for Use After Storage
1. Slowly pull the starter cord a few times to
clean oil from the cylinder or to eject any
antifreeze from the pump which were
added prior to storage.
2. Remove the spark plug from the cylinder.
Wipe oil from the spark plug and return it
to the cylinder and retighten.
3. Reconnect the spark plug wire.
16

8. SPECIFICATIONS
Model
PW2700
PW3500
Max. Water Flow
2.2 GPM
3.3 GPM
Pump Type
Axial (AL)
Triplex
Engine Type
6.5HP / OHV
7.5HP / OHV
KW/RPM
3.8 / 3600
4.5 / 3600
Displacement
196CC
223CC
Fuel Tank Capacity
3 Liters 3 Liters
Low Oil Sensor
YES
YES
Thermal Relief Valve
YES
YES
9. TROUBLESHOOTING GUIDE
Problem
Probable Cause
Solution
Engine shuts down when
running
Out of fuel
Fill fuel tank
Low engine oil
Add oil
Engine will not run; or
starts and runs roughly
Engine On/Off set to "OFF" position
Set switch to "ON" position
Fuel valve is in "OFF" position
Turn fuel position
valve
Dirty air cleaner
Clean or replace air cleaner
Out of fuel
Fill fuel tank
Stale fuel
Drain fuel tank end
carburetor; fill with frosh
Spark plug wire not connected to
spark plug
Connect wire to spark plug
Bad spark plug
Replace spark plug
Water in fuel
Drain fuel tank and
carburetor; fill with fresh fuel
Flooded
Wail 5 minutes and re-crank
engine
Excessively rich fuel/air mixture
Call Customer Service
Intake valve stuck open or closed
Call Customer Service
Engine has lost compression
Call Customer Service
Low engine oil
Add oil
Wrong fuel
Use recommended fuel
Engine is too hot
Allow engine to cool
Chock is in the wrong position
Change chock position
Pressure builds up after 2 pulls on
starter coil or after initial USO
Squeeze the gun trigger to
relieve pressure
17

Problem
Probable Cause
Solution
Engine “hunts” or falters
Carburetor is running too
Rich or too lean
Call Customer Service
Engine lacks power
Cylinder pressure is low
Call Customer Service
Dirty air cleaner
Replace air filter
No pressure or Low
pressure
Spray wand not sot to high
pressure
See 3-5. Selecting the
Right Nozzle section
Inadequate water supply
Water supply must by 7 GPM
Hose fitting leaks during high
pressure
Tighten hose fitting. Use
thread sealant tape it
necessary.
Nozzle obstructed
Clean Nozzle (See 7-1.
Maintenance)
Water filter screen obstructed
Remove and clean filter.
Defective pump
Call Customer Service
Air in hose
Squeeze trigger to remove air
Choke lever in choke position
Move choke to "RUN" position
Throttle control lever is hot in fast
position
Move throttle control lever
from fast position.
Water leaking at pump
Loose connections
Tighten connections
Piston packing worn
Clean or replace. Call
Customer Service.
Worn or broken O-ring
Clean or replace. Call
Customer Service.
Pump head or tubes damaged from
freezing
Clean or replace. Call
Customer Service.
Pump will not draw
chemicals
Spray wand not set to low pressure
See 3-5. Selecting the
Right Nozzle section
Chemical hose/filter clogged
Clean hose/filter
Chemical screen not in chemical
Ensure end of chemical hose
is fully submerged into
chemicals
Chemical solution too thick
Dilute chemical. Chemical
solutions should have same
consistency as
water or replace.
Chemical build-up in chemical
injector.
Call Customer Service
No or low pressure (after
period of normal use)
Worn seal or packing
Clean or replace. Call
Customer Service.
Worn or obstructed valves
Clean or replace. Call
Customer Service.
Worn unloader piston
Clean or replace. Call
Customer Service.
Water Leaking at spray
gun/Spray wand
connection.
Worn or broken O-ring
Replace
Loose hose connection
Tighten hose connection
18

General Info
Problem
Probable Cause
Solution
Water Leaking at spray
gun/Spray wand
connection.
Oil seals worn
Clean or replace. Call
Customer Service
Oil leaking at pump
Loose drain plug
Tighten drain plug
Worn drain plug O-ring
Inspect and replace O-ring
Worn fill plug O-ring
Inspect and replace O-ring
Pump overfilled
Check for correct amount
Incorrect oil used
Drain and refill with correct
type and amount
Vent plug clogged
Clean vent plug. Use air hose
to free it of blockage. If
problem persists, replace vent
plug.
Pump pulsates
Nozzle obstructed
Clean Nozzle (See 7-1.
Maintenance)
Air In the system
Squeeze trigger to remove air
Gas
Use fresh high-quality unleaded gasoline (minimum 87 Octane)
Add stabilizer to fuel tank and run engine for 5 minutes before
storage
Oil
Pump oil: Use only 40-450ml-weight non-detergent oil
Engine oil: Use only 30-600 ml-weight non-detergent oil
Water
Use only cold water
Do not operate pressure washer with clogged or missing water filler
screen.
Do not operate pressure washer without adequate water supply to
pressure pump. Adequate water supply is a minimum of 20 PSl @
5GPM
Pressure Adjustment
Pressure setting is preset at factory
For lowering pressure, refer operation section of this manual
Pump
Squeeze spray gun trigger every 2 minutes while engine is running
Do not allow water to freeze in pump
By-Pass Mode
Never leave unit running for more than 2 minutes without
squeezing spray gun trigger. Doing so could damage pump and
void warranty
*Optional Spare Parts
Pump is equipped with a thermal relief valve. If water overheats,
this valve opens releasing gush of water. Afterwards, the valve
opens releasing gush of water. Afterwards, the valve closes
returning pump to normal operation
19

Hose
Do not allow hoses to come in contact with engine muffler during
or immediately after use
DO NOT pull unit by pressure hose
Engine
Do not adjust or attempt maintenance without consulting 8upplied
engine manual or having adjustments made at an authorized
service center
Add stabilizer to fuel tank and lei engine run for 5 minutes before
storage
Always turn on water before starting engine
Soap / Chemicals
Use only soaps and chemical detergents designed for pressure
washer use
Use chemical nozzle (Black) with Soap/Chemicals
Nozzle
Always keep nozzles unclogged
Chemical/ soap solutions cannot be applied using high pressure
setting. Set pressure pump to low pressure and use low pressure
nozzle
Storage or Winterizing
Run clean water through chemical inlet
Add stabilizer to any remaining fuel in fuel tank
Do not allow water to freeze in pressure pump, spray gun, spray
wand or hoses
20
This manual suits for next models
1
Table of contents
Popular Pressure Washer manuals by other brands

Texas Equipment
Texas Equipment HTR 1600 user manual

Briggs & Stratton
Briggs & Stratton Brute 020629-00 Quick setup guide

Bison
Bison 1800 instruction manual

Kärcher
Kärcher K 855 HS Original operating instructions

Simpson
Simpson MS60772 instruction manual

Briggs & Stratton
Briggs & Stratton 20228 user manual

Ducar
Ducar DGPW3200 Operator's manual

Clarke
Clarke TIGER 2600A Operation & maintenance instructions

Kärcher
Kärcher K 5.86 M operating instructions

Shark
Shark BT-3530 Operating instructions and parts manual

EINHELL
EINHELL TC-HP 2042 PC Original operating instructions

Jula
Jula HAMRON 220-155 operating instructions