Promelit Tulip User manual

V 1.1
Libretto_guida_22072011_v.indd 1 25/07/2011 11:12:33

1
2
3
4
5
6
7
8
9
10
11
12
13
14
15
16
17
18
Caratteristiche principali
Dati tecnici e tipo di selezione
Contenuto della confezione
Base di TULIP
Portatile di TULIP (icone del display e descrizione dei tasti)
- Icone del display
- Funzioni dei tasti
Principali impostazioni di fabbrica
- UNITÀ PORTATILE
- UNITÀ BASE
Installazione
- Fase 1: collegare la base
- Fase 2: inserire la batteria nel portatile
- Fase 3: mettere il portatile in ricarica sulla base
Note di sicurezza e cura del prodotto
Smaltimento del prodotto
Usare il telefono
- Accendere e spegnere il portatile
- Eettuare chiamate
- Rispondere a una chiamata
- Vivavoce
- Regolare il volume di ascolto
- Opzioni in conversazione
- Suonerie (melodia, volume, disattivazione/riattivazione)
- Regolare la data e l’ora
- Impostare una sveglia o un appuntamento
- Blocco tasti
- Cercare il portatile (tasto“Paging”)
- Tasto R (Flash)
Rubrica
- Corrispondenza tra numeri e lettere
- Assegnare una melodia a un contatto della rubrica
- Opzioni sui contatti della rubrica
Liste chiamate
Registrazione di un portatile TULIP a una base (Aliazione)
Congurazione multi-portatile
- Chiamate interne (tra portatili associati alla base)
- Trasferimento di chiamata e Conferenza a tre (2 portatili + 1 esterno)
Congurazione multi-base
- Registrazione di un portatile TULIP ad una seconda base
- Registrazione di un portatile di un modello dierente sulla base di TULIP
- Selezionare una base
Impostazioni della base
- Disattivare un portatile associato alla base TULIP
- Tempi di Pausa e di Flash
- Modica PIN della Base
- Reset della Base
Impostazioni del portatile (personalizzazioni)
- Nome del Telefono
- Lingua del menu
- Risposta automatica
- Suono dei tasti
- Modica PIN del telefono
- Reset del Portatile
- Controllo Bebè
Conformità del prodotto alle norme di sicurezza
............................................................................................................ 3
.................................................................................................... 3
........................................................................................................ 3
............................................................................................................................. 4
......................................................... 4
........................................................................................................................................ 4
........................................................................................................................................ 4
.............................................................................................. 5
....................................................................................................................................... 5
................................................................................................................................................. 5
.............................................................................................................................. 5
............................................................................................................................ 5
.................................................................................................... 5
....................................................................................... 6
......................................................................................... 6
......................................................................................................... 6
........................................................................................................................ 6
............................................................................................................. 6
.................................................................................................................................... 7
....................................................................................................................... 7
..................................................................................................................................................... 7
..................................................................................................................... 7
........................................................................................................................... 7
........................................................................ 7
............................................................................................................................... 7
.............................................................................................. 7
...................................................................................................................................................7
............................................................................................................ 7
............................................................................................................................................. 8
...................................................................................................................................... 8
......................................................................................................... 8
................................................................................. 9
............................................................................................................... 9
............................................................................................................................ 9
........................................................ 9
................................................................................................. 10
................................................................................. 10
...................................................... 10
....................................................................................................... 10
.................................................................... 10
.......................................... 10
............................................................................................................................... 10
............................................................................................................ 10
.................................................................................. 10
......................................................................................................................... 10
......................................................................................................................... 10
..................................................................................................................................... 10
........................................................................... 11
................................................................................................................................... 11
..................................................................................................................................... 11
................................................................................................................................ 11
......................................................................................................................................... 11
........................................................................................................................ 11
................................................................................................................................... 11
......................................................................................................................................... 11
....................................................................... 11
INDICE
2Manuale d’uso mod.
Libretto_guida_22072011_v.indd 2 25/07/2011 11:12:33

1.
2.
3.
4.
5.
3Manuale d’uso mod.
1 Caratteristiche principali
Design esclusivo
Tecnologia DECT a standard GAP
10 Suonerie a 3 toni
Display retroilluminato a matrice di punti
Vivavoce di alta qualità
Rubrica con 50 numeri
Associazione numero chiamante-melodia (con servizio erogato dagli operatori telefonici)
Orologio sveglia
Visualizzazione numero chiamante e lista delle ultime 50 chiamate ricevute (con servizio erogato dagli operatori telefonici)
Ripetizione ultimi 20 numeri selezionati
Timer di conversazione
Esclusione microfono
Blocco tastiera
Menu multilingue
Segnalazione batteria scarica
2 Dati tecnici e tipo selezione
DATI TECNICI DEL TELEFONO:
Tipo di tecnologia: Standard DECT (Digital European Cordless Telephone) con prolo GAP (Generic Acess Prole)
Canali RF: 10 canali
Campo di frequenze: 1880 Mhz ~1900 Mhz
Spaziatura Canali: 1728 Mhz
Codica Audio: ADPCM/32 kbit per secondo
Tipo modulazione: GFSK
Potenza massima di trasmissione: 250mW circa (24dBm)
Raggio d’azione: max. 50 mt interno e 300 mt esterno
Alimentazione Portatile: 2xAAA Batterie ricaricabili Ni-MH 1.2V 500 mAh
Alimentazione Base: PRI AC 100-240V 50/60 Hz 0.2A; SEC DC 5.1V 0.7A
Autonomia: no a 100 ore in stand-by e no a 10 ore in conversazione.
DATI TECNICI DELLA BATTERIA:
Batterie ricaricabili Ni-MH 1.2V 500 mAh
Tempo necessario per la prima ricarica: 16 ore
Tempo necessario per le cariche successive: 8 ore
Temperatura di esposizione durante la carica: tra 0°C e 40°C (valori indicativi)
Temperatura di funzionamento: tra -20°C e +60°C (valori indicativi)
Cicli di ricarica supportati: 400 (valore indicativo)
NOTA: La durata di vita delle batterie dipende dall’uso che ne viene fatto.
Osservare in particolare quanto riportato al cap.8“Note di sicurezza e cura del prodotto”.
TIPO DI SELEZIONE: L’apparecchio utilizza la selezione in modo DTMF (Multi-frequenza) o a impulsi.
AVVERTENZE SULLE BATTERIE RICARICABILI E SUL LORO UTILIZZO:
La durata di vita delle batterie dipende dall’uso che ne viene fatto.
Si consiglia di riporre sempre il portatile in carica sulla propria base quando si prevede di non utilizzare il telefono per un periodo
prolungato di tempo (per esempio durante la notte e/o quando ci si trova fuori casa/ucio). Osservare in particolare quando
riportato al capitolo: “Note di sicurezza e cura del prodotto”.
In caso di sostituzione della batteria, una volta giunta al termine del proprio ciclo di vita, assicurarsi che la nuova batteria sia di tipo
AAA (R03) ricaricabile e che abbia le stesse caratteristiche elettriche e meccaniche di quelle fornite in dotazione con il prodotto.
Smaltire le batterie esaurite in accordo con quando riportato al capitolo:“Smaltimento del prodotto”.
Non utilizzare mai comuni batterie del tipo“usa e getta”in questo prodotto!
3 Contenuto della confezione
n.1 Unità base con caricabatteria incorporato
n.1 Unità portatile
n.1 Alimentatore elettrico per l’unità base
n.1 Cordone di linea rettilineo con terminazione plug-plug
n.2 Batterie ricaricabili Ni-Mh 1.2V 500 mAh
n. 1 Manuale di istruzioni
Libretto_guida_22072011_v.indd 3 25/07/2011 11:12:33

1)
2)
3)
1)
2)
3)
4)
TELEFONO 1
10:35 09/06
Menu Rubrica
1)
2)
3)
4)
5)
1)
2)
3)
4)
5)
6)
7)
8)
9)
4 Base di TULIP
Tasto Ricerca Portatile / Registrazione di un
portatile
LED di chiamata in arrivo / linea impegnata /
ricerca portatile / registrazione portatile
Contatti per la ricarica della batteria del Portatile
5 Portatile di TULIP (icone del display e descrizione dei tasti)
Auricolare
Display retroilluminato a matrice di punti
Tastiera alfanumerica
Microfono
Icone del display
Il display a matrice di punti di Tulip è in grado di
visualizzare le seguenti icone e informazioni:
Icone del display
: Stato di carica della batteria
(le tacche di colore bianco indicano lo stato
eettivo di carica)
: Indicazione di campo
: Linea impegnata
: Sveglia abilitata
: Blocco tastiera attivato
: Suoneria disattivata
Nome e numero del portatile (predenito: Telefono 1)
Data e Ora
Tasto funzione sinistro
Tasto funzione destro
Tasto di navigazione / con i tasti regolazione del volume di ascolto (in
conversazione)
Tasto funzione sinistro
Tasto Vivavoce (attiva e disattiva in conversazione)
Tasto di risposta alla chiamata / lista delle ultime 10 chiamate eettuate / impe-
gno di linea (con pressione prolungata)
Tasto *: Attiva e disattiva il microfono (con pressione prolungata, in conversazione)
Tasto #: Attiva e disattiva il blocco tasti (a riposo, con pressione prolungata)
Tasto di ne chiamata / ritorno in stand-by / accensione e spegnimento del portatile
Tasto R (Flash)
Tasto funzione destro
Funzioni dei tasti
Il display a matrice di punti di Tulip è in grado di visualizzare le seguenti icone e informazioni:
4Manuale d’uso mod.
Libretto_guida_22072011_v.indd 4 25/07/2011 11:12:33

Selezionare la lingua desiderata per la visualizzazione dei menu scegliendo tra quelle proposte a display e premere OK. In seguito,
per cambiare la lingua dei menu in ogni istante, consultare il cap. 17 (sezione“Lingua dei menu”) in questo manuale.
Per la vostra sicurezza e per il buon funzionamento del cordless utilizzate solo le batterie ricaricabili fornite in dotazione con il
prodotto o delle batterie di identico tipo. Consultare inoltre le norme di sicurezza riportate al capitolo: “Note di sicurezza e cura
del prodotto”in questo manuale.
1)
2)
3)
6 Principali impostazioni di fabbrica
UNITÀ PORTATILE
Numero portatile: 1
Nome portatile: TELEFONO 1
Rubrica telefonica: vuota
Risposta automatica: o
Liste chiamate ricevute /non risposte /eettuate: vuote
Base selezionata: 1
Codice PIN portatile: 0000
7 Installazione
Fase 1: collegare la base
Individuare i connettori per il cavo telefonico plug-plug (Line) e per il cavo dell’alimentatore (Power), come da gura qui riportata.
Inserire lo spinotto del cavo di alimentazione nell’apposita sede (Power) poi inserire l’alimentatore elettrico in una presa
elettrica a muro situata nelle vicinanze della base.
Inserire lo spinotto del cordone telefonico nell’apposita sede (Line) quindi inserire l’altra estremità del cavo direttamente nella
presa a muro oppure mediante un’opportuna presa telefonica (non fornita in dotazione e non mostrata in gura).
NOTA: Il telefono è in grado di funzionare indierentemente, sia se si eettua il collegamento alla linea telefonica utilizzando
una spina telefonica (non fornita in dotazione e non mostrata in gura), sia se si utilizza il solo cavo telefonico plug-to-plug
inserito direttamente in un jack modulare (presa a muro); in entrambe le modalità di collegamento, il telefono risulterà sempre
collegato in parallelo alla linea.
UNITÀ BASE
Codice PIN Base: 0000
Tempo di ash (tasto R): 98 ms
Tempo di pausa: 2 secondi
Portatile associato predenito: Telefono 1
Utilizzare soltanto l’alimentatore in dotazione, che
deve essere sempre inserito nella presa di corrente.
Se si acquista in un negozio un altro cavo telefonico,
assicurarsi che i collegamenti siano identici a quelli del
cavo in dotazione.
Inserire la batteria come mostrato in gura, avendo cura che le polarità riportate sull’etichetta della stessa siano visibili e volte verso
l’alto. Richiudere quindi il portatile. Per vericare il corretto inserimento della batteria, accendere il portatile tenendo premuto per
1 secondo il tasto .
Fase 2: inserire la batteria nel portatile
Rimuovere il guscio bianco di plastica dal lato posteriore del portatile, esercitando una leggera forza con entrambe le mani sul foro
di apertura sul fondo del telefono, come illustrato in gura.
5Manuale d’uso mod.
Libretto_guida_22072011_v.indd 5 25/07/2011 11:12:34
Fase 3: mettere il portatile in ricarica sulla base
Accendere il portatile renendo premuto per 1 secondo il tasto .
Riporre il portatile sulla propria base per mantenere le batterie cariche: un tono acustico confermerà il corretto posizionamento del
portatile sulla base e quindi avrà inizio la ricarica delle batterie.
Eettuare la prima ricarica per almeno 16 ore. In seguito sarà suciente un tempo di ricarica di 8 ore.
NOTA: Durante la prima carica, il prodotto non deve essere utilizzato né per ricevere, né per eettuare chiamate telefoniche.
8 Note di sicurezza e cura del prodotto
Utilizzare sempre le batterie ricaricabili originali o delle batterie di identico tipo (con stesse caratteristiche elettriche e
meccaniche).
Prestare la massima attenzione anché le batterie vengano correttamente inserite nel proprio alloggiamento rispettando la
corretta polarità.
Non tentare di aprire / danneggiare le batterie.
Non gettare le batterie nel fuoco: potrebbero esplodere.
Eettuare la prima ricarica per almeno 16 ore. In seguito sarà suciente un tempo di ricarica di 8 ore.
Non esporre le batterie a temperature inferiori a -10°C o maggiori a +50°C durante l’uso; ricaricare le batterie solo ad una
temperatura compresa tra 0°C e +45°C.
In caso di prolungato inutilizzo del telefono, si consiglia di togliere le batterie dal vano batterie.
Utilizzare soltanto l’alimentatore fornito in dotazione.
L’apparecchio potrebbe interferire con le apparecchiature elettromedicali.
Osservare quindi le indicazioni presenti negli ambienti in cui ci si trova (per es. ambulatori, ospedali, ecc.).
Non tenere il telefono in locali da bagno o nella doccia. Il telefono e la base non sono protetti dagli spruzzi d’acqua.
Pulire la base e il telefono con un panno umido (senza solvente) o antistatico.
Non utilizzare in nenessun caso un panno asciutto perché su potrebbero generare cariche elettrostatiche che potrebbero
danneggiare il cordless.
Qualora il portatile fosse venuto a contatto con liquidi, spegnerlo e togliere subito le batterie. Lasciare deuire il liquido dal
telefono. Asciugare tutte le parti con un panno e conser vare il telefono per almeno 72 ore con il vano batterie aperto e la tastiera
rivolta verso il basso in un luogo caldo e asciutto (non metterlo assolutamente in forno, sia esso a microonde, a gas o di qualsiasi
altro tipo). Una volta asciugato completamente, in molti casi sarà possibile rimettere in funzione il telefono anche se sarà possibile
il manifestarsi di problemi.
Per l’eventuale trasporto dell’apparecchio utilizzare esclusivamente l’imballo originale.
ATTENZIONE: se il prodotto viene posto in carica con delle batterie di tipo errato esiste un poten-
ziale pericolo di esplosione delle stessa. Smaltire le batterie usate seguendo le istruzioni riportate
al capitolo successivo.
9 Smaltimento del prodotto
INFORMAZIONE AGLI UTENTI
Ai senti dell’art. 13 del Decreto Legislativo 25 Luglio 2005, n. 151 (Attuazione delle Direttive 2002/95/CE,
2002/96/CE e 2003/108/CE, relative alla riduzione dell’uso di sostanze pericolose nelle apparecchiature
elettroniche, nonché allo smaltimento dei riuti).
Il simbolo del cassonetto barrato riportato sull’apparecchiatura o sulla sua confezione indica che il prodotto alla ne della
propria vita utile deve essere raccolto separatamente dagli altri riuti.
L’utente dovrà, pertanto, conferire l’apparecchiatura giunta a ne vita agli idonei centri di raccolta dierenziata dei riuti elettronici
ed elettrotecnici, oppure riconsegnarla al rivenditore al momento dell’acquisto di una nuova apparecchiatura.
L’adeguata raccolta dierenziata per l’avvio successivo dell’apparecchiatura dismessa al riciclaggio, al trattamento e allo
smaltimento ambientale compatibile contribuisce ad evitare possibili eetti negativi sull’ambiente e sulla salute e favorisce il
reimpiego e/o riciclo dei materiali di cui é composta l’apparecchiatura.
Lo smaltimento abusivo del prodotto da parte dell’utente comporta l’applicazione delle sanzioni previste dalla normativa vigente.
10 Usare il telefono
Accendere e spegnere il portatile
Tenere premuto per 1 secondo il tasto . Per spegnerlo, tenere premuto lo stesso tasto per 2 secondi.
6Manuale d’uso mod.
Libretto_guida_22072011_v.indd 6 25/07/2011 11:12:34

7Manuale d’uso mod.
Eettuare chiamate
In preselezione: comporre il numero telefonico e premere il tasto . Usare il tasto Cper cancellare cifre digitate erroneamente.
Con impegno linea: tenere premuto per 1 secondo il tasto e comporre il numero da chiamare. (É anche possibile premere il
tasto e comporre il numero da chiamare).
In caso di errore premere e ricominciare. Durante la chiamata il LED rosso sulla base lampeggia.
Rispondere a una chiamata
Se il portatile non è posizionato sulla base: premere il tasto oppure qualsiasi tasto per rispondere. A ne conversazione
premere per terminare la chiamata.
Se il portatile è posizionato sulla base e la risposta automatica è attiva (impostazione da attivare: ved. Cap. 17), è suciente sollevarlo
per rispondere alla chiamata. Se la risposta automatica non è attiva, premere il tasto oppure qualsiasi tasto per rispondere.
Durante la fase di squillo il LED rosso sulla base lampeggia a intermittenza e il display mostra, a seconda dei casi:
“Esterno”se non è attivo sulla linea telelefonica il servizio di idnticazione del numero chiamante.
Il numero telefonico del chiamante (dopo il primo squillo), se è attivo sulla linea telefonica il servizio di identicazione del numero chiamante.
“N. riservato” se è attivo il servizio di identicazione del numero chiamante ma quest’ultimo nasconte volutamente il proprio
numero telefonico.
Vivavoce
Durante una conversazione premere il tasto per attivare il vivavoce e premerlo nuovamente per disattivarlo.
Regolare il volume di ascolto
Premere i tasti per regolare il volume di ascolto durante una conversazione (normale e in vivavoce).
Opzioni in conversazione
Durante una conversazione premere i tasti funzione (sinistro“Menu”o destro“Rubrica”) o R per accedere alle seguenti opzioni:
RUBRICA: per accedere alla rubrica (cfr. cap. “Rubrica” in questo manuale).
MICROFONO MUTO: per disattivare il proprio microfono. Per riattivarlo, premere il tasto destro ABILITA.
VOLUME ASCOLTO: premere direttamente i tasti per regolare il volume di ascolto durante una conversazione (normale
e in vivavoce).
CHIAMATA INTERNA: Per mettere in attesa l’interlocutore esterno e chiamare un altro portatile associato alla base di TULIP. Alla
risposta del portatile chiamato, è possibile eettuare una conferenza a 3 premento ancora OPZIONI > CONFERENZA.
TASTO R (Tasto Flash): per usufruire di eventuali servizi supplementari se oerti dall’operatore telefonico e abilitati sulla linea.
Consultare il proprio operatore per dettagli sull’uso di queste funzioni.
Suonerie (melodia, volume, disattivazione/riattivazione)
Scelta della Melodia: premere Menu > TELEFONO > SUONERIA > MELODIA ESTERNA (oppure INTERNA) > MELODIA > OK.
Scegliere la suonerie con e confermare con OK.
Regolazione del Volume: premere Menu > TELEFONO > SUONERIA > VOLUME > OK.
Impostare il volume con e confermare con OK.
Disattivazione della suoneria: premere Menu > TELEFONO > SUONERIA > VOLUME > OK.
Muoversi nel sottomenu VOLUME con , portarsi sull’opzione Nessuno e confermare con OK.
Regolare la data e l’ora
Premere MENU > BASE > IMPOSTAZIONE ORA. Inserire la dara nel formato “gg/mm/aa”, inserire l’ora nel formato “hh.
mm” (a 24 ore) usando i tasti per spostarsi tra i campi e premere OK per terminare.
Impostare una sveglia o un appuntamento
Per impostare una sveglia/allarme, premere MENU > MENU EXTRA > ALLARME. Muoversi nel sottomenu con i tasti , portarsi
sull’opzione MODALITÀ e premere MODIFIC scegliere“SINGOLO” oppure “QUOTIDIANO”, premere OK e quindi SALVA.
Portarsi su ORA e inserire l’orario della sveglia nel formato “hh.mm” (a 24 ore), premere OK e quindi SALVA.
Ripetere la stessa operazione per cambiare melodia (MELODIA), per far suonare nuovamente la sveglia (RIPETI) e per scegliere
ogni quanti minuti la sveglia deve suonare (CICLO).
Quando una sveglia è attiva, sul display a riposo compare l’icona .
Blocco tasti
Premere a lungo il tasto # per attivare il blocco tasti. Quando il blocco tasti è attivo, sul display a riposo compare il simbolo . Per
riattivare la tastiera, premere a lungo il tasto #.
Cercare il portatile (tasto“Paging”)
Se non si trova più il proprio telefono portatile (oppure un altro portatile associato alla base TULIP) premere brevemente il tasto
Ricerca Portatile (“Paging”) sulla base. Il LED sulla base lampeggia a intermittenza e tutti i telefoni associati a quella base iniziano a
squillare. Premere nuovamente il tasto Ricerca Portatile sulla base o un qualunque tasto sul telefono per interrompere la suoneria.
All’ora programmata per la sveglia, il portatile emette la melodia della sveglia. Per interromperla,
premere un qualunque tasto sul portatile
Libretto_guida_22072011_v.indd 7 25/07/2011 11:12:34
Tasto R (Flash)
Durante una conversazione premere tasto Rper attivare il tasto Flash.
Consultare il proprio operatore per i servizi disponibili con questo tasto.
Tenendo premuto a lungo il tasto Rsi può introdurre un tono di pausa P.
11 Rubrica
A ogni contatto possono essere associati:
il nominativo (max 15 caratteri/cifre);
il numero telefonico (max 24 cifre);
una melodia, se il servizio di identicazione del chiamante è attivo sulla linea telefonica;
la velocità, per la selezione del tasto a selezione rapida.
Per accedere alla rubrica, con il telefono a riposo premere il tasto destro RUBRICA.
MOSTRA VOCI: per visualizzare l’elenco di tutti i contatti presenti in rubrica in ordine alfabetico.
NUOVA VOCE: inserire il nome e il numero di telefono del nuovo contatto usando i tasti per passare da un campo all’altro.
Premere il tasto Cper cancellare caratteri/cifre inseriti erroneamente.
Premere SALVA per salvare subito il contatto, oppure Melodia o Velocità (cfr. par.“Assegnare una melodia a un contatto della rubri-
ca”più sotto) per personalizzare ulteriormente il contatto, ricordandosi poi di salvare le impostazioni eettuate premendo SALVA.
CANCELLA TUTTI: per svuotare tutta la rubrica con una sola operazione.
DATI MEMORIA: per visualizzare quanti contatti sono stati registrati in rubrica, sui 50 slot disponibili.
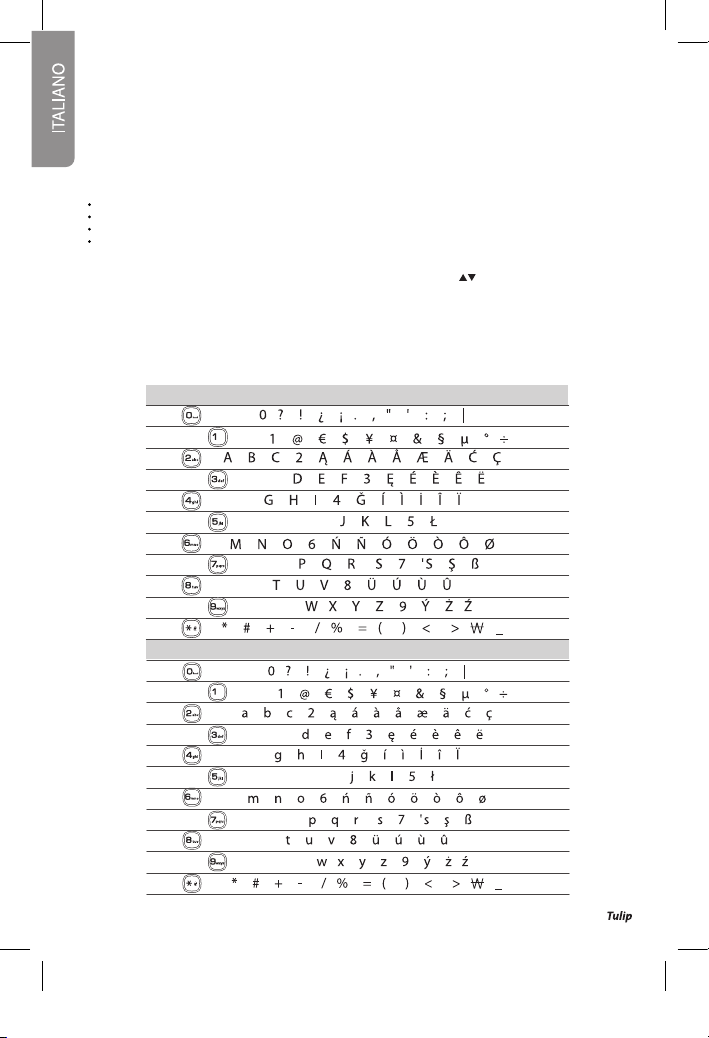
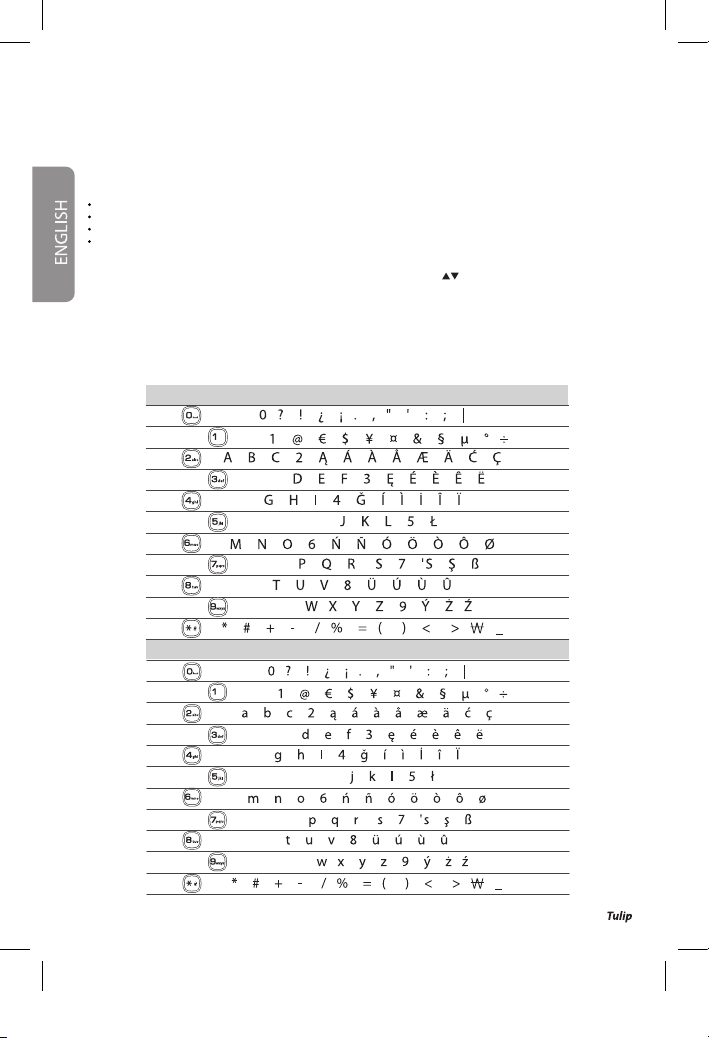
Corrispondenza tra numeri e lettere
#: cambia la scrittura da maiuscolo a minuscolo.
Tabella dei caratteri (Maiuscolo)
Tabella dei caratteri (minuscolo)
8Manuale d’uso mod.
Libretto_guida_22072011_v.indd 8 25/07/2011 11:12:34

1)
2)
3)
4)
Assegnare una melodia a un contatto della rubrica
Queste funzioni sono disponibili solo se il servizio di identicazione del chiamante (CLI) è attivo sulla propria linea telefonica. Per
informazioni rivolgersi al proprio gestore telefonico.
ASSEGNA MELODIA: all’arrivo di una chiamata esterna, dopo il primo squillo, il portatile emette la melodia assegnata in precedenza
a quel contatto.
Per assegnare una meloria a un nuovo contatto, dopo averne inserito nome e numero telefonico selezionare Melodia > MODIFIC.
Scegliere la melodia per quel contatto con i tasti e premere OK, spostarsi successivamente con i tasti su Nome e NUMERO
per salvare le modiche eettuate. In alternativa selezionare un contatto esistente all’interno della rubrica, premere MOSTRA VOCI
> OK > MENU > MODIFICA VOCE > Melodia e procedere come sopra.
Opzioni sui contatti della rubrica
Quando un contatto è selezionato, premendo MENU è visualizzato il seguente menu:
MODIFICA VOCE: per modicare un’impostazione del contatto. Confermare con SALVA al termine.
CANCELLA: per cancellare il contatto dalla rubrica.
12 Liste chiamate
Premendo MENU > DATI CHIAMATA sono disponibili le seguenti liste chiamate:
RICOMPONI (ultime chiamate eettuate, è possibile accedervi anche premendo direttamente il tasto con il telefono a
riposo)
NUOVA CHIAMATA (senza risposta)
TUTTE LE CHIAMATE (ricevute, senza e con risposta)
NOTA: Le liste delle chiamate“NUOVA CHIAMATA”e “TUTTE LE CHIAMATE” sono disponibili solo se il servizio di identicazione del
chiamante (CLI) è attivo sulla propria linea telefonica. Per informazioni rivolgersi al proprio gestore.
Quando una chiamata è evidenziata con il cursore in uno degli elenchi di cui sopra, premendo OK > Menu compare il seguente
menu:
COPIA IN AGENDA
ELIMINA
ELIMINA TUTTI
13 Registrazione di un portatile TULIP a una base
(Aliazione)
A ciascuna base è possibile associare no a 5 portatili (1 in dotazione + 4 opzionali). In questo modo sarà possibile utilizzare i por-
tatili anche per eettuare comunicazioni interne gratuite, senza impegnare la linea telefonica.
Per registrare un nuovo Telefono alla vostra base:
Sulla base
Temere premuto il tasto “Ricerca Portatile”sulla base per circa 5 secondi, no a quando il LED rosso sulla base inzia a lampeggiare.
Passare ora a operare sul portatile.
Sul portatile da registrate
Premere MENU >TELEFONO > REGISTRAZIONE > OK.
Selezionare la base (es. BASE 2) su cui si intende registrare il telefono e premere OK.
Inserire il PIN della base (predenito: 0000) su cui si intende registrare il portatile e confermare con OK.
NOTA: Di default il portatile è registrato sulla“BASE 1”.
Il display visualizza “Modalità di registrazione” seguito dal numero della base selezionata; ad identicazione avvenuta viene
chiesto di modicare il nome del telefono (es.TELEFONO 2). Premere OK e il telefono sarà assegnato alla base selezionata.
Una volta eettuata la registrazione, all’avvio di una chiamata tutti i telefoni associati alla stessa base squillano contemporanea-
mente. Se un telefono è in conversazione esterna, su tutti gli altri telefoni associati appare l’icona in alto sul display. Con questi ultimi
non è possibile eettuare chiamate esterne, nchè la linea stessa non viene liberata.
9Manuale d’uso mod.
Libretto_guida_22072011_v.indd 9 25/07/2011 11:12:34

1)
2)
14 Congurazione multi-portatile
Chiamate interne (tra portatili associati alla base)
Per chiamare un altro portatile associato alla stessa base TULIP (cfr. cap. precedente), premere MENU > MENU EXTRA > CHIAMATA
INTERNA. Scegliere ilTELEFONO a cui si vuole eettuare la chiamata (“Tutti”se si vogliono chiamare tutti i dispositivi collegati) e premere OK.
Per rispondere a una chiamata interna, comportarsi come per le chiamate esterne.
Trasferimento di chiamata e Conferenza a tre (2 portatili + 1 esterno)
Durante una chiamata tra un telefono (es. TELEFONO 1) e l’esterno, sulTELEFONO 1 premere il tasto Menu e scegliere CHIAMATA INTERNA.
Selezionare nell’elenco a display il numero di telefono da chiamare (es. TEELFONO 2) e premere OK (l’utente esterno rimane in attesa).
Alla risposta del TELEFONO 2, è possibile:
Trasferire la chiamata esterna al TELEFONO 2: sul TELEFONO 1 basta premere il tasto .
Attivare la conferenza a 3: sul TELEFONO 1 premere Menu e scegliere Conferenza. Premendo, invece, “Fine Chiam INT” sul
TELEFONO 1, il secondo portatile viene disconnesso e il TELEFONO 1 tornerà a essere connesso con il chiamante esterno.
15 Congurazione multi-base
Grazie al prolo GAP di cui l’apparecchio dispone, è possibile aliare il proprio portatile a più basi DECT (anche di marche e modelli
dierenti), purché anch’esse dispongano del prolo GAP. Ogni portatile TULIP può essere registrato su di un massimo di 4 basi.
Registrazione di un portatile TULIP ad una seconda base.
Per registrare il portatile TULIP ad un’altra base TULIP, la procedura è quella illustrata al cap. 13“Registrazione di un portatile a una
base”(Aliazione).
Per registrare invece il portatile TULIP ad una base di un modello dierente, porre quest’ultima in modalità registrazione come
descritto nel manuale ad essa relativo, poi eettuare la procedura di aliazione sul portatile TULIP come descritto al cap. 13
(inserendo quando richiesto il codice PIN dell’altra base).
Registrazione di un portatile di un modello dierente sulla base di TULIP
Premere il tasto“Ricerca Portatile”sulla base di TULIP per circa 5 secondi, e poi seguire le istruzioni riportate sul manuale del telefono
dell’altro costruttore (inserendo quando richiesto il codice PIN della base di TULIP).
Selezionare una base
Se il telefono è registrato su più di una base (sono contentite al massimo 4 basi diverse), è possibile impostare manualmente la
base da utilizzare, oppure lasciar che il telefono ricerchi automaticamente la prima base disponibile, tra quelle su cui era stato
eventualmente registrato in precedenza.
Premere MENU >TELEFONO > SELEZIONA BASE.
Le basi presso le quali il portatile è già stato registrato appaiono nell’elenco. Scegliere la base desiderata e confermare con OK,
oppure scegliere l’opzione “AUTOMATICO”.
16 Impostazioni della base
Disattivare un protatile associato alla base TULIP
Premere MENU > BASE > DEREGISTRAZIONE > OK.
Inserire il PIN della base (es: 0000) e selezionare con i tasti il portatile da disattivare e premere OK.
Il telefono disattivato, se è registrato anche su un’altra base, passerà automaticamente a funzionare sotto quest’ultima.
NOTA: Non è possibile disattivare un portatile quando esso è l’unico ad essere registrato sulla base collegata.
Tempi di Flash
Premere MENU > BASE > TEMPO FLASH.
Con i tasti , selezionare il valore del tempo di ash (da 98ms a 900ms) e confermare con OK.
Modica PIN della Base
Premere MENU > BASE > PIN BASE > OK.
Inserire il PIN della base (es: 0000). Inserire il nuovo PIN (4 cifre) e confermare con SALVA.
Reset della Base
NOTA: Dopo l’operazione di “Reset Base”, oltre a tutte le impostazioni relative alla base (cap. 6) verranno anche de-registrati
tutti i portatili associati a quella base, ad eccezione di quello originario.
Premere MENU > BASE > IMP. DI DEFAULT > OK. Inserire il PIN della base (es: 0000). Verrà chiesto “Reset di tutte le impostazioni?”.
Confermare premendo il tasto funzione OK.
Quando il reset è stato eettuato il display mostra un messaggio di notica.
10 Manuale d’uso mod.
Libretto_guida_22072011_v.indd 10 25/07/2011 11:12:35

1)
2)
17 Impostazioni del portatile (personalizzazioni)
Nome del Telefono
Il nome predenito è“TELEFONO 1”. Per cambiarlo, premere MENU >TELEFONO > NOME TELEFONO.
Inserire il nome personalizzato (max. 8 caratteri) e confermare con OK.
Per ripristinare il nome predenito (“TELEFONO 1”) del telefono, ripetere la sequenza di cui sopra cancellando il nome personalizzato
e confermare con OK.
Lingua dei menu
La lingua di TULIP è da scegliere al primo avvio del telefono.
Per cambiarla durante l’utilizzo, premere MENU > TELEFONO > LINGUA.
Con i tasti selezionare una delle lingue disponibili e confermare con OK la scelta.
Risposta automatica
Quando la risposta automatica è attiva, all’arrivo di una chiamata, se il portatile è riposto sulla base, è suciente sollevarlo per rispondere.
Quando la risposta automatica non è attiva, per rispondere a una chiamata è necessario premere sempre un tasto qualsiasi.
Premere MENU >TELEFONO > RISPOSTA AUTOM. Con i tasti selezionare “ON”
(per abilitare la risposta automatica) oppure “OFF” (per disabilitarla) e confermare con OK.
Suono dei tasti
Premere MENU >TELEFONO > SUONERIA > SUONO DEI TASTI.
Per attivare o disattivare i toni emessi alla pressione dei tasti sul portatile (ON/OFF e confermare con OK).
Modica PIN del telefono
Il PIN del telefono serve per poter eettuare uno dei due tipi di Reset disponibili per telefono (cfr. paragrafo successivo).
Premere MENU >TELEFONO > PIN TELEFONO. Inserire il PIN attuale del portatile (4 cifre, quello di fabbrica è 0000).
Inserire il nuovo PIN e premere SALVA.
Comparirà la scritta “Memorizzato!”. A questo punto il portatile avrà il nuovo PIN.
NOTA: Si consiglia di prendere nota del nuovo codice introdotto e di conservare l’informazione in un luogo sicuro.
Reset del Portatile
Quando si eettua il reset del portatile verranno cancellate:
IMPOSTAZIONI: sono ripristinate le impostazioni del telefono riportate al cap. 6 ad eccezione della rubrica, delle liste delle
chiamate e del PIN del portatile, così come pure saranno mantenute in memoria le informazioni di registrazione del portatile
in oggetto presso le basi.
TELEFONO: saranno riportate ai valori di fabbrica tutte le impostazioni relative al portatile riportate al cap. 6, comprese le
informazioni relative alle basi su cui il portatile è registrato. Per eettuare uno dei due tipi di reset di cui sopra, premere MENU >
TELEFONO > IMP. DI DEFAULT. Quando richiesto, inserire il PIN del portatile. Apparirà la scritta “Reset di tutte le impostazioni?”
confermare il reset premendo il tasto funzione OK.
Per un corretto utilizzo, dopo il reset del portatile, spegnere e riaccendere il telefono, reimpostando la lingua alla
nuova accensione.
Controllo Bebè
Premere MENU > MENU EXTRA > CONTROLLO BEBÈ > MODALITÀ > MODIFIC.
Con i tasti selezionare una delle due seguenti voci e premere OK.
CHIAMA BEBÈ: con i tasti scegliere CHIAMATA A (“INTERNA“ o “ESTERNA”), premere SALVA per memorizzare.
INTERFONO: con i tasti scegliere la SENSIBILITÀ (“ALTO” o “BASSO”) e CHIAMATA A (“INTERNA” o “ESTERNA”), premere
SALVA per memorizzare.
18 Conformità del prodotto alle norme di sicurezza
Con la presente la Società PROMELIT S.p.a. sita in Via Modigliani n°20, a Cinisello Balsamo (Milano), dichiara che l’apparecchio TULIP è
conforme ai requisiti essenziali e alle altre disposizioni pertinenti, stabiliti dalla Direttiva E&TTE 1999/5/EC
in particolare il prodotto è conforme a:
Parte Radio: ETSI EN 3001-406 V2.1.1 (TBR 6)
Compatibilità elettromagnetica (EMC): ETSI EN301 489-1 V1.8.1, EN301 489-6V1.3.1.
Sicurezza elettrica: EN60950- 1:2006+A11:2009
La conformità a detti requisiti viene espressa tramite la marchiatura .
La dichiarazione di conformità originale è disponibile all’indirizzo di cui sopra.
La scheda informativa per il ne-vita del prodotto è archiviata presso l’Ucio Qualità dell’azienda“Promelit S.p.a.”.
NOTA: Per funzionare il telefono ha bisogno di alimentazione elettrica. Usare solo con l’alimentatore fornito in dotazione.
11Manuale d’uso mod.
Libretto_guida_22072011_v.indd 11 25/07/2011 11:12:35

1
2
3
4
5
6
7
8
9
10
11
12
13
14
15
16
17
18
Main Features
Technical specications and dial type
Content of the package
TULIP base unit
TULIP Cordless (icons on the display and description of the keys)
- Icons on the display
- Keys’function
Basic default settings
- HANDSET Unit
- BASE Unit
Installation
- Phase 1: connecting the base
- Phase 2: insert the battery into the handset
- Phase 3: place the handset on the base for recharging
Safety notes and product’s care
Disposal of the product
How to use the telephone
- Switch the cordless on and o
- How to place calls
- How to answer a call
- Hands-free mode
- Adjusting the listening volume
- Options during the conversation
- Sounds (melodies, volume, deactivation/reactivation)
- Setting date and time
- Setting the clock or alarm
- Keypad lock
- Searching the handset (“Paging”key)
- R key (Flash)
Phonebook
- Correspondence between numbers and letters
- How to assign a melody to a contact in the phonebook
- Options on the contacts in the phonebook
Call list
Registration of an TULIP handset to a base (Aliation)
Multi-handset conguration
- Internal calls (between handsets associated to the base)
- Call Transfer and Three-way Conference (2 handsets + 1 external)
Multi-base conguration
- Registration of an TULIP handset on a second base
- Registration of an handset of a dierent model on the TULIP base
- Select one base
Settings of the base
- How to deactivate a handset associated to the TULIP base
- Flash Time
- How to modify the PIN of the Base
- Reseting the Base
Settings of the handset (customisations)
- Handset Name
- Language of the menu
- Automatic answer
- Key Beep
- Modifying the handset PIN
- Resetting the Handset
- Baby Monitor
Conformity of the product to the safety regulations
............................................................................................................................ 3
.......................................................................................... 3
.............................................................................................................. 3
........................................................................................................................... 4
................................................. 4
.................................................................................................................................... 4
.............................................................................................................................................. 4
.................................................................................................................. 5
............................................................................................................................................. 5
..................................................................................................................................................... 5
.................................................................................................................................. 5
.................................................................................................................... 5
............................................................................................. 5
............................................................................ 6
.................................................................................................. 6
.............................................................................................................. 6
.......................................................................................................... 6
................................................................................................................... 6
....................................................................................................................................... 7
................................................................................................................................... 7
........................................................................................................................................ 7
.................................................................................................................. 7
............................................................................................................... 7
............................................................................ 7
................................................................................................................................. 7
.......................................................................................................................... 7
.................................................................................................................................................7
........................................................................................................ 7
................................................................................................................................................ 8
................................................................................................................................. 8
....................................................................................... 8
......................................................................... 9
.............................................................................................. 9
....................................................................................................................................... 9
................................................................. 9
...................................................................................................... 10
...................................................................... 10
............................................................ 10
........................................................................................................... 10
.............................................................................. 10
...................................................... 10
........................................................................................................................................ 10
.................................................................................................................. 10
................................................................... 10
................................................................................................................................................. 10
....................................................................................................... 10
.................................................................................................................................... 10
................................................................................... 11
.......................................................................................................................................... 11
............................................................................................................................ 11
.................................................................................................................................... 11
................................................................................................................................................... 11
...................................................................................................................... 11
............................................................................................................................. 11
............................................................................................................................................ 11
.................................................................. 11
CONTENTS
2User Manual mod.
Libretto_guida_22072011_v.indd 12 25/07/2011 11:12:35

1.
2.
3.
4.
5.
3
1 Main Features
Exclusive design
GAP standard DECT Technology
10 sounds with 3 tones
Dot matrix backlit display
High quality hands-free option
Phonebook with 50 contacts
Caller number – melody association (this service being provided by the telephone providers)
Clock, alarm and dating
Caller number display and list of the last 50 received calls (this service being provided by the telephone providers)
Redialling of the last 20 numbers dialled
Conversation timer
Microphone mute
Keypad lock
Multi-language Menu
Low battery indication
2 Technical specications and dial type
TELEPHONE TECHNICAL SPECIFICATIONS:
Type of technology: Standard DECT (Digital European Cordless Telephone) with GAP prole (Generic Access Prole)
RF channels: 10 channels
Range of Frequencies: 1880Mhz ~ 1900Mhz
Channels Spacing: 1.728MHz
Audio Coding: ADPCM/32kbit per second
Type of modulation: GFSK
Maximum transmission power: about 250mW (24dBm)
Range: max. 50mt indoor and 300mt outdoor
Cordless Power Supply: 2xAAA rechargeable Ni-MH batteries 1.2V 500mAh
Base Power Supply: PRI AC 100-240V 50/60 Hz 0.2A ; SEC DC 5.1V 0.7A
Autonomy: up to 100 hours in stand-by and up to 10 hours in conversation
BATTERY TECHNICAL SPECIFICATIONS:
Rechargeable battery Ni-MH 1.2V 500mAh
Time needed for the rst charging: 16 hours
Time needed for subsequent charging: 8 hours
Exposure temperature during recharge: between 0°C and 40°C (indicative gures)
Operating temperature: between -20°C and +650°C (indicative gures)
Supported recharge cycles: 400 (indicative value)
NOTE: The battery life span depends on the way it is used.
Respect in particular what is reported under chapter 8 “Safety and product’s care notes”.
DIAL TYPE: The equipment uses both the tone dial (Multifrequency) and the pulse dial modes (Pulse).
WARNINGS ABOUT RECHARGEABLE BATTERIES AND THEIR USE:
The battery life span depends on the way it is used.
It is always recommended to place the handset in recharge mode on the base when it is anticipated that it will not be used for a
prolonged period of time (for example during the night and/or when you are out of home/oce). Respect in particular what is
reported under chapter 8“Safety and product’s care notes”.
In the event of battery replacement, once this has reached its lifetime end, ensure that the new one is a rechargeable AAA (R03)
battery having the same electrical and mechanical characteristics that are provided with the product.
Disposal of the exhausted batteries should conform with what is reported under the“Product Disposal” chapter.
Never use common“throwaway”type batteries in this product!
3 Content of the package
n.1 Base unit with built on battery charger
n.1 Handset unit
n.1 Electric power supply for the base unit
n.1 Straight line cord with plug-plug termination
n. 2 Rechargeable battery: Ni-MH 1.2V 500mAh
n.1 Instruction manual
User Manual mod.
Libretto_guida_22072011_v.indd 13 25/07/2011 11:12:35
1)
2)
3)
1)
2)
3)
4)
TELEFONO 1
10:35 09/06
Menu Rubrica
1)
2)
3)
4)
5)
1)
2)
3)
4)
5)
6)
7)
8)
9)
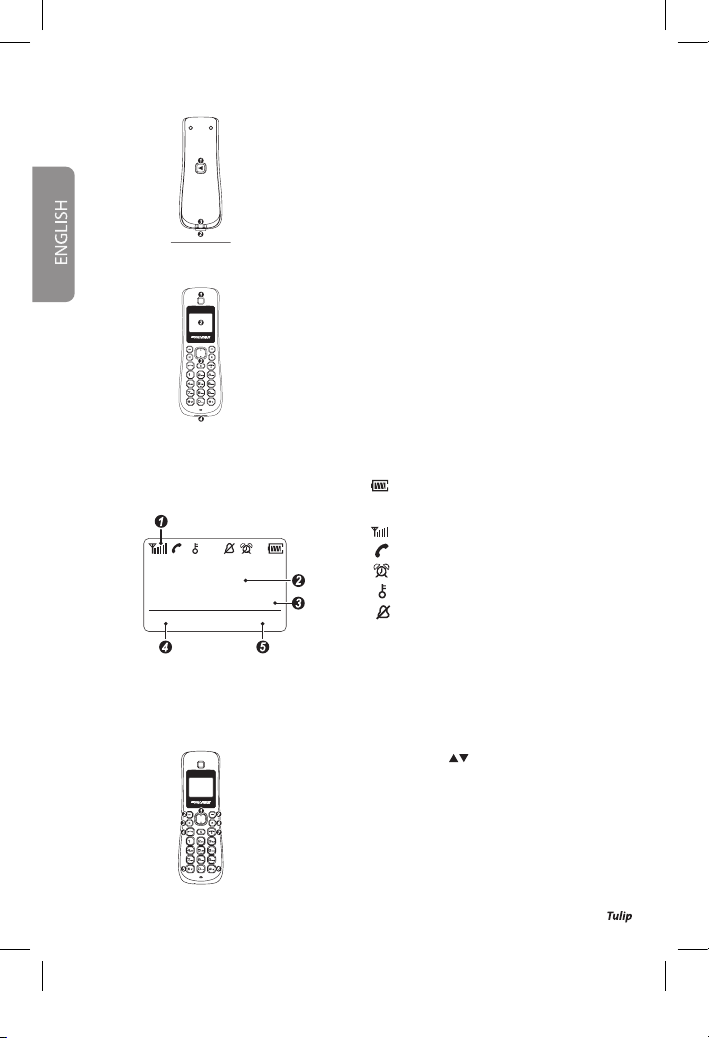
4 TULIP base unit
Handset Search / Handset Registration Key
LED Incoming Call / Line Seized / Handset Search
/ Handset Registration
Contacts for recharging the handset battery
5 TULIP Cordless (icons on the display and description of the keys)
Earphones
Dots matrix backlit display
Alpha-numeric keyboard
Microphone
Icons on the display
The Tulip’s dots matrix display is able to show the
following icons and information:
Icons on the display
: Charging status of the battery (the
white coloured bars indicates the
real charge level)
: Signal strength indication
: Line seized
: Alarm enabled
: Keypad lock enabled
: Sounds disabled
Name and number of the handset (predened: Handset 1)
Date and Time
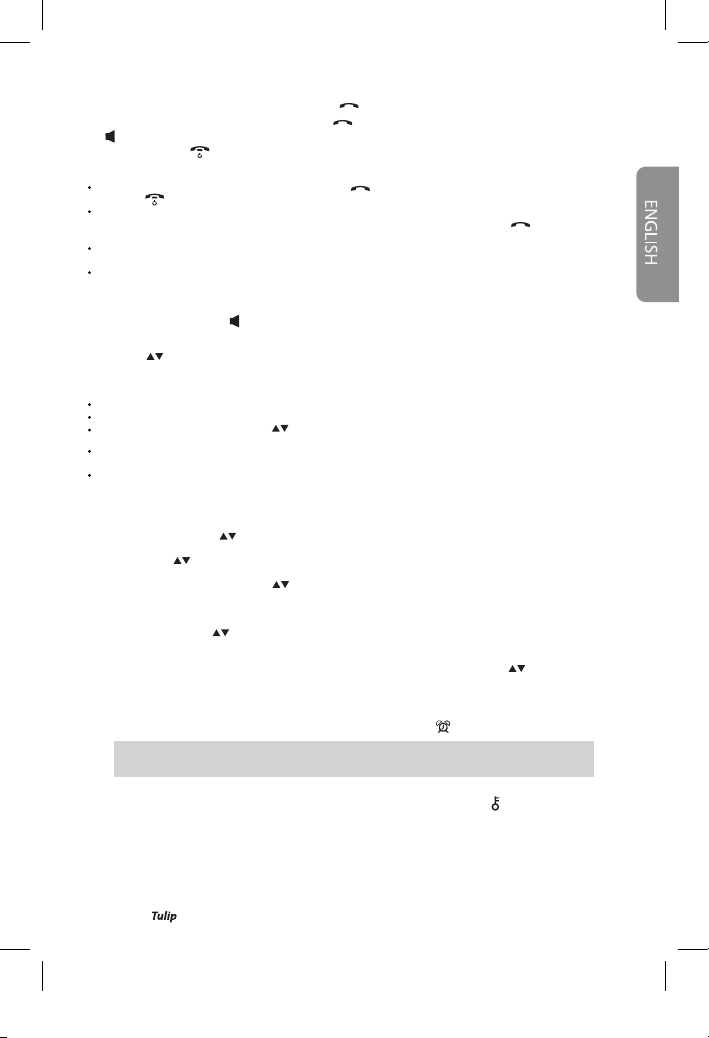
Left Function Key
Right Function Key
Navigation key / with adjustment keys for the listening volume
(in conversation)
Function key left
Handsfree key (activation/deactivation during conversation)
Call answer key/list of the last 10 calls performed/line seizing
(while keeping pressed)
Key * : Activates and deactivates the microphone (while keeping pressed, during conversation )
Key # : Activates and deactivates the key lock (in standby, while keeping pressed)
Call termination key / back to stand-by / switching cordless on/o
Key R (Flash)
Function key right
Keys’function
The Tulip’s dot matrix display is able to show the following icons and information:
4User Manual mod.
Libretto_guida_22072011_v.indd 14 25/07/2011 11:12:35

Select the desired language for menu visualization by choosing among those proposed on the display and press OK. Later, to
change the language of the menus at any time, refer to chapter 17 (section “Menu language”) in this manual.
For your safety and for a good functioning of the cordless use only the rechargeable battery provided with the product or a battery
of the same type. Also refer to the safety rules reported in the paragraph“Safety notes and product’s care”in this manual.
1)
2)
3)
6 Basic default settings
HANDSET Unit
Handset number: 1
Handset Name: Handset 1
Phonebook: void
Automatic answer: O
List of received/no answer/made calls: void
Selected Base: 1
Handset PIN code: 0000
7 Installation
Phase 1: connecting the base
Locate the connectors for the plug-plug telephone cord (Line ) and the power supply cable (Power), as illustrated below.
Plug the jack of the power supply cable in the suitable socket (Power ) then plug the power supply in a wall electric socket located
in the vicinity of the base.
Plug the jack of the telephone cord in the suitable socket (Line) then plug the other end of the cable directly in the wall socket or
use a suitable telephone socket (not provided with the equipment and not displayed in the gure below).
NOTE: The telephone is able to operate equally upon either performing the connection to the telephone line using a specic
telephone plug (not provided with the equipment and not displayed in the gure below), or using the sole plug-to-plug
telephone cord directly plugging it into a modular jack (wall socket); in both connection modes, the telephone will always
result in a parallel connection to the line.
BASE Unit
Base PIN code: 0000
Flash Time (R key): 98 ms
Pause duration: 2 seconds
Predened associated handset: Handset 1
Use exclusively the power supply provided, which must
remain always plugged into the power supply socket.
In case another cable has been purchased in a shop,
ensure that the connections are identical to those of the
cable provided.
Insert the battery as illustrated in the gure above, taking care that the polarities reported on the battery label are visible and aimed
upward. Then close the handset.
To verify the correct installation of the battery, switch on the handset by keeping the key pressed for 1 second.
Phase 2: insert the battery into the handset
Remove the plastic shell from the rear side of the handset, exerting a light pressure with both hands on the opening hole, as
illustrated below.
5User Manual mod.
Libretto_guida_22072011_v.indd 15 25/07/2011 11:12:36

Phase 3: place the handset on the base for recharging
Switch on the handset by keeping the key pressed for 1 second.
Place the handset on its base to have the battery charged: an acoustic tone will conrm the correct positioning of the handset on
the base and the start of the battery charging process.
Perform the rst charging cycle for at least 16 hours. Later, a recharge time of 8 hours will be sucient.
NOTE: During the rst recharge cycle, the product must not be used neither to receive, nor to make any telephone call.
8 Safety notes and product’s care
Use always the original rechargeable battery or a battery of the very same type (having the same electrical and mechanical
characteristics).
Be extremely careful in ensuring that the battery is correctly inserted in its housing upon respecting the proper polarities.
Do not attempt to open / damage the battery.
Do not throw the battery into the re: it could explode.
Perform the rst charging cycle for at least 16 hours. Later, a recharge time of 8 hours will be sucient.
Do not expose the battery to temperatures lower than -10°C or higher than +50°C during operation; recharge the battery only at
temperatures between 0°C and +45 °C.
In case of prolonged periods when the telephone is not used, it is recommended to remove the battery from the battery housing.
Use only the power supply provided with the equipment.
The equipment could interfere with other electro-medical equipment. Therefore respect the indications displayed in the premises
where you are (for example consulting rooms, hospitals, etc.).
Do not keep the handset in the bathroom or in the shower. The handset and its base are not protected against water splashes.
Clean the base and the handset with a wet (with no solvents) or antistatic cloth. Do not use in any case dry clothes since
electrostatic charges may be generated that could damage the cordless.
In case the cordless should have been in contact with liquids, switch it o and immediately remove the battery. Let the liquid ow
away from the cordless. Wipe all parts with a cloth and keep the cordless with the battery housing open and the keyboard facing
downward for at least 72 hours in a warm and dry place (do not put it absolutely in the oven, either a microwave, gas or any other
type of oven). Once completely dried, in many cases it will be possible to operate the cordless again even if problems might occur.
For any transportation requirement use only the original packaging of the equipment.
WARNING: if the product is placed under recharge with a wrong type of battery there is a potential
danger of explosion of the battery itself. Disposal of exhausted batteries should be made according
to the instructions reported in the following chapter.
9 Disposal of the product
INFORMATION TO THE USERS
According to art. 13 of the Decree by Law n. 151, dated July 25, 2005: (Implementation of the Directives
2002/95/CE, 2002/96/CE and 2003/108/CE, related to the reduction of the use of dangerous substances
in electric and electronic equipment, and the related waste disposal)
The symbol of the barred disposal box reported on the equipment or on its package indicates that the product must be
disposed separately from other wastes at the end of its lifetime.
The user shall therefore deliver the equipment once at its lifetime expiry to the suitable separate refuse collection centres for
electronic and electro-technical wastes, or deliver it back to the dealer upon purchasing the new equipment.
The suitable separate collection for eventual routing of the equipment to recycling, treatment and environmentally compatible
disposal will contribute to avoid possible negative eects to the environment and health and favour the reuse and/or recycling of
the construction materials of the equipment.
The abusive disposal of the product by the user will imply the application of the sanctions as provisioned by the regulations in force.
10 How to use the telephone
Switch the cordless on and o
Keep the key pressed for 1 second. To switch o, keep the same key pressed for 2 seconds.
6User Manual mod.
Libretto_guida_22072011_v.indd 16 25/07/2011 11:12:36
7
How to place calls
In pre-dialling: dial the telephone number and press the key . Use the Ckey to delete any digit that was inserted by mistake.
With line seized: Keep pressed for at least 1 second the key and dial the number you wish to call. (You can also press
the key and dial the number you wish to call).
In case of error press the key and start again. During the call the red LED on the base will blink.
How to answer a call
When the handset is not placed on its base: press the key or any key to answer. Once the conversation is over,
press the key terminate the call.
When the handset is placed on its base and the automatic answer is enabled (see Chapter 17 for the settings needed for activation),
lifting the handset will be sucient to answer the call.When the automatic answer is disabled, press the key or any other key to
answer. During the ring tone phase the red LED on the base will ash intermittently and the display will show, on a case by case basis:
“External call”, when the caller number identication service is not active on the telephone line.
The telephone number of the caller (after the rst ring tone), when the caller number identication service is active on the telephone line.
“Number concealed”, when the caller number identication service is active but the latter voluntarily conceals its own telephone
number.
Hands-free mode
During the conversation press the key to activate the hands-free mode and press it again to deactivate this mode.
Adjusting the listening volum
Press the keys to adjust the listening volume during the conversation (both normal and in hands-free mode).
Options during the conversation
During the conversation you can press the function keys (left“Menu”or right“Phonebook”) or R to access the following options:
PHONEBOOK: to access the phonebook (see the“Phonebook” chapter in this manual).
MIC MUTE: to disable your microphone. To enable it again, press the right key ENABLE.
LISTENING VOLUME: press directly the keys to adjust the listening volume during the conversation (both normal and
handsfree).
INTERNAL CALL: to place the external caller on hold and call another handset associated with the TULIP base. Once the called
handset will answer, it will be possible to perform a three ways conference by pressing again OPTIONS > CONFERENCE.
R KEY (Flash):To exploit possible supplementary services provided they are oered by the telephone company and enabled on
the line. Refer to your own provider for details on the use of such functions.
Sounds (melodies, volume, deactivation/reactivation)
To select a Melody: press Menu > HANDSET > SOUND > EXTERNAL MELODY (or INTERNAL) > MELODY > OK.
Choose the desired sound with and conrm with OK.
Adjusting the Volume: press Menu > HANDSET > SOUND > VOLUME > OK.
Set the volume with and conrm by pressing OK.
Disabling the sound: press Menu> HANDSET > SOUND > VOLUME> OK.
To move within the submenu VOLUME with , go to the None option and conrm with SAVE.
Setting date and time
Press MENU > BASE > TIME SETTING. Type in the date in the “dd.mm.yy” format, type in the time in the “hh.mm” (24
hours) format by using the keys to move through the various fields and press OK when terminated.
Setting the clock or alarm
To set the clock/alarm, press MENU > EXTRA MENU > ALARM. Move within the submenu using the keys, go to the MODE
option and press EDIT to select“SINGLE” or “EVERYDAY”, press OK and then SAVE.
Go to TIME and insert the time for the alarm in the format “hh.mm” (24 hours), press OK and then SAVE.
Repeat the same operations to change the melody (MELODY), to let the alarm sound again (REPEAT) and to select the cycle in
minutes for repeating the alarm (CYCLE).
When the alarm is enabled, the relevant icon will appear on the display in standby .
Keypad lock
Keep pressing the # key to activate the keypad lock. When the keypad lock is active, the symbol will appear on the display in
stand-by.To reactivate the keypad, keep pressing the # key.
Searching the handset (“Paging”key)
If you are no more able to nd your handset (or another handset associated with the TULIP base) shortly press the Handset Sear-
ching (“Paging”) key on the base. The LED on the base will ash intermittently and all handsets associated to that base will start to
ring. Press again the Handset Searching key on the base or any other key on the handset to stop the ring tone.
At the time programmed for the alarm, the handset will play the alarm melody. To stop it, press any
key on the handset.
User Manual mod.
Libretto_guida_22072011_v.indd 17 25/07/2011 11:12:36
R key (Flash)
Press the Rkey during the conversation to activate the ash key.
Refer to your own provider for the services available with this key.
By keeping the Rkey pressed for a while a pause tone Pwill be inserted.
11 Phonebook
Each contact can be associated with:
the contact name (max 15 characters/digits).
the telephone number (max. 24 digits).
one melody, if the caller identication service is active on the telephone line.
the velocity, for the use of the quick dial service.
To access the phonebook, press the right key with the telephone in stand-by PHONEBOOK.
SHOW ENTRY: to show the list of all contacts included in the phonebook in an alphabetic order.
NEW ENTRY: type in the name and telephone number of the new contact by using the keys to move from one eld to another.
Press the Ckey to delete characters/digits inserted by mistake.
Press SAVE to immediately save the contact, or Melody or Speed Dial (see the section “Assign a melody to a phonebook entry”
below) to further customise the contact, and remember to save the settings by pressing SAVE.
DELETE ALL: to empty the whole phonebook with one single operation.
MEMORY INFO: to show how many entries have been stored in the phonebook, out of the 50 slots available.
Correspondence between numbers and letters
#: change from uppercase to lowercase.
Table of characters (Uppercase)
Table of characters (Lowercase)
8User Manual mod.
Libretto_guida_22072011_v.indd 18 25/07/2011 11:12:36

1)
2)
3)
4)
How to assign a melody to a contact in the phonebook
These functions are only available if the Caller Identication Service (CLI) is active on your own telephone line. For further informa-
tion refer to your telephone provider.
ASSIGN A MELODY: upon an incoming external call, after the rst ring the handset will play the melody previously assigned to
that contact.
To assign a melody to a new entry, after having typed in the name and telephone number, select Melody > EDIT.
Select the melody for that entry by using the keys and press OK, then move with the keys on Name and NUMBER to
save the changes. As an alternative select an existing contact from within the phonebook, press SHOW ENTRY > OK > MENU > EDIT
ENTRY > Melody and proceed as above.
Options on the contacts in the phonebook
When a contact is selected, by pressing MENU the following menu will be displayed:
MODIFY ENTRY: to modify the settings of this contact. Conrm by pressing SAVE once terminated.
DELETE: to delete this contact from the phonebook.
12 Call list
By pressing MENU > CALL INFO the following lists of calls will be made available:
REDIAL (last performed calls, these can be accessed also by directly pressing the key with the telephone
in standby)
NEW CALLS (with no answer)
ALL CALLS (received, with and without answer)
NOTE: The lists of calls“NEW CALL” and“ALL CALLS” are only available if the caller identication service (CLI) is active on your own
telephone line. For further information refer to your own telephone provider.
When highlighting a call with the cursor in one of the above lists, the following menu will appear by pressing
OK > Menu:
COPY TO PHONEBOOK
DELETE
DELETE ALL
13 Registration of an TULIP handset to a base
(Aliation)
Each base can be associated with up to 5 handsets (1 provided + 4 optional).
In this way it will be possible to use the handset also to perform internal free of charge communications, without seizing the
telephone line.
To register a new Handset to your base:
On the base
Keep the“Handset Search”key pressed on the base for about 5 seconds, until the red LED on the base will start blinking.
Now start operating on the handset.
On the handset to be registered
Press MENU > HANDSET > REGISTRATION > OK.
Select the base (e.g. BASE 2) where you intend to register the handset and press OK.
Insert the PIN of the base (predened: 0000) where you intend to register the handset on and conrm by pressing OK.
NOTE: By default the handset is registered on“BASE 1”.
The display will show“Registration Mode”followed by the number of the selected base; once identication is successfully achieved the
system will ask to modify the name of the handset (e.g. HANDSET 2). Press OK and the handset will be assigned to the selected base.
After the registration has been nalised, upon any incoming call all handsets assigned to the same base will ring simultaneously.
If one handset is busy with an external conversation, the icon on the top of the display will appear on all other associated handsets.
These can not be used to make any external call until the line is released.
9User Manual mod.
Libretto_guida_22072011_v.indd 19 25/07/2011 11:12:37

1)
2)
14 Multi-handset conguration
Internal calls (between handsets associated to the base)
To call another handset associated to the same TULIP base (see the previous chapter), press MENU > EXTRA MENU > INTERNAL CALL.
Select the HANDSET you want to call (“All”in case you wish to call all the connected handsets) and press OK.
To answer an internal call, proceed as for the external calls.
Call Transfer and Three-way Conference (2 handsets + 1 external)
During a call between one handset (e.g. HANDSET 1) and one external party, press the Menu key on HANDSET 1 and select INTERNAL
CALL. Choose from the list on display the telephone number to call (e.g. HANDSET 2) and press OK (the external user will remain on hold).
When HANDSET 2 will answer, it is possible to:
Transfer the external call to HANDSET 2: it is sucient to press the key on HANDSET 1;
Activate a three-way conference: press Menu on HANDSET 1 and choose Conference. By pressing instead “INT Call End” on
HANDSET 1, the second handset is disconnected and HANDSET 1 will be connected back to the external caller.
15 Multi-base conguration
Thanks to the GAP prole, which the device is equipped with, it is possible to aliate your own handset to more than one DECT
bases (even from dierent brands and models), provided they are also equipped with the GAP prole. Each TULIP handset can be
registered on 4 bases as a maximum.
Registration of an TULIP handset on a second base.
To register the TULIP handset on a second TULIP base, the procedure is the same as illustrated under chapter 13“Registration of an
handset on a base”(Aliation).
To register instead the TULIP handset on a base from a dierent model, set the latter in registration mode as described in the related
user manual, then follow the aliation procedure on the TULIP handset as described under chapter 13 (typing in when requested
the PIN code of the second base).
Registration of an handset of a dierent model on theTULIP base
Keep pressing the “Handset Searching” key on the TULIP E base for about 5 seconds, then follows the instructions reported on the
user manual of the handset of the other manufacturer (typing in when requested the PIN code of the TULIP E base).
Select one base
If the handset is registered on more than one bases (4 dierent bases are allowed as a maximum), it is possible to either manually
set the base to be used, or leave the handset to automatically search for the rst available base among those where it had been
previously registered on. Press MENU > HANDSET > SELECT BASE.
The bases where the handset is already registered at will appear on the list.
Select the desired base and conrm by pressing OK, or choose the“AUTOMATIC” option.
16 Settings of the base
How to deactivate a handset associated to theTULIP base
Press MENU > BASE > DEREGISTRATION > OK.
Insert the PIN of the base (e.g. 0000) and select the handset to be deactivated using the keys, then press OK.
The deactivated handset, if registered also on another base, will automatically start operating under the latter one.
NOTE: it is not possible to deactivate an handset when it is the only one registered on the connected base.
Flash Time
Press MENU > BASE > FLASH TIME.
Using the keys, select the value for the ash time (from 98ms to 900ms) and conrm by pressing OK.
How to modify the PIN of the Base
Press MENU > BASE > PIN BASE > OK.
Insert the PIN of the base (e.g. 0000). Insert the new PIN (4 digits) and conrm by pressing SAVE.
Resetting the Base
NOTE: after the“Base Reset” operation, further to all settings related to the base (chapter 6), all handsets associated with that
base will also be de-registered, with the exception of the original one.
Press MENU > BASE > SET DEFAULT > OK. Insert the PIN of the base (e.g. 0000). The system will ask“Reset all settings ?”.
Conrm by pressing the function key OK. After reset has been performed the display will display a notication message.
10 User Manual mod.
Libretto_guida_22072011_v.indd 20 25/07/2011 11:12:37
Table of contents
Languages:


