PROMULTIS contourkiosk User manual

For more exciting multitouch products visit
www.promultis.info
or call +44 (0) 239 251 2794
MULTITOUCH SOLUTIONS
contourkiosk
U S E R ’ S M A N U A L
CAUTION
• Changes or modications not expressly approved by the party responsible
for compliance could void the user’s authority to operate the equipment.
• This User’s Manual includes detailed usage instructions for your product.
• Please read this manual thoroughly.
• Figures and illustrations in this User Manual are provided for reference only
and may differ from actual equipment appearance. Equipment design
and specications may be changed without notice.
• Due to the processes required for manufacturing a large format Projected
Capacitive product Promultis will only accept warranty requests for units
that have a blemish, mark or smear on the touch skin that is 5% or larger
than the total interactive area.
For more exciting multitouch products visit
www.promultis.info
or call +44 (0) 239 251 2794
MULTITOUCH SOLUTIONS
contour kiosk
2
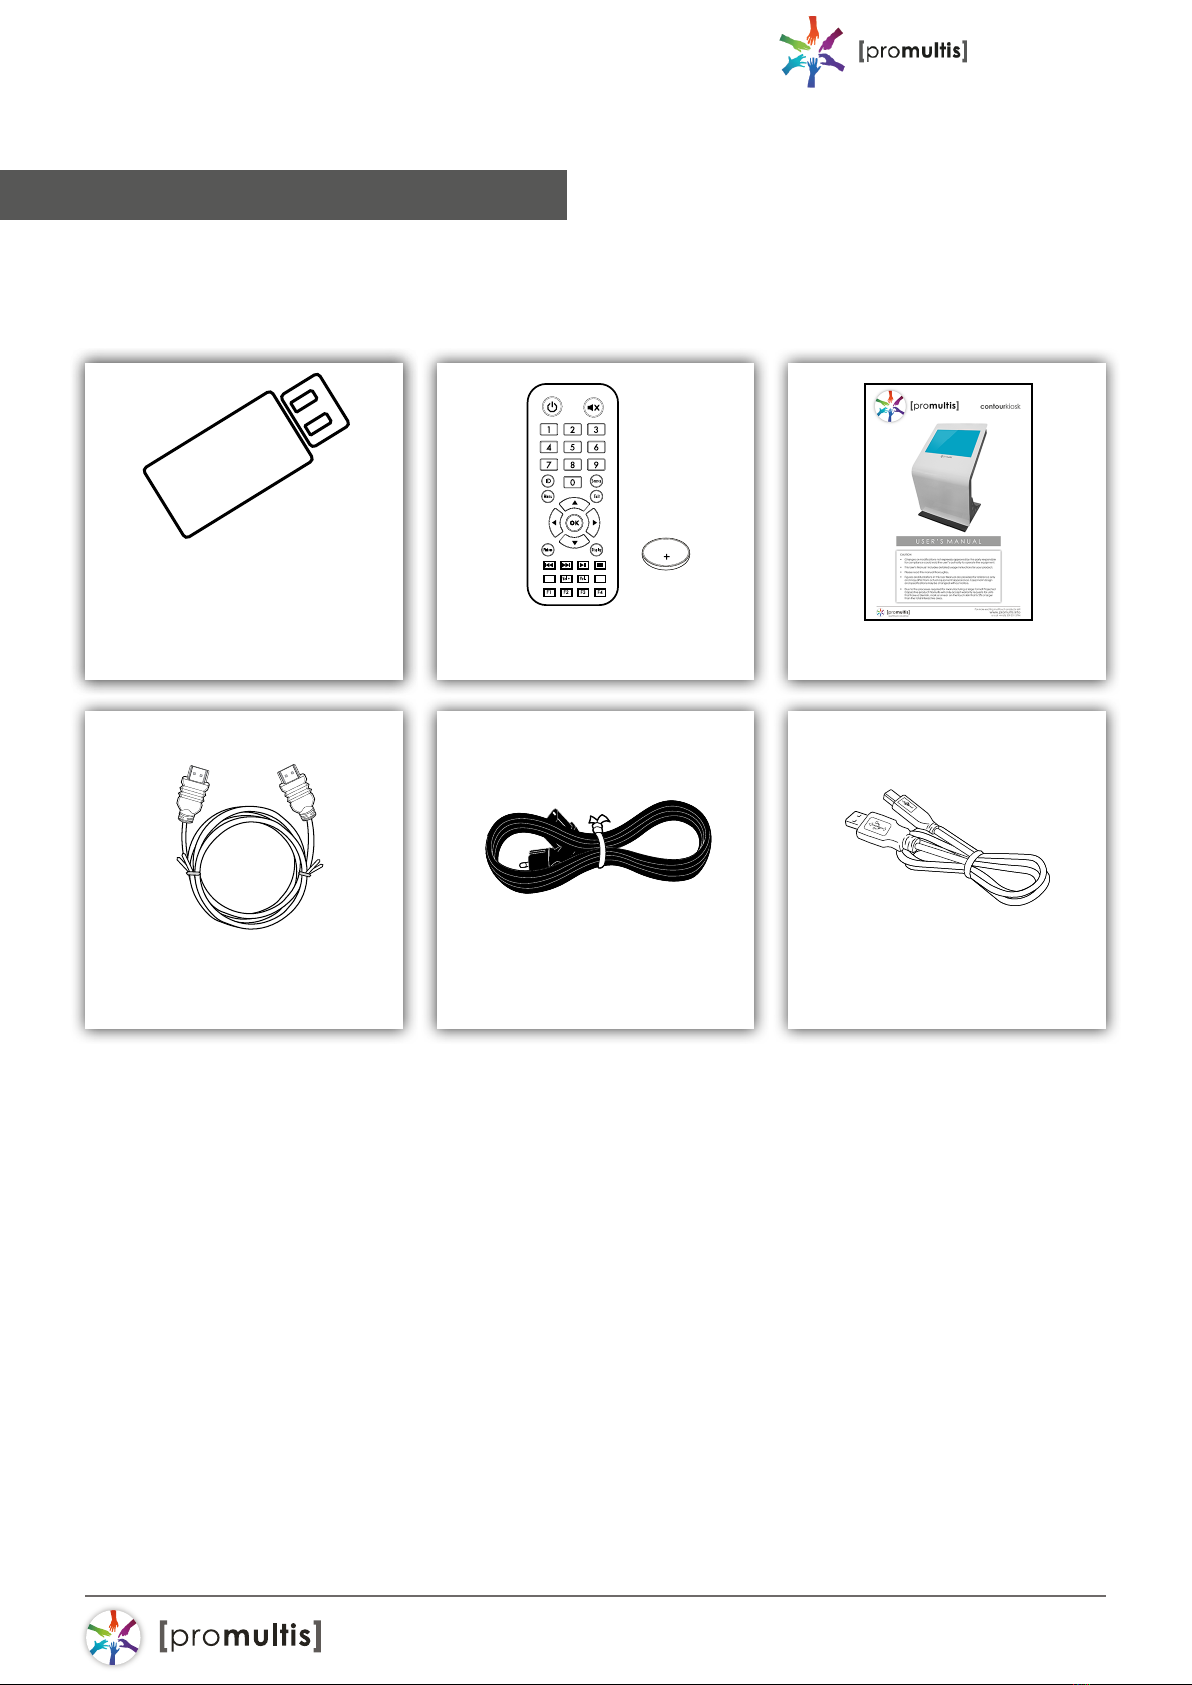
USB Memory Stick with
Promultis User Manual pdf
Warranty Card
Displax Driver Remote Control Promultis Manual
HDMI Cable AC Power Supply USB Cable
Getting started
The following items are included in your
product box.
For more exciting multitouch products visit
www.promultis.info
or call +44 (0) 239 251 2794
MULTITOUCH SOLUTIONS
contour kiosk
3
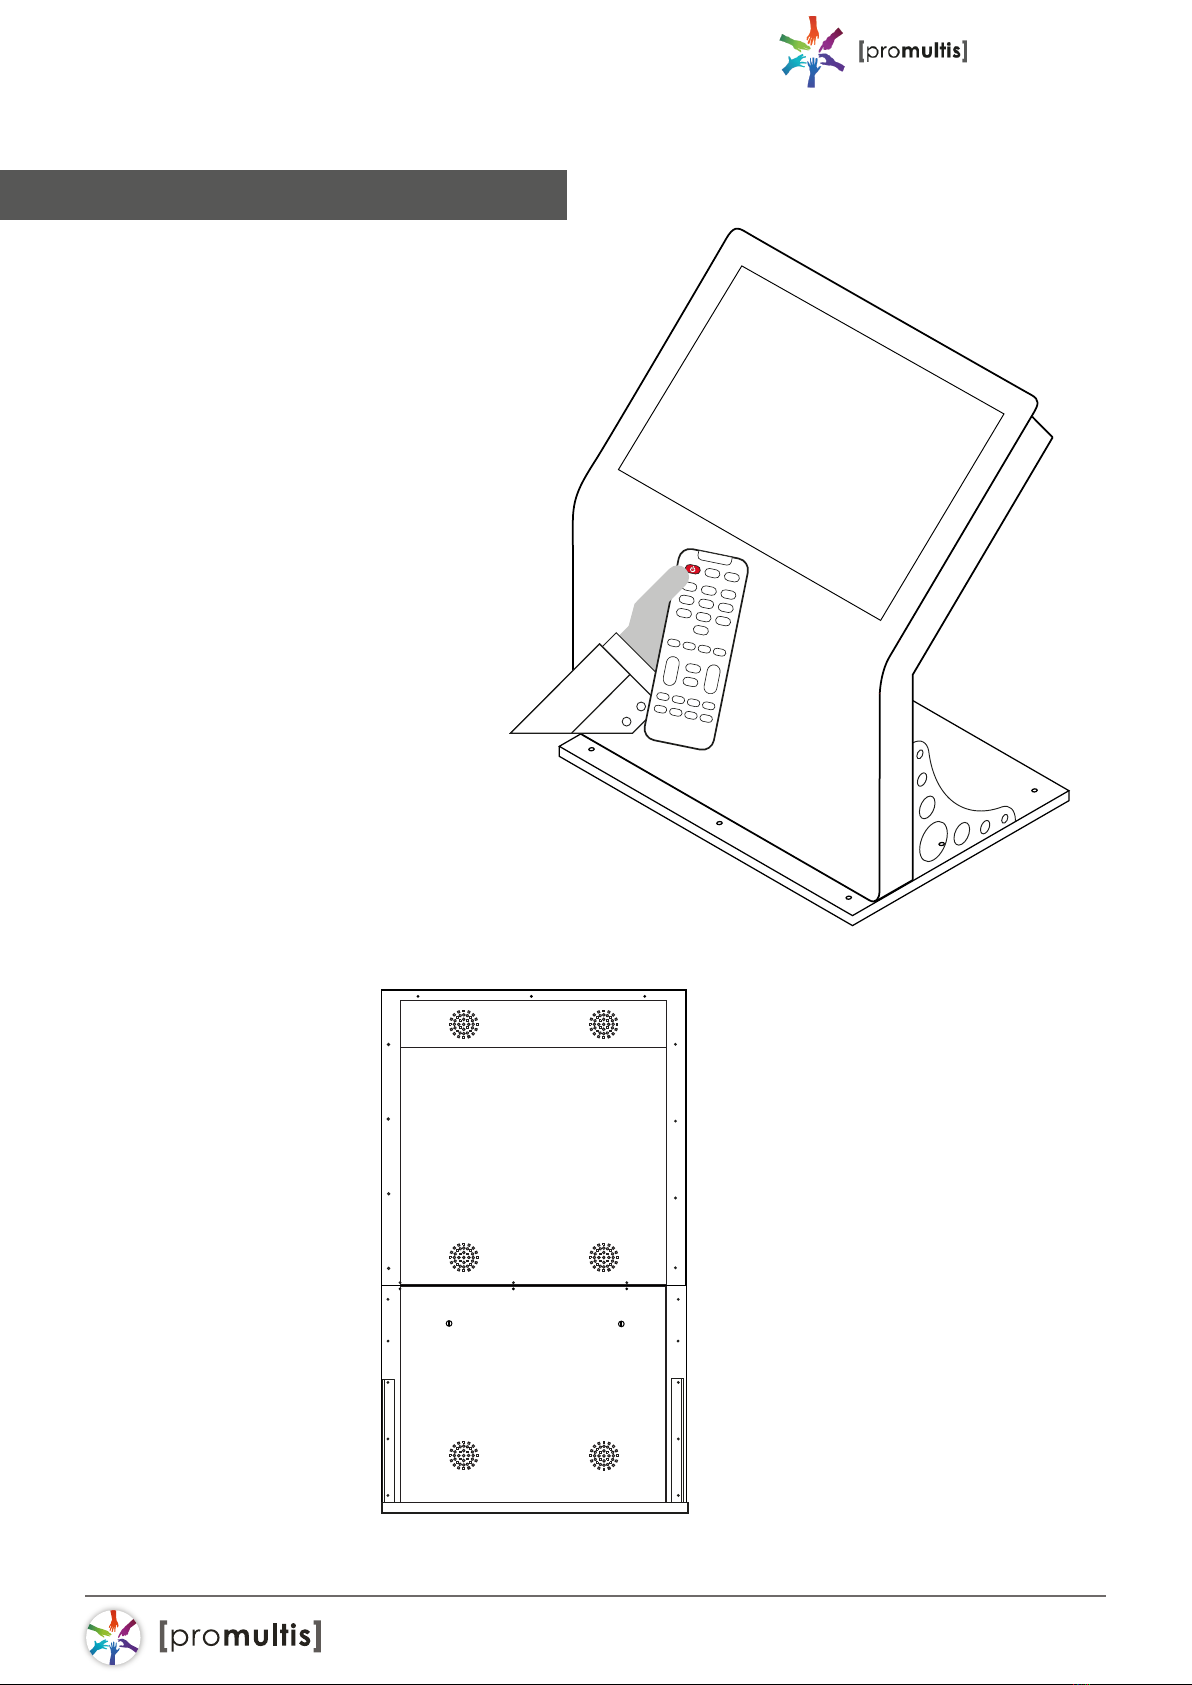
Start the device
1. Check the plug is switched on at
the wall socket.
2. When the power is turned on the
screen should power up.
3. After a few seconds, if the screen
is still blank, take the TV remote
contron.
BACK PANEL
Lower back panel can be unlocked and
removed for access to monitor cables
and power cables.
A PC can be
connected to the
monitor via HDMI cable.
For more exciting multitouch products visit
www.promultis.info
or call +44 (0) 239 251 2794
MULTITOUCH SOLUTIONS
contour kiosk
4
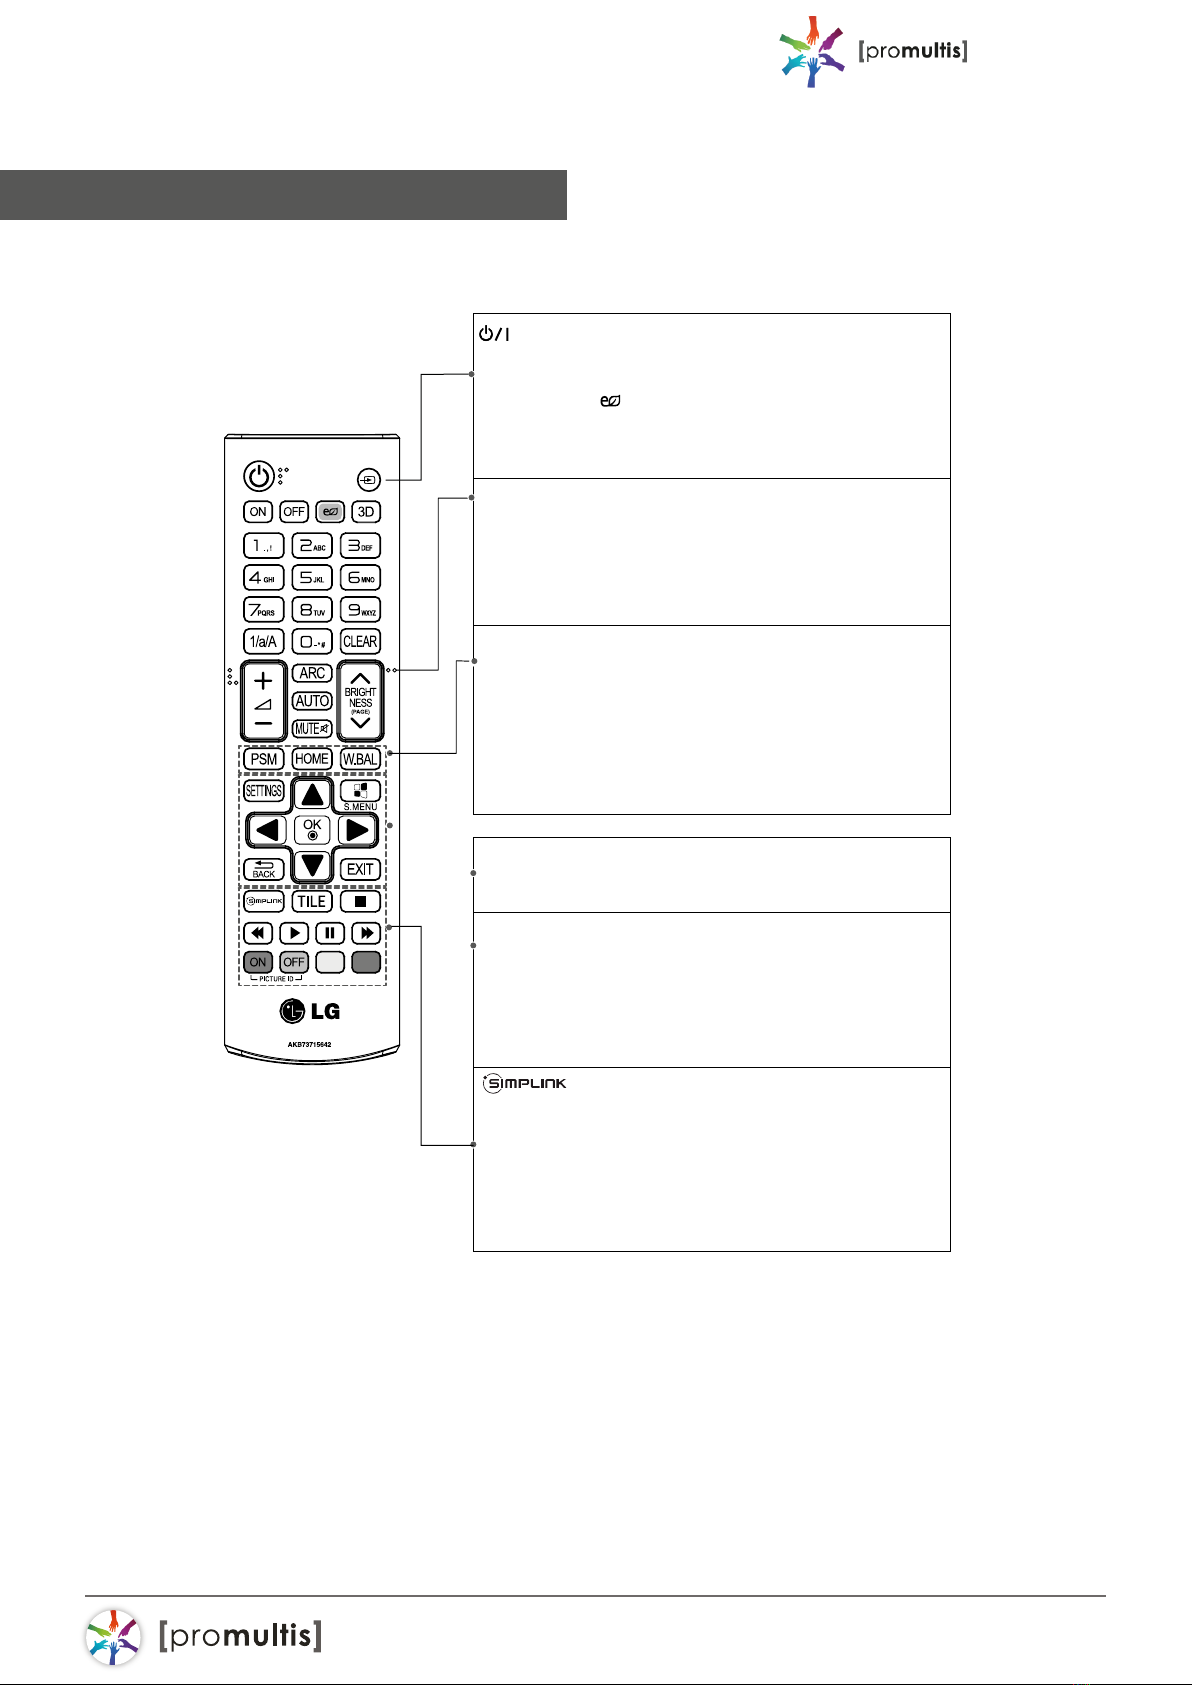
PSM Selects the Picture Mode.
HOME Activates the Launcher.
W.BAL Enters the White Balance menu.
SETTINGS Accesses the main menus or saves your input and exit menus.
S.MENU SuperSign menu key (Depending upon the model, this feature
may not be supported.)
Navigation Buttons Scrolls through menus or options.
OK Selects menus or options and conrms your input.
BACK Allows you to move back one step in the user interaction function.
EXIT Quit all OSD tasks and applications.
Allows you to control various multimedia devices to enjoy
multimedia simply by using the remote control through the
SimpLink menu. (Depending upon the model, this feature
may not be supported.)
TILE Selects the TILE Mode.
PICTURE ID ON/OFF When the Picture ID number matches the Set ID
number, you can control whichever monitor you
want in multi-display format.
USB Menu Control Buttons Controls media playback.
(POWER) Turns the monitor on or o.
MONITOR ON Turns the monitor on.
MONITOR OFF Turns the monitor o.
ENERGY SAVING( ) Reduces power consumption by adjusting peak
screen brightness.
INPUT Selects the input mode.
3D Used for viewing 3D videos. (This model does not support this.)
1/a/A Toggles between numerical and alphabetical.
(Depending upon the model, this feature may not be supported.)
Number and Alphabet buttons
Enters numerical or alphabetical characters depending upon the setting.
(Depending upon the model, this feature may not be supported.)
CLEAR Deletes the entered numerical or alphabetical character.
(Depending upon the model, this feature may not be supported.)
Volume Up/Down Button Adjusts the volume.
ARC Selects the Aspect Ratio mode.
AUTO Automatically adjusts picture position and minimizes image
instability (available for RGB input only).(Depending upon the
model, this feature may not be supported.)
MUTE Mutes all sounds.
BRIGHTNESS Adjusts the brightness of the display. PAGE Function is not
supported in the this model. (Depending upon the model,
this feature may not be supported.)
Controller for LG

For more exciting multitouch products visit
www.promultis.info
or call +44 (0) 239 251 2794
MULTITOUCH SOLUTIONS
contour kiosk
5
Screen Cleaning
Over time and use the screen will
become tarnished with nger prints;
to clean a mist spray class cleaner /
degreaser should be used when the
screen is at a 45 degree angle. Should
any liquid be dropped on the screen
when it is in the horizontal position this
should be mopped up with a liquid
absorbent cloth prior to cleaning.
Operation Guidance
When using the screen the gesture
functions are similar to using your
smartphone or tablet but on a much
larger scale.
The way Projected Capacitive touch
technology works is by xing a sensor grid
between a layer of cover glass and the
LCD panel, so when a nger touches the
glass the grid detects the coordinates of
the touch point.

For more exciting multitouch products visit
www.promultis.info
or call +44 (0) 239 251 2794
MULTITOUCH SOLUTIONS
contour kiosk
6
Skin Ultra has all the following features.
If you have Skin Fit or Skin Dualtouch some features may not be available, whenever a
feature is not available, a note is provided.
A. Stand by: the touch is temporally disabled when opening the control panel.
This way, if you want to adjust a setting you will be able to do it without the touch being
active. When you close ‘DISPLAX Connect’ the touch injection will be automatically
re-enabled and the STAND-BY status will change to ON. This stand-by status is only
active when ‘DISPLAX Connect’ is open.
B. Product designation.
C. Firmware version.
D. Product serial number.
E. Label: you can attribute a label to the touch controller.
F. Touch Injection Status: touch injection to the Operating System has 3 modes:
ON: Operating system will receive touch events from the Skin.
Displax Connect: index of features

For more exciting multitouch products visit
www.promultis.info
or call +44 (0) 239 251 2794
MULTITOUCH SOLUTIONS
contour kiosk
7
OFF: Operating system will not receive touch events from the Skin.
STAND-BY: Operating system will temporarily not receive touch events from the Skin.
This way, if you want to adjust some setting you will be able to do it. When you close
‘DISPLAX Connect’ the touch injection will be automatically re-enabled and the STAND-
BY status will change to ON. This stand-by status is only active when ‘DISPLAX Connect’
is open.
G. Conguration wizard: automatically congures the touch parameters i.e. Gain,
Threshold, Shield level. If the conguration wizard fails the touch parameters must be
congured manually. Conguration Wizard is not available for Skin Dualtouch.
Settings
H. Settings tab: touch conguration settings.
H1. Gain: adjusts the signal strength injected by the Touch Controller on the Touch
Sensor - thicker glasses and bigger Touch Sensors may require a stronger signal (higher
GAIN values). Gain values range between 0 and 7.
H2. Threshold: adjusts the threshold level of what is considered a touch. Values vary
between 0 and 50 starting on rmware version 1.5.0. (0 to 15 on rmware version equal
or previous to 1.4.0).
H3. Shield: electromagnetic shielding reduces noise that may exist between the
Skin product and the LCD. Shielding level ranges between 1 and 6, with 6 being the
strongest shielding level. The shielding level should be maintained as low as possible.
H4. Palm: allows the rejection of areas with dimensions larger than a nger, such as a
hand or an arm. (Feature not available in Skin Dualtouch).
H5. Sensor tools: Allows enabling and disabling horizontal and vertical electrodes and
the selection of areas to be activated or deactivated within the touch sensor active
area.
H5.1. Trash: reactivates the electrodes or electrode portions that we have deactivated.
H5.2. Rectangle selection: Enables drawing rectangular areas to be deactivated.

For more exciting multitouch products visit
www.promultis.info
or call +44 (0) 239 251 2794
MULTITOUCH SOLUTIONS
contour kiosk
8
H5.3. Rectangular eraser: Allows the selection of areas to be reactivated.
H5.4. Draw selection: With the draw selection you can select parts of the active
area to be disabled.
H5.5. Draw eraser: With the draw eraser you can select parts of the active area
to be enabled.
For more exciting multitouch products visit
www.promultis.info
or call +44 (0) 239 251 2794
MULTITOUCH SOLUTIONS
contour kiosk
9
I. Calibration: Geometrical calibration process to match the physical touch with the
Operating System digital coordinates.
I1. Screens: select the display where you want to perform
the geometric calibration.
I2. Calibrate: Click the button to start the geometric calibration.
For most scenarios 4 calibration points are more than enough.
I3. + Advanced geometric calibration.
I4. Calibration points: Number of points used to perform the geometric
calibration. Please refer to the advanced calibration chapter.
I5. Drag mode: Calibration of a touch sensor smaller than the LCD.
Please refer to the advanced calibration chapter.
Calibration

For more exciting multitouch products visit
www.promultis.info
or call +44 (0) 239 251 2794
MULTITOUCH SOLUTIONS
contour kiosk
10
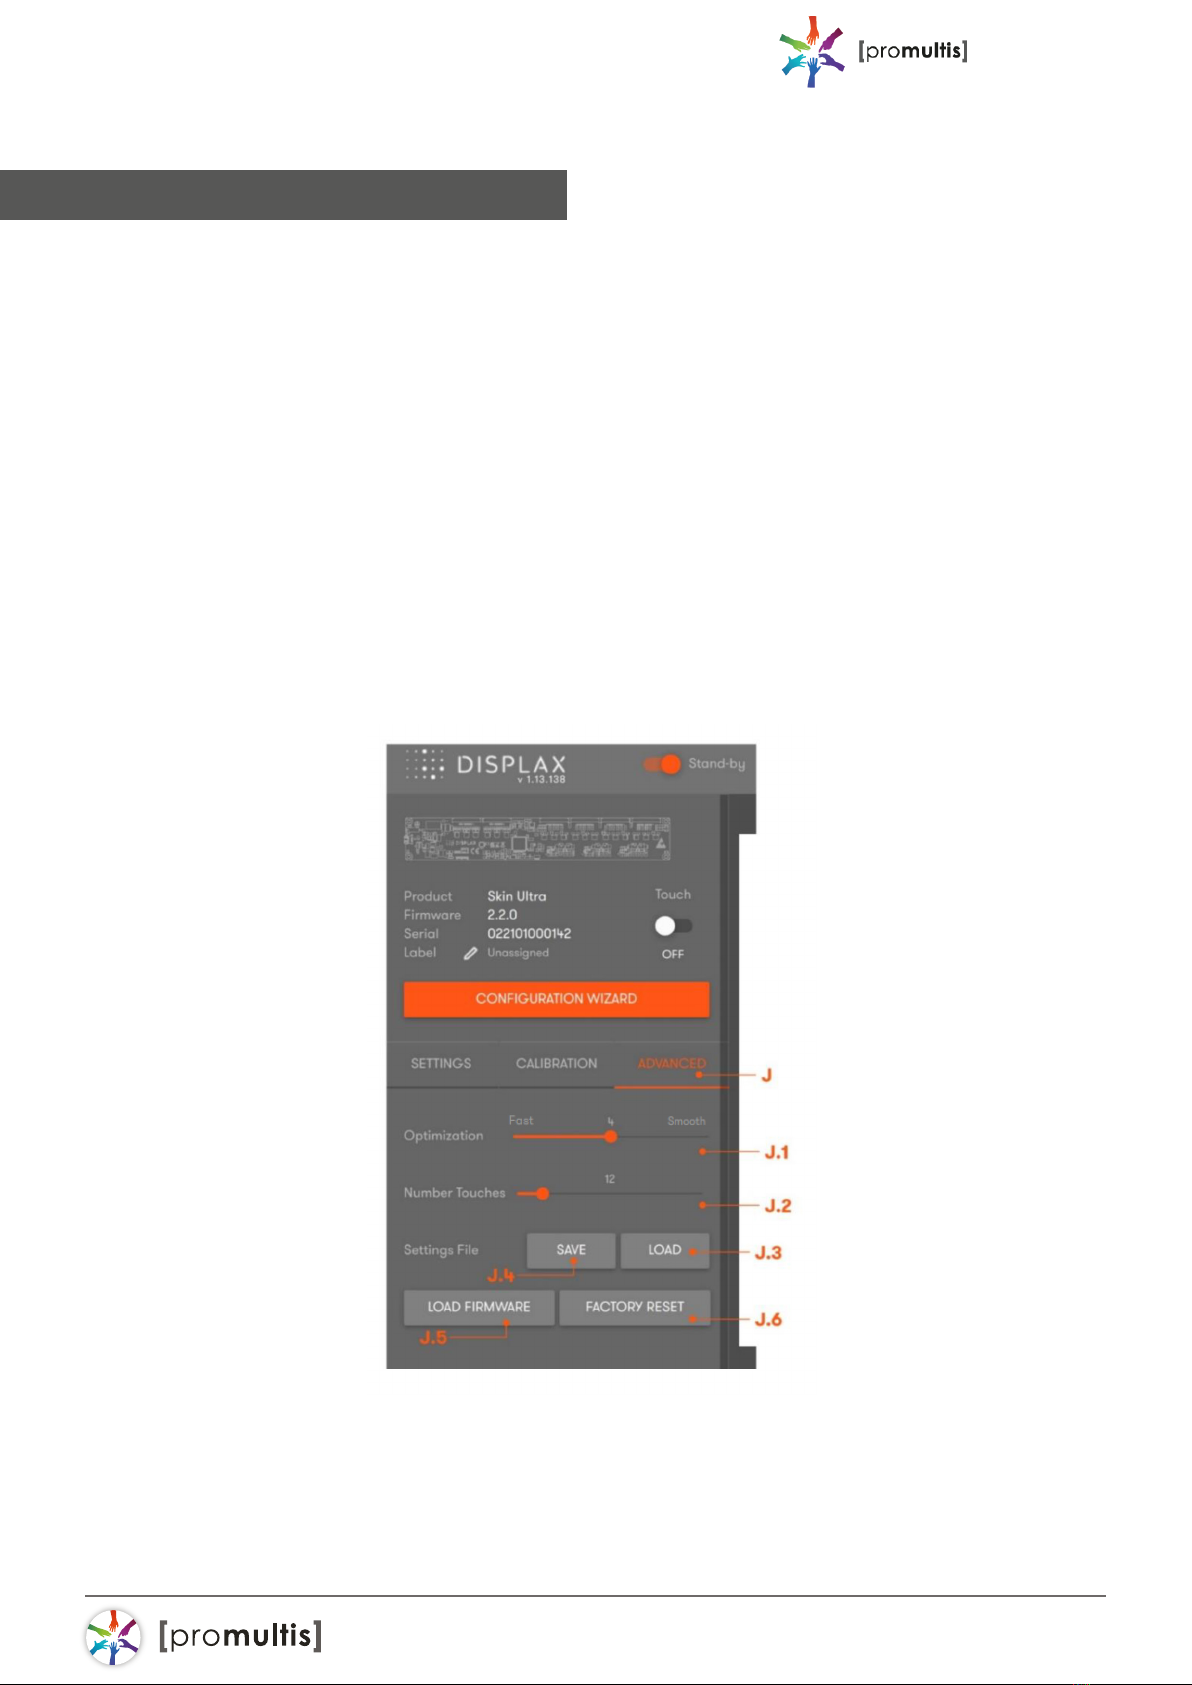
J. Advanced tab: advanced conguration tools.
J1. Optimization: establishes a balance between Touch speed
and Touch precision.
J2. Number of touches: limits the number of touches reported by the Touch
Controller (Skin Ultra: between 1 to 100 touches; Skin Fit: 1 to 40 touches; Skin
Dualtouch: 1 or 2 touches). This feature is available depending on the Touch
Controller version and rmware you are using.
J3. Load settings le: allows loading previously saved conguration les. The user
must wait 10 seconds after changing settings, before changing to other settings,
in order to correctly save them into the controller.
J4. Save current settings to le: Allows saving the current settings to be used in
other congurations. This feature should be used with equivalent setups, i.e. same
LCD, glass thickness and size, sensor size and air gap. Note that there may
be other sources of electromagnetic interferences on each setup, and the
settings may have to be adjusted.
J5. Load rmware: allows to load a rmware le to the Touch Controller.
This feature can be used when there is no internet access onsite, if you have
internet access you do not need to use this feature.
J6. Factory reset: sets the Touch Controller to its default settings.
View options
K. View options:
K1. Touches: enables and disables touch recognition.
K2. Frame: represents electromagnetic interferences over the touch sensor.
K3. Frame color: choose between, a white, black or green frame.
K4. Full screen: expand the view of the touch sensor active area.
Advanced
Table of contents
Other PROMULTIS Digital Signage manuals


