PROMULTIS Totem Focus User manual

totemfocus
55” 10 TOUCH TOTEM FOCUS
INSTRUCTION MANUAL
PM-TOTEM2A/55/CAM
Before connecting, operating or adjusting this product,
please read the manual completely.
Please keep this manual for future reference.

Contents
Important Information 1
Important Safety Precautions 2
Identification of Controls 4
Remote Control 6
Connections 8
Basic Operations 11
Device Settings 13
Network Settings 14
Menu List
Troubleshooting 26
Specifications 27
20
Using USB Multi Media Player 22

1
IMPORTANT INFORMATION
If the totem is not positioned in a stable location, it can be potentially
hazardous due to falling. Many injuries, particularly to children, can be
avoided by taking simple precautions such as:
! Use cabinets or stands recommended by the manufacturer of the
.
! Only use furniture that can safely support the .
! Ensure the totem is not hanging over the edge of the supporting
furniture.
! Do not place the totem on tall furniture (for example, cupboards or
bookcases) without anchoring both the furniture and the totem to a
suitable support.
!
! Educating children about the dangers of climbing on furniture to reach
the totem or its controls.
!Do not use immediately after moving from a low temperature to high
temperature environment, as this causes condensation, which may
result in fire, electric shock, or other hazards.
!To avoid possible condensation it is recommended to not use the
device within 24 hours after its arrival, to avoid possible condensation.
Warning:
To prevent the spread of fire, keep candles or other
open flames away from the totem all the times.
totem
totem
Do not position the totem on cloth or place any material between the
totem and supporting furniture.

2
Important Safety Precautions
Electricity may cause personal injuries and property damage if improperly handled. The has been
engineered and manufactured with the highest priority on safety. But IMPROPER USE CAN RESULT IN
POTENTIAL ELECTRIC SHOCK OR FIRE HAZARD. In order to prevent potential danger, please observe the
following instructions when installing, operating and cleaning the product. To ensure your safety and prolong the
service life of your , please read the following precautions carefully before using the product.
All warnings on the product and in the instruction manual must be observed closely.
7.Power cord protection---
totem
totem
1. Read these instructions---All operating instructions must be read and understood before the product is
operated.
2. Keep these instructions---These safety and operating instructions must be kept in a safe place for future
reference.
3. Note all warnings---
4. Follow all instructions---All operating instructions must be followed.
5.Attachments---Only use attachments/accessories specified by the manufacturer. Do not use attachments which
are not recommended by the manufacturer. Use of improper attachments can result in accidents.
6. Power source---This product is intended to be supplied with a listed power supply indicated on the marking
label. If you are not sure of the type of power supply to your home, consult your product dealer or local power
company. For added protection for this product during a lightning storm, or when it is left unattended and unused
for a long period of time, unplug it from the wall outlet and disconnect the cable system.
Protect the power cord from being walked on or pinched particularly at plugs,
convenience receptacles, and the point where they exit from the apparatus.
NOTE: Where the mains plug or an appliance coupler is used as the disconnected device, the disconnected device
shall remain readily operable.
8.Overloading---Do not overload wall outlets, extension cords, or convenience receptacles on other
equipment as this can result in a risk of fire or electric shock.
9.Entering of objects and liquids---Never insert an object into the product through vents or openings. High
voltages are present in the product and inserting an object can cause electric shock and/or short internal parts.
For the same reason, do not spill water or liquid on the product.
10. Servicing---Refer all servicing to qualified service personnel. Servicing is required when the apparatus has
been damaged in any way, such as the power-supply cord or plug is damaged, liquid has been spilled or objects
have fallen into the apparatus, the apparatus has been exposed to rain or moisture, does not operate normally or
has been dropped.
11.Damage requiring service---If any of the following conditions occurs, unplug the power cord from the AC outlet
and request a qualified service technician to perform repairs.
a. When the power cord or plug is damaged.
b. When liquid is spilled on the product or when objects have fallen into the product.
c. When the product has been exposed to rain or water.
d. When the product does not operate properly as described in the operating instructions.
e. If the product has been dropped or the cabinet has been damaged in any way.
f. When the product displays an abnormal condition or exhibits a distinct change in performance. Any noticeable
abnormality in the product indicates that the product needs servicing.
12. Replacement parts---In case the product needs replacement parts, make sure that the service person uses
replacement parts specified by the manufacturer, or those with the same characteristics and performance as the
original parts. Use of unauthorized parts can result in fire, electric shock and/or other danger.
13. Safety checks---Upon completion of service or repair work, request the service technician to perform safety
checks to ensure that the product is in proper operating condition.
14. Wall or ceiling mounting---When mounting the product on a wall or ceiling, be sure to install the product
according to the method recommended by the manufacturer. This is a safety issue.

3
Important Safety Precautions (Continued)
15.Careful move---When a trolley is used, be c when moving the trolley/apparatus combination to avoid
injury from the product tipping over. Sudden stops, excessive force and uneven floor surfaces can cause the
product to fall from the trolley.
Never attempt to move the totem unless the AC Power cord has been disconnected.
16. Lightning---Unplug this apparatus during a thunder storm or when unused for long periods of time.
17. —
Do not use immediately after moving from a low temperature to high temperature environment, as this causes
condensation, which may result in fire, electric shock, or other hazards.
18.Clean only with dry cloth---Unplug this product from the wall outlet before cleaning. Do not use liquid cleaners
or aerosol cleaners. Use a soft cloth for cleaning.
19.Ventilation---Do not block any ventilation openings. Install the in accordance with the manufacturer
instructions. The vents and other openings in the cabinet are designed for ventilation. Do not cover or block
these vents and openings since insufficient ventilation can cause overheating and shorten the life of the product.
20.Panel protection---The display panel used in this product is made of glass. Therefore, it can break when the
product is dropped or impacted upon by other objects. Be careful not to be injured by broken glass pieces in case
the display panel breaks.
21.Pixel defect---The display panel is a very high technology product, giving you finely detailed pictures.
Occasionally, a few non-active pixels may appear on the screen as a fixed point of blue, green or red. Please
note that this does not affect the performance of your product.
WARNING: For continued safety, apparatus with class I construction shall be connected to a mains socket outlet
with a protective earthing connection.
autious
About location / environment Do not use in hot and cold rooms (locations).
! When the unit is used in rooms (locations) with low temperature, the picture may leave trails or appear slightly
delayed. This is not a malfunction, and the unit will recover when the temperature returns to normal.
! Do not leave the unit in a hot or cold location. Also, do not leave the unit in a location exposed to direct
sunlight or near a heater, or in high humidity, as this may cause the cabinet to deform and the screen to
malfunction, and affect the totem’s performance .
!
!
totem
Environment condition:
Operating temperature: 5°C – 35°C
Operating humidity: 20 – 80 % ( no moisture condensation )
Storage temperature: -15°C – 45°C
Storage humidity: 10 – 80 %
Atmospheric pressure: 86 kPa ~106 kPa
Environmental Protection Waste electrical products should not be disposed of with
household waste. Please recycle where facilities exist. Check
with your Local Authority or retailer for recycling advice.

Identification of Controls
4
Remote Sensor
123
1.USB1/2 for the OPS
2.WiFi antenna for the OPS
3.LAN for the OPS
Enable connection to cable and log on to Internet.
4.Power Switch
Push to (1) to connect the power, push to (O ) to cut off the power.
Note:
5.AC IN
Plug the AC cord into this jack and into a power outlet. (~100-240V 50Hz/60Hz)
Note: USB port, WiFi, LAN port is extended from the OPS, this port and the port on the OPS choose one to use.
Do not cover the Power switch, it should be kept free from coverings so that it can be easily and conveniently
operated.
Power Indicator
USB1
USB2
SWITCH AC IN
4 5
Camera
Note: It can perfectly support camera’s up to 720p.
Open the back cover with the key.
Note: 1.Cut off power before opening the
back cover.
2.Make sure that the back cover is
locked before turning on power.
70 498
87
4- 15
70
87
The totem must be secured to building structure
before operation.
As illustrated in figure, positioning 4 holes on
the earth and drill the holes at the
corresponding position.
The diameter of the hole on the earth should
be smaller than the diameter of the screw.
Fit the four fastening screws, fastening the totem
to earth.
Notes: 1.The appearance of this product in these illustrations may differ from
your actual product, and is for comparative purposes only.
2.We may change the design and specifications without notice.
Fastening the totem

Identification of Controls
5
2
3
4
5
6
3
1
AUDIO
TOUCH
OUT 2
28 9 10
1112 67
HDMI 1
(MHL)
HDMI 2
(ARC)
VGA 1
PC IN 1
VGA 2
PC IN 2
DP IN
USB 2.0
TOUCH
OUT 1
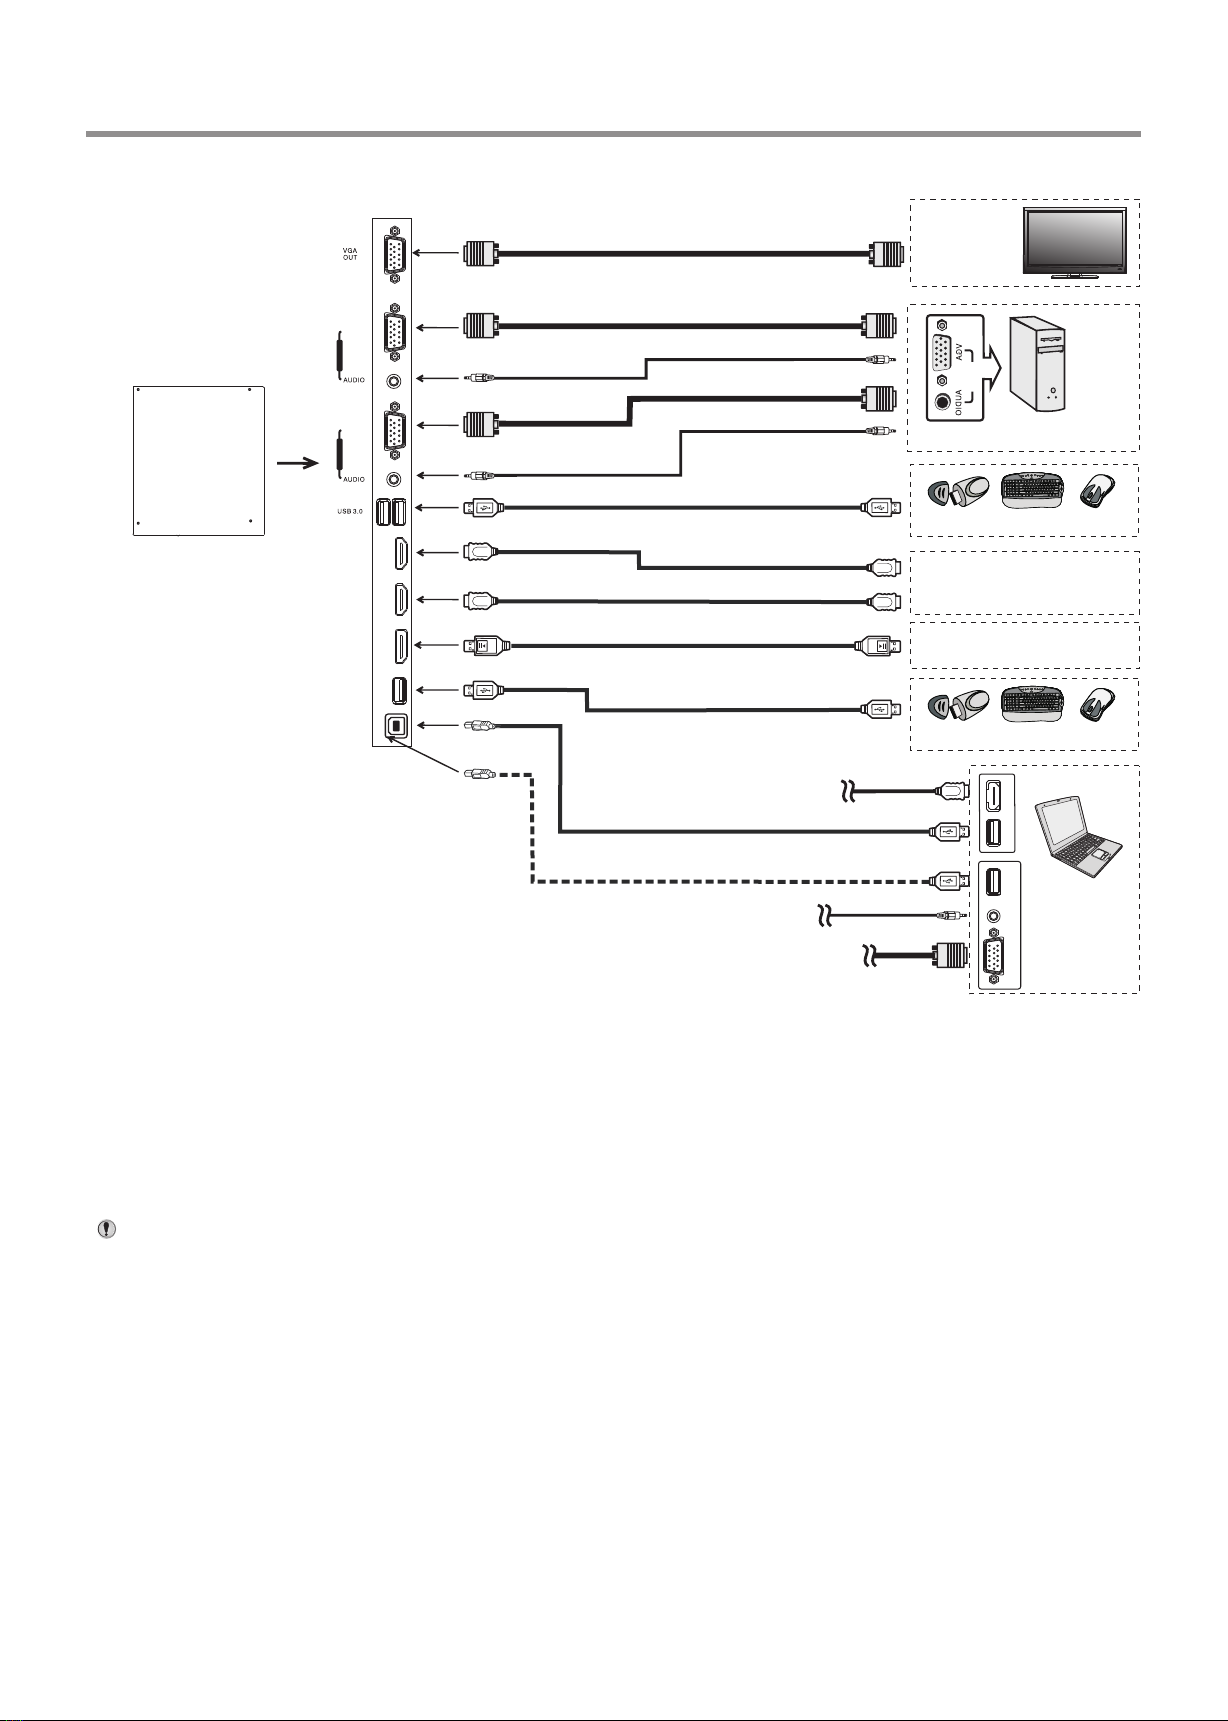
1.VGA OUT
The currently selected PC IN 1/2/3 signal
output.
2.PC IN1/2/3
Enable connection to PC or other external
devices with VGA/AUDIO ports.
3.USB2.0/3.0
Connect USB devices to these ports.
4.HDMI1/2 Input
To connect with those equipments with
HDMI or DVI interface.
HDMI1(MHL): Connect an MHL - enabled
device such as a cell phone to this jack to
view the external device’s screen on your
totem.
HDMI2(ARC): Connect an ARC-enabled
home theater receiver to this jack.
5. DP(DisplayPort) Input
Connect an external device to DP out
jack.
6.TOUCH1/2 OUT
Output the touch for external devices
connected to PCx or HDMIx port which
support touch system.
Note: TOUCH OUT 2 takes precedence
over TOUCH OUT 1 in default. You can
define it to in Lock menu.
7.RS232
For service, RS232 control and the other
uses.
8.WAN IN
The built-in router input port. Connect to
the external network.
9.LAN OUT
The built-in router output port. Connection
to another computer or other Internet
enabled devices.
10.AV IN
Connect an AV device to this jack.
11.S/PDIF digital audio output
Connect a digital sound system to this
jack.
12.
Connect headphones to this jack. The
totem is the current audio output.
Main board
OPS
Power Indicator
fixed disk Indicator
.
The OPS WIFI port for receiving network signal.
. (DisplayPort)
Enable connection to a monitor or other external devices with
DisplayPort.
. HDMI Output
Enable connection to a monitor or other external devices with
HDMI input port.
. VGA OUT
Enable connection to a monitor or other external devices with
VGA input port.
.
Connect headphones to this jack. Audio output of the OPS.
.
The anti-theft lock groove.
. MIC
The microphone input of the OPS.
. LAN IN
Enable connection to cable and log on to Internet access via
Cable.
. USB2.0/3.0
USB standard interface, enable connection to USB2.0,
USB3.0 standard devices. Connecting, please select the
appropriate port.
OPS
Main
board

6
Remote Control
Notes:
● This operation manual provides a description based on operating functions with the remote control.
● In different mode, some buttons may have different function.
RC-J56-0A
Set up the sleep timer
Select picture mode
Select aspect ratio
Display or exit the setting menu screen
0-9 number buttons
Switch to AV mode
Switch to TV mode
Press to enter or exit the disc tray
Go to USB multi media player
Go to DVD multi media player
CHANNEL UP/DOWN
Note: If no DVD, this button has no function.
Note: If no RF, this button has no function.
Switch the totem power on or Standby
Display or exit input source menu
Display desktop (Home page)on the screen
Takes a screenshot and stores the
data onto your connected USB
storage device.
If there is no USB storage, the
screenshot will be stored on the
built-in storage.
Select sound mode
Return to previous menu
or exit the on-screen menu
Mute the sound
Coloured buttons(RED/GREEN/YELLOW/BLUE)
Red: Screen off /on.
Blue: Call or exit recent application list.
Switch to HDMI mode
Switch to VGA mode
Disp lay OPS on the scr ee n
: Play/Pause button
: STOP button
/ : Fast forward/fast reverse
/ : Previous/next
Return to the previous channel
VOLUME UP/DOWN
Control buttons for USB/DVD Multi Media Player
To confirm or enter a sub-menu or toggle
between options during MENU operation.
Use Arrow buttons to navigate in on-
screen menu.
Freeze the content displayed on the screen
Note: If no OPS, this button has no
function.
Display or exit the current
program information
Note: If no RF, this button has no function.

7
Installing remote control Batteries
Battery precautions:
Improper use of batteries can result in a leakage of chemicals and/or
explosion. Be sure to follow the instructions below.
·Place batteries with their terminals corresponding to the (+) and (–)
indications.
·Different types of batteries have different characteristics. Do not mix
batteries of different types.
·Do not mix old and new batteries. Mixing old and new batteries can shorten
the life of new batteries and/or cause old batteries to leak chemicals.
·Remove batteries as soon as they are non-operable. Chemicals that leak
from batteries can cause a rash. If chemical leakage is found, wipe with a
cloth.
·Dispose of batteries in a proper manner.
·If the remote control is not used for an extended period of time, remove the
batteries.
·The batteries shall not be exposed to excessive heat such as sunshine, fire
or the like.
Open the battery cover.
1
Insert two AAA batteries into the battery compartment. Make sure that the
+ and – symbols on the batteries match the + and – symbols in the battery
compartment.
2
Replace the cover.
3
To install remote control batteries:
Aiming the remote control
Use the remote control by pointing it towards the remote sensor on the front
of your totem. Objects between the remote control and the remote sensor
may prevent proper operation.
Cautions regarding use of remote control
·Do not expose the remote control to shock. In addition, do not expose the
remote control to liquids, and do not place in an area with high humidity.
·Do not install or place the remote control under direct sunlight. The heat may
cause deformation of the unit.
·The remote control may not work properly if the remote sensor window of
the main unit is under direct sunlight or strong lighting. In such a case,
change the angle of the lighting or the totem set, or operate the remote
control closer to the remote sensor window.
7
Remote Control

=When connecting an external device to the totem, make sure that the totem and the device are turned off.
=Check the plugs at the ends of cables to make sure that they are the correct type before you try plugging them into jacks
on the totem.
=Make sure that all plugs are securely inserted into the jacks. Loose connections can result in image or color problems.
=The illustration of the external device may be different depending on your model.
=Refer to the operating manual of the external device as well.
Cautions Before Connecting
Connections
8
AV devices
DVD/VCD
Game console
Digital sound system
PC, etc.
VGA devices
Serial port cable
VGA cable
AV cable
AV adapter
Network cable
Computer, etc.
Internet devices
Network connection
S/PDIF cable
Audio cable
Camcorder
Satellite signal receiver
Computer, etc.
Network cable
Set top box
Y
W
R
Y
W
R
VGA OUT AUD IO
OUT
USB
Computer
USB HDMI
Connect TOUCH OUT with USB cable
to PC USB port.
Connect PC with VGA cable or HDMI
cable. Please choose the proper
method of connection based on your
device.
Note: After installation of the driver, it
can control the external computer by
native touch control. (Only for PC、
HDMI signal)
TOUCH OUT 2 takes precedence
over TOUCH OUT 1 in default. You
can define it to in Lock menu.
Headphone cable
Note: Before using headphones, adjust the device volume so as
to avoid excessive levels, as hearing damage may result.
Audio input devices
USB cable
AV OUT
VIDEO AU DI O
Y
W
R
PC OUT
AUDIO
TOUCH
OUT 2
Main
board
9
Connections
Connect TOUCH OUT with USB cable to PC USB port.
Connect PC with VGA cable or HDMI cable. Please choose the proper method
of connection based on your device.
Note: After installation of the driver, it can control the external computer by
native touch control. (Only for PC、HDMI signal)
TOUCH OUT 2 takes precedence over TOUCH OUT 1 in default. You
can define it to in Lock menu
Notes: 1.The totem is multiple USB port designed(3.0, 2.0), when connect with USB device, please select the
appropriate port.
2.The VGA output is signal of what has been currently selected from PC1/2/3.
HDMI cable
USB cable
USB devices
PC OUT
VGA cable
Audio cable
VGA cable
HDMI devices
PC, etc.
VGA devices
Monitor
Audio cable
VGA cable
VGA OUT AUD IO
OUT
USB
Computer
USB HDMI
DP devices
USB cable
USB devices
HDMI cable
DP cable
USB cable
USB cable
3.0
2.0
HDMI 1
(MHL)
HDMI 2
(ARC)
VGA 1
PC IN 1
VGA 2
PC IN 2
DP IN
USB 2.0
TOUCH
OUT 1
Main
board
10
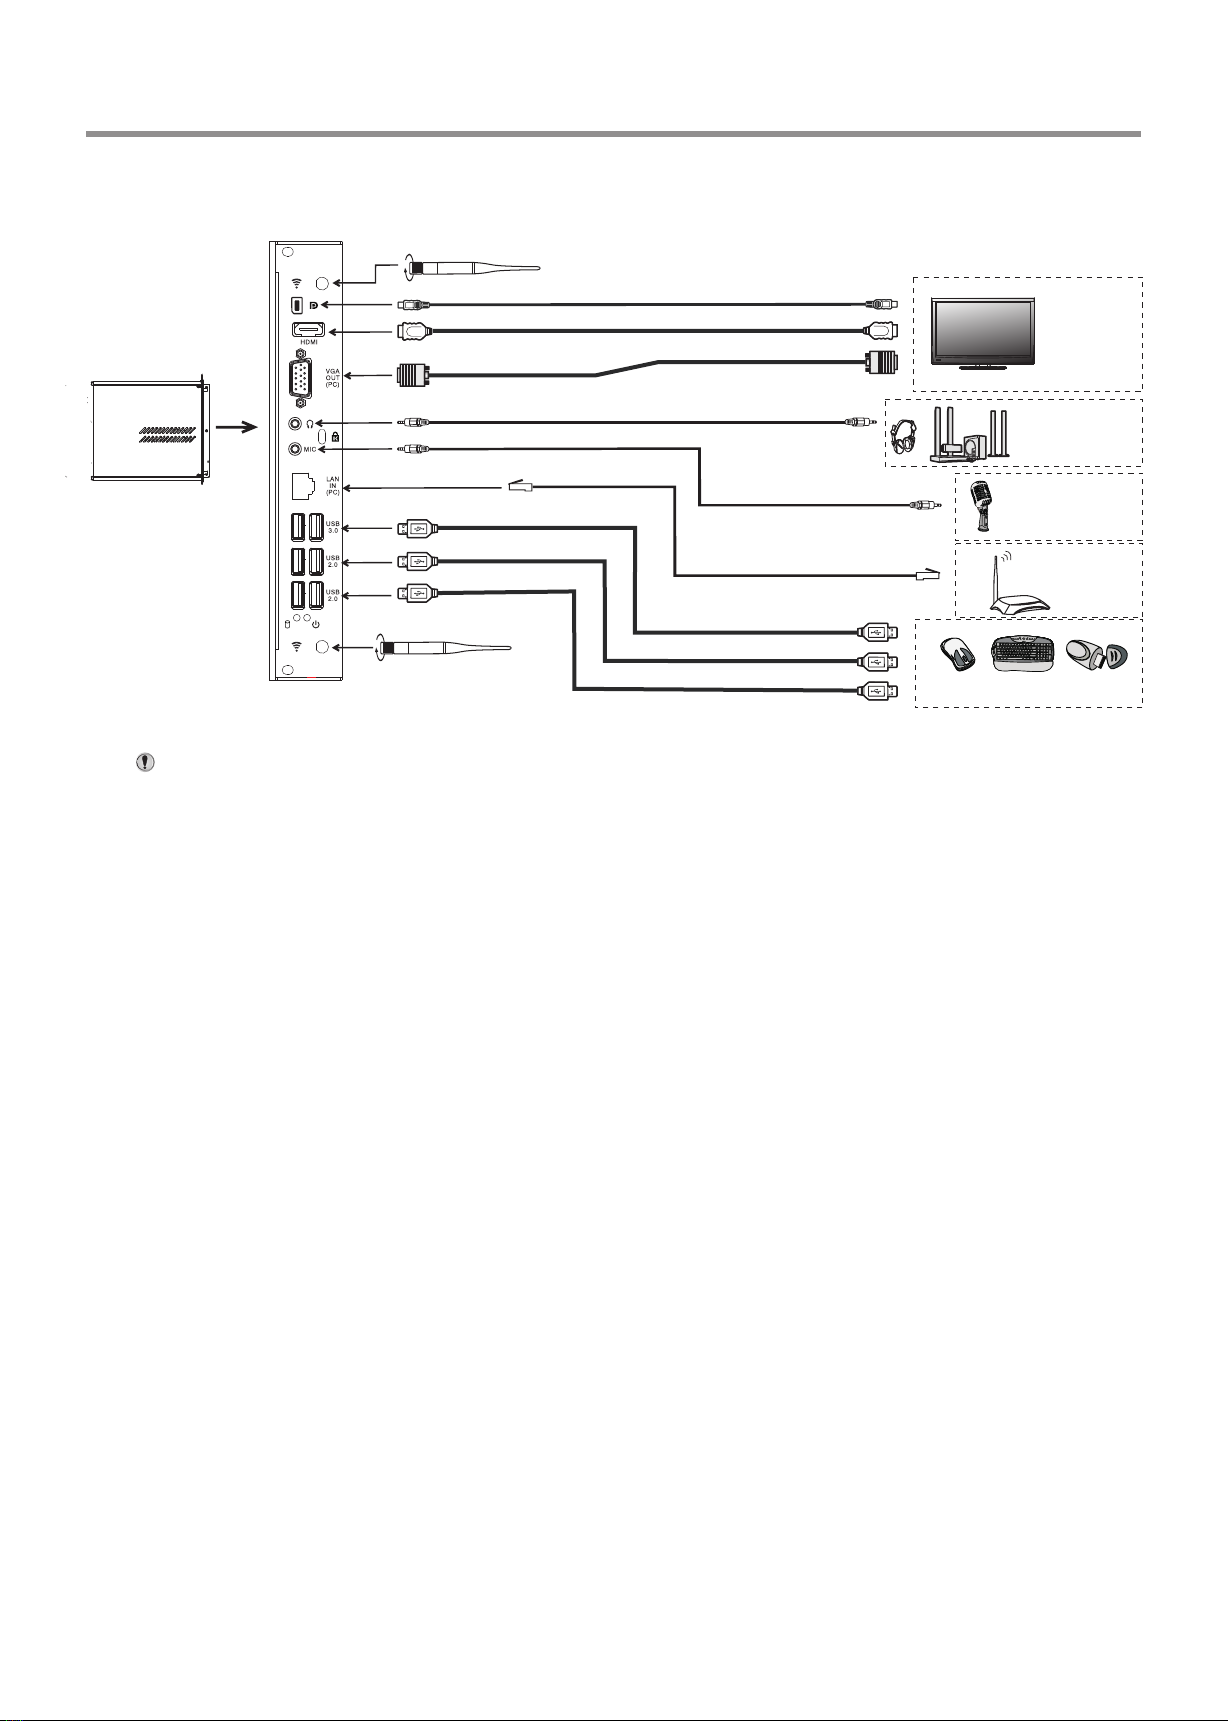
Connections
Tighten the WiFi antenna in clockwise direction.
The WiFi antenna is able to access WiFi network.
Connect to the network
Router, etc.
Microphone, etc.
VGA cable
DISPLAY PORT cable
HDMI cable
USB cable
Notes:
2. The signal of Audio or Video output are OPS generated.
1. The OPS is multiple USB port designed(3.0, 2.0), when connect with USB device, please select the appropriate port.
3.0
2.0
2.0
USB cable
USB cable
Headphone cable
Network cable
Audio cable
USB device
Monitor
Audio input device
OPS

Basic Operations
11
Note: If the totem does not receive a displaying signal for a certain time, the totem goes into standby mode.
Plug the power cord into an AC Power outlet. Press Power Switch on the totem.
Now the totem is in standby mode. Wait a moment until the power indicator lights up, then press POWER to
turn on the totem. (Be sure to wait for a few seconds before pressing POWER button. If you promptly press
POWER button then the totem may not respond or act wrongly.)
Press button again to turn off the totem and put the totem in standby mode.
To cut off the power completely, press Power Switch on the totem.
1
2
3
Turning the totem on or off
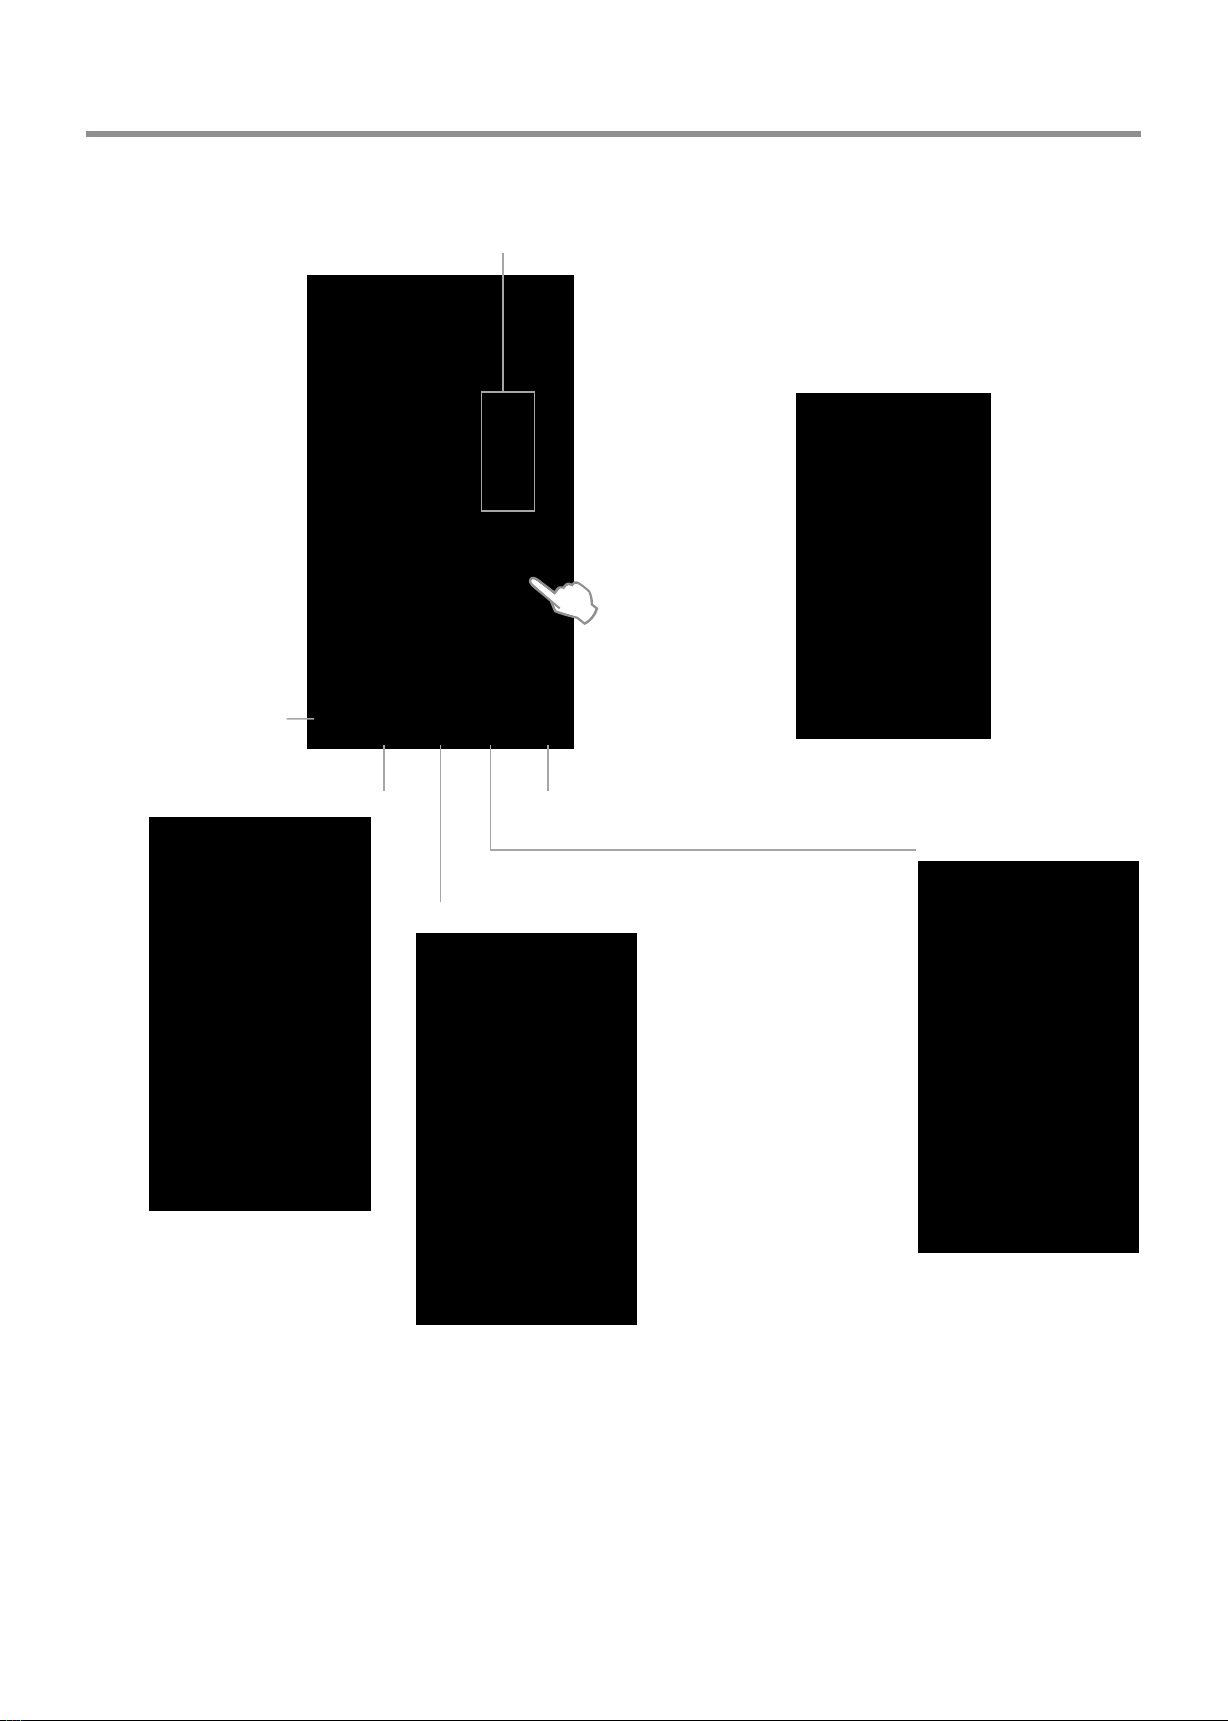
Operating the Float menu
The first time installation
Connect to power source and turn on the totem, the below installation menu page will display on the totem.
Select desired menu
language, then press START
and go to next page.
Select location and go to
next page.
1.Slide up from bottom of the screen center by two or more fingers to call .
Press and drag to any place of the screen.
2. Press to take 2 seconds to be activated in VGA/HDMI/DP/PC mode.
3.When displaying at USB interface, touch once at the lower part of the screen, the display
control menu will appear.
Call the Volume bar
Call the input source menu
Back to previous
Turn off the screen
Call the application history
Call the Home page (Android Interface)
Call the annotation
Basic Operations(Continued)
12
Note: The layout of menu may vary upon different models you purchased.
Home Menu Overview
In all applications, press and drag the icon to on Home
page for shortcut created, press and drag the shortcut to X
for shortcut deleted.
Note: When using the app
Camera, store the data
onto your connected USB
device. If USB device is
not connected , store the
data onto the built-in
storage.
Show all applications
Shortcuts you created on Home page
Go to your USB Drive
Go to your web Browser
Call the divice Settings menu
ES File Explorer
Long press on the
screen will call the
wa ll pa per s an d
widgets menu.

13
Device Settings
Allow installation of apps from sources other than
the Play Store.
To set Security and Restrictions
To set default input method
To set Android keyboard(AOSP)
Note: To manually set date and time, you should
toggle “Automatic Date & time” to OFF.
To set on-screen language
To set Date and time
Automatic search for Bluetooth devices
Network Setting
Show all apps
Display system Storage
Display information of the unit
14
Network Settings
Input the default UserName:
admin, skip the default password
setting as there is no default
password, then press Login
button.
IP settings Proxy settings
Change the UserName and
Password: Select Management,
then Password.
Internal routing setting
Reset Internal Router by
hardware. Password is required
for this operation and is the
same password to access Lock
menu. (The default password is
0000)
Ethernet setting
Set the Built-in WiFi

15
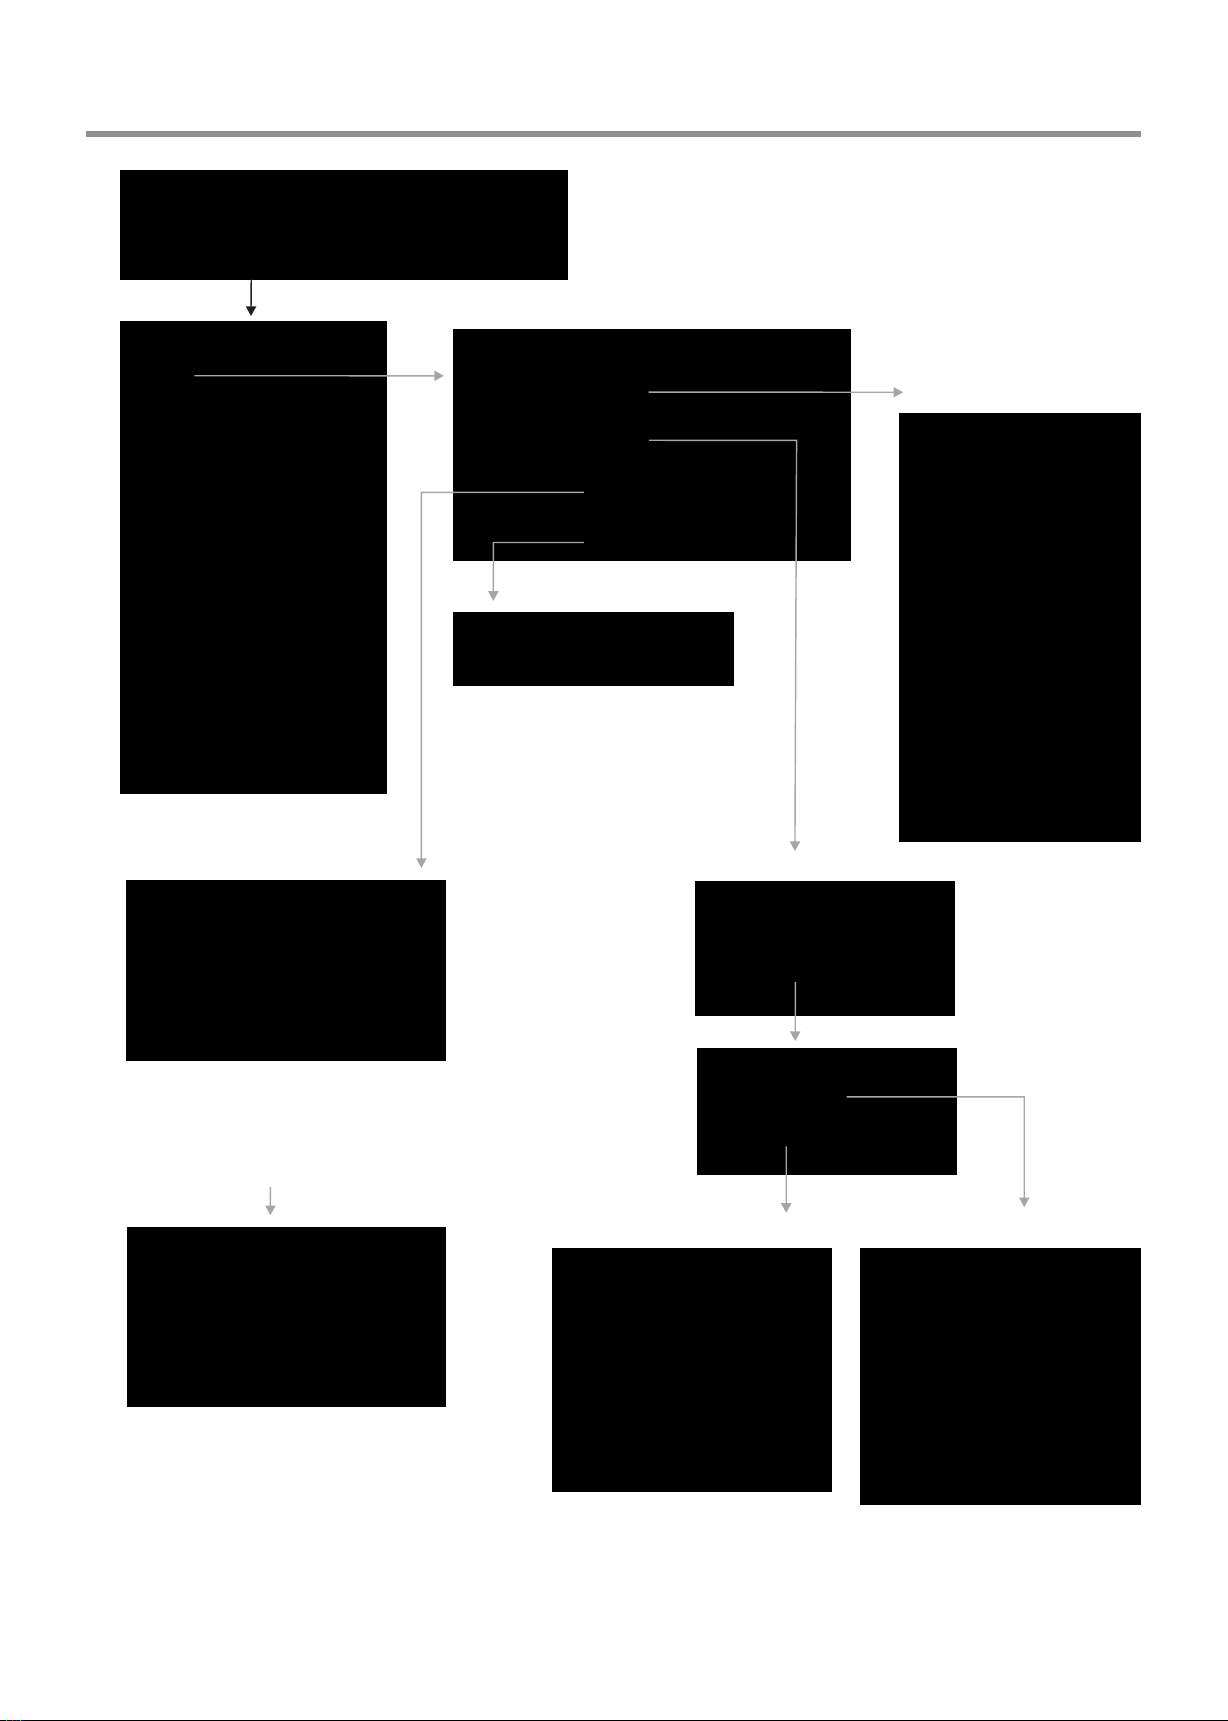
Wired Network Setting ( )Internal router
Method 1: Easy Setup Wizard
Network Settings(Continued)
Select
Easy Setup Wizard
Select Gateway
Next
There are five methods to connect with
network, choose your preferred one.
Recommended to select the DHCP
Client connection. Automatically obtain
IP information from your ISP.
Automatically obtain IP
information from your ISP. If your ISP
doesn’t provide a designated IP for you,
then choose DHCP Client.
If all Internet IP information is
provided by your ISP, then choose Static
IP.
Ethernet Point to Protocol. Your
ISP will provide you with Login ID and
password. Usually this option is
applicable to DSL service.
Point to Point Tunneling Protocol.
Your ISP will provide you with Login ID
and password.
Layer 2 Tunneling Protocol. Your
ISP will provide you with Login ID and
password. Usually this option is
applicable to DSL service.
DHCP Client:
Static IP:
PPPOE:
PPTP:
L2TP:
Password Setting Format
Input the default UserName: admin,
skip the default password setting as
there is no default password, then
press Login button.
Finished
WiFi Password of Internal
Router in the totem.
(Password should be set at
least 8 characters. )
Get IP address
Setting successfully
16
Wired Network Setting ( )Internal router
Network Settings(Continued)
Method 2: Advanced Mode
Select
Gateway
Next
Next
There are five methods to
connect with network,
choose your preferred one.
Recommended to select
the DHCP Client
connection. Automatically
obtain IP information from
your ISP.
Password Setting Format
Recommended to select AP
Input the default UserName: admin, skip
the default password setting as there is
no default password, then press Login
button.
Select
Advanced Mode
Select Setup Wizard
Next
Next
WiFi Password of
Internal Router in the
totem. (Password should
be set at least 8
characters. )
Get IP address
Setting successfully
Next
Next
Finished

17
Network Settings(Continued)
Wireless Network Setting ( )Internal router
Method 1: Easy Setup Wizard
Select
Easy Setup Wizard
Select
Wireless ISP
Next
Input the default UserName:
admin, skip the default password
setting as there is no default
password, then press Login
button.
There are five methods to connect with network,
choose your preferred one.
Recommended to select the DHCP Client
connection. Automatically obtain IP information from
your ISP.
Password Setting Format WiFi Password of Internal
Router in the totem.
(Password should be set at
least 8 characters. )
Successfully
connected to return .
Confirm
Site Survey
Select your desired
WiFi signal.
Connect
Input Password
Next
Finished
Select Site Survey
Get IP address
Setting successfully

18
Network Settings(Continued)
Wireless Network Setting ( )Internal router
Password Setting Format.
Wi-Fi Password of Internal
Router in the totem.
(Password should be set
at least 8 characters. )
Recommended to select AP
Next
There are five methods to connect with
network, choose your preferred one.
Recommended to select the DHCP
Client connection. Automatically obtain
IP information from your ISP.
Next
Next
Finished
Next
Successfully connected,
return to Site contents.
Select
Wireless,
then Site
Survey.
Confirm
Site Survey
Select your desired WiFi signal.
Connect
Input Password
Method 2: Advanced mode Input the default UserName:
admin, skip the default
password setting as there is
no default password, then
press Login button.
Select Advanced Mode
Select
Setup
Wizard
Select
Wireless
ISP
Next
Get IP address
Setting successfully
Table of contents
Other PROMULTIS Digital Signage manuals


