Propel RC Air Recon User manual

I
NDOOR
HELICOPTER
WITH
CAMERA
USER
MANUAL
WARNING
AIR
RECON
1s
an
1ndoor
1nfrared
hel1copter
Infrared
Signals
cannot
functiOn
1n
daylight
due
to
mterference
from
the
sun
In
add1t1on,
your
AIR
RECON
helicopter
1s
not
su1ted
to
handle
wmd
or
other outdoor
enVIronmental
cond1t1ons
Anemptmg
to
fly
th1s
helicopter outdoors
may
lead
to
severe
damage
THIS
PACKAGE
CONTAINS
:
Colors
and
styles
may
slightly
vary
.

TABLE
OF
CONTENTS
Feature
s
..
Remote
Battery
Installation
.. ....•......•..
•.
Charging
the
Helicopter
......... ....•......,..•..
H
elicopter
diagram,
Remote
Cont
rol
diagram
. .
..•......•..•...
,..•. .
.......
3
Preparing
for
Flight
........ ................
..
..... 4
Ho
w
to
Sy
nc
your
Helicopter.
....
..
.....
..
....... .
.......
4
Demon
st
r
atio
n
Mode
... .
.....
4
Flying
Tips
.........
..
............
..
.... ... 4
Und
erstan
ding
He
li
copte
rT
ri
m
Adjustments
............
....
.......
.
......
.
......
.
..
.
......
5
Basic
Flight
Control
s..
........
.....
...........
..
.
..
.
......
5
Turbo
And
Light
Buttons
..........................
.
..........
5
Advanced
Flight
Contro
ls
............
.
................
6
Us
ing
Yo
ur
on
Board
Ca
m
era
an
dVid
eo
R
ecor
de
r.
..
......
...
.....
......
.
.........
7
H
elicopter
Warni
ng
And
Safety
Precautions....
.............
..
............. ....8
Part
Replacement
In
st
ru
ctions
...
..
........
..
...
..
..... ..
..
...
..
...........
..
.... .. 9
Contents
. .....
...
.................................. .. 9
Air
recon
Propeller
System.
... ....
........
..............................
..
.....
.
.....
9
Replacing
the
Upper
Propeller
Blade
.............•..• ..
..
.•......•
..
•...•
..
•......•......•.
..
. 10
Replacing
the
Bottom
Propeller
Blade
... .
........
.........................................10
Battery
Warning
s ................ ................ .
..
.................
11
Care
and
Maintenance
.............•.... ....................
..
..
11
FCC
Informa
ti
on
. .................................. .
..
.......................
11
Thank
you
for
purcha
s
ing
the
AIR
RECON
™3
Channei
iR
Gyro
Helicopter
.
Please
read
this
in
s
truct
ion
booklet
ca
refully
as
it
contai
ns
valuable
information
on
how
to
properly
fly
an
d
ca
re
for
your
helicopter
.
FEATURES
•
Built-in
gyroscopic
chip
for
ext
r
eme
stabi
lity
and
co
ntrol
.
•
Turn
s
like
ar
eal
helicopter
-
even
hovers
in
mid
-
air
.
• 3
Channel
:
fly
up
,
down
,l
eft,
right
,
foiWard
,
backward
.
•
Full
-
function
i
nfr
ared
r
emote
al
so
charges
h
elico
pt
er.
•
Mu
l
ticolored
blinking
LEOs
ca
n
be
turned
on
/
off
remotel
y.
•
Two
speeds
beginner
and
Turbo
for
accelerated
fun
.
•
Records
video
footage
on
Micro
SO
cards
•
Tak
es
sti
ll
Photo
shots
•
Included
de
monstrat
ion
mod
e
sh
ow
s
the
flight
function
of
th
eh
elicopter

REMOTE
CONTROL
BATTERY
INSTALLATION
1.
Pull
the
battery
cover
off
of
the
remote
cont
r
ol.
1.1nsta
ll
6"
AA'
'
alkaline
batteries
as
shown
in
the
diagram
.
3.
Replace
the
battery
cover.
CHARGING
THE
HELICOPTER
0
A: FROM THE CONTROLLER:
l.Openupthechargercovertotheopenpositiononthe
rightsideofremote
control(seediagramB).
2.Makesuret
heh
elicop
t
erpowerswi
t
chisset
t
otheOFF
po
si
ti
on
(see
diagram
A&().
All
l
ightsand
propel!
eo
s
hould
be
off.
3.Connectthechargingplugo
n
theremotecontro
lt
othechargingsocketon
thesideofthehelicopter{seediagramA&D).
"
4.
Turn
the
controller
power
swi
tch
to
the
ON
position
(set
diagram
E
).
T
he
green
charging
indicator
light
on
upper
right
side
of
the
controller
will
illuminate
to
indicate
c
harging
is
in
prog
r
ess.
5.
The
gr
ee
n
charging
indicator
light
will
s
hut-off
when
the
helicopter
is
fully
charged
.
6.
L
ength
of
c
harg
ing
time
will
vary
depending
on
percentage
of
helicopter
battery
already
charged
and
the
condition
of
the
batteries
in
the
controller
.
Average
charging
time
is
25
-3
0
minutes
with
new
batteries.
The
heli
co
pter
o
perat
es
for
app
r
oximately
6-8
minutes
per
charge
.
B: FROM THE USB CABLE:
1.
Plug
the
included
USB
charging
cable
into
a
USB
port
on
yo
ur
com
puter
.Pl
ease
make
su
re
that
yo
ur
com
puter
is
turned
on
.
2.
Make
sure
the
heli
co
pter
Power
Switch
is
in
the
"
OfF
•
position
(see
diagramA&D
).
3.Whenthehelicopterischargingtherewillbenolighto
nt
opofthe
USB
body
that
connects
to
you
r
compute
r.
When
charg
ing
is
comp
l
ete
a
red
LED
l
ight
will
appear
on
top
of
the
USB
body
that
connects
to
your
computer
(see
d
iagram
F).
USB
c
harging
time
may
vary
depending
on
th
e
amount
of
charge
needed
to
fill
the
h
elico
pter
battery
.
The
average
USB
chargingtimeis1S-30minutes
.
Battery
Compartment
(6
"
AA
"b
atteries)
IMPORTANT
:
ALWAYS
DIS<ONNECT
CHARGER
CORD
AFTER
CHARGING
.
NEVER
LEAVE
CHARGER
CONNECTED
TO
HELICOPTER
OVERNIGHT
OR
FOR
EXTENDED
PERIODS
OF
TIME
.
(.
E.
NOT£
Chargmg
socket
1slocatedonthebacks1drofthrhehcoptrr
Chargmgcordconnrctsas
1nd1cated
lndlcatorhghtonchargerstaysonuntllchargmglscomplrtrd

HELICOPTER
DIAGRAM
Below
is
a
basic
list
offeatures
and
part
s
on
the
helicopt
er.
REMOTE
CONTROL
DIAGRAM
Be
lo
w
is
a
basic
li
st
of
features
on
the
infrared
wireless
remote
control.
Throttle
Control
--
Stabilizer
bar
Charging
Cord
Cover
Camera
S
nap
-
+--
---
----'
~-
!?'
'is;;~'-
---
-++
-
Trim
Controls
Shot
Button
Start
/
Stop
+t-
-'r
---
Video
Recording
Button
-!+
-
+-
---
Helicopter
Demonstration
NOTE
When
fly1ng
your
A1r
Recon
w1th
other
mfrared
helicopters
make
sure
that
each
helicopter
IS
set
to
operate
on
a
dlfferentmfraredchanneltoavoldlnterferencewhenflymg
Seebackpanelforaddl!lonalprecautlons

PREPARING
FOR
FLIGHT
•
Verify
that
there
are
6
"AA''
batteries
inside
the
infrared
remote
control
unit
and
the
helicopter
has
been
fully
cha
rg
ed.
·Make
sure
your
helicopter
is
turned
on
and
properly
synced
to
your
controller.
(See
"SYNC
YOUR
HELICOPTER
"
below)
·Make
s
ure
to
be
in
a
large
room
with
an
open
radius
of
at
l
east
25
feet.
Cl
ose
all
windows
and
doors,
turn
off
fans
and
close
air
duct
s
or
any
other
openings
that
may
cause
drafts
in
the
room.
·Make
s
ure
the
room
has
no
obstacles
and
the
highest
ceil
ing
pos
sible.
DO
NOT
A
TTEMPT
TO
FLY
YOUR
HELICOPTER
OUTDOORS.
Set
your
helicopter
on
a
dean
flat
s
urfac
e
before
t
ake-off.
HOW
TO
SYNC
YOUR
HELICOPTER
Your
AIR
RECON™
utilizes
an
automatic
multi
-c
hann
el
se
l
ection
system
that
allows
up
to
3
people
to
fly
side
by
side
inthesamewirel
essrange.
FOR
ONE
PERSON
PLAY:
1.
Before
starting,
make
su
re
that
both
your
controller
and
helicopt
er
are
in
the
power
"
OFF
"
position
.
2.
Se
l
ect
the
desired
flight
channel
(a,
b
or
c)
from
the
controller
and
turn
the
controller
on
(see
diagram
Eon
page
2).
Make
su
re
your
t
hrottl
e
stick
is
all
the
way
down
and
in
the
off
position.
3.
Next,
turn
on
the
helicopter
and
set
it
on
a
table
or
hold
it
in
your
h
and
from
underneath
.
Make
sure
your
hands
and
body
are
away
from
the
helicopter
blades.
~
4.
There
will
be
slight
delay
and
then
the
helicopter
multi
~
colored
"s
ide
body
lights
"
will
begin
to
flash.
When
the
side
body
lights
begin
to
flash
your
helicopter
is
synced
and
yo
u
are
r
eady
to
fly.
6.
Note:
if
you
turn
your
h
elicopter
off
or
the
battery
runs
out,
you
will
need
to
re
~sy
nc
the
helicopter
and
controller.
FOR
MULTI
PERSON
PLAY:
7.
Before
starting,
make
sure
that
All
the
helicopters
and
controllers
are
in
the
power
"
OFF
"
position.
8.
Each
individual
player
must
select
a
different
flight
chan
nel
(a,
b
or
c)
on
his
/
her
own
controller.
If
more
than
one
person
is
on
the
same
flight
channel,
there
will
be
interference
.
9.
Only
one
person
at
a
time
should
sy
nc
their
helicopter
by
following
ste
ps3
thru
5
above.
Remember
to
make
sure
that
each
player
chose
a
different
channel
befo
re
anyone
begi
ns
to
sync
their
h
elicopters.
If
a
mistake
is
made
when
"
pairing
"
helicopte
rss
imply
turn
off
all
the
helicopters
,
make
sure
all
players
are
set
to
different
cha
nnel
s
and
start
again,
one
by
one.
10.
When
apl
ayer's
helicopter
is
synced
and
wo
rking
it
shou
ld
be
l
eft
on
while
the
next
player's
sync
their
helicopters.
11
.
Note
if
you
turn
your
helicopter
off
or
the
battery
runs
out,
you
will
need
to
re
~s
ync
the
he
l
ico
pter
and
controller.
DEMONSTRATION MODE
Your
AI
R
RECON™
wi
rel
ess
infrared
remote
contro
l
helicopt
er
has
a
unique
demonstration
mode
that
sh
ows
you
some
of
the
basic
maneuvers
and
flight
functions
that
your
helicopter
is
capable
of.
To
activate
the
demonstration
simply
hover
your
AIR
RECON
™
helicopter
slightly
above
eye-leve
l
in
the
centre
of
clear
open
room
with
no
obstacles
and
press
the
"
DEMO
"
button
on
the
front
of
your
contro
ll
er
(See
"
CONTROLLER
DIAGRAM
"
on
page
3).
NOTE
:
once
the
demo
button
is
depressed
do
not
move
I
touch
the
Throttle
or
Direction
Control
sticks.
To
exit
demonstration
mode
simp
ly
move
the
Throttl
e
stick
or
Direction
Control
stick.
FLYING
TIPS
·It
is
recommended
that
you
operate
the
helicopter
in
a
wide
indoor
space.
You
shou
ld
allow
at
least
a
25~foot
radiu
s
range.
The
helicopter
is
designed
for
INDOOR
USE
ONLY
.
·Par
ental
guidance
or
adult
supervision
is
suggested
at
all
times
.
·If
you
are
flying
the
helicopter
with
others,
make
sure
all
spectators
are
behind
you.
·For
best
performance
,
it
is
recommended
that
you
operate
the
helicopter
in
zero
wind
conditions.
Close
all
open
doors
or
windows,
and
turn
off
any
nearby
fans.
Wind
can
greatly
affect
the
performance
of
the
helicopter
.
NOTE
Beforeactlvatmgdemonstratlonmodeyoushouldmakesurethatyourhehcopterlsfullychargedandthat
youhaveaclear25footradluswl
thnoobstacles

UNDERSTANDING
HELICOPTER
TRIM
ADJUSTMENTS
If
you
rhe
licopt
er
nose
rotat
es
to
the
left
or
right
uncontro
ll
ab
l
y,
yo
u
may
n
eed
to
utili
ze
the
T
RIM
button
s.
If
you
r
helicopt
er
over
rotate
s
CLOCKWISE
(to
the
right),
pu
sh
and
re
l
ease
the
LEFT
si
de
ofT
rim
bu
tton
repeatedly
until
th
e
turning
stops
and
proper
flight
is
maintained.
If
you
r
helicopter
over
r
otates
COUNTER
-CL
OCKWISE
(to
the
l
eft),
push
and
re
leas
e
the
RIGHT
side
ofT
rim
button
in
the
same
manner
un
ti
l
the
prob
l
em
isr
esolved.
Fr
om
time
to
time
you
may
have
to
adjust
the
left
and
right
trim
to
ensu
re
the
helicopter
will
fly
straight
and
respond
accu
r
ately
to
cont
rol
com
m
ands.
Trim
Controls
lf
overrotatestotheright...
{g(V
Pushlefttrim.
('g[YPu
sh
r
ighttrim.
BASIC
FLIGHT
CONTROLS
Below
is
a
list
of
basic
flight
functions
for
your
Ai
r
Recon
™
wire
l
ess
infrared
remot
e
control
he
li
copter.
While
learning
to
fly
your
heli
co
pter
it
is
best
to
start
with
a
large
room
until
you
get
u
sed
to
the
basic
co
n
trols.
As
you
m
as
ter
flying
your
he
li
copter
you
can
move
to
more
advanced
maneuvering
technique
s.
t
Move
the
Throttle
froward
to
increase
the
speed
of
the
main
rotor
and
the
helicopter
will
ri
se
up
.
Move
the
Direction
Control
l
eft
and
the
helicopt
er
will
turn
l
eft.
Move
the
Direction
Control
forward
and
the
helicopter
will
move
forward.
TURBO
AND LIGHT
BUTTONS
~
Move
the
Thro
ttle
backwards
to
decrease
the
s
peed
of
the
main
rotor
and
the
helicopter
w
ill
descend
.
~
Move
the
Direction
Cont
rol
right
and
the
he
li
copter
w
ill
tu
rn
right.
Move
the
Di
r
ection
Control
backward
s
and
the
he
licopter
will
mov
e
backward
.
Press
the
TURBO
button
on
the
front
of
the
controller
{see
CON
TROLLER
DIAGRAM
pg
3)
and
you
r
AIR
RECON
TM
helicopter
wi
ll
change
into
high
-s
peed
mode
.
Press
the
TURBO
bun
on
a
secon
d
time
to
go
back
to
the
original
s
peed
.
Press
the
LIGHT
button
on
the
face
of
the
controller
(see
CONTROLER
DIAGRAM
pg
3)
to
r
emotely
sw
it
ch
helicopter
lights
off
and
on.

ADVANCED
FLIGHT
CONTROLS
Once
you
have
mastered
the
basic
flight
controls
of
your
AIR
RECON
TM
Infrared
Indoor
Helicopter
its
time
to
try
your
hand
at
some
more
advanced
flying
techniques
like
forward
and
reverse
sweeping
turns
.
1.
To
make
a
forward
sweeping
turns
,
first
push
the
Direction
Control
straight
s
tick
all
-
the
-
way
forward
until
the
control
stick
touches
the
upper
edge
of
the
controller
.
(see
Diagrams
A
and
8,
step
1
below)
.
You
s
hould
be
moving
straight
forward
at
this
point.
l.
Secondly
begin
to
slowly
roll
the
Directional
Control
stick
along
the
outer
edge
towards
One
O'
Clock
to
sweep
right
or
Counter
-
Clockwise
along
the
outer
edge
towards
Ten
O'Clock
to
sweep
left
(
see
Advance
Flight
Maneuvers
diagrams
A
and
8
below
steps
1
and
2)
.
3.
To
do
reverse
sweeps
simply
reverse
the
Control
Stick
by
moving
first
directly
to
the
lower
or
backwards
edge
of
the
controller,
then
begin
to
roll
the
control
stick
slowly
along
the
outer
edge
in
the
direction
that
you
want
the
hel
icopter
to
sweep
in
reverse.
Remember
you
must
first
h
ave
reverse
momentum
before
attempting
a
sweep
or
you
will
sim
pl
y
turn
in
place
.
4.
Once
yo
u
get
familiar
wit
h
flying
your
AIR
RECON
rM
helicopter
you
can
begin
to
fly
higher
and
faster
,
making
quicker
turns
and
practicing
new
tricks
.
.-------:--
A_o_v_A_N_C_E_D
-,
FLIGH
J MA
r-
N-
EU
_V_E_R_s
_______
~
NOH
To
make
mce
sweep1ng
moves
you
will
need
to
first
be
movmg
forward
at
a
decent
pace
In
order
to
ach1eve
th1s
you
should
depress
the
TURBO
button
on
the
front
of
your
controller
and
make
sure
you
are
m
fast
Speed
mode
before
you
brgm

USING
YOUR
ON
BOARD
CAMERA
AND
VIDEO
RECORDER
Your
AIR
RECON
TM
Indoo
r
wireless
helicopter
comes
equipped
with
an
on
boa
rd
digital
camera
that
takes
both
Video
and
still
Photographs.
Now
you
can
have
hou11
of
fun
creating
aerial
photography
an
d
videos
for
family
and
frie
n
ds.
WHA
T
YOU
WI
LLN
EED
TO
GET
STARTED
US
I
NG
YO
UR
CAMERA
1.
One
M
icr
o
SO
ca
rd
{i
ncl
u
ded)
2.
One
Micro
SO
card
rea
d
er
(inclu
d
ed)
3.
One
Computer
wi
th
USB
po
rt
and
Windows
Media
Playe
r
or
other
Media
player
that
ca
npl
ay
AVI
files
(not
in
cl
u
ded).
FORMATTING
Y
OUR
MICRO
SO
CARD
Before
you
can
be(]
in
to
take
videos
or
digital
photographs
you
must
first
fonnat
your
Micro
SO
card.
To
format
yo
ur
Micro
SO
card
simply
place
the
Micro
SO
card
into
the
included
USB
SO
card
reader
and
pl
ug
it
into
your
computers
USB
port
(See
diagram
1
and
2
below).
After
a
few
moments
an
icon
will
appear
on
your
Desktop.
Right
dick
on
the
Icon
and
follow
instructions
to
format
your
Micro
SO
card.
INSTALLING
THEMI
CRO
SO
CARD
IN
YOUR
AIR
RECON
'"
HELICOPTER
·Make
sure helicopter
is
in
the
powe
r
"OFF"
posit
i
on.
•
Place
the
fo
r
matted
SO
card
in
to
the
back
of
the
helicopters
digital
camera
port.
(
see
diag
r
am
3
below)
Push
gently
and
consistently
until
you
hear
and
feel
the
micro
SO
card
~
dick"
into
the
digital
camera
slot
·Tum
the
helicopter
on
and
make
sure
that
it
is
both
fully
charged
and
properly
synced
to
the
Controller
(see
HOW
TO
SYNC
YOUR
HELICOPTER
on
page4)
.
·When
you
have
successfully
installed
you
r
micro
SO
card
and
your
helicopte
r
is
in
the
power
~
ON
"
position
,
you
will
see
a
solid
green
l
ight
on
the
helicopter
cameras
belly.
This
green
light
is
accompanied
bya
sepa
r
ate
fl
ashing
r
ed
light
on
its
side.
Th
is
r
ed
l
ed
light
sho
uld
flash
5
times
and
then
go
off.
This
i
ndicates
you
are
ready
to
take
bot
h
ph
otograp
hs
and
videos.
(see
ca
m
era
in
d
icator
light
diag
r
am
4
below).
NO
TE
:If
you
see
a
co
n
tinuous
flas
h
ing
red
l
ight
th
is
mea
ns
yo
u
have
not
insta
ll
ed
your
Micro
SO
card
corrertly
or
there
is
ap
ro
blem
wit
h
your
SO
car
d.
If
this
happens
first
make
sure
that
t
he
pr
oduct
is
not
in
Video
Record
mode
and
if
not
,
th
en
please
r
eformat
and
try
again.
If
you
continue
to
encounter
problems
call
ou
r
customers
service
l
ine
at
949
.
566.9573
Ext
1
for
assistance
.
TAKING
DIG
I
TAL
PHOTO
S
To
take
photographs
simply
press
the
PHOTO
button
on
the
face
of
the
controller
(refer
to
CONTROLLER
DIAGRAM
on
pg
3)
the
red
l
ight
on
the
belly
of
the
camera
will
flash
RED
3x.
As
this
r
ed
light
is
flashi
ng
it
is
taking
one
still
photo.
When
the
camera
r
eady
l
ight
becomes
green
again
you
arer
eady
for
your
n
ext
photog
ra
ph
.
RECORDING
V
IDEOS
To
reco
rda
video
firs
t
make
sure
that
your
helicopter
is
fully
char
ge
dand
that
yo
uh
ave
co
rr
ertly
ins
ta
ll
ed
the
micro
SO
card
in
theH
elicopters
camera
port
.
Begin
recordi
nga
video
by
pressing
the
VIDEO
RECO
RDb
utton
on
the
fron
tle
ft
side
of
the
controller
(see
CONTROLLER
DIAGRAM
on
page
3)
.
The
red
indicator
light
will
continuously
flash
RED
indicating
that
VIDEO
recording
is
in
progress
.
To
stop
the
video
recording
,
press
the
RECORD
button
a
second
time
.
The
red
indicator
light
on
the
belly
of
the
camera
will
tum
OFF
indicating
that
video
recording
has
stopped
and
the
Camera
is
in
ready
mode
again.
Diagram
1
Diagram
2
Diagram
3
Diagram
4

REMOVING
YOUR
MICRO
SO
CARD
To
remove
your
Micro
SO
Card
push
in
gently
on
the
back
of
the
SO
card
with
your
thumb
or
forefinger
until
you
hear
and
feel
a"
clicking
sound
".
The
Micro
SO
card
will
"
pop
out"
slight
ly
and
is
ready
for
removal
.
Simply
grab
and
pull
gently
away
from
the
helicopter
camera
port
to
remove
the
card.
Always
store
your
Micro
SO
card
in
a
dean,
safe
and
cool
environment
DOWNLOADING
AND
CLEARIN
G
SPACE
ON
YOUR
MICRO
SO
CARD
Plug
your
micro
SO
ca
rd
into
micro
SO
card
reader
and
conne<t
to
your
computer
.
It
is
best
to
always
download
all
your
videos
and
pictures
on
to
your
computer
and
not
store
this
data
on
your
Mic
ro
SO
ca
rd.
After
downloadi
ng
you
r
photos
and
videos
,
follow
your
computers
instructions
to
"
delete
"
files
on
your
Micro
SO
card.
IMPORTANT
NOTICE
:
When
yo
ur
Micro
SO
ca
rd
is
full
t
he
i
nd
ica
tor
lig
ht
on
the
bon
om
of
your
helicopter
will
become
solid
REO.
This
i
ndicates
that
its
time
put
a
new
SO
card
in
yo
ur
helicopter
or
down
l
oad
files
and
clear
s
pace
for
futu
re
photos
and
videos.
NOTICE
When
record1ng
v1deo
footage
the
AIR
RECON
1
~'
helicopter
automatiCally
goes
1nto
slow
mot1on
mode
th1s
allows
steady
controlled
record1ng
of
v1deo
footage
that
would
not
be
poss1ble
1n
faster
fiy1ng
modes
HELICOPTER
WARNING AND
SAFETY
PRECAUTIONS
The
helicopter
blades
revolve
at
hig
h
speeds
and
can
cause
damage
to
the
user
,
spectators
and
animals.
Stand
away
from
the
helicopter
to
reduce
the
risk
of
getting
into
the
flight
path
.
Warn
spectators
that
you
will
be
flying
your
helicopter
so
that
they
are
aware
of
its
position.
Before
flight
,
inspect
the
rotor
blades
to
make
certain
that
the
blades
are
securely
fastened
to
the
helicopter.
WARNINGS
·Choking
/
Cutting
Hazard
.
Small
Parts/Sharp
Rot
or
Blades.
•
Keep
han
d
s,
h
air
andl
oose
clothing
away
fr
om
the
prope
ll
er
when
the
power
switch
is
turned
to
the
ON
position
.
•
Turn
off
the
transmitter
and
he
l
icopter
powe
r
switc
h
es
when
not
in
use.
·The
remote
contro
lchar
ge
r
is
bui
lt
sp
ecifica
ll
yfor
th
eh
elic
o
pters
li-P
oly
b
attery.
Do
not
u
se
it
to
charge
any
othe
r
b
attery.
·New
alkali
nebatter
ies
arer
ecommended
form
ax
im
um
p
erfo
r
mance.
·Par
ental
supervision
r
ecommended
when
fly
in
ghe
li
copter.
IMPORTANT
:
ALWAY
SDI
SCONNECT
CHARGER
CORD
AFTER
CHARGING
.
NEVE
R
LEAVE
CH
A
RGER
CONNECTED
TO
HELICOPTER
OVERNIGHT
OR
FOR
EXTENDED
PERIOD
S
OF
TIME
.
INFRARED
MULTI
CH
ANN
EL
CONTROL
SYSTEM
PART
REPLACEMENT
INSTRUCTIONS
CONTENTS
: 0
(3)4screws
(1)
1
upper
propeller
blade
(2)
1
bottom
propeller
blade
a
xl
xl
(4)4
connecting
rods
x4
x4
AIR
RECON
PROP
E
LLER
SYSTEM
Your
AIR
RECON
propeller
system
isa
precision
instrument
that
may
need
repair
or
replacement
from
time
to
time
for
optimal
flight
function
.
Crash
landing
from
high
-s
peed
aerial
flight
s
may
cause
damage
to
your
AIR
RECON
propeller
or
propeller
connecting
rod
s.
TRO
UBL
ESHOOTING:
If
your
AIR
RECON
loses
it
s
ability
to
fly
co
rrectly
,
please
inspect
the
propeller
sys
tem
carefully
for
the
following
five
c
ommon
issues:
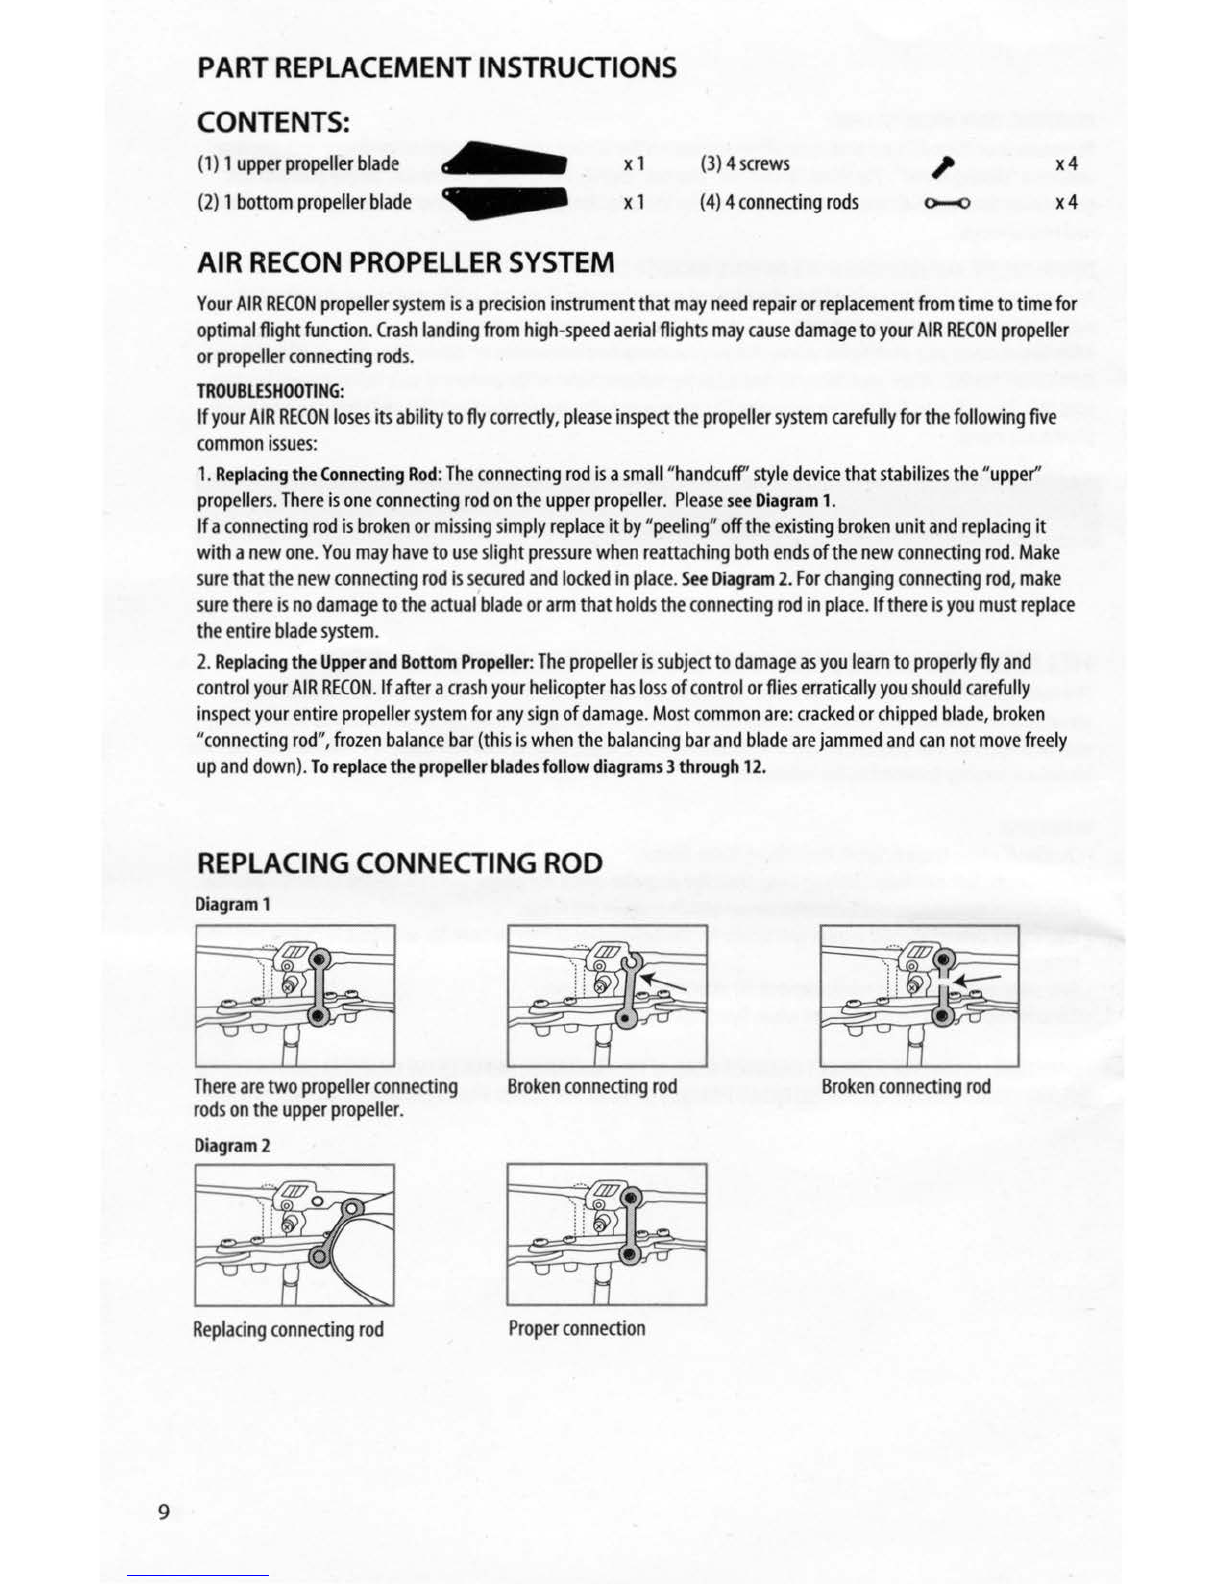
1.R
eplacing
the
Connecting
Rod
:
The
connecti
ng
rod
is
a
small
~
hand
c uff'
style
device
that
stabilizes
the
"
upper"
propellers
.
There
is
one
connecting
rod
on
the
upper
propeller.
Please
see
Diagr
am
1.
Ifa
connecting
rod
is
broken
or
mi
s
sing
s
imply
replace
it
by
"
peeling
~
o
ff
the
exis
ting
broken
unit
and
r
ep
l
aci
ng
it
with
a
new
one
.
You
may
have
tou
se
sli
ght
pr
ess
ure
whe
n
reattaching
both
ends
of
the
new
connecti
ng
rod
.
Make
s
ur
e
that
the
new
connecting
rod
is
sec
ured
and
loded
in
pla
ce
.
S«
Diagram
2.
For
cha
nging
connecting
rod
,
make
s
ure
there
is
no
damage
to
the
actual
blade
or
arm
that
holds
the
connect
ing
rod
in
pla
ce.
If
there
is
yo
u
mu
st
replace
the
entire
blade
system.
2.
Replacing
the
Upp
er
and
Bottom
Propeller
:
The
propeller
iss
ubje
ct
to
damage
as
you
learn
to
properly
fl
y
and
co
ntrol
your
AIR
RECON.If
after
ac
ra
sh
your
he
li
copte
r
has
loss
of
co
ntrol
orfli
es
erratically
you
s
hould
ca
refully
inspect
you
rentire
prop
eller
sys
tem
for
any
s
ign
of
damage
.
Mo
st
common
are:
cracked
or
c
hipped
bl
ade,
broken
~co
nnecting
rod",
frozen
b
alance
bar
(thisis
when
the
b
alancing
bar
and
bl
ade
are
jamm
ed
and
can
not
mov
e
freely
up
and
down
).
To
replace
the
propell
er
blades
follow
diagram
s3
through
12
.
REPLACING
CONNECTING
ROD
Diagram1
Th
ere
are
two
propell
er
connecting
r
ods
on
the
upper
propeller
.
Diagram2
Broken
con
necti
ng
rod
~niE9
~~
Rep
la
cing
connecting
r
od
Proper
co
nnection
Broken
co
nn
ecting
rod

REPLACING
THE
UPPER
PROPELLER
BLADE
Diagram
l
Using
a
S<rewdriver
turn
counterclockwise
to
r
emovethescrew.
Diagram
5
Using
the
screwdriver
turn
clockwise
totightenthescrew.
Pl
ease
note
the
design
oftheupperblade.
Diagram
7
Remove
the
broken
blade
and
carefully
replace
with
a
new
one.
When
you
tighten
the
screw
you
s
hould
t6t
the
blade
to
make
su
reth:t
it
still
has
free
movement.
If
the
blade
cannot
move
freely
,
slightly
loosen
the
screw.
REPLACING
THE
BOTTOM
PROPELLER
BLADE
Diagram
8
U
si
ng
a
sc
r
ewd
r
ive
r
turn
co
unt
er
clockwise
toremovethescrew
.
Di
agram
10
Using
the
screwdriver
turn
clockwise
to
tighten
the
screw.
tG
\a
Bottom
Blade
Pl
ease
not
e
th
edesig
n
ofthe
bottom
blade
.
Diagram
12
Diagram
9
Remove
the
broken
blade
and
ca
r
efully
replace
with
a
new
one.
~Diagram
111!!11
11
When
you
tighten
the
screw
you
should
test
the
blade
to
make
sure
that
it
still
has
free
movement.
If
the
blade
cannot
move
freely,
slightly
loosen
the
screw.
10

BATTERY WARNINGS
RECHARGEABLE
BATIERY:
This
helicopter
uses
an
internalli-Poly
rechargeable
battery
and
is
not
replaceable
.
If
battery
no
longer
stays
charged,
dispose
of
battery
properly
according
to
local
disposal
requirements.
CONTROllER
BATIERIES
:
Remote
control
require
s6"
AA'
'
batteries
(not
included).
Please
read
the
important
battery
safety
warning
below.
·Do
not
mix
alkaline,
s
tandard
(carbon-zinc)
and
rechargeable
batterie
s
(Nickel
Metal
Hydride)
.
•
Do
not
mix
old
and
new
batteries.
·Non-rechargeable
batterie
s
are
not
to
be
recharged.
·Rechargeable
batteries
are
to
be
removed
from
the
item
befor
e
being
ch
arged
(if
removab
l
e).
·Rechargeable
batterie
s
are
on
ly
to
be
charged
under
adult
supervision.
·Exh
austed
batteries
should
be
r
emoved
immediately
and
must
be
recycled
or
disposed
of
properly
according
to
state
or
local
government
ordinances
and
regulations.
·The
supply
terminals
are
not
to
be
short-circui
t
ed.
·Only
batteries
of
the
same
or
equivalent
type
as
r
ecommended
are
to
be
used
.
·Batteries
are
to
be
inserted
with
the
correct
polarity
(see
inside
booklet
for
diagram).
·Do
not
dispose
batteries
in
a
fire-
batteries
may
leak
or
explode.
CARE
AND
MAINTENANCE
·A
lways
remove
the
batteries
from
the
wireless
infrared
remote
co
ntrol
when
it
is
not
being
used
for
an
extended
period
of
tim
e.
·To
clean,
gently
wipe
the
remote
control
and
helicopter
with
a
dean
damp
doth.
·
Keep
the
toy
away
from
direct
heat
or
sunlight.
·Do
not
s
ubmerge
the
toy
into
water.
This
can
damage
the
unit
beyond
repair.
·Parental
guidance
recommended
when
installing
or
replacing
the
batteries
.
FCC
Part
15
8 Notice
CAUTION:
Changes
or
modifications
not
expressly
approved
by
the
party
re
s
pon
sib
le
for
compliance
could
vo
id
the
u
sers
authority
to
operate
the
equipment.
NOTE:
This
equipment
has
be
en
tested
and
found
to
comply
with
the
limits
for
aCl
ass
B
digita
l
device,
pur
suantto
Part
15
of
the
FCC
Rules.
These
limits
are
designed
to
provide
reasonable
protection
against
harmful
interference
in
a
residential
installation
.
Thi
s
equipment
generates,
uses
and
can
radiate
radio
frequency
energy
and,
if
not
installed
and
used
in
accordance
with
the
instruction
s,
may
cause harmful interference to radio communications.
However
,there
is
no
guarantee
that
interference
will
not
occur
in
a
particular
in
sta
llation
.If
this
equipment
doe
s
cause
harmful
int
erfe
ren
ce
to
radio
or
television
reception
,
which
ca
n
be
determined
by
turning
the
equipment
off
and
on,
the
user
is
encouraged
to
try
to
correct
the
interference
by
one
or
more
of
the
following
measures:
Reorient
or
relocate
the
receiving
antenna.
•
Increase
the
sepa
ra
t
ion
between
the
equipment
and
receiver
.
•
Connect
the
equipment
into
an
outlet
ona
circuit
different
from
that
to
which
the
r
eceiver
is
connected.
•
Consult
the
dealer
or
experienced
radio/TV
technician
for
help.
This
device
complies
with
Part
15
of
the
FCC
Rules.
Operation
is
subject
to
the
following
two
conditions:
(1)
th
is
device
may
not
cause
harmful
interference,
and
(l)
this
device
must
accept
any
interference
r
eceived,
including
interference
that
may
cause
undesired
operation.
Conforms
to
safety
requirements
of
ASTM,
CPSIA
and
FCC.
PROPEL
RCTM
and
AIR
RECQNTM
are
trademarks
of
Rooftop
Brands.
<C>
2012Rooftop8rands™ Allrightsreserved
Tel
:+
01
949·566
·
9573
•
WWN
.
rooftopbrands
.
com
Made
in
China
11
&
WARNING!
CH
O
KIN
G
HAZA
RD
-
Small
parts.
Nolsuilablelorchildrenunder3years
.
Other manuals for Air Recon
1
Table of contents
Other Propel RC Toy manuals


Popular Toy manuals by other brands

Jamara
Jamara Snow Play Bob Karol 460364 instructions

LeapFrog
LeapFrog Count Along Cash Register Deluxe Parents' guide

Reely
Reely 2147829 operating instructions

Eduard
Eduard StuG 40 Ausf.G manual

Elenco Electronics
Elenco Electronics TEACH TECH HYDROBOT ARM KIT Assembly & instruction manual

Tronhelicopters
Tronhelicopters Tron 5.5 manual

Amewi
Amewi RC Magic Traxx Glow instruction manual

Fisher-Price
Fisher-Price Creative Coaster 72690 instructions

REVELL
REVELL Sharx Mini user guide

LGB
LGB 22512 instruction manual
 railings 1/350 quick start guide")
Eduard
Eduard German Z-25 (1944) railings 1/350 quick start guide

PlayMonster
PlayMonster ROOMINATE Zoey's Pet Vet Van instructions


