ProRacing VP User manual

ProRacing® Chip Box Digital VP
Certicate IPC: 7711/21, IEC: 61340-4-1

Table of Contents.
2
1. ProRacing® Chip Box Digital VP. ..................................................................... 3
2. Set contains. ..................................................................................................... 3
3. Principle of operation. ....................................................................................... 4
4. Pro Power Increase – The Power Boost. ......................................................... 4
5. Pro Driving Safety – For your and others’ safety. ............................................. 4
6. Pro Eco Driving – Fuel Economy. ..................................................................... 5
7. Usability of the product. .................................................................................... 5
8. Typical location of the plug. .............................................................................. 6
9. Installation. ....................................................................................................... 8
10. Installation in Volkswagen T4. ........................................................................ 10
11. Marking of the VAG engines with a VP37 pump. ........................................... 11
12. Types of plugs. ............................................................................................... 12
13. FAQ. .............................................................................................................. 13
14. Regulation of the device. ............................................................................... 14
15. We meet the global IPC standards. ................................................................ 15
16. ProRacing® in the world. ................................................................................ 15
17. Customer Service. .......................................................................................... 16

1. ProRacing® Chip Box Digital VP.
2. Set contains.
ProRacing Chip Box Digital VP is a digital device connected in the engine
compartment. The device is programmed for use with diesel engines equip-
ped with rotary pump VP37 - cars from Volkswagen Group (VAG). Equipped
with an additional self-regulation system - rotary potentiometer. The set
includes dedicated wires with Plug & Play plugs.
Get ready for:
• The power increase up to 25%
• The torque increase up to 25%
• Reducing fuel consumption up to -15%
• ProRacing® Chip Box Digital VP,
• Cables with dedicated plugins,
• Assembly instructions and an operating manual,
• Warranty.
3

1. Increase in power and a maximum speed of the car.
2. Torque increase, guaranteeing:
• better driving dynamics,
• stable and exible engine operation,
• much better acceleration due to faster response to the gas pedal,
3. Easy starting of the engine even in winter conditions.
4. Reducing turbo lag in turbo-charged cars.
5. Smooth acceleration starting from low engine revs.
3. Principle of operation.
4. Pro Power Increase – The Power Boost.
1. Increased driving dynamics.
2. Easier and safer overtaking manoeuvre.
3. Improved driving comfort.
• The device improves driving comfort. Improved driving dynamics and impro-
ved engine performance mean increased road safety.
• When the device is connected, the torque increases signicantly. The car
becomes more dynamic, better responsive to the gas pedal. Also, for the
cars with the automatic transmission, this increase translates to faster gear
change/reduction, which makes the car gain much better acceleration. This is
very important, for example, when overtaking.
• Thanks to the easy overtaking, we are taking care of our passengers and the-
ir safety. The overtaking manoeuvre will be easier and, above all, safer when
we are sure of the power of the car.
The device is prepared for mounting in the engine compartment, in a suitable
sensor at the fuel pump. As a result, we modify the data transmitted between the
control computer (ECU) and the corresponding sensor, including fuel injection,
fuel charge, turbocharger boost, air feed rate, engine speed, throttle position,
injector opening time.
5. Pro Driving Safety – For your and others’ safety.
4

6. Pro Eco Driving – Fuel Economy.
1. Reduce fuel consumption up to 1.5 l per 100 km
• Among the dened 10 MAPs are also ECO maps - which limit fuel consumption.
We use them mostly for long trips. In a continuous route, without rapid acce-
leration and deceleration, we can expect a reduction of up to 1.5 l per 100 km.
• The increase in power and torque improves the engine performance. Optimi-
zing engine performance reduces fuel consumption. Performance depends on
the car’s output parameters, engine displacement, current fuel consumption,
and driving style.
2. By reducing the combustion, we reduce the number of harmful substances
emitted to the atmosphere, including nitrogen and carbon oxides.
• We can refuel less, save money and protect the environment.
7. Usability of the product.
5
Car warranty protection.
The device can be used on cars with a guarantee, because in the
computer control (ECU) no parameters are permanently changed.
When the device is disconnected, the ECU returns to the serial pa-
rameters, so the modication is undetectable by the service during
the technical review.
Easy Plug & Play installation.
This device is intended for self-installation. Includes detailed instal-
lation instructions and dedicated cables with original manufacturer
plugs.
Durability and reliability.
The device is built in SMD technology; the electronic circuit is enc-
losed in a well-insulated housing made of durable plastic. Heat-in-
sulated cables are provided with waterproof plugs for durability and
reliability.

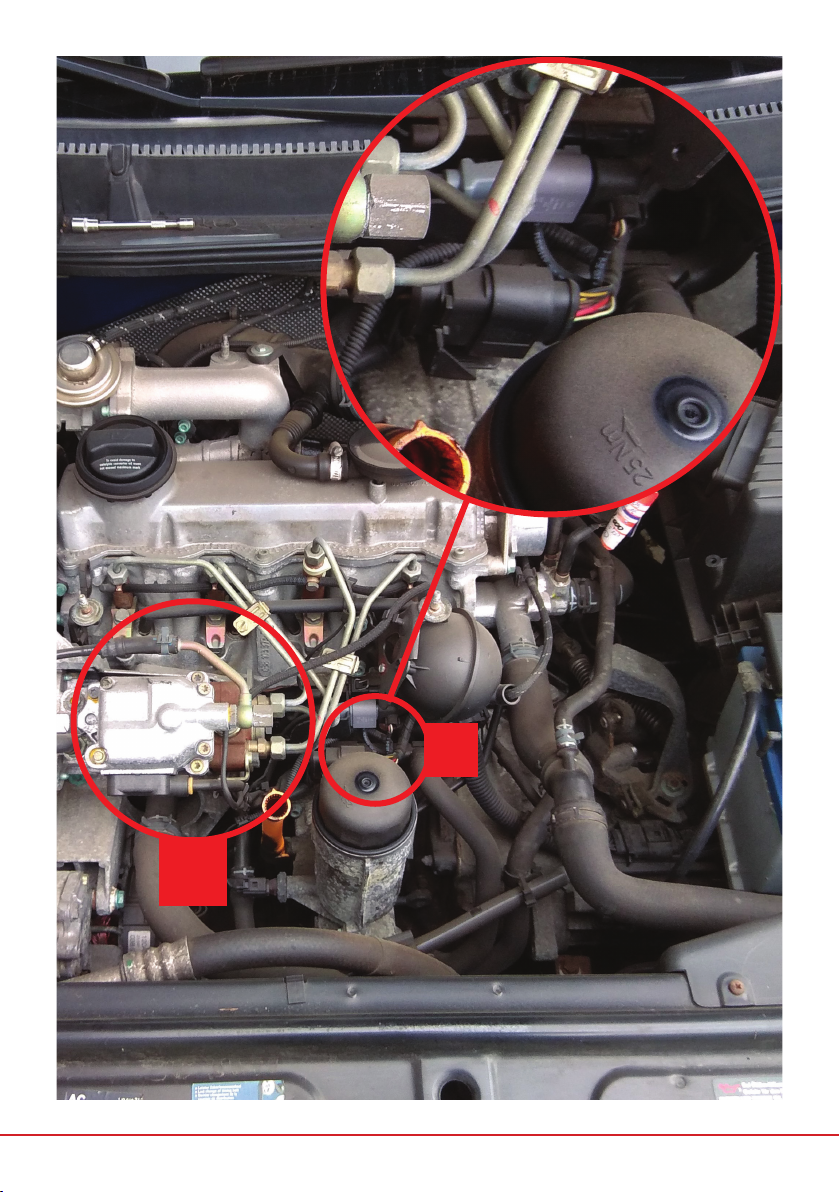
8. Typical location of the plug.
1
1
2
2
B
1
1
2
2
B
In the example drawings and
photos, the location of the
VP37 rotary pump is marked
with the letter A, plugs for the
controller with the letter B.
6
Fast effect.
The power of the car is increased by the electronics, so there is
no need to interfere with the mechanical parts of the engine or the
components, and the effect is almost immediate.
Engine protection function.
Ensures the engine operates in a safe range of engine speed. The
power increase is always maintained within the tolerance range of
the engine. This function prevents the engine from overheating at
high loads - very dynamic driving.
Additional self-regulating system
- an adjustment screw.
Allows you to make software modications - it makes it easy to
adjust the device to the needs of the engine - reduce or increase
the power of the device.
+
-
A
B
7
9. Installation.
The device is prepared for mounting in the engine compartment, to a suitable
sensor on the rotary pump. As a result, we modify the data transmitted between
the control computer (ECU) and the corresponding sensor, including fuel injection,
fuel charge, turbocharger boost, air feed rate, engine speed, throttle position,
injector opening time.
1
Step 1.
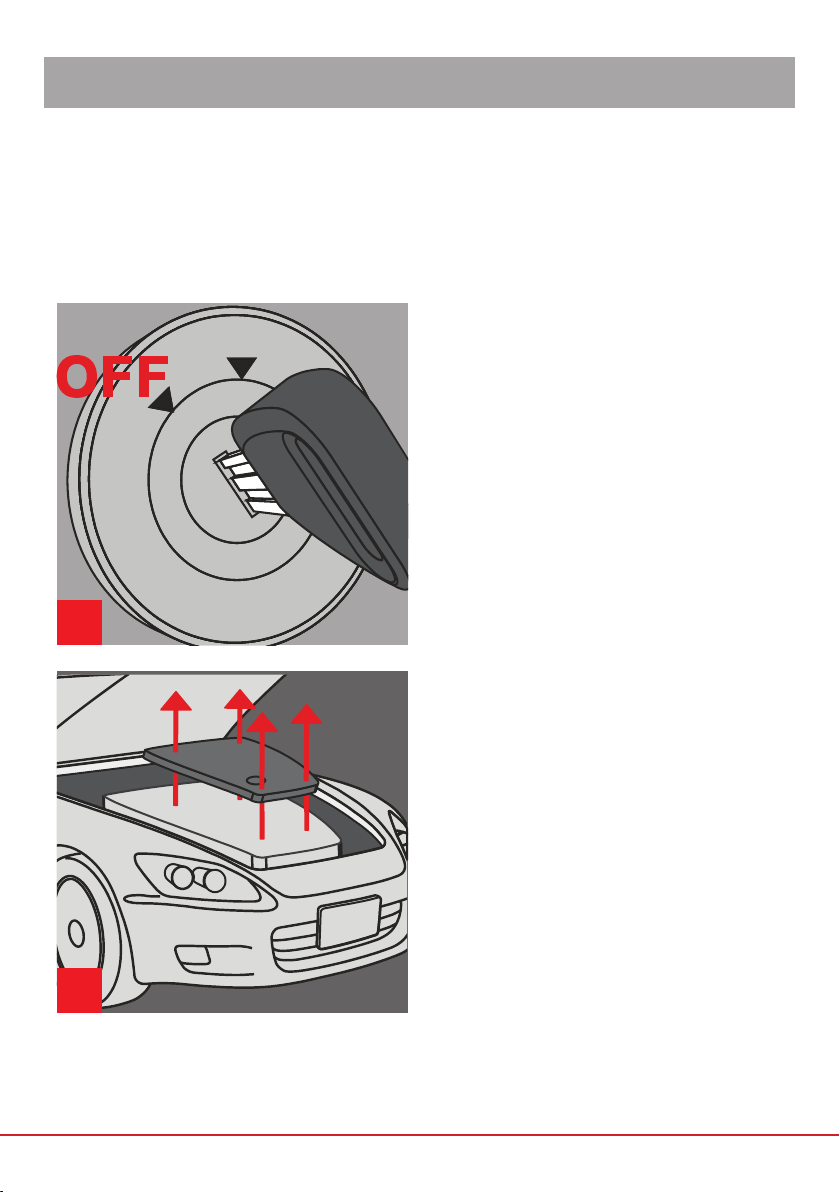
Make sure the car’s engine is not
working and all electric elements are
in an OFF position. The key in the
ignition ought to be in an OFF position,
no devices such as navigation, car
radio, air- conditioning, internal lighting
etc. ought to be working. If a car is not
started with a key, the power ought to
be cut off with a START/STOP button
or by removing a card.
2
Step 2.
After removing the engine
compartment cover locate the VP37
injection pump. Near the pump there
are plugs running out of the controller
[See section 8 - „Typical plug location”].
Note! The location of plugs may be
different in different car models.
8

4
Step 4.
Connect the male plug to the
unplugged female plug.
It should be noted that during the
insertion a characteristic click of the
fastened snap / clasp is created. This
will guarantee us the certainty of the
connection.
Step 5.
Connect the female plug with the
previously unplugged male plug,
then connect the cable to the VP
Chip Box. Attach the Chip Box in a
safe place, away from the hot engine.
After correct installation, you can start
the engine and start driving.
3
Step 3.
Unplug the plug from the socket.
To unplug the connector, press the
clasps and then pull. Always pull the
plug not wires!
Remember! Attempting to pull out
the plug without rst unclipping the
clasps can cause it to tighten even
more tightly. Before unplugging the
plug, it is good to push it into the
socket to loosen the clasps.
5
9
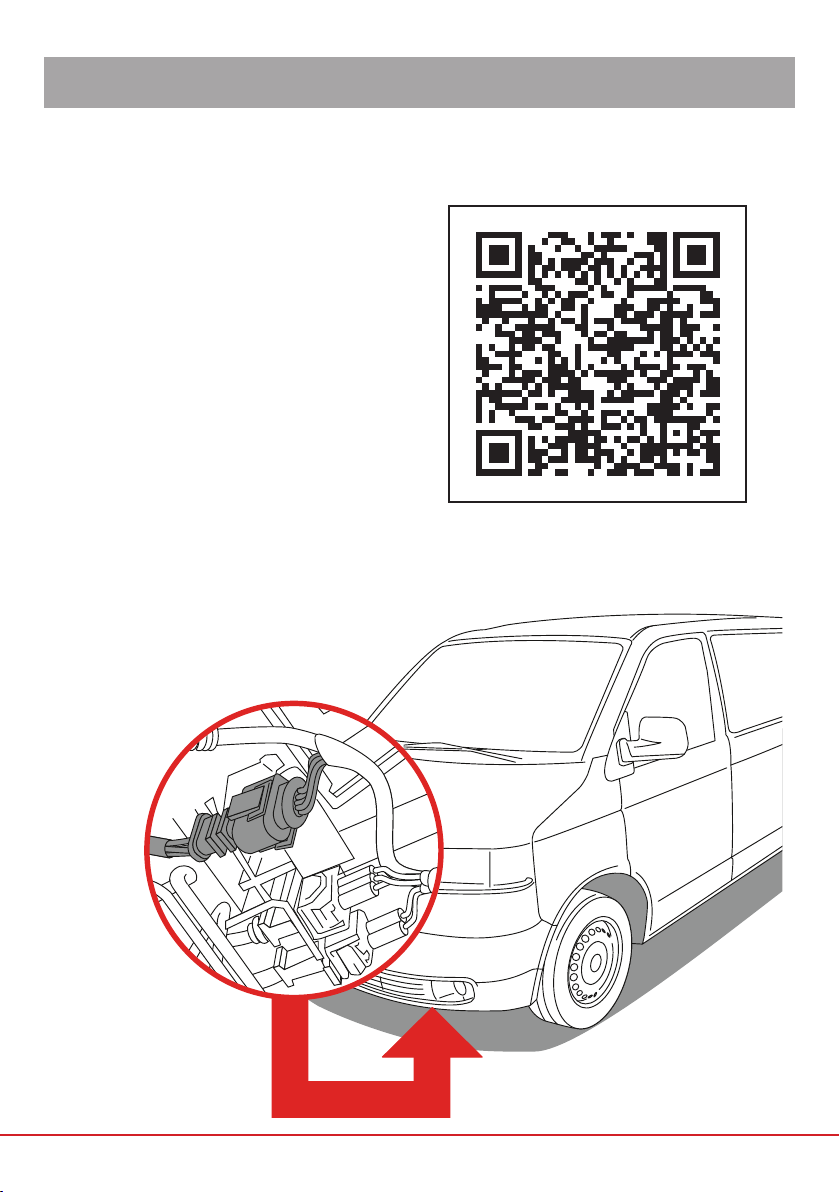
10. Installation in Volkswagen T4.
10
The installation is different in
Volkswagen Transporter T4. The VP37
pump driver plug is located underneath
the engine. To mount the ProRacing®
Chip Box Vp-10 Map you must rst
remove the motor cover.
Warning! The cover is mounted on
a series of screws. Take particular
care when loosening the screws! A
falling cover can cause harm!
After uncovering the bottom of the
engine, we should get direct access
to the plugs coming from the VP37
rotary pump. The assembly takes place
in the same way as described earlier
(begining from step 3 at page 11).
If you want to see a video
of installation of the device
in Volkswagen T4, please
visit our YouTube channel:
https://www.youtube.com/c/
ProRacingMorepower
Scan the QR code and watch the
assembly video on YouTube.

11. Marking of the VAG engines with a VP37 pump.
Engine Mark Power Torque
1.9TDi 1Z, AHU 90 hp (66 kW) 202 N•m
1.9TDi AGR, AHH, ALE,
ALH
90 hp (66 kW) 210 N•m
1.9TDi AFN, AHF, ASV,
AVG, ASF
110 hp (80kW) 235 N•m
2.5 TDi (niebieska
literka i)
AJT, AYY 88 hp (65 kW) 195 N•m
2.5 TDi (srebrna
literka i)
ACV, AUF, AXL,
AYC
102 hp (75 kW) 250 N•m
2.5 TDi (czerwona
literka i)
AHY, AXG 151 hp (111 kW) 295 N•m
To conrm that your car is
equipped with a VP37 rotary pump,
check the engine code.
The code designation of the engine
can be read from the sticker placed
in the spare wheel hatch (see
gure opposite). On the sticker can
be found marking in the three-letter
format (as in the table above). A
similar sticker can also be found on
the casing of timing gear.
The VP37 pump can also be found on Volvo cars: s40 and v40 with 2.5 TDi
engines rated at 140 hp (103 kW).
11
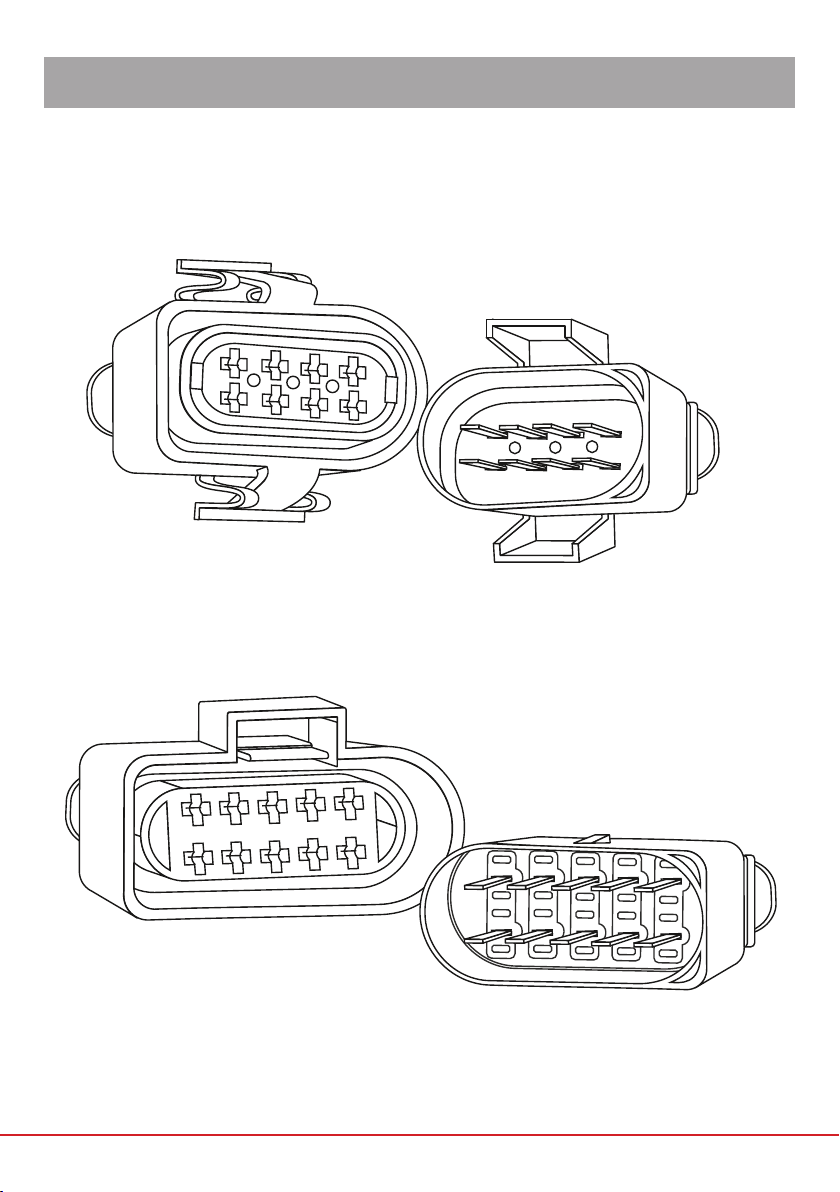
12. Types of plugs.
12
Depending on the car model, the plugs on the VP37 can be 8 - pin or 10 -
pin. Below are drawings of male and female plugins, eight and ten-pin.
Female plug 8 PIN. Male plug 8 PIN.
Female plug 10 PIN. Male plug 10 PIN.

13. FAQ.
13
QQ: Should the ProRacing® Chip Box VP be permanently connected
to the VP37 injection pump controller?
AA: Yes, when using the device it must be permanently connected.
When you disconnect the device, the car will return to the factory
settings.
QQ: Should I turn off the engine before adjusting?
AA: Yes. In order for the ProRacing® Chip Box VP device to work
properly, each time before any adjustment the motor should be turn
off. Thanks to this, we are sure that the modication will have a
correct effect on the ECU in the car.
Q: I have an 8 pin plug at the pump, but only seven wires come out
of it. Does it affect anything?
A: No. It happens that one pin in the plug is empty. This does not
affect the operation of the device because the signal is given on
completely different pins.
Q
A

14. Regulation of the device.
14
You receive a device programmed for your car. Chip Box should not be adjusted
immediately after installing! After installing the device, the car should cover
a distance of about 100 km (not necessarily in one drive.) The engine has to
be heated up and cooled at least once so that ECU can completely read the
parameters which are changed by Chip Box. Most often there is no need to
perform additional regulation of the device.
Additional regulation with an adjusting screw is done only when:
• a glow plug or CHECK ENGINE indicator appear on a dashboard, the
engine does not work in an even way or goes into emergency mode. The
regulation is performed with a not working engine. The adjusting screw shown
in the picture should be moved 4 turns to the right. Then the engine should
be started and its work checked. The action should be repeated until the
undesirabled symptoms disappear.
• when after covering the distance of 100 km you want to raise the power
increase, the adjusting screw should be moved 2 turns to the left with a not
working engine. Next, the engine should be started and its work checked.
The action can be repeated until a satisfactory effect is obtained, but
implementing new settings can be performed on condition of maintaining
steady even work of an engine. If the engine starts working in an unsteady
way return to turning the adjusting screw to the right.
Turns to the LEFT
- anti-clockwise.
Turns to the RIGHT
- clockwise.

15. We meet the global IPC standards.
16. ProRacing® in the world.
15
Our production meets the highest standards of international
Association Connecting Electronics Industries (IPC) and Polish
and international standards of production.
IPC® certications are recognized around the world for guaranteeing the quality
of our products and services in the electronics industry. The application of the
PN-IEC production standards guarantees high quality and repeatability of the
technological process which directly translates into high trust for our products. We
are proud to offer the high quality cutting edge technological solutions, that are
able to win high demand competition on the global tuning electronics market in
premium segment.
Check it out and join to our satised users!
Our top class devices are sold all over the world!
Join our team!

17. Customer Service.
16
Our service is available to you from
Monday to Friday, from 900 to 1700.
Contact address:
ProRacingX
Wrocławska 261
59-220 Legnica
Poland
Technical Support:
(+48) 506-711-155
(+48) 514-186-905
Company’s data:
ProRacingX Piotr Miziołek
Wrocławska 261, 59-220 Legnica,
NIP: 511-022-94-10
REGON: 141940372
Sales department:
(+48) 720-004-003
Visit us on:
www.proracing24.com
facebook.com/proracingpolska
plus.google.com/+ProRacingMorepower
youtube.com/ProRacingMorepower
Table of contents
Popular Automobile Electronic manuals by other brands

BrandMotion
BrandMotion AVMS-3604 installation instructions

Axxess
Axxess AXTC-FD3 installation instructions

Directed Electronics
Directed Electronics Valet 9405T user guide

Gemini
Gemini 814FWH Installation and use manual

Double Intelligence Technology
Double Intelligence Technology PSA quick start guide

Saab
Saab 12 787 887 installation instructions

Nokia
Nokia HSU-4 installation guide

Firstech
Firstech MOMENTO C3 HD quick start guide

Parksafe Automotive
Parksafe Automotive PS440 Installation & user guide

Muller Elektronik
Muller Elektronik TRACK-Guide III Installation and operating instructions

Paser
Paser KIT052USRE12 manual

PAC
PAC RadioPRO 5 RP5-GM41 quick start guide


