Prospec Electronics INF PRV315.2 User manual

INF PRV315.2 Owner's Manual
()Bluetooth
PRV-315.2
.&
TIJNE
*This stereo should not be washed with a pressure
washer neither should it be washed with chemicals.
A wet sponge or damp cloth will suffice.*
~
P
~
Prospec
Electronics
---
~
_- Sound Systems For The
Outdoor
Enthusiast
PROSPEC
3325 South Morgans Point Rd. IMt. Pleasant, SC 29466
P:
843·849·9037 Iwww.prospecelectronics.com

Table
of
Contents
Table
of
Contents ----------------------------------------------------------------- 1
Product Description -------------------------------------------------------------- 2
Installation Instructions ---------------------------------------------------------- 3
Wiring Configuration ------------------------------------------------------------ 4
General Function
of
Buttons ---------------------------------------------------- 5
Sign
up
Display & Home
Menu
------------------------------------------------ 6
General Operations --------------------------------------------------------------- 7
General Settings ------------------------------------------------------------------ 7
Radio Section Operation -------------------------------------------------------- 9
Bluetooth Section Operation --------------------------------------------------
11
USB Section Operation --------------------------------------------------------
13
AUX
Section Operation --------------------------------------------------------
15
Troubleshooting ----------------------------------------------------------------- 16
ProductDescription
This radio is another forward thinking product from Infinity
by
Harman. Other
Harman
brands include JBL, JBL Professional, AKG,
Mark
Levinson, Harman Kardon, and Revel.
Harman
was
purchased
by
Samsung in 2016. Prospec Electronics is
Harman's
exclusive
distributor to
OEM's
in the marine, side
by
side,
golf
car, and hot tub industries .Ourproducts
range from mechless receivers, amplifiers, subwoofers, speakers, and other accessories.
Prospec is located in Mount Pleasant, S.C., a stone'sthrow away from Charleston, S.C. Should
you
need
our
expertise, please do
not
hesitate to give us a call.
We're
all about the music and
this music should resonate from components verified to complement
your
hard earned
off
road
purchase.
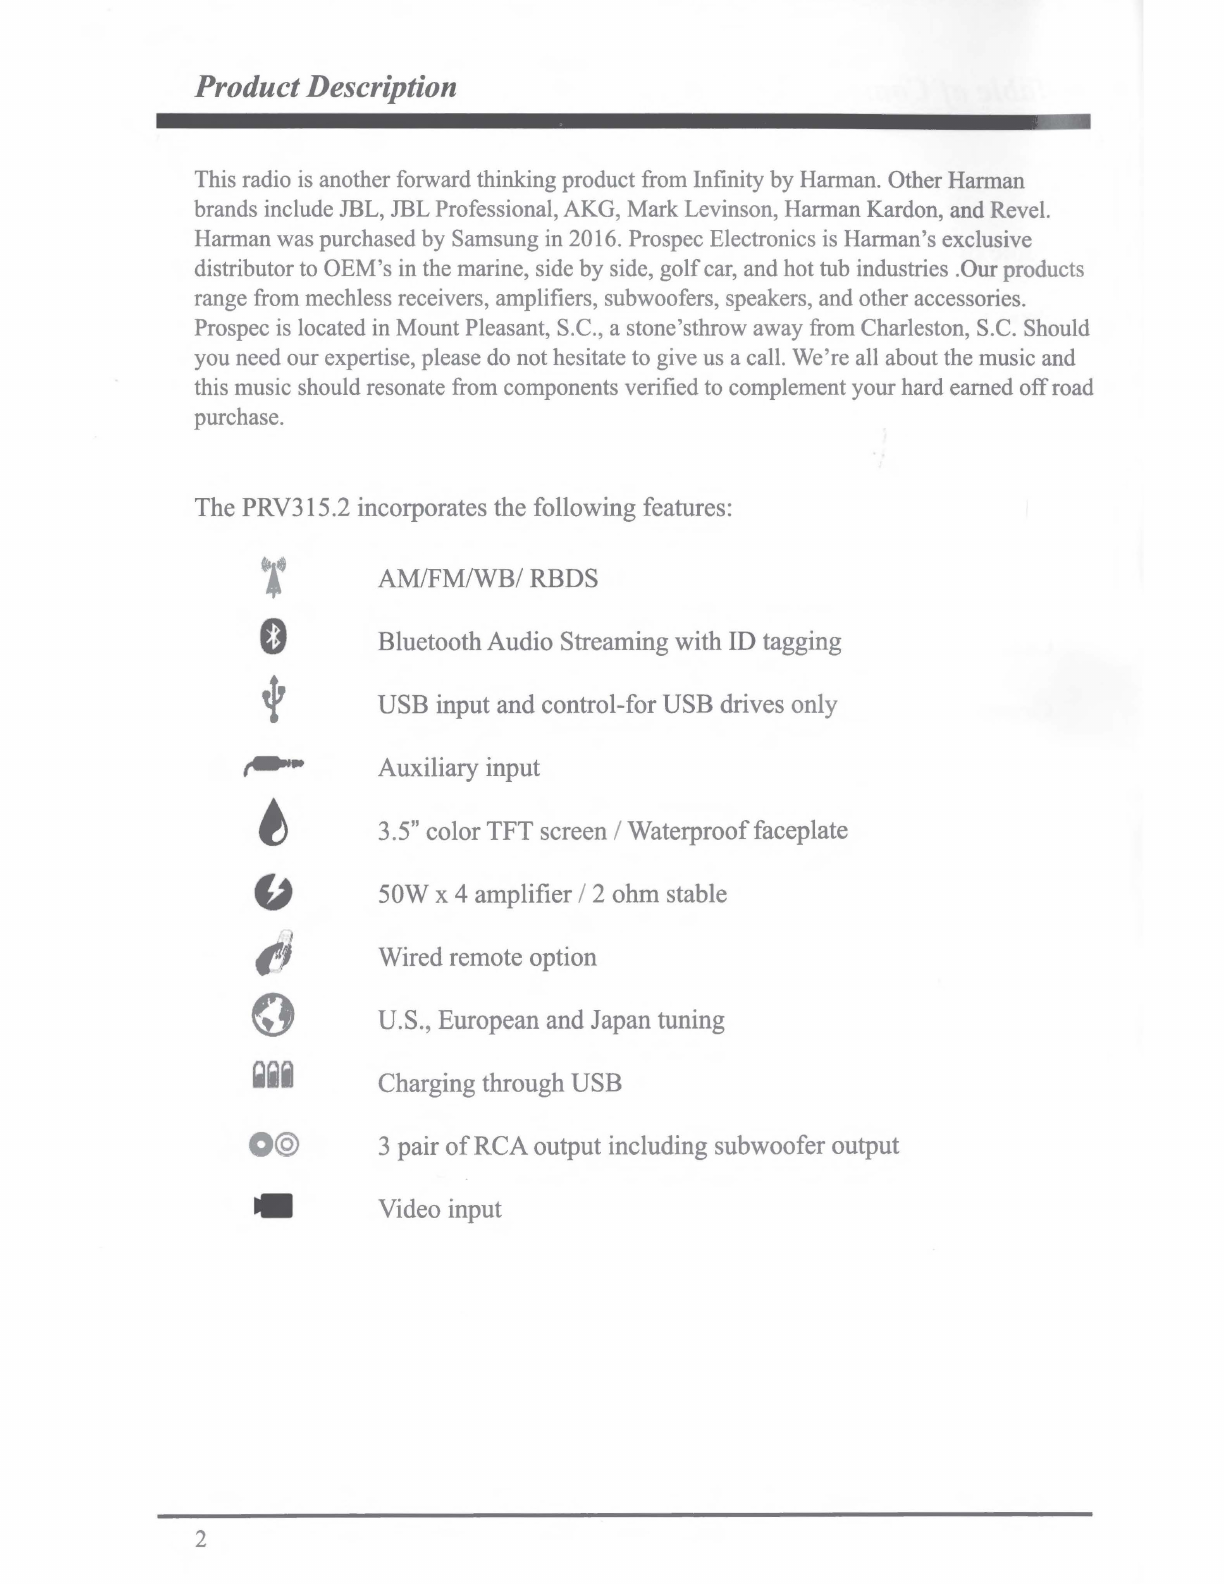
The PRV3 l5.2 incorporates the following features:
2
O@
-
AM/FM/WB/ RBDS
BluetoothAudio Streaming with ID tagging
USB input and control-for USB drives only
Auxiliary input
3.5" color TFT screen / Waterprooffaceplate
50W x 4 amplifier / 2 ohm stable
Wired remote option
U.S., European and Japan tuning
Charging through USB
3 pair
of
RCAoutput including subwoofer output
Video input

Installation
A mounting gasket has been added inside the package for convenience. Trace along
the outside edge
of
the gasket thus revealing your cutout.
Mounting Illustration
1.
Avoid installing stereo
below
cupholders!
Make
sure mounting
substrate is flat to avoid
flexing
of
the plastic.
2.
Use
the
back
bracket and
studs
to
affix
the
unit. Install
the
U bracket
behind
the
unit,
using
two
nuts
per
bolt
for
ultra
hold
.
3. To avoid possible
water
ingress into
wire
harness
area, route
the
harness in
the
downward
direction
as
shown
above
.
NO.
PART
DESCRIPTION
1
RADIO
2
MOUNTING
PLATE
3
MOUNTING
STUDS
4
JAMB
NUTS
5
MOUNTING
BRACKET
6
SPRING
WASHER
7
OUTER
NUTS
Instructions:
1. Install
jamb
nuts (
4)
loosely
on
mounting
studs (3), so
they
will
not
touch mounting
brackets (5)
when
installed.
2. Slip mounting bracket (5)
on
and
make
flush
with
mounting surface (2).
DO
NOT
TIGHTEN
3.
Snug
spring
washer
(6)
and
outer nuts (7)
against mounting plate (2).
DO
NOT
TIGHTEN
4.
Positionjamb
nuts (4) approximately
1/
16"
from mounting bracket.
5. Tighten outer
nut
s (7) completely.
3

Wire Configuration
6PREMOTE
CONTROL
(ANT
JACK)
C=:J•f--_J
(REAR
CAMERA
DET)
__
PI_NK
___
~
12P
CONNECTOR
(REM)
---=;a--_B_L_U_E__,
(ACC)
RED
(GROUND)-----=BL=A=C~K'--'
WHITE
GRAY
( FRONT LEFT )
WHITE/BLACK
GRAY/BLACK
GREEN
VIOLET
( REAR LEFT)
GREEN/BLACK
VIOLET/BLACK
NOTE:
RED
(FRONT
LINE
OUT)
WHITE
RED
(REAR
LINE
OUT)
WHITE
RED
· '
(AUX)
WHITE
(REAR
CAMERA)
(USB)
RED
(SUBWOOFER)
WHITE
(FRONT
RIGHT
) .
(
REAR
RIGHT
)
1.
When
wiring, the
red
lead is
recommended
to be wired
to
ACC/ignition
power
lead.
2.
Make
sure
that
the black
wire
on
the
wiring harness is connected
to
a
good
ground point
on
the
boat.
If
the chassis
of
th
e boat is
used
as a ground point,
make
sure
that
the surface
is scraped clean
of
paint before attaching
the
wire
to
it. It is recommended
to
connect
the
black
ground wire directly to negative terminal (-)
of
the
boat
battery.
3.
Before
wiring
your
system
, disconnect
your
boat battery's
positive(
+) cable.
Thi
s helps
prevent
damage
in
case
of
ashort.
4

General Function
of
Buttons
/ '
t\o
lnflrity
0
Bluetoottr
PRV-315.2
1
--
1-s~c I ~ ·
..
....
....
2 E
~
...
... ...
....
'
.....
..
.....
r-@
\
I
~
~
0
~
(v~w]
E
'-
_/'
'-
: : i
@ ® !
® ®
1. POWER, SRC button
-With unit
off
, press
to
power
the unit
on
.
-With the unit on, press and
hold
for
over
3s
to
power
the unit off.
-Press SRC button to switch modes amongstAM/FM/WB/Bluetooth/USB/
AUX
.
2.
MENU
button
-
In
any
source playing, short press to display sub-menu
of
current source.
-
In
any source playing, press
and
hold
for
2s
to
enter Settings.
3. Tune Up/Down button
-
In
Radio (FM/AM/WB) mode playing, short press to select the previous
or
next
station.
-
In
USB/BT
Music source playing, shortpress to select the previous
or
next
track.
-
In
USB source playing, press
and
hold
to
go
fast forward
or
rewind.
4. Return button
-
In
any status, press to return to previous screen.
5. Pause, Mute button
-
In
Radio,
AUX
source, press to
MUTE
sound output, press again to resume sound output.
-
In
USB
,
BT
Music source playing, press to PAUSE
playback,
press again to resume
playback.
6. VOLKnob, Selection/Enter button
-
At
source playing status, turn the
knob
to increase
or
decrease volume level.
-
In
selection status, turn it to scroll move highlight upward/over,
and
press
it
to confirm
selection.
7. P.List button
-
In
Radio source, press to enterGlobal Preset List.
-
In
USB
source, press to enter file/folder list.
8. VIEW button
-
In
any
source, press to activate
Rear
Camera
display, press
it
again to exit
Camera
view.
5
Sign
Up
Display &Home Menu
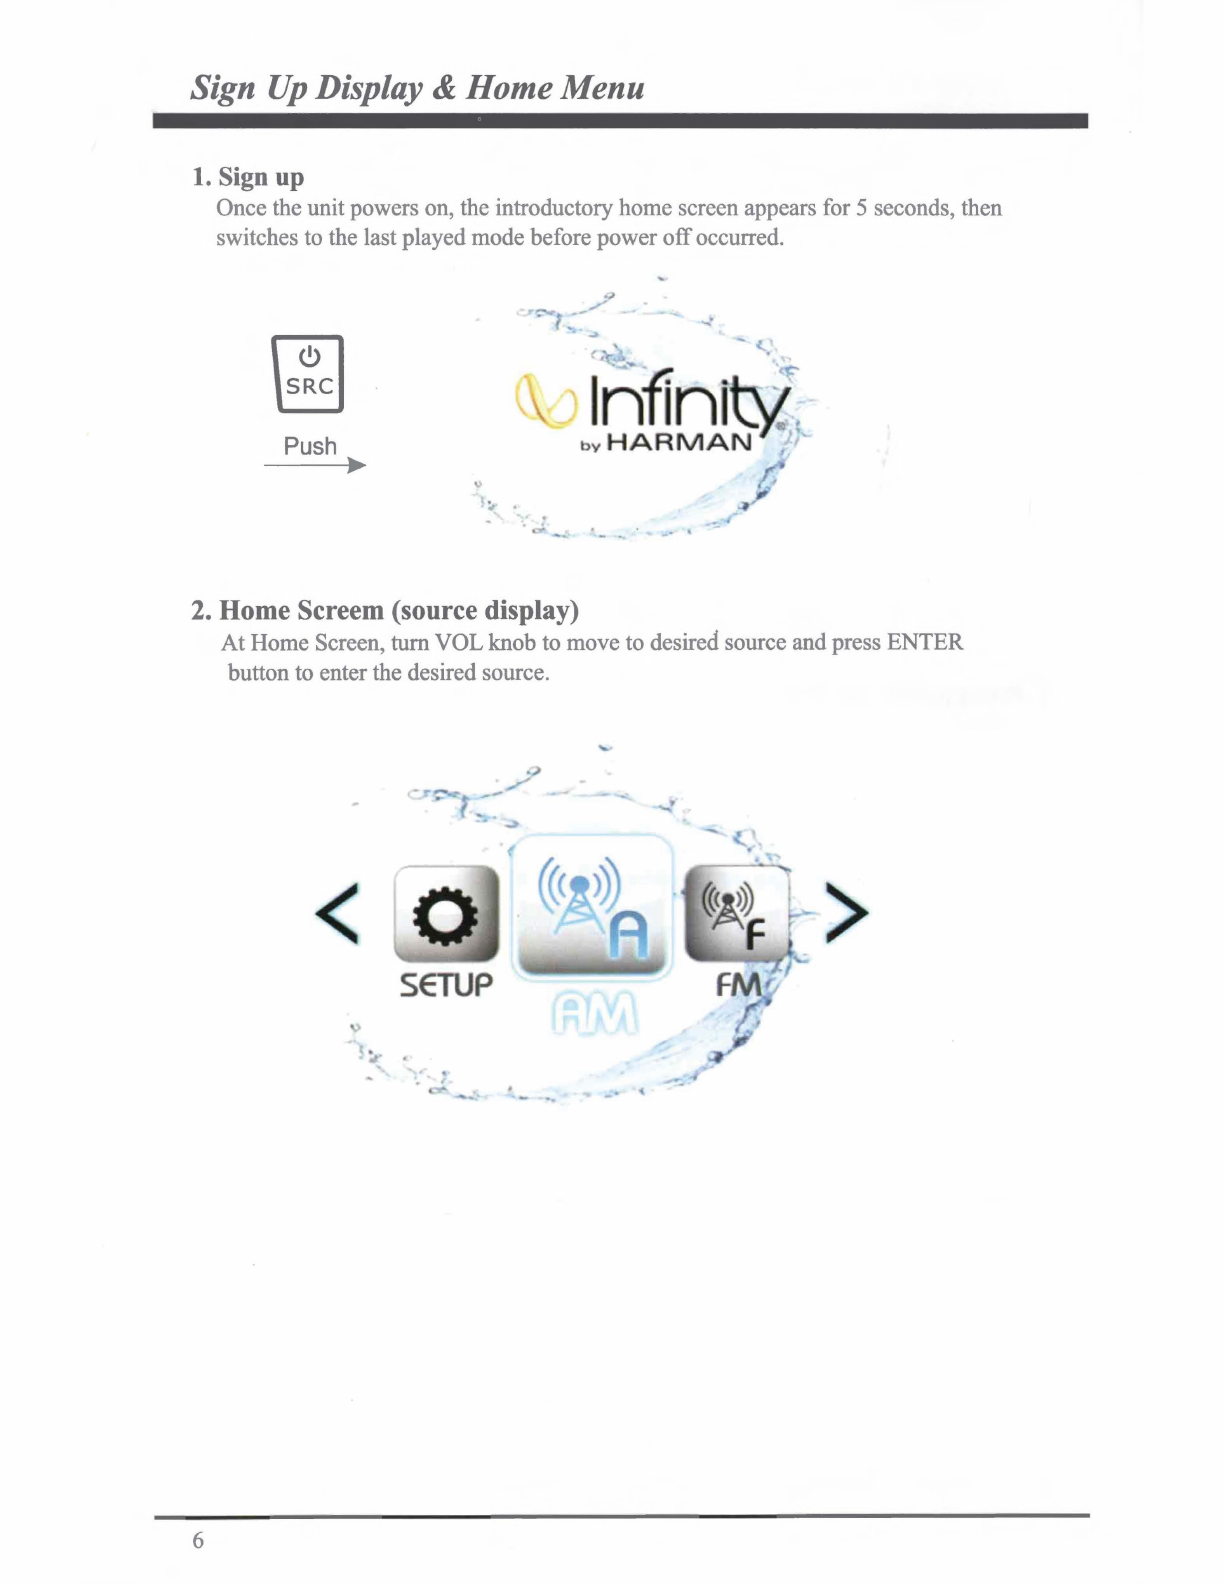
1. Sign up
Once the unit powers on, the introductory home screen appears for 5 seconds, then
switches to the last played mode before power
off
occurred.
m
~
Push
►
2. Home Screem (source display)
6
At
Home Screen,
tum
VOL knob to move to desired source and press ENTER
button to enter the desired source.
< 0 >
SETUP

General Operations
' - -
------
--
1.
VOLUME Control
In any source playing status,
tum
VOL knob to
adjust volume level.
2. MUTE Control
In Radio orAUX mode, press MUTE button to mute
sound output; press again to resume sound output.
3. SETUP
At Home Screen,
tum
VOL knob and press it to enter
SETUP, then tum VOL knob to move amongstAudio,
System, Bluetooth, About. Press the knob at desired
feature and tum the knob again to adjust the level.
Press the knob again to exit current feature adjustment.
Note:
Ifno
operation occurs, it will revert back to source
playing screen after 5s.
You can also enter Setup by pressing and hold
MENU button at any status.
3-1. Audio Settings
At
Audio Settings, tum VOL knob and press it to select
the sub-item what you desired to adjust, then tumVOL
knob to adjust the level, and press VOL knob again to
exit current item adjustment. Then you can repeat above
operations to adjust other items to desired value.
-BASS: Minimum -7 to maximum +7.
-MIDDLE: Minimum -7 to maximum +
7.
-TREBLE: Minimum -7 to maximum +
7.
-
BALANCE:
LIO (full left) to RIO (full right).
-FADER:
Fl0
(full front) to RIO (full rear).
-PRESET EQ: OFF, JAZZ, POP, CLASSIC, ROCK, VOCAL.
-LOUDNESS: OFF, ON
-SUBWOOFER GAIN: Minimum Oto maximum
15.
-a
x
~ -
Setup
AUDIO
SYSTEM
BLUETOOTH
ABOUT
Audio
Settings
BASS
MIDDLE
TREBLE
BALANCE
FADER
PRESET
EQ
Audio
Settings
LOUDNESS
SUBWOOFER
GAIN
7

GeneralSettings
3-2. System Settings Setup
AUDIO
At
System Settings, turn VOL knob and press it to select
the sub-item what you desired to adjust, then turn
VOL
knob to adjust the level, and press VOL knob again to
exit current item adjustment. Then you can repeat above
operations to adjust other items to desired value.
-BRIGHTNESS: This feature controls the brightness
of
the display panel. It is adjustable from Oto 7.
-I-VOL: This feature controls the initial volume level
of
next power on.
-BEEP: This feature controls the beep sound when button
was pressed. With beep 2nd selected,
you
will hear a beep
sound when the button was pressed over 2s; With beep on
selected,
you
will hear a beep sound when any button was
pressed; With beep
off
selected, no beep sound will
be
heard.
SYSTEM
BLUETOOTH
ABOUT
System
Settings
BRIGHTNESS
I-VOL
BEEP
REGION
FACTORY
RESET
-REGION: The Tuner Region is optional for EURO, USA, JAPAN.
(Note: with wrong Region selected, the tuner reception might be affected.)
-FACTORY RESET: The unit works like a computer, sometimes might happen malfunction.
If
encountered such condition, operate Factory Reset could make it recover once again.
(Note: once Factory Reset carried out, the memory settings will be cleared,
you
will need
to setup the features and Global Presets once again.)
3-3. Bluetooth Settings Bluetooth Settings
AUTO
CONNECTION
DEVICE
NAME
At
Bluetooth Settings,
tum
VOLknob and press it to
select the sub-item what you desired to adjust, then
tum
VOL
knob to adjust the level, and press VOL
knob again to exit current item adjustment.
-Auto
Connection: With
ON
selected, it will try to connect with the last paired
BT
device
once Bluetooth source selected.
-Device Name: PRV315.2 will show once you
tum
VOL knob to Device Name highlighted.
3-4. About
Press
VOL
knob at About highlighted to show the firmware information
of
the product.
8

Radio Section Operation
1.
To
Select Radio mode
At Home Screen, tum VOL knob and press it to selectAM,
FM
or
WB
source. (The bigger
popup icon refers to the source changing.)
Or simply repeat press
SRC
button
to
select the desired source.
2. Radio Screen Description
Displays
EURO,
USA
or
JAPAN
to
indicate
the Region selected in
the
Settings.
Displays FM,AM,WB.
Only
shows
when
the
station
is
a
Stereo Channel.
Refers Manual or
Auto
Tune
status.
>
Only displays when
EQ
/
LOUD
ON
was
selected
in
the
Settings.
--.+
---+-
--1
Frequency Mark
Only displays when
the
station
is
a preset station
9
Radio Section Operation
3. Auto Tuning
In
AM,
FM, WB playing mode, press Tune up
or
down button to activate auto tune.
This results
in
automatically stopping at next station
of
sufficient signal strength.
4. Manual Tuning
InAM, FM, WB playing mode, long press Tune
up
or
down button for 2s. This will activate
manual tune with MANUAL display
on
the top area. Then repeatedly press Tune up
or
down
button to tune frequency
by
steps.
Note: Radio will revert back to AUTO tune mode after 5s without operation.
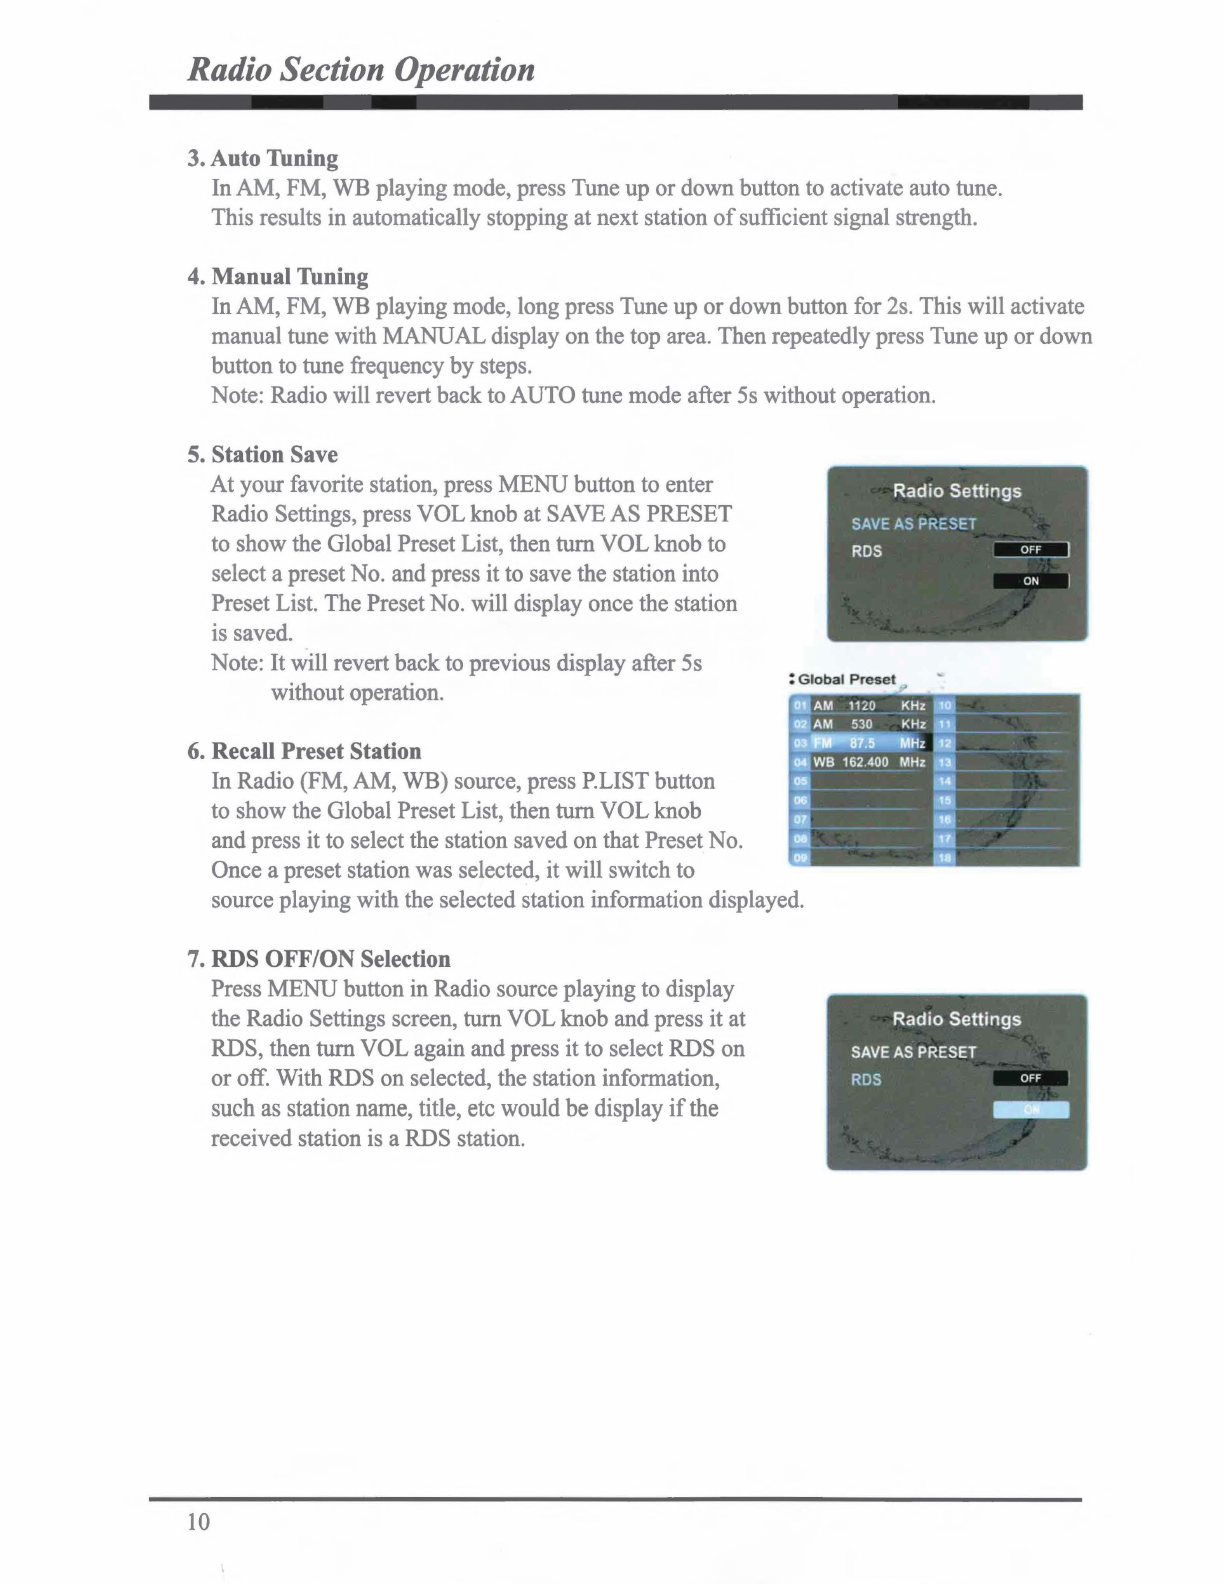
5. Station Save
At
your favorite station, press
MENU
button to enter
Radio Settings, press
VOL
knob at SAVE AS PRESET
to show the Global Preset List, then
tum
VOL
knob to
select a presetNo. and press it to save the station into
Preset List. The Preset No. will display once the station
is saved.
Note: It will revert back to previous display after 5s
without operation.
6. Recall Preset Station
In Radio (FM, AM, WB) source, press P.LIST button
to show the Global Preset List, then
tum
VOL
knob
and press it to select the station saved
on
that Preset No.
Once a preset station was selected, it will switch to
: Global
Preset
AM 1120 _
J(Hz
0
AM
530 KHz
-~
---
Hz
WB 162.400 MHz
-.!--
--
source playing with the selected station information displayed.
7. RDS OFF/ON Selection
10
Press
MENU
button in Radio source playing to display
the Radio Settings screen,
tum
VOL
knob and press it at
RDS, then tum VOL again and press
it
to select RDS
on
or
off. With RDS on selected, the station information,
such
as
station
name,
title,
etc
would
be
display
if
the
received station is a RDS station.
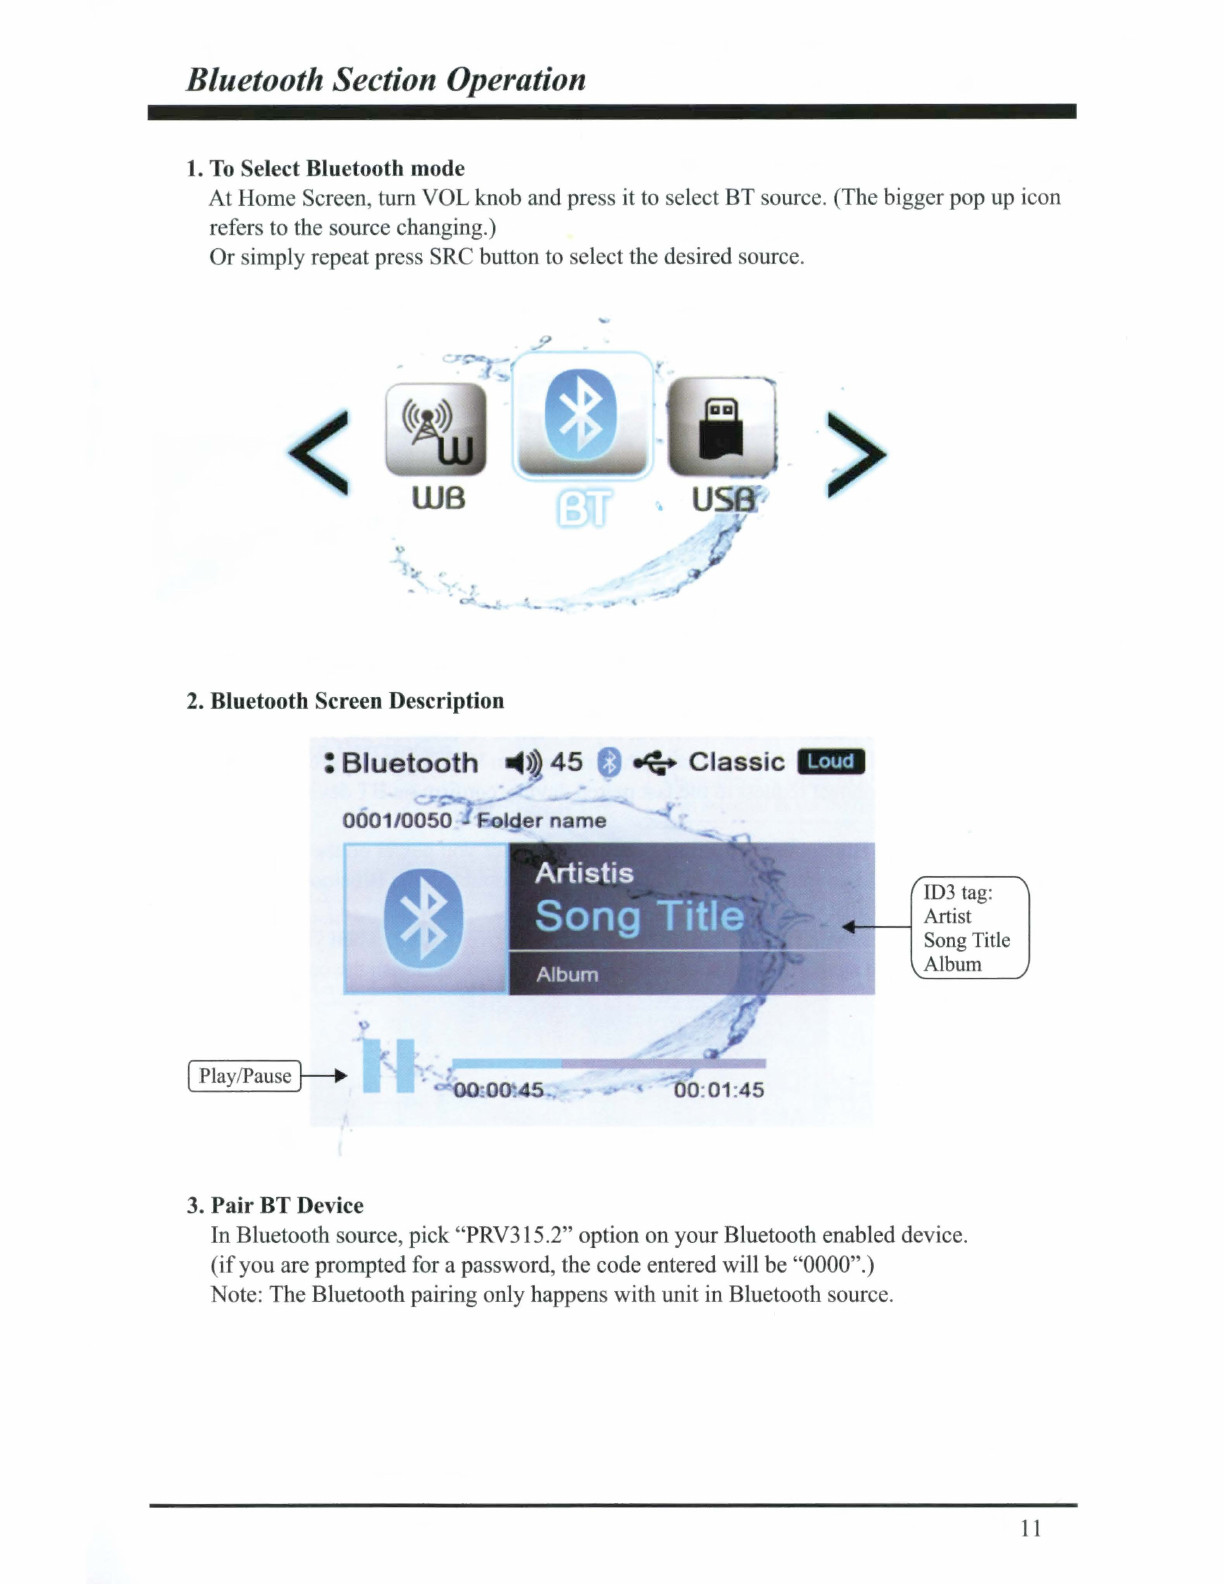
Bluetooth Section Operation
1. To Select Bluetooth
mode
At
Home Screen, turn VOL knob and press it to select BT source. (The bigger pop up icon
refers to the source changing.)
Or
imply repeat press SRC button to elect the desired source.
WB >
2. Bluetooth Screen Description
• Bluetoo h >
45
+ Classic
13•
1
•1
•4
ID3 tag:
-
--
Artist
Song Title
Album
:
0045
3.
Pair
BT
Device
In Bluetooth source, pick "PRV315.2" option on your Bluetooth enabled device.
(if
you are prompted for a password, the code entered will
be
"0000".)
Note: The Bluetooth pairing only happens with unit in Bluetooth source.
11

Bluetooth Section Operation
4. Play/Pause Play
Once the
BT
device being paired is successful, music will begin to play.
Note: For some Bluetooth enabled phones, you may need to activate play from your
phone first.
It
depends on the phone itself.
While BT Music is playing, press the PAUSE button to pause the playback, and press it
again to resume playback.
Note:
11
refers to PLAY;
►
refers to PAUSE.
5. Disconnect
In
BT
Music playing mode, in order to disconnect the BT
device, press MENU to dis
pla
y Bluetooth Settings,
tum
VOL
knob and press it at Disconnect.
Note: When your BT device battery is at low charge, the
Bluetooth connection may occasionally be lost.
To maintain good connectivity ensure that your BT
device battery is adequately charged.
6. Connect
With
BT
device paired but disconnected,
if
you want to re-establish the BT connection,
simply press MENU to display Bluetooth Settings, tum VOL knob and press it at Connect.
It
will send a connect request to the last paired device, confirm on BT device to establish
BT connection.
Note: With the Bluetooth connection disconnected, once you power on the unit next time,
you should go into Bluetooth mode, then it will establish the Bluetooth connection
automatically.
12
Sometimes, with Bluetooth Source not in use for over 1 hour, when you switch to
BT
Source again, it might take sometime (5~10s to re-establish the connection
by
itself).
USB Section Operation
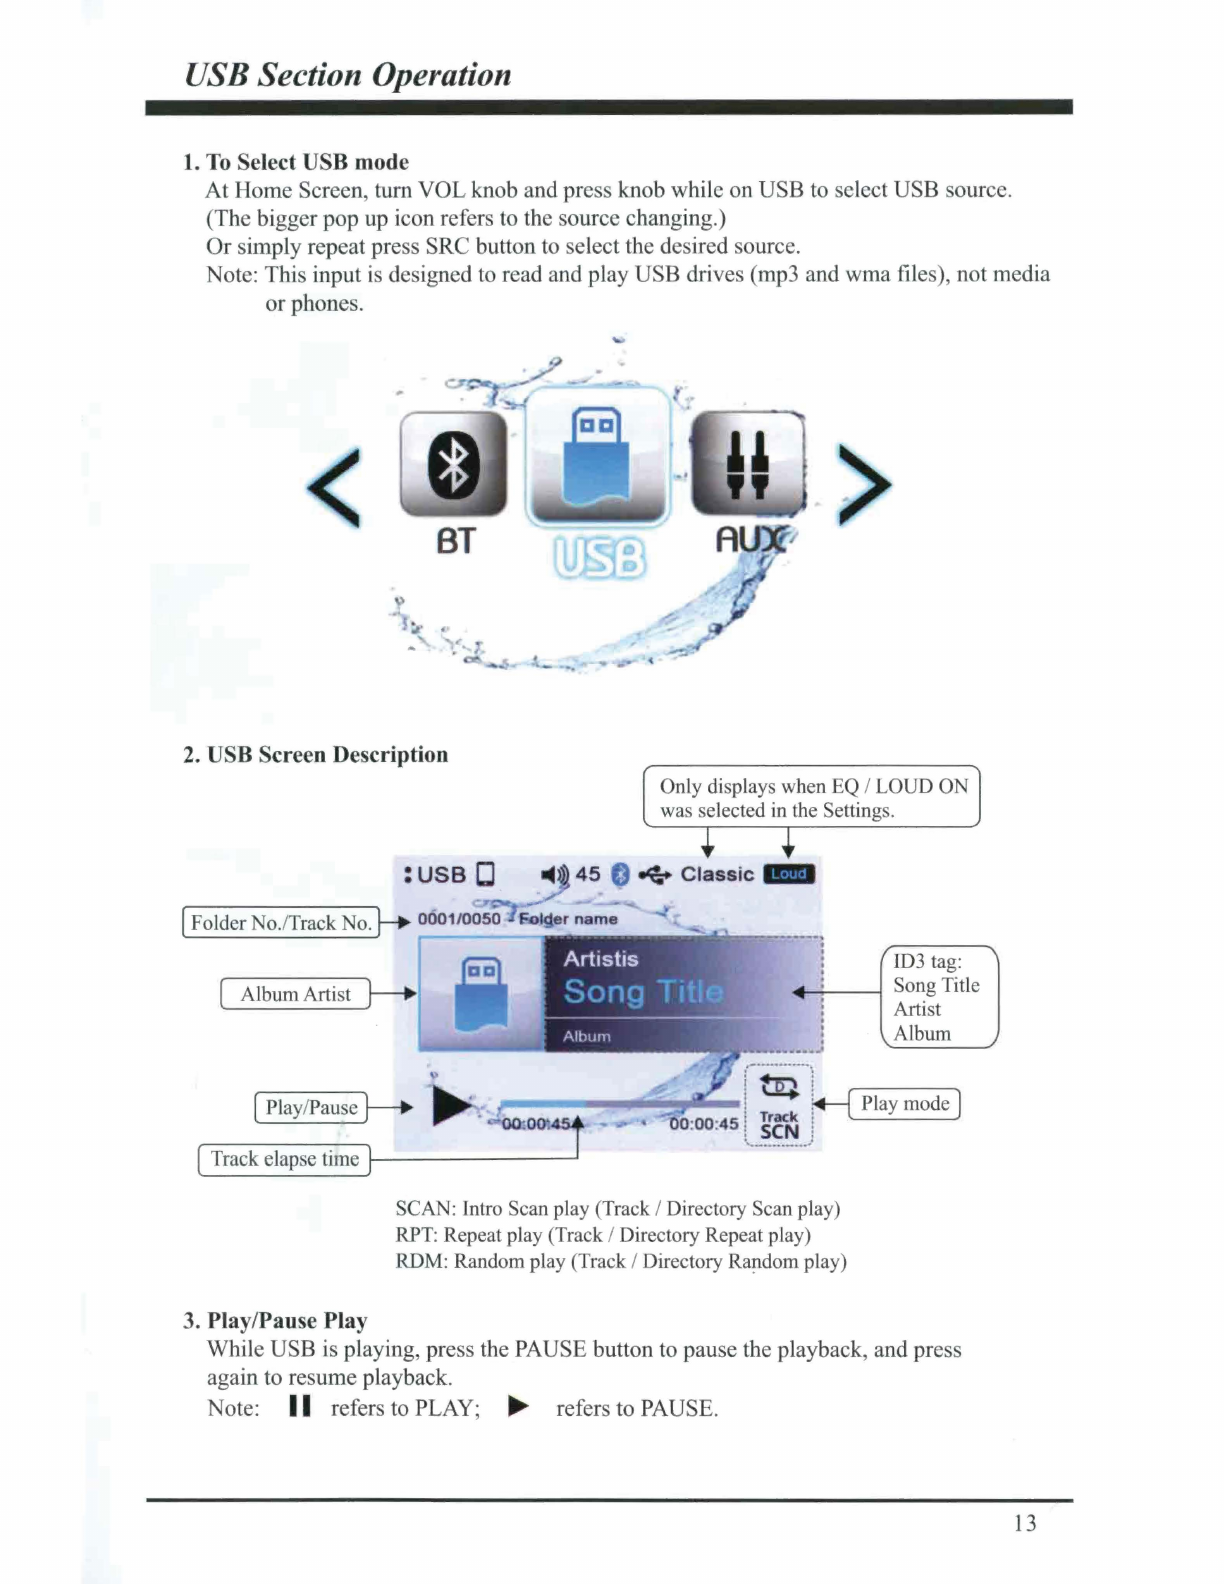
1. To Select USB mode
At
Home Screen, tum VOL knob and press knob while on USB to select USB source.
(The bigger pop up icon refers to the source changing.)
Or
simply repeat press SRC button to elect the desired source.
Note: This input
is
designed to read and play USB drives (mp3 and wma files), not media
or
phones.
< >
2. USB Screen
De
scription
IFolder
Album Artist
Play/Pause
Only display when EQ / LOUD ON
was selected in the Setting .
ID3 tag:
-
-----1
Song Title
Artist
Album
Play mode
[
Track
elap
e
time
]1------
- -
SCAN: Intro Scan play (Track / Directory Scan play)
RPT: Repeat play (Track / Directory Repeat play)
RDM: Random play (Track / Directory Rap.dom play)
3. Play/Pause Play
While USB is playing, press the PAUSE button to pause the playback, and press
again to resume playback.
Note:
11
refers to PLAY;
►
refers to PAUSE.
13
USB Section Operation
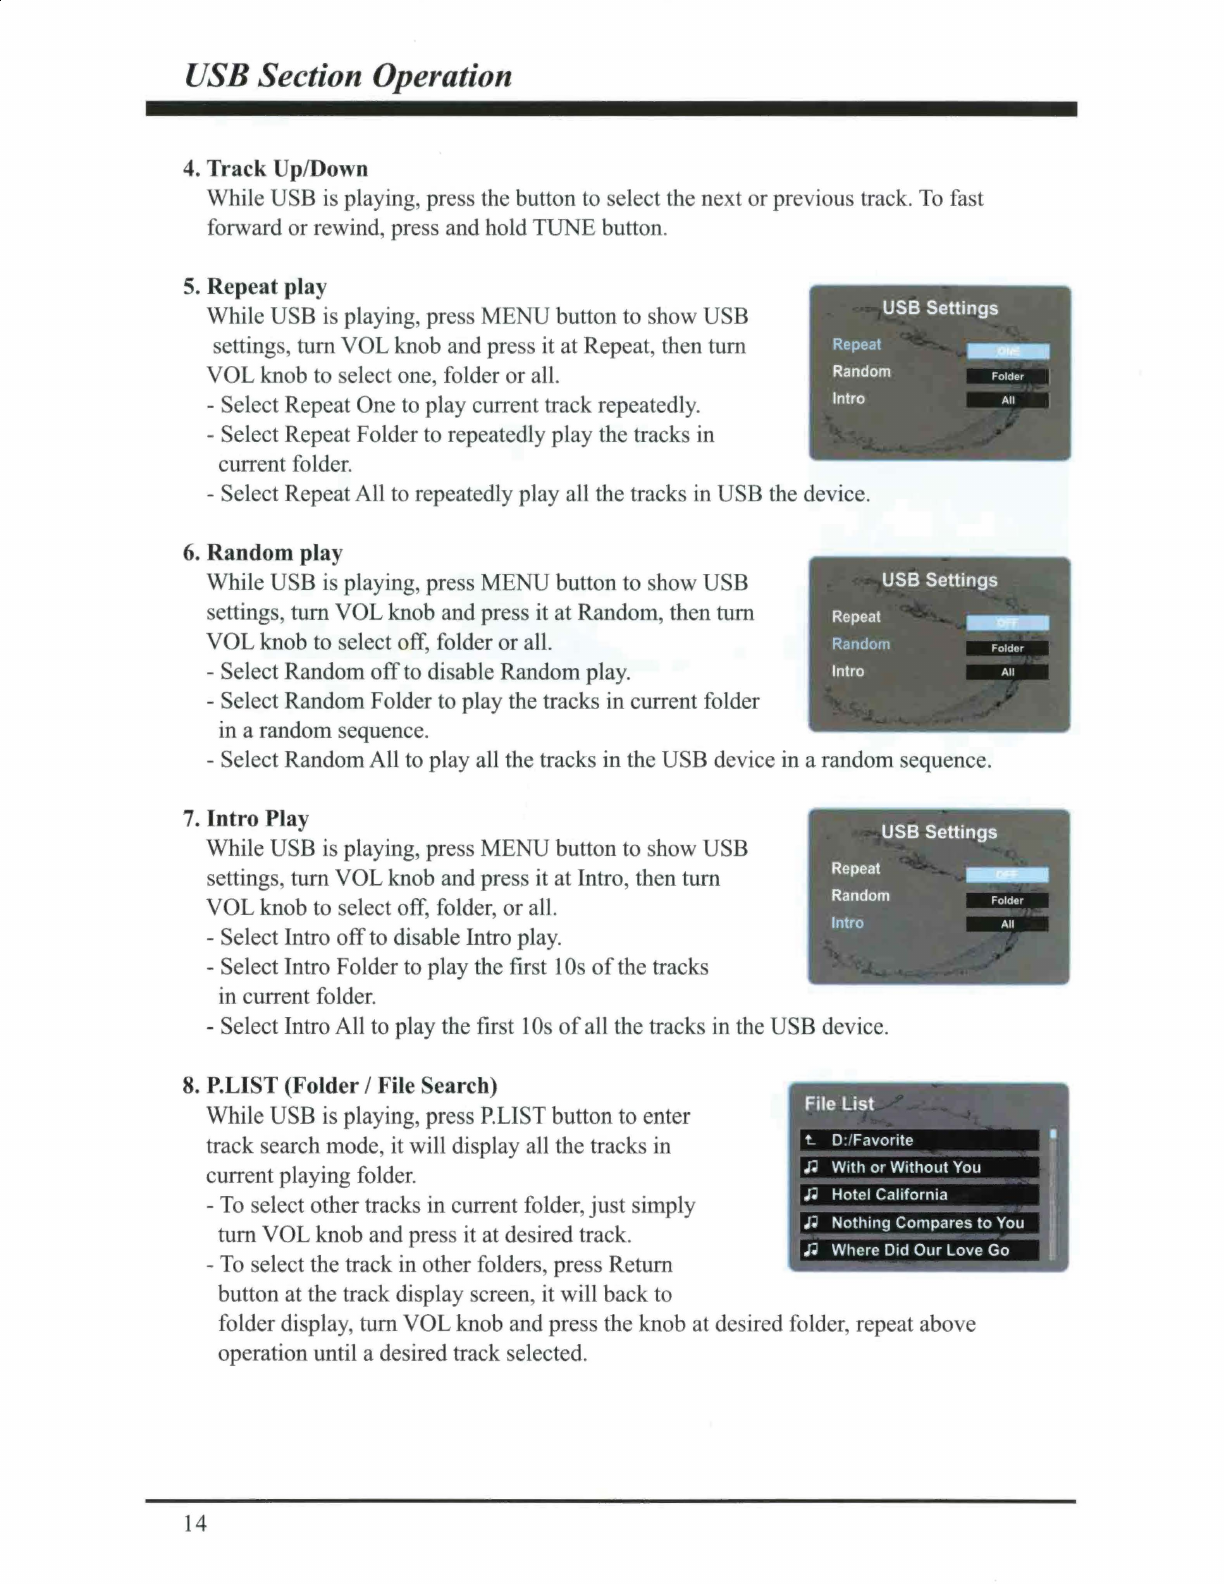
4. Track Up/Down
While USB is playing, press the button to select the next or previous track.
To
fast
forward or rewind, press and hold TUNE button.
5. Repeat play
While USB is playing, press MENU button to show USB USB Settings
setting ,
tum
VOL knob and pre s it at Repeat, then
tum
VOL knob to elect one, folder or all.
-Select Repeat One to play current track repeatedly.
-Select Repeat Folder to repeatedly play the tracks in
current folder.
Repeat
Random
Intro
-Select RepeatAll to repeatedly play all the tracks in USB the device.
6. Random play
Folder
While USB is playing, press MENU button to show USB
settings,
tum
VOLknob and press it at Random, then
tum
VOL knob to select off, folder or all.
USB Settings
-Select Random
off
to di able Random play.
-Select Random Folder to play the tracks in current folder
in a random sequence.
Repeat
Random
In
tr
o
-Select RandomAll to play all the tracks in the USB device in a random sequence.
Folder
7. Intro Play
While USB is playing, press MENU button to show USB
settings,
tum
VOL knob and press it at Intro, then
tum
VOL knob to select off, folder, or all.
USB Settings
-Select Intro
off
to disable Intro play.
-Select Intro Folder to play the first I
Os
of
the tracks
in current folder.
Repeat
Random
Intro
-Select Intro All to play the first 1
Os
of
all the tracks in the USB device.
8. P.LIST (Folder / File Search)
While USB is playing, press P.LIST button to enter
track search mode, it will display all the tracks in
current playing folder.
File
List
t.. 0:/Favorite
n With
or
Without
You
J;i
Hotel California
Folder
-
To
select other tracks in current folder,
just
simply
tum
VOL knob and press it at desired track.
-To select the track in other folders, press Return
button at the track display screen, it will back to
.I~
Nothing
Compares
to
You
n Where Did
Our
Love Go
14
folder display, tum VOL knob and press the knob at desired folder, repeat above
operation until a desired track selected.

AUX
Section Operation
1.
To
Select
AUX
mode
At Home Menu, press TUNE Up orDown to move the highlight to AUX source, then
press ENTER button to go into the AUX mode. You can also press SRC button to
enterAUX mode.
Note: highlight movement indicated
by
the icon background change to light blue.
.
-.,
/
<USB
The use
of
auxiliary mode allows you to play
the portable music device through the
headphone jack.
Note: An additional accessory/adaptor must be
purchased in order for this to happen.
Prospec's part, SEAMINI2 or
SEAUSBMINI36 fulfills this option.
:
AUX
:,
>
◄
45
. 1--
~
Class
ic • •
15
Troubleshooting
*Note: In many respects, a stereo acts much like a computer and occasionally requires a
reboot. In the unlikely event
of
productmalfunction, a reset canusually fix the issue.
For
software reset operation, please refer to page
8.
Issue Cause Solution
No
power 1. Incorrect wiring
1.
Double check wiring
2. Fuse is blown 2. Replace fuse
3. Low battery voltage 3. Check voltage
of
vehicle battery
with multimeter. Voltage must
be
at least
11
V.
No
Sound
1.
Speaker connection
1.
Double check connections.
came loose
2. Bad speaker 2. Replace bad speakerwith known
good speaker and connect.
3. Output blown 3. Sendunit in for repair.
4. Volume too low
on
4. Increase volume
of
mediadevice
media device
No
Reception 1. Antenna not firmly
1.
Insert firmly
seated insocket
USB stick not 1. File must be a mp3 1. Convert format to mp3
or
mwa.
reading
orwma
file
While in Bluetooth mode:
No Connection
1.
You are not connected 1. Choose "PRV315.2"
to the "PRV315.2"
address
on
your
portable media
device.
2. Out
of
range 2. Bringportable media device closer
to the receiver. Device needs to
be
within
30'.
3.
The connection is 3. Ask the person who first paired to
already
in
use. drop out.
16

~
p
~
Prospec
Electronics
---
~
_- Sound Systems For The
Outdoor
Enthusiast
PROSPE C
This product
is
serviced exclusively by Prospec Electronics Inc. and must
be
returned to Prospec for
in
a
nd
out ofwarranty repairs.
It
can not
be
serviced
under warranty by other Infinity service centers.
For service contact
us
:
3325 South Morgans Point Road Mt Pleasant SC 29466
Tel
843-849-9037
Or visit: www.prospecelectronics.com
Table of contents
Popular Car Video System manuals by other brands


Alpine
Alpine XXL Premium X902D-ID installation manual

Pioneer
Pioneer AVH-P4900DVD - DVD Player With LCD Monitor installation manual

JVC
JVC KV-DV50 Installation & connection manual

Clarion
Clarion WXZ468RMP Installation/wire connection guide

Audiovox
Audiovox RVM35 Installation & user manual

Pyle
Pyle PLVIN56 instruction manual


