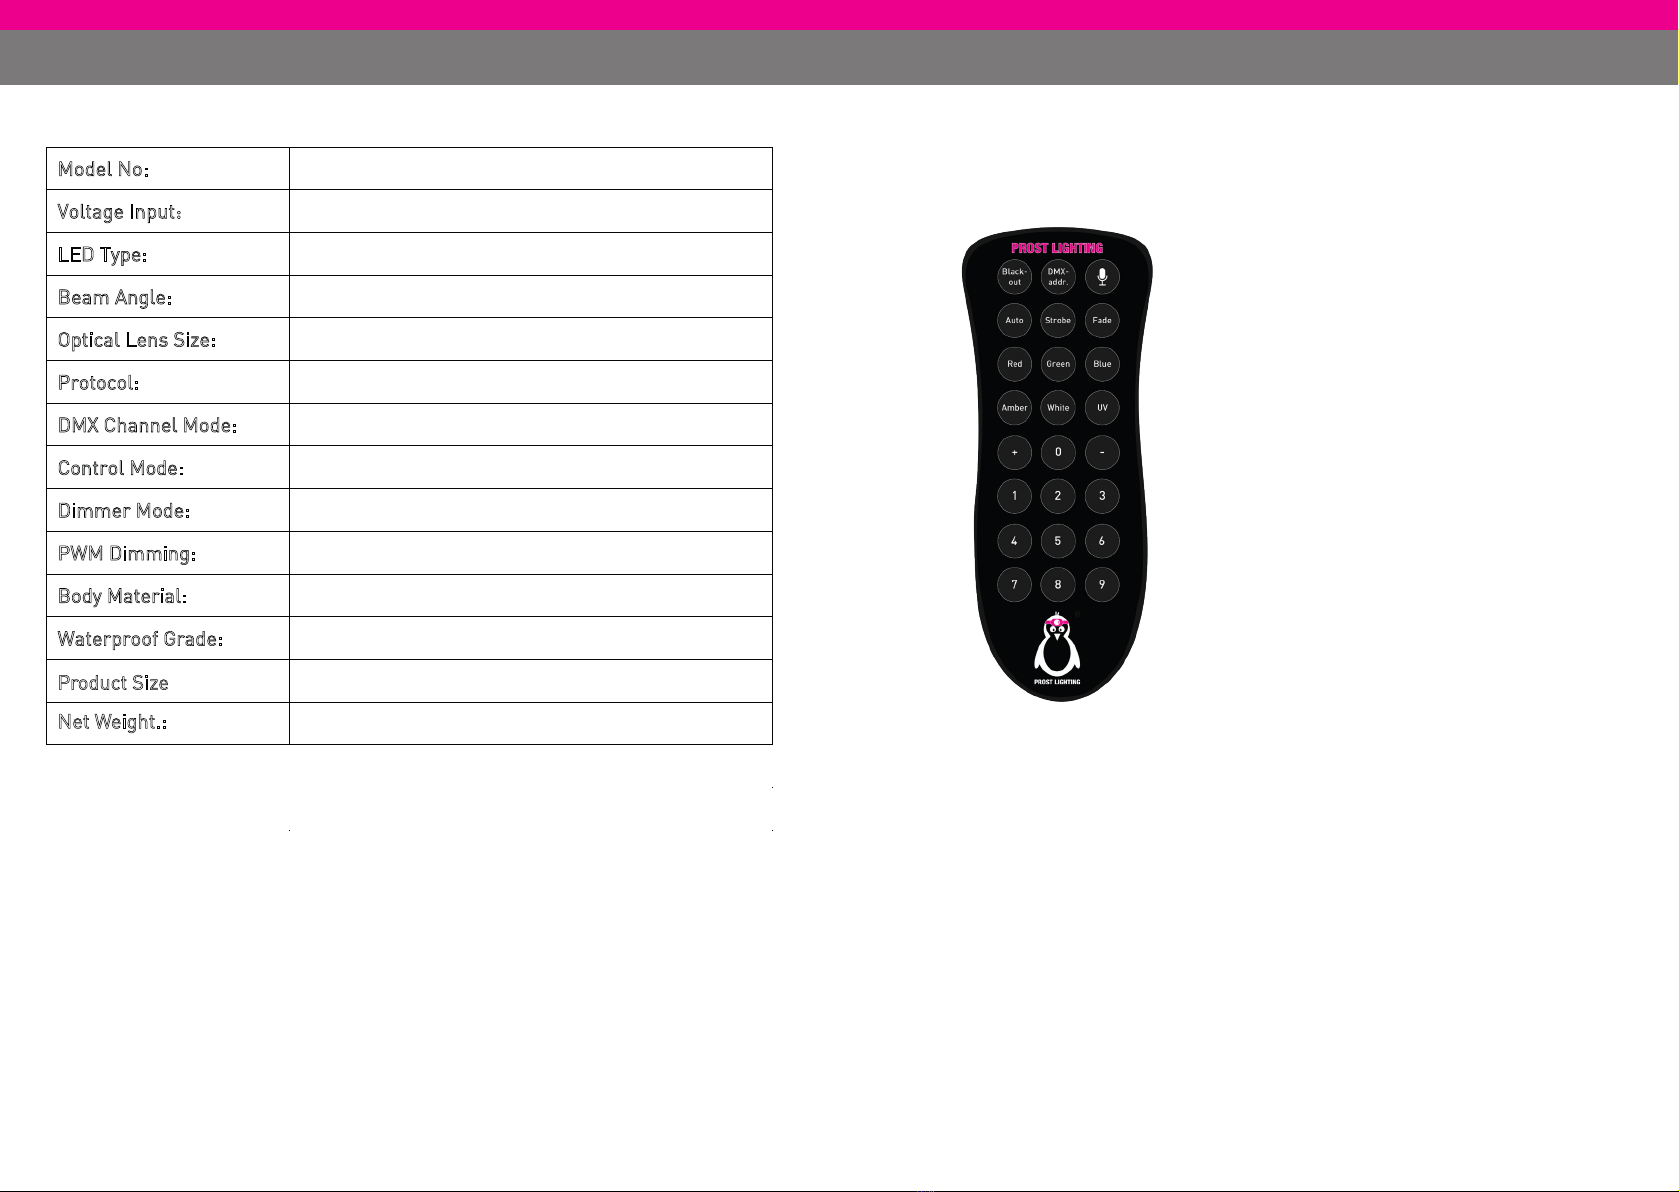
PROST LIGHTING UberPar User manual

UberPar
user manual
Item-No.: 1006
IP-1007
© Copyright 2018
keep this manual for future needs
reproduction prohibited
www.prostlighting.com
www.prostlighting.de

1
Safety Instruction 2
Operating Determination
Conformities
Tech Specification
Infrared Remote Control
DMX Channel Modes
Mode Explanation
Menu Panel
Menu Structure
3
Installation / Disposal
4
5
6
7
8
10
11
12
Check the latest version of this manual at
www.prostlighting.com
Table of Contents
12
Menu Structure
Address : 001-512 Address Setting
Channel : 11 4 Channel Modes of 3 / 6 / 8 / 11
Slave : Master / Slave Slave/Master
Auto : 10 Auto Chase Speed from 1 to 15
Fade : 10 Auto Fade Speed from 1 to 15
Color : 1 Preset Colors from 1 to 32
Sound : 10 Sound Active Sensitivity from 1 to 10
Red : 000 Red Dimmer from 000 to 255
Green : 000 Green Dimmer from 000 to 255
Blue : 000 Blue Dimmer from 000 to 255
Amber : 000 Amber Dimmer from 000 to 255
White : 000 White Dimmer from 000 to 255
UV : 000 UV Dimmer from 000 to 255
Strobe : 0 Strobe from 0 to 15
Dimmer : 2 4 Dimming Curves of 1 / 2 / 3 / 4
Screen : ON / 30”s Screen Protection UnCode: “Esc” or
“down”, ”up”,”down”,”up”,”enter”
Infrared : Enable / Disable Infrared Remote Control
TEMP: 36°C * Temperature / DMX Signal

This device has left our premises in absolutely perfect condition. In order
to maintain this condition and to ensure a safe operation, it is absolutely
necessary for the user to follow the safety instructions and warning
notes written in this user manual.
Damages caused by the disregard of this user manual are not subject to warranty.
The dealer will not accept liability for any resulting defects or problems.
If the device has been exposed to drastic temperature fluctuation (e.g. after
transportation), do not switch it on immediately. The arising condensation
water might damage your device. Leave the device switched off until it has
reached room temperature.
Should you notice any damages on the A/C connection cable or on the casing,
do not take the device into operation and immediately consult your local dealer.
This device falls under protection-class III. The power plug must only be
plugged into a protection class III outlet. The voltage and frequency must exactly
be the same as stated on the device. Wrong voltages or power outlets
can lead to the destruction of the device and to mortal electrical shock.
Always plug in the power plug last. The power plug must always be inserted
without force. Make sure that the plug is tightly connected with the outlet.
Never let the power-cord come into contact with other cables! Handle the
power-cord and all connections.
Never modify, bend, strain mechanically, put pressure on, pull or heat up
the power cord. Never operate next to sources of heat or cold. Disregard
can lead to power cord damages, fire or mortal electrical shock.
The cable insert or the female part in the device must never be strained.
There must always be sufficient cable to the device. Otherwise, the cable
may be damaged which may lead to mortal damage.
Make sure that the power-cord is never crimped or damaged by sharp
edges. Check the device and the power-cord from time to time.
If extension cords are used, make sure that the core diameter is sufficient
for the required power consumption of the device. All warnings concerning
the power cords are also valid for possible extension cords.
2
Safety Instructions
The Control Panel
11
Control Panel / Buttons
Adress : 001
Channel : 11CH
Slave : Master
Auto : 10
Fade : 10
Color : 1
Sound : 10
TEMP: 32°C *
ESC DOWN UP ENTER
ESC Is used to navigate to the previeous higher-level menu item.
Down Scrolls trough the menu items and numbers in descending order.
UP Scrolls trough the menu items and numbers in asscending order.
ENTER Is used to select and confirm/store the current selection.

Automatic Mode
Automatic Mode will enable you to run the automatic programs on the products
To turn on Automatic mode:
1. Press Auto on the IRC Remote
2. Press +or -to increase or decrease the speed of the program
Fade Mode
Fade Mode will enable you to run the automatic programs under Fade Mode.
To turn on Fade mode:
1. Press Fade on the IRC Remote
2. Press +or -to increase or decrease the Fade speed of the program
Manual Color Mixing Mode
To manually control the RGBAW+UV Color Mixing:
1. Press R, G, B, A, W, or UV to make color mixing.
Note: To use the amber, white, or UV color options,
the fixture must be capable of outstanding that corresponding color light.
2. Press +or -to increase or decrease the value of each color
Color Mode
Color Mode will enable you to choose 10 colors built-in.
1. Press any number between 0and 9to choose your color
2. 0is for red,
2 is for green,
3 is for blue,
4 is for amber,
5 is for white,
6 is for ultraviolet,
7is for yellow,
8is for purple,
9is for grass green
Strobe Mode
Strobe Mode will enable you to adjust the strobe rate of the color you choose.
To turn on Strobe mode:
1. Press Strobe on the IRC Remote
2. Press +or -to increase or decrease the Strobe Rate
3. Choose a color by Manual Color Mixing Mode
10
Mode Explanation
Always disconnect from the mains, when the device is not in use or before
cleaning it. Only handle the power-cord by the plug. Never pull out the plug
by tugging the power-cord. Otherwise, the cable or plug can be damaged
leading to mortal electrical shock. If the power plug or the power switch is
not accessible, the device must be disconnected via the mains.
If the power plug or the device is dusty, the device must be taken out of
operation, disconnected and then be cleaned with a dry cloth. Dust can reduce
the insulation which may lead to mortal electrical shock. More severe
dirt in and at the device should only be removed by a specialist.
There must never be any objects entering into the device. This is especially
valid for metal parts. If any metal parts like staples or coarse metal chips
enter into the device, the device must be taken out of operation and
disconnected immediately. Malfunction or short-circuits caused by metal
parts may cause mortal injuries.
Never look directly into the light source, as sensitive persons may suffer an
epileptic shock (especially meant for epileptics)!
Keep away children and amateurs!
OPERATING DETERMINATIONS
This device is designed for professional use, e.g. on stages, in discotheques,
theatres etc.
Lighting effects are not designed for permanent operation. Consistent
operation breaks will ensure that the device will serve you for a long time
without defects.
Do not shake the device. Avoid brute force when installing or operating the
device.
When choosing the installation-spot, please make sure that the device is
not exposed to extreme heat, moisture or dust. There should not be any
cables lying around. You endanger your own and the safety of others!
This device must never be operated or stockpiled in sourroundings where
splash water, rain, moisture or fog may harm the device. Moisture or
very high humidity can reduce the insulation and lead to mortal electrical
shocks. When using smoke machines, make sure that the device is never
exposed to the direct smoke jet and is installed in a distance of 0.5 meters
between smoke machine and device. The room must only be saturated with
an amount of smoke that the visibility will always be more than 10 meters.
The ambient temperature must always be between -5° C and +45° C. Keep
away from direct insulation (particularly in cars) and heaters.
Never use the device during thunderstorms. Over voltage could destroy the
device. Always disconnect the device during thunderstorms. 3
Safety Instructions / Operating Determinations

4
The device can be installed on the ground or on the wall or ceiling.
Please consider the EN 60598-2-17 and the respective national standards
during the Installation! The installation must only be carried out by an
authorized dealer!
The operator has to make sure that safety-relating and machine-technical
installations are approved by an expert before taking into operation for the
first time and after changes before taking into operation another time.
IMPORTANT! OVERHEAD RIGGING REQUIRES EXTENSIVE EXPERIENCE,
including (but not limited to) calculating working load limits, installation
material being used, and periodic safety inspection of all installation
material and the projector. If you lack these qualifications, do not attempt
the installation yourself, but instead use a professional structural rigger.
Improper installation can result in bodily injury and.or damage to property.
Before rigging make sure that the installation area can hold a minimum
point load of 10 times the projector‘s Weight.
Mount the projector with the mounting-bracket to your trussing system
using an appropriate clamp.
For overhead use, always install an appropriate safety bond.
You must only use safety bonds complying with DIN 56927, quick links
complying with DIN 56926, shackles complying with DIN EN 1677-1 and
BGV C1 carbines. The safety bonds, quick links, shackles and the carbines
must be sufficiently dimensioned and used correctly in accordance with the
latest industrial safety regulations (e. g. BGV C1, BGI 810-3).
Installation / Disposal
DISPOSAL
If the device is to be put out of operation definitively, take it to a local
recycling plant for a disposal which is not harmful to the environment.
Never throw exhausted batteries or defective rechargeable batteries into
the household rubbish: Always take them to a special waste disposal
(e. g. collecting container at your retailer).
9
DMX Channel Modes
2. Standard Mode
8
Channel
Ch1 000-255 Master Dimmer
Ch2
000-255
Red
Ch3 000-255 Green
Ch4 000-255 Blue
Ch5 000-255 Amber
Ch6 000-255 White
Ch7
000-255
UV
Ch8 000-255 Strobe
6
Channel
Ch1
000-255
Red
Ch2 000-255 Green
Ch3 000-255 Blue
Ch4 000-255 Amber
Ch5 000-255 White
Ch6 000-255 UV
3
Channel
Ch1 000-255 Hue
Ch2 000-255 Saturation
Ch3
000-255
Value
3. Color Mode
3. Minimalistic Mode

Model No: UberPar
Voltage Input:100-240V AC, 50/60Hz
LED Type: 12 x 18W RGBWAUV
Beam Angle: 25 °
Optical Lens Size: 29mm
Protocol: DMX-512
DMX Channel Mode: 3/6/8/11 CH
Control Mode: DMX-512, Standalone, Master/slave, Sound Active
Dimmer Mode: 4 Smooth Dimming Curves
PWM Dimming: 16bit PWM Dimming at 5200HZ
Body Material: Aluminum Die-casting
Waterproof Grade:
NON-IP VERSION: Item No. 1006
IP VERSION: Item No. 1007
Product Size
215x215x120mm
Net Weight.:
4.5Kgs
6
Tech Specification
7
Infrared Remote Control
Note: Make sure to point the IRC Remote
directly at the receiver on the product.
Address Mode
Sound-Active Mode will enable
the product to respond to the music.
To turn on Sound-Active mode:
1. Press Sound on the IRC Remote
2. Press + or -to increase or
decrease sound sensitivity
Address Mode will enable you
to set up the new DMX Address.
To set up a new DMX address:
1. Press Addr on the IRC Remote
2. Press +or -to increase or
decrease the DMX Address Value
Sound-Active Mode

8
DMX Channel Modes
1. Extended Mode
11
Channel
Ch1 000-255 Master Dimmer
Ch2 000-255 Red
Ch3 000-255 Green
Ch4 000-255 Blue
Ch5 000-255 Amber
Ch6 000-255 White
Ch7 000-255 UV
Ch8 000-255 Strobe
Ch9
000-015
016-095
096-175
176-255
None
Auto Mode
Fade Mode
Sound Active
Ch10 0 255 Speed for Ch9
Ch11
000-005
006-065
066-125
126-185
186-255
Menu Default
Linear Dimmer Mode
Curve Dimmer Mode
Theatre Dimmer Mode
Studio Dimmer Mode
5
CONFORMITIES
Conformities
This manual suits for next models
1
Table of contents