Prostor P6 User manual

Félicitations avec votre achat d'un produit de qualité Prostor. Nous avons apporté tous nos soins
à la fabrication de ce parasol qui a passé avec succès tout les contrôles de qualité et a reçu un
numéro de série, figurant à la page 16. Lisez les instructions attentivement et conservez les
pour l’avenir. Ce manuel contient des informations importantes pour l’installation, l’utilisation et
l’entretien de votre parasol PROSTOR.
FR
Congratulations, you are the owner of a Prostor quality product. Your parasol has been produced
with the greatest care, meets the strictest quality standards and has been given a serial number,
which you can find at page 16. This manual contains important information for a correct installation,
a correct use and the maintenance of your PROSTOR umbrella. Read this manual attentively and
keep it for future use.
EN
Gefeliciteerd, u bent de eigenaar van een Prostor kwaliteitsproduct. Uw product is met de meeste
zorg gefabriceerd en heeft de eindcontrole doorstaan en een serienummer gekregen, op pagina
16 terug te vinden. Deze handleiding en garantievoorschriften bevatten belangrijke informatie voor
de correcte installatie, het correct gebruik en onderhoud van uw PROSTOR parasol. Lees deze
aandachtig en bewaar deze voor in de toekomst.
NL
-1-
Herzlichen Glückwunsch, Sie sind der Besitzer eines hochwertiges Prostor Produkts. Ihr Son-
nenschirm wurde mit größter Sorgfalt produziert und erfüllt die strengsten Qualitätsstandards. Der
Schirm wurde mit einer Seriennummer ausgestattet. Diese finden Sie auf Seite 16. Dieses Hand-
buch enthält wichtige Informationen für eine korrekte Installation, die richtige Verwendung und die
Wartung Ihres PROSTOR Sonnenschirmes. Lesen Sie dieses Handbuch aufmerksam und heben
Sie es auf.
DE
Handleiding - garantie
Anleitung - Garantie
Manuel - garantie
Manual - warranty
-2-
-3-

1.1. Bevestiging met Tegelvoet
1: Bevestig de 4 stelvoetjes aan de hoeken.■
2: Schroef de 'Pole Support' op de tegelvoet (sleutel■
13/inbussleutel 5).
3: Plaats de draaibare schijf (enkel voor P7 model).■
4: Plaats minimum 4 tegels van 50x50x5cm (100x100■
voet) of 8 tegels van 40x40x4cm (90x90 voet).
5: Plaats de Inox of Aluminium Cover (optioneel).■
6: Plaats plastiekkapje over de 'Pole Support'.■
7: Ga vervolgens naar punt 2. "Montage Paal".■
1.2. Bevestiging met Grondanker
1: Graaf een put van min. 50x50x60cm (lengte x■
breedte x diepte).
2: Steek de spalken door het grondanker.■
3: Plaats het grondanker in de put en zorg dat deze■
waterpas staat. De bovenkant van het profiel
moet 20mm boven de grond blijven, om zo
gemakkelijk aan de twee inbusbouten te kunnen
die de 'Pole Support' in het anker fixeren.
Opgepast: positie van het grondanker is belang-
rijk!!!
4: Vul de put met beton van goede kwaliteit.■
5: Verbind de “ronde” 'Pole Support' met de "vier-■
kante" (enkel voor P7 model).
6: Plaats de vierkante 'Pole Support' in het grondan-■
ker vast dmv de inbusbout.
7: Plaats het klein stukje paal over de vierkante■
'Pole Support' (enkel voor P6 model).
8: Plaats de draaibare schijf (enkel voor P7 model).■
9: Ga vervolgens naar punt 2. "Montage Paal".■
1.3. Muurbevestiging P6 Model
Opgepast: enkel mogelijk met vierkante parasols!
1: Bevestig de 2 muurbeugels tegen de muur met■
chemische verankering.
Onderkant: +/- 350mm van de grond
Bovenkant: +/- 2200mm van de grond
2: Ga vervolgens naar punt 2. "Montage Paal".■
3: Schuif de paal in de bovenste muurbeugel.■
4: Schuif daarna de paal in de onderste muurbeu-■
gel.
5: Schroef de bouten vast (sleutel 17).■
6: Ga vervolgens naar punt 3. “Montage■
Parasolframe”.
1.4. Muurbevestiging P7 Model
1: Bevestig onderste muurbeugel met draaielement■
tegen de muur met chemische verankering.
2: Plaats de draaibare schijf.■
3: Ga vervolgens naar punt 2. “Montage Paal”.■
4 Plaats de paal op de onderste muurbeugel om de■
bovenste muurbeugel af te tekenen op de muur.
5: Bevestig de bovenste muurbeugel met draai-■
element tegen de muur met chemische veranke-
ring. Opgepast: De paal moet hierbij geplaatst zijn
tussen de 2 muurbeugels!!!
6. Ga vervolgens naar punt 3. “Montage■
Parasolframe”.
VEILIGHEIDSVOORSCHRIFTEN
Lees deze handleiding aandachtig voor u de parasol
monteert!
Een correcte plaatsing is noodzakelijk voor de goede
werking van de parasol. Het niet naleven van de vei-
ligheids- of montagevoorschriften kan leiden tot ern-
stige schade. De producent kan niet aansprakelijk
gesteld worden bij montagefouten.
De windbestendigheid van de parasols is beperkt.
Er moet voldoende gewicht geplaatst worden in de
tegelvoet om de parasols ten allen tijde veilig te ge-
bruiken. Houd er rekening mee dat tegelvoeten min-
der stabiel zijn dan een grondanker. De plaatsing van
de verankering dient te gebeuren door een erkend
installateur rekening houdende met de stabiliteit van
de parasol, de muur (in het geval van muurbevesti-
ging) en de lokale regelgeving.
Terwijl Prostor parasols gemaakt zijn om wat wind
te weerstaan, is het aanbevolen om de parasol altijd
te sluiten tijdens winderige omstandigheden (> 5
Beaufort) of bij afwezigheid. Onverwachte windsto-
ten of storm kunnen ernstige schade veroorzaken!
Sluit de parasol tevens bij hagel, sneeuw en hevige
regen.
Opmerking: Windschade (of enige schade veroor-
zaakt door de natuur) valt nooit onder de garantie.
Zorg er voor dat het openen en sluiten van de para-
sol niet bemoeilijkt wordt door obstakels.
Parasols met LED verlichting of motor dienen geïn-
stalleerd te worden door een erkende monteur vol-
gens de montage instructies. De aansluiting op het
elektriciteitsnet dient volgens de lokale regelgeving
te gebeuren.
MONTAGEVOORSCHRIFTEN
NL
-4-
1. MONTAGE VERANKERING

1: Bepaal de bovenkant en onderkant van de paal.■
De bovenkant heeft 2 gaatjes per zijde; de onder-
kant heeft 1 gaatje.
2: Indien verwarming, monteer het stopcontact op de■
paal.
3: Schuif de 'Gliding Wagon' in de paal met de zwarte■
knop langs onder en draai de knop vast.
4: Bevestig staafjes (2 korte en 1 lange) aan het■
'Frame Support' met 3 bouten (inbussleutel 4/5) en
draai de oogbout in de onderkant van de lange
staaf.
5: Schuif 'Frame Support' in de paal en schroef■
vervolgens vast met 2 bouten.
6: Indien LED verlichting, schuif grijs of wit bakje in■
onderkant van de paal en zet vast op +- 20 cm van
de onderkant.(zie 4.1. "LED verlichting").
7: Plaats de paal op de 'Pole Support' en zet vast■
door middel van 2 inbusbouten (zie 1.1. of 1.2.) of
aan de Muurbeugels (zie 1.3. of 1.4.) .
8: Ga vervolgens naar punt 3. “Montage■
Parasolframe”.
3. MONTAGE PARASOLFRAME
1: Neem het parasolframe en bevestig deze aan het■
'Frame Support' bovenaan (A) en aan de 'Gliding
Wagon' (B) van de paal.
2: Schuif de 'Gliding Wagon' naar boven en draai■
vast met zwarte knop.
3: Monteer eerst de onderkant van de gasveer aan■
de oogbout van de paal en dan aan de oogbout
van de parasolarm. De oogbout in de parasolarm
kan in- of uitgedraaid worden om de gasveer
gemakkelijk te verbinden. Opgepast: richting van
de gasveer is belangrijk!!!
4:■Belangrijk: Bevestig een inbusmoer in de paal,
deze moer dient als stop voor de glijwagen.
5: Monteer de top cover op de paal.■
4. MONTAGE TOEBEHOREN
4.1. LED verlichting
Het grijs of wit bakje is reeds in de paal geschoven.
1: Er is een nylondraad voorzien in de paal. Koppel■
de LED-kabel van het parasolframe aan de nylon-
draad. Trek voorzichtig de stroomkabel door de
paal naar beneden.
2: Plaats de LED-kabel en de 230V stroomkabel in■
het grijs of wit bakje mits gebruik te maken van
waterdichte gummis. Altijd de kabels langs de zij-
of onderkant van het bakje binnenbrengen.
3: De kabels aansluiten op printplaat.■
Opgepast: Plaats en kleur van de kabels zijn
heel belangrijk!
Opgepast: bij de verwarming wordt een aangepaste
'Gliding Wagon' geleverd.
1. Schuif 'Gliding Wagon' in de paal.■
2. Schroef de adapter vast aan de 'Gliding Wagon'.■
3. Schroef heater aan adapter.■
4. Bevestig stopcontact aan paal.■
5. Voorzie het stopcontact van stroom. Hou er reke-■
ning mee dat de heater 1500W verbruikt.
Raadpleeg uw elektricien voor meer informatie.
Veiligheidsmaatregelen verwarming:
Verwarming nooit aanraken. Gevaar voor verbran-■
ding!
Zorg ervoor dat de verwarming buiten het bereik van■
kinderen staat.
De verwarming altijd uitschakelen 10 minuten voor u■
de parasol sluit.
De verwarming altijd uitschakelen bij afwezigheid.■
IP 65: bestand tegen opspatend water.■
Verwarming nooit aanschakelen aan printplaat van■
LED.
Zorg dat de stroomkabel niet in aanraking komt met■
de verwarming.
Regengoten (optioneel) verwijderen indien de para-■
sol met verwarming wordt gesloten, dit ter preventie
brandgevaar.
5. BEDIENING
Zie ook de film op de website: www.prostor.be.
Film P6: http://www.prostor.be/NL/product/
Vrijhangendeparasol/P6/Video.html
Film P7: http://www.prostor.be/NL/product/
Vrijhangendeparasol/P7/Video.html
5.1. Parasol openen
1: Haal de beschermhoes van de parasol.■
2: Draai de zwarte draaiknop los en duw naar boven■
tot de parasol helemaal open is. Het is belangrijk
om de parasol volledig te openen tot er een opti-
male doekspanning is, zodat er geen wateropho-
ping kan ontstaan. Opgepast: zorg dat de parasol
geen hindernissen raakt.
3: Draai de zwarte draaiknop terug vast.■
5.2. Parasol sluiten
1: Draai de zwarte draaiknop los en laat de parasol■
voorzichtig zakken. Opgepast: zorg dat de para-
sol geen hindernissen raakt.
2: Draai de zwarte draaiknop lichtjes vast als de■
parasol dicht is
3: Plaats de beschermhoes over de parasol.■
5.3. Beschermhoes plaatsen
1■: Neem de beschermhoes bij de stok en plaats de
bovenkant over de parasol(s).
2: Trek de beschermhoes lager terwijl u rond de■
parasol(s) stapt.
3: Sluit de ritssluiting.■
-5-
2. MONTAGE PAAL 4.2. Verwarming

7. GARANTIEBEPALINGEN
7.1. Duur van de garantie
Prostor garandeert uw parasol voor een periode van 2
jaar vanaf aankoopdatum. Op het doek en de elektri-
sche onderdelen gelden de garantievoorschriften van
de respectievelijke fabrikanten. Een herstelling onder
waarborg leidt nooit tot een verlenging van de garan-
tieperiode.
7.2. Wat omvat deze garantie?
De garantie omvat het kosteloos versturen van elk
defect onderdeel of het versturen van het artikel na
kosteloze herstelling.
7.3. Wat valt niet onder deze garantie?
Schade berokkend door een ongeval, nalatigheid,■
storm, wind, waterophoping, slechte montage, nege-
ren van de voorschriften, verkeerd gebruik of normale
slijtage.
Schade door blootstelling aan schadelijke atmosferis-■
che omstandigheden ten gevolgen van industrie of
aan hoog zoutgehalte.
Kleine kleurafwijkingen t.o.v. de kleurstalen en tussen■
de componenten en profielen die een gevolg zijn van
het industrieel proces.
Kosten voor het demonteren of herplaatsen van het■
defecte onderdeel of de parasol en de daaruit
voortvloeiende schade of daaraan verbonden
verplaatsingskosten.
Schade aan derden. Herstellingskosten via derden.■
8. PROCEDURE BIJ GARANTIES
Neem steeds contact op met uw erkende Prostor-
verdeler!
Uw verdeler zal uw parasol herstellen of de te vervan-
gen onderdelen vaststellen, deze bij Prostor bestellen
en de herstelling zo spoedig mogelijk uitvoeren.
Procedure te volgen door de verdeler bij het herstel-
len van vervangonderdelen:
Contacteer de Prostor klantendienst voor een retour-■
nummer.
Geef het type product, serienummer en aard van het■
probleem door.
Verpak het onderdeel voor verzending zorgvuldig en■
vermeld altijd het retournummer op de verpakking.
Prostor laat het onderdeel ophalen bij de verdeler■
door zijn transporteur. Niet geautoriseerde zendingen
of leveringen door derden worden altijd geweigerd.
In geval van hoge herstellingskosten neemt Prostor■
eerst contact op.
U ontvangt zo snel mogelijk het herstelde onderdeel■
of de nodige wisselstukken.
BEPERKTE GARANTIE
5.4. Beschermhoes afnemen
1:■Open de beschermhoes met de ritssluiting.
2:■Neem de beschermhoes bij de stok en duw de
beschermhoes (verticaal) omhoog.
3:■Duw de beschermhoes omhoog terwijl u rond de
parasol(s) stapt.
5.5. LED verlichting aandoen/doven
1:■Duw op de <> knop van de afstandsbediening
zodat het 1e rode lampje (kanaal 1) brandt.
2:■Duw vervolgens op het pijltje Λom de LED verlich-
ting aan te steken.
3:■Duw op het V om de LED verlichting te doven.
5.6. Parasol 300° draaien (Enkel P7
model)
U blokkeert de parasol op de gewenste positie door de
pen in de rotatieschijf (onderkant paal) te stoppen.
6. ONDERHOUDSVOORSCHRIFTEN
6.1 Reiniging doek
Reinig het doek met een tuinslang of lauw water en■
milde zeep. Spoel het doek na met water.
Laat het doek in open lucht drogen, zeker niet in de■
droogkast.
Sluit de parasol enkel wanneer het doek droog is.■
Gebruik voor het reinigen geen schuurmiddelen,■
hoge drukreiniger of bijtende producten.
Het parasoldoek mag niet in de wasmachine gewas-■
sen worden.
Gebruik jaarlijks een spray om het doek waterdicht■
te houden.
Prostor biedt volgende producten aan:■
‘Prostor Cleaner’ (krachtige doekreiniger) en ‘Prostor
Rain Guard’ (maakt het doek waterafstotend).
6.2. Onderhoud paal/frame
Smeer jaarlijks de bewegende onderdelen met olie of■
lichte vetstof.
De kunststofdelen en aluminium geleidingsprofielen■
enkel met droog smeermiddel (vb. silicone-spray)
smeren.
Reinig de paal en frame regelmatig met water, vaker■
als de installatie zich in een zoute of industriële
omgeving bevindt.
Inspecteer de installatie op een regelmatige basis en■
draai onderdelen vast indien nodig.
-6-

1. MONTAGE ANCRAGE
1.1. Fixation avec socle
1: Fixez les 4 pieds réglables aux coins du socle.■
2: Visez le 'Pole Support' sur la plaque de sol (clés 13 /■
vis à six pans 5).
3: Placez le disque rotatif (seulement pour le modèle■
P7).
4: Placez au minimum 4 dalles de 50x50x5cm (socle■
100x100) ou 8 dalles de 40x40x4cm (socle 90x90).
5: Placez le couvercle en alu ou en acier (en option).■
6: Placez le capuchon en plastique sur le 'Pole■
Support'.
7: Puis avancez à la rubrique 2. “Montage mât”.■
1.2. Fixation avec pied à sceller
1:■Creusez un trou d'au moins 50x50x60cm (longueur x
largeur x profondeur).
2: Mettez les attelles dans le pied à sceller.■
3: Placez le pied à sceller dans le trou et assurez-vous■
qu'il soit de niveau. Le sommet du profil doît rester à
20mm au dessus du sol, afin de pouvoir serrer les
vises à six pans qui fixent le 'Pole Support' au pied à
sceller.
Attention: la position du pied à sceller est très
importante!!
4: Remplissez le trou avec du béton de bonne qualité.■
5: Connectez le 'Pole Support' rond avec le 'Pole■
Support' carré (seulement pour le modèle P7).
6: Fixez le 'Pole Support' carré dans le pied à sceller par■
des vises à six pans.
7: Placez la rallonge (bas du mât) sur le 'Pole Support'■
carré (seulement pour le modèle P6).
8: Placez le disque rotatif (seulement pour modèle P7).■
9: Puis avancez à la rubrique 2. ’Montage mât’.■
1.3. Fixation murale modèle P6
Attention: seulement possible avec des parasols carrés.
1: Fixez les 2 supports muraux avec ancrage chimique.■
En bas: +/- 350mm du sol
En haut: +/- 2200mm du sol
2: Puis avancez à la rubrique 2 ‘Montage mât’.■
3: Glissez le mât dans le support mural supérieur.■
4: Glissez le mât dans le support mural inférieur.■
5: Serrez les boulons (clé 17).■
6: Puis avancez à la rubrique 3 ‘Montage frame'■.
1.4. Fixation murale modèle P7
1: Fixez le support mural inférieur avec élément rotatif■
contre le mur avec ancrage chimique.
2: Installez le disque de rotation.■
3: Puis avancez à la rubrique 2. “Montage mât”.■
4 Placez le mât au support mural inférieur afin de■
pouvoir marquer la position du support mural supérieur
au mur.
5: Fixez le support mural supérieur avec élément rotatif■
contre le mur avec ancrage chimique.
Attention: le mât doit être fixé entre les 2 supports
muraux!
6. Puis avancez à la rubrique 3. “Montage frame”.■
INSTRUCTIONS DE SECURITE
Lisez les instructions attentivement et conservez les
pour l'avenir. Une installation correcte est indispen-
sable pour une fonction optimale du parasol.
Ignorant les instructions de sécurité et de montage
peuvent résulter en dégâts sérieux. Le fabricant
n’est pas responsable pour les erreurs d'installation.
La résistance au vent des parasols est limitée. Suf-
fisamment de poids doit être mis dans le socle pour
faire fonctionner les parasols en toute sécurité en
tout temps. Veuillez tenir compte que le socle est
moins stable que le pied à enterrer. La fixation doit
être effectuée par un installateur qualifié tenant
compte de la stabilité du parasol, du mur (en cas de
fixation mural) et de la législation locale.
Bien que les parasols Prostor sont faits pour résis-
ter à un peu de vent, il est recommandé de toujours
abaisser les parasols dans des conditions venteu-
ses (> 5 Beaufort) ou en cas d'absence. Des coups
de vents imprévus ou tempête peuvent résulter en
dégâts sérieux! Fermez le parasol également en cas
de pluie battante, neige et grêle.
Note: Les dégâts du vent (ou tout dommage causé
par des actes de la nature) ne sont jamais couverts
par la garantie.
Assurez-vous que l'ouverture ou la fermeture ne
soit pas gênée par des corps étrangers.
Les parasols avec LED ou moteur doivent être
installés par des installateurs qualifiés selon les
instructions de montage. Le raccordement au
réseau d’électricité doit être fait conformément aux
réglementations locales.
INSTRUCTIONS DE MONTAGE
FR
-7-

2. MONTAGE MAT
1: Déterminez le haut et le bas du mât. Le haut a 2■
trous de chaque côté, le bas a 1 seul trou.
2: Avec chauffage: montez la prise sur le mât.■
3: Glissez le ‘Gliding Wagon’ dans le mât avec le■
bouton noir vers le bas et serrez-le.
4: Fixez les bâtonnets (2 courts et 1 long) au 'Frame■
Support' avec 3 boulons (vise à six pans 4/5) et
visez le boulon avec l'œillet en bas du bâtonnet
long.
5: Glissez le 'Frame Support' dans le mât, ensuite■
vous le fixez avec 2 boulons.
6: Avec lumière LED: glissez le boîtier gris ou blanc■
par le bas du mât et fixez à environ 20cm du bas.
7: Placez le mât sur le support du mât et fixez avec■
deux vises à six pans (consultez 1.1. ou 1.2.) ou
au support mural (consultez 1.3. ou 1.4.).
8: Puis avancez à la rubrique 3. “Montage frame”.■
3. MONTAGE FRAME
1: Prenez le frame du parasol et attachez-le au■
'Frame Support' (A) et puis au 'Gliding Wagon'
(B).
2: Glissez le 'Gliding Wagon' jusqu’en haut et fixez-■
le.
3: Fixez d’abord le bas du vérin à gaz au boulon à■
l'œillet du mât et fixez après le vérin au boulon du
bras du parasol. Le boulon à œillet dans le bras du
parasol peut facilement être serré ou dévissé afin
de connecter facilement le vérin à gaz. Attention:
Le positionnement du vérin à gaz est important!
4: Important : fixez une vise à six pans au mât, cette■
vise fonctionnera comme arrêt pour le ‘Gliding
Wagon’.
5: Montez le top cover sur le mât.■
4. MONTAGE ACCESSOIRES
4.1. Lumière LED
Le boîtier gris ou blanc a déjà été glissé dans le mât.
1. Vous trouvez un fil de nylon dans le mât. Connectez■
le câble électrique du LED au fil de nylon. Tirez
soigneusement sur le câble LED par le haut du
mât vers le bas.
2. Placez le câble LED et le câble électrique 230V■
dans le petit boîtier gris ou blanc utilisant les joints
imperméable à l'eau. Introduisez toujours les
câbles par le côté ou le bas du boîtier.
3. Connectez les câbles sur la carte à circuits impri-■
més. Attention: Emplacement et couleurs des
câbles sont très importants.
4.2. Chauffage
Attention: le chauffage est livré avec un 'Gliding
Wagon’ adapté au chauffage.
1.■Glissez le 'Gliding Wagon’ avec le chauffage dans
le mât.
2. Visez l'adaptateur au 'Gliding Wagon'.■
3. Visez le chauffage à l'adaptateur.■
4. Fixez la prise au mât.■
5. Prévoyez du courant pour la prise. Tenez compte■
que le chauffage consomme 1500W. Consultez
votre électricien pour plus d'informations.
Mesures de sécurité pour le chauffage:
Le chauffage ne peut jamais être touché. Risque de■
brûlures!
Assurez-vous que le chauffage soit hors de portée■
des enfants.
Eteignez toujours le chauffage 10 minutes avant de■
fermer le parasol et lorsqu'il n'y a personne à proxi-
mité.
Enlevez les gouttières avant de fermer les parasols■
avec chauffage.
IP 65: résistant aux projections d'eau.■
Ne connectez jamais le chauffage à la carte à circuits■
imprimés du LED.
Vérifier que le câble d'alimentation ne touche jamais■
le chauffage.
5. INSTRUCTIONS D’OPERATION
Consultez également la video sur www.prostor.be:
Video P6: http://www.prostor.be/FR/product/
Parasolexcentré/P6/Video.html
Video P7: http://www.prostor.be/FR/product/
Parasolexcentré/P7/Video.html
5.1. Ouvrir le parasol
1: Enlevez la housse de protection du parasol.■
2: Dévissez le bouton noir et poussez le vers le haut■
jusqu’ à ce que le parasol soit complètement
ouvert. Il est important d’ouvrir le parasol complè-
tement ainsi vous créez une tension optimale et
vous évitez une accumulation d’eau dans la toile.
Attention: Assurez vous que le parasol ne touche
pas d’obstacles!
3: Fixez le bouton noir.■
5.2. Fermer le parasol
1■: Dévissez le bouton noir et faites glisser le parasol
en bas jusq’à ce que celui-ci soit complètement
fermé. Attention: Assurez vous que le parasol ne
touche pas d’obstacles!
2: Serrez le bouton noir soigneusement une fois le■
parasol est fermé.
3: Mettez la housse sur le parasol.■
-8-

5.3. Mettez la housse de protection
1: Prenez la housse au bâton et placez la housse au■
dessus des parasols.
2: Tirez la housse vers le bas en marchant autour■
des parasols.
3: Fermez la fermeture éclair.■
5.4. Enlevez la housse de protection
1: Ouvrez la housse avec la fermeture éclair.■
2: Prenez la housse par le bâton et poussez la■
housse (verticalement) vers le haut.
3: Enlevez la housse en marchant autour des para-■
sols.
5.5. Allumer / éteindre les lumières LED
1: Appuyez sur le bouton <> sur la télécommande■
jusque à la première lumière rouge (chaine 1)
s'allume.
2: Appuyez ensuite sur la flèche Λpour allumer les■
lumières LED.
3: Appuyez V sur pour éteindre les lumières LED■.
5.6. Tournez le parasol 300° (Seulement
pour le modèle P7)
Vous bloquez le parasol à la position désirée en mettant
le levier dans le disque de rotation (en bas du mât).
6. ENTRETIEN CORRECT DE VOTRE
PARASOL
6.1 Nettoyage du tissu
Nettoyez le tissu avec un tuyau d’arrosage ou avec■
de l'eau tiède et un détergent doux. Rincez à l'eau
claire.
Laissez secher le tissu à l’air et n’utilisez jamais le■
sèche-linge.
Ne refermez le parasol que lorsque le tissu est parfai-■
tement sec.
Surtout ne pas utiliser d'abrasifs ou de lance à haute■
pression.
Ne mettez jamais la toile du parasol dans la machine■
à laver.
Utilisez annuellement un spray afin de imperméabili-■
ser le tissu.
Prostor vous offre les produits suivants:■
‘Prostor Cleaner’ (nettoyant de toile puissant) et ‘
‘Prostor Rain Guard’ (rend le tissu imperméable à
l’eau).
6.2. Entretien mât / frame
Chaque année, lubrifiez les parties mobiles avec un■
peu de graisse ou du lubrifiant léger.
Pour les parties en plastique et les profils en alumi-■
nium, n'utilisez qu'un lubrifiant à sec (bombe de sili-
cone p.e.).
Rincez le mât et le frame avec de l'eau régulière-■
ment, même plus souvent si l'installation est dans un
environnement industriel ou salée.
Inspectez le raccord d'installation sur une base régu-■
lière et resserrez si nécessaire.
GARANTIE LIMITEE
7. DISPOSITIONS DE GARANTIE
7.1. Durée de la garantie
Prostor garantit ce parasol pour une période de 2 ans
à compter de la date d'achat. La toile et les pièces
détachées électriques sont couvertes par la garantie
du fabricant. La réparation sous garantie n'entraîne
jamais la prorogation de la période de garantie initiale.
7.2. Qu'englobe cette garantie?
La garantie englobe l'envoi gratuit de tout élément
défectueux ou l'envoi de l'article après intervention
gratuite.
7.3. Qu’est-ce qui n’est pas couvert par la
garantie?
Tout dégâts suite à un accident, une négligence, une■
tempête, du vent, une inondation, un montage incor-
rect, une manque d'entretien, utilisations incorrectes
ou une usure normale.
Dégâts qui sont causés par l'exposition à des circons-■
tances climatologiques nuisibles en raison de
présence d'industries ou d'un taux de sel trop élevé
dans l'air ambiant.
Légers écarts de teinte par rapport aux échantillons■
et entre les composants et les profiles, qui sont la
suite du processus de fabrication.
Des frais d'installations ou réinstallations de l'élément■
défectueux ou le parasol complet par des tiers et les
frais de déplacement engagés par eux.
Dégâts causés à des tiers.■
Les frais de réparation par des tiers.■
8. PROCEDURE EN CAS DE GARANTIE
Contactez toujours un installateur Prostor agréé!
Le revendeur réparera votre parasol ou définira les
éléments à remplacer, les commandera chez Prostor et
effectuera la réparation le plus rapidement possible.
Procédure à respecter par le concessionnaire pour
le retour des pièces détachées à réparer ou à
remplacer:
Contactez le service clients Prostor pour obtenir un■
numéro de retour.
Indiquez le type et le numéro de produit ainsi que la■
nature du problème.
Emballez les éléments à retourner soigneusement et■
indiquez toujours le numéro de retour sur l'embal-
lage.
Prostor fera enlever le colis chez l'installateur par ses■
soins. Des retours non autorisés ou effectués par des
tiers seront systématiquement refusés.
Au cas où les frais de réparation seraient élevés,■
Prostor contactera l'installateur.
Prostor retournera dans les meilleurs délais les■
éléments réparés ou les pièces détachées nécessai-
res.
-9-

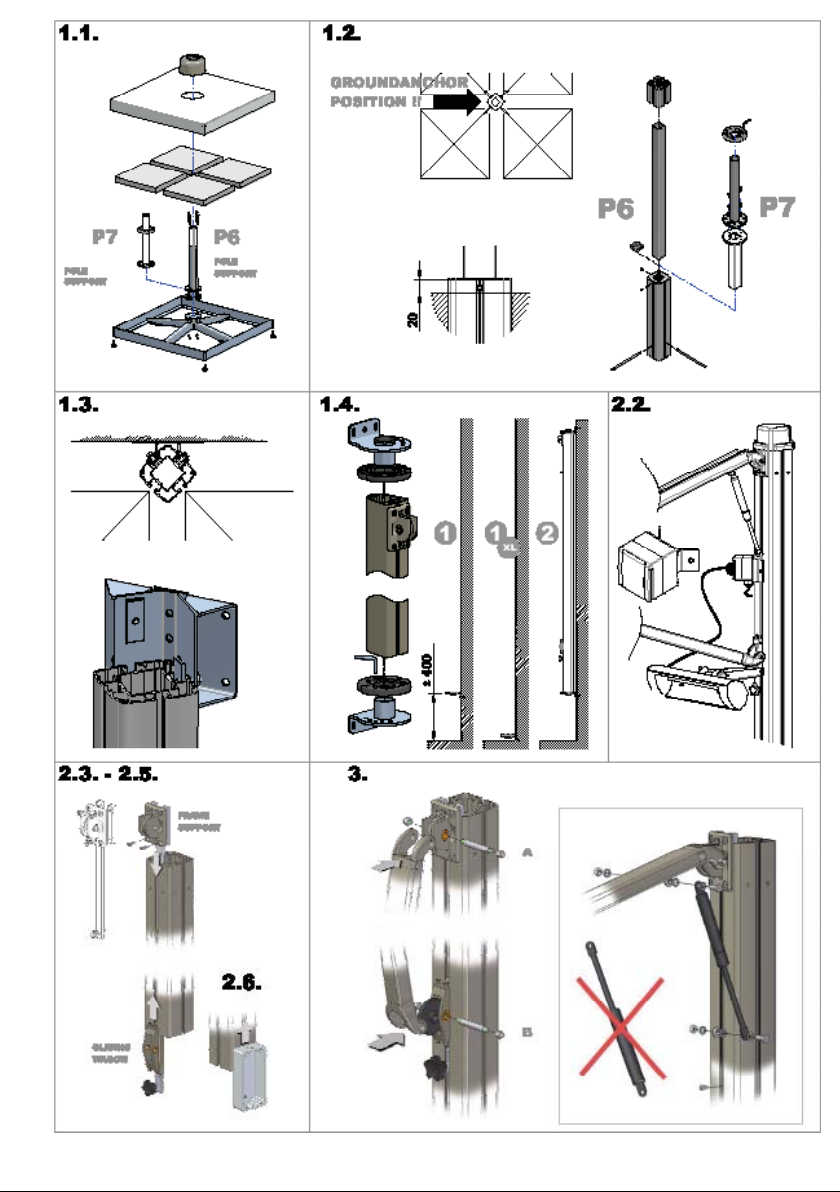
1. MOUNTING FIXATION
1.1. Fixation with steel base
1: Attach the 4 adjustable feet to the corners.■
2: Screw the 'Pole Support' at the tile base (wrench■
13/ allen headbolt 5)
3: Place the rotation plate (only for P7 model).■
4: Place minimum of 4 tiles 50x50x5cm (100x100■
base) or 8 tiles of 40x40x4cm (90x90 base).
5: Place the Inox or Aluminium Cover (optional).■
6: Place the plastic cover over the 'Pole Support'.■
7: Proceed to section 2. “Mounting pole”.■
1.2. Fixation with ground anchor
1: Dig a hole of at least 50x50x60cm (length x width■
x depth).
2: Insert the splints through the ground anchor.■
3: Place the ground anchor in the hole and make■
sure it is level. The top of the profile should
remain 20mm above the ground to be able to
fasten easily the allen headbolts which fix the
'Pole Support' to the ground anchor.
Attention: the position of the ground anchor is
very important!!
4: Fill the hole with concrete of good quality.■
5: Connect the “round” 'Pole Support' with the■
"square" 'Pole Support' (only for the P7 model).
6: Secure the “square” Pole Support in the ground■
anchor by means of an allen headbolt.
7: Place the little piece of pole over the square 'Pole■
Support' (only for P6 model).
8: Place the rotation plate (only for P7 model).■
9: Proceed to section 2. “Mounting pole”.■
1.3. Wall fixation P6 Model
Caution: only available for square umbrellas!
1: Fix the 2 wall clamps against the wall with chemi-■
cal anchoring.
Bottom: +/- 350mm of the ground
Top: +/- 2200mm of the ground
2: Then proceed to section 2. “Mounting pole”.■
3: Glide the pole in the upper wall clamp.■
4: Then glide the pole in the lower wall clamp.■
5: Fix the bolts (wrench 17).■
6: Proceed to section 3. “Mounting umbrella frame”.■
1.4. Wall fixation P7 Model
1. Fix the lower wall clamp to the wall with chemical■
anchoring.
2. Place the rotation plate on the lower wall clamp.■
3. Proceed to section 2. "Mounting pole".■
4. Place the pole on the lower wall clamp which■
enables to mark the position of the higher wall
clamp onto the wall.
5. Fix the higher clamp with rotation element to the■
wall with chemical anchoring. Caution: the pole
must be placed between the two wall clamps.
6. Proceed to section 3. “Mounting umbrella frame”.■
Read the manual thoroughly before you mount the
umbrella.
A correct placement is crucial for the correct op-
eration of the umbrella. Any disregard of the safety
instructions or regulations can result in serious dam-
age. The manufacturer is not liable for any installa-
tion faults.
The wind resistance of the umbrellas is limited. Suffi-
cient base weight must be used to secure umbrellas
at all times.
Keep in mind that the steel base is less stable than a
ground anchor. The installation should be done by a
certified technician according the local regulations
and assuring the stability of the umbrella and the wall
(for wall mounting umbrellas).
While Prostor umbrellas are made to withstand
some wind, it is recommended to always close the
umbrellas during windy conditions (> 5
Beaufort) and when it is unsupervised.
Unpredictable wind or storm can cause serious dam-
age to sunshade and human being! Also close your
umbrella in bad weather conditions such as rain,
snow, wind and hail.
Note: Wind damage (or any damage caused by acts
of nature) is never covered under warranty.
Umbrellas with LED lights or motor should be
installed by a certified technician according to the
required standards. The connection to the electricity
grid should be done according the local regulations.
MOUNTING INSTRUCTIONS
ENG
-10-
SAFETY INSTRUCTIONS

2. MOUNTING POLE
1: Determine the top and the bottom of the pole. The■
bottom has 2 holes per side, the bottom has 1
hole.
2: With heating: mount the socket on the pole.”■
3: Glide the 'Gliding Wagon' in the pole with the black■
turn button down and tighten.
4: Fix the small bars (2 short and 1 long) to the■
'Frame Support' with 3 bolts (allen headbolt 4/5)
and turn eye bolt in the bottom of the long bar.
5: Glide 'Frame Support' in the pole and then screw■
it tight with 2 bolts.
6: With LED lights: Glide the grey or white small■
junction box into the bottom of the pole and fix at
+/- 20 cm of the bottom (see 4.1. "LED lights").
7: Place the pole on the 'Pole Support' and tighten■
with two allen headbolts (see 1.1. or 1.2.) or onto
the wall clamps (see 1.3. or 1.4.).
8: Proceed to section 3. “Mounting umbrella frame”.■
3. MOUNTING UMBRELLA FRAME
1: Take the umbrella frame and fix it to the 'Frame■
Support' (A) on top and then onto the 'Gliding
Wagon' (B).
2: Glide the 'Gliding Wagon' (B) to the top and tigh-■
ten.
3: First mount the bottom of the gas spring to the■
eyebolt on the pole and then onto the eyebolt on
the umbrella arm. The eyebolt on the umbrella arm
can be unscrewed or tightened to be able to
connect the gas spring easily.
Caution: the direction of the gas spring is impor-
tant!
4:■Important: Fix an allen headbolt in the pole, this
bolt serves as stop for the 'Gliding wagon'.
5: Mount the 'Top Cover' on the pole.■
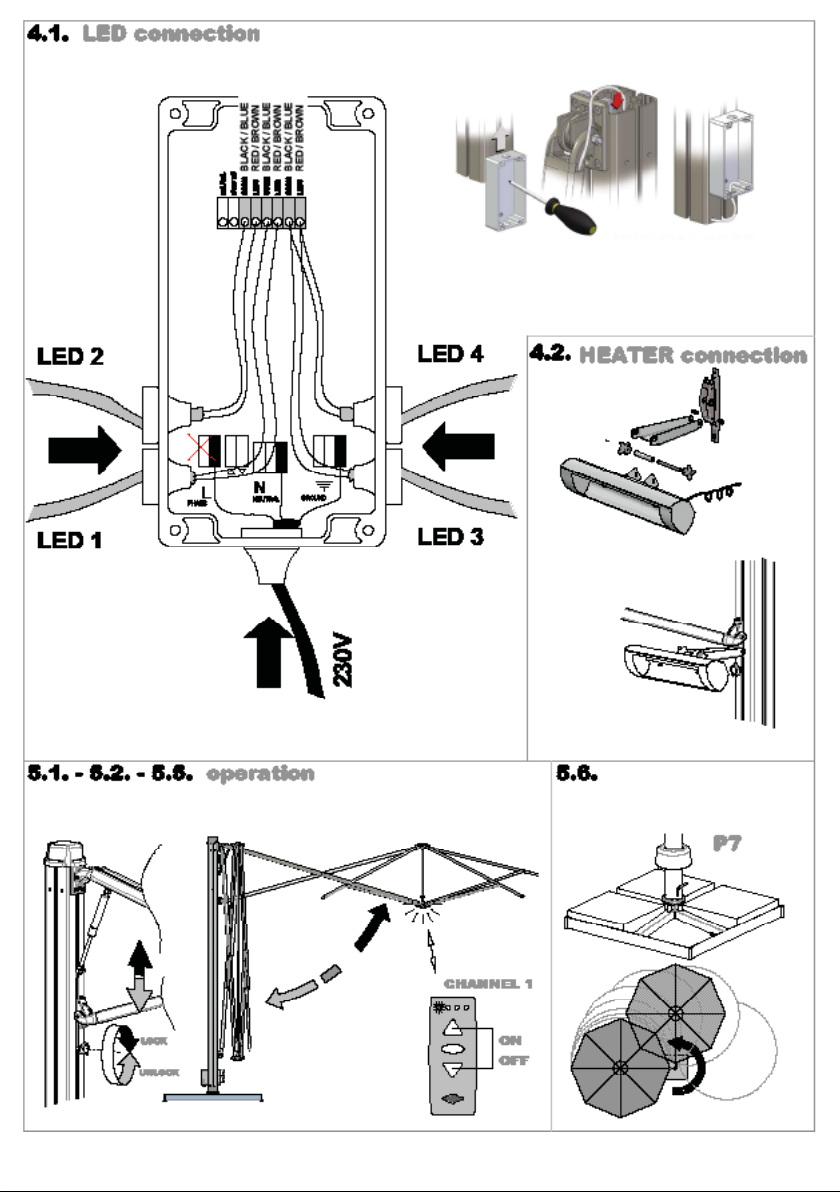
4. MOUNTING ACCESSORIES
4.1. LED lights
The grey or white small junction box is already fixed at
the pole.
1: You find a nylon guide string in the pole. Tie the■
end of the power cable to the nylon guide string.
Pull carefully the cable through the exit points at
the bottom of the pole.
2: Place the LED wire and the 230V power through■
the side or bottom opening of the grey or white
junction box while using the waterproof seals.
3: Connect the cables to the Printed Circuit Board.■
Caution: The position and the colour of the cables
are very important!
4.2. Heating
Caution: The heating is delivered with an extra 'Gliding
Wagon' adjusted to the heating.
1. Slide the 'Gliding Wagon' in the pole.■
2. Screw the adapter to the 'Gliding Wagon'.■
3. Screw the heater to the adapter.■
4. Attach the socket to the pole.■
5. Provide power to the socket. Pay attention the■
heater consumes 1500W. Consult an electrician
for more details.
Safety instructions heating:
The heater should never be touched. Danger of■
burns!
Make sure the heater is out of reach of children!■
Disable always the heater 10 min. before closing the■
umbrella.
It is recommended to switch off the heater when■
nobody is nearby.
Always remove the rain gutters (optional) before■
closing the umbrella(s) equipped with heater(s).
IP 65: resistant to water jets.■
Never connect the heating to the Printed Circuit■
Board of the LED.
Be aware■the power cable never touches the
heating.
5. OPERATING INSTRUCTIONS
Also consult the videos on the PROSTOR website:
www.prostor.be.
Video P6: http://www.prostor.be/EN/product/Side-
poleumbrella/P6/Video.html
Video P7: http://www.prostor.be/EN/product/Side-
poleumbrella/P7/Video.html
5.1. Opening the umbrella
1: Remove the protection cover from the umbrella.■
2: Unscrew the black turn button and push the■
umbrella up until it is completely open. It is impor-
tant to open the umbrella completely until a perfect
fabric tension is reached, this prevents water
accumulation in the fabric. Caution: make sure
the umbrella does not touch any obstacle!
3: Tighten the black turn button.■
5.2. Closing the umbrella
1: Unscrew the black turn button and lower the■
umbrella gently. Caution: make sure the umbrella
does not touch any obstacle!
2: Tighten the black turn button gently when the■
umbrella is closed.
3: Place the protection cover over the umbrella.■
-11-

5.3. Placing the protection cover
1■: Place the top of the cover over the umbrella(s) by
using the pole which is inside the protection
cover.
2: Pull the protection cover down while you move■
around the umbrella(s).
3: Close the zipper.■
5.4. Take off the protection cover
1: Open the zipper of the protection cover.■
2: Take the pole of the protection cover and push■
the protection cover up (vertically).
3: Push the protection cover up while you move■
around the umbrella(s).
5.5. Switching the LED lights on and off
1: Push the <> button on the remote control until the■
first red light (channel 1) ligths up.
2: Then you push the button Λto switch on the LED■
light.
3: Push the button V to switch off the LED ligh■t.
5.6. Rotating the umbrella 300° (only for
P7 model)
You can fix the umbrella at the desired position when
placing the pen in the rotation plate (at the bottom of
the pole).
6. MAINTENANCE INSTRUCTIONS
6.1 Cleaning instructions fabric
Clean the fabric with garden hose or warm tap water■
and mild soap. Rinse thoroughly.
The fabric should dry in open air and an automatic■
dryer is prohibited.
Do not close the umbrella until the fabric is dry.■
Never use an abrasive, high pressure hose or corro-■
sive products.
Do not wash the umbrella fabric in the washing■
machine.
Use annually a spray to keep the fabric waterproof.■
Prostor offers the following products:■
‘Prostor Cleaner’ (powerful fabric cleaner) and
‘Prostor Rain Guard’ (makes fabric water repellent).
6.2. Maintenance pole and frame
Grease all moving parts annually with oil or a light■
lubricator.
The synthetic parts and aluminium gliding profiles■
may only be greased by using a dry-lubricator such
as silicone spray.
Clean mast and frame with water periodically, more■
often if installation is in a salty or industrial environ-
ment.
Inspect the installation fitting on a regular basis and■
tighten if necessary.
7. REQUIREMENTS FOR WARRANTY
7.1. Duration of the warranty
Prostor guarantees your umbrella for a period of 2 years
starting from the day of invoice. The warranty for fab-
ric and electric spare parts is covered by the respective
manufacturers. Repair under warranty never means that
the warranty period will be extended.
7.2. What does this warranty contain?
This warranty covers dispatch of all spare parts free of
charge or dispatch upon repair of a default article.
7.3. What is not covered by this warranty?
Damage caused by an accident, negligence, storm,■
wind, accumulation of water, wrong installation, not
following the maintenance instructions, wrong use or
natural ageing.
Damage caused by exposure to hazardous atmos-■
pheric situations due to industry or a high salt level.
Small colour variations between the fabric and the■
colour samples and between the components and
profiles, which are caused by the industrial process.
Costs for taking off or reinstalling the umbrella or the■
faulty part and damage or travelling costs resulting
from it.
Damage to a third party.■
Repair costs by a third party.■
8. PROCEDURE IN CASE OF WARRANTY
Please always consult your certified Prostor dealer!
Your dealer will repair your umbrella or will determine the
parts that have to be replaced. He will order these from
Prostor and will carry out the repair as soon as possible.
Procedure to be followed by the dealer when replac-
ing parts:
Contact the Prostor customer service in order to■
obtain a return note number.
Indicate product type, serial number and the nature of■
the problem.
Wrap the part carefully before dispatching and always■
indicate the return note number on the wrapping.
Prostor instructs its transporter to collect the parts at■
the dealer. Non authorised returns or deliveries by a
third party will always be refused.
Prostor will contact you in case of high repair costs.■
You will receive the repaired article or the necessary■
spare parts as soon as possible.
LIMITED WARRANTY
-12-

-13-
DE
Sicherheitshinweise
Lesen Sie die Bedienungsanleitung sorgfältig, bevor
Sie den Sonnenschirm montieren.
Eine korrekte Platzierung ist entscheidend für rich-
tige Verwendung des Schirmes.
Eine Missachtung der Sicherheitsanweisungen oder
Vorschriften kann zu schweren Schäden führen.
Der Hersteller haftet nicht für jede Installation.
Die Windempfindlichkeit der Sonnenschirme ist be-
grenzt. Die Befestigung der Ständergewichte muss
jederzeit korrekt gesichert sein.
Bitte beachten Sie, dass die Bodenhülse dem Schirm
einen stabileren Stand verleiht, als der Plattenstän-
der oder die Wandhalterung.
Der Einbau sollte von einem geschulten Monteur
vorgenommen werden, de die örtlichen Vorschriften
bekannt sind.
Bei der Wandmontage ist die Eignung der Wand zu
prüfen.
Prostor Schirme sind sehr windstabil. Jedoch ist
darauf zu achten, dass die Schirme bei einer Wind-
stärke von (> 5 Beaufort) geschlossen werden und
die Schirme im geöffneten Zustand niemals un-
beaufsichtigt sind.
Unvorhersehbarer Wind oder Sturm kann zu schw-
eren Schäden am Sonnenschirm und Menschen füh-
ren! Schließen Sie die Schirme auch bei schlechtem
Wetter wie Regen, Schnee, Wind und Hagel.
Hinweis: Schäden durch höhere Gewalt oder
Schäden, die durch falsche Bedienung verursacht
werden werden nicht als berechtigte Reklamation
anerkannt.
Schirme mit LED-Beleuchtung oder Motor muss
durch einen zertifizierten Elektriker nach den örtlich
geltenden Vorschriften angeschlossen werden.
MONTAGEANLEITUNG
1. MONTAGE BEFESTIGUNG
1.1. Befestigung mit Plattenständer
1: Befestigen Sie die 4 verstellbare Füße an den■
Ecken.
2: Schrauben Sie das Standrohr auf den■
Plattenständer (13er Sechskantschlüssel / 5er
Inbusschlüssel).
3: Stecken Sie den Drehteller auf das Standrohr (nur■
beim P7 Model).
4: Legen Sie mindestens 4 Betonplatten 50x50x5cm■
(bei 100x100cm Ständer) oder 8 Betonplatten
40x40x4cm (bei 90x90 Ständer) ein.
5: Stülpen Sie die Ständerabdeckung (Edelstahl oder■
Aluminium) über den Ständer (optional).
6: Legen Sie die Plastik Abdeckung über das■
Standrohr.
7: Fahren Sie fort mit Punkt 2. Montage Mast.■
1.2. Befestigung mit Bodenhülse
1: Graben Sie ein Loch von mindestens 50x50x60cm■
(LxBxT).
2: Schieben Sie die zwei Bewährungsstangen durch■
die Bodenhülse.
3: Setzen Sie die Bodenhülse in das Erdloch und■
richten Sie Sie aus. Die Oberkante der
Bodenhülse sollte 20mm über die Oberkante des
Erdreichs ragen. Somit stellen Sie sicher, dass
Sie das Standrohr nachträglich in der Hülse fixie-
ren können.Verschrauben Sie die Bodenhülse mit
dem Standrohr. Achtung: Die Position der
Bodenhülse ist sehr wichtig!!!
4: Füllen Sie das Loch ringsum die Bodenhülse mit■
Beton.
5: Verschrauben Sie das runde Standrohr mit dem■
eckigen Standrohr (nur bei Schirm P7).
6: Befestigen Sie das eckige Standrohr in der■
Bodenhülse
7: Stülpen Sie das Mastverlängerungsstück über das■
Standrohr. (nur bei Schirm P6).
8: Stecken Sie den Drehteller auf das Standrohr (nur■
beim P7 Model).
9: Fahren Sie fort mit Punkt 2. Montage Mast.■
1.3. Wandbefestigung P6 Model
Achtung: nur mit quadratischen Schirmdächern
möglich!
1: Befestigen Sie die beiden Wandhalterungen mit■
Schwerlastdübeln an der Wand.
Untere Wandhalterung : +/- 350mm vom Boden.
Obere Wandhalterung : +/- 2200mm vom Boden.
2: Fahren Sie fort mit Punkt 2. Montage Mast.■
3: Führen Sie den Mast in die obere Wandhalterung.■
4: Anschließend führen Sie den Mast in die untere■
Wandhalterung.
5: Befestigen Sie die Schrauben (17er■
Sechskantschlüssel).
6: Fahren Sie fort mit Punkt 3. Montage Schirmdach.■

1.4. Wandbefestigung P7 Model
1. Befestigen Sie die untere Wandhalterungen mit■
Schwerlastdübeln an der Wand.
2. Stülpen Sie den Drehteller über die■
Wandhalterung.
3. Fahren Sie fort mit Punkt 2. Montage Mast.■
4. Setzen Sie den Mast auf die untere Wandhalterung■
Stecken Sie die obere Wandhalterung auf den
Mast und markieren Sie die Position der oberen
Halterung an der Wand.
5. Stülpen Sie den Drehteller über die obere■
Wandhalterung und verankern diese mit
Schwerlastdübeln. Achtung: Der Mast muss
zwischen beiden Halterungen eingeklemmt sein.
6. Fahren Sie fort mit Punkt 3. Montage■
Schirmdach.
2. MONTAGE MAST
1: Bestimmen Sie die Ober- und Unterseite des■
Mastes. Oben sind zwei Löcher pro Seite vorhan-
den. Unten nur eins.
2: Mit Heizstrahlern: Befestigen Sie die Steckdose■
am Mast.
3: Schieben Sie den Gleitwagen mit dem schwarzen■
Drehfeststeller nach unten. In den Mast und fixie-
ren Sie diesen.
4: Befestigen Sie die obere Schirmaufhängung mit■
den Aluminium Vierkant Stangen an der oberen
Befestigung am Mast (zwei kurze und eine lange
Stange) mit den 3 Schrauben ( 4er und 5er Inbus)
und schrauben Sie die Ösenschraube in das
untere Loch der langen Stange.
5: Führen Sie die Schirmaufhängung von oben in den■
Mast und befestigen Sie die restlichen zwei
Schrauben.
6: Mit LED-Beleuchtung: Führen Sie den■
Anschlusskasten von unten auf den Mast und
befestigen Sie diesen auf ca. 20cm Höhe von
unten (siehe 4.1. LED Beleuchtung).
7: Stecken Sie den Mast auf das Standrohr und■
schrauben Sie die kleinen Inbus Schrauben in den
Führungsschienen fest (siehe 1.1. oder 1.2.) oder
auf die Wandhalterung (siehe 1.3. oder 1.4.).
8: Fahren Sie fort mit Punkt 3. Montage Schirmdach.■
3. MONTAGE SCHIRMDACH
1: Nehmen Sie das Schirmdach und befestigen Sie■
es am Mast (A) und am Gleitwagen (B).
2: Fahren Sie den Gleitwagen nach oben, und fixie-■
ren Sie diesen.
3: Zuerst verschrauben Sie den unteren Teil der■
Gasdruckfeder mit der Ösenschraube am Mast
und dann an der Ösenschrabe am Schirmarm.
Achtung: Einbauposition des Feder ist wichtig!!!
4:■Wichtig: Schrauben Sie die kleine Inbusschraube
in die Führungsschiene am Mast. Hiermit wird die
Höchstposition des Gleitwagens am Mast vorge-
geben.
5: Befestigen Sie die Kunststoffabdeckung auf dem Mast.■
4. MONTAGE ZUBEHÖR
4.1. LED -Beleuchtung
Der Anschlusskasten ist bereits am Mast befestigt.
1: Sie finden einen Bindfaden am Mast. Befestigen■
das Kabel von der LED- Beleuchtung am oberen
Ende des Bindfadens und ziehen Sie das Kabel
vorsichtig von oben nach unten durch den Mast.
2: Stecken Sie die LED Kabel und der 230V■
Sromanschluss in den Anschlusskasten.
3: Klemmen Sie die Kabel nach Anleitung im Kasten■
an. Achtung: Die Position und die richtige
Kabelfarbe ist beim Anklemmen wichtig.
4.2. Heizstrahler
Achtung: Der Heizstrahler wird mit einem extra Gleit-
wagen geliefert, an dem bereits Bohrungen für die Be-
festigung des Heizstrahler vorhanden sind.
1. Schieben Sie den Gleitwagen in den Mast.■
2. Schrauben Sie die Heizstrahler Konsole am■
Gleitwagen fest.
3. Verbinden Sie den Heizstrahler mit der Konsole.■
4. Befestigen Sie die Steckdose am Mast.■
5. Führen Sie die Zuleitung zur Steckdose.■
Achtung: jeder Heizstrahler hat 1.500Watt.
Kontaktieren Sie Ihren Elektriker.
Sicherheitshinweise für den Heizstrahler:
Berühren Sie nicht den Heizstrahler. Es besteht die■
Gefahr von Verbrennungen!
Stellen Sie sicher, dass der Heizstrahler außerhalb■
der Reichweite von Kindern ist!
Trennen Sie den Heizstrahler immer min. 10 Minuten■
vor dem Schließen der Schirme vom Stromnetz.
Den Heizstrahler nicht unbeaufsichtigt eingeschaltet■
lassen.
Immer die Regenrinnen (optional) entfernen, bevor■
Sie den Schirm schließen.
IP 65: Spritzwasser geschützt.■
Niemals die Heizstrahler über die Platine im■
Anschlusskasten mit anklemmen.
Achten Sie darauf, dass das Kabel nicht zu nah am■
Heizstrahler liegt.
5. BETRIEBSANLEITUNG
Besuchen Sie auch unsere Webseite: www.prostor.be.
Video P6: http://www.prostor.be/EN/product/Side-
poleumbrella/P6/Video.html
Video P7: http://www.prostor.be/EN/product/Side-
poleumbrella/P7/Video.html
5.1. Öffnen des Sonnenschirme
1: Nehmen Sie die Schutzhülle von dem■
Sonnenschirm.
2: Lösen Sie den Drehfeststeller am Gleitwagen und■
Schieben Sie diesen bis zum Anschlagspunkt
nach oben. Es ist wichtig, den Schirm ganz zu
öffnen, damit der Bezug perfekt sitzt, und sich
keine Wassersäcke bilden können. Achtung:
Stellen Sie sicher, dass der Schirm keine
Gegenstände berührt.
3: Drehen Sie den am Drehfeststeller am Gleitwagen■
fest.
-14-

5.2. Schließen des Sonnenschirmes
1: Lösen Sie den Drehfeststeller am Gleitwagen und■
lassen Sie den Gleitwagen am Mast herunter
gleiten. Achtung: Stellen Sie sicher, dass der
Schirm keine Gegenstände berührt.
2: Drehen Sie den am Drehfeststeller am Gleitwagen■
fest, wenn der Schirm komplett geschlossen ist.
3: Versehen Sie den Schirm mit der Schutzhülle■
5.3. Aufziehen der Schutzhülle
1: Führen Sie die Spitze der Schutzhülle über die■
Schirme mit Hilfe des eingenähten Handstabes.
2: Ziehen Sie die Schutzhülle runter indem Sie um den■
Schirm laufen.
3: Ziehen Sie den Reißverschluss nach unten zu.■
5.4. Abnehmen der Schutzhülle
1: Offnen Sie den Reißverschluss nach oben.■
2: Fassen Sie an den eingenähten Handstab, und■
drücken Sie die Schutzhülle senkrecht nach oben.
3: Laufen Sie dabei um den Schirm.■
5.5. Ein und Ausschalten der LED
1: Drücken Sie den <> Knopf unten auf der■
Fernbedienung bis die erste rote Kontrollleute
blinkt. (Kanal 1).
2: Dann drücken Sie auf den ΛKnopf um das LED■
Licht einzuschalten.
3: Drücken Sie den V Knopf um das Licht wieder■
auszuschalten.
5.6. Drehen des Sonnenschirmes um 300°
(nur bei Schirm P7)
Sie können den Schirm an der gewünschten Stelle
fixieren, indem Sie den Edelstahl Stift in den Drehteller
stecken (unterseite der Pfahl) und einrasten lassen.
6. WARTUNGSANLEITUNG
6.1 Reinigungsanletung des Stoffes
Reinigen Sie des Stoff mit lauwarmem Wasser und■
PH neutraler Seife. Spühlen Sie den Stoff
anschließend gut aus.
Lassen Sie den Bezug im freien trocknen. Nicht im■
Wäschetrockner.
Den Schirm nicht schließen, wenn der Bezug nicht■
vollständig getrocknet ist.
Niemals Scheuermittel oder Hochdruckreiniger■
verwenden.
Den Stoff nicht in der Waschmaschine reinigen.■
Verwenden Sie Imprägnierspray um den Bezug■
wieder wasserabweisend zu versiegeln.
6.2. Wartung und Reinigung des Gestells
Alle beweglichen Teile jährlich mit Silikonspray■
eisprühen.
Alle Kunststoffteile oder Aluminiom Teile dürfen nur■
mit Silikonspay gewartet werden.
Reinigen Sie den Mast und das Gestell je nach■
Bedarf mit Wasser. In salziger Umgebung ist dies
öfters zu tun.
Überprüfen Sie regelmäßig alle Verschraubungen,■
und ziehen Sie diese ggf. nach Garantie.
7. GARANTIEBEDINGUNGEN
7.1. Dauer der Garantie
Prostor gewährt auf die Sonnenschirme 2 Jahre ab
Rechnungsdatum. Die Garantie des Stoffes und der
Elektrik wird durch die jeweiligen Hersteller abgedeckt;
Reparaturen unter Garantie, bedeuten nicht, dass sich
die Gewährleistungsfrist verlängert.
7.2. Was ist in der Garantie enthalten?
Die Garantie deckt den Versand aller Ersatzteile frei
Haus zum Standort des Schirmes.
7.3. Was ist in der Garantie nicht
enthalten?
Schäden, die durch einen Unfall, Fahrlässigkeit,■
Sturm, Wind, Ansammlung von Wasser, falsche
Installation, nicht nach den Wartungsvorschriften
entsprechen, falsche Verwendung oder natürliche
Alterung entstanden sind.
Schäden, die durch die Exposition gegenüber gefähr-■
lichen atmosphärischen Stoffen verursacht.
Situationen durch Industrie oder einem hohen■
Salzgehalt entstanden sind.
Kleine Farbabweichungen zwischen dem Stoff und■
dem Farbmuster und zwischen den Komponenten
und Profilen, die von dem industriellen Prozess verur-
sacht wurden.
Schäden an Dritten. Reparaturkosten durch einen■
Dritten.
8. VERFAHREN IM FALL EINER REKLAMATION
Bitte kontaktieren Sie immer Ihren zertifiziert Prostor
Händler!
Ihr Fachhändler repariert Ihren Sonnenschirm oder wird
Ihnen helfen, herauszufinden, welche Teile ersetzt wer-
den müssen. Er wird diese bei Prostor bestellen und die
Reparatur so schnell wie möglich durchführen.
Verfahren, um durch den Händler befolgt werden
beim Ersetzen Teilen.
Kontaktieren Prostor Kundendienst, um eine■
Reklamationsnummer zu erhalten.
Geben Sie dem Händler den Produkt-Typ, die■
Seriennummer und die eine Beschreibung des
Problems.
Verpacken Sie das defekte Teil ordnungsgemäß ein,■
und versehen den Karton mit der
Reklamationsnummer.
Prostor beauftragt seinen Transporter, die Teile bei■
Ihnen abzuholen. Senden Sie keine Teile unfrei an
Prostor. Dier Annahme wird verweigert.
Falls Reparaturkosten auf Sie zukommen, wird■
Prostor sich mit Ihnen in Verbindung setzen.
Sie erhalten die reparierten Teile oder Ersatzteile so■
schnell wie möglich.
BESCHRÄNKTE GARANTIE
-15-
Prostor bietet folgende Produkte an:■
‘Prostor Cleaner (starke Textilreiniger) und ‘Prostor
Rain Guard’ (macht Tuch wasserabweisend).

De waarborgbepalingen zijn onderdeel van de leverings-, betalings-, en verkoopsvoorwaarden.■
Les termes de cette garantie font partie intégrante des conditions de livraison, de paiement et de vente.■
The warranty terms are part of the delivery terms, payment terms and sales conditions.■
Die Garantiebedingungen sind Bestandteil der Lieferbedingungen, Zahlungs- und Verkaufsbedingungen.■
Eindcontrole kwaliteitsnummer - Numéro de contrôle final - Final inspection quality number - Endkontrolle Qualitätsnummer
Stempel - adres verkoper - installateur■
Cachet - adresse revendeur - installateur■
Stamp - address dealer - installer■
Stempel - Adresse Händler - Installateur■
-16-
Brutsaert Trading - Lourdesstraat 84 - 8940 Geluwe (Belgium) - www.prostor.be - info@prostor.be
This manual suits for next models
1
Table of contents
Languages:
Popular Patio Heater manuals by other brands


Outsunny
Outsunny 842-111 instruction manual

Changzhou Gardensun Furnace
Changzhou Gardensun Furnace NCZH-G-SS manual

PAMAPIC
PAMAPIC ZHQ1580-WM-RM instruction manual

empasa
empasa Classic light HMXD-A user manual

Hortus
Hortus 211-352 instructions

Siabs
Siabs KALIENTE E Installation, use and maintenance guide