PROTMEX PT20C User manual

PT20C Weather Station Clock
WWVB RCC/NO RCC Version
User Manual

1
1. Functional Overview
1) Perpetual calendar;
2) RCC function (Only RCC version weather station has this function);
3) Multi-time zone clock, WWVB version supports time zones is US time zone
(Only RCC version weather station has this function);
4) Weekly display, support 7 languages (English, German, Italian, French,
Spanish, Dutch, Danish)
5) Personalized alarm clock, can be set to ring on weekdays, weekends or every
day, and has a snooze alarm clock function;
6) Moon phase;
7) Weather forecast function;
8) Temperature and humidity measurement function, support Celsius and
Fahrenheit;
9) The temperature measurement range of the signal receiver: -9.9℃~50 ℃
(14.2℉~122℉); when the temperature is higher than 50℃, the screen will
display “HH.H”; when it is lower than -9.9℃, it will display “LL.L” ";
10) Wireless sensor temperature measurement range: -40°C to 70°C (-40°F~
158 ° F); when the temperature is higher than 70 ° C, the screen displays
"HH.H"; when it is lower than -40°C, it displays "LL.L" ";
11) Receiver and sensor humidity measurement range: 20-99%; when the relative
humidity of the air is higher than 99%, the screen displays "HH"; when it is
lower than 20%, it displays "LL";

2
12) Air pressure measurement range: 800~1100 hPa, error range: ±2hPa, and
the supported unit systems are: hPa / mb / inHg / mmHg;
13) The data trend of indoor and outdoor temperature/humidity/air pressure;
14) Maximum and minimum temperature and humidity recording function;
15) Dew point temperature;
16) Frost alarm function;
17) Temperature alarm function;
18) Heat index;
19) Indoor comfort graded expressions;
20) The PT20C signal receiver can connect up to 3 signal sensors at the same
time, and display the data of each sensor on the receiver screen in a carousel
mode;
21) Low battery alarm;
22) LCD backlight;
23) Power supply: The receiver needs 3 batteries with a specification of "AAA (LR
03)" or a power input with a specification of "DC 5V"; the wireless sensor only
needs 2 batteries with a specification of "AAA (LR 03)".
3
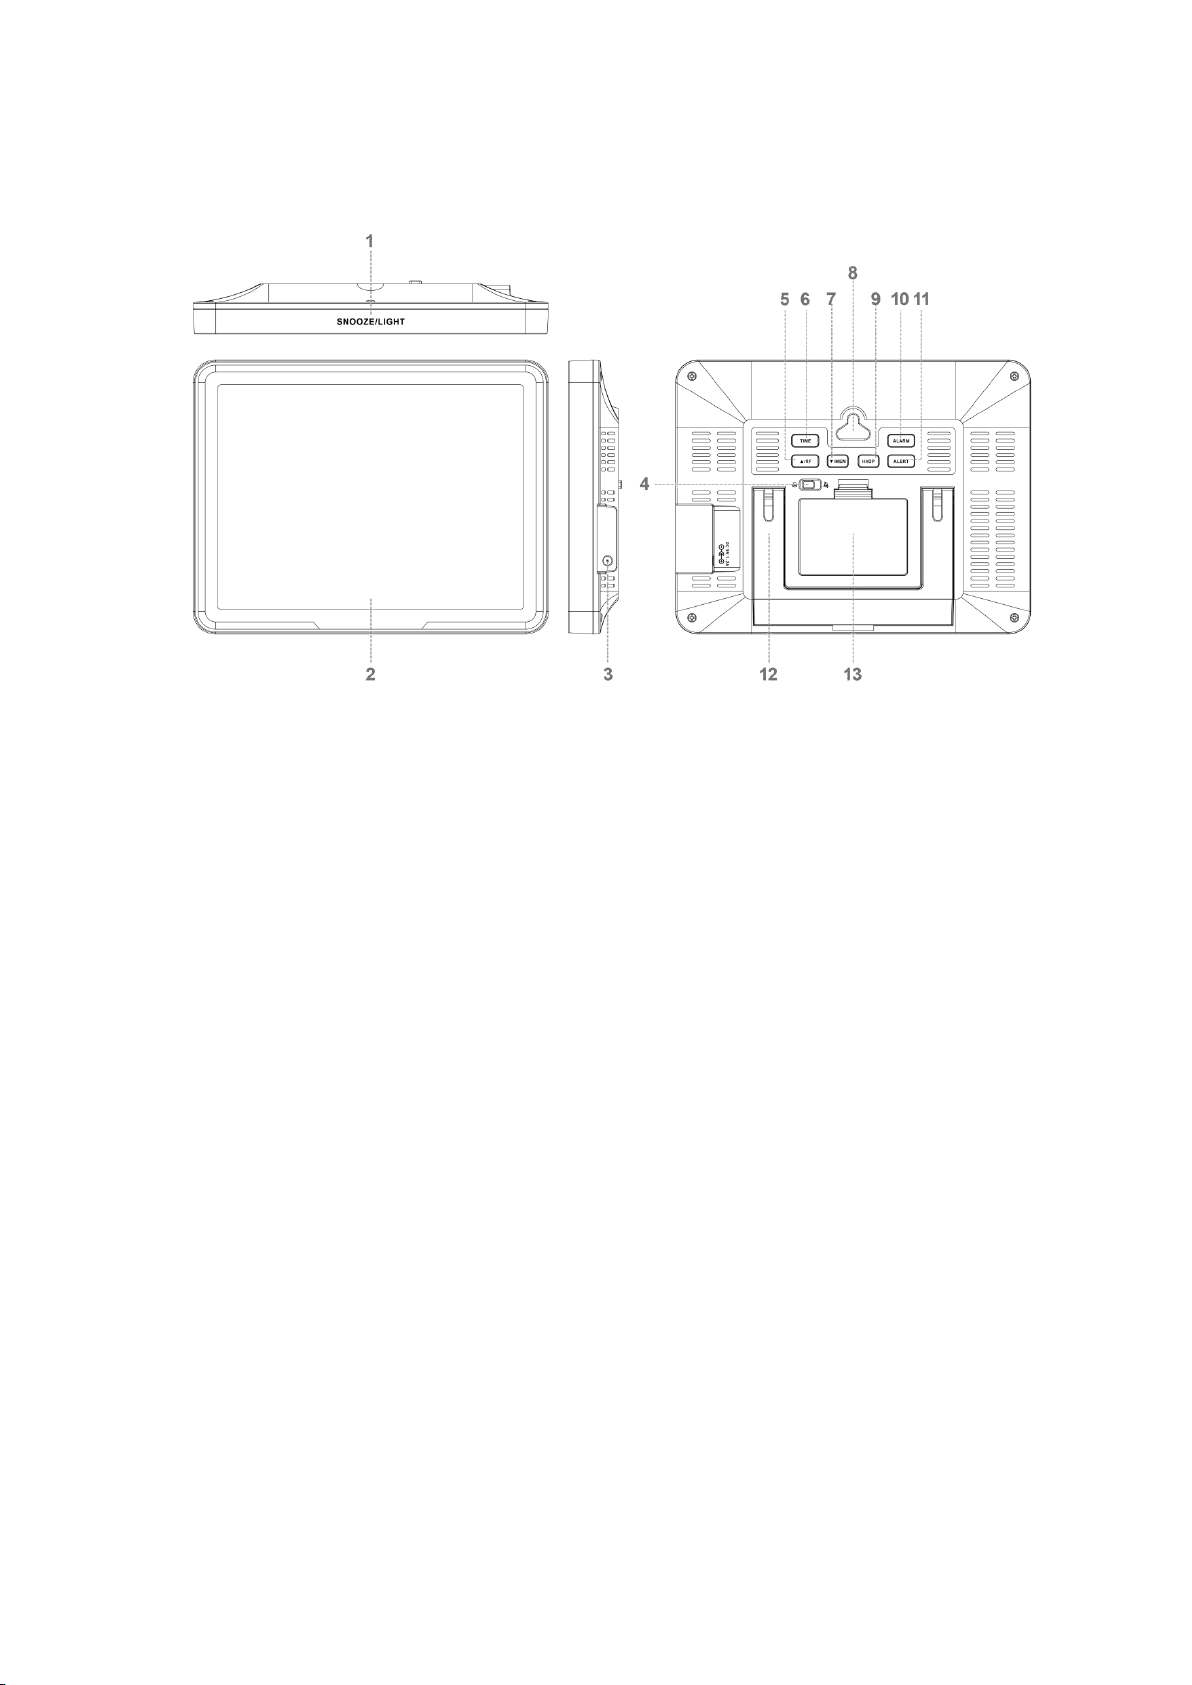
2. Appearance & Screen Display Introduction
1) Snooze alarm clock and backlight wake up, touch sensing area;
2) LCD display;
3) Power adapter socket;
4) Alarm clock switch
5) "▲/RF" key;
6) "TIME" key;
7) "▼/MEM" key;
8) Hook up hole;
9) "HI/DP" key;
10) “ALARM” Key;
11) “ALERT” Key;
12) Folding support frame;
13) Battery compartment.

4
1) LCD Screen;
2) °C / °F Switch Button;
3) Hanging Hole;
4) Channel Switch Button;
5) Transmit signals immediately;
6) Battery compartment;
7) Support piece.
5
1) Frost alarm;
2) Weather forecast;
3) Temperature alarm;
4) Signal channel;
5) The maximum and minimum outdoor temperature and humidity;
6) Sensor low battery alarm;
7) Outdoor temperature;
8) Outdoor temperature change trend;
9) Outdoor dew point temperature;
10) Outdoor heat index;
11) Outdoor humidity change trend;

6
12) Outdoor relative humidity;
13) Date;
14) Moon phase;
15) Weekly display;
16) The maximum and minimum indoor temperature and humidity;
17) Signal receiver low battery alarm;
18) Indoor temperature change trend;
19) Indoor relative humidity change trend;
20) Indoor relative humidity;
21) Graded expressions of indoor comfort;
22) Indoor temperature
23) Alarm clock;
24) Time;
25) Daylight saving time (only WWVB version);
26) Time zone (only RCC version);
27) RCC signal (only RCC version);
28) Air pressure;
29) Air pressure change trend.
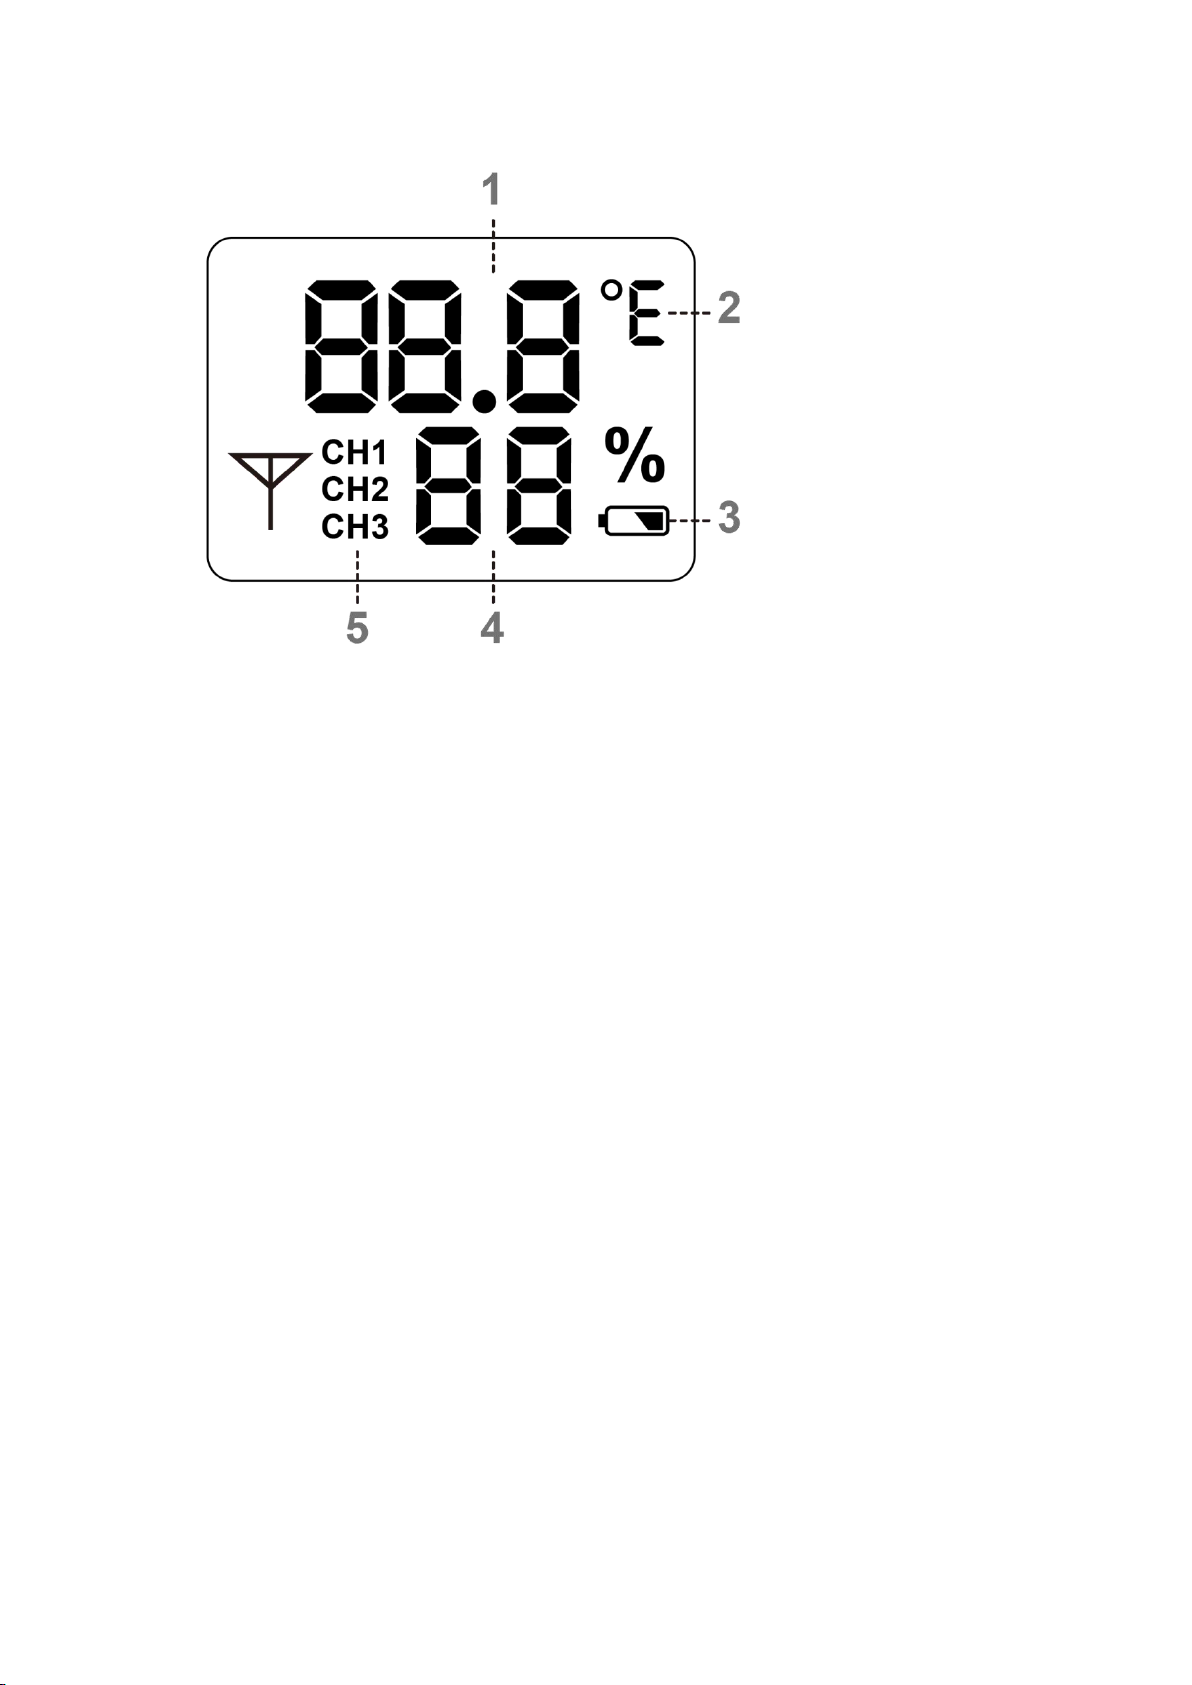
7
1) Temperature;
2) Celsius or Fahrenheit units;
3) Sensor low battery alarm;
4) Relative humidity;
5) Signal channel.
3. Power On & Reset
When the signal receiver is powered on or reset, the full screen display lasts for 3
seconds, and the backlight is on. Then, the buzzer emits a beep to detect and
display the real-time indoor temperature and humidity. At the same time, enter
the RF signal receiving state, automatically search for and connect to nearby
signal sensors, and automatically enter the RCC search and receive state;

8
After power on, the screen display will display the content by default, as shown in
the following table:
4. Setup & Operation
The relationship between keys and operations is shown in the following table:
version
Display type
display
time
Mont
h/Day
date
Default
language of
the week
Tempera
ture unit
Time
zone
AL1 time
AL2 time
WWVB RCC US
12:00AM
(12 hour
clock)
M/D
January 1st , 2021
English
℉
EST
7:00AM,
Off by
default
1:30PM,
Off by
default
WWVB NO RCC US
12:00AM
(12 hour
clock)
M/D
January 1st , 2021
English
℉
NO
7:00AM,
Off by
default
1:30PM,
Off by
default
operating
button
【TIME】
【ALARM
】
【ALERT】
【HI/DP】
【▲/RF】
【▼/MEM】
【SNOOZE/LI
GHT】
Alarm clock
toggle
switch
General
mode
Single
press
------
Switch
time/alarm
1/alarm 2
temperatur
e alarm
on/off
Switch
current
temperature
/heat
index/dew
point
temperature
Switch display of CH1,
CH2, CH3 temperature
and humidity
Switch to view
current/maximu
m/minimum
temperature and
humidity
Turn on the
backlight /
switch
brightness
level
Alarm clock
on&off/Soun
d on&off
Keep
pressi
ng
Enter
setting
mode
Enter
alarm
settings
Enter
temperatur
e alarm
setting
Temperature
unit switch
Clear outdoor channel
data and search signal
again
Maximum and
minimum
interface clear
memory value
RCC
receive/stop(O
nly RCC
version)
------
Setting
mode
Single
press
Select
setting
item/Con
firm
setting
Select
setting
item/Confi
rm setting
Select
setting
item/Confir
m setting
------
Single step increment
Single step
decrement
------
------
Keep
pressi
ng
-----
------
------
------
8 steps/sec increment
8 steps/sec
decrement
------
------

9
Time setting: long press the "TIME" button for two seconds, the specific process
is shown in the following table:
Note:
1) The week changes with the year, month and day;
2) The annual setting range is 2020~2099;
3) The second returns to zero when the minute is set;
4) Single press the "TIME" key to confirm the setting result and move to the next
setting item;
5) Single press the "▲/RF" key to set the item one step forward; long press for
more than 2 seconds, it will advance at the speed of 8 steps per second;
6) Single press the "▼/MEM" key to go back one step of the setting item; long
press for more than 2 seconds, it will go back at 8 steps per second;
7) No operation within 20 seconds will save the settings and exit the setting
mode;
WWVB
RCC US
Weather
pattern→
RCC
ON/OFF
→
Time
zone
→
Lang
uage
→
12/24H
→
hour
→
min
ute
→
year
→
DM/MD
→
month→
day
→
Air
pressure
value
unit→
DST
on/off
→
drop
out
WWVB NO
RCC US
Weather
pattern→
Language
→
12/24
H→
hour
→
minute
→
year
→
DM/
MD
→
mon
th→
day→
Air
pressure
value
unit→
drop
out
/
/
/
Table of contents
Popular Clock manuals by other brands

Silicon Laboratories
Silicon Laboratories SI5324 manual

Heathkit
Heathkit GC-1005 Assembly manual

Oregon Scientific
Oregon Scientific PRYSMA RMR221P manual

Andrew O'Malley
Andrew O'Malley DOTKLOK Assembly instructions

ALGE-Timing
ALGE-Timing ASC3 manual

Bodet
Bodet Profil 960 Installation and operating instructions


Progetti
Progetti KALIMERO Directions

La Crosse Technology
La Crosse Technology WT-3141b Quick setup instructions

La Crosse Technology
La Crosse Technology W86531 owner's manual

Sharp
Sharp SPC900 instruction manual

La Crosse Technology
La Crosse Technology 404-50447 quick start guide

Datexx
Datexx DF0063 quick guide