Protos BT-COM User manual

Stand:01.03.2020
BEDIENUNGSANLEITUNG
USER MANUAL

EN
DE
INHALTSVERZEICHNIS TABLE OF CONTENT
EINLEITUNG 4
PACKUNGSINHALT 6
BEDIENELEMENTE 8
GRUNDLAGEN 10
Optimale Umgebungsgeräuschunterdrückung 12
Einflüsse auf die Reichweite 12
Funktionsweise des BT Com® Intercom Netzwerk 14
VERBINDEN 16
Einmalige Inbetriebnahme eines Protos® Intercom Netzwerks 16
Täglicher Gebrauch eines Protos® Intercom Netzwerks 18
Koppeln mit einem Bluetooth-fähigen Gerät 20
Telefonate im verbundenen Protos® Intercom Netzwerk 22
Verbindung mit einem zusätzlichen Gerät, z.B. Funkgerät 24
Verbindung mit einem zusätzlichen Gerät, z.B. zweites Smartphone 26
MONTAGE 28
Montage der BT Com Kapsel in den Protos® Integral 28
LADEN 30
Laden der Batterie 30
REINIGUNG 32
Reinigung und Pflege Ihres BT Com 32
APP 34
Protos® Control App 34
Protos® Control für Android (Samsung, Sony, usw.) 34
Protos® Control für IOS (iPhone) 34
HÄUFIGE FRAGEN 36
Häufige Fragen 36
INTRODUCTION 5
PACKAGE CONTENT 7
CONTROL ELEMENTS 9
BASICS 11
Ideal surrounding noise suppression 13
Impacts on the range 13
Operating principle of the BT Com® Intercom Network 15
CONNECT 17
Setting up a new Protos® Intercom Network 17
Day-to-day use of an existing Protos® Intercom Network 19
Pairing with a Bluetooth device 21
Phone calls within an active Protos® Intercom Network 23
Connection with an additional bluetooth device, e.g. radio device 25
Connection with an additional device, e.g. second Smartphone 27
MOUNTING 29
Mounting of the BT Com muff into the Protos® Integral 29
CHARGING 31
Charging the battery 31
CLEANING 33
Cleaning and care of your BT Com 33
APP 35
Protos® Control App 35
Protos® Control for Android (Samsung, Sony, etc.) 35
Protos® Control for IOS (iPhone) 35
FAQ 37
Frequently asked questions 37
2 3

EN
DE
EINLEITUNG INTRODUCTION
Congratulations on your decision on the
Protos® BT Com communication device
for up to four participants. This product
has been developed by implementing the
most current electronic know how. You
can use the BT Com in combination with
a Protos® Integral or with the Protos®
Headset Integral as a hands-free kit for
Bluetooth mobile phones and to receive
music from Bluetooth enabled audio
devices. You can also have conversations
with up to three other BT Com users over
the Intercom Network.
To benefit from all the technical options of
your device please read these instructions
carefully. You can find step by step instruc-
tion videos as well in the Protos® Control
App under the chapter “Help”, or you can
scan the QR codes on the following pages.
The BT Com offers you the following
functions:
•Four way intercom conference
•Bluetooth headset for Bluetooth capa-
ble devices as e.g.:
• mobile phones
• audio devices
• GPS navigation devices
• radio devices
•Bluetooth intercom with a range up to
max. 600 m *
•Clear and natural sound in HD quality
•Hearing protection according to EN352
(for devices with sound insulation inserts)
•Self organizing, self healing Intercom
Network: in case a participant leaves, the
network will be build up again automat-
ically.
•Smart Phone app for IOS (iPhone) and
Android
4 5
* abhängig vom Gelände * dependent on open field conditions
BT Com Bedienung
Gratulation, dass Sie sich für das Protos®
BT Com Kommunikationssystem für bis
zu vier Teilnehmer entschieden haben.
Das BT Com wurde nach den neuesten
elektronischen Erkenntnissen für Sie ent-
wickelt. Sie können es in Verbindung mit
dem Protos® Integral oder dem Protos®
Headset Integral als Freisprechanlage
für Bluetooth Mobiltelefone und zum
Empfang von Musik von Bluetooth Au-
diogeräten nutzen. Außerdem können Sie
Unterhaltungen mit bis zu drei anderen
BT Com Nutzern führen.
Um die technischen Möglichkeiten Ihres
Gerätes voll auszuschöpfen, lesen Sie
bitte diese Anleitung sorgfältig durch. Sie
können sich die Bedienung auch per Video
erklären lassen, indem Sie in der Protos®
Control App über den Menüpunkt „Hilfe“
auf unsere Videos zugreifen oder die
jeweiligen QR-Codes scannen.
Das BT Com bietet Ihnen folgende Funk-
tionen:
•Vier-Wege-Konferenz-Gegensprechan-
lage
•Bluetooth Headset für Bluetooth-fähige
Geräte wie z.B. :
• Mobiltelefone
• Audiogeräte
• GPS Navigationsgeräte
• Funkgeräte
•Bluetooth Gegensprechanlage, Reich-
weite bis max. 600 m*
•Klarer, natürlicher Klang in HD Qualität
•Gehörschutz gemäß EN352 (bei Geräten
mit Dämmeinlage)
•Selbst-organisierendes, selbstheilendes
Intercom Netzwerk: Verlassen Teilnehmer
die Konferenz baut sich diese mit den
verbleibenden Teilnehmern automatisch
wieder auf.
•Smartphone App für IOS (iPhone) &
Android

EN
DE
PACKUNGSINHALT PACKAGE CONTENT
4
3
2
1
6 7
4Transporttasche Carrying case
3USB-Ladebügel USB charging bracket
2Schwanenhalsmikrofon Goose-neck microphone
1Bluetooth Funkkapsel Bluetooth communication
earmuff

EN
DE
BEDIENELEMENTE CONTROL ELEMENTS
4
Multifunktionstaste Multi-function button
3
LED Anzeige LED Indicator
1
Aufwärtstaste Up button
2
Abwärtstaste Down button
8 9
43
2
1

EN
DE
GRUNDLAGEN BASICS
Einschalten
Drücken Sie die Multifunktionstaste (4)! Es ertönt ein aufsteigendes Signal und die
LED (3) blinkt 2x rot alle 2 Sek.
Lautstärkereglung
Betätigen Sie kurz die Aufwärtstaste (1), um die Lautstärke zu erhöhen, oder die Ab-
wärtstaste (2), um die Lautstärke zu reduzieren! Es ertönt jeweils ein kurzes Bestäti-
gungssignal. Bei jeder Betätigung wird die Lautstärke um eine Stufe lauter bzw. leiser.
Bei maximaler oder minimaler Lautstärke ertönt ein langes Tonsignal.
Stummschaltung
Um das Mikrofon stumm zu schalten, drücken sie kurz die Multifunktionstaste (4)!
Dies wird durch eine Tonfolge bestätigt. Erneutes Antippen reaktiviert das Mikrofon.
Diese Funktion ist nur während eines Anrufs oder im Protos® Intercom Netzwerk
verfügbar.
Verlassen des Netzwerkes
Um ein BT Com aus dem Netzwerk zu trennen, betätigen sie die Aufwärtstaste (1) ca.
3 Sek. lang! Ein absteigendes Signal ertönt. Zum erneuten Verbinden, drücken Sie
wiederum die Aufwärtstaste (1)! Ein aufsteigendes Signal ertönt.
Ausschalten
Drücken Sie lange die Multifunktionstaste (4)! Es ertönt ein Mehrfachsignal. Die LED
(3) leuchtet 2 Sek. rot auf und erlischt anschließend.
Power On
Press the multifunction button (4). You will hear an ascending signal and the LED (3)
flashes 2x red every 2 sec.
Volume + / -
Briefly press the up button (1) to increase or down button (2) to decrease the volume.
A short confirmation signal sounds. Each click increases the volume by one level. When
the maximum or minimum volume is reached a long signal sound will be audible.
Mute
To mute the microphone, briefly press the multifunction button (4). This will be con-
firmed by a tone sequence. Press again to reactivate the microphone.
This function is only applicable in combination with a call or in the Protos® Intercom
Network.
Access the network
To disconnect a BT Com from the Protos® Intercom Network press the up button (1) for
approx. 3 sec. A descending signal will confirm the selection. To re-connect, press the
up button (1) again and an ascending signal will sound for confirmation.
Power Off
Press the multifunction button (4) for a long time until a signal is audible. The LED (3)
lights up red for 2 sec. and then turns off.
10 11

EN
DE
GRUNDLAGEN BASICS
Optimale Umgebungsgeräuschunterdrückung
Bei der Entwicklung Ihres BT Com stand eine störungsfreie Kommunikation
im Vordergrund.
Störende Umgebungsgeräusche während des Sprechens werden durch die
Verwendung eines Richtmikrofons sowie einer eingebauten Umgebungs-
geräuschunterdrückung wirksam reduziert. Hierfür ist es notwendig, das
Mikrofon so nahe wie möglich am Mund zu platzieren, um die optimale
Wirkung zu erreichen. Das aufgedruckte Logo sollte hierbei nach außen und
die Markierung am Schwanenhals Richtung Mund zeigen.
Einflüsse auf die Reichweite
Die Reichweite von Funkwellen wird nicht nur durch das Gelände, wie z.B.
Bäume, Strommasten oder Morast, sondern auch durch den menschlichen Körper re-
duziert. Dies liegt unter anderem daran, dass die Wellen durch Wasser, z.B. im mensch-
lichen Körper, in Bäumen und bei Regen, gedämpft werden. Somit verändert sich auch
je nach Kopfstellung die Reichweite. Das Intercom Netzwerk ist so aufgebaut, dass die
Reichweite durch einen Zwischenteilnehmer jeweils verlängert wird.
Ideal surrounding noise suppression
One of the major goals in the development of this product was an inter-
ferance-free communication.
During communication interfering noise is reduced efficiently by the
use of a near-field microphone as well as by a built in noise cancellation
function. For optimum communication, place the microphone as close
to the mouth as possible. The red logo should be pointing to the outside
and the white dot on the goose neck towards the mouth. In this way
the special near-field microphone capsule is optimaly placed to prevent
picking up disturbing surrounding noises.
Impacts on the range
The range of radio waves is reduced not only by the surrounding area, e.g. trees, power
lines and marsh land, but also by the human body. This is because waves are absorbed
by water (eg. in the human body, by rain or in trees). In this way the radio range of the
BT Com will be influenced by the positioning of the heads. The Intercom Network is
developed so that with each linked device the range will be extended.
Reduzierte Reichweite
Reduced range
Verbesserte Reichweite
Improved range
12 13

EN
DE
GRUNDLAGEN BASICS
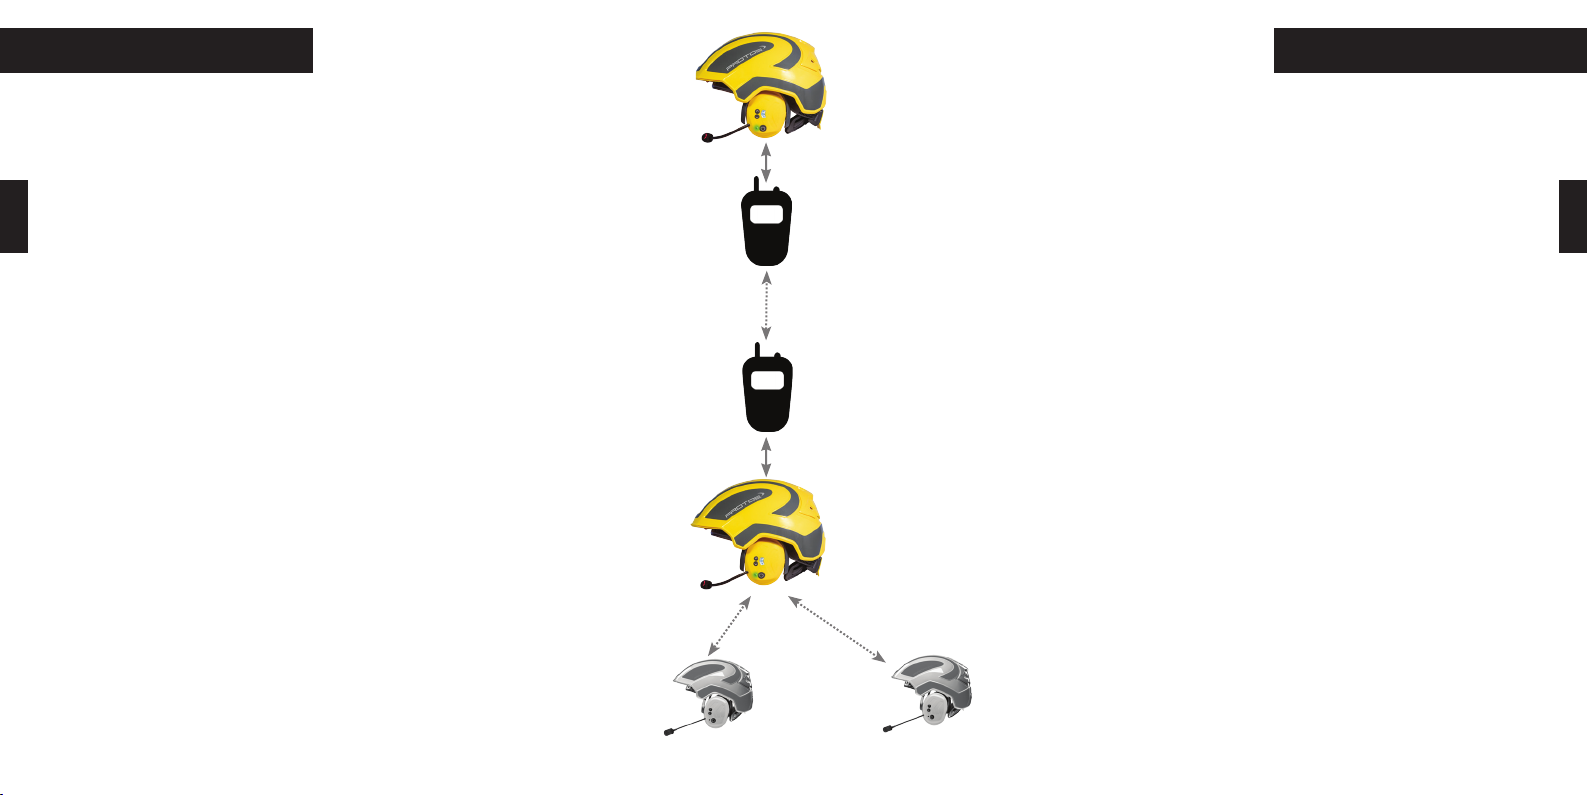
Funktionsweise des BT Com® Intercom Netzwerk
Nach einmaliger Kopplung (S. 16) verbinden sich bis zu vier Protos® BT Com Funkkap-
seln selbstständig zu einem Intercom Netzwerk, so dass alle Teilnehmer miteinander
kommunizieren können. Betritt ein gekoppeltes Gerät den Netzbereich wird dieses
automatisch integriert. Ebenso wird beim Verlassen eines Geräts dieses selbständig
ausgegliedert. Durch Drücken der Aufwärtstaste (1) kann dieser Vorgang beschleunigt
werden. Entsteht eine Lücke in der Kette, wird diese automatisch geschlossen.
Zwischen jedem Glied der Kette besteht eine maximale Reichweite von 250 m. Die
Reichweiten addieren sich. Sie werden jedoch maßgeblich von den im vorigen Kapitel
erwähnten Faktoren beeinflusst.
Endglied 1
LED blinkt grün
End device 1
LED flashes green
Bindeglied
LED blinkt 2x grün
Link device
LED flashes 2x green
Bindeglied
LED blinkt 2x grün
Link device
LED flashes 2x green
Endglied 2
LED blinkt grün
End device 2
LED flashes green
Operating principle of the BT Com® Intercom Network
After the initial pairing (page 16) up to four Protos® BT Com communication earmuffs
will link automatically to an Intercom Network so that all participants can commu-
nicate with each other. If an already paired device enters the range of the Network
it will be integrated automatically. By pushing the up button (1) the connection and
disconnection can be accelerated. If a device leaves the reach of the Network it will be
linked out and the missing link in the chain will be closed autonomously.
In-between each linked device a maximum range of 250 m can be reached. The ranges
sum but, nevertheless, they are highly impacted by the surrounding factors as ex-
plained in the previous chapter.
14 15

EN
DE
VERBINDEN CONNECT
Einmalige Inbetriebnahme eines Protos® Intercom Netzwerks
Um bis zu vier BT Com Funkkapseln zu verbinden, führen Sie bitte die Schritte 1-3
einmalig aus!
1.) Kopplung an Kapsel 1 auslösen
Drücken Sie gleichzeitig die Multifunktionstaste (4) und Aufwärtstaste (1)! Die LED (3)
blinkt abwechselnd in rot-grün.
2.) Kopplung an Kapsel 2 auslösen
Drücken Sie gleichzeitig die Multifunktionstaste (4) und Aufwärts-
taste (1). Die LED (3) blinkt abwechselnd rot-grün, die Kopplung mit
Kapsel 1 beginnt. Nach einigen Sekunden wechselt die LED (3) zu
violett. Nach einer Minute wird die erfolgreiche Kopplung mit grünem
Blinken bestätigt.
3.) Kopplung an Kapsel 3 und Kapsel 4 auslösen
Um Kapsel 3 ins Netzwerk einzubinden, wiederholen Sie die
vorherigen Schritte mit Kapsel 2 und Kapsel 3! Verfahren Sie
ebenso mit Kapsel 3 und 4, um Kapsel 4 einzubinden!
Für die Benutzung des Intercom Netzwerkes im täglichen Gebrauch beachten Sie bitte
die Anweisungen auf S.18!
Setting up a new Protos® Intercom Network
To connect up to four BT Com communication earmuffs, please execute the following
steps once:
1.) Start pairing mode for communication earmuff 1
Simultaneously press the multifunction button (4) and the up button (1).
The LED (3) flashes alternately in red-green.
2.) Start pairing mode for communication earmuff 2
Simultaneously press the multifunction button (4) and the up button
(1). The LED (3) flashes alternately red-green. Pairing with earmuff 1
begins. After a few seconds, the LED (3) turns purple. After one min-
ute, the LEDs (3) confirm successful pairing by flashing in green.
3.) Pairing earmuff 3 and earmuff 4
To connect earmuff 3 to the network, repeat the above described
steps with earmuff 2 and earmuff 3. Proceed accordingly with ear-
muff 3 and 4 to pair earmuff 4 into the Network.
The every day use of the Protos® Intercom Network is described on page
19.
NOTE: The initial pairing might take some time. Afterwards the devices recognize
each other and the connection will be built up faster.
16 17
4
3
2
1
HINWEIS: Anfänglich kann der Verbindungsaufbau zwischen den Geräten etwas
mehr Zeit in Anspruch nehmen. Danach erkennen sich die Geräte und der Verbind-
ungsaufbau erfolgt schneller.

EN
DE
VERBINDEN CONNECT
Day-to-day use of an existing Protos® Intercom Network
Day-to-day operation of the BT Com in an existing Protos® Intercom Network:
1.) Turn on all BT Com communication earmuffs
Press the multifunction button (4) for 3 sec. on all earmuffs. An ascending signal will
sound and the LED (3) will flash 2x red every 3 sec..
2.) Connect into a known Network
For all earmuffs to be connected, press the up button (1) for 2 sec.. Hereby the order of
the earmuffs doesn’t matter. The LED (3) will flash green.
3.) Disconnect a BT Com earmuff from the Network
To disconnect a communication earmuff from the Network, press the up button (1) for
about 3 sec. until a descending signal sounds. The capsule is now disconnected from
the Network.
To reconnect, press the up button (1) again until an ascending signal sounds.
4.) Mute
Press the multifunction button (4) shortly to mute the BT Com. You will hear a descend-
ing signal. To disable the mute function please press the multifunction button again
(4)!
Täglicher Gebrauch eines Protos® Intercom Netzwerks
Tägliche Inbetriebnahme der BT Com Kapseln mit bestehendem Protos® Netzwerk:
1.) Alle BT Com Kapseln einschalten
Bei allen im Einsatz befindlichen Kapseln die Multifunktionstaste (4) 3 Sek. lang drü-
cken. Es ertönt ein aufsteigendes Signal; die LED (3) blinkt alle 3 Sek. 2x rot.
2.) Verbinden in ein bekanntes Netzwerk
Bei allen zu verbindenden Kapseln 3 Sek. lang die Aufwärtstaste (1) drücken. Die Rei-
henfolge der Kapseln spielt dabei keine Rolle. Die LED (3) blinkt grün.
3.) Verlassen des Netzwerks
Um eine Kapsel aus dem Netzwerk zu trennen, betätigen sie die Aufwärtstaste (1) ca.
3 Sek. lang, bis ein absteigendes Signal ertönt! Die Kapsel ist nun vom Netzwerk ge-
trennt. Um sie erneut zu verbinden, drücken sie abermals die Aufwärtstaste (1) - siehe
Punkt 2.) - bis ein aufsteigendes Signal ertönt.
4.) Stummschaltung
Sie können das BT Com stumm schalten, indem Sie die Multifunktionstaste (4) kurz
gedrückt halten. Es ertönt ein absteigendes Signal. Um die Stummschaltung aufzuhe-
ben, drücken Sie erneut kurz die Multifunktionstaste (4)!
18 19
HINWEIS: Falls seit der letzten Kopplung ein “Reset” durchgeführt wurde, muss
eine Neuerstellung des Netzwerkes erfolgen. Setzen Sie alle Geräte im Netzwerk
zurück und führen Sie die Schritte unter “Verbinden - Inbetriebnahme Intercom
Netzwerk” (S. 16) aus!
NOTE: If a “Reset” has been carried out since the last coupling, the network must
be set up again. To do this, reset all devices and follow the steps under “Connect -
Set up of a new Intercom Network” (page 17).

EN
DE
VERBINDEN CONNECT
Pairing with a Bluetooth device
To connect your BT Com to a Bluetooth enabled device, such as a mobile phone or
MP3 player, proceed as follows:
1.) Switch on the BT Com by pressing the multifunction button (4).
2.) Please ensure that Bluetooth is activated on your mobile phone.
3.) Start pairing to the communication earmuff
Turn on the communication earmuff. Simultaneously press the multifunction button
(4) and the up button (1). The LED (3) starts to flash alternately red-green. After a few
seconds “Protos® BT Com” will appear on the display of the Bluetooth device. Confirm
the connection. After successfully pairing the LED (3) will flash twice periodically blue.
4.) Receive and reject incoming phone calls
To answer an incoming call with your BT Com, briefly press the multifunction button
(4). To reject an incoming call, press the
multifunction button (4) for 3 sec..
5.) Redial
Shortly press the multifunction button (4)
to redial the last called phone number.
Koppeln mit einem Bluetooth-fähigen Gerät
Sie können Ihr BT Com mit einem Bluetooth-fähigen Gerät, wie z.B. Mobiltelefon oder
Bluetooth-fähigem MP3-Player, verbinden. Gehen Sie dazu wie folgt vor!
1.) Schalten Sie das Gerät über die Multifunktionstaste (4) ein!
2.) Stellen Sie sicher, dass Bluetooth in den Einstellungen Ihres Mobiltelefons akti-
viert ist!
3.) Kopplung an der Kapsel auslösen
Stellen Sie sicher, dass die Kapsel eingeschaltet ist und drücken Sie gleichzeitig die
Multifunktionstaste (4) und die Aufwärtstaste (1). Die LED (3) blinkt abwechselnd rot-
grün. Nach einigen Sekunden erscheint “Protos® BT Com” auf dem Display. Bestätigen
Sie die Verbindung durch Antippen! Bei erfolgreicher Kopplung blinkt die LED (3) in
regelmässigen Abständen 2x blau auf.
4.) Eingehende Telefonanrufe entgegennehmen und abweisen
Um einen eingehenden Anruf direkt am BT Com anzunehmen, drücken Sie kurz die
Multifunktionstaste (4)! Um einen eingehenden Anruf abzuweisen,
drücken Sie die Multifunktionstaste (4) 3 Sek. lang!
5.) Wahlwiederholung
Drücken Sie kurz die Multifunktionstaste (4), um die letzte gewählte
Rufnummer erneut anzurufen!
20 21

EN
DE
CONNECT
VERBINDEN
Telefonate im verbundenen Protos® Intercom Netzwerk
1.) Eingehenden Anruf annehmen
Zum Annehmen des Anrufes drücken Sie die Multifunktionstaste (4)
ACHTUNG: Die bestehende Verbindung zum Netzwerk wird unterbrochen.
2.) Eingehenden Anruf abweisen
Zum Abweisen des Anrufes drücken Sie die Multifunktionstaste
(4) 3 Sek.! Die Verbindung zum Netzwerk bleibt bestehen.
3.) Beenden eines Anrufs
Zum Beenden eines Gespräches drücken Sie die Multifunktions-
taste (4)! Nach dem Beenden des Anrufs werden Sie automatisch
wieder in das Protos® Intercom Netzwerk integriert.
4.) Sprachassistent
Durch zweimaliges Betätigen der Multifunktionstaste (4) kurz
hintereinander, können Sie den Sprachassistenten Ihres Mo-
biltelefons aktivieren.
Phone calls within an active Protos® Intercom Network
1.) Answer a phone call
To answer an incoming call briefly press the multifunction button (4).
ATTENTION: your BT Com will be disconnected from the Protos® Intercom Network.
2.) Reject a phone call
To reject an incoming call press the multifunction button (4) for 3 sec..
The connection to the Protos® Intercom Network will be maintained.
3.) Hanging up on a call
To hang up on a call, press the multifunction button (4).
After you finished the call you will automatically be re-connected to the Protos® Inter-
com Network.
4.) Voice assistant
By pushing the multifunction button (4) twice shortly you can
activate the voice assistant of your smart phone.
HINWEIS FÜR EINE GEFAHRENSITUATION:
Ihre Sicherheit ist uns wichtig. Deswegen wollen wir
Sie an dieser Stelle nochmals ausdrücklich darauf
hinweisen, dass Sie in einer gefährlichen Situation
keine Anrufe entgegennehmen oder Musik hören
sollten.
NOTE FOR EMERGENCY SITUATIONS:
Your safety is our priority. This is why we ask you not to
take any phone calls or listen to music in any critical or
emergency situation.
22 23
EN
DE
VERBINDEN CONNECT
Verbindung mit einem zusätzlichen Gerät, z.B. Funkgerät
Sie können Ihren BT Com mit bluetoothfähigen Funkgeräten verbinden.
1.) Bitte prüfen Sie im App Store, ob auf Ihrem Smartphone die neueste App Versi-
on installiert ist. Vergewissern Sie sich anschließend mit Hilfe der Protos® Control
App, dass die Software Version Ihres BT Com‘s auf dem neuesten Stand ist.
2.) Stellen Sie sicher, dass Ihr BT Com angeschalten und mit der App verbunden ist
(siehe S.32).
3.) Gehen Sie in die Protos® Control App, wählen Sie in der Kachel „zusätzliches
Gerät“ im Auswahlmenü „Funkgerät“ die Marke und den Typ Ihres Funkgeräts aus.
4.) Aktivieren Sie den Koppelungsvorgang in Ihrem Funkgerät und drücken Sie die
Taste „Koppeln“ in der Protos® Control App. Eine Ansage bestätigt die erfolgreiche
Verbindung mit den Worten „radio connected“.
5.) Wenn Sie die Abwärtstaste lange drücken wechselt das Gerät in den Zweit-
gerätemodus, die LED leuchtet blau und die Ansage „radio mode“ ertönt.
6.) Durch erneutes langes Drücken der Abwärtstaste kommen Sie zurück in
den Erstgeräte Bedienmodus „primary mode”, die LED blinkt.
7.) Durch langes Drücken der Aufwärtstaste können Sie jederzeit in das Pro-
tos® Intercom Netzwerk zurückwechseln.
Im 2ten Geräte Modus dient die Multifunktionstaste als Push to talk Taste
(Ptt-Taste), d.h. nur bei Gedrückhalten wird der Sprachkanal geöffnet.
Connection with an additional bluetooth device, e.g. radio device
you can connect your BT Com with bluetooth compatible radio devices.
1.) Please check in the App Store that the newest version of the app is instaled on
your smarphone. Afterwards you can check with the Protos® Control App that you
have installed the most current software on your BT Com.
2.) Make sure that your BT Com is turned on and connected to the app (see p. 32)
3.) Select the BT Com and then the tile “additional device“ in the Protos® Control App.
There you will find a selection menu, choose “radio device“. Select the brand and the
type of your radio device there.
4.) Activate the pairing mode on your radio device and select “pairing” in the Protos®
Control App. The voice prompt “radio connected” confirms the successfull connection.
5.) By pressing the down button for 3 seconds the BT Com will switch to the second
device mode, the LED will flash blue and the voice prompt will state “radio mode“.
6.) If you press the down button for 3 seconds again you will go back to the operation
mode of the first device “primary mode“ and the LED flashes.
7.) By pressing the up button for 3 seconds you can switch back to the
Protos® Intercom Network .
In the additional device mode the multifunction button serves as Push
to talk button, this means that pushing the button opens the speaking
channel.
24 25

EN
DE
VERBINDEN CONNECT
Verbindung mit einem zusätzlichen Gerät, z.B. zweites Smartphone
Mit Hilfe der zusätzlichen Geräte Funktion können Sie zudem ein zweites Mobiltelefon
koppeln. Dies ermöglicht Telefonate von zwei Mobiltelefonen zu empfangen und zu füh-
ren, z.B. pivat und geschäftlich. Dies ermöglicht auch, in gut erschlossenen Telefonnetzen,
eine Telefonkonferenz anstelle von Funkgeräten über weite Distanzen zu nutzen.
1.) Bitte prüfen Sie im App Store, ob auf Ihrem Smartphone die neuste APP Version
installiert ist. Vergewissern Sie sich anschliessend mit Hilfe der PROTOTS Control App,
dass die Software Version ihres BT Com‘s auf dem neuesten Stand ist.
2.) Stellen Sie sicher, dass Ihr BT Com angeschalten und mit dem Erstgerät und der App
verbunden ist (siehe S.32).
3.) Gehen Sie in die Protos® Control App und wählen Sie in der Kachel „zusätzliches
Gerät“ aus dem Auswahlmenü „Mobilgerät“ aus. Bringen Sie das zweite Mobiltelefon in
den Kopplungsmodus und drücken Sie die „Koppeln“ Taste. Eine Ansage bestätigt die
erfolgreiche Verbindung mit den Worten „second mobile connected“.
4.) Wechseln Sie zwischen dem „Primary Mode“ und dem „Second Mobile Mode“ durch
Drücken der Abwärtstaste (siehe S. 24), oder durch Drücken der Aufwätstaste ins Inter-
com Netzwerk.
Bei lauten Umgebungsgeräuschen besteht die Möglichkeit im Telefonmodus die Multi-
funktionstaste als PTT Taste zu nutzen. Aktivieren Sie hierfür den PTT Modus in der APP
unter der Kachel „zusätzliches Gerät“.
Connection with an additional device, e.g. second Smartphone
The second device function enables you to pair a second mobile phone with your BT
Com. This makes it possible to receive and start calls from two mobile phones, eg.
privat phone and work phone. You are also able to set up a Telephone Conference over
long distances instead of a radio connection in areas with good reception.
1.) Please check in the App Store that the newest version of the app is installed on
your smarphone. Afterwards you can check with the Protos® Control App that you
have installed the most current software on your BT Com.
2.) Make sure that your BT Com is turned on and connected with the first device and
the app (see p. 32).
3.) Select the BT Com and then the tile “additional device“ in the Protos® Control App.
There you will find a selection menu choose “mobile device“, turn on the pairing mode
on the second mobile phone and then press the pairing button. A voice prompt states
“second mobile connected“.
4.) You can switch between the “primary mode“ and “second mobile mode” by
pressing the down key for 3 seconds. By pressing the up button for 3 seconds you will
switch back to the Protos® Intercom Network.
In case of loud surrounding noises, there is the option of using the mutifinction button
as PTT button. You can activate the PTT mode in the app under the tile “additional
devices“.
HINWEIS: Solange Sie im Intercom Netzwerk sind hören Sie lediglich eingehende
Anrufe vom Erstgerät.
Im „Primary mode“ wird durch das Blinken der LED die Anzahl der verbunden Geräte
angezeigt.
NOTE:As long as you are in the Intercom Network you will only hear incoming calls
to the first device.
In the primary mode the number of connected devices is indicated by the flashing
of the LED.
26 27

EN
DE
MONTAGE MOUNTING
Mounting of the BT Com muff into the Protos® Integral
To mount the BT Com muff correctly into your Protos® Integral please follow the
instructions below:
1.) Remove the left ear protector earmuff from the Protos® Integral by swivelling it
to an angle of 90° to the bracket arm. The ear muff can only be removed in this 90°
position and by pressing the side bracket arm away from the earmuff (see picture on
the left).
2.) Proceed now in reverse order to insert the BT Com. Place it at a 90° angle into the
bracket arm. Then rotate the muff into the straight position
3.) You can adjust the fitting of your BT Com on the ear by pushing the earmuff in the
bracket arm up or down.
4.) To charge the battery of your BT Com please remove the BT Com earmuff by swiv-
elling it to a 90° angle and pressing the side bracket arm away.
In case you have the Protos® Integral Head Protection you can position the BT Com in
3 ways: operation position, venting position and parking position. Please be aware that
communication only works in operation position.
Montage der BT Com Kapsel in den Protos® Integral
Um die BT Com Kapsel in Ihren Protos® Integral fachgerecht einzubauen,
beachten Sie bitte folgende Schritte!
1.) Entfernen Sie die linke Gehörschutzkapsel des Protos® Integral, indem
Sie diese in den Winkel von 90° zum Bügelarm schwenken. In dieser
Stellung kann die Kapsel durch Aufbiegen der Bügelarme (siehe Bild)
entnommen werden.
2.) Setzen Sie nun in umgekehrter Reihenfolge das BT Com im 90° Winkel
in den Bügel ein und bringen Sie die Kapsel dann zurück in die senkrechte
Position.
3.) Sie können die BT Com Kapsel an Ihr Ohr feinjustieren, indem Sie diese
im Bügel beliebig nach oben oder unten verschieben.
4.) Für das Laden des BT Com entnehmen Sie die Kapsel indem Sie diese
erneut 90° schwenken und die Bügelarme leicht auseinanderbiegen.
Den BT Com können Sie in drei Stellungen im Protos® Integral Kopfschutz
positionieren: Betriebsstellung, Lüftungsstellung und Parkposition. Ledig-
lich in der Betriebsstellung ist die Kommunikation möglich.
NOTE: The charging bracket arm is for charging purposes only. Never try to place
the charging bracket arm into your Protos® Integral!
HINWEIS: Der USB-Ladebügel ist ausschliesslich zum Laden der Batterie des
BT Com gedacht und darf unter keinen Umständen in den Protos® Integral
eingesetzt werden!
28 29

EN
DE
LADEN CHARGING
Charging the battery
Your BT Com has a Lithium Ion battery with a runtime of 3-5 days on standby and 10
hours in Protos® Intercom operation. The runtime is dependent on surrounding factors
like cold temperatures. At low battery the LED will flash red 6 times and a
signal will be audible every 60 sec.. You can also check the battery charg-
ing status of your BT Com in the Protos® Control App at any time.
To charge the battery place the communication earmuff in the charging
bracket arm so that the label FRONT is on the same side as the buttons on
the communication earmuff. The LED will light up red during the charging
process. As soon as the charging is finished the BT Com will change to
trickle charging and the LED will change to a permanent green colour. If
your battery has not been used for an extended time, it can happen that
the charging electronic will not react promptly. The Protos® Bluetooth
Electronic is designed so that it will try to recover deeply discharged batteries. The
charging control light will blink as long as it takes to reactivate the battery for charg-
ing.
To achieve an optimum output the battery should be fully charged. The charging time
is approximately 30 Minutes for minimum charging and 1,5 hours for complete charg-
ing.
Laden der Batterie
Ihr BT Com hat einen Lithium Ionen Akku mit einer Laufzeit von 3-5 Tagen im
Standby und 10 Stunden im Protos® Intercom Betrieb. Die Laufzeit kann von
Umwelteinflüssen wie z.B. Kälte beeinträchtigt werden.
Bei niedrigem Akku-Stand blinkt die LED 6x hintereinander rot und ein
Signal ertönt im Abstand von 60 Sek.. Zudem könen Sie in der Protos®
Control App jederzeit den Ladestand Ihres BT Com kontrollieren.
Setzen Sie die Funkkapsel so in den Ladebügel ein, dass die Bedienele-
mente auf der Seite mit der Aufschrift „Front“ auf dem Ladebügel zu
sehen sind.
Die LED leuchtet während des Ladevorgangs rot. Die Elektronik wech-
selt automatisch auf Erhaltungsladung, wenn der Akku vollständig
gelanden ist. Der vollständig geladene Akku wird durch ein dauerhaft
grünes Leuchten der LED angezeigt.
Wenn der Akku längere Zeit nicht geladen wurde, ist es möglich, dass die Lade-
elektronik nicht gleich anspringt. Die Protos® Bluetooth Elektronik versucht tief-ent-
ladene Akkus wieder zu regenerieren. Die Ladekontrolle blinkt dann so lange, bis der
Akku wieder ladebereit ist.
Für eine optimale Leistung sollte der Akku vollständig geladen sein. Die Ladezeiten
betragen ca. 30 Minuten für eine Mindestaufladung und ca. 1,5 Stunden für eine voll-
ständige Aufladung.
Hinweis: Bitte entfernen Sie vor dem Laden immer die Dämmeinlage und Auf-
lagepolster um Staunässe vorzubeugen!
Sollte der Akku heiß werden, darf das Gerät keinesfalls weiter benutzt werden.
Bitte senden Sie es an den Fachhändler.
NOTE: Please always remove the insulation insert and padding always before
charging to prevent waterlogging!
If your battery becomes hot you must not use the device any more. Please send it
to your retailer.
30 31

EN
DE
REINIGUNG CLEANING
Cleaning and care of your BT Com
Humidity and sweat are harmful to the electronics of your BT Com. Because of this
please take care to dry your device after use. To ensure this, execute the following
steps:
1.) Remove the sound insulation insert and the padding from the earmuff after each
use, by firmly holding the earmuff in your hand and by hooking your index and middle
finger under the side of the padding (see left picture). The padding can be removed by
pulling firmly.
2.) Take the sound insulation insert out, rinse it under clear water and let it dry out
completely.
3.) If your BT Com is not in use, leave it in an opened position.
4.) Exchange the sound insulation insert with the enclosed exchange insert at next
use
Reinigung und Pflege Ihres BT Com
Feuchtigkeit und Schweiß schaden der Elektronik des BT Com. Bitte bewahren Sie
diesen deswegen stets trocken auf und achten Sie darauf, dass er nach Ge-
brauch austrocknen kann! Gehen Sie hierfür bitte wie folgt vor!
1.) Entfernen Sie nach jedem Gebrauch das Auflagepolster vom BT Com!
Halten Sie dafür die Kapsel fest in der einen Hand und haken Sie seitlich mit
Zeige-und Mittelfinger der anderen Hand unter das Auflagepolster ein (siehe
rechtes Bild)! Durch kräftiges Ziehen lässt sich dieses entfernen.
2.) Nehmen Sie die Schalldämmeinlage heraus, spülen Sie diese unter
klarem Wasser ab und lassen Sie sie vollständig austrocknen!
3.) Der BT Com sollte bei Nichtgebrauch in geöffnetem Zustand austrocknen.
4.) Tauschen Sie das Polster beim nächsten Gebrauch mit dem beigelegten Ersatz-
polster aus!
HINWEIS: Das Auflagepolster und die Dämmeinlage sollten Sie
spätestens nach sechs Monaten erneuern, um die optimale Funktions-
fähigkeit zu gewährleisten.
Nicht nur Ihr BT Com bedarf der richtigen Pflege. Auch für Ihren Protos®
Integral sollten Sie zum optimalen Schutz die Pflegehinweise beachten.
Instruktionen hierzu finden Sie unter dem nebenstehenden QR-Code im
Internet.
NOTE: The sound insulation insert and padding should be replaced
every six month to ensure proper insulation functionality.
Not only your BT Com requires proper care. Please consider the mainte-
nance instructions as well for your Protos® Integral head protection.
32 33
Video on correct
care of your
PROTOS®
Video zur korrek-
ten Pflege des
Protos®

EN
DE
APP
Protos® Control App
Die Protos® Integral Produktfamilie wird laufend weiterentwickelt und für Sie opti-
miert. Um Ihnen die Möglichkeit zu bieten, Ihren BT Com auf dem neuesten Stand zu
halten, wurde eine spezielle App entwickelt. Lassen Sie sich von unserer App durch
die Anwendungsbereiche Ihres BT Com führen! Wir wünschen Ihnen viel Spass beim
Entdecken der Protos® Welt!
APP
Protos® Control für IOS (iPhone)
Koppeln Sie den BT Com mit Ihrem iPhone! Bitte laden Sie die
Protos® Control App im App Store herunter! Anders als bei
Android fordert Apple eine zusätzliche separate Kopplung mit
der App.
free Protos
Control App in
Google Play
Protos® Control für Android
(Samsung, Sony, usw.)
Laden Sie die Protos® Control App in Google
Play herunter. Um die App mit Ihrem BT Com
benutzen zu können, muss dieser vorab mit
dem Smartphone gekoppelt sein.
free Protos Con-
trol APP in the
App-Store
Protos®Control for Android (Samsung, Sony, etc.)
Please download the Protos® Control App from Google Play.
To be able to use the Protos® Control App with your BT Com, it must be
paired with the Smart Phone first.
Protos® Control App
The Protos® Integral product family is continuously being developed and optimized
for you. To give you the opportunity to keep your BT Com up-to-date, a special app has
been developed.
Let the app guide you through the different functions of your device. Please enjoy
exploring the Protos® world!
Protos® Control for IOS (iPhone)
Pair the BT Com with your iPhone. Please download the Protos® Control -
App from the App Store. You will need to pair your BT Com again with the
app.
HINWEIS: Mittels Software und App Updates können Sie von erweiterten Funkti-
onalitäten Ihres BT Com‘s profitieren. Unter dem Menüpunkt „Update“ in der App
werden Sie über mögliche Updates informiert und können diese bei bestehender
Internetverbindung herunterladen und installieren. Dies kann einige Minuten
dauern.
kostenlose Protos
Control App
NOTE: by updating your BT Com software and app regularly, you can benefit from
enhanced functionalities for your BT Com. In the tile “Update“ in the app you will
be informed on available updates and you can download them as soon as you are
connected to the internet. Please keep in mind that an update can take a couple of
minutes.
34 35
kostenlose Protos
Control App in
Google Play
Anleitung zum
Aktivieren der
App

EN
DE
HÄUFIGE FRAGEN FAQ
Frequently asked questions
1.) Your BT Com can not be paired with other BT Coms?
In case you have a problem with pairing or detecting other devices, we recommend
reseting all the BT Com’s in the Intercom Network to factory settings. This can be done
by pressing the multifunction button (4) together with the down button (2) for 3 sec..
The LED (3) will flash green and red.
2.) Is it possible to connect more than four devices?
In theory more than four devices can be paired with each other. Nevertheless we
recommend limiting the conversation to four devices.
3.) How can I delete a device in the app?
When you press the device column in the main screen for a few seconds the trash bin
symbol will appear and when selected, the device will be deleted from the app.
4.) Do you have issues charging the battery of your BT Com?
•Please check if you have connected your device properly with the USB charging
bracket arm (see page 27).
•Try to charge the device with another USB charger.
•If the battery was completely empty it can take a couple of minutes until the LED
indicates charging by flashing red (see page 27).
Häufige Fragen
1.) Lässt sich Ihr BT Com Gerät nicht mehr mit einem anderen Gerät koppeln?
Sollten Probleme beim Koppeln bzw. der Erkennung von anderen Geräten auftreten,
empfehlen wir die Werkseinstellungen aller Geräte im Intercom Netzwerk zurück-
zusetzen (RESET). Drücken Sie dafür die Multifunktionstaste (4) zusammen mit der
Abwärtstaste (2)! Die LED (3) leuchtet abwechselnd rot und grün auf.
HINWEIS: Alle BT Com Geräte im Intercom Netzwerk sollten gleichzeitig zu-
rückgesetzt werden. Die Adresse eines BT Com wird von den anderen Geräten
gespeichert. Wird ein einzelnes Gerät zurückgesetzt, führt dies zu Konflikten im
Netzwerk. Ein Reset verbessert nicht die Reichweite der Geräte zueinander!
2.) Lassen sich auch mehr als vier Geräte miteinander verbinden?
Theoretisch können Sie auch mehr als vier Geräte miteinander koppeln. Wir empfehlen
jedoch, den Sprachbetrieb auf vier Geräte zu beschränken.
3.) Wie lösche ich ein verbundenes Gerät in der App?
Bei langem Gedrückthalten der Geräte Zeile im Hauptbildschirm erscheint das
Mülleimer Symbol. Wenn Sie dieses anwählen, wird das Gerät aus der App gelöscht.
4.) Sie haben Probleme beim Aufladen der Batterie?
•Bitte achten Sie darauf, dass das Gerät korrekt mit dem USB-Ladebügel verbunden ist
(siehe S. 26 )!
•Bitte versuchen Sie, das Gerät mit einem anderen USB-Ladegerät zu laden!
•Wenn die Batterie komplett leer war, kann es ein paar Minuten dauern, bis die LED rot
aufleuchtet (siehe S. 26 ).
NOTE: All BT Com devices in the Intercom Network need to be reset together. The
address of a BT Com is saved by the other devices. If only one device is reset it will
cause conflicts in the network. Please consider that a reset will not enhance the
range between the devices.
36 37

Unser Produkt wurde nach den neuesten technischen Anforderungen hergestellt und ge-
prüft. Detailliertere Informationen zur CE-Kennzeichnung können Sie gerne bei der PROTOS
GmbH anfragen.
Dieses Gerät entspricht der neuesten ROHS Richtlinie.
Bitte achten Sie auf die Umwelt und entsorgen Sie dieses Gerät ausschließlich über die
Elektronikentsorgung und nicht über den Hausmüll!
Unser Unternehmen ist nach der ISO 9001:2015 zertifiziert. Gemäß dieser Norm pflegen wir ein
Qualitätsmanagementsystem, mit dem wir eine gleichbleibend hohe Arbeitsgüte garantieren. So ist
höchstmögliche Qualität unserer Arbeit - und dadurch auch Ihres Produktes - gewährleistet.
Auf die Elektronik gewähren wir dem Endverbraucher eine Garantie im Rahmen der zweijährigen
Gewährleistung nach europäischem Recht. Übergeben Sie das defekte Gerät ungeöffnet mit einer aus-
führlichen Fehlerbeschreibung ihrem Fachhändler. Bei Fremdeingriff erlischt jeder Garantieanspruch!
Wasserschäden und Batterie sind von der Gewährleistung ausgeschlossen.
Defekte Verschleißteile werden auf Wunsch gerne kostenpflichtig gewechselt.
PROTOS GmbH | Herrschaftswiesen 11 | 6842 Koblach - Austria | T: +43 (0) 595050-411 | offi[email protected]
Druck- und Satzfehler vorbehalten. Bezirksgericht A-6800 Feldkirch.
Table of contents


