Prowise All-in-One PC User manual

All-in-One PC - Manual
The Prowise All-in-One PC is a computer as well as a tablet. You can use this versatile device for any situation in
the classroom. The integrated battery and the fact that you can lay the screen flat on the table, is what makes
the Prowise All-in-One PC unique. This way, you can use the Prowise All-in-One as a PC, as well as a powerful
tablet for small group exercises.
Create a Microsoft account and gain access to all applications (apps) in the Microsoft Store. New apps can be
downloaded or existing apps can be updated here.

Disclaimer
The functions and features described in this user guide apply to most of the models. It is possible that not all the
functions and features are available on this model.
By installing, downloading or otherwise using the software product that has been pre-installed on the All-in-One
PC, you agree with the terms and conditions of the relevant software manufacturer.
www.prowise.com
2 / 16

Table of Contents
1. Get to know your All-in-One PC 4
1.1 In the box 4
1.2 Front 5
1.3 Back 6
1.4 Labels 7
2. Using your All-in-One PC 8
2.1 Touchscreen 8
2.2 NFC card 10
3. Charger & Battery 11
3.1 Charger 11
3.2 Battery 11
4. Cleaning your All-in-One PC 12
4.1 Cleaning the screen 12
4.2 Cleaning the casing 12
5. Prowise 13
5.1 Prowise Presenter 13
5.2 Touchscreens & Personal Devices 13
Get started with the Prowise Chromebooks instantly 14
Notebooks are prepared for anything 14
All-in-Ones that can actually do everything 14
6. More information 16
6.1 Wireless LAN 16
6.2 VPN 16
6.3 Bluetooth 16
www.prowise.com
3 / 16
1. Get to know your All-in-One PC
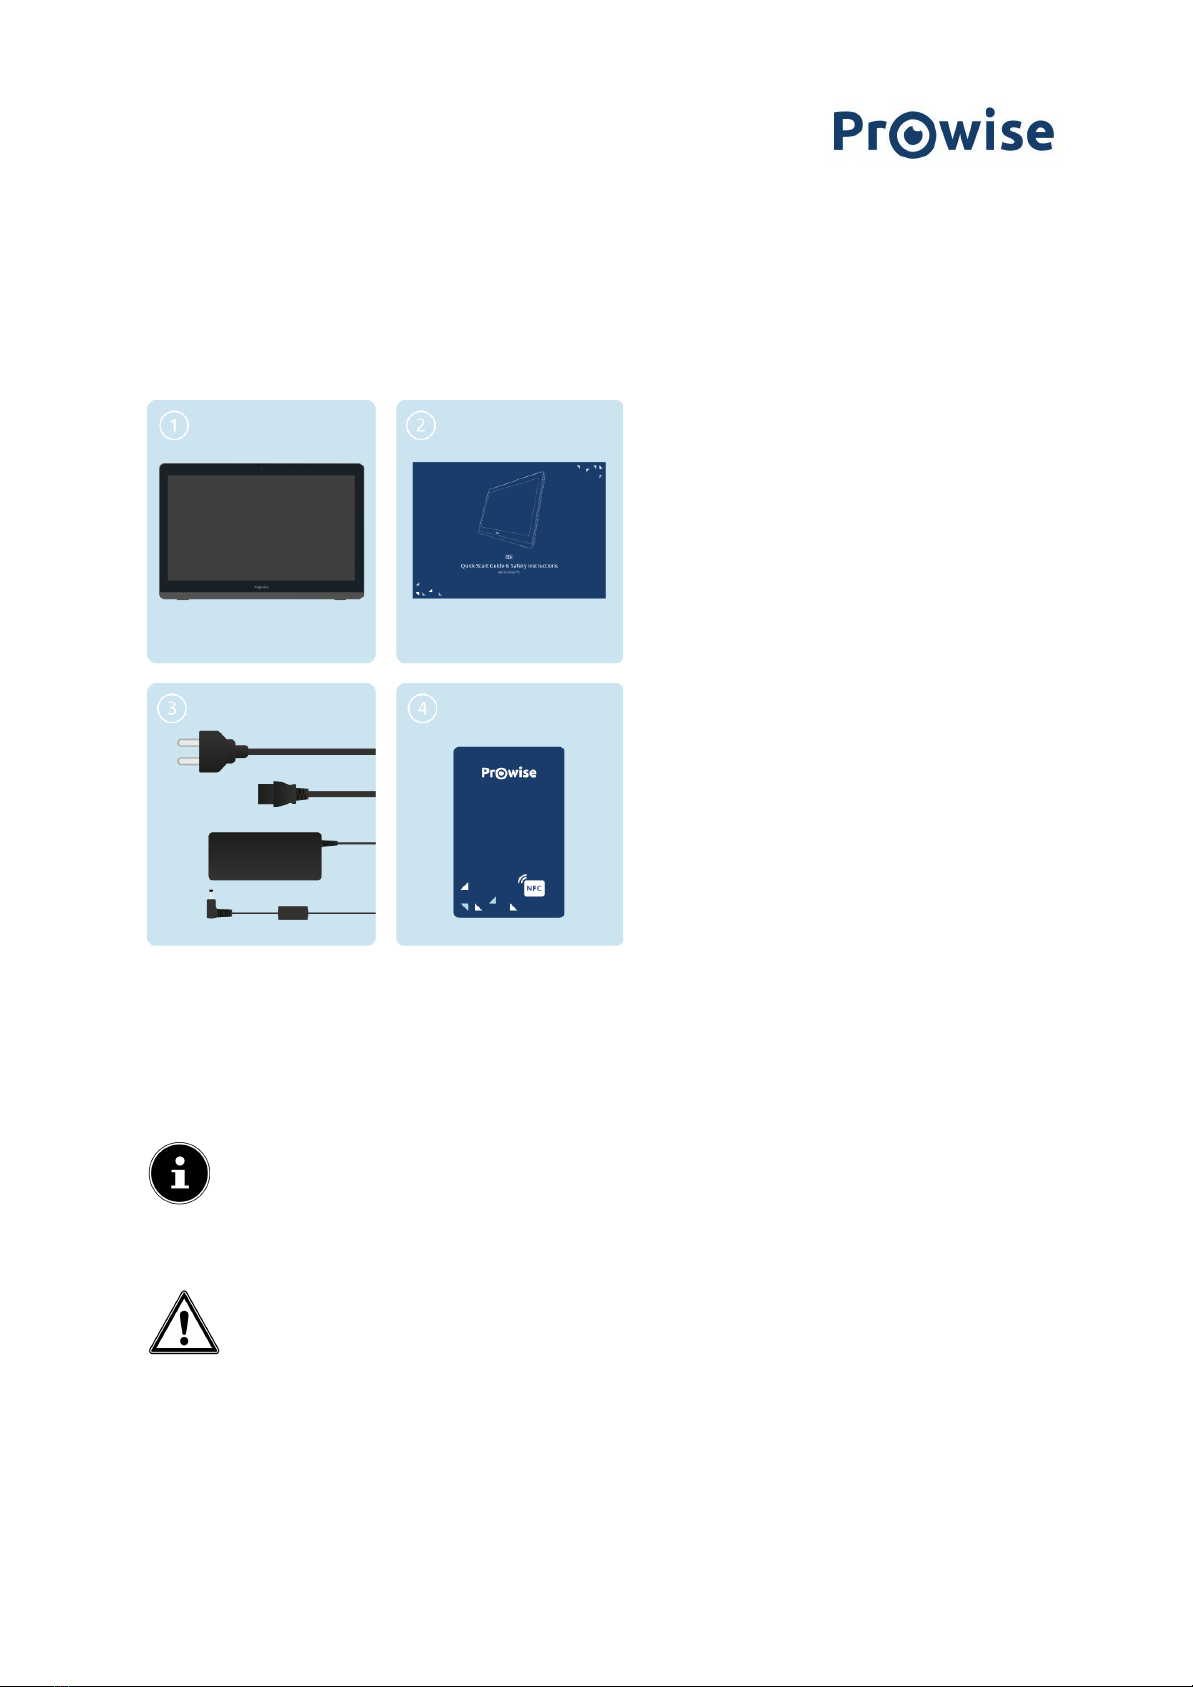
1.1 In the box
1. Prowise All-in-One PC
2. Quick Start Guide & Safety Instructions
3. Adapter with power cord
4. NFC Card
PLEASE NOTE!
Check whether the delivery is complete. If not, please contact our service desk in writing
within five days after delivery. Please advise the serial number and a copy of the packing slip.
DANGER!
Keep the packaging material, such as the foils, out of the reach of children. Improper use can
cause suffocation hazard.
www.prowise.com
4 / 16

1.2 Front
1
Camera
You can record videos, take photos or hold a video conversation with the
camera.
2
On/Standby indicator
This LED indicator shows whether your All-in-One PC is in standby mode or
switched off.
3
Microphone
The internal microphone enables audio recording in the All-in-One PC.
www.prowise.com
5 / 16
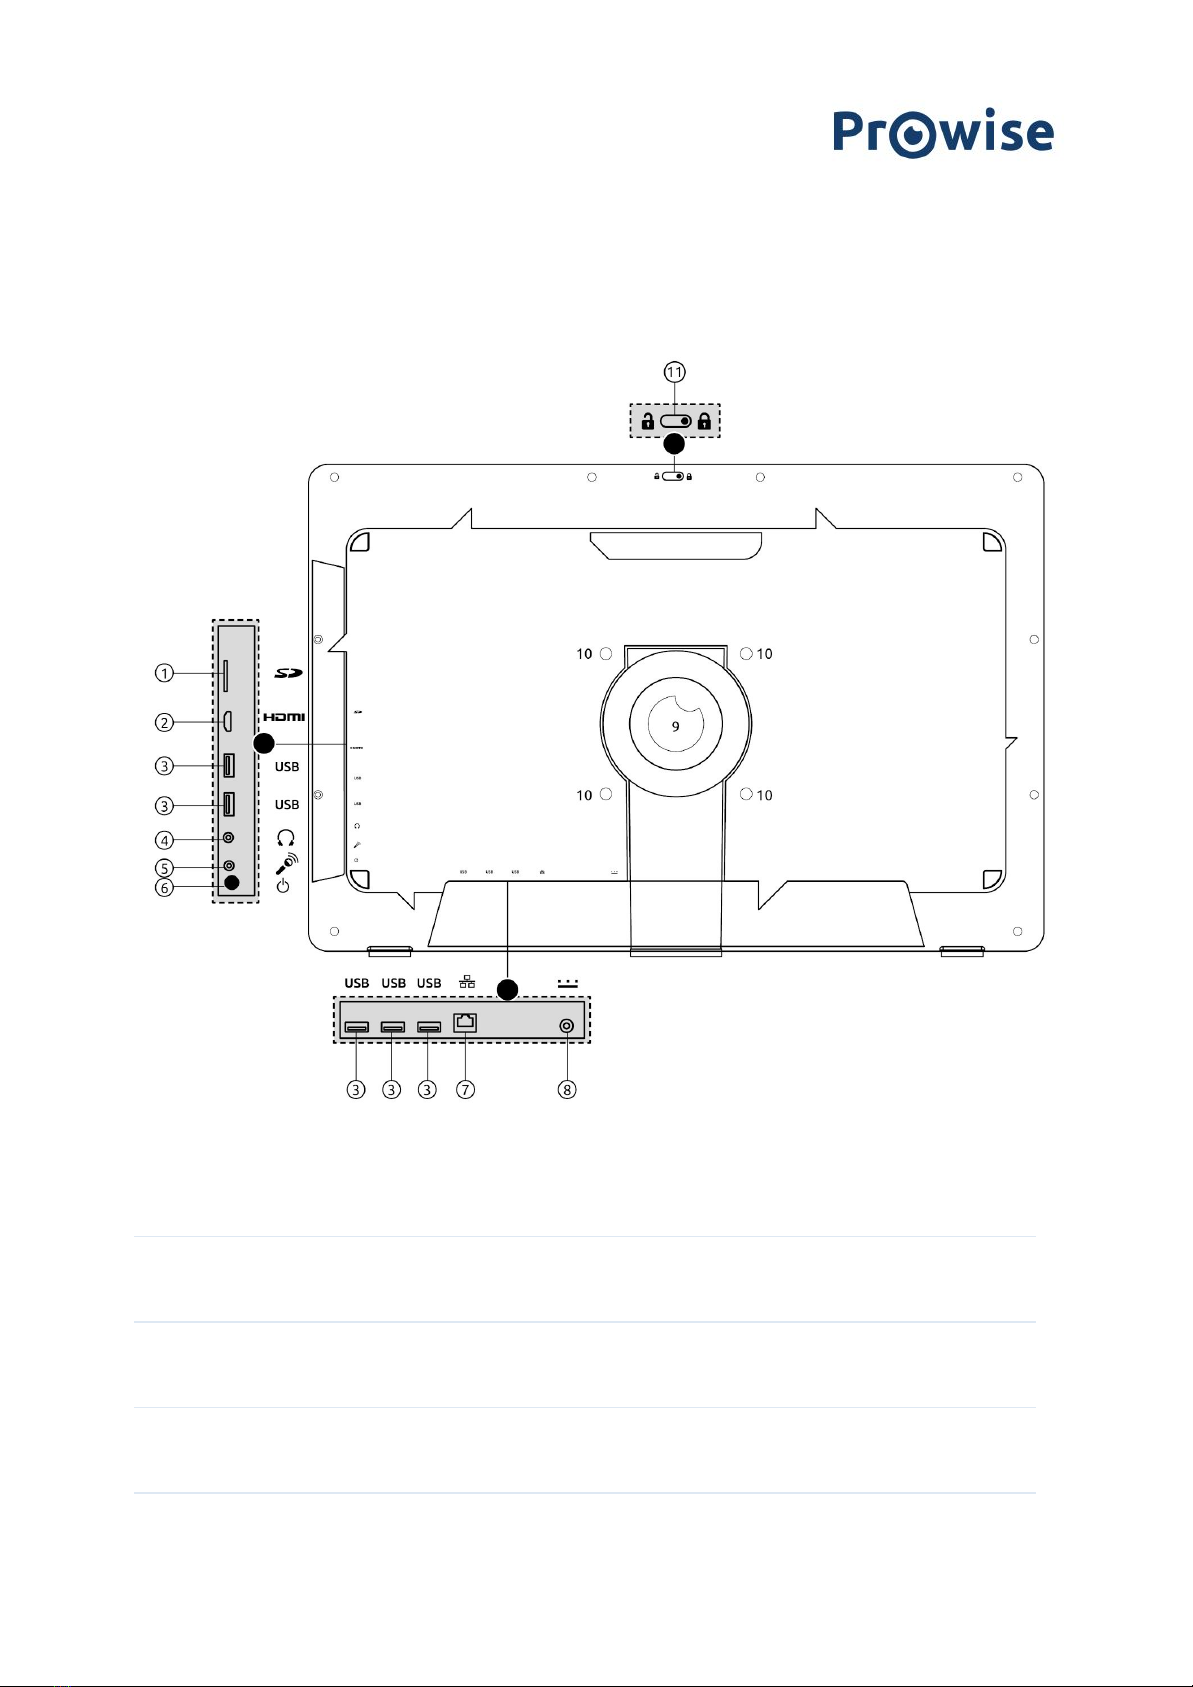
1.3 Back
1
MicroSD card reader
You can read SD cards directly by placing them in the card reader (with the
connectors aimed towards the back of the All-in-One PC).
2
HDMI 1.4
You can connect an HDMI cable to project audio and/or video from the
All-in-One PC to a second screen.
3
USB 3.0
A USB 3.0 port transfers data quickly, or can connect devices such as mobile
phones, a camera or a smartwatch.
4
Audio
3.5mm port to plug in headphones.
www.prowise.com
6 / 16
5
Microphone port
3.5mm port to connect microphone
6
ON/OFF button
Switch your All-in-One PC on or off
7
Ethernet
You can connect an Ethernet cable if you want a fixed internet connection
(1GBps)
8
AC Power
Here you can plug in the adapter to charge the All-in-One PC.
9
Stand
You can use the All-in-One PC in different angles (ranging from 90° to 130°)
by adjusting the stand to the desired position. In addition, you can fold up
the stand entirely so you can safely place the screen on a flat surface.
10
VESA mount option
The four screws allow you to assemble the All-in-One PC to a VESA mount
(100 mm x 100 mm).
BEWARE: the VESA mount is not supplied by Prowise on default.
11
Camera cover
You can slide the cover over the camera to safeguard privacy.
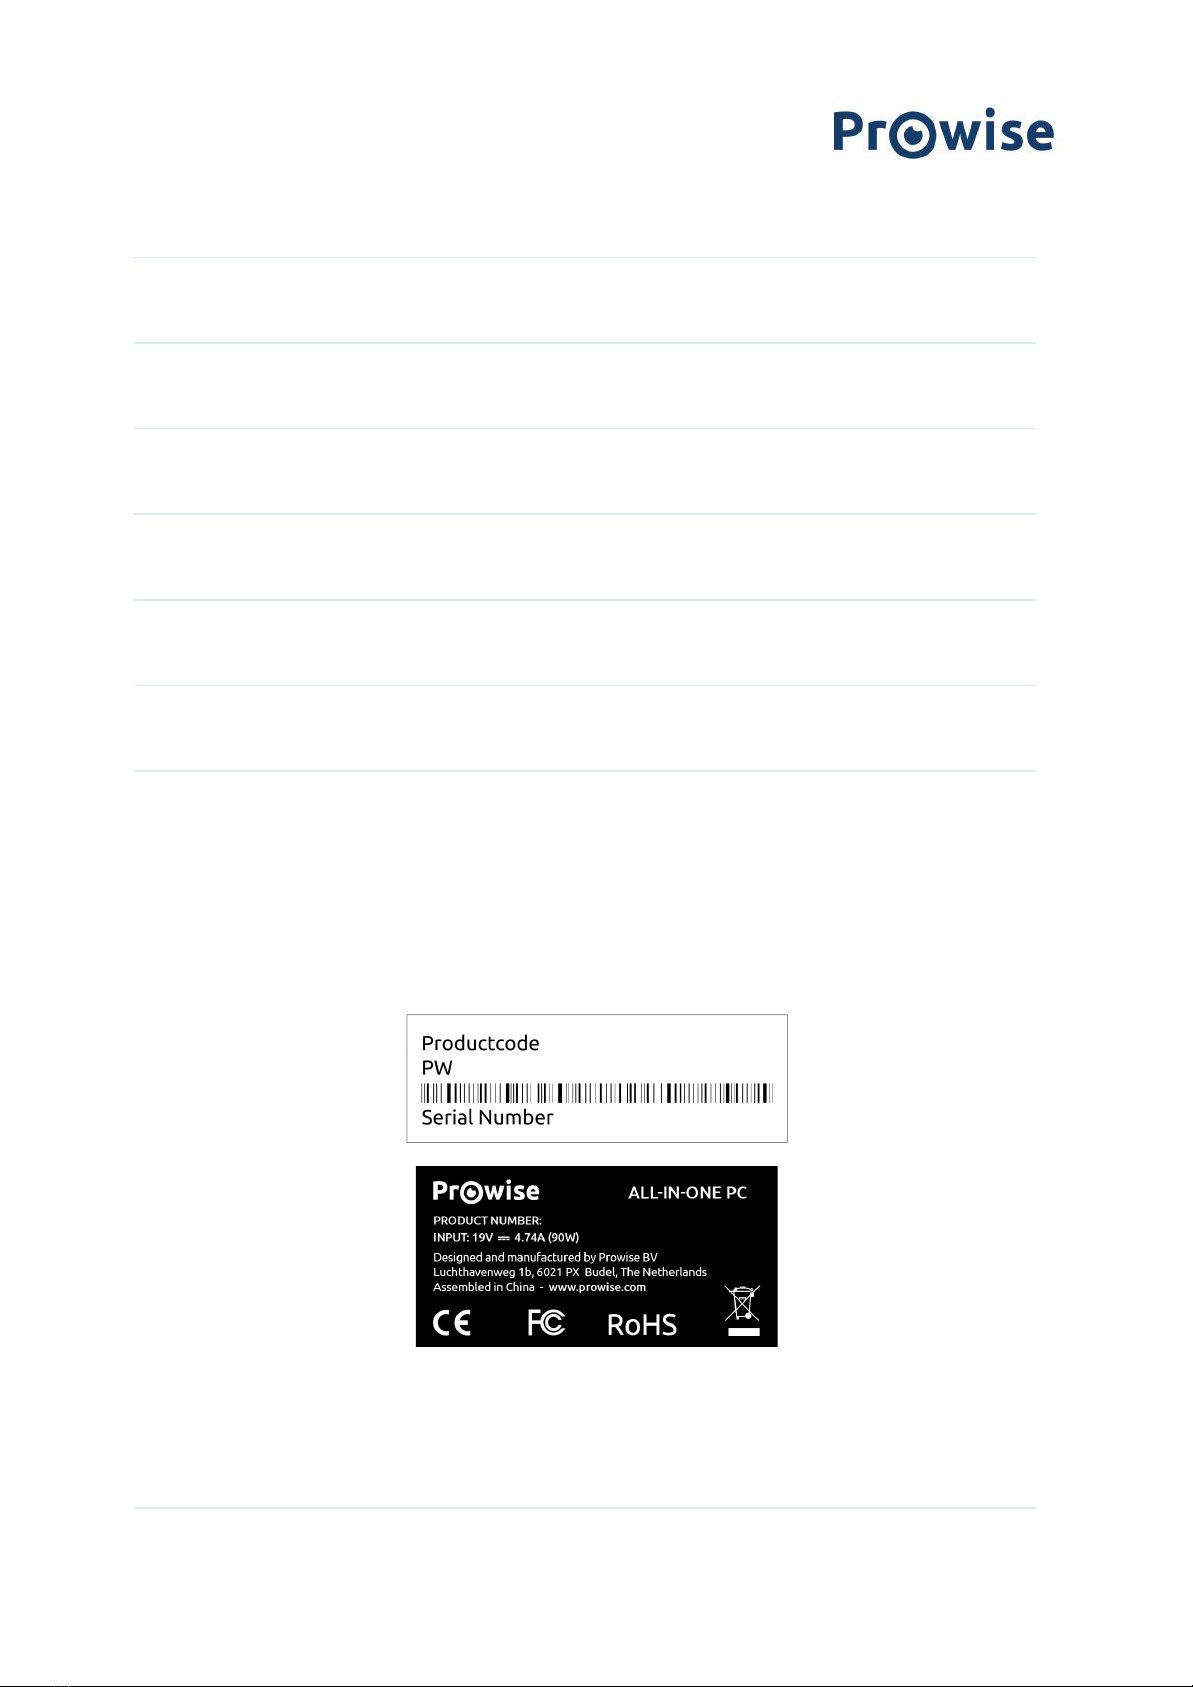
1.4 Labels
The labels of the Prowise All-in-One PC can be found underneath the stand at the back. If you want to read the
labels, you need to completely unfold the stand first.
Label
Labels provide important information in terms of identifying your
All-in-One PC. For instance, you can find information such as the serial
number, product number or Prowise details you need in case you contact
the Prowise customer service.
www.prowise.com
7 / 16

www.prowise.com
8 / 16

2. Using your All-in-One PC
The Prowise All-in-One PC is a computer as well as a tablet. You can use this versatile device for any situation in
the classroom. Teach, divide students into small working groups or enable somebody to carry out exercises
independently.
You can use the All-in-One PC in various situations. You can adjust the screen angle from 90° to 130° with the
stand. In addition, it is possible to fully fold up the stand and lay the All-in-One PC flat on the table, ensuring that
the screen can be placed safely on a stable surface.
2.1 Touchscreen
The All-in-One PC is fitted with a touchscreen and has a few specific gestures to control and operate the screen.
Click
Tap on the screen.
Drag
Press and hold your finger down on an item and drag it
to the desired location without lifting your finger off
the screen.
Display all opened
windows
Swipe from the left-hand side of the screen to the
right.
www.prowise.com
9 / 16
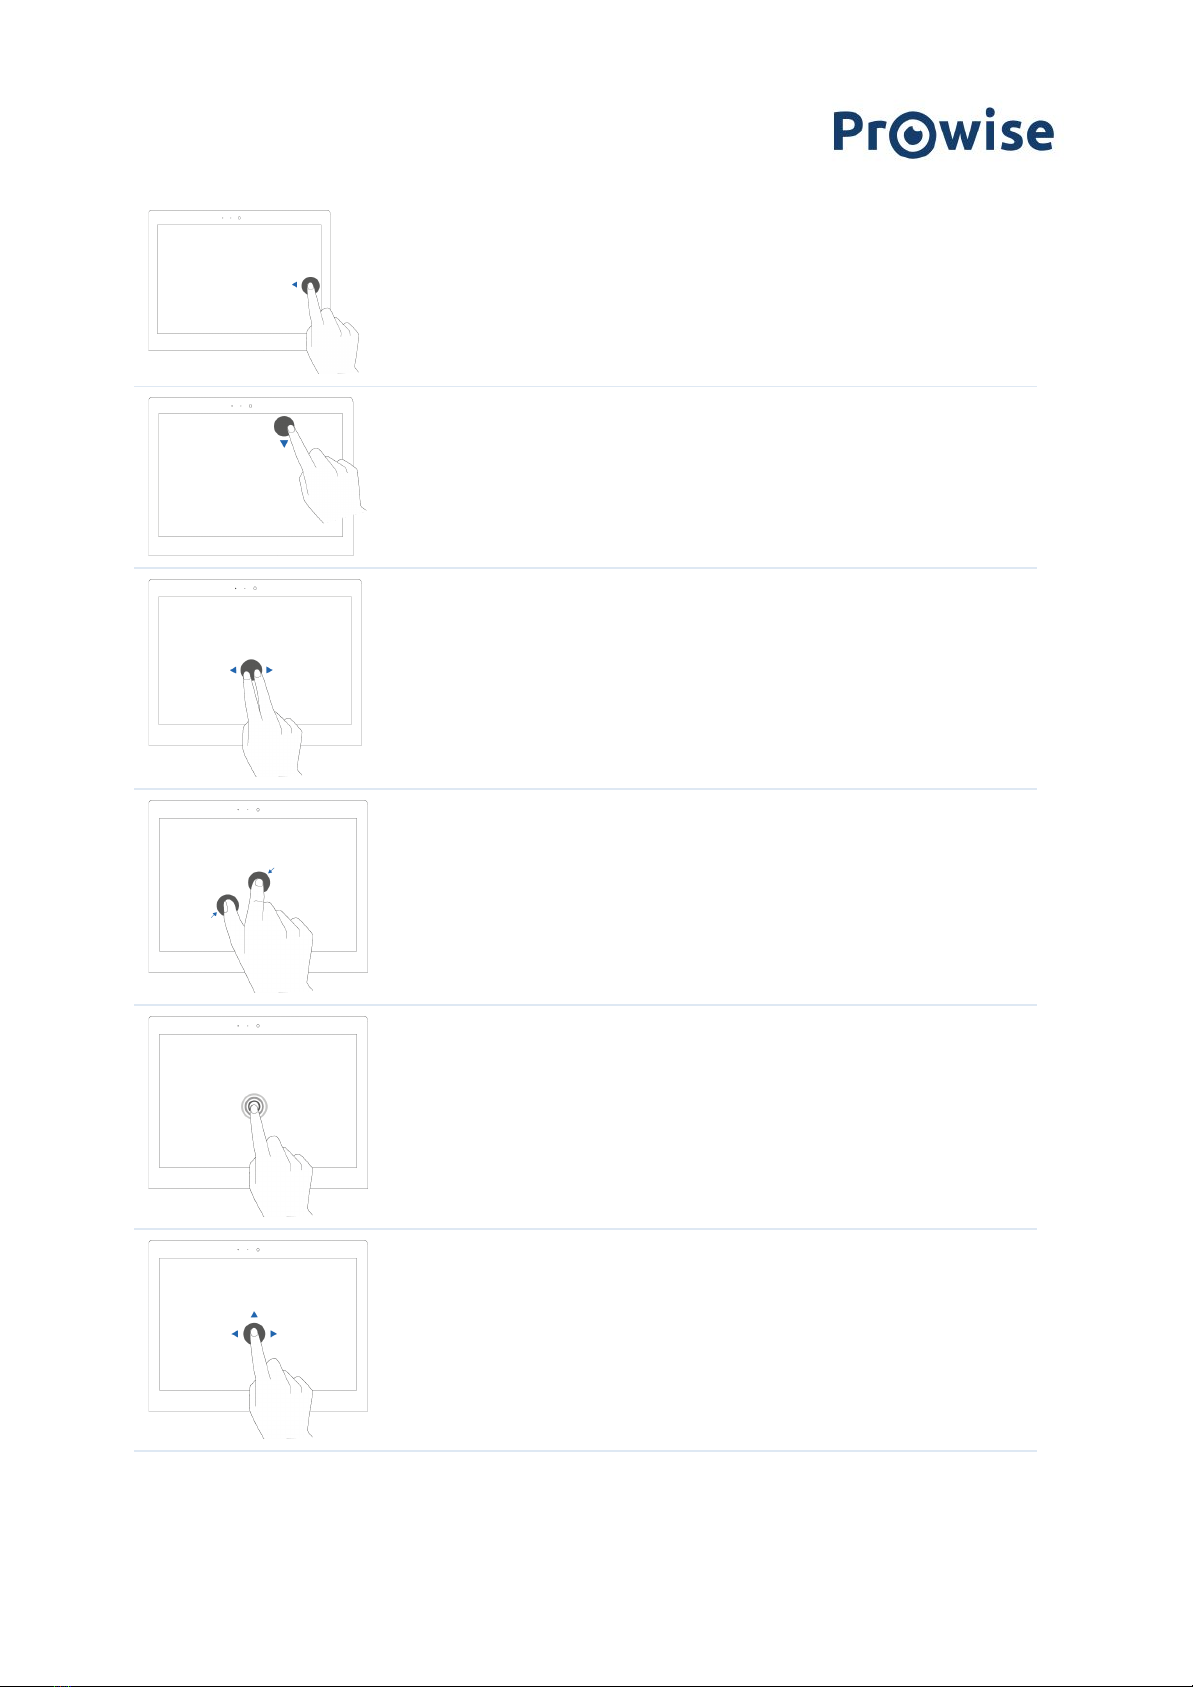
Display action menu
Swipe from the right-hand side of the screen to the
left.
Close full screen
Swipe down from the top of the screen.
Swipe
Swiftly use two fingers to swipe left to go to the
previous webpage and right to go to the next. The
same applies for apps.
Zooming in / zooming
out
Move two or more fingers towards each other and
away from each other to zoom out or in
Right-click (context
menu)
Press and hold down the item you want to select for
several seconds to activate the right-click menu.
Scroll
Press and hold down one finger on the screen and drag
towards the direction you want to scroll.
www.prowise.com
10 / 16

3. Charger & Battery
3.1 Charger
To charge your All-in-One PC, only use the adapter that was supplied with your device. Plug the charger in the
power outlet and then into the All-in-One PC through the AC Power (charger port(8)).
PLEASE NOTE!
Only plug the power cable into grounded electrical outlets with AC 100-240V ~,50-60Hz.
Consult your energy company if you are unsure about the power supply at the installation site.
3.2 Battery
The All-in-One PC has an internal battery. This battery is integrated in the casing and can only be removed or
replaced by qualified personnel.
PLEASE NOTE!
In case the battery is replaced by a third party, the warranty lapses. In case of battery
defects, always contact Prowise or a certified Prowise partner. Contact details are available at www.prowise.com
www.prowise.com
11 / 16

4. Cleaning your All-in-One PC
4.1 Cleaning the screen
Cleaning the screen
Use a soft, dry and lint-free microfibre cloth to clean the screen. Double check whether the cloth is actually clean.
If you want to use a cleaning agent, only use one recommended by Prowise. Under no circumstance use
aggressive chemical cleaning agents. because they can damage the screen.
Always apply the cleaning agent to a cloth first. Never apply it directly to the screen of the
All-in-One PC. The cloth can be slightly moist, certainly not wet. This can cause damage to the
All-in-One PC.
Carefully wipe the screen with the lint-free cloth. Do not apply excessive pressure, for this can
damage the screen. For the optimal result, gently wipe the screen using circular motions. Never use
an abrasive cleanser.
4.2 Cleaning the casing
Use a soft, dry and lint-free microfibre cloth to clean the casing of the All-in-One PC. Make sure this cloth is free
of any impurities and that the All-in-One PC is switched off.
Always apply the cleaning agent to a cloth first. Never apply it directly to the casing of the
All-in-One PC. The cloth can be slightly moist, certainly not wet. This can cause damage to the
All-in-One PC.
PLEASE NOTE!
Always disconnect all cables leading to the All-in-One PC before cleaning, including the
power cable.
WARNING!
Should the All-in-One PC get wet, do not switch it on or plug the charger in the power outlet.
This can cause electric shocks. In case the All-in-One PC is already switched on, turn it off immediately and unplug the
charger before drying the All-in-One PC in order to avoid a short circuit.
www.prowise.com
12 / 16

5. Prowise
Together with you, Prowise aims to achieve better education. Therefore, together with our passionate team,
Prowise continues to develop software and hardware solutions that make an actual difference in the classroom.
5.1 Prowise Presenter
Thanks to Prowise Presenter, lessons and presentations can be created quickly, easily and interactively. Presenter
is packed with educational content and interactive options for teachers (instruction), groups (collaborative
learning) and students (processing). For both primary and secondary education. Consider, for example: images,
videos, tools, Touch Table tools and 3D models, but also ready-made curriculum strands, quizzes and mind maps.
Prowise Presenter is the education software that is used by over 400,000 users to easily create interactive
lessons.
Teach and let students get started with Prowise Presenter. It offers many possibilities for both teacher and
student: create lessons or essays, work with innovative tools and explore 3D models.
The entire Prowise Presenter version is free for all users.
For more information, please consult www.prowise.com/en/presenter-software
5.2 Touchscreens & Personal Devices
With the Prowise Touchscreen, you can carelessly enjoy the world's highest audiovisual quality. The
top-of-the-line materials in combination with the hardware and software developed by Prowise for unique
education and presentation possibilities. Prowise Touchscreens are available in the sizes 55", 65", 75" and 86”.
- The 4K Ultra HD IPS Panel guarantees the best possible visual experience. Only the very best top-quality
LG panels are used for this purpose.
- The fully-integrated 2.1 soundbar ensures crystal clear sound. The two integrated speakers (at the
front) and subwoofer (at the back) are certified as Dolby Digital.
www.prowise.com
13 / 16

- The four microphones integrated in the Prowise Touchscreen recognise voices and people from as far
away as 8 metres. This means you can invite external experts to your class via Skype or similar VoIP
applications and let students communicate with him or her through the touchscreen.
- With the two ergonomic pens, two students can simultaneously complete exercises or other tasks on
the Prowise Touchscreen. The pens remember two colours (front and back) and provide a smooth and
realistic writing experience.
For more information, please consult www.prowise.com/en/touchscreens
In addition, you can further expand the functionality and possibilities of your touchscreen by combining the
Prowise Touchscreen with the Prowise iPro lift. Prowise iPro Lift Systems have been developed with the
fundamental purpose of usability.
- Safety is provided by the brake that is automatically applied once the screen is no longer in its lowest
position. Sensors recognise obstacles when the lift moves up and down. The lift stops immediately once
the sensors detect resistance.
- Prowise offers several lift systems, each for different situations, thus safeguarding usability. For
instance, the Tilt & Toddler lift offers the possibility to set the touchscreen to table mode, enabling
even the shortest pupils to participate.
For more information, please consult www.prowise.com/en/prowise-ipro-lift-series/
The Prowise personal devices are exceptionally suitable for secondary education. All devices have been designed
specifically for classroom use, with features and functionality that optimally support the Prowise software. Due
to the robust casing and the rapid WiFi connection, using software such as Prowise Connect is easy, enabling you
to smoothly switch between different devices. Prowise has developed several types of devices, each with their
own user applications.
Get started with the Prowise Chromebooks instantly
Open up your Chromebook and it launches rapidly. Students log in with their own details and since the Prowise
Chromebook operates in the cloud, they have direct access to documents. With Chrome OS, Google's operating
system, you can get the most out of your Chromebook.
Notebooks are prepared for anything
Powerful notebooks, equipped with Windows 10, designed to be able to take a knock. Moreover, with Prowise
notebooks you can easily collaborate via Office 365 and Microsoft Azure (cloud) via Windows.
All-in-Ones that can actually do everything
The Prowise All-in-One PC is a computer as well as a tablet. You can use this versatile device for any situation in
the classroom. What makes the Prowise All-in-One stand out is that it has an integrated battery and can still be
www.prowise.com
14 / 16


6. More information
6.1 Wireless LAN
Use a WiFi connection to connect to a wireless network. A WiFi connection is required to use Prowise software
such as Prowise Connect.
Make sure to check which WiFi network you have to connect to and to have the right password before installing
your WLAN.
To connect the All-in-One PC to a WiFi network, click on the wireless internet icon in the bottom-right corner of
the taskbar. Then select the network you want to connect to and enter the password.
For more information, please visit https://www.prowise.com/en/support/
6.2 VPN
With a VPN connection, you can connect to a private network, such as a school or work network. A VPN
connection increases the safety of the connection between the company network and the internet.
Before connecting to a VPN, you need to create a VPN profile. This can be done in two ways:
●Create a VPN profile for yourself.
●Create a VPN profile for your work.
In case you do not have a VPN profile, you need to create one before being able to connect. You can find out how
to do this on https://www.prowise.com/en/support/
6.3 Bluetooth
To switch on bluetooth on the All-in-One PC, click on the "roof" icon in the bottom-right corner of the screen in
the taskbar. Click on the bluetooth icon to open the bluetooth menu and choose your desired option.
www.prowise.com
16 / 16
Table of contents


