Prowise iPro Wall Lift G2 User manual

1
EN
DE
NL
05
55
55
EN
DE
NL
User Manual
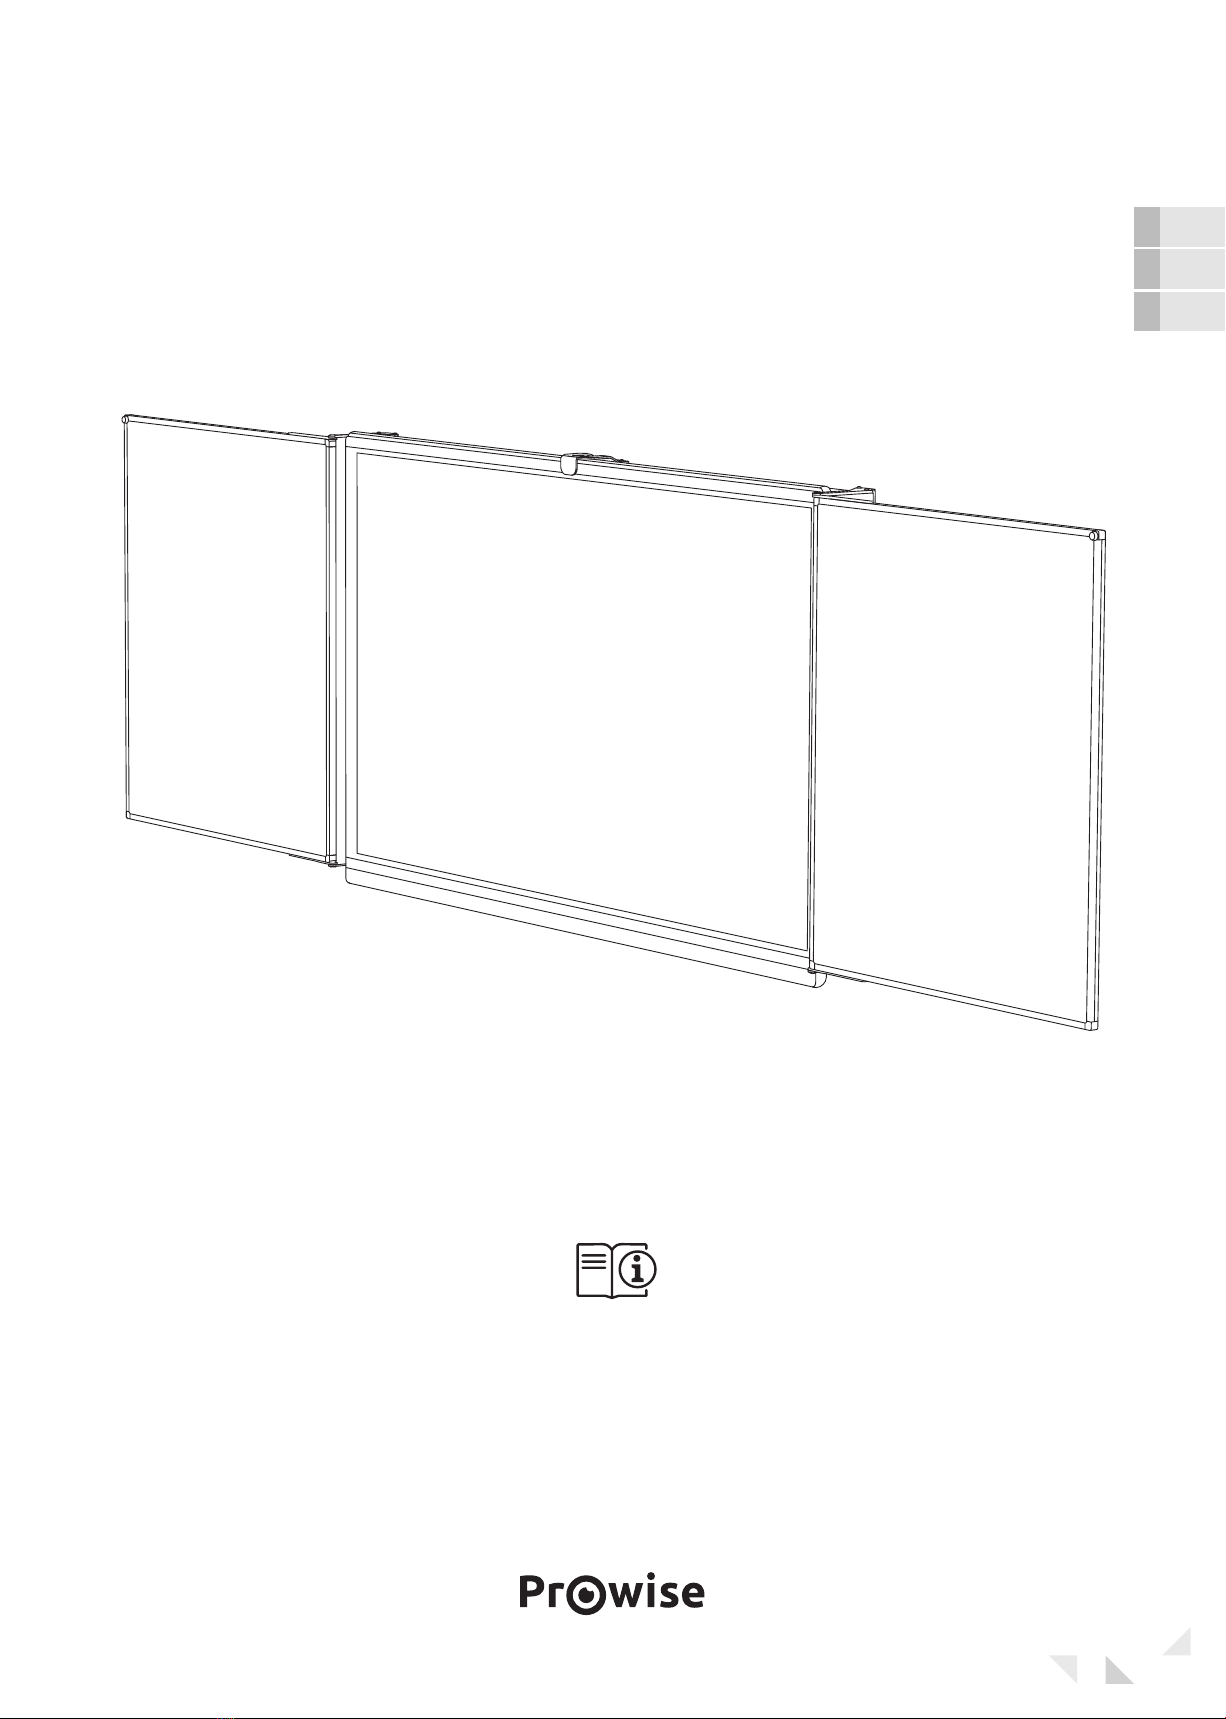
Prowise iPro Whiteboard Extension Kit G2
for Prowise Touchscreen One and Prowise Touchscreen Ten

2
© Prowise 2021.01
3
EN
DE
NL
04
05
06
User Manual
Prowise iPro Whiteboard Extension Kit G2
for Prowise Touchscreen One and Prowise Touchscreen Ten

4
Table of Contents
Installation guidelines 4
Where can I go if I have questions? 4
Safety instructions 4
What is in the box? 8
Necessities 9
Technical installation of the Whiteboard Extension Kit G2 11
Installation guidelines
Please consider the following guidelines before installing the
whiteboard extension kit G2.
1The wall to which the lift is assembled, needs to be capable of
supporting twice the combined weight of the touchscreen and
the whiteboards.
2The maximum load of the Prowise lifts is 150 kg. The mobile lifts
cannot support systems larger than 75 inches.
3Clear the wall from any obstacles. To prevent the risk of
entrapment, a minimum distance of 10 cm to the left, right and
above the screen and a minimum of 12 cm below it must be
respected between the screen and any other objects around it
such as accessories, whiteboards and keyboard holders.
4Before installing the whiteboards, please read the supplied
safety guide carefully.
5The Whiteboard Extension Kit G2 is made for Prowise
Touchscreen One and Prowise Touchscreen Ten.
Where can I go if I have
questions?
In case you have any additional questions about the installation or
use of the Prowise whiteboards, our colleagues at the Customer
Service department are happy to help.
Please send an email to:[email protected]
Safety requirements
Please read the supplied safety regulations carefully before
installing and using the Prowise whiteboards. Please follow
warnings and instructions closely and always keep the Safety
Guide and User Manual at hand.

5
EN
DE
NL
05
55
55
EN
DE
NL
04
05
06
Inhalt
Installationsvorschriften 5
Ansprechpartner bei Fragen 5
Sicherheitshinweise 5
Lieferumfang 8
Das benötigen Sie außerdem 9
Technische Installation des Whiteboard Extension Kits G2 11
Installationsvorschriften
Vor der Installation des Whiteboard Extension Kits G2, bitte folgende
Anweisungen zu beachten.
1Die Wand, an welcher der Lift befestigt ist, muss für eine
Tragkraft ausgelegt sein, die dem Zweifachen des Gewichts des
Touchscreens entspricht.
2Die maximale Tragkraft der Prowise Lifte beträgt 150 kg. Auf
mobilen Liften dürfen nur Systeme mit einer Größe von maximal
75 Zoll installiert werden.
3Stellen Sie sicher, dass die Wand frei von Hindernissen ist. Um die
Gefahr eines Einklemmens zu vermeiden, muss nach der Installation
links, rechts und oberhalb des Bildschirms mindestens 10 cm
Platz bleiben, nach unten mindestens 12 cm. Diese Abstände
verstehen sich inklusive aller Zubehörteile wie Whiteboards und
Tastaturhalterungen.
4Machen Sie sich vor Installation der Whiteboards mit den im
Lieferumfang enthaltenen Sicherheitshinweisen vertraut.
5Das Whiteboard Extension Kit G2 ist für die Prowise Touchscreen
One und Prowise Touchscreen Ten ausgelegt.
Ansprechpartner bei Fragen
Bei Fragen zur Installation oder Verwendung der Prowise
Whiteboards sind unsere Mitarbeiter vom Kundendienst gern für
Sie da.
Per E-Mail an:[email protected]
Sicherheitsvorschriften
Machen Sie sich vor Installation und Gebrauch der Prowise
Whiteboards mit den im Lieferumfang enthaltenen
Sicherheitshinweisen vertraut. Beachten Sie sorgfältig alle
Warnhinweise und bewahren Sie sowohl die Sicherheitshinweise als
auch die Bedienungsanleitung stets in Reichweite auf.
6
Inhoudsopgave
Installatierichtlijnen 6
Waar kan ik met vragen terecht? 6
Veiligheidsinstructies 6
Wat zit er in de verpakking? 8
Benodigdheden 9
Technische installatie van de Whiteboard Extension Kit G2 11
Installatierichtlijnen
Voordat je start met het installeren van de whiteboard extension
kit G2, is het belangrijk dat je onderstaande richtlijnen in acht
neemt.
1De muur waaraan de lift of muurplaat is bevestigd, moet een
draagvermogen hebben van twee maal het gezamenlijke
gewicht van het touchscreen en de whiteboarden.
2De maximale belasting van de Prowise liften is 150 kg. Op
mobiele liften mogen geen systemen groter dan 75 inch
geïnstalleerd worden.
3Zorg ervoor dat de wand vrij is van obstakels. Om beknellings-
gevaar te voorkomen moet er na de installatie te allen tijde
rondom het scherm inclusief eventuele accessoires, zoals
whiteboarden en toetsenbordhouders, naar links, rechts en boven
minstens 10 cm ruimte vrij blijven en naar onder minstens 12 cm.
4Lees voordat je de lift whiteboarden installeert de
meegeleverde safety instructions goed door.
5De Whiteboard Extension Kit G2 is gemaakt voor de Prowise
Touchscreen One en Prowise Touchscreen Ten.
Waar kan ik met vragen
terecht?
Mocht je onverhoopt toch nog vragen hebben over de installatie
of het gebruik van de Prowise whiteboarden, dan zitten onze
collega’s van Customer Service uiteraard voor je klaar.
Mail naar: [email protected]
Veiligheidsvoorschriften
Lees voordat je de Prowise whiteboarden installeert en in
gebruik neemt de meegeleverde veiligheidsvoorschriften.
Volg eventuele waarschuwingen zorgvuldig op en bewaar de
veiligheidsvoorschriften en gebruikershandleiding altijd binnen
handbereik.

7
EN
DE
NL
04
05
06
8
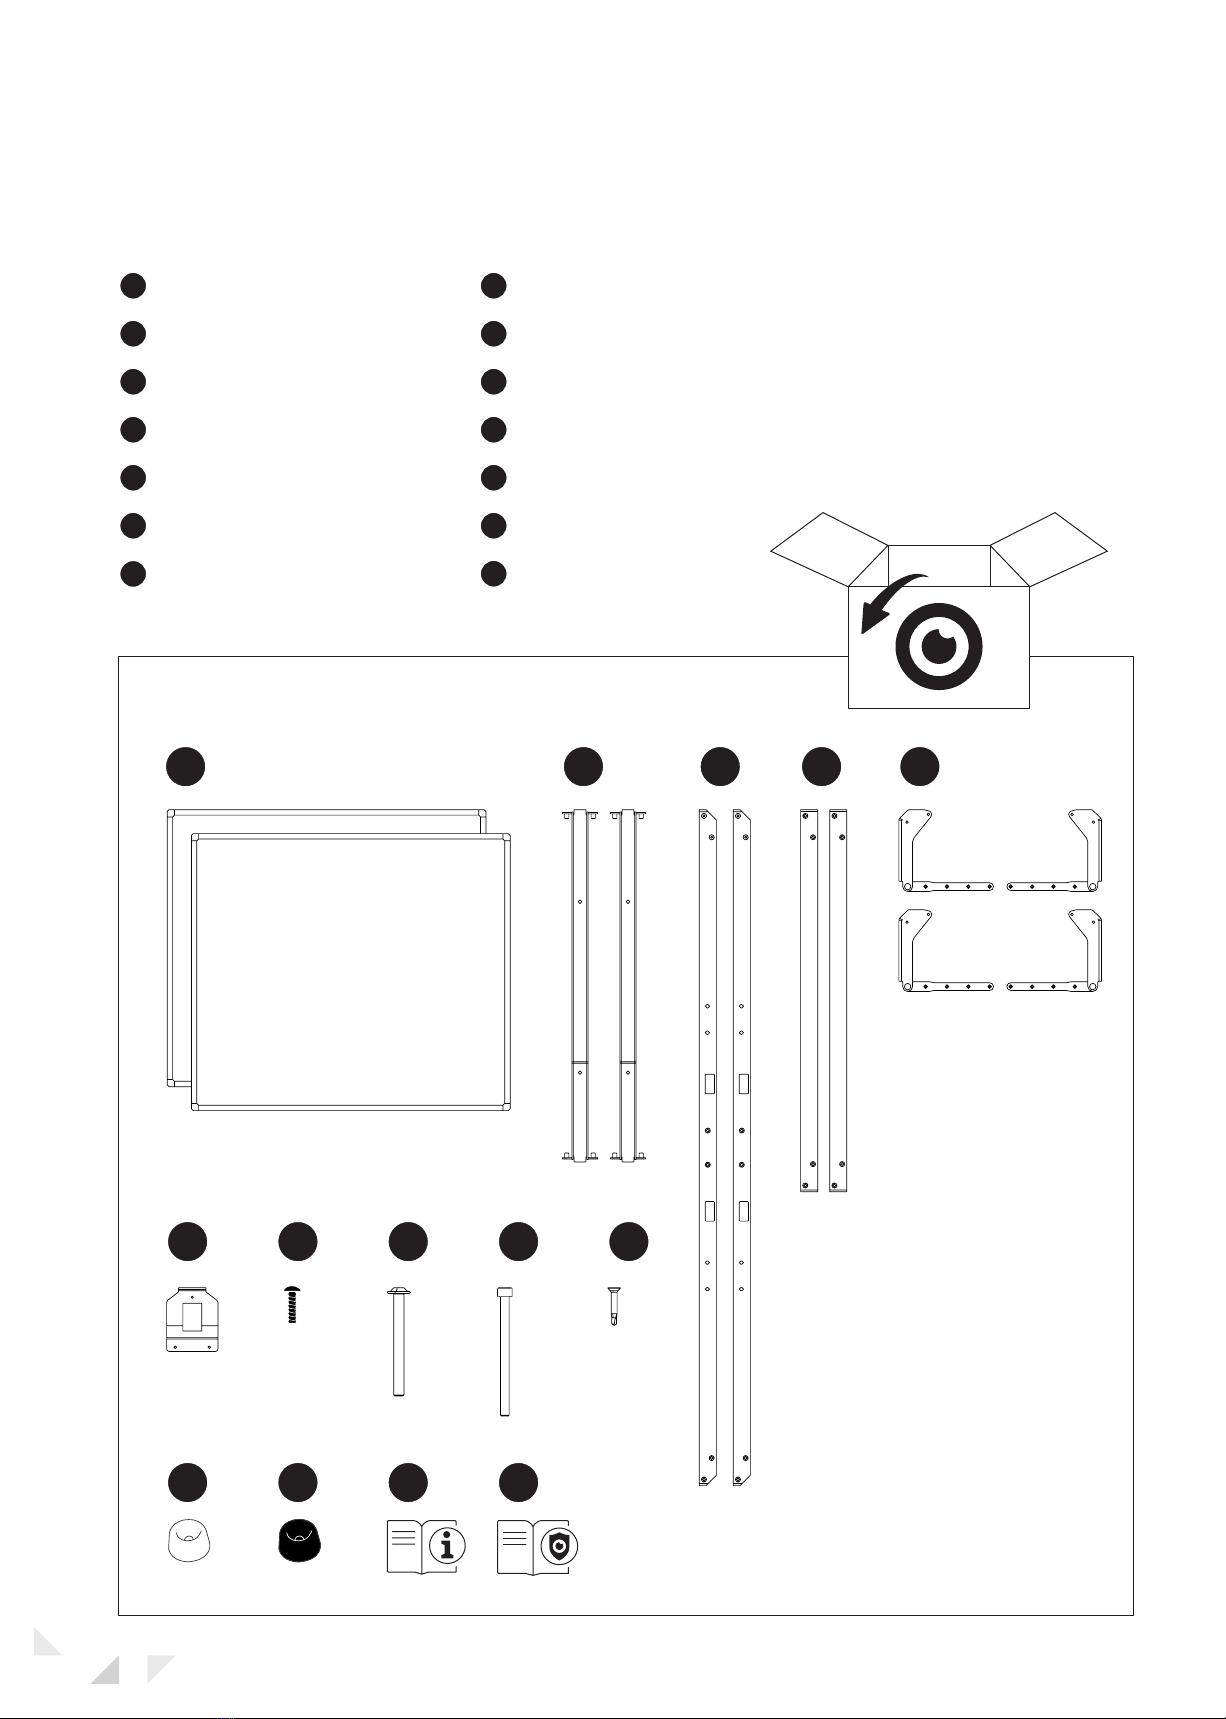
1 3 5
7 9
2 4
6 8 10
12 1411 13
18x
2x
8x 2x 18x
2x
2x Prowise Whiteboards
2x VESA clamps
2 x crossbars 40x40
2x sidebars 40x20
4x hinges (2x left, 2x right)
1x safety clamp
18x M6x20 (black)
8x M6x60
2x M5x70
18x self-tapping screws 4.5x25
2x bumper feet white
2x bumper feet black
User manual
Safety instructions
What’s in the box?
DE Lieferumfang | NL Wat zit er in de verpakking?
1
2
3
4
5
6
8
9
10
11
12
13
714

9
EN
DE
NL
04
05
06
4 mm 5 mm
1 2 3 4
5 6
20
You need
DE Das benötigen Sie außerdem | NL Benodigdheden
Bit holder
Bit hex key 4 mm
Bit hex key 5 mm
Bit ttap 20
Drill
Drill 3 mm
1
2
3
4
5
6

10
VESA brackets assembly positions
DE Montagepositionen Vesa-Halterungen | NL VESA brackets montage posities
Touchscreen One 65" Touchscreen Ten 65"
Touchscreen One 75" Touchscreen Ten 75"
Touchscreen One 86" Touchscreen Ten 86"
11
EN
DE
NL
04
05
06
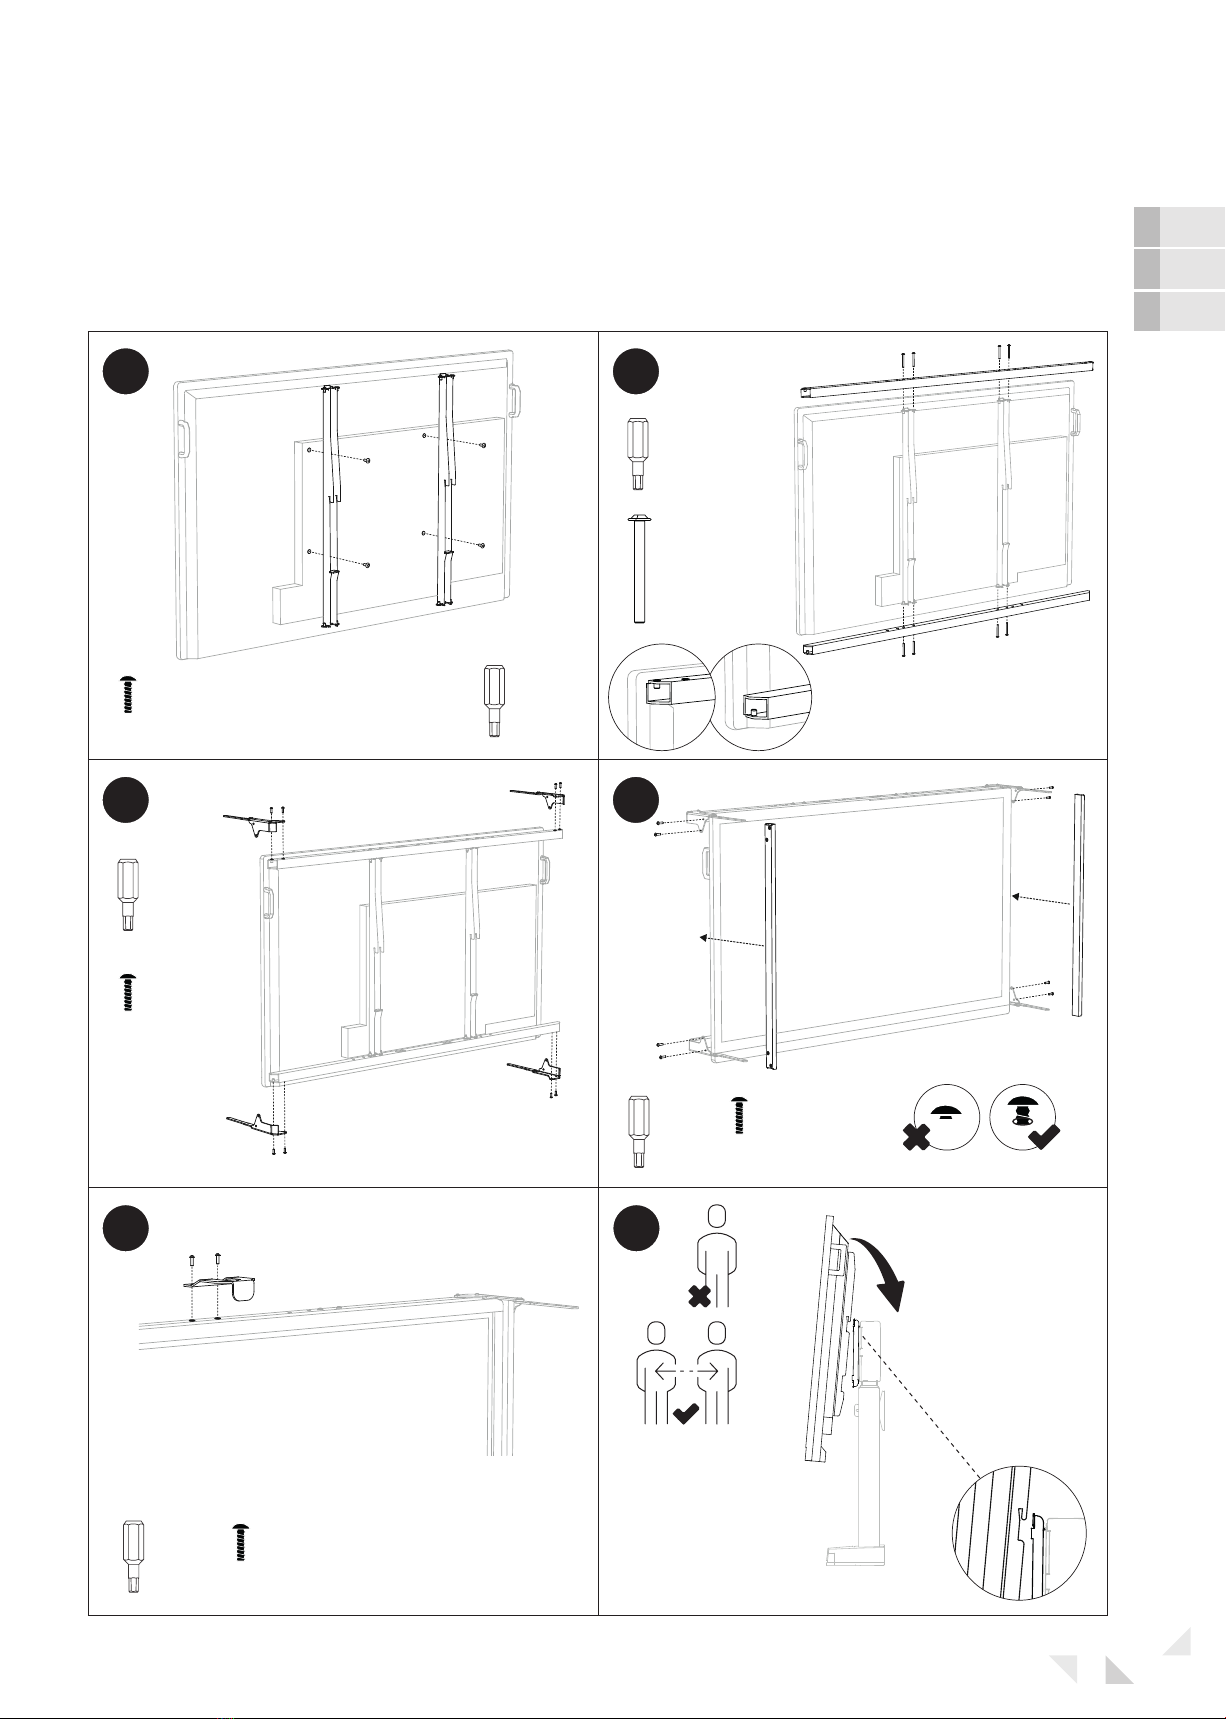
Installation Whiteboard Extension Kit
DE Installation Whiteboard Extension Kit | NL Installatie Whiteboard extension kit
8x
M6x60
8x
M6x20
8x
M6x20
2x
M6x20
Hex
4mm
Hex
5mm
Hex
4mm
Hex
4mm
Hex
4mm
4x
M8x20*
*Supplied with Prowise Touchscreen and/or Prowise Lift System
1
3
5
2
4
6

12
2x
M5x70
16x
self-tapping screws
4.5x25
2x
self-tapping screws
4.5x25
2x White or Black
Bit
ttap 20
Bit
ttap 20
Hex
4mm
8x
3mm
2x
Hex
4mm
Prowise MOVE camera (optional)
7
9
11
8
10
12

13
EN
DE
NL
04
05
06
Keyboard Tray G2 (optional) on G2 Lift Keyboard Tray G1 (optional) on G1 Lift
13 14

14

15

16
www.prowise.com
Let education speak
Other manuals for iPro Wall Lift G2
1
Table of contents
Languages:


